This instructions have been prepared for GEOG 176A - Summer B - 2021. Most of the material is borrowed from the PostGIS.net.
Please find the instructions here. Make sure to download the latest version of the software: PostgreSQL 13. Please follow instructions to the letter. In all of the pop-up windows use the default options and click Yes / Okay!
Go the QGIS Download page and download QGIS Standalone Installer Version 3.16 in the corresponding pane. Use Windows pane for Windows and MacOS pane for MacOS.
Go to DBeaver Download page and download Community Edition 21.1.5 in the corresponding section. Use Windows pane for Windows and MacOS pane for MacOS.
Please download the data from the Workshop page. Navigate to the downloaded file and unzip it in the same directory (or any other directory of your choice).
Follow the set-up instructions here. IMPORTANT: in the 'Creating a Database' step there is one important thing that you need to do: setting up a binary path. Navigate to File -> Preferences. Scroll down to Paths -> Binary paths. Scroll down to 'PostgreSQL Binary Path' -> PostgreSQL 13. Click on '...' and input C:\Program Files\PostgreSQL\13\bin and click 'validate' (the icon next to '...'). Click Save in the bottom right. On MacOS the path will be different: /Applications/Postgres.app/Contents/Versions/latest/bin (or something similar to the specified path). Continue following the instructions on the page.
Please follow instructions from this page. You will need to use the data that you previously downloaded.
It is really simple and straightforward to open and work with the data stored in PostgreSQL (PostGIS).
- Start the QGIS and create a new project (Project -> New)
- Connect to the geodatabase that you previously created. (Layer -> Add Layer -> Add PostGIS Layers)
- In the pop-up windows click 'New'. Use 'nyc1' for name, 'localhost' for host, 'nyc' for Database. In the Authentification panel click on 'Basic' pane and use 'postgres' for user and the password that you previously specified. Click on 'Test Connection'. If the information is correct you will see the corresponding message on successful connection to the database. Click 'OK'.
- In the Connections list select 'nyc1' and click 'Connect'. You will be prompted to input your username and password (from the previous step). You will see 'public' schema. Click on the triangular next to the 'public' you will see the list of available spatial layers. Press and hold Shift while also selecting all of the layers with the left click and press 'Add'.
- In QGIS menu Plugins -> Manage and Install Plugins. Search for 'QuickMapServices' and click 'Install'. Once installed, click 'Close' and navigate to QGIS menu: Web -> QuickMapServices -> Settings -> More Services -> Get contributed pack. Once done, click Save.
- In QGIS menu Web -> QuickMapServices -> Stamen -> StamenTonerLite. You may also try out different basemaps to see which one you like better.
We will be using DBeaver to practice the queries as it has some useful functionality, including autocomplete and code formatting, which comes in handy when the names of the tables and variables are long. We will need to add a connection to the database in DBeaver.
- Open DBeaver. From menu: Database > New Database Connection. Select 'PostgreSQL' and click 'Next'. Use the same credentials as you used in Part II: Exploring the geodatabase with QGIS. Before hitting 'Finish' make sure to click on 'Test Connection' to check if you input the credentials correctly. Click 'Finish', when done.
- Please download the demo.sql file from My Github repository.
- We will be running queries in class together, with explanations. The purpose of this exercise is to calculate the number and types of crimes in the vicinity to subway stations in Queens.
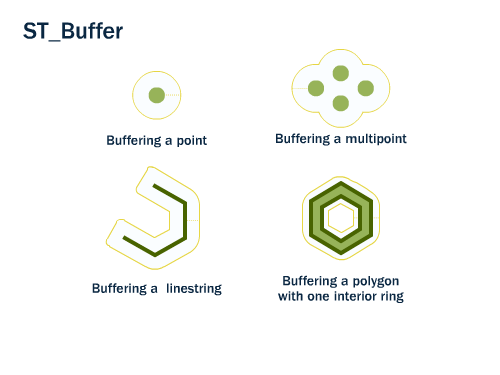
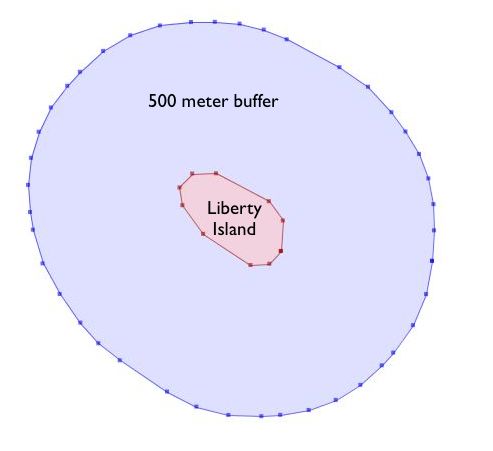
ST_Buffer(geometry,distance) takes in a buffer distance and geometry type and outputs a polygon with a boundary the buffer distance away from the input geometry.
Computes a point which is the geometric center of mass of a geometry. Returns geometry. Syntax: ST_Centroid(geometry g1);

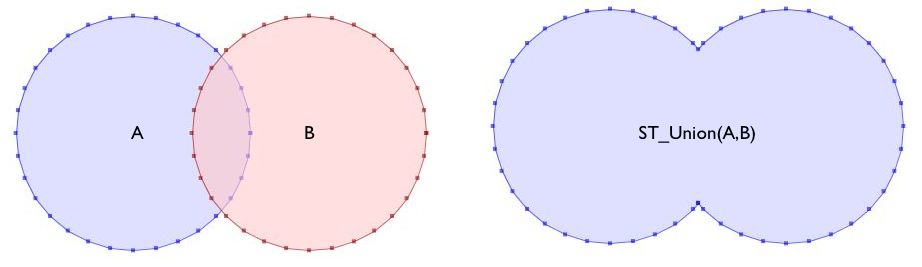
Unions the input geometries, merging geometry to produce a result geometry with no overlaps. Returns geometry. Syntax: ST_Union(geometry[] g1_array);