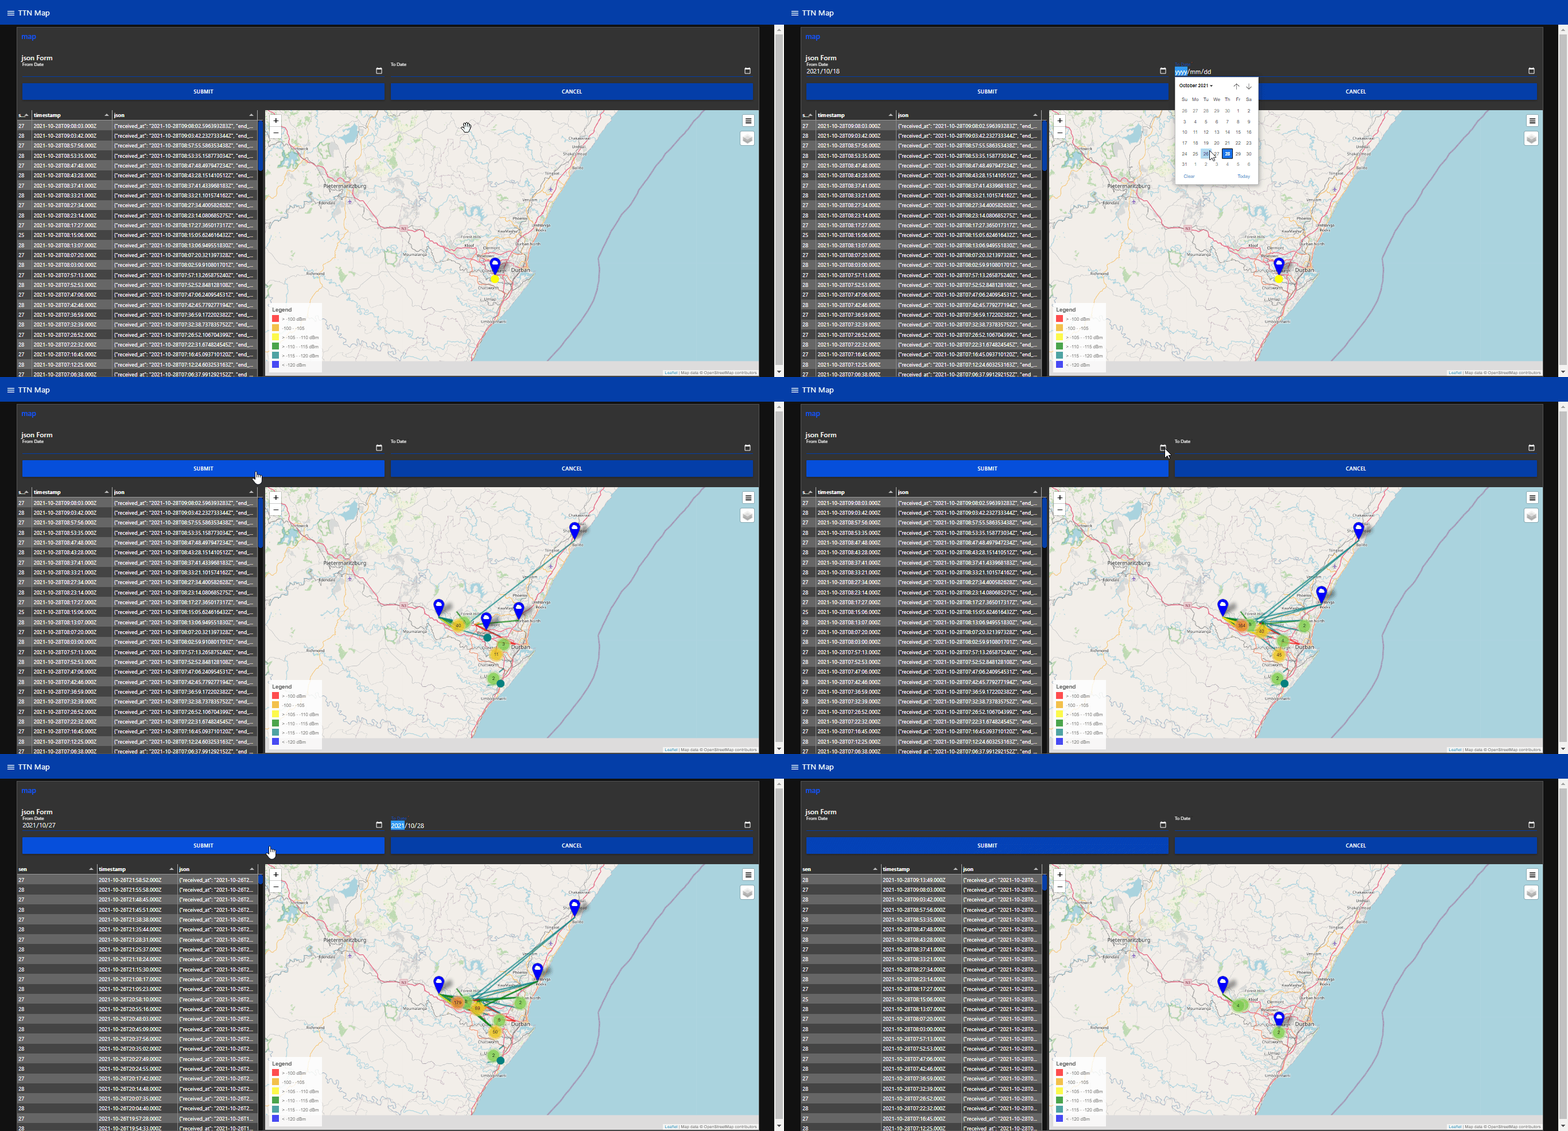
Project is aimed to store node GPS points and then display on a map the nodes and gateway connections
Explore the docs »
View Demo
•
Report Bug
•
Request Feature
In this project were are going to save all the uplinks from TTN in the raw format to a MySQL database. From here we will recall the data and display it on a map. The map will display the location of the node, the uplink path and the gateway the node connected to. The node will be colour and the link as to the rssi.
TTN-Node-Map
To get a local copy up and running follow these simple steps.
-
Node-Red
https://nodered.org/docs/getting-started/
-
node-red-dashboard
https://flows.nodered.org/node/node-red-dashboard
-
node-red-contrib-web-worldmap
https://flows.nodered.org/node/node-red-contrib-web-worldmap
-
node-red-node-mysql
https://flows.nodered.org/node/node-red-node-mysql
-
MySQL
With a little bit of Googling find the installation for your OS -
MySQL Workbench
https://dev.mysql.com/downloads/workbench/
-
The Things Network – Application with GPS nodes connected
https://www.thethingsnetwork.org/
-
Install Node-Red following the relevant getting started guide for your operating system form the official website
https://nodered.org/docs/getting-started/
-
Install npm package node-red-dashboard
npm install node-red-dashboard
-
Install npm node-red-contrib-web-worldmap
npm install node-red-contrib-web-worldmap
-
Install npm node-red-node-mysql
npm install node-red-node-mysql
-
Install MySQL Workbench
https://dev.mysql.com/downloads/workbench/
-
Open Workbeanch and follow the instructions on creating a new database and table. Please keep a note of the username and password for the db, we will require it later to set up the node-red flow. We require a table that has two columns, "json" and "timestamp".
https://dev.mysql.com/doc/workbench/en/wb-getting-started-tutorial-creating-a-model.html
-
From your application in “The Thing Network” go to your “Console”, select the application that contains your GPS Nodes. This is the application that collect the data from your GPS nodes. Go to “Integration” and select “MQTT”, select “Generate new API key”. Note the “Public TLS address”, “Username” and “Password”, this is going to be needed in the MQTT node in the Node-Red flow.
-
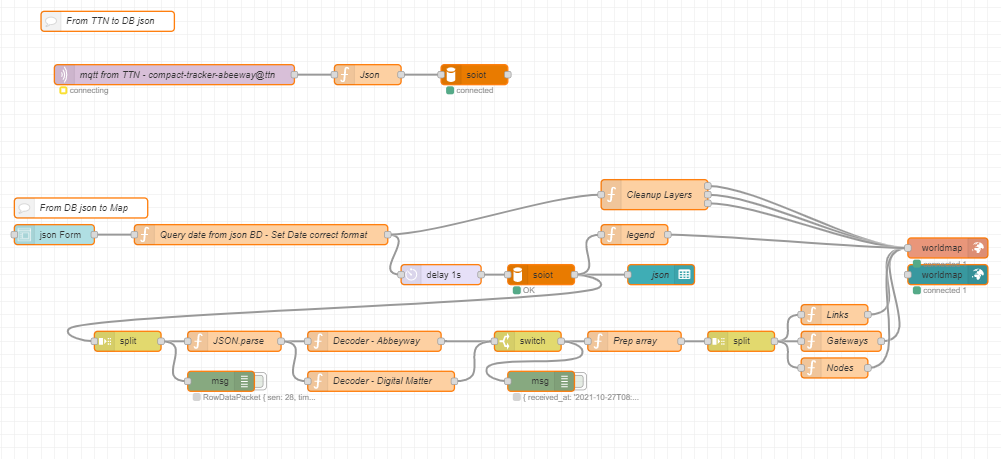
Install the Node-Red flow, copping the *.json from below into your Node-Red running on the sever you have installed Node-Red on. “localhost:1880”
https://github.com/JohanScheepers/TTN-Node-Map/blob/main/TTN_Node_Map.json
-
In the Node-Red flow configure the MQTT node “mqtt from TTN”, here you need the credentials from Step 7 and “MQTT in Node-RED [HowTo]” the link below is a good resource to read
https://www.thethingsnetwork.org/forum/t/mqtt-in-node-red-howto/39909
-
In the Node-Red flow configure the “json to DB” MySQL node. Select in the Database dropdown “Add new MySQLdatabase”. Enter your Host, Port 3306, User, Password and Database.
-
In the Node-Red flow configure the “Query date from json BD - Set Date correct format”, here you need to add your database in the msg.topic. Where you see “soiot.json” replace this with your database and table name.
-
In the Node-Red flow configure “DB to json” here in the Database dropdown you should see tor database, if not Deploy your flow and then re-check and see if it is there and select it.
-
In the Node-Red flow configure the function node “Decoder ****”, in my flow I have two different GPS nodes decoders, as I use both Abbeway and Digital Matters GPS nodes. You need the change the “On Start” to suit your device decoder.
-
Deploy your flow, now you need to wait and get some GPS date into the DB so you have date to recall. This will take some time, dependant on how often your nodes report in.
There are one user interfacing areas, Date Selection, you select the “date from” to “date to”.
There the user via the dropdown box the “date from” and the “date to”, selects “SUBMIT”.
Now the flow queries the DB and returns the data and plots on the map. It will plot the location of were the node were, the link path and the gateway connected to. The node and link colour is relative to the rssi.
You will note that sometimes the uplink were received by more than one gateway from the node. Here you will see that from one node location there are multiple links, each link will still be relative to the rssi, but you will only notice a plot with a number for the node. If you select it, all the plotted node points will pop up, by selecting one you will be able to see the uplink rssi and the gateway information.
You will also see all the “raw” data in the table from the DB.
See the open issues for a list of proposed features (and known issues).
Distributed under the MIT License. See LICENSE for more information.
Project Link: https://github.com/JohanScheepers/ TTN-Node-Map


