Pull requests are welcome. For major changes, please open an issue first to discuss what you would like to change.
- Installing GitHub
- Configuring git for the first time
- Setting up SSH keys
- Workflow of changes
- Working on changes from remote repository to local machine
- Working on changes from local machine to remote repository
- Git branches
- Forking
- Upstream- adding and reviewing upstreams
- Additional information
- Git commit messages
- Making your organization public.
Configure user information for all local repositories
Sets the email you want attached to your commit transactions:
git config --global user.email "[email address]"
Sets the name you want attached to your commit transactions:
git config --global user.name "[name]"
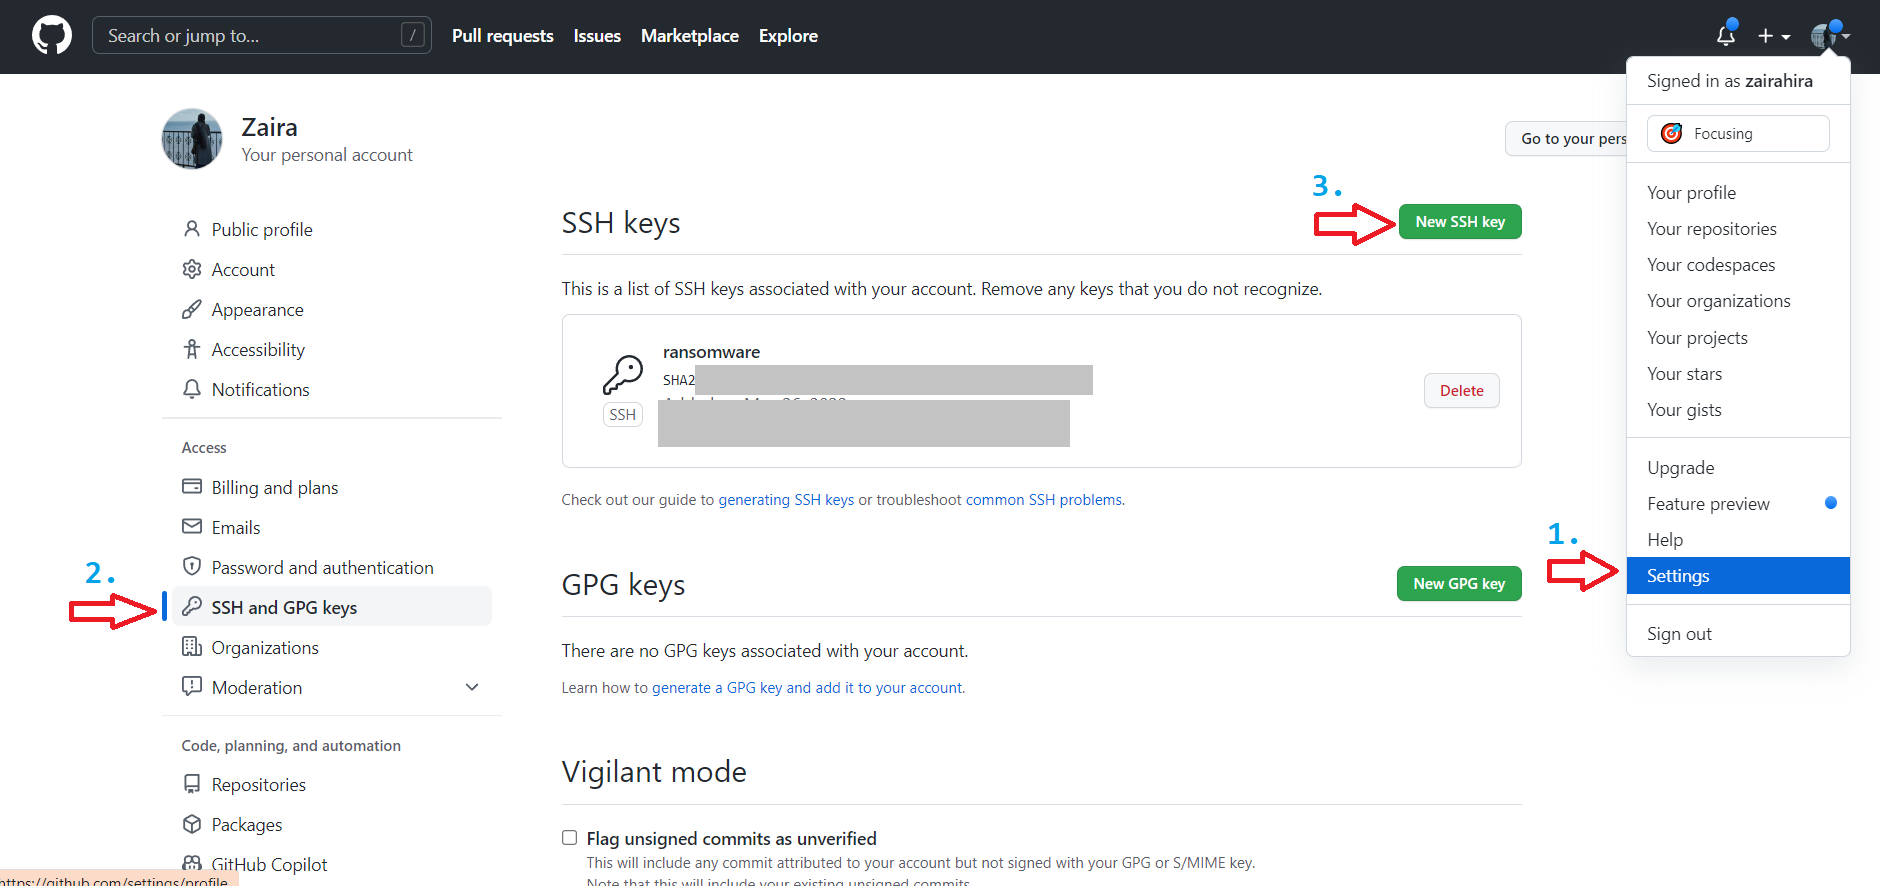
To push your changes to the remote repo, you would need the SSH keys set up.
You can use the command below in git bash and get a pair of keys.
ssh-keygen -t rsa -b 4096 -C <email>
This would generate 2 keys- public and private
Login to your account and navigate to settings.
-
start ssh agent:eval "$(ssh-agent -s)"` -
ssh-add <your-key>orssh-add ~/.ssh/key.
Changes are made locally in the working area. Then they are staged and then pushed.
Stage files for tracking them by using the command: git add.
The command below adds all the files in the repo to staging area:
git add .
Once changes move to the staging area, you can commit them with a proper commit message. See section Writing a good commit message
To push your changes to the remote repo, you can use the git push command.
git push origin main
Here, main is the name of the branch and can be replaced with another branch you are working on.
- Cloning
Clone a repo by going to a specific repo and selecting
httpsfromcodebutton.
In your current directory, initialize the git repository using git init.
To push the changes, create a repo in GitHub.
- Link the remote repo:
git remote add origin <ssh-link-to-remote-repo>. - Verify of the branch has been added:
git remote -v. - Push the files and changes:
git push origin main.
Set upstream manually:
- To set upstream:
git push -u origin main. - Once set, now you can simply use
git push.
💡 Tip and good practice: Always make changes in a forked branch.
Branches fall into these categories:
- Main: The original/main branch.
- Feature branch: Used when you are adding a feature.
- Hotfix branch: Created for bugs in production releases. Used as a patch for next release cycle.
Branches often start with fix/ or feat/, among others, like commit messages, but they use a forward slash and can't contain spaces. Create a new branch named feat/add-create-table-reference
git branch
git checkout -b <branch-name>
git checkout main.
git push origin <feature-branch-name>
git branch -d feature-branch
forking creates a copy of the original repo in your account. Then you can make changes in a branch and then create a PR(Pull Request)
When attached, remote branches tell the repo from where to push and pull the changes.
Remote branches can be added using this syntax:
git remote add upstream <ssh-of -orignal repo>
Note: you can add any other name instead of
upstreamand use it to refer the repo.
Use HTTPS to avoid SSH keys
git remote add upstream <https-of -orignal repo>
When fetching from upstream,
- Switch to master:
git checkout main. - Fetch:
git fetch upstream. - Merge changes:
git merge upstream main.
git pulldoesgit fetch upstreamandgit merge upstream mainin one go.
git push origin <branch-name>
Make sure upstream is configured.
Method:1
- Find hash ID, use:
git log - Revert change:
git checkout <hash-id>
Method:2
- Find hash ID:
git reflog. - Revert change:
git reflog <hash-id>.
- Find dangling blobs:
git fsk. - View details:
git show. - Save in a file:
git show <hash-id> > output.txt.
💡 Detailed blog on recovering such files
The commit message should follow a structure like this: This makes it easy to understand your changes in a glance.
<type>[optional scope]: <description>
Some commonly-used conventions.
chore:Changes that don't change source code or tests.docs:Changes to the documentation.feat:Added new feature.fix:A bug fixbuild:Changes that affect the build system or external dependencies.style:Changes that do not affect the meaning of the code (white-space, formatting, missing semi-colons, etc.)test:Adding missing tests or correcting existing tests
💡 Read the original post on commits here
If you have recently joined an organization, you have to make it visible on your profile by setting it to public in the settings.


