While using Spot Fleet, it is possible that you will be outbid and your instances will be terminated. Any builds running on terminated instances will not be completed.
The plugin relies on fleet remote agents following the naming convention "ip-xxx-xxx-xxx-xxx.xxxxxxx.internal", i.e beginning with "ip-" and ending with ".internal". Other remote agents following the same naming conventions will conflict with the plugin, causing the conflicting agents to be removed from Bamboo. If you use other ec2 instances as remote agents, rename them before running the task.
AWS account setup - before using the Fleet plugin for Bamboo you must set a few things up on your AWS account
Create/log in to your AWS account
- Navigate to IAM under services
- Select users from the tab on the left
- Click the create button
- Add a new user
-
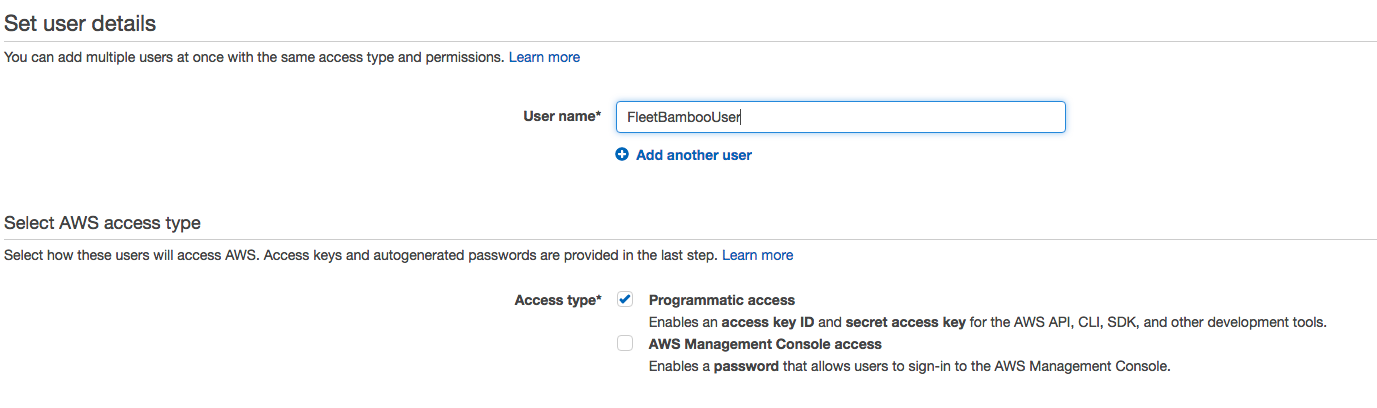
Details - choose a name for this user and select programmatic access
-
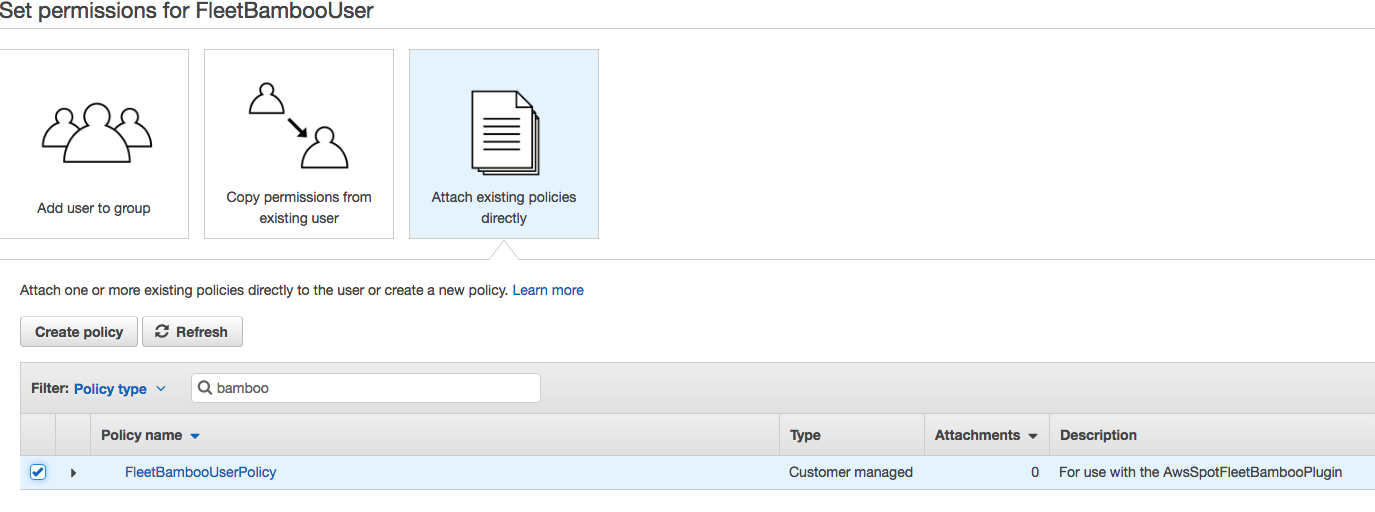
Permissions - select "attach existing policies" directly and click the "Create policy" button, opening a new window/tab
-
In the Create policy page click the select button under "Create Your Own Policy"
-
Provide a name and description for this policy
-
Copy and paste the following into the policy document:
{
    "Version": "2012-10-17",
    "Statement": [
        {
            "Effect": "Allow",
            "Action": [
                "ec2:DescribeImages",
                "ec2:DescribeInstances",
                "ec2:DescribeSubnets",
                "ec2:RequestSpotInstances",
                "ec2:TerminateInstances",
                "ec2:DescribeInstanceStatus",
                "ec2:DescribeSpotFleetRequests",
                "ec2:ModifySpotFleetRequest",
                "ec2:CancelSpotFleetRequests",
                "ec2:DescribeSpotFleetInstances",
                "ec2:CreateTags",
                "ec2:DescribeTags",
                "iam:PassRole"
            ],
            "Resource": [
                "*"
            ]
        }
    ]
}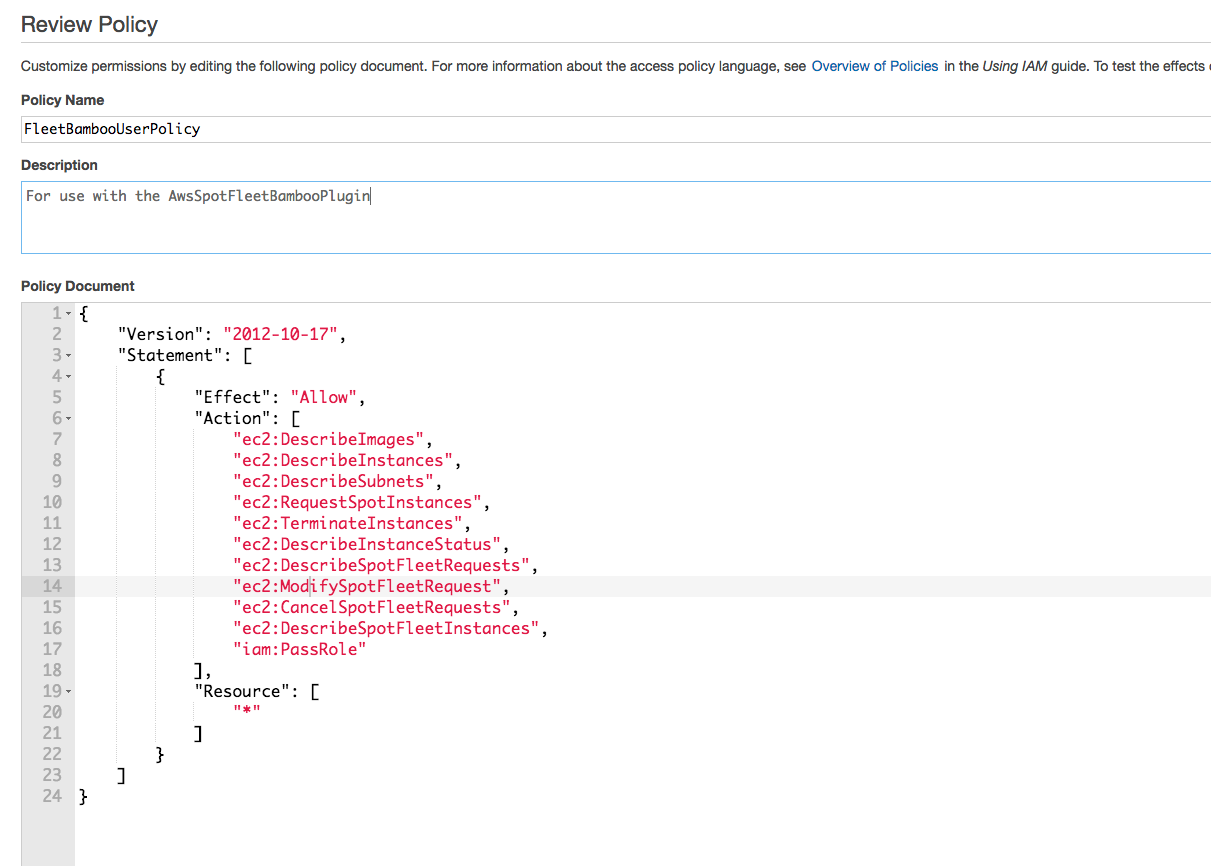
-
Validate the policy and create it
-
Navigate back to the permissions window from before
-
Enter the name of your policy into the search bar and click the refresh button
-
Select the policy just created by clicking on the checkbox
-
Click on the "Next: Review" button when finished
-
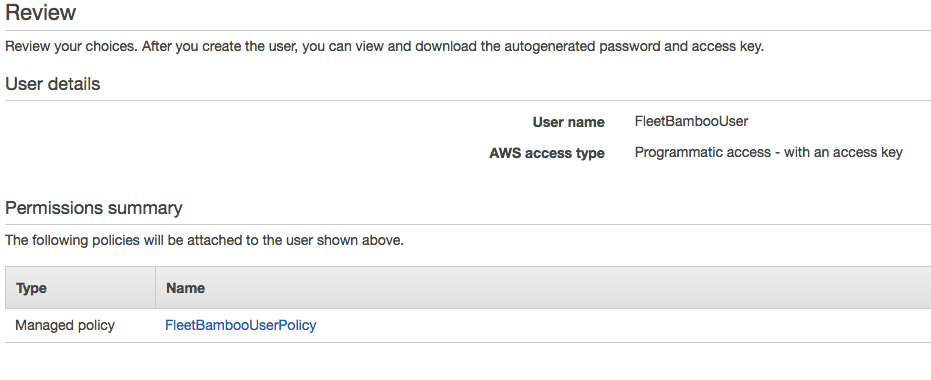
Review - Ensure the policy you just created will be attached to the created user and that the AWS access type is programmatic. Click the "Create user" button when finished
-
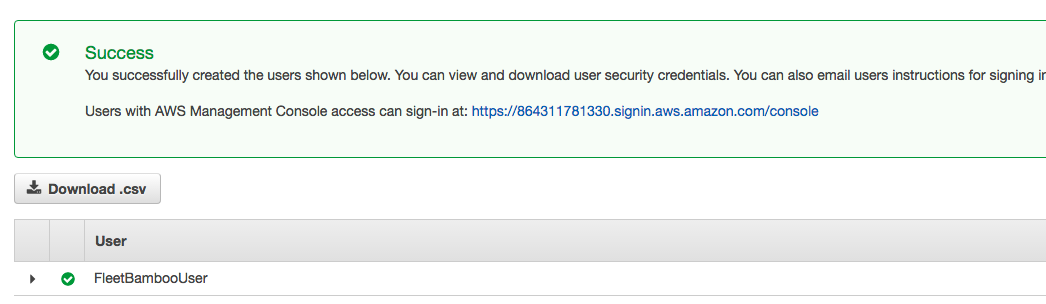
Complete - An Access key ID and Secret access key are listed on this page. Download the csv or otherwise store these credentials in a secure location for later use
-
If no credentials are present repeat these steps ensuring you selected programmatic access in the Details page
-
-
-


Your security group must exist in the same region that you plan on running Fleet The plugin supports these regions:
- "us-east-1 (N. Virginia)"
- "us-west-1 (N. California)"
- "us-west-2 (Oregon)"
- "eu-west-1 (Ireland)
- "eu-central-1 (Frankfurt)"
- "ap-southeast-1 (Singapore)"
- "ap-southeast-2 (Sydney)"
- "ap-northeast-1 (Tokyo)"
- "ap-northeast-2 (Seoul)"
- "sa-east-1 (São Paulo)"
-
Navigate to EC2 under services
-
Select Security Groups under the Network & Security section of the EC2 Dashboard on the left tab of the page
-
Click the "Create Security Group" button
-
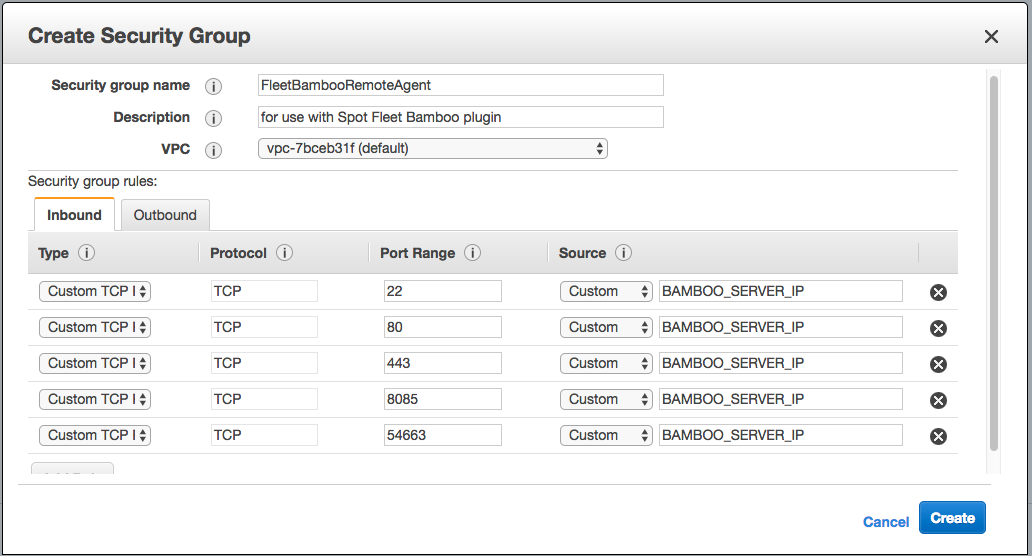
Provide a name and description for this Security Group. Select a VPC for this group (default is fine)
-
Allow Inbound TCP traffic on ports 22, 80, 443, 8085, 54663 with the source being specified as your bamboo server IP address
-
Outbound traffic can be left at allowing all traffic
-
Click the "Create" button when finished

Before using Fleet ensure that you can install a remote agent manually. If you can manually install an ec2 instance as a remote agent first then it is likely that automatic installation of Fleet agents via User data will succeed.
- Enable support for Remote Agents
- On the Bamboo server, click the gear icon in the top right. Select 'Agents'
- Enable support for Remote agents (Ensure that your Bamboo license allows for remote agents)
- Configure server settings for remote agent support
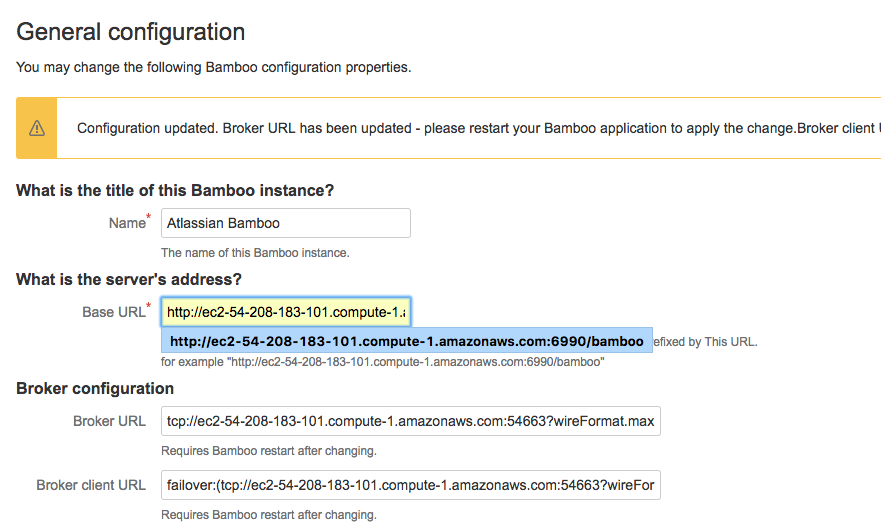
- Navigate to the General configuration page under System in Bamboo administration
- Ensure the base URL, broker URL, and Broker client URL are correct for your Bamboo server setup and are going to be reachable from an ec2 instance
- The server has two addresses (URL:port) to connect with a remote agent:
- Bamboo Base URL, usually http(s)://(hostname):8085/
- Bamboo Broker URL, usually tcp://(hostname):54663 (if not defined otherwise)
- The server has two addresses (URL:port) to connect with a remote agent:
- Click the 'Save' button when finished
- Restart the Bamboo server if the broker URL or broker client URL were changed
- Ensure the ports Bamboo uses for agent Installation, 8085 and 54663 by default, are reachable from server to agent and agent to server
- Troubleshooting
- Manually install a remote agent
- Navigate back to the Bamboo agents page (Gear icon in top right corner -> Agents)
- Click install remote agent
- Follow the instructions on this page
- During agent installation you should see status information on the agents page
- Upon first contacting the Bamboo server you should see a message indicating that the agent is loading
- Typically if the installation succeeds you will see another message indicating that the agent has registered within 2-3 minutes of the loading message
- If this message doesn't appear within this time, it is likely something has gone wrong with the agent installation. After the installation times out (as specified in the broker URL)
- The remote agent installer will print a stack trace of the error, before retrying the installation up to the number of retries specified.
- Typically problems here indicate that the agent cannot communicate with the server. Try following the Troubleshooting remote agents guide linked above to resolve these issues.

- (Optional) Manually install a remote agent on an ec2 instance
- The plugin task provides an agent installation script that provides a working example of how to automate agent installation via the User data field in the AWS console (more detailed instructions on this further down)
- The best way to ensure that this automatic installation succeeds is to execute the script manually on an ec2 instance
If the agent installation succeeds (especially on an ec2 instance) following these instructions then the agent installation script provided in the plugin task should succeed.
- Replace SERVER_URL with the correct value before using this
- you can change the number of agents per instance by modifying the upper bound of the for loop
#!/bin/bash
sudo yum -y install java-1.8.0-openjdk-devel
sudo yum -y remove java-1.7.0-openjdk
sudo yum -y install git
sudo yum -y install mercurial
sudo yum -y install ant
wget -A jar -m -p -K -np -O agentInstaller.jar SERVER_URL/agentServer/agentInstaller/
for i in {1..2}
do
  nohup java -Dbamboo.home=RemoteAgentHome$i -jar agentInstaller.jar SERVER_URL/agentServer/ &
done
exit 0With your AWS account and Bamboo Server setup complete, the plugin task is ready to be used. The task's scope includes providing an agent installation script example, Registration of a Spot Fleet with Bamboo, and optionally automatic fleet autoscaling/termination based on Bamboo metrics (number of queued builds, average queue time, idle fleet agents)
-
Create a new plan with the 'Register and Monitor Spot Fleet' Task
- Navigate to the Bamboo server
- Click the create tab from the Bamboo menu, select create new plan
- On the Configure plan page, Create a new project or select an existing one, choose a plan name and key, and select 'None' for your repository host
- Under Configure Tasks, select 'Add task'
- Select 'Register and Monitor Spot Fleet'
- The field 'User data script' contains an example of what is needed to automate Bamboo agent installation on the default Amazon Linux AMI for ec2 instances associated with the fleet we will register in the next step. The agent will come with JDK 8, Mercurial, Git, and Ant capabilities via this script.
- As Bamboo is capable of auto detecting many capabilities, configuring agents to have additional capabilities is often as easy as having a package manager install the capability on the agent. To test whether a new capability will be auto detected you should first attempt agent and capability installation manually, before recreating the steps in the user data script to enable automatic capability installation on fleet instances/agents.
-
Create a Spot Fleet to associate with Bamboo
-
In a separate window navigate back to the EC2 Console in the desired region for your Fleet to run in.
- Ensure the fleet is being created in the same region that the security group was created in previously, and that the chosen region is supported by the plugin.
-
Select Spot Requests under instances in the EC2 dashboard
-
Click the 'Request Spot Instances' button to begin creating a Spot Fleet
-
Step 1: Find instance types
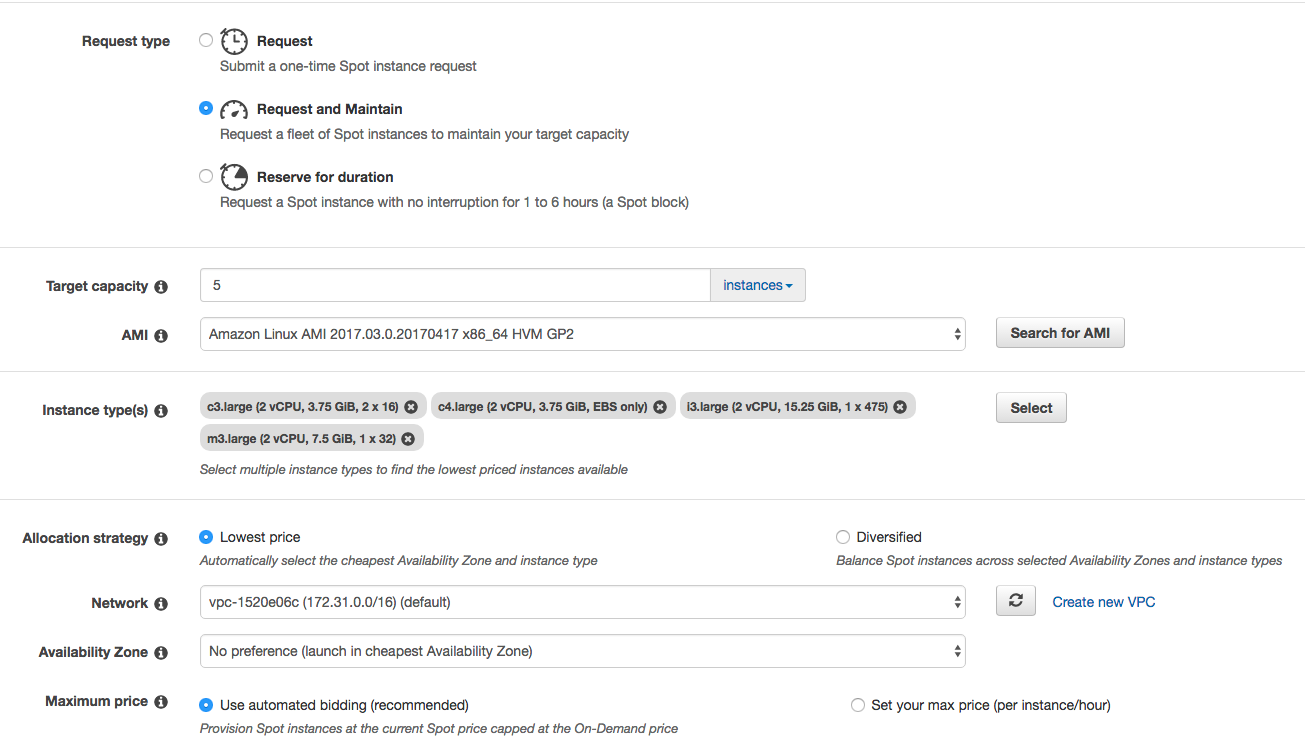
- Under 'Request type' select Request and Maintain. This allows the request to be modified, scaling the number of requested instances up or down.
- One-time spot instance requests are not supported by the plugin, but can still make use of the 'User data script' field to be configured and installed on a Bamboo server
- Under 'Target capacity' enter the desired initial number of instances the request should target. An instance can support multiple agents if the computational power is sufficient for the tasks planned to be executed, so take this into account when choosing this initial target capacity amount.
- Ensure that (chosen target capacity * planned agents per instance) does not exceed the licensing restrictions for remote agents on your Bamboo server
- Under 'AMI' the default Amazon Linux AMI is targeted by the provided User data script.
- Other AMIs may work so long as they have the necessary Java 8 capability.
- Select the desired instance types for your fleet under 'Instance type(s)'. The User data script will install the same number of agents on all instances, so the number of agents per instance should be low enough to support the least powerful instance type chosen.
- It isn't possible to vary agents per instance across a single fleet, but this would work across multiple fleets by varying the number of agents per instance in the User data section. The plugin doesn't support multiple fleets, so one-time spot requests may better suit your needs if you don't plan on manually modifying the target capacity of a Fleet.
- For 'Allocation strategy', 'Network','Availability Zone', and 'Maximum price' the default values are sufficient, but choose whatever best suits your needs.
- Click the 'Next' button when finished
- Under 'Request type' select Request and Maintain. This allows the request to be modified, scaling the number of requested instances up or down.
-
Step 2: Configure
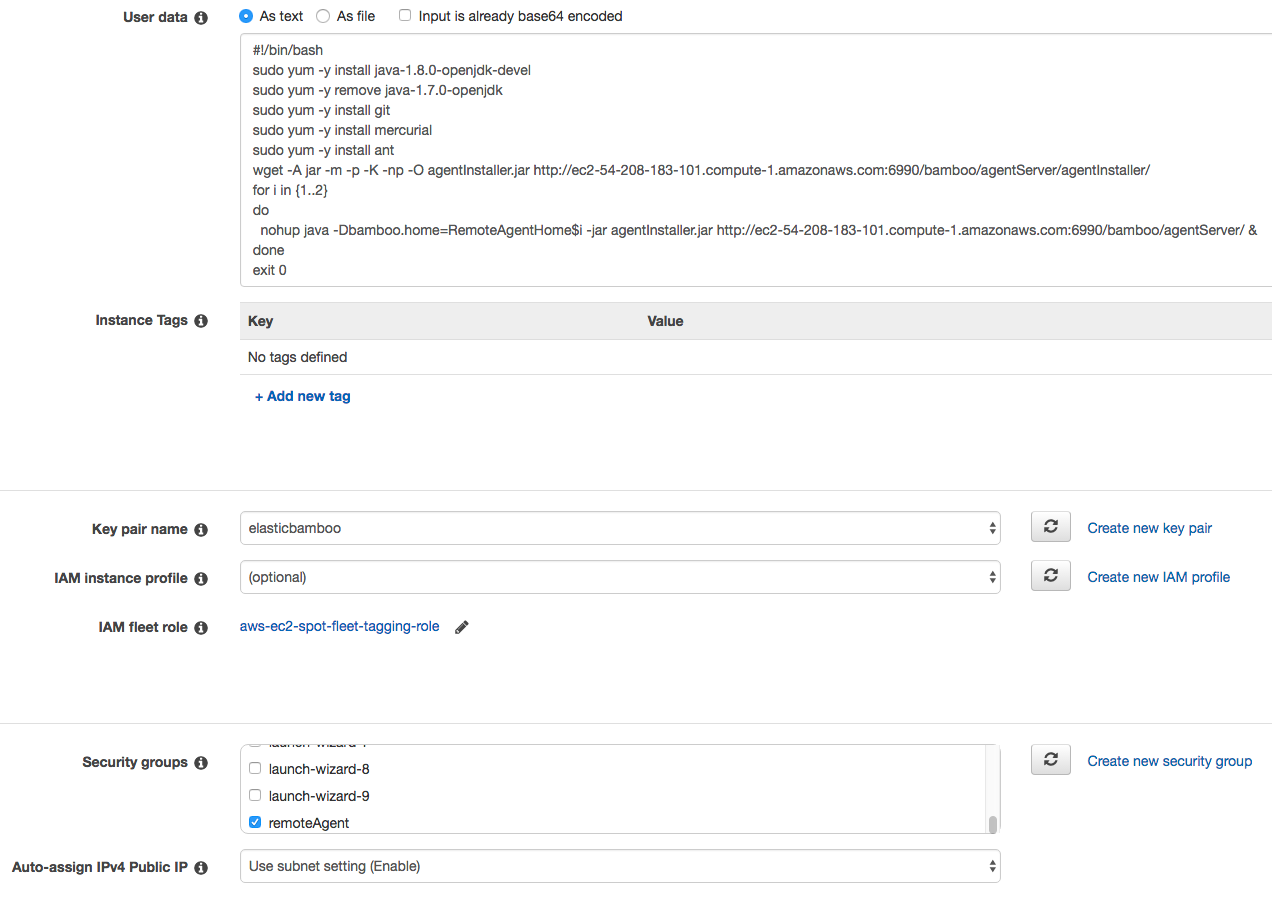
- Additional configuration settings may be specified here. The ones required for the plugin to work 'User data' and 'Security groups'
- Under 'User data' copy and paste the user data script from the Register and Monitor Spot Fleet Bamboo task.
- To vary the number of agents per instance change the upper bound of the loop inside the script: 'for i in {1..2}' to the desired number of agents per instance.
- Again ensure that (chosen target capacity * agents per instance) does not exceed the licensing restrictions for remote agents on your Bamboo server
- Under 'Security groups' select the security group you created earlier.
- If your security group is not there, ensure you are in the same region it was created
- If you plan on manually SSHing into these instances, create/select a key pair under 'Key pair name'
- Click the 'review button when finished'
-
Step 3: Review
- Review the details of the created fleet and click 'Launch' when ready
- Copy the spot request id presented upon submitting the Fleet
-
-
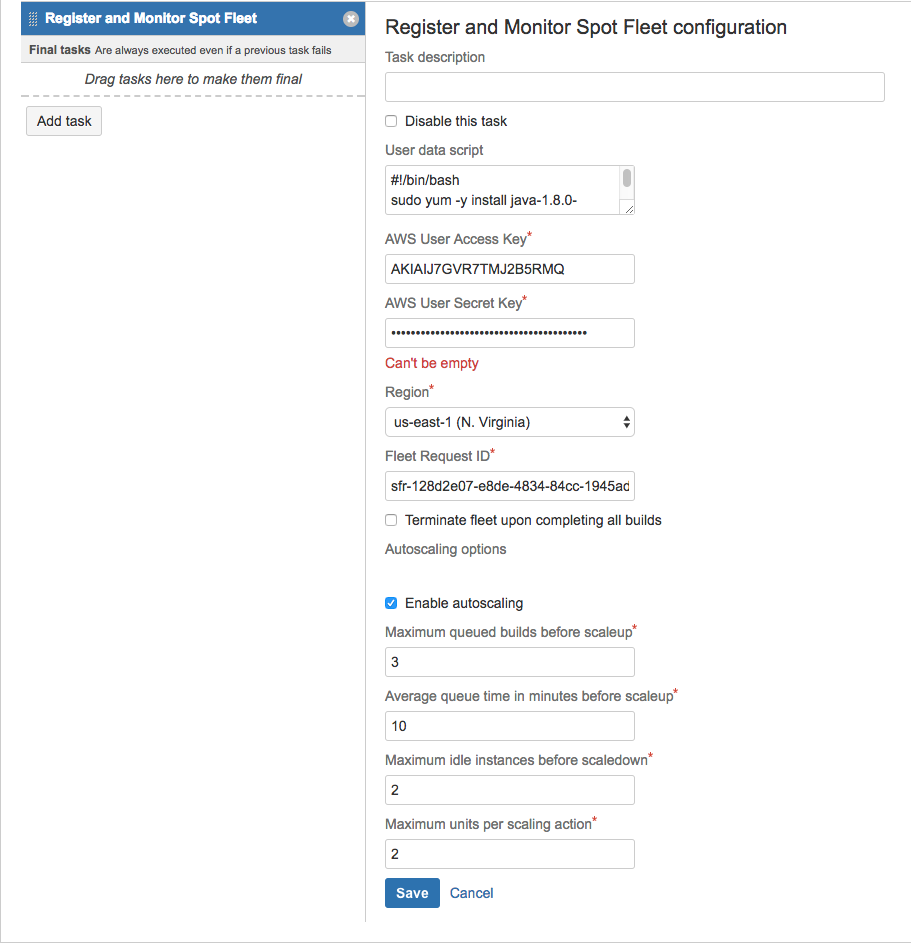
Finish 'Register and Monitor Spot Fleet' Task
- Paste the spot fleet request ID obtained in the 'Fleet Request ID' field
- Enter the credentials of the User created earlier on in the 'AWS User Access Key' and "AWS User Secret Key" fields
- Select the region your fleet is running in under 'Region'
- If you want the fleet (and any associated instances) to be terminated upon the completion of all builds, check the 'Terminate fleet upon completing all builds' checkbox
- If you want the plugin to scale the fleet up/down based on build metrics, check the "Enable Autoscaling checkbox"
- The plugin will attempt to scale up if 'Maximum queued builds before scaleup' or 'Average queue time in minutes before scaleup' thresholds are exceeded. The plugin will attempt to scale down if the 'Maximum idle instances before scaledown' threshold is exceeded. The plugin will always try to scale by up to the 'Maximum units per scaling action' value specified when a threshold is exceeded, subject to these rules:
- Scaling down takes precedence over scaling up. (If you have idle fleet instances and queued builds, then the fleet instances are not capable of executing the builds)
- Scaling decisions are based on active capacity when active capacity is not equal to target capacity, and only modify target capacity when doing so would have an effect. For example, if you have 5 active instances out of 10 targeted instances, a scale up by 3 would only move the target capacity to 8, so the target capacity is instead unchanged
- Scaling up is bound by licensing restrictions. The plugin will attempt to determine number of agents per instance and not increase target capacity if the creation of a new instance would exceed licensing restrictions.
- It's important to ensure the (initial target capacity * agents per instance) does not exceed your licensing restrictions for the plugin to work properly. Also, all initial agents associated with the fleet must register with Bamboo for this feature to work properly
- Scaling down will never terminate a non-idle instance, and may terminate fewer than the specified 'Maximum units per scaling action' if that value is greater than the threshold for 'Maximum idle instances before scaledown'
- Scaling will never exceed the lower/upper bounds of target capacity, which is bound between 1 and 3000 (inclusive)
- For 'Maximum queued builds before scaleup' enter a positive integer to act as an upper bound of allowed queued builds before the plugin attempts to scale up
- For 'Average queue time in minutes before scaleup' enter a positive integer to act as an upper bound of allowed average queue time before the plugin attempts to scale up
- For 'Maximum idle instances before scaledown' enter a positive integer to act as an upper bound of allowed idle instances before the plugin attempts to scale down
- An instance is considered idle if all of its agents are idle
- For 'Maximum units per scaling action' enter a positive integer that the plugin will attempt to modify the target capacity by when a scaling decision is made (subject to the rules specified above)
- The plugin will attempt to scale up if 'Maximum queued builds before scaleup' or 'Average queue time in minutes before scaleup' thresholds are exceeded. The plugin will attempt to scale down if the 'Maximum idle instances before scaledown' threshold is exceeded. The plugin will always try to scale by up to the 'Maximum units per scaling action' value specified when a threshold is exceeded, subject to these rules:
- Click 'Save' when finished. If any errors are present, correct them and before proceeding.
- Check the 'Enable plan' checkbox after saving the task
-
Schedule plan containing 'Register and Monitor Spot Fleet' task for automatic execution
-
Navigate to all build plans in the Bamboo server
-
Select the edit icon on the plan containing the 'Register and Monitor Spot Fleet' task
-
Select the 'triggers' tab from the menu
-
Click the 'Add trigger' button
-
Select 'Scheduled'
-
Click the edit icon next to the Schedule
-
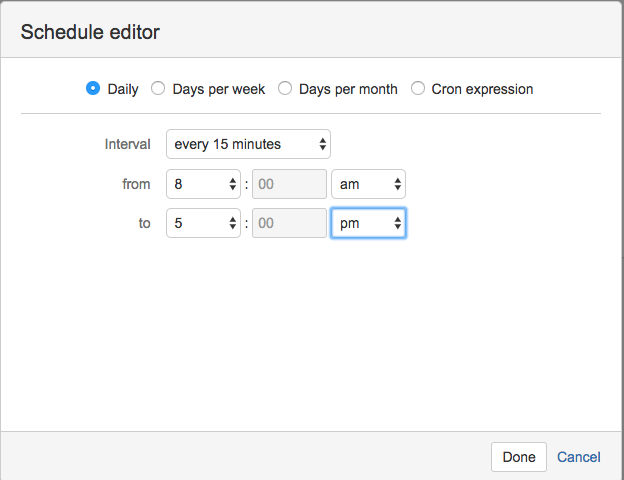
Configure the schedule for the task's execution
- This is how frequently the task will attempt to scale
- It is important to allow enough time in between task executions for new agents to install. With the default settings, at least 5 minutes should suffice
-
(Optional, but recommended) Dedicate a local agent to run this plan. The 'Register and Monitor Spot Fleet' task must be run on a local agent as it requires Bamboo components which are only available to local agents. Dedicating a local agent ensures that the task will be run quickly once it is queued.
- Navigate to the Agents page under Bamboo Administration.
- If desired, add a new local agent via the 'Add local agent' button
- Under the Local Agent section, click the name of the agent you wish to Dedicate
- Select the 'Dedicate agent' tab
- Find the plan that contains the 'Register and Monitor Spot Fleet' task and click the 'Add' button to dedicate the agent to this plan
The plugin should now automatically make scaling decisions as scheduled, scaling the associate Fleet up/down as specified in the task creation screen. If the 'Terminate fleet upon completing all builds' checkbox was not checked, ensure that you cancel the fleet and terminate all associated instances when you are finished with them.
The plugin will log successes, warnings, and errors in the build log every scaling cycle. The task will report that it has succeeded unless something unexpected has prevented it from finishing. Expected errors will be logged and will not stop task execution.
-


[Follow the instructions here to install the atlassian development sdk](https://developer.atlassian.com/docs/getting-started/set-up-the-atlassian-plugin-sdk-and-build-a-project/install-the-atlassian-sdk-on-a-linux-or-mac-system)

We'd recommend doing this in an EC2 instance if your local machine is behind a restrictive firewall.

[A convenient wizard exists for setting up a Bamboo server in AWS](https://confluence.atlassian.com/bamboo/running-bamboo-server-in-aws-858705568.html)

When finished, run this command in desired location:
```
atlas-create-bamboo-plugin
```
You will be prompted for the following values, which you should enter as follows:
* Define value for groupId:  AwsSpotFleetBambooPlugin
* Define value for artifactId:  AwsSpotFleetBambooPlugin
* Define value for version: 1.0.0-SNAPSHOT:  1.0.0-SNAPSHOT
* Define value for package: com.atlassian.tutorial:  AwsSpotFleetBambooPlugin

At this point the skeleton for plugin development will be set up. Now clone/download the files
on this repo and drag the files into the folder generated by the atlas-create-bamboo-plugin command.

Bamboo can be started with the command:
```
atlas-run
```
This will run tests, package the plugin, and run the bamboo server itself on port 6990 (Typically takes 1-2 minutes)