


This repository contains examples and related resources showing you how to preprocess, train, debug your training script with breakpoints, and serve on your local machine using Amazon SageMaker Local mode for processing jobs, training and serving.
 SageMaker Studio now supports local mode and Docker: https://aws.amazon.com/about-aws/whats-new/2023/12/sagemaker-studio-local-mode-docker/
Read the Blog Post: Accelerate ML workflows with Amazon SageMaker Studio Local Mode and Docker support
The local mode in the Amazon SageMaker Python SDK can emulate CPU (single and multi-instance) and GPU (single instance) SageMaker training jobs by changing a single argument in the TensorFlow, PyTorch or MXNet estimators. To do this, it uses Docker compose and NVIDIA Docker. It will also pull the Amazon SageMaker TensorFlow, PyTorch or MXNet containers from Amazon ECS, so you’ll need to be able to access a public Amazon ECR repository from your local environment.
For full details on how this works:
- Read the Machine Learning Blog post at: https://aws.amazon.com/blogs/machine-learning/use-the-amazon-sagemaker-local-mode-to-train-on-your-notebook-instance/
This repository examples will work in any IDE on your local machine.
Here you can see a TensorFlow example running on PyCharm. The data for processing, training and serving is also located on your local machine file system.


The repository contains the following resources:
-
scikit-learn resources:
- scikit-learn Script Mode Training and Serving: This example shows how to train and serve your model with scikit-learn and SageMaker script mode, on your local machine using SageMaker local mode.
- scikit-learn Bring Your Own Model: This example shows how to serve your pre-trained scikit-learn model with SageMaker, on your local machine using SageMaker local mode.
- Gensim Word2Vec Bring Your Own Model: This example shows how to serve your pre-trained Word2Vec model, trained using BlazingText algorithm with SageMaker, and gensim for inference, on your local machine using SageMaker local mode.
- CatBoost with scikit-learn Script Mode Training and Serving: This example shows how to train and serve a CatBoost model with scikit-learn and SageMaker script mode, on your local machine using SageMaker local mode.
- Delta Sharing scikit-learn Script Mode Training and Serving: This example shows how to train a scikit-learn model on the boston-housing dataset fetched from Delta Lake using Delta Sharing, and then serve your model with scikit-learn and SageMaker script mode, on your local machine using SageMaker local mode.
-
XGBoost resources:
- XGBoost Script Mode Training and Serving: This example shows how to train and serve your model with XGBoost and SageMaker script mode, on your local machine using SageMaker local mode.
-
TensorFlow resources:
- TensorFlow Script Mode Training and Serving: This example shows how to train and serve your model with TensorFlow and SageMaker script mode, on your local machine using SageMaker local mode.
- TensorFlow Script Mode Debug Training Script: This example shows how to debug your training script running inside a prebuilt SageMaker Docker image for TensorFlow, on your local machine using SageMaker local mode.
- TensorFlow Script Mode Deploy a Trained Model and inference on file from S3: This example shows how to deploy a trained model to a SageMaker endpoint, on your local machine using SageMaker local mode, and inference with a file in S3 instead of http payload for the SageMaker Endpoint.
- TensorFlow Script Mode Training and Batch Transform: This example shows how to train your model and run Batch Transform job with TensorFlow and SageMaker script mode, on your local machine using SageMaker local mode.
- Extending SageMaker TensorFlow Deep Learning Container Image: In this example we show how to package a TensorFlow container, extending the SageMaker TensorFlow training container, with a Python example which works with the California Housing dataset. By extending the SageMaker TensorFlow container we can utilize the existing training solution made to work on SageMaker, leveraging SageMaker TensorFlow
Estimatorobject, withentry_pointparameter, specifying your local Python source file which should be executed as the entry point to training. To make it work, we replace theframework_versionandpy_versionparameters, withimage_uriof the Docker Image we have created. This sample code can run on your local machine using SageMaker local mode.
-
PyTorch resources:
- PyTorch Script Mode Training and Serving: This example shows how to train and serve your model with PyTorch and SageMaker script mode, on your local machine using SageMaker local mode.
- PyTorch Script Mode Deploy a Trained Model: This example shows how to deploy a trained model to a SageMaker endpoint, on your local machine using SageMaker local mode, and serve your model with the SageMaker Endpoint.
- Deploy a pre-trained PyTorch HeBERT model from Hugging Face on SageMaker Endpoint: This example shows how to deploy a pre-trained PyTorch HeBERT model from Hugging Face, on SageMaker Endpoint, on your local machine using SageMaker local mode.
- Deploy a pre-trained PyTorch YOLOv5 model on SageMaker Endpoint: This example shows how to deploy a pre-trained PyTorch YOLOv5 model on SageMaker Endpoint, on your local machine using SageMaker local mode.
-
Bring Your Own Container Training resources:
- Bring Your Own Container TensorFlow Algorithm - Train/Serve: This example provides a detailed walkthrough on how to package a Tensorflow 2.5.0 algorithm for training and production-ready hosting. We have included also a Python file for local training and serving that can run on your local computer, for faster development.
- Bring Your Own Container TensorFlow Algorithm - Train/Batch Transform: This example provides a detailed walkthrough on how to package a Tensorflow 2.5.0 algorithm for training, and then run a Batch Transform job on a CSV file. We have included also a Python file for local training and serving that can run on your local computer, for faster development.
- Bring Your Own Container TensorFlow Algorithm - Serve without TensorFlow Serving: This example provides a detailed walkthrough on how to package a Tensorflow 2.5.0 algorithm for production-ready hosting without TensorFlow Serving. We have included also a Python file for local serving that can run on your local computer, for faster development.
- Bring Your Own Container CatBoost Algorithm: This example provides a detailed walkthrough on how to package a CatBoost algorithm for training and production-ready hosting. We have included also a Python file for local training and serving that can run on your local computer, for faster development.
- Bring Your Own Container LightGBM Algorithm: This example provides a detailed walkthrough on how to package a LightGBM algorithm for training and production-ready hosting. We have included also a Python file for local training and serving that can run on your local computer, for faster development.
- Bring Your Own Container Prophet Algorithm: This example provides a detailed walkthrough on how to package a Prophet algorithm for training and production-ready hosting. We have included also a Python file for local training and serving that can run on your local computer, for faster development.
- Bring Your Own Container HDBSCAN Algorithm: This example provides a detailed walkthrough on how to package a HDBSCAN algorithm for training. We have included also a Python file for local training that can run on your local computer, for faster development.
- Bring Your Own Container scikit-learn Algorithm and deploy a pre-trained Model: This example provides a detailed walkthrough on how to package a scikit-learn algorithm for serving with a pre-trained model. We have included also a Python file for local serving that can run on your local computer, for faster development.
- Delta Lake Bring Your Own Container CatBoost Algorithm: This example provides a detailed walkthrough on how to package a CatBoost algorithm for training on data fetched from Delta Lake, directly from S3, and then serve your model with the Docker image you have built. We have included also a Python file for local training and serving that can run on your local computer, for faster development.
-
Built-in scikit-learn Processing resources:
- Built-in scikit-learn Processing Job: This example provides a detailed walkthrough on how to use the built-in scikit-learn Docker image for processing jobs. We have included also a Python file for processing jobs that can run on your local computer, for faster development.
-
Bring Your Own Container Processing resources:
- Bring Your Own Container scikit-learn Processing Job: This example provides a detailed walk-through on how to package a scikit-learn Docker image for processing jobs. We have included also a Python file for processing jobs that can run on your local computer, for faster development.
- Delta Sharing Bring Your Own Container Processing Job: This example provides a detailed walk-through on how to package a scikit-learn Docker image for processing job that fetch data from a table on Delta Lake using Delta Sharing, and aggregate total COVID-19 cases per country. We have included also a Python file for processing jobs that can run on your local computer, for faster development.
- Dask Bring Your Own Container Processing Job: This example provides a detailed walk-through on how to package a Dask Docker image for processing job that fetch JSON file from a website, and outputs the filenames found. We have included also a Python file for processing jobs that can run on your local computer, for faster development.
-
Graviton resources - will work only on MacBook M1/ARM/Apple Silicon:
- Deploy a pre-trained TensorFlow model on SageMaker Graviton Endpoint: This example shows how to deploy a pre-trained TensorFlow model on SageMaker Graviton Endpoint, using your local machine using SageMaker local mode.
- Deploy a pre-trained PyTorch CIFAR-10 model on SageMaker Graviton Endpoint: This example shows how to deploy a pre-trained PyTorch CIFAR-10 model on SageMaker Graviton Endpoint, using your local machine using SageMaker local mode.
- Bring Your Own Container scikit-learn Algorithm - Train/Serve: This example provides a detailed walkthrough on how to package a scikit-learn algorithm for training and production-ready hosting. We have included also a Python file for local training and serving that can run on your local M1 MacBook computer, for faster development.
- Bring Your Own Container TensorFlow Algorithm - Train: This example provides a detailed walkthrough on how to package a TensorFlow algorithm for training. We have included also a Python file for local training that can run on your local M1 MacBook computer, for faster development.
- Bring Your Own Container TensorFlow Algorithm - SageMaker Training Toolkit: This example provides a detailed walkthrough on how to package a TensorFlow algorithm for training using the SageMaker Training Toolkit. We have included also a Python file for local training that can run on your local M1 MacBook computer, for faster development.
Note: Those examples were tested on macOS, Linux and Windows.
-
Create an AWS account if you do not already have one and login.
-
Mac users: Install Docker Desktop for Mac
-
Windows users: Install Docker Desktop for Windows, WSL 2 and then, a Linux distro from the Microsoft Store. You can follow the instructions here.
-
Make sure you have Python3 installed
python --version -
Make sure you have pip installed
pip --version
We assume the root folder of the project is ~/Documents/dev/
-
Open Terminal and navigate to the project root folder:
cd ~/Documents/dev/ -
Create a directory for the GitHub projects:
mkdir GitHub -
Navigate to
~/Documents/dev/GitHub/:cd GitHub -
Clone the repo onto your local development machine using
git clone https://github.com/aws-samples/amazon-sagemaker-local-mode -
Open PyCharm
-
Open
amazon-sagemaker-local-modeproject from~/Documents/dev/GitHub/amazon-sagemaker-local-mode/ -
Now you will add a new virtual environment and install the required Python dependencies to run the demos.
-
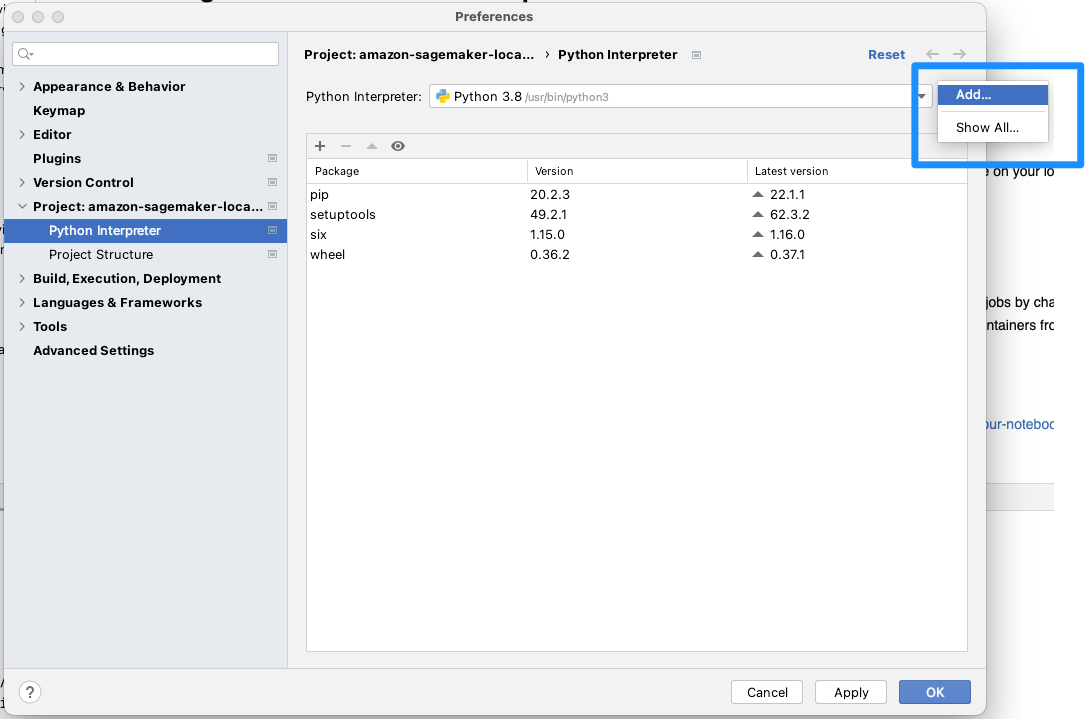
Navigate to PyCharm -> Preferences -> Python Interpreter, and click "Add"
-
Add a new Virtual environment by specifying the location of the virtual environment to be created:
/Users/<MY USER>/Documents/dev/sagemaker-python-sdk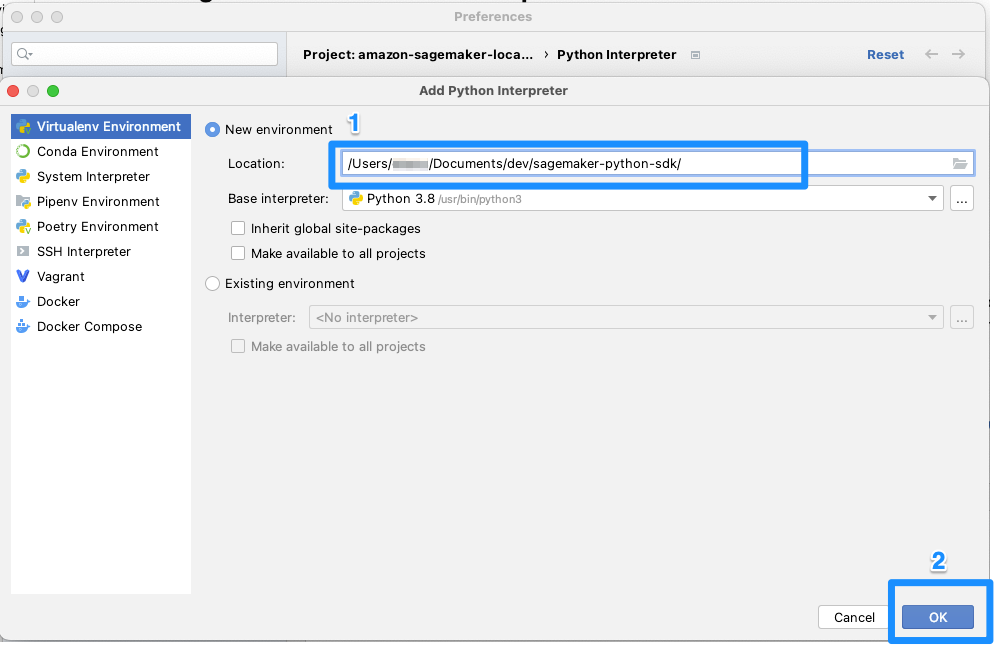
-
Click OK
-
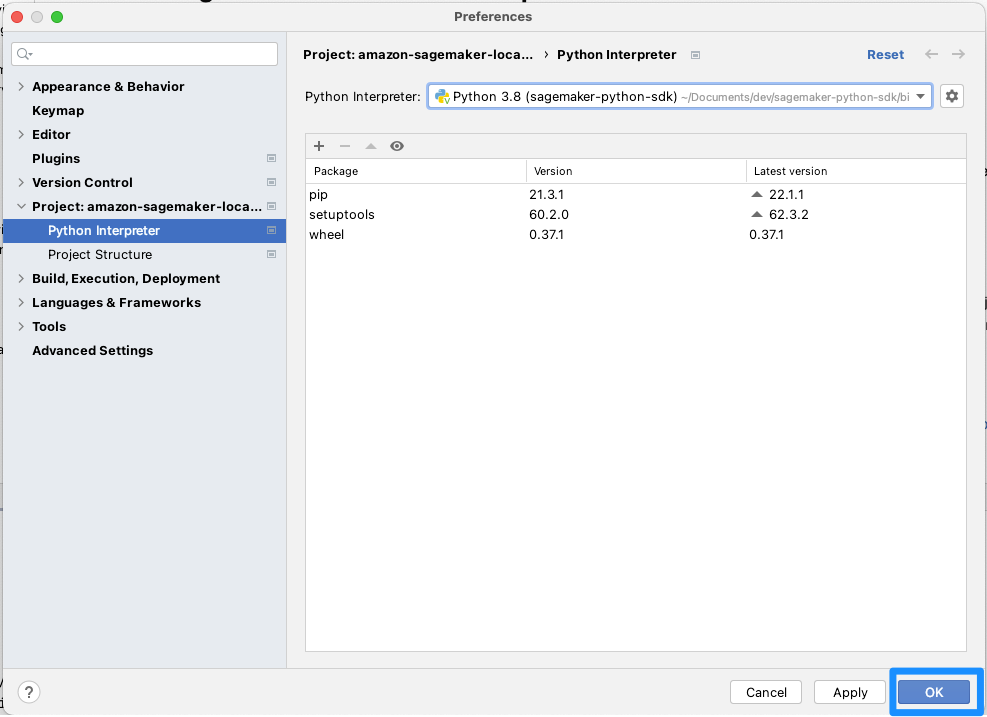
On the Python Interpreter Screen, click OK.
-
Open terminal (inside PyCharm) and install the requirements:
python -m pip install -r requirements.txt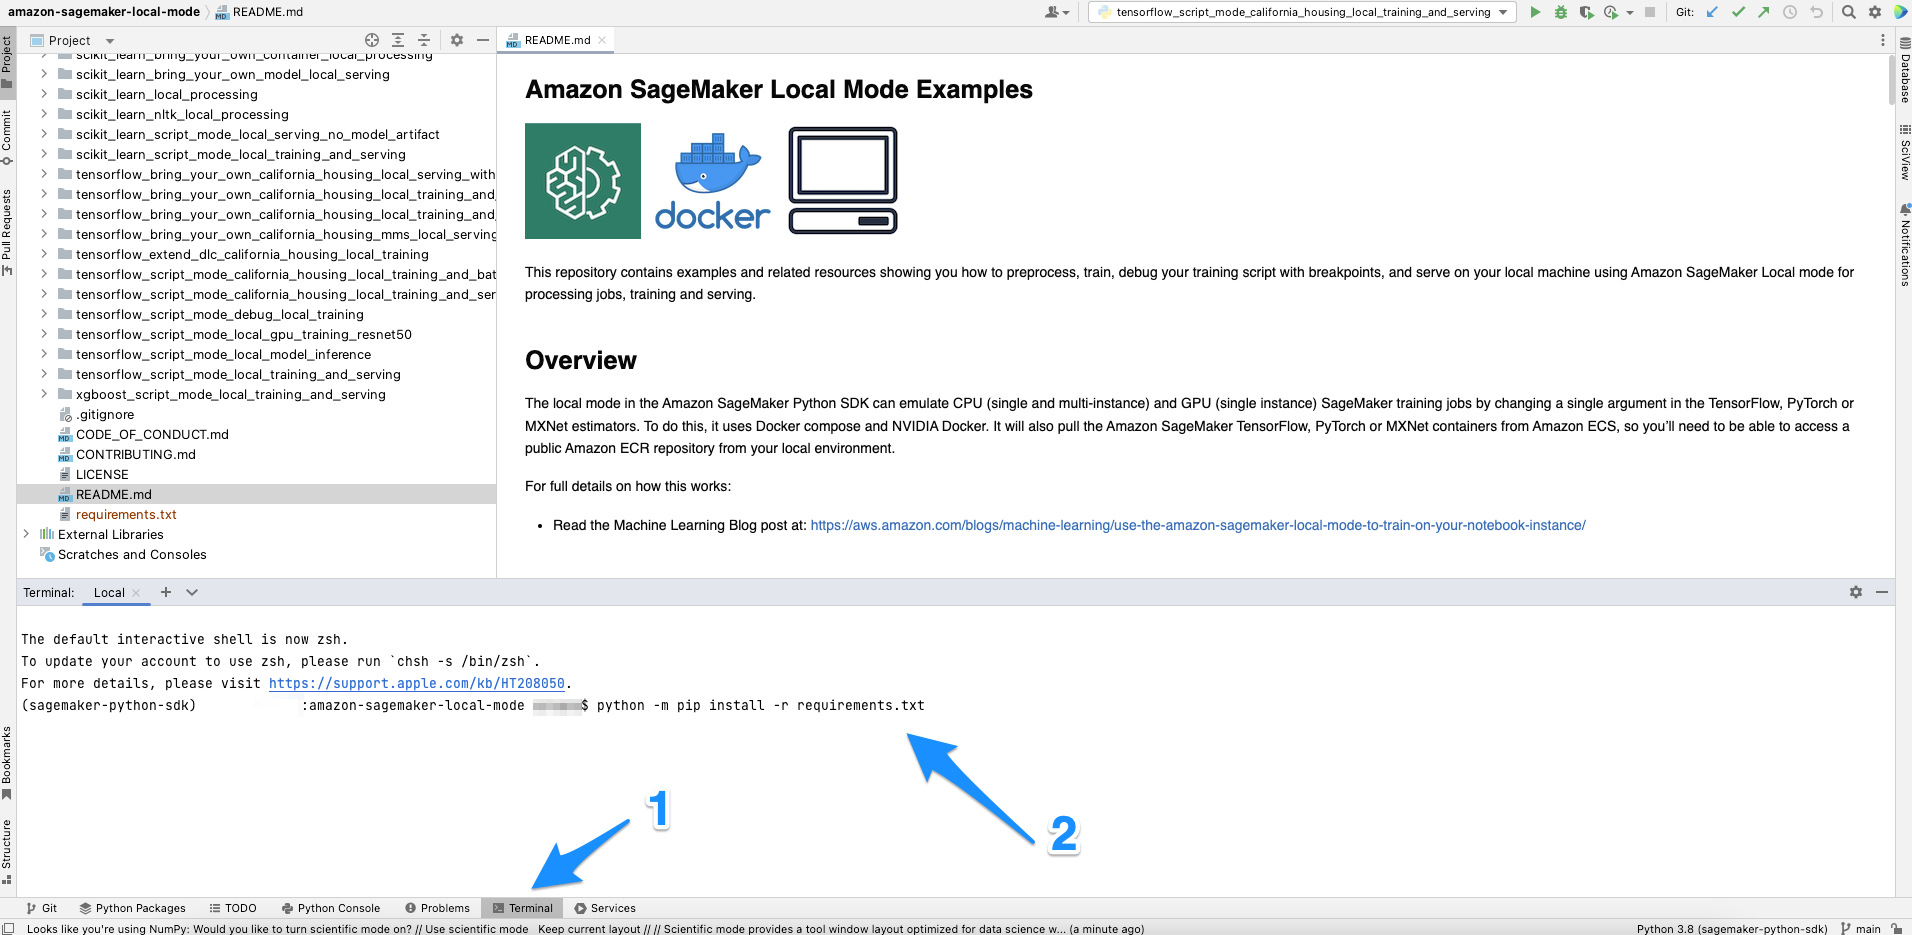
-
Once completed, navigate to
tensorflow_script_mode_california_housing_local_training_and_servingfolder, and double click ontensorflow_script_mode_california_housing_local_training_and_serving.pyfile
-
Right click -> Run
tensorflow_script_mode_california_housing_local_training_and_serving.py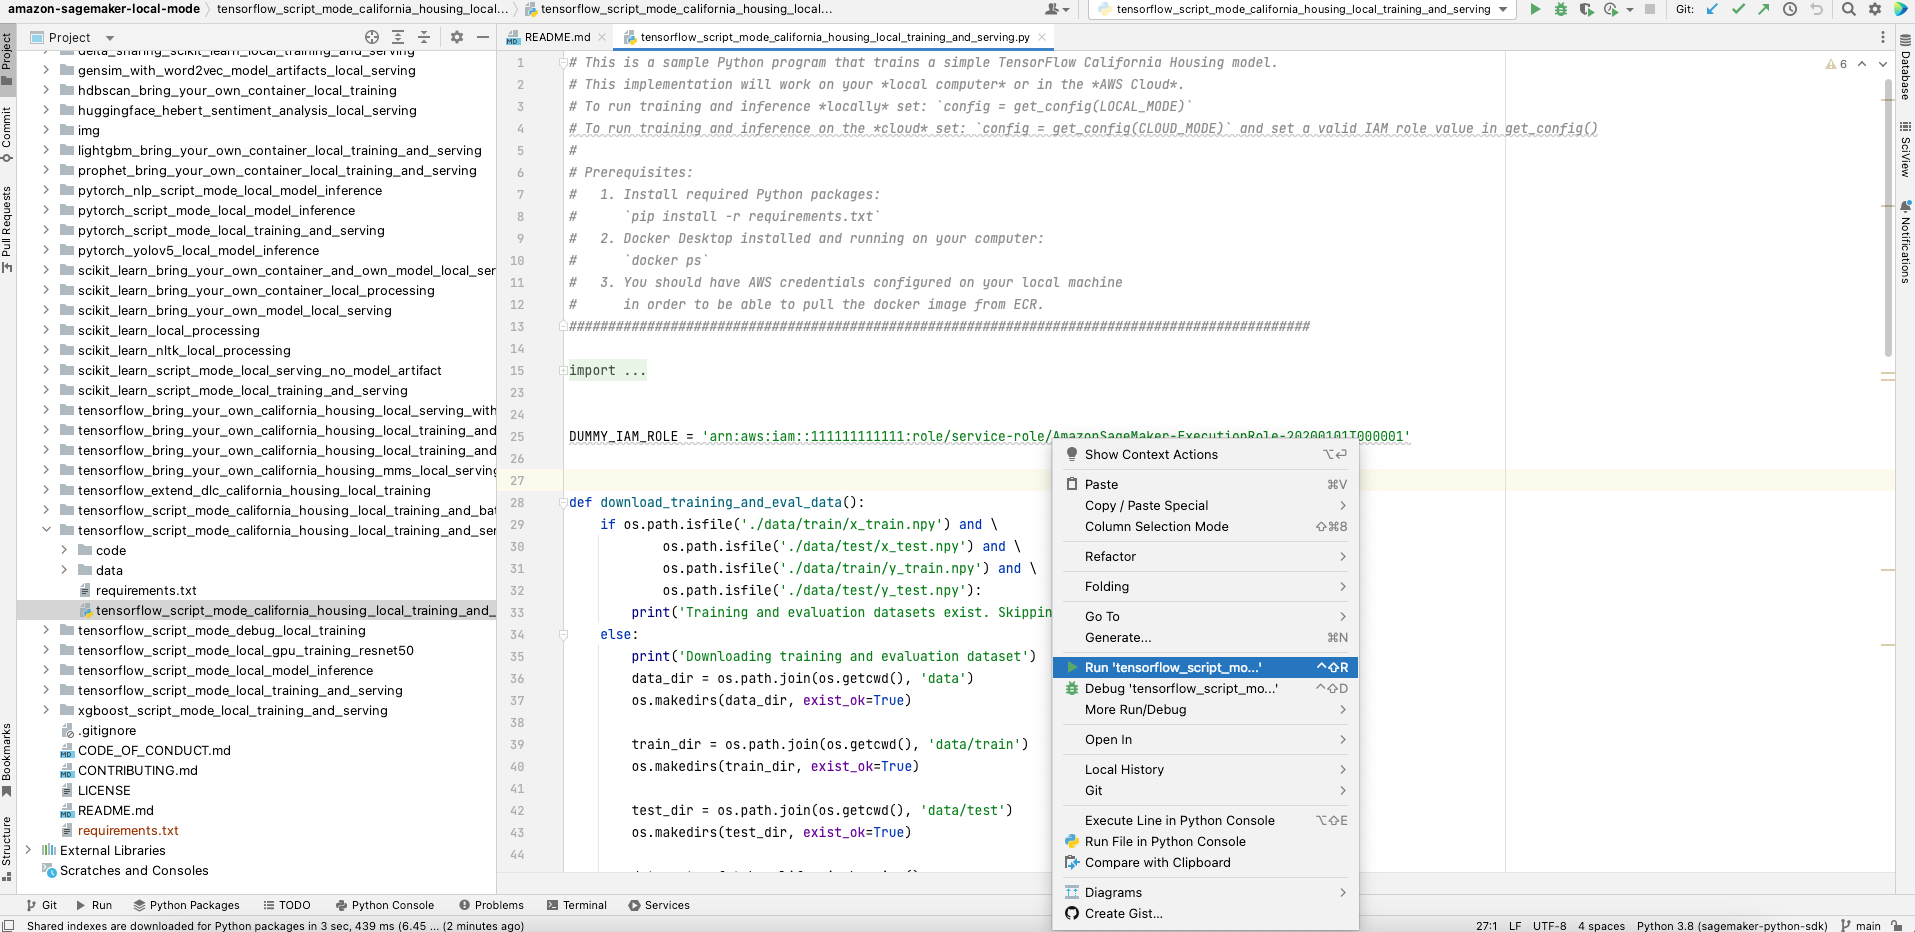
-
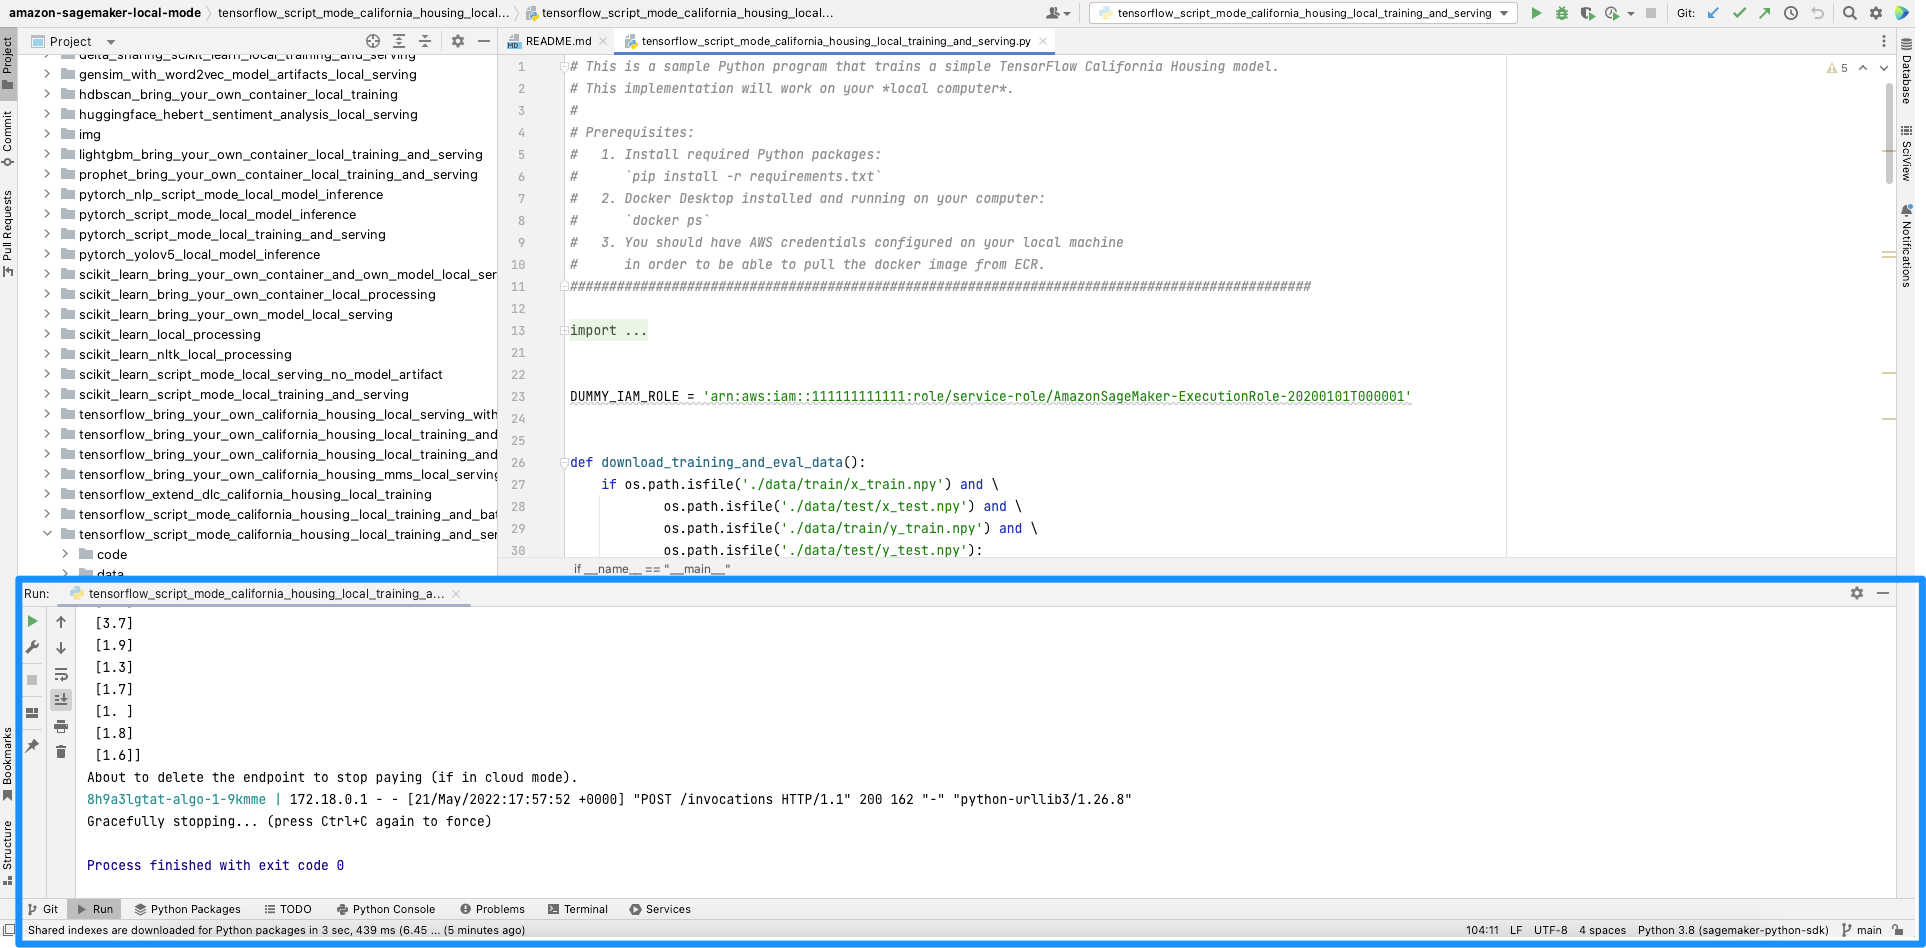
The container image download might take a few minutes to complete, but eventually you will View the output


-
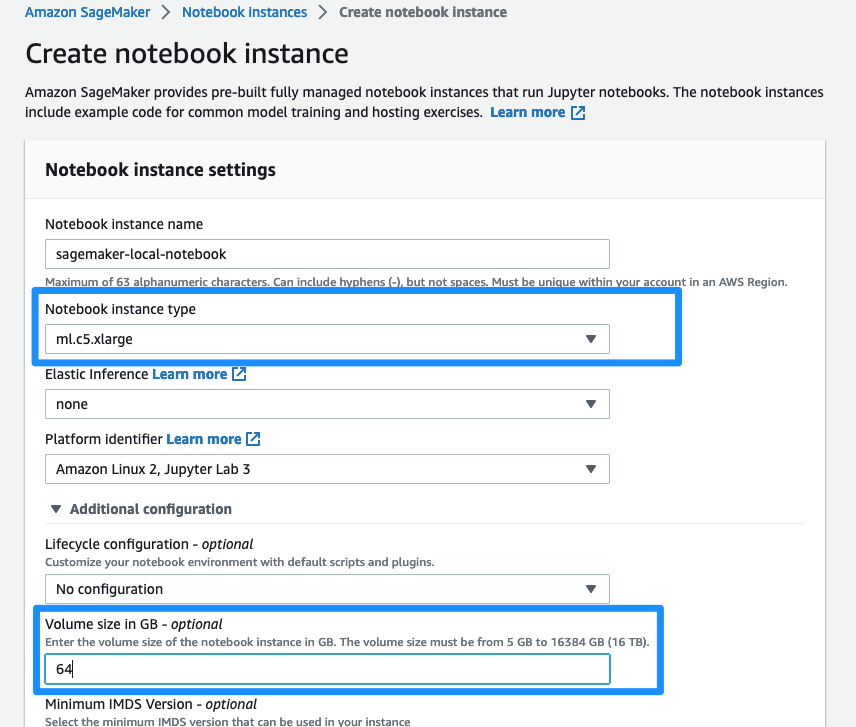
Create a new SageMaker Notebook instance. Choose
ml.c5.xlargeand set volume size to 64 GB. This is required since SageMaker Dokcer images that are fetched are few GB in size
-
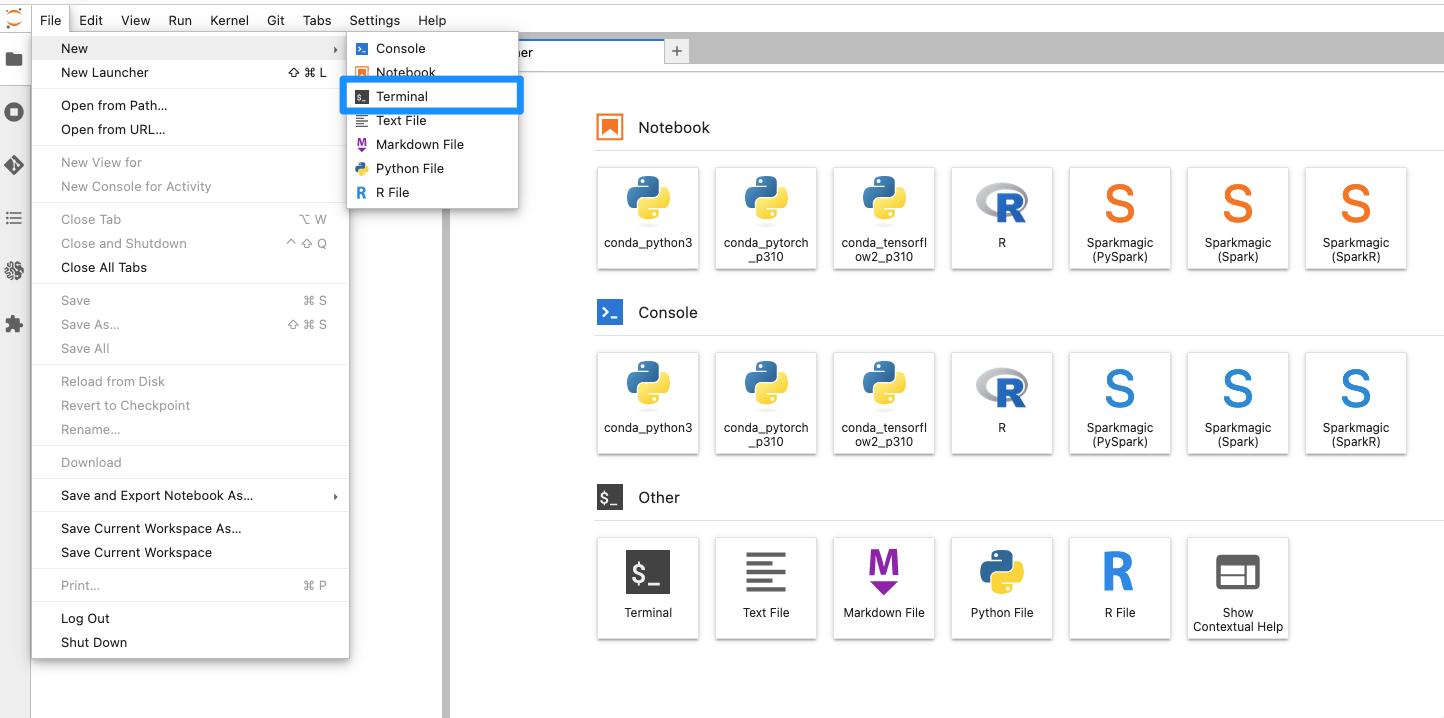
Open JupyterLab, and from there open terminal: File -> New -> Terminal
-
List Conda environments by running
conda env list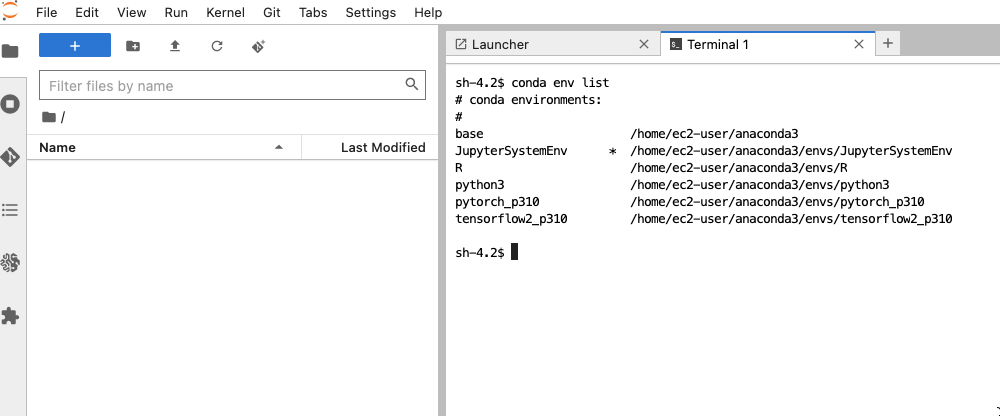 We will use
 python3kernel. -
Activate specific Conda environment by running the following commands:
source ~/anaconda3/etc/profile.d/conda.shand thenconda activate python3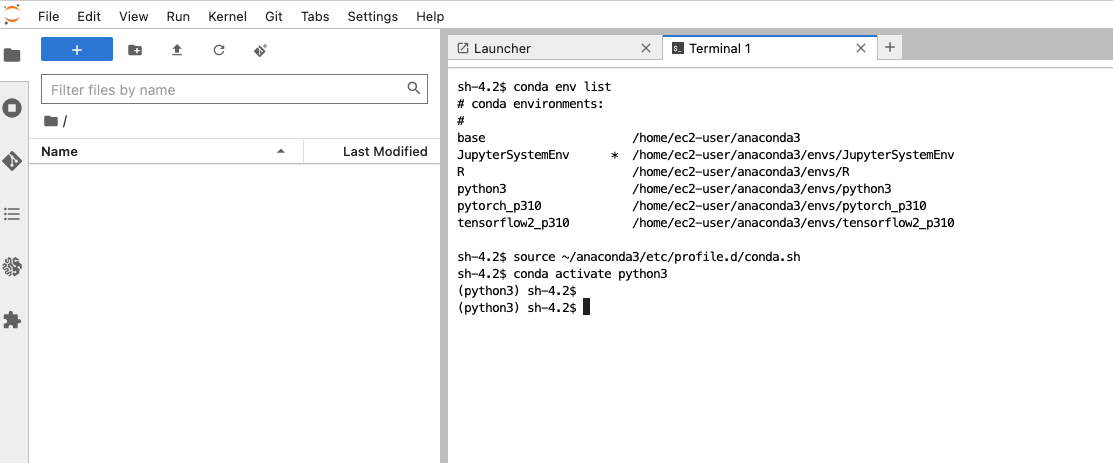
-
Clone the GitHub repo by running


cd SageMakergit clone https://github.com/aws-samples/amazon-sagemaker-local-mode
- Create virtual environment and then install dependencies:
cd amazon-sagemaker-local-modepython -m venv venvsource venv/bin/activatepip install -r requirements.txt
- Test the environment
cd scikit_learn_script_mode_local_training_and_servingpython scikit_learn_script_mode_local_training_and_serving.pyyou should seeLogin Succeededmessage. It will take few minutes to download the Docker image so be patient.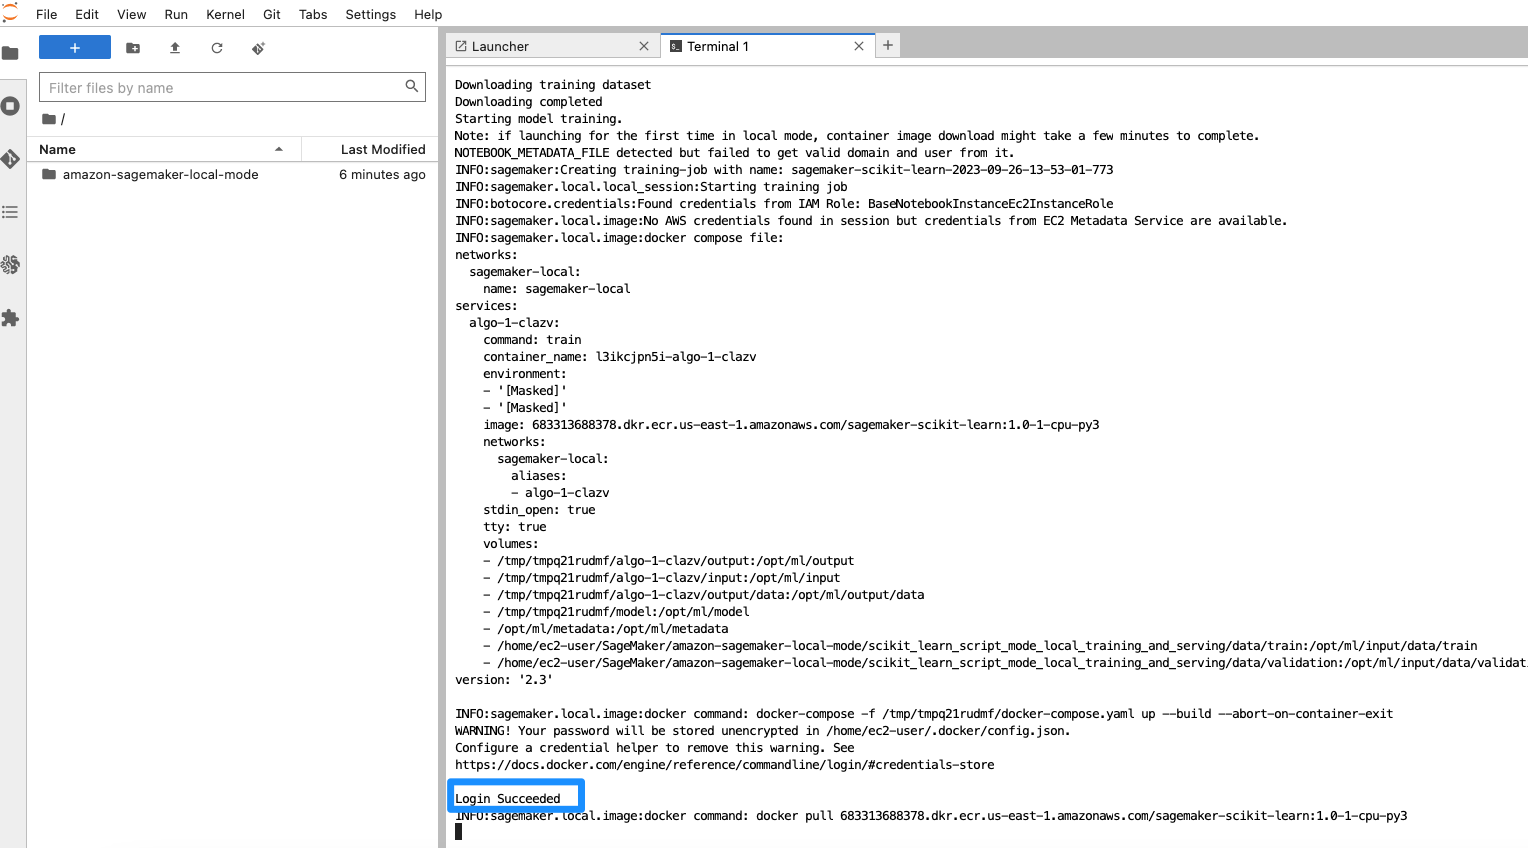

-
Once script is completed, you should see
Predictions,ActualandRMSE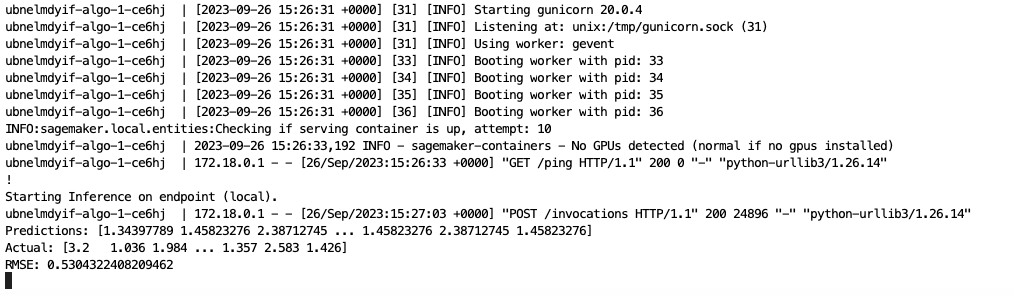
-
Press Control-C to exit the program.

Please contact Eitan Sela on LinkedIn or raise an issue on this repo.
This library is licensed under the MIT-0 License. See the LICENSE file.