Latest release is here.
AutoPkgr is an app that makes it easy to install and configure AutoPkg.
AutoPkg is an awesomely powerful tool for automating OS X software packaging and distribution, but it requires its users to be comfortable with command-line tools and methods.
If you're not comfortable with the command-line, or if you just want to get AutoPkg set up from scratch quickly, AutoPkgr is for you.
Here are the tasks that AutoPkgr makes easier:
- Installation of AutoPkg itself.
- Installation of Git, which AutoPkg requires.
- Discovery of and subscription to popular AutoPkg recipe repositories.
- Ability to easily create AutoPkg recipe overrides.
- Configuration of AutoPkg to use a local Munki repo.
- Basic integration of AutoPkg with the JAMF Casper Suite.
AutoPkgr also lets you do all of the following, which wouldn't be possible using AutoPkg alone:
- Easy tracking of which specific AutoPkg recipes you care about.
- Automatic scheduled checks of the selected recipes.
- Email notifications when the recipes are updated (and sweet silence when they're not).
- One-click access to common folders that Munki and AutoPkg admins need.
AutoPkgr requires Mac OS X 10.8 or higher. If you plan on integrating with JAMF's Casper Suite, you'll need Casper 9 or newer.
Download the latest release, and drag the AutoPkgr app to your Applications folder. Then launch it.
-
Launch the AutoPkgr app.
-
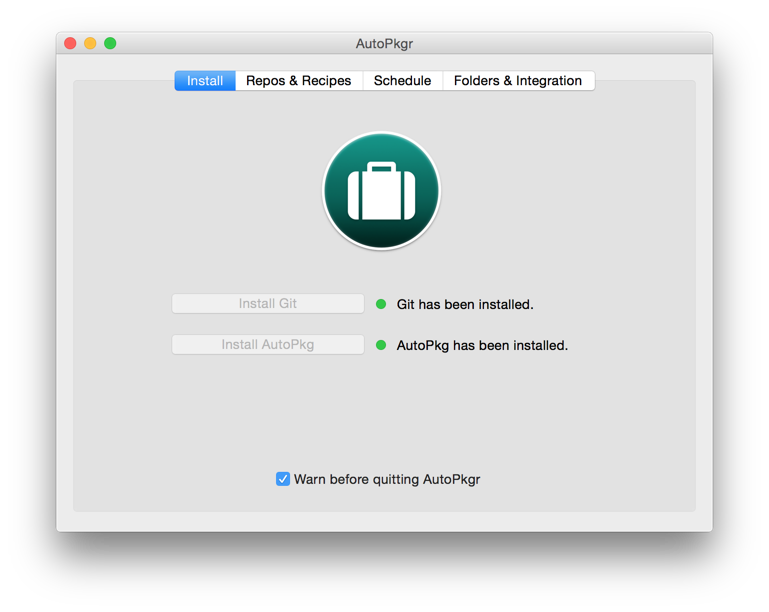
On first launch, you'll see the configuration window:
-
Click the button to Install Git if needed.
-
Click the button to Install AutoPkg if needed.
-
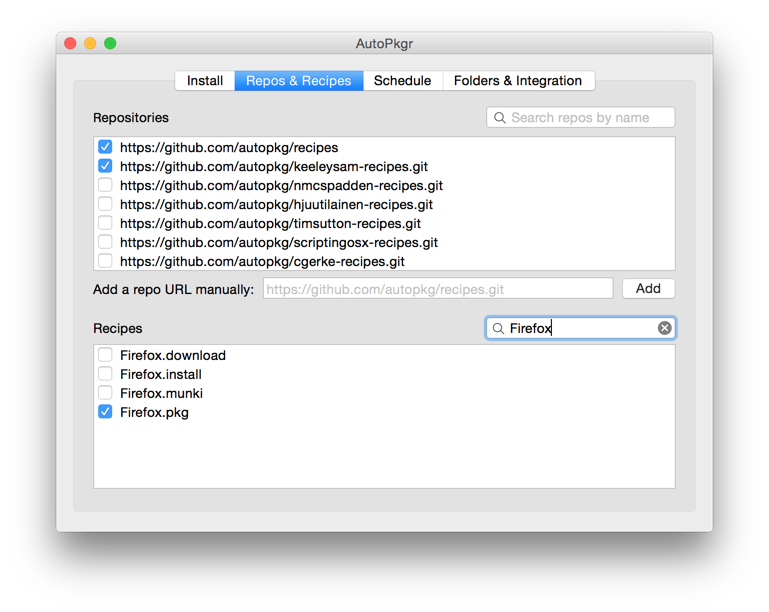
Switch to the Repos & Recipes tab.
-
Select the repositories you'd like to subscribe to. We recommend the first one, to get you started. You can also add repositories manually by pasting their URL into the text field and clicking Add.
-
Select the recipes you'd like to watch for changes.
-
If you're importing the apps into a Munki repo, put the repo path in the Local Munki Repo box.
-
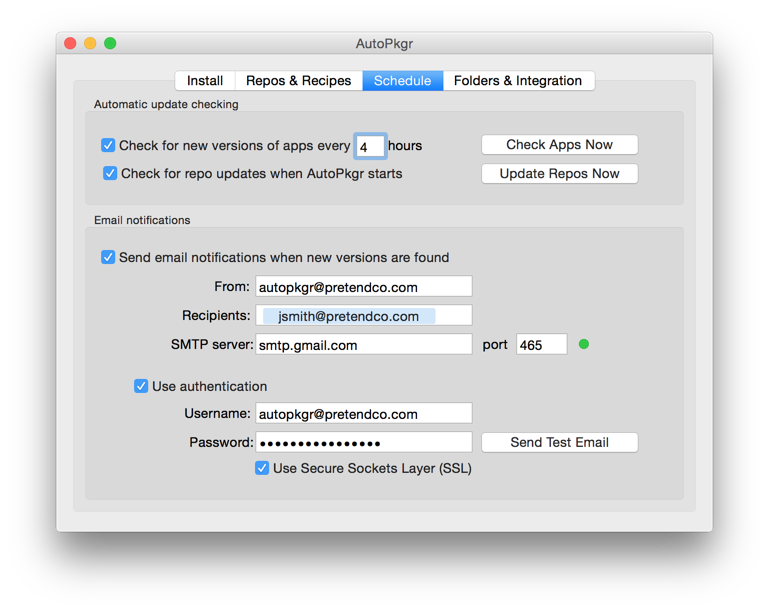
Switch to the Schedule tab.
-
Set your automatic update checking preferences — we recommend checking at least once per day, and checking for repo updates when AutoPkgr starts.
-
Configure email notifications, if desired.
-
Click Save and Close.


That's it! AutoPkgr will now check for the latest app updates you specified, and when an update is available you'll receive an email notification.
Anytime you'd like to make changes to AutoPkgr's configuration, just click on the AutoPkgr icon in the menu bar ( ), and choose Configure...
You'll also find some useful shortcuts on the Folders & Integration tab, which will take you directly to several convenient AutoPkg folders. On that tab, you can also configure integration with Munki or Casper (see below).

To configure AutoPkgr to add updates directly into your Munki repository, follow these steps:
- Click on the Folders & Integration tab.
- In the Munki Integration section, click Choose.
- Select your munki_repo folder.
You'll also want to make sure you have a few .munki recipes selected. Once the new versions of apps appear in your Munki repo, you can add them to the appropriate catalogs and manifests to deploy them.
To configure AutoPkgr to create Self Service policies in Casper for new app updates, follow these steps:
- Create a static computer group on your JSS called Testing. Add one or more test computers to the group.
- Create an account on your JSS with Create, Read, and Update access to the following objects:
- Categories
- Smart Computer Groups
- Static Computer Groups
- Computer Extension Attributes
- Packages
- Policies
- Scripts
- File Share Distribution Points (only needs Read access)
- Open AutoPkgr and go to the Folders & Integration tab.
- In the Casper Suite integration section, enter your JSS URL, API username, and API password. Then click Connect.
- When prompted, follow the instructions to install the jss-autopkg-addon.
- When prompted, enter the read/write password for each distribution point.
You'll also want to make sure you have a few .jss recipes selected. AutoPkgr will automatically add Shea Craig's jss-recipes repo so you'll have a few to choose from.
When a .jss recipe runs, the package is uploaded to your distribution points, a Self Service policy is created and scoped to a new smart group. As a result, computers in the Testing group with less than the latest version of the app should now be able to install the latest version through Self Service.
For detailed tips on integrating AutoPkgr with Casper, and to see some descriptions of example workflows, read Auto Update Magic.
If your network uses a proxy, you may need to run one or more of these commands to configure AutoPkg/AutoPkgr to use your proxy for internet access.
Note: Running these commands is equivalent to this shell command:
export HTTP_PROXY=http://proxy:8080
It should not be compared to what you can access from a web browser. If running autopkg in the shell won't work with the environmental variables set, neither will AutoPkgr.
Note: Proxy support is still in early development and we would love feedback from the community as to it's functioning, both success and failure.
-
Use proxies defined in System Preferences.
defaults write com.lindegroup.AutoPkgr useSystemProxies -bool trueThis should also pick up auto-detected WPAD/PAC proxies. Make sure you have the domains that should not use a proxy listed in the
System Preferences -> Network -> Advanced -> Proxies -> "Bypass proxy settings for these Hosts & Domains" -
If using the settings from system preferences doesn't work you can try to manually set the proxy environment yourself.
Note: when manually setting make sure to unset useSystemProxies
defaults write com.lindegroup.AutoPkgr useSystemProxies -bool false
-
To use HTTP proxy:
defaults write com.lindegroup.AutoPkgr HTTP_PROXY http://proxy:8080 -
To use HTTPS proxy:
defaults write com.lindegroup.AutoPkgr HTTPS_PROXY https://proxy:8080 -
To use HTTP proxy with authentication:
defaults write com.lindegroup.AutoPkgr HTTP_PROXY http://username:password@proxy:8080 -
To use HTTPS proxy with authentication:
defaults write com.lindegroup.AutoPkgr HTTPS_PROXY https://username:password@proxy:8080 -
To add a list of bypassed hosts:
defaults write com.lindegroup.AutoPkgr NO_PROXY ".local,10.0.0.0/24,.mylocaldomain.com"(this is a list of comma separated items use .xxx.xxx to bypass an entire domain) -
To stop using HTTP proxy:
defaults remove com.lindegroup.AutoPkgr HTTP_PROXY -
To stop using HTTPS proxy:
defaults remove com.lindegroup.AutoPkgr HTTPS_PROXY
Note: This will not create or modify any system proxy settings; it will only add them to your shell env.
If AutoPkgr doesn't do what you expect, first try running your selected recipes using autopkg run manually. If the issue repeats itself there, it's likely that a particular recipe or repo is having trouble, and not the AutoPkgr app itself.
During troubleshooting, you may find it useful to enable AutoPkgr's verbose logging feature. To do that, hold the Option key while you click the AutoPkgr icon in the menu bar (). Then select Verbose Logs. The simplest way to view the logs is to filter for "AutoPkgr" in the Console app on your Mac.
If you discover an issue with the AutoPkgr app itself, you may want to post a message to our Google Group. And if it's a reproducible problem, please submit an issue on GitHub. We do our best to investigate and squash bugs.
AutoPkgr was created by James Barclay, Elliot Jordan, and Josh Senick of the Linde Group with help from Eldon Ahrold.
We're very friendly. Stop by Berkeley sometime and have an espresso.
Briefcase icon from FontAwesome.