This first course basically the introduction on how this framework does work and we are going to build an API where we going to have three layers also we are going to connect to real database. We'll see the amazing power of framework.
Spring boot is an amazin framework for building applications whether you want to build back-end applications or full-stack applications using Java or Kotlin.
I said spring boot is an amazing framework that gives you everything you need in order to build applications if you need security you can use security modules available if you need logging you can use the logging integration, connecting to databases whether you want to connect to mongodb, postgres, mysql they made it super easy for you as a developer to connect any database. Metrics so checking how your application is behaving in production and the cool thing is that it's very easy for you to learn as a beginner as like me. Also it's production ready, you can build microservices has dependency injection built-in configuration greate community and a bunch more. Let's go ahead and learn how to get started with spring boot.
For this project, we 're going to build entire application as showed in below excluding the front end part. We can have the API, so the API will receive GET, POST, PUT and DELETE request and then we have a service layer this is mainly for business logic and then we'll have a data access layer and this layer is responsible for connecting to any database. We're going to use real database and we'll see how easy it is for us to implement all of this with spring boot.
Now in order for us to get started with spring boot let's go ahead and navigate to spring initializer. Go go Spring Initializr, in this web site we can bootstrap any given spring boot application we can pick from Maven or Gradle project, we pick Maven Project, and in the languages we are going to select Java and then pick any version but i prefer the stable version. And then we can customize the project metadata, so I'm gonna leave everything as default and for packaging go ahead and select Jar, this is the most common packaging type for Java application. And then for Java version I have got the 11 installed. I'm just going to select that and let me scrool up and right there select dependencies. In here we can pick dependencies that our project needs. So this list is quite huge and by all means feel free to explore this list but for this project let's go ahead and select the Spring Web so build web including RESTful applications using Spring MVC (for multiple selection use CTRL for Windows and use Command for others) and select Spring JPA so we're going to connect to a database by using JPA and Hibernate and select PostgreSQL Driver now that I have selected everything thus we can Generate them.
If you want you can use this link to download the same dependencies as i have.
After download the file, extract it. Next let's go ahead and open this project with IntelliJ.
In IntelliJ File>Open and navigate to your maven project folder and select Pom.xml file then it may ask 'Would you like to open the project?' select Open as Project then Trust the Project . And wait a few seconds to download dependencies which we select in https://start.spring.io
Open up demo folder and then open up pom.xml so in hereyou can see that we have project metadata and then dependencies.
To start an application in demo folder so we have source (src) inside of source we have main and then test (this is where all of the test code goes ) so open up DemoApplicationTest so you see that we have one empty test right there. This is wehere we put all of our testing code .
@SpringBootTest
class DemoApplicationTests {

	@Test
	void contextLoads() {
	}
}
If i open up the Java folder so here here this is where we put our code but more importantly we have DemoApplication. Inside of source folder we have java and resources folders. Inside the resources we have static and templates folder and application.properties.
So application.properties where we configure all the properties for out application as well as environment specific properties you'll see this in a second when we connect to a real database. Then we have static and templates this is when you are doing we development such as working with HTML,Css, JavaScript and all of that good stuff.
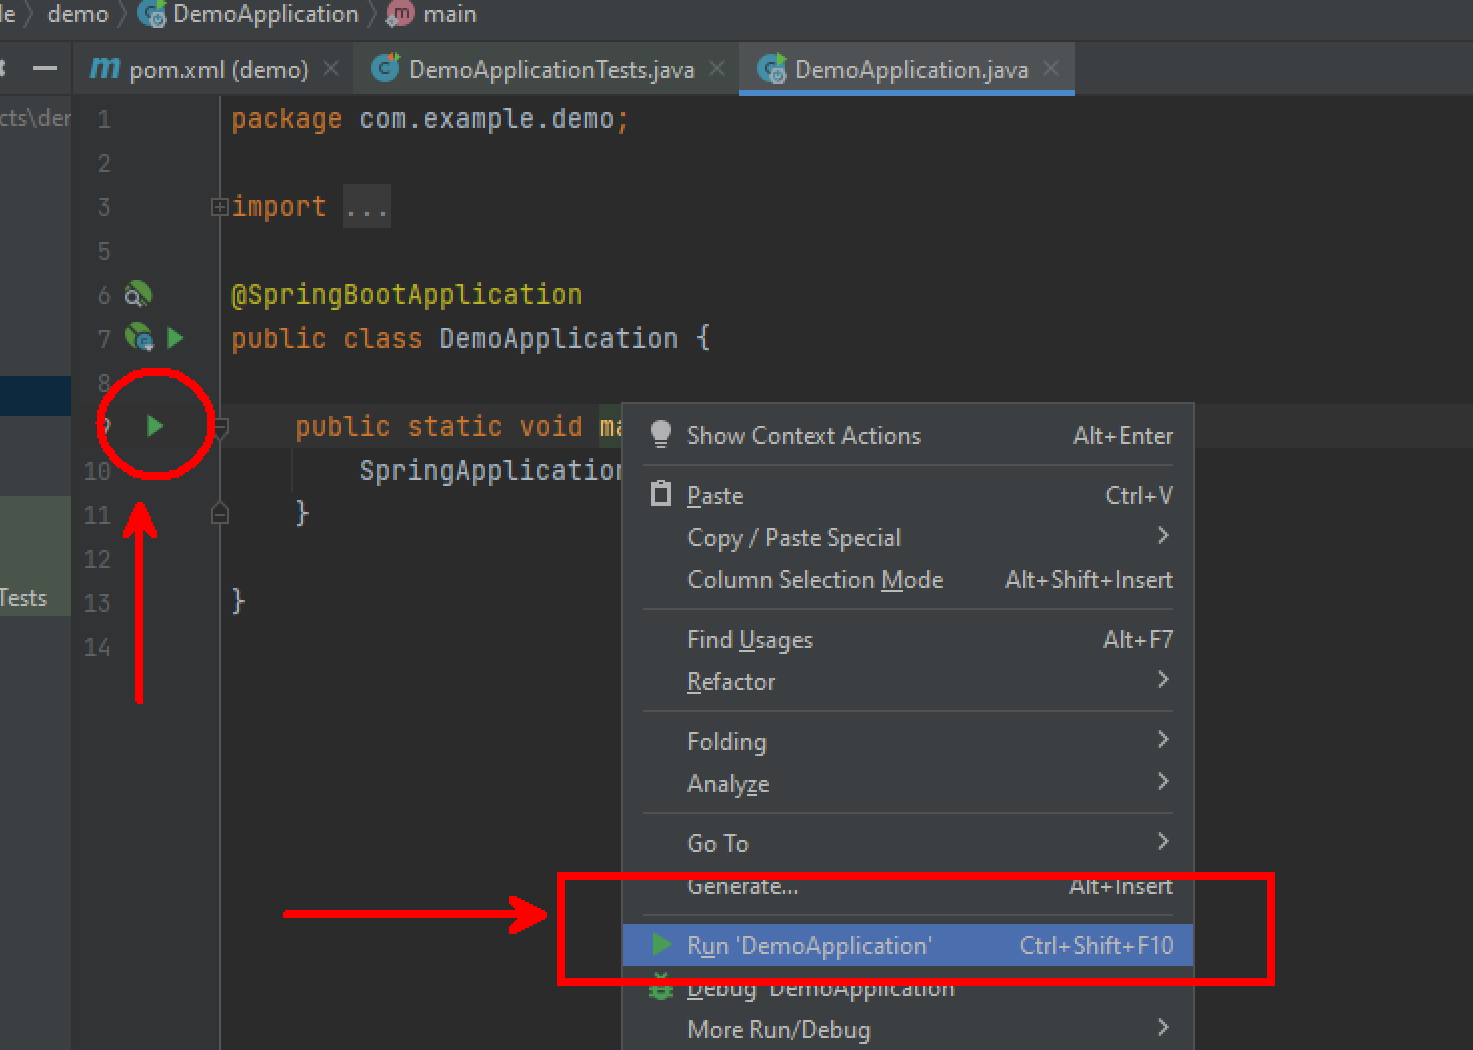
Now open up the DemoApplication,let's actually run the application and you should see run button or you can right click and then Run 'DemoApplication'
This should fail because it will try to connect to a database
***************************
APPLICATION FAILED TO START
***************************

Description:

Failed to configure a DataSource: 'url' attribute is not specified and no embedded datasource could be configured.

Reason: Failed to determine a suitable driver class
I'm going to open up the Pom.xml and where we have the spring-boot-starter-data-jpa and comment this dependency for now.
<!--
<dependency>
			<groupId>org.springframework.boot</groupId>
			<artifactId>spring-boot-starter-data-jpa</artifactId>
</dependency>
-->
After that, right click on the Pom.xml and then Maven and then Reload Project sometimes it might not reload automatically but this make sure that it's actually removing this dependency from here now let's go ahead and start the application and there we go you can see that no errors. We will put this dependency back once we are ready to connect to our database. In the log we can see that tomcat started on 8080 which means that we have a web server up and running and if we try to hit our web server on this port we will get nothing because we haven't implemented any endpoints.
.... : Tomcat started on port(s): 8080 (http) with context pathNext let me go a head and show how easy it is for you to implement a simple RESTful API.
@RestController annotation makes class as a RESTful makes this class to serve rest endpoints
Now we are mark our DemoApplication class as a RESTful then we are going go write a metod which returns String. And mark that metod as @GetMapping
@SpringBootApplication
@RestController
public class DemoApplication {

	public static void main(String[] args) {
		SpringApplication.run(DemoApplication.class, args);
	}
	@GetMapping
	public String hello(){
		return "Hello World";
	}
}
After that If we go to http://localhost:8080, this method returns Hello World as a String. but If we change return type as like List< String > what would happen?
@SpringBootApplication
@RestController
public class DemoApplication {

    public static void main(String[] args) {
        SpringApplication.run(DemoApplication.class, args);
    }

    @GetMapping
    public List<String> hello() {
        return List.of("Hello", "World");
    }
}
If I open up browser again and then reload the page you can see that we have a JSON back
[
    "Hello",
    "World"
]
and basically we did no do anything and we get a Json array out of the box. Obviously we don't want this simple API where we have hello world but we want all of 3 layers as mentioned in introduction.
We are going to create a class to model student and then we're going to give it some attributes and behaviours and then ultimately students will end up in database but for now let's just begin with a simple class represent a student and then implement the student based off everything in our diagram.
Let's take this student right above represent it in a class so that we can start building entire API
- id
- name
- dateOfBirth
- age
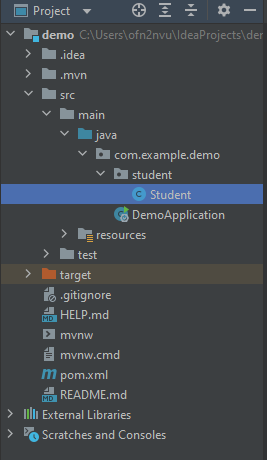
Go back to IntelliJ, first thing we are going to do here is to create package so here I'm going to create package I'm going to name this as student, inside of this package we have to pull every code which is student related so here we need to have the Student class so this will be our model
Now let's go ahead and define attributes and generate the getters and setters and constructors
We create 3 constructors one is for no argumans second is for all of them and third one is without id parameter because database will generate id's for us.
public class Student {
    private Long id;
    private String name;
    private String email;
    private LocalDate dateOfBirth;
    private Integer age;

    public Student() {
    }
    public Student(Long id,
                   String name,
                   String email,
                   LocalDate dateOfBirth,
                   Integer age) {
        this.id = id;
        this.name = name;
        this.email = email;
        this.dateOfBirth = dateOfBirth;
        this.age = age;
    }

    public Student(String name,
                   String email,
                   LocalDate dateOfBirth,
                   Integer age) {
        this.name = name;
        this.email = email;
        this.dateOfBirth = dateOfBirth;
        this.age = age;
    }

    public Long getId() {
        return id;
    }

    public void setId(Long id) {
        this.id = id;
    }

    public String getName() {
        return name;
    }

    public void setName(String name) {
        this.name = name;
    }

    public String getEmail() {
        return email;
    }

    public void setEmail(String email) {
        this.email = email;
    }

    public LocalDate getDateOfBirth() {
        return dateOfBirth;
    }

    public void setDateOfBirth(LocalDate dateOfBirth) {
        this.dateOfBirth = dateOfBirth;
    }

    public Integer getAge() {
        return age;
    }

    public void setAge(Integer age) {
        this.age = age;
    }

    @Override
    public String toString() {
        return "Student{" +
                "id=" + id +
                ", name='" + name + '\'' +
                ", email='" + email + '\'' +
                ", dateOfBirth=" + dateOfBirth +
                ", age=" + age +
                '}';
    }
}
So now we have a class called Student. I'm going to do now is open up DemoApplication and instead of a list of String I'm going to say list of Student and then return new Student with fields.
@SpringBootApplication
@RestController
public class DemoApplication {

    public static void main(String[] args) {
        SpringApplication.run(DemoApplication.class, args);
    }

    @GetMapping
    public List<Student> hello() {
        return List.of(
                new Student(1L,
                        "Asım",
                        "asim@asimkilic.com",
                        LocalDate.of(2001, Month.JANUARY,1),
                        20)
        );
    }
Now let's go ahead and start the server, if I open up web browser now
[
	{
         "id":1,
         "name":"Asım",
         "email":"asim@asimkilic.com",
         "dateOfBirth":"2001-01-01",
         "age":20
    }
]
we have an array of and then objects so our class was converted into a Json object and we have an array surrounded by it.
Now is a perfect time for us to get things done in the proper way so we want to structure our application into this n-tier architechure where we have the API layer, Service layer and then Data Access. We already have the class student let's go ahead and create a class that will serve as the api layer.
Inside of student create a new class which named StudentController this class which will have all of the resources for our api. What we're going to do is remove @RestController annotation from DemoApplication, also cut hello method. and remove all of those unuse imports So DemoApplication would as be first time like we see. Go back to our StudentController and annotate with @RestContoller also we want is to say that this will have a @RequestMapping thus we can pass the path over there and paste that hello metod inside the controller. Instead of hello I'm going to say getStudents, now we have get mapping for our StudentController. Let's start the application.
@RestController
@RequestMapping(path="/api/v1/students")
public class StudentController {

    @GetMapping
    public List<Student> getStudents() {
        return List.of(
                new Student(1L,
                        "Asım",
                        "asim@asimkilic.com",
                        LocalDate.of(2001, Month.JANUARY,1),
                        20)
        );
    }
}
Go back to browser and go to http://localhost:8080/api/v1/students.
[
	{
         "id":1,
         "name":"Asım",
         "email":"asim@asimkilic.com",
         "dateOfBirth":"2001-01-01",
         "age":20
    }
]
The api working but now things are much more organized. Next let's go ahead and create a class that will serve as the business logic for managing students
Api layer should talk to the service layer to get some data and service layer should also talk to the data access layer to get a data so it does a round trip . Client > Api > Service > Data Access and then all the way back.
Now let's move getStudents method from Controller to the Service Layer. So Service Layer is mainly responsible for business logic so we're going to create a new class and then call it StudentService.
What we going to do is we're going to take getStudents method and then put it inside of Service
public class StudentService {
    public List<Student> getStudents() {
        return List.of(
                new Student(1L,
                        "Asım",
                        "asim@asimkilic.com",
                        LocalDate.of(2001, Month.JANUARY, 1),
                        20)
        );
    }
}
and we can go back go controller and here that returns no longer be and instead we have to use the method inside of our student service. Let's have a reference first
private final StudentService studentService;and add it to the constructor. And now we can say return studentService.getStudents() in controller.
@RestController
@RequestMapping(path="/api/v1/students")
public class StudentController {
    private final StudentService studentService;


    public StudentController(StudentService studentService) {
        this.studentService = studentService;
    }

    @GetMapping
    public List<Student> getStudents() {
        return studentService.getStudents();
    }
}
This now is a much better approach. But ideally list is a static list which is in getStudents method in StudentService. We also want this to come from a database but we're going to worry about that in a second. Next let us go ahead and learn about some annotations and dependency injection within spring and spring boot.
In StudentController we are having a reference to StudentService, this is not going to work because we don't have an instance of StudentService . Now the way that this would work is If i was to say equals to new StudentService() like below.
private final StudentService studentService;
public StudentController(StudentService studentService){
    this.studentService=new StudentService();
}
Now this will work but when writing code we should avoid stuff like this and use dependency injection as much as possible. So how do we tell that this StudentService should be injected into that constructor there or anything that we pass into that constructor should be injected. Well we have annotation called @Autowired now we are saying that this StudentService should be autowired for us. So field StudentService is will be magically instantiated for us and then injected into that consturctor and then all of those are work, but now we have to also tell that StudentService is a class that has to be instantiated. It has to be a spring bean.
@RestController
@RequestMapping(path="/api/v1/students")
public class StudentController {
    private final StudentService studentService;

    @Autowired
    public StudentController(StudentService studentService) {
        this.studentService = studentService;
    }

    @GetMapping
    public List<Student> getStudents() {
        return studentService.getStudents();
    }
}
We can use @Component annotation after that when you go back to controller and you should see that studentService doesnt have red underline any more.
@Component
public class StudentService {

    public List<Student> getStudents() {
        return List.of(
                new Student(1L,
                        "Asım",
                        "asim@asimkilic.com",
                        LocalDate.of(2001, Month.JANUARY,1),
                        20)
        );
    }
}
Now Controller know where to find that bean. We used @Component but spring we have annotations that allows us to be more specific so here we don't want this to be just a regular component but we want this to be a service so instead of @Component we can use @Service. @Component and @Service they are the exact same thing but @Service is more for semantics, more for readability. This class is meant to be a service class.
Now we have API Layer talking successfully to the Service Layer and the Service Layer is giving back some data back to the API Layer. Next let's focus on Data Access by connecting to a real database and then store the student inside of the database and then get it back out.
Open up the application.properties in resources folder and write these configurations for database;
spring.datasource.url=jdbc:postgresql://localhost:5432/student
spring.datasource.username=postgres
spring.datasource.password=12345
spring.jpa.hibernate.ddl-auto=create-drop
spring.jpa.show-sql=true
spring.jpa.properties.hibernate.dialect=org.hibernate.dialect.PostgreSQLDialect
spring.jpa.properties.hibernate.format_sql=true
this is the configuration that we need in order to connect to a database.
If you are using Mac easiest way for you to download and install Postgres on a MAC is by installing Postgres.app
So once you have postgres installed we have to create a database and that's what we're going to do next.
Open the terminal and run the command then it will ask you to password for user
PS C:\Users\ofn2nvu> psql -U postgres
password for user postgres:
then create a database with SQL command
postgres=# CREATE DATABASE student;
CREATE DATABASE
postgres=#
If you have user which doesnt have priviliges for all database let him.
postgres=# GRANT ALL PRIVILEGES ON DATABASE "student" TO username
postgres=# GRANT ALL PRIVILEGES ON DATABASE "student" TO postgres;
GRANT
postgres=# \l
Now let's open up IntelliJ and Pom.xml, we commented out dependency of Jpa, I'm going to uncomment and then right click Pom.xml then Maven and Reload Project. Now we can start the application. There we go so we actually connected to our database. You can see the logs. But we dont have any tables yet in our database and thats what I'm going to show you how to do next.
Now we want to do is to take Student class and use spring data jpa to create table inside of our database that we can that then add, delete and basically perform all of the crud operations against our database so to do that is very straightforward with spring boot and spring data jpa.
Open the Student class and map this Student to our database simply type @Entity and then say @Table .
Entity is for hibernate and Table is for the table in our database we also need to say add @Id and then here we're going to generate a sequence with allocation size.
@Entity
@Table
public class Student {
    @Id
    @SequenceGenerator(
            name="student_sequence",
            sequenceName = "student_sequence",
            allocationSize = 1
    )
    @GeneratedValue(
            strategy = GenerationType.SEQUENCE,
            generator = "student_sequence"
    )
    private Long id;
    private String name;
    private String email;
    private LocalDate dateOfBirth;
    private Integer age;
now that we've mapped this student class to a table in our database next let's go ahead start the application and see what is happening under the hood.
So in the logging ;
Hibernate: create sequence student_sequence start 1 increment 1
Hibernate:
create table student (
   id int8 not null,
    age int4,
    date_of_birth date,
    email varchar(255),
    name varchar(255),
    primary key (id)
)
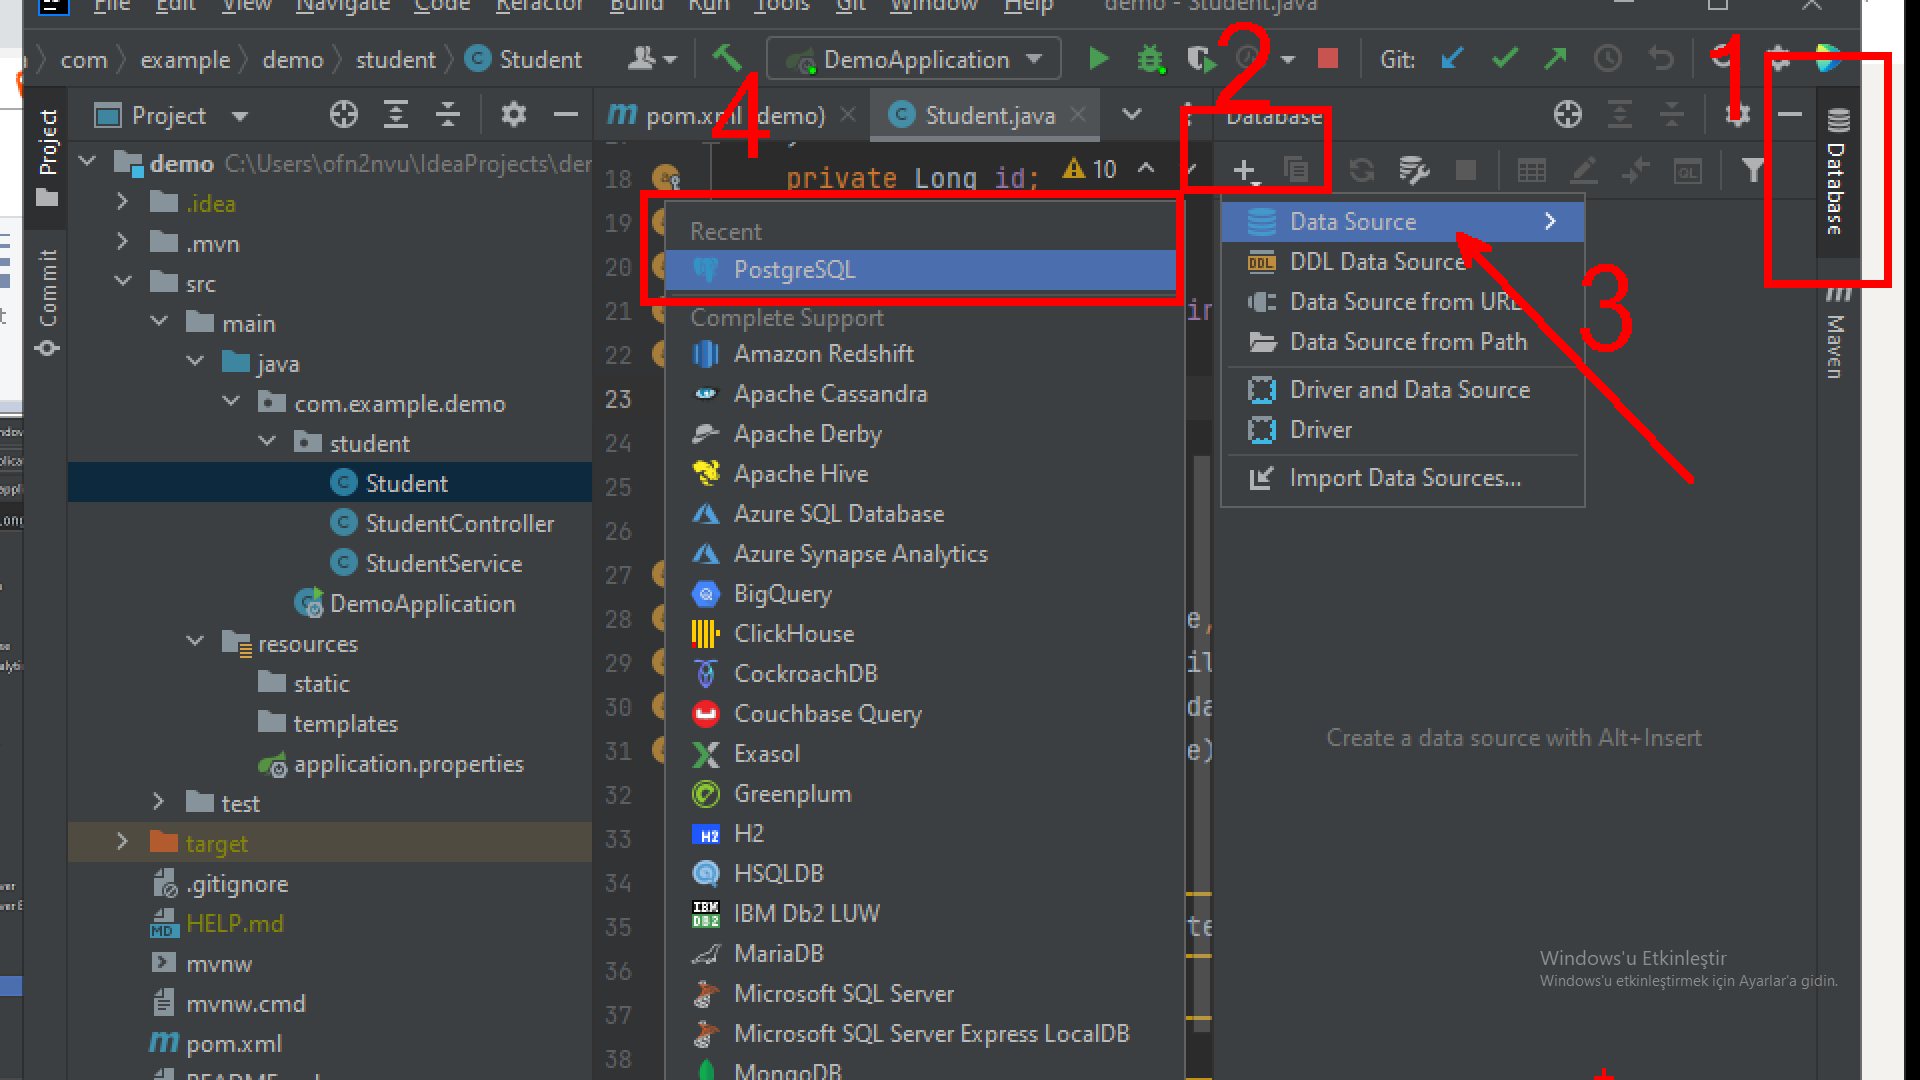
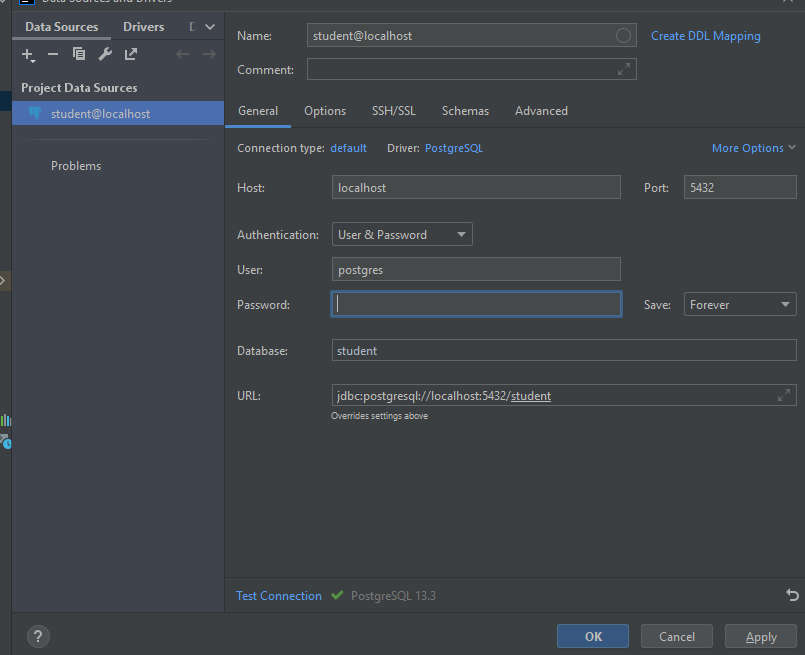
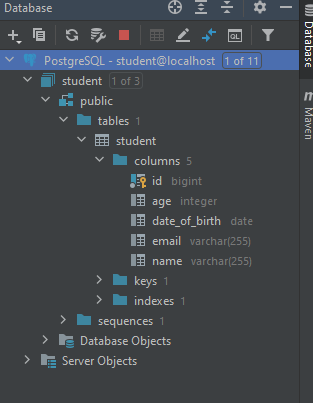
Now I'm going to connect from IntelliJ to database
Apply and OK then we can see our database and tables with columns
Also we can see in powershell as well
                Nesnelerin listesi
  Ìema  |       Ad²        | Veri tipi |  Sahibi
--------+------------------+-----------+----------
 public | student          | tablo     | postgres
 public | student_sequence | sequence  | postgres
(2 sat²r)


student=# \d student
                                      Tablo "public.student"
     Kolon     |       Veri tipi        | S²ralama (collation) | Bo■ (null) olabilir | Varsay²lan
---------------+------------------------+----------------------+---------------------+------------
 id            | bigint                 |                      | not null            |
 age           | integer                |                      |                     |
 date_of_birth | date                   |                      |                     |
 email         | character varying(255) |                      |                     |
 name          | character varying(255) |                      |                     |
¦ndeksler:
    "student_pkey" PRIMARY KEY, btree (id)


student=#
what we are missing now, Data Access Layer. So I'm going to create a interface inside the student package which is StudentRepository, then extend it with JpaRepository<>. JpaRepository would want generic type first one is which Entity would we work and second one is what type is that's Id. And add @Repository annotation to the interface.
@Repository
public interface StudentRepository extends JpaRepository<Student,Long> {
}
We want to use this interface inside of our service. So in StudentService instead of having a static list. We declare
private final StudentRepository studentRepository;then we want to add this to the constructor and then let's also annotate the constructor with @Autowired
@Component
public class StudentService {
private final StudentRepository studentRepository;

    @Autowired
    public StudentService(StudentRepository studentRepository) {
        this.studentRepository = studentRepository;
    }
In the getStudents method if you write studentRepository. you will have bunch of methods there, we have find all we can pass the sorting if you want by id we can save...and you can see a bunch of methods and to be fair we haven't implemented any of these and this is the magic of Spring Data Jpa, so there we're going to say findAll() this returns a list to us.
Now I'm going to create a new class which named StudentConfig and annotate it with @Configuration and in there we want to have Bean. So this bean runs and access to our repository.
@Configuration
public class StudentConfig {
    @Bean
    CommandLineRunner commandLineRunner(StudentRepository repository) {
        return args -> {

            Student asim = new Student(
                    "Asım",
                    "asim@asimkilic.com",
                    LocalDate.of(2001, Month.JANUARY, 1),
                    20);
            Student abdullah = new Student(
                    "Abdullah",
                    "abdullah@abdullah.com",
                    LocalDate.of(2004, Month.JANUARY, 1),
                    21);
            repository.saveAll(List.of(asim, abdullah));
        };
    }
}
It will execute SQL command for save when we start the application.
Before we implement the post method that will allows us to save new students into our database. I want to do is take care of age basically i don't want age to be stores in our database because we can calculate that based of the date of birth.
In the Student class mark Age field as @Transient this annotation basically do there is no need for you to be a column in our database so which means that age will be calculated for us, remove age also in constructors then calculate the age in the getAge()
 public Integer getAge() {
return
    Period.between(this.dateOfBirth, LocalDate.now()).getYears();
}For our post request we want to send data to our server and we want to check whether the email exists if it does not then we save the student to our database if the email is taken we want to throw an exception.
Inside of StudentController let's implement the Post method. Post is used when you want to add new resources to your system in our case we want to add a new student.
So the Json which is coming from client we want to map that into the Student by taking it from the @RequestBody
@PostMapping
    public void registerNewStudent(@RequestBody Student student){
        studentService.saveNewStudent(student);
    }
There is no saveNewStudent method in StudentService thus focus saveNewsSudent and then press ALT + Enter and select create method for us or basically you can go to StudentService and add method this method manually.
 public void saveNewStudent(Student student) {

    }
In StudentService we can perform some business logic and what we want first is to open up the repository and we want to have a custom function here that will find a user by email.
@Repository
public interface StudentRepository extends JpaRepository<Student,Long> {

    Optional<Student> findStudentByEmail(String email);
}
then in the StudentService
   public void saveNewStudent(Student student) {
        Optional<Student> studentOptional = studentRepository.findStudentByEmail(student.getEmail());
        if (studentOptional.isPresent()) {
            throw new IllegalStateException("email taken");
        }
        studentRepository.save(student);
    }
It will check email is taken or not, then if it doesn't then it will save or throw an exception
If we want to see error messages in the response body we have to add some configuration in application.properties.
server.error.include-message=alwaysIn StudentController
    @DeleteMapping(path = "{studentId}")
    public void deleteStudent(@PathVariable("studentId") Long studentId){
    studentService.deleteStudent(studentId);
    }
In StudentService first we have to check is it exist or not then delete it.
    public void deleteStudent(Long studentId) {
        boolean exists = studentRepository.existsById(studentId);
        if (!exists) {
            throw new IllegalStateException("student with id " + studentId
                    + " does not exists");
        }
        studentRepository.deleteById(studentId);
    }
Put is used when you want to update a resource in your system in our case we want to update name and email so for this exercise what I'm going to do is to have a method like
@Transactional
public void updateStudentin your service class and then use @Transactional annotation which we haven't learned about it but by using this annotation, it means that you don't have to implement any jpql query so you can use the setters from your entity that you get back to check whether you can or cannot update and then you can use the setters to automatically update the entity in your database again use the setters to update the entity when it's possible. So go ahead and try and write some business logic for this exercise.
We added this method in Controller
    @PutMapping(path="{studentId}")
    public void updateStudent(
            @PathVariable("studentId") Long studentId,
            @RequestParam(required = false) String name,
            @RequestParam(required = false) String email){
        studentService.updateStudent(studentId,name,email);
    }
In Service
  @Transactional
    public void updateStudent(Long studentId, String name, String email) {
        Student student = studentRepository.findById(studentId).orElseThrow(() -> new IllegalStateException(
                "student with id " + studentId + " does not exists"
        ));
        if (name != null && name.length() > 0 && !Objects.equals(student.getName(), name)) {
            student.setName(name);
        }
        if (email != null && email.length() > 0 && !Objects.equals(student.getEmail(), email)) {
            Optional<Student> studentOptional = studentRepository.findStudentByEmail(email);
            if (studentOptional.isPresent()) {
                throw new IllegalStateException("email taken");
            }
            student.setEmail(email);
        }
    }
We write there some business logic but we didnt use any Repository methods nevertheless it works because of @Transaction, setters save automatically.
Now let's go ahead and learn how to take our API produce a jar that we can run multiple instances of our application. Let's go back to IntelliJ and if you see target folder in solution delete it.
Once you deleted open up maven tab and then you can clean the project first this will get rid of the target folder and then install the application and make sure your database is up and running so install and this will validate, compile, test, package, verify, and then inside we're going to have the jar file which we can then run manually. Then we would have the target folder now inside of this target folder if we expand this we can see that we have demo and basically ....SNAPSHOT.jar so this is what we are insterested in let's open up the terminal in IntelliJ and then you can see that i'm inside of demo so i can navigate the target
PS C:\Users\ofn2nvu\IdeaProjects\demo> cd target/
PS C:\Users\ofn2nvu\IdeaProjects\demo\target>
now we can run our application from here then I'm going to say
PS C:\Users\ofn2nvu\IdeaProjects\demo\target> java -jar .\demo-0.0.1-SNAPSHOT.jar
and then basically the application now is up and running so which means that i can navigate to localhost so if I open up my web browser http://localhost:8080/api/v1/student we would see application is running correctly.
Now we've run one instance if you want to run a different instance it is completely up to you and you can run as many as you want but you need to specify the port so.
If I press Ctrl + C it would shutdown the application and If you want to run for example the application on a different port just run the same command and then you can say --server.port=8081 for example
PS C:\Users\ofn2nvu\IdeaProjects\demo\target> java -jar .\demo-0.0.1-SNAPSHOT.jar --server.port=8081there you have it. Now know how to package up your application and then from a jar spin up and instance that contains your application basically from now on you can basically take the jar you can deploy it to a server or you can dockerize it you can pretty much do anything you want with your jar file to deploy it for real users to use your application.

