This tutorials shows how you can use Qt for Python – still often (mostly) referred as PySide2 – to build a desktop app with Python 3.
It covers the whole workflow:
- setting up Qt for Python,
- creating the Qt application and simple dialogs,
- loading a Qt Designer
.uifile with a complex dialog, - creating an executable package you can distribute for Windows, Mac and Linux.
This tutorial is based on PyQt5 tutorial: Learn how you can create a Python GUI in 2018 by Michael Hermann.
Qt for Python is a library that lets you use the Qt GUI framework to create desktop applications from Python.
While Qt for Python is the official set of Python bindings for Qt, its latest release is still labelled as technical preview. Historically, a separate project has existed for many years and is to be considered more mature PyQt5.
The two libraries have an almost identicall API – both mimicking closely the Qt original API – the main difference being the license: Qt for Python is LGPL (and has the same license as Qt) and PyQt5 is GPL.
This tutorial presents Qt for Python, the original tutorial by Michael Hermann presents PyQt5.
The best way to create Python application that use packages and modules that don't come as part of the standard library is via a virtual environment.
Virtual environments make it easy to enclose in a directory all dependencies of your project, without affecting the rest of the system.
To create a virtual environment as a sub directory of your project directory, execute the following command
python3 -m venv venv
This creates a venv directory where you will find all the libraries you sintall with pip.
Whenever you work on the code in this tutorial, you need to activate the virtual environment.
On Linux and Mac, activate the virtual environment with:
source venv/bin/activateOn Windows with:
call venv/scripts/activate.batWhen the virtual environment is active you will see the venv prefix in your shell:

Of course, you can pick any name you like for the virtual environment, venv is just a common used name.
When the virtual environment is active, you can install Qt for Python locally to your project:
pip install PySide2As mentioned in the introduction, while the official name is "Qt for Python", currently you still mostly have to use the old name: PySide2.
This applies for both the pip package, the name of the library you import and the search keywords, when you're looking for help.
If you're using an IDE like PyCharm, by default it will create a virtual environment for each project and – in the project's configuration – gives you an interface for adding the PySide2 module.
Time to write your first desktop application.
In the directory created by venv write the following Python file:
from PySide2.QtWidgets import QApplication, QLabel

app = QApplication([])
label = QLabel('Hello World')
label.show()
app.exec_()
With the virtual environment still active, you can run the program and you will see an "Hello World" window:

How does it work? Let's dissect the 5 lines above, one line at a time.
First we tell Python to load the QApplication and QLabel modules from the Qt for Python library (yes, PySide2...).
from PySide2.QtWidgets import QApplication, QLabelNext, we create the app, a QApplication:
app = QApplication([])Every Qt program must have exactly one instance of QApplication.
QApplication expects the command line arguments to be passed as argument: since we don't have any, we pass an empty array ([]).
A label is a text to be shown in the window:
label = QLabel('Hello World')You can guess now, why there can be only QApplication: you don't need to manually link QLabel to your app, this is done by Qt.
Since the label acts acts as a window, we have to tell Qt to show it:
label.show()Finally, we hand the control over to Qt and ask it to "run the application until the users quits it":
app.exec_()Congratulations, you've built your first desktop app with Python and Qt.
Everything you see in a Qt app is a widget: windows, dialogs, labels, buttons, progress bars, etc.
Widgets are often nested: for example, a dialog can contain a button, which in turn contains a label.
This screenshot shows the most common Qt widgets:

Top-to-bottom, left-to-right, they are:
- QLabel
- QComboBox
- QCheckBox
- QGroupBox
- QRadioButton
- QPushButton
- QTabWidget
- QTableWidget
- QLineEdit
- QSpinBox
- QDateTimeEdit
- QSlider
- QDial
- QProgressBar
There is one thing that you cannot directly see in the "widgets showroom" above, but still can guess: the layouts.
The whole window is defined as a vertical layout, where each row has an horizontal layout.
For complex layouts like the one above, Qt provides the Qt Designer application, that produces .ui files that can be loaded in Qt for Python.
We will have a look at the .ui files later. First we have a look at how the layout can be created and used directly in the Python code.
We create a simple dialog with two buttons vertically stacked:
from PySide2.QtWidgets import QApplication
from PySide2.QtWidgets import QDialog, QVBoxLayout, QPushButton

app = QApplication([])
dialog = QDialog()

layout = QVBoxLayout()
layout.addWidget(QPushButton('Top'))
layout.addWidget(QPushButton('Bottom'))
dialog.setLayout(layout)
dialog.show()
app.exec_()
As in previous example, we first create an app, then a dialog that will contain two buttons.
Since we want the buttons, to be automatically placed on top of each other, we create a layout of type QVBoxLayout and add the two buttons into it.
Using a QHBoxlayout would automatically put the buttons next to each other. You can try it!
Finally, we tell the dialog to use the layout we have defined, show it and run the application.
Qt uses signals to let the application react to events such as the user clicking a button. In the following example,
- When clicking on the "Alert" button, an message pops up with the content of the input field in the dialog.
- The application quits as soon the "Quit" button is clicked.
from PySide2.QtWidgets import QApplication
from PySide2.QtWidgets import QDialog, QMessageBox, QVBoxLayout
from PySide2.QtWidgets import QPushButton, QLineEdit

app = QApplication([])
dialog = QDialog()

def on_alert_clicked():
    global text_field
    alert = QMessageBox()
    alert.setText(text_field.text())
    alert.exec_()

layout = QVBoxLayout()
text_field = QLineEdit()
alert_button = QPushButton('Alert')
quit_button = QPushButton('Quit')
layout.addWidget(text_field)
layout.addWidget(alert_button)
layout.addWidget(quit_button)
dialog.setLayout(layout)

alert_button.clicked.connect(on_alert_clicked)
quit_button.clicked.connect(quit)

dialog.show()
app.exec_()
As in the previous example, we are laying out the widgets in a vertical layout.
This time, we are first creating the buttons and in a second step we add them to the layout. By doing it in two steps, we have an object that we can further use in our code to set the action to be performed by the buttons.
For the "Alert" button we create a on_alert_clicked function that reads the value of the text_field input field and we connect it to the clicked signal of the alert_button.
Then we simply connect the click signal of the "Quit" button with the quit function defined by QApplication.
As we have seen in the "signals" example, as soon as the the widgets interact, we need them to see each other. In the example above, we have done it by marking text_field as global.
A better solution is to encapsulate the dialog in a class:
from PySide2.QtWidgets import QApplication
from PySide2.QtWidgets import QDialog, QMessageBox, QVBoxLayout
from PySide2.QtWidgets import QPushButton, QLineEdit

class Dialog(QDialog):
    def __init__(self, parent = None):
        super(Dialog, self).__init__(parent)

        self.text_field = QLineEdit()
        self.alert_button = QPushButton('Alert')
        self.quit_button = QPushButton('Quit')

        layout = QVBoxLayout()
        layout.addWidget(self.text_field)
        layout.addWidget(self.alert_button)
        layout.addWidget(self.quit_button)
        self.setLayout(layout)

        self.alert_button.clicked.connect(self.alert)
        self.quit_button.clicked.connect(quit)

    def alert(self):
        alert = QMessageBox()
        alert.setText(self.text_field.text())
        alert.exec_()

if __name__ == '__main__':
    app = QApplication([])
    dialog = Dialog()
    dialog.show()
    app.exec_()
Here, we create our own Dialog class that extends the QDialog provided by Qt: the code is very similar to the previous example, but now the buttons and the input fields belong to the same context and can access each other.
You will have noticed that we only create the application if __name__ = '__main__'. Trough this cryptic condition we make sure that the application is only started when the program is directly run and not imported as a library.
If you have used other GUI frameworks in the past, you could problaby appreciate the compactness and readability of the code we have present until now. But – as you can probably guess – creating a dialog like the one we have seen in the Qt Widgets chapter will lead to a long list of trivial instantiation of widgets.
Here is where Qt Designer comes to our rescue.
Qt Designer is part of Qt Creator, the IDE for the C++ Qt. The IDE itself is not really geared towards writing Python code, but you can use Qt Designer as a standalone for creating layouts for the Python applications.
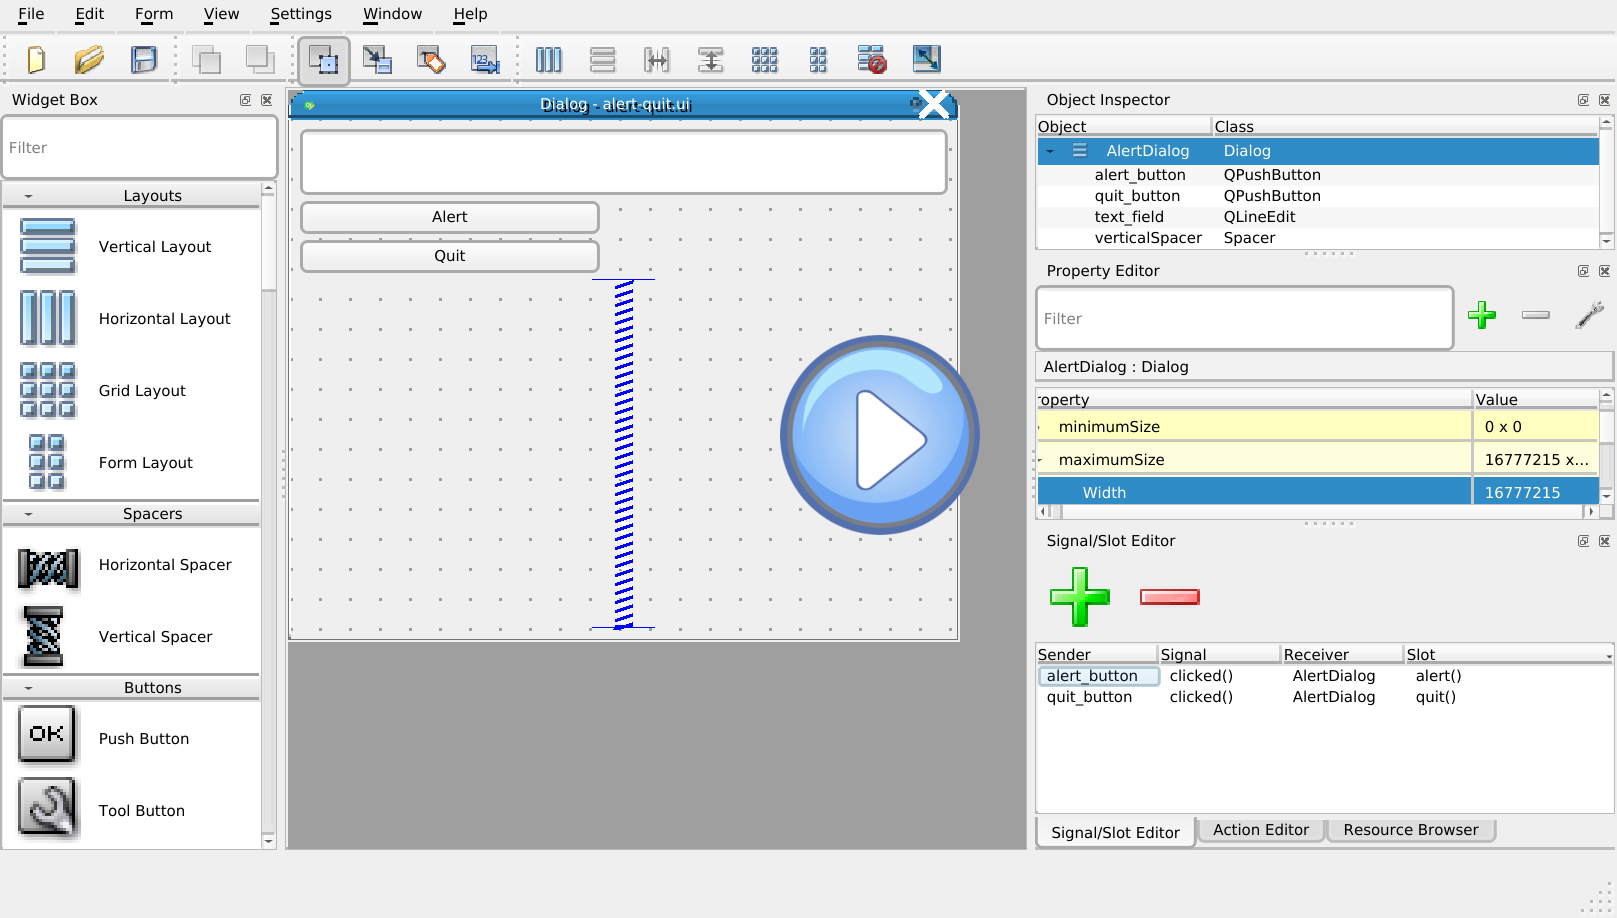
In a first exemple, we create the same dialog as above:
- Open Qt Designer as a standalone application and create a file with the template "Dialog without Buttons".
- Pull two "Push Buttons" and a "Line edit" into the dialog.
- Right click on the dialog's background and set its layout to the vertical one.
- Rename the widgets to
text_field,alert_button,quit_buttonand set buttons labels to "Alert" and "Quit". - Reduce the maximum size of the buttons to 100.
- Add a vertical spacer below the three widgets.
- Rename the dialog to "AlertDialog" (the name in the
.uifile cannot be the same as the name of the class you create in your code). - Add the signals by activating the "Signal" mode, pulling the new signals from the buttons into the background and defining the two new signals
alert()andquit(). - Save the file as
alert-quit.ui.
There is one step, that Qt Designer does not implement. You have to open the alert-quit.ui file with a text editor and modify its fourth line from
<widget class="QDialog" name="AlertDialog">to
<widget class="Dialog" name="AlertDialog">At first sight, these steps might seem a bit cumbersome. Luckily, integrating the .ui file in Python is pretty easy:
from PySide2.QtWidgets import QApplication
from PySide2.QtWidgets import QDialog, QMessageBox
from PySide2.QtCore import QFile, Slot
from PySide2.QtUiTools import QUiLoader

class Dialog(QDialog):
    def __init__(self, parent = None):
        super(Dialog, self).__init__(parent)

    @Slot()
    def alert(self):
        alert = QMessageBox()
        alert.setText(self.text_field.text())
        alert.exec_()

    @Slot()
    def quit(self):
        quit()

if __name__ == '__main__':
    app = QApplication([])

    loader = QUiLoader()
    loader.registerCustomWidget(Dialog)

    base_dir = os.path.dirname(os.path.realpath(__file__))
    dialog = loader.load(os.path.join(base_dir, 'alert-quit.ui'))
    dialog.show()

    app.exec_()
TODO:
-
show, how to embed the widgets examples and let it switch style.
-
you can also load partial widgets (to be added to your class):
from PySide2.QtWidgets import QApplication
from PySide2.QtUiTools import QUiLoader
app = QApplication([])
dialog_ui = QUiLoader().load("list-of-buttons.ui")
dialog_ui.show()
app.exec_()
-
the official page: https://wiki.qt.io/Qt_for_Python_UiFiles
-
have a look at: https://stackoverflow.com/questions/4442286/python-code-generation-with-pyside-uic
-
when directly loading an
.uifile, it seems impossible to get all the files in a package.
Up to the need for the small manual editing in the .ui file, using QUILoader is a good solution. Sadly, it produces code that is not compatible with most packagers. If you want to distribute your program to other people who simply want to click on an executable, you should prefer the older external pre-processing of the .ui file.
With the pyside2-uic tool (automatically installed with PySide2), you can convert the .ui file in a Python module:
$ pyside2-uic -o ui_alert_quit.py alert-quit-uic.uiNow, you can import the dialog as you would do with any other module:
from PySide2.QtWidgets import QApplication
from PySide2.QtWidgets import QDialog, QMessageBox
from PySide2.QtCore import Slot

from ui_alert_quit import Ui_AlertDialog

class Dialog(QDialog, Ui_AlertDialog):
    def __init__(self, parent = None):
        super(Dialog, self).__init__()
        self.setupUi(self)
        self.text_field.setText("Hey!")

    @Slot()
    def alert(self):
        alert = QMessageBox()
        alert.setText(self.text_field.text())
        alert.exec_()

    @Slot()
    def quit(self):
        QApplication.quit()


if __name__ == '__main__':
    app = QApplication([])

    dialog = Dialog()
    dialog.show()

app.exec_()- the manual for pyqt5: http://pyqt.sourceforge.net/Docs/PyQt5/designer.html
"If you want to find things, indipendently of where they are in the filesystem"
<!DOCTYPE RCC><RCC version="1.0">
<qresource prefix="/forms">
    <file>myform.ui</file>
</qresource>
</RCC><!DOCTYPE RCC><RCC version="1.0">
<qresource>
<file>images/copy.png</file>
<file>images/cut.png</file>
<file>images/new.png</file>
<file>images/open.png</file>
<file>images/paste.png</file>
<file>images/save.png</file>
</qresource>
</RCC>that's the missing file in https://doc.qt.io/qtforpython/overviews/resources.html
- ./lib/python3.6/site-packages/PySide2/pyside2-rcc
- https://doc.qt.io/qtforpython/overviews/resources.html
import ui.myResources as myResources_rc- https://doc.qt.io/qtforpython/PySide2/QtCore/QResource.html#PySide2.QtCore.QResource
When the program runs on a Mac Os or Windows system, you might want it to use the a style that is closer to the native one, rather than use the typical Qt style.
You can use setStyle to modify the look and feel of the widgets demo dialog:
from PySide2.QtWidgets import QApplication
app = QApplication([])
app.setStyle('Fusion')
# ...
The available styles are: "windows" (Windows only), "windowsvista" (Windows only), "fusion", and "macintosh" (OS X only).
And while we're at it: if we recreate with Qt Designer the dialog demoing the Qt Widgets...
... despite having that many widgets, the Python code remains very compact:
import os
from PySide2.QtWidgets import QApplication
from PySide2.QtWidgets import QDialog, QMessageBox
from PySide2.QtCore import QFile, Slot
from PySide2.QtUiTools import QUiLoader

class Dialog(QDialog):
    def __init__(self, parent = None):
        super(Dialog, self).__init__(parent)

    def setup(self):
        for s in ['fusion', 'macintosh', 'windows', 'windowsvista']:
            self.comboBox.addItem(s)
        self.comboBox.currentIndexChanged.connect(self.setStyle)
        for r in range(0, 4):
            self.tableWidget.insertRow(0)
            self.tableWidget.insertColumn(0)
    def setStyle(self) :
        app.setStyle(self.comboBox.currentText())

if __name__ == '__main__':
    app = QApplication([])

    loader = QUiLoader()
    loader.registerCustomWidget(Dialog)

    base_dir = os.path.dirname(os.path.realpath(__file__))
    dialog = loader.load(os.path.join(base_dir, 'widgets.ui'))
    dialog.setup()
    dialog.show()

app.exec_()?
You can change the appearance of the widgets via style sheets. This is Qt's analogue of CSS.
- List of all properties that can be set: http://doc.qt.io/qt-5/stylesheet-reference.html#list-of-properties
- Seventeen CSS 2.1 color names are available.
TODO: to be redacted
If you want to distribute your programs written with Python and PySide, each user will have to install all the dependencies.
- https://build-system.fman.io/
- pip install fbs PyInstaller==3.3.1
pip install pyinstaller
pyinstaller main.py- Supports Linux, Mac, and Windows but is not a cross-compiler.
- https://pyinstaller.readthedocs.io/en/stable/
- PyInstaller is GPL but can be used to package application under any license.
$ pyinstaller --onefile --windowed widgets.pydoes work but:
- you have to explicitely import
PySide2.QtXmlby editing thewidgets.specfile created bypyinstalleron its first run and - you have to copy
widgets.uinext to the executable.
You can add both options in the command line:
$ --hidden-import "PySide2.QtXml" --add-data "widgets.ui:."or by editing the widgets.spec file:
datas=[('widgets.ui', '.')],
hiddenimports=['PySide2.QtXml'],
This works for QtXml, but the ui file still cannot be found.
- it does not work with a relative path either.
- the script using the ui converted through
pyside2-uicseems to be correctly packaged.
pip install nuitkapython -m nuitka --standalone --follow-imports main.py
or (at least for windows)
python -m nuitka --recurse-all --portable main.py
- http://nuitka.net/
- Supports Linux, Mac, and Windows but is not a cross-compiler.
- status of the tests
pylibui, Python bindings for libui
get and compile libui
$ git clone https://github.com/andlabs/libui/
$ cd libui
$ mkdir build
$ cd build
$ cmake ..
$ make
Get pylibui
$ git clone https://github.com/joaoventura/pylibuiCopy the pylibui directory inside of your project.
Copy the content of the libui's build/out directory into the pylibui shared libraries:
$ mkdir pylibui/libui/sharedlibs/
$ cp out/* pylibui/libui/sharedlibs/
Does not work with pyinstaller:
$ pyinstaller --onefile --windowed hello-world-libui.pynor
$ pyinstaller --onefile --add-binary=pylibui/libui/sharedlibs/libui.so --windowed hello-world-libui.py- Projets and tutorials for building desktop GUI applications in Python
- Create Simple GUI Applications: Quick, awesome applications in Python with Qt (you can buy it here.
- More on signals and slots: https://wiki.qt.io/Qt_for_Python_Signals_and_Slots
- https://news.ycombinator.com/item?id=18067684
- Modify the bash prompt:
$PS1="${debian_chroot:+($debian_chroot)}\[\033[01;32m\]\u\[\033[00m\]:\[\033[01;34m\]\w\[\033[00m\]\$" - Play button: https://openclipart.org/detail/164047/blue-play-button-pressed-down
- loading qrc files (resources)
- for now i've not found any way to do it.
- https://techartjourney.wordpress.com/2018/05/12/pyside2-compile-resource-file-qrc-for-maya-2018/
- https://www.ics.com/blog/we-ported-qt-app-c-python-heres-what-happened