
Application deployed on Heroku: https://easy-lib.herokuapp.com/
To start locally, use the npm script start_local, which loads environment variables from the .env file. Ideally, passwords in the .env file should not be reveled publicly, therefore the file should not be put in the repository. However, people should be able to easily re-create it starting from the .env.example file.
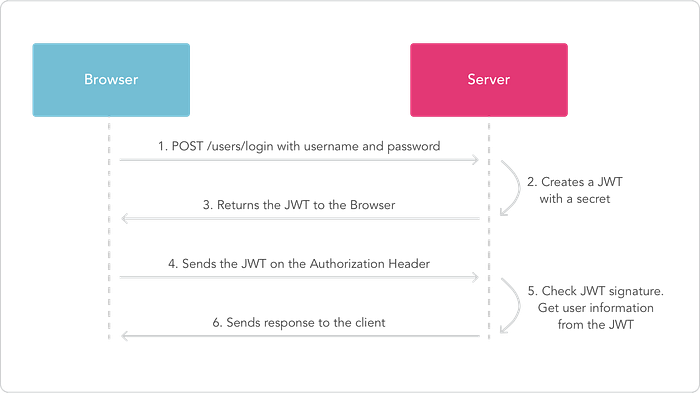
> npm run start_localhttps://medium.com/@technospace/understanding-json-web-tokens-jwt-a9064621f2ca
Use this to manually encode and decode a token:
Implementation in EasyLib:
app.post('/api/v1/authentications', async function(req, res) {

	// find the user
	let user = await Student.findOne({ email: req.body.email }).exec();

	// user not found
	if (!user)
        res.json({ success: false, message: 'Authentication failed. User not found.' });

	// check if password matches
	if (user.password != req.body.password)
		res.json({ success: false, message: 'Authentication failed. Wrong password.' });

	// if user is found and password is right create a token
	var token = jwt.sign({ email: user.email }, process.env.SUPER_SECRET, { expiresIn: 86400 });

	res.json({
		success: true,
		message: 'Enjoy your token!',
		token: token
	});

});
}
File tokenChecker.js:
const tokenChecker = function(req, res, next) {

	// check header or url parameters or post parameters for token
	var token = req.body.token || req.query.token || req.headers['x-access-token'];

	// if there is no token
	if (!token) {
		return res.status(401).send({
			success: false,
			message: 'No token provided.'
		});
	}

	// decode token, verifies secret and checks exp
	jwt.verify(token, process.env.SUPER_SECRET, function(err, decoded) {
		if (err) {
			return res.status(403).send({
				success: false,
				message: 'Failed to authenticate token.'
			});
		} else {
			// if everything is good, save to request for use in other routes
			req.loggedUser = decoded;
			next();
		}
	});

};

module.exports = tokenChecker
To protect endpoints, we can put the tockenChecker.js middelware before all route handlers that we want to protect:
app.use('/api/v1/authentications', authentication);
...
// requests handled until here are not authenticated
app.use('', tokenChecker);
// request with no valid token stop here
// requests that goes through the tokenChecker have the field `req.loggedUser` set to the decoded token
Or we can protect specific endpoints, by associating the tockenChecker with specific url:
app.use('/api/v1/booklendings', tokenChecker);
...
// only requests matching '/api/v1/booklendings' have been authenticated by the tokenChecker
app.use('/api/v1/booklendings', booklendings);
// Requests on '/api/v1/students' are not authenticated
app.use('/api/v1/students', books);
https://livecodestream.dev/post/2020-08-11-a-practical-guide-to-jwt-authentication-with-nodejs/
Environment variables are used to:
- Remove password and private configurations from the code;
- Manage different configurations for different execution environments.
Locally, environment variables can be set at system level or passed in the command line:
> PORT=8626 node server.jsAlternatively, environment variables can be managed in a .env file, which ideally should not be put under version control. However, it is useful to provide a .env.example file with the list of all variables.
The .env file can be pre-loaded using the dotenv module.
> npm install dotenv
> node -r dotenv/config server.js
A script can be defined in the package.json:
scripts: {
    "test": "jest",
    "start": "node index.js",
    "start_local": "node -r dotenv/config server.js"
}
It can be run by:
> npm run start_localhttps://stackoverflow.com/questions/48033841/test-process-env-with-jest
When using Jest locally, a setup file can be used to load variablem from .env file with dotenv.
Jest configuration file setEnvVars.js:
require("dotenv").config()The setupFiles option can be specified in jest.config.js or directly in the package.json.
https://jestjs.io/docs/en/configuration#setupfiles-array
On Heroku, TravisCI, or other cloud services, it is possible to manually set env variables.
- Heroku https://devcenter.heroku.com/articles/config-vars
- TravisCI https://docs.travis-ci.com/user/environment-variables/
When HerokuCLI is used to run the app locally, it automatically load env variables from .env file.
https://devcenter.heroku.com/articles/heroku-local#copy-heroku-config-vars-to-your-local-env-file
> heroku local web