Please do not supply your name or email address in this document. We're doing our best to remain unbiased.
October 13th, 2021.
Need to deploy locally.
7-8 hours
I am assuming we are free to make some changes if needed in the Gemfile, as I had to upgrade puma version to enable ssl.
In a real world environment I would have used the Dockerfile to create an image and push to our internal container repo. Then use that image in a Kubernetes Deployment with atleast 2 replicas to support high availability. Then create a ClusterIP service to expose it internal to the cluster. And then to access it via the outside world, create an ingress controller like nginx to route the requests to this service.
Documented this in the later section.
Take a clone of this repo and go inside the cloned directory:
$ git clone https://github.com/ankur512512/think.git
$ cd thinkFor the Development purposes, I have enhanced the docker-compose stack further by using the Logging feature which will utilise fluentd to forward logs to kibana.
Go to development folder and you will see all the required files there, then use docker-compose command to get everything up and running in single shot:
$ cd development
$ docker-compose up -d --build
Give it some time, it will automatically build and run your required images. Once ready, go to https://localhost:3000/.
You will get a certificate warning because we are using self-signed certificate. Ignore that, click on Advanced and proceed to the application and you will see something like this:

Hit it a few more times to generate some logs that we can see in Kibana.
Now go to this link:
http://localhost:5601/app/management/kibana/indexPatterns
And you will see something like this:
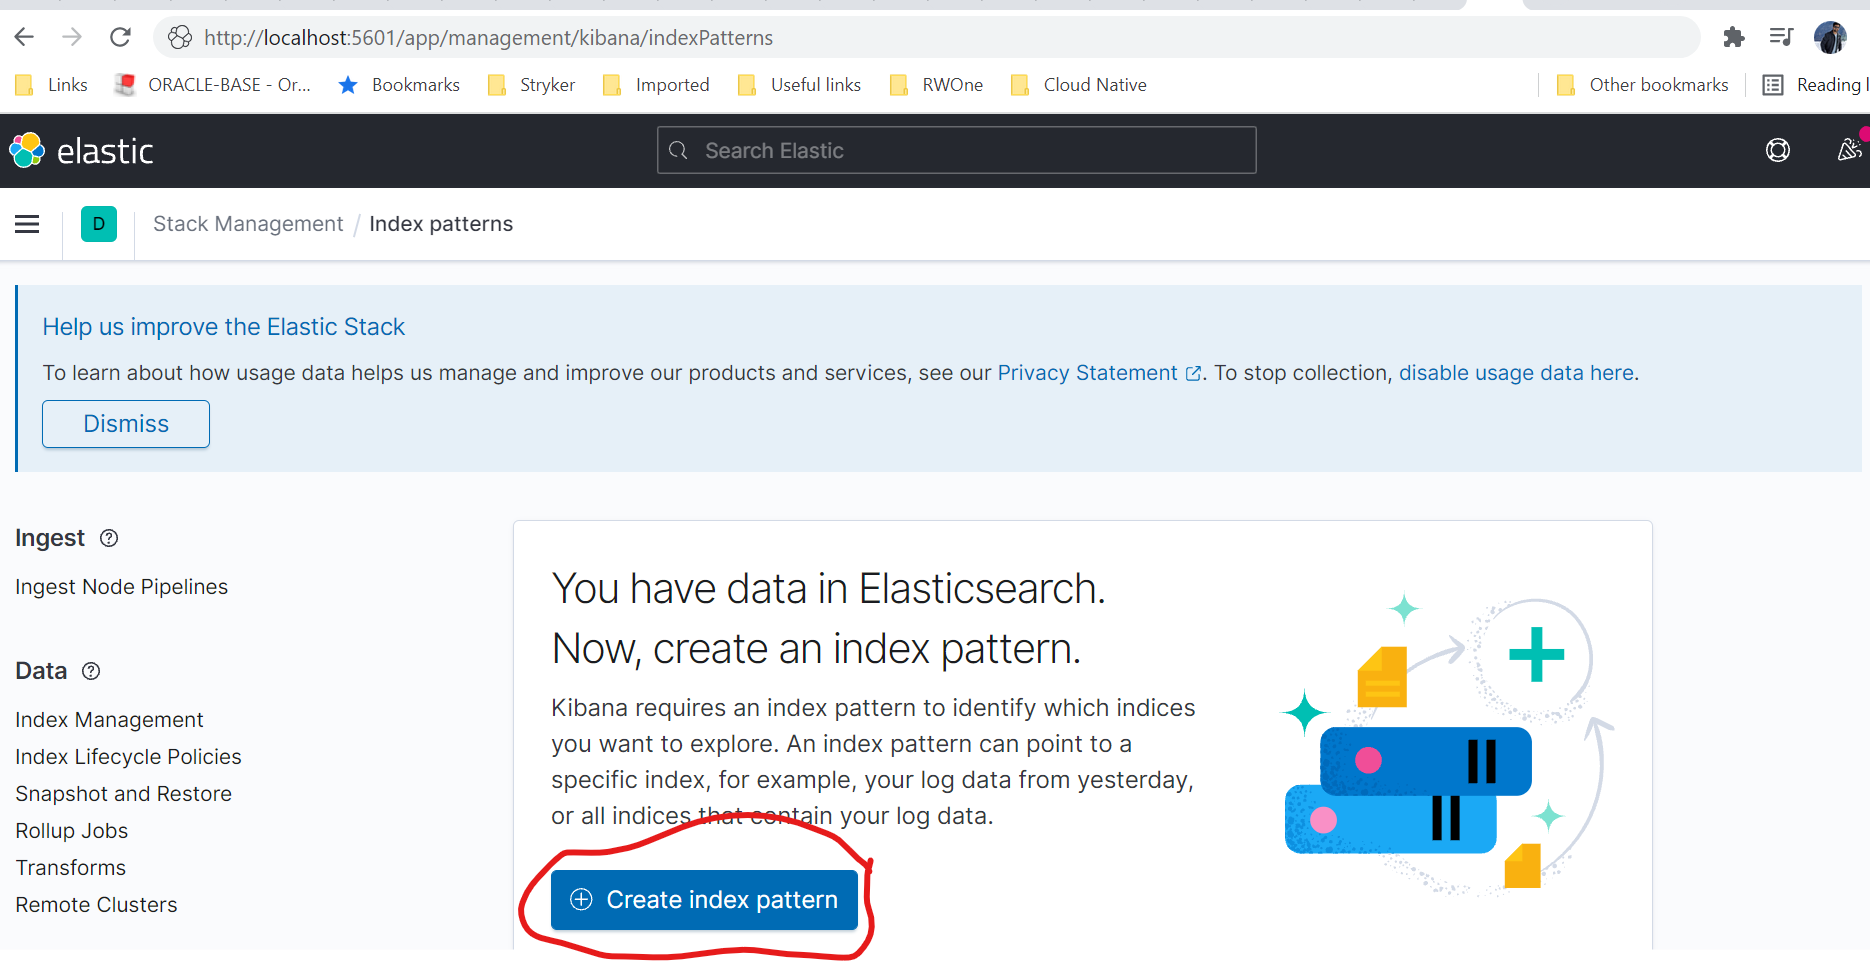
Click on Create Index Pattern and then in the index pattern name enter fluentd-* and you will see a confirmation message below that it matches one source. Something like this:
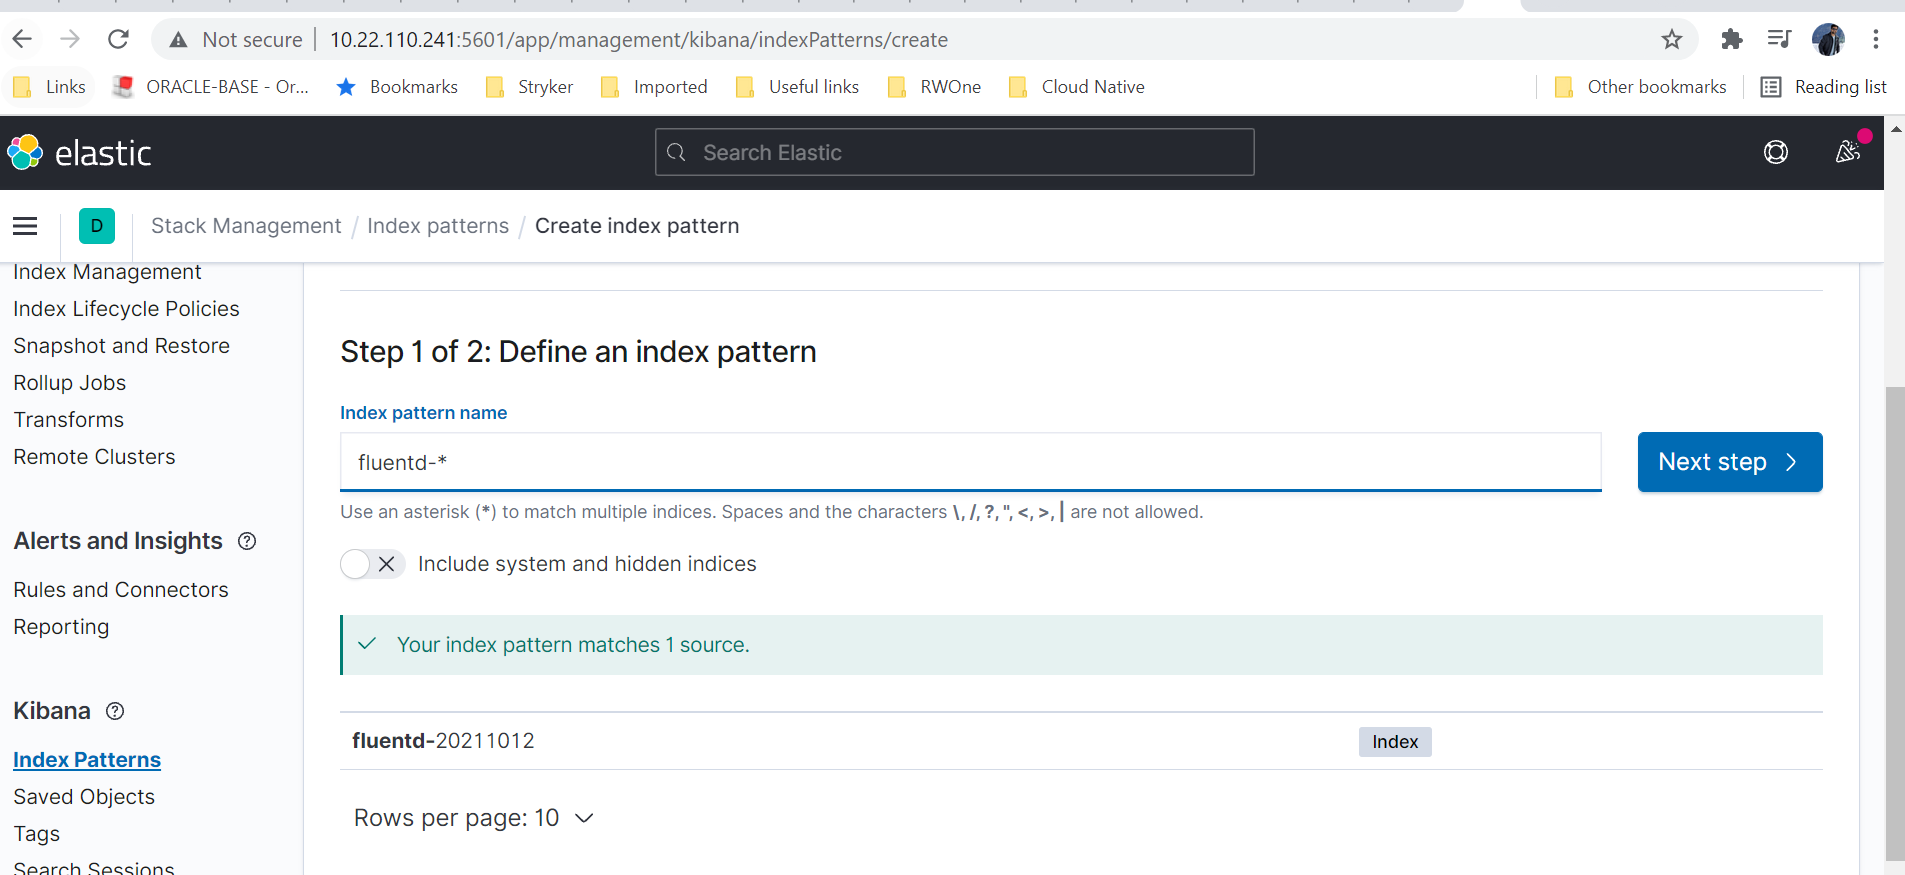
Click on Next step, and in the next screen select @timestamp for Time field and click on Create index pattern. Our index pattern is created now.
Next, from the top-left menu, click on Discover under Analytics panel as below:
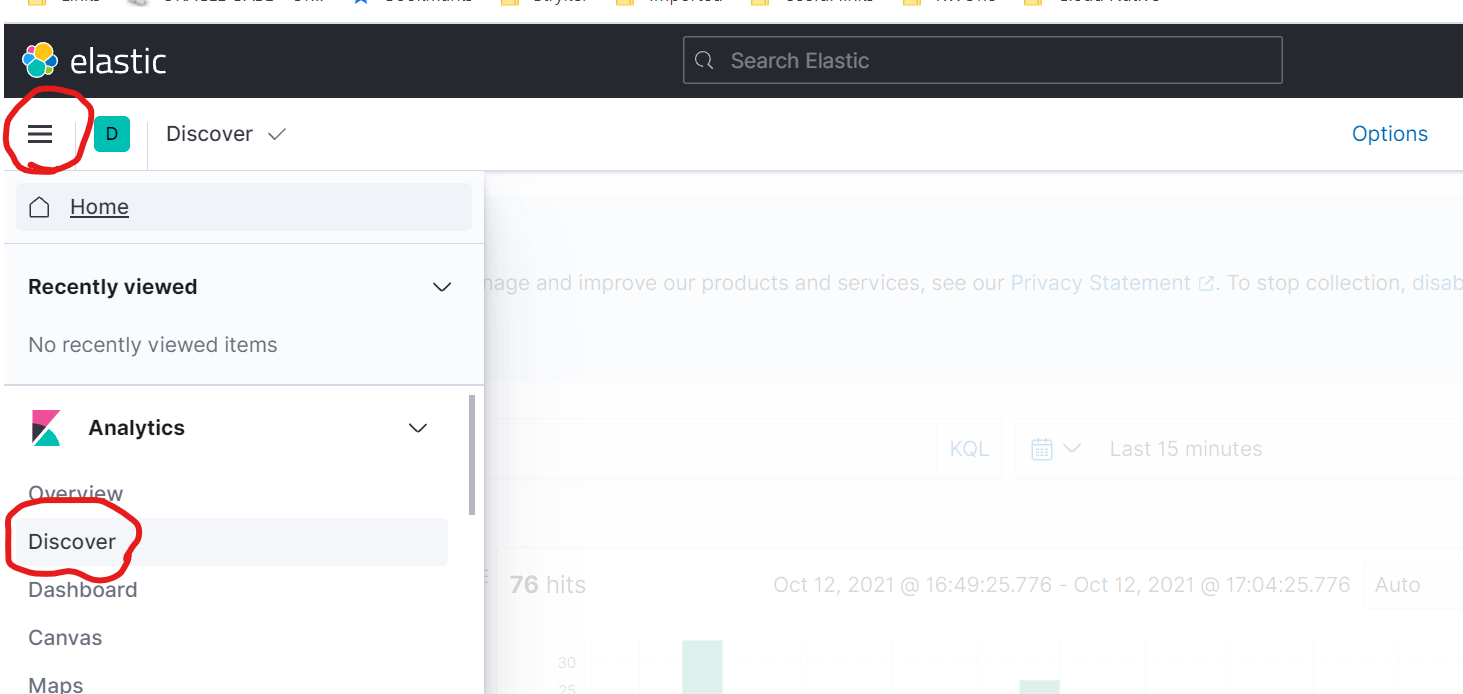
You will see something like this:

As you can see, our logs have been sent to the Kibana dashboard and you can easily go through them in a Chart form or in JSON form to analyze any patterns or errors.
Once you are done with the testing, remember to shutdown the docker-compose stack using below command from the same directory:
$ docker-compose downCome back to the home directory of cloned git repository and go to production folder to see all the required files.
$ cd productionFor production, I am only using rails and postgresql without any extra features.
To run the application locally in one shot which will also create and use a postgresql database on your localhost, use the docker-compose file and run it using below command.
$ docker-compose up -d --buildThis will start your application on localhost. Please note that since this is using Production mode, don't try to hit the default url i.e. https://localhost:3000 as it will give 404 error because it is not having any static pages.
To hit the api for creating user, you can simply use a curl command on the same host:
$ curl -X POST -k "https://localhost:3000/users/create?username=testuser&password=testingpassword"You will get response like this:
{"data":{"id":"1","type":"user","attributes":{"api_key":"9XoQuT7NmRRjMHFbsPgvmpxh"}},"jsonapi":{"version":"1.0"}}Alternatively, use a tool like postman to hit the api for creating user but first make sure ssl verification is off as shown below:

Now send a POST request to this url https://localhost:3000/users/create?username=testuser&password=mypassword and you will result like this:
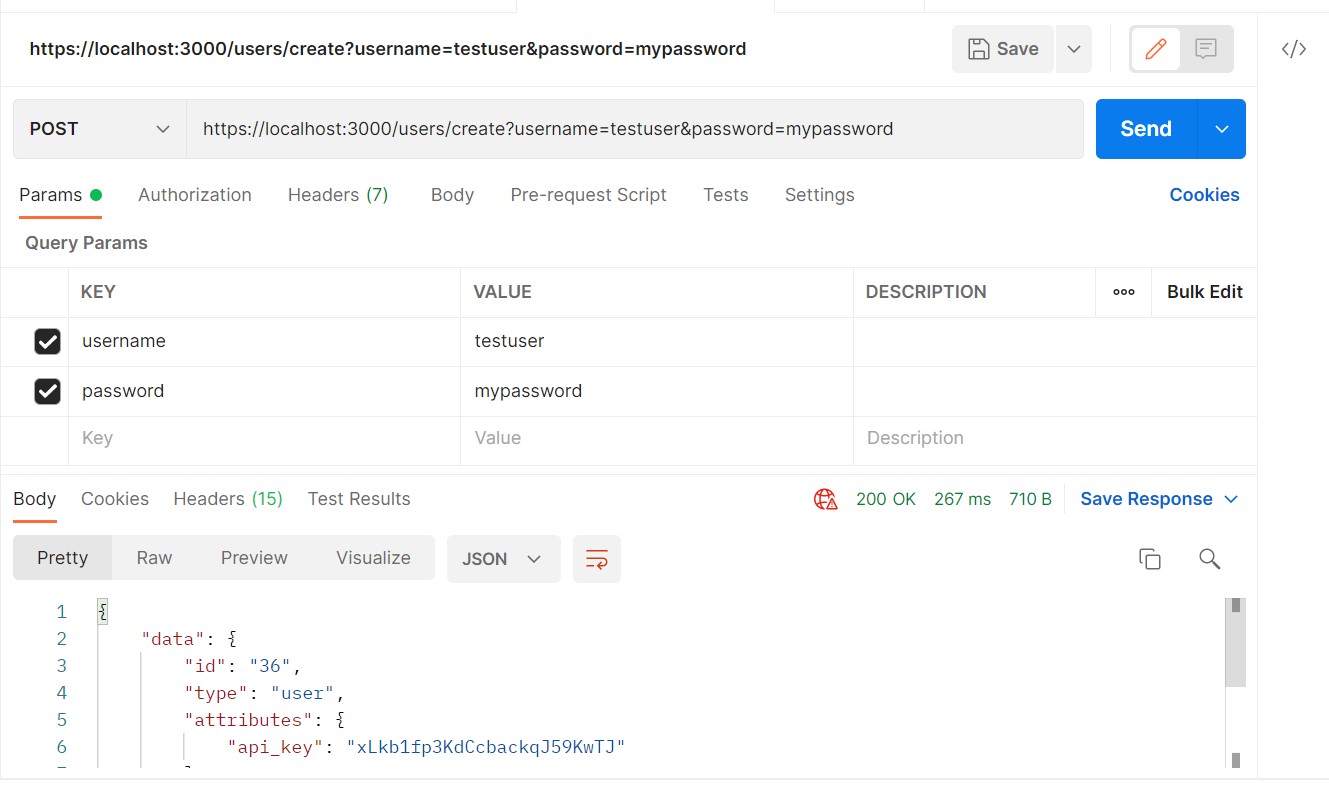
As you can see a user is created successfully, so everything is working fine. Again, once satisfied, shutdown your docker-compose stack using below command:
$ docker-compose downIn case you want to use this application Dockerfile only, without docker-compose (for ex: you already have your own postgresql database server running), follow these steps:
- First of all, while being inside the
productiondirectory, build the docker image using below command:
$ docker build -t prod:latest .- It will take some time to build the image and after it's done, edit the
.envfile to enter your own database related details. For example, if your database username is 'postgres', password is 'postgres123' and host ip is '172.17.0.2' with port '5432' then yourDATABASE_URLwill look like below:
DATABASE_URL=postgresql://postgres:postgres123@172.17.0.2:5432Keep the other two variables as it is as you don't need to change them.
- You might want to use your own CA trusted certificates in production. To do that, copy your .crt and .key file for your PROD certificate to
./volumes/certs. Make sure you rename them toprod.keyandprod.crt, else the application won't be able to pick them up.
After doing that run the docker image using below command, note that we are mounting the volume for certs and passing the .env file as environment variable to inject values for required environment variables.
$ docker run -d -p3000:3000 -v /home/agarg/tmp/think/production/volumes/certs:/myapp/config/certs --env-file .env --name ruby prod:latestGive it around 20-30 seconds to get ready and after that verify if it's working fine, again, using a simple curl command from the same host:
$ curl -X POST -k "https://localhost:3000/users/create?username=testuser&password=testingpassword"You will get a response similar to this:
{"data":{"id":"1","type":"user","attributes":{"api_key":"9XoQuT7NmRRjMHFbsPgvmpxh"}},"jsonapi":{"version":"1.0"}}So this is the production ready image which we can use for ruby. We can modify the DB details as per the DB connection details and we can also use our own trusted CA certificates. Whenever we have to do any change in the DB details or certificates we just need to re-do the deployment (which can be easily done in a rolling fashion using kubernetes etc.) without needing to rebuild the image.
Future Scope: We can also make the .env file as mountable volume so as to keep the secrets always up-to-date without redoing the deployment. However, we might still need to restart the application if we make any change at runtime to reflect the changes in environment variables.
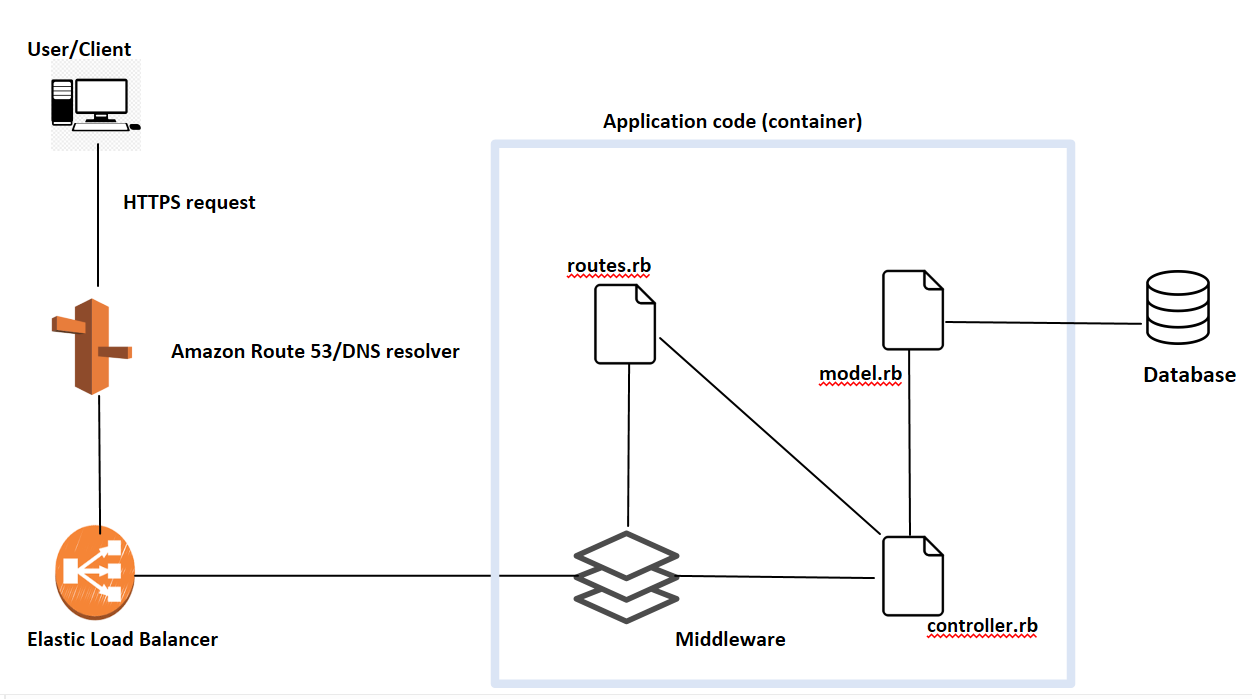
Above is the architectural diagram that I have created for my application. The single point of failure would be:
- From Elastic Load Balancer to Application : If our application has increased load or fails for some reason then it might result in failure for client. To rectify that, we can spin up two or more instances of our containerized application for high availability in either active-passive or active-active mode as per our requirements.
- From Application to DB: While transferring data between Application and DB, there are chances that DB server might go down. To fix this, we should use multiple replicas of DB server, either in master slave mode or some database like mariadb-galera with multiple masters so that application can write to any of the replica.
To handle the multitenancy requirements, we have multiple approaches that we can use:
- Row-level: You put a tenant_id column into every DB table and filter by tenant_id in every query. Advantage for using this approach is that it's fast, easy to implement and involves no additional cost as such. Drawback would be that it can lead to data leakage between different tenants if you forget to include the tenant_id in a query.
- Schema-level: For every tenant you create a separate namespaced set of tables inside one database. Easily achievable with PostgreSQL schemas. It is slower in comparison with row-level approach but chances of data leakage are less here.
- Database level: You setup a whole new DB for every tenant. It is slowest among all and you get a lot of databases which might result in high operational cost.
In our case, I would probably choose between row-level and schema-level.
- We need to get our Cloud Infrastructure ready which will host the application as shown in the diagram.
- We need to create Elastic Load Balancer or nginx which can route the requests from client to our Application container.
- We have to spin up a Database server which can be accessed by our Application container.
- We also need to create a CSR for the required SSL certificates that will be used by our application for HTTPS connections. After getting them signed we need to put them in the correct path with correct names as documented already so that they can be mounted inside the application container.
- After doing these steps we can spin up our dockerized application using the steps mentioned already.
I did include the prometheus part earlier and I was able to pull metrics as well in the dashboard but due to shortage of time I couldn't get my head around how to document it in a nice fancy way to present. I have intentionally commented out the code in the docker-compose file, so if needed, can be used again.
Also, I could have implemented a reverse proxy solution using nginx but again due to shortage of time and as instructed in the assignment I chose to go with only one feature which is Logging feature using fluentd. But if given more time or needed in future I can do reverse proxy as well I guess, atleast I have an idea of how I am going to do that in my mind already. :)
This was my first time working on Ruby on Rails, so please forgive my novice mistakes, if any.
Cheers !! Ankur