Introduction
We are going to make a robot that beeps and has a flashing antenna using a Raspberry Pi. A Raspberry Pi is a small computer that we can use to create exciting technology. It was created in the UK by the Raspberry Pi Foundation.
To use this tutorial you will need a Raspberry Pi, a few electronics components, and a special version of the Scratch programming language, ScratchGPIO, installed on your Raspberry Pi.
Further information
We hope this worksheet is self contained, but if you need or want more information, here are some links to get you started:
- Raspberry Pi. http://www.raspberrypi.org
- Getting started with the Pi. http://www.raspberrypi.org/learning/teachers-classroom-guide/getting-started-guide
- Getting started with Scratch. http://www.raspberrypi.org/resource/getting-started-with-scratch/
- Installing Scratch GPIO on the Pi. To do this, you need to open the LX Terminal icon on the desktop, and type in the commands given here: http://cymplecy.github.io/scratch_gpio/
- More details on using Scratch GPIO. http://simplesi.net/scratchgpio/scratchgpio-1st-project/
You will need to set up your Raspberry Pi to take part in this activity. See the information already provided to get you up and running, or see http://www.raspberrypi.org/help/quick-start-guide/
Let’s get hands on with electronics! This is where the Raspberry Pi comes in handy. You will program a small light called a LED (Light Emitting Diode) to flash.
You will need a coloured LED, a 270 ohm resistor, a paper clip (the sort without a plastic coating) and 4 female to female jumper wires.
Electricity revision:
If you are not happy with simple circuits and connecting a battery to a bulb, LED, or buzzer then please ask: we can go over this with you.
Activity checklist:
-
The LED has a short leg and a long leg. Slot a jumper wire onto the long leg.
-
Slot the resistor into the other end of the same jumper wire.
-
Add another jumper wire to the other end of the resistor.
-
Add a third jumper wire to the short leg of the LED.
-
Unbend the paper clip and add it to the jumper wire coming from the short leg of the LED.
-
Add the last jumper wire to the other end of the paper clip.
-
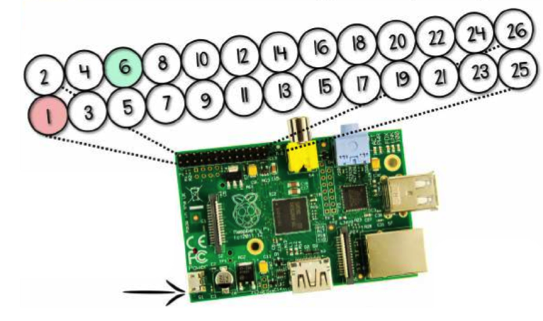
Find pin 1 and pin 6 on your Raspberry Pi using the diagram below:
The general purpose input ouput (GPIO) pins on the Raspberry Pi speak and listen to the outside world and can be controlled or programmed. Each pin his a specific role. To make life easier the pins are numbered for reference. Pin 1 is for power. Pin 6 is for grounding.
-
Plug the resistor jumper wire into pin 1 on your Raspberry Pi and the paper clip jumper wire into pin 6.
-
Plug in the micro USB power supply and you should see some text appear on your screen.
How the light antenna works:
Now you have a circuit and the LED should be on. But why does the LED shine?
When the circuit is plugged into the Raspberry Pi GPIO pins, electricity flows through the circuit. The flow is called the current.
The LED lights up only when electric current flows from the long leg through the bulb to the short leg.
The resistor reduces the amount of electric current passing through the circuit. This protects the LED from breaking, as a high current will make the light shine more brightly and then stop working.
Now you have an antenna that lights up, and it is connected to your Raspberry Pi, you can write a program to tell the LED when you want it on.
For this section you will need to use pin 11 rather than pin 1 to power your LED. Pin 11 is special as it can switch power on and off – if you tell it to!
You will need ScratchGPIO installed (see instructions sheet for installing ScratchGPIO).
Activity Checklist:
-
Switch off the power to the Raspberry Pi. Move your jumper wire from pin 1 to pin 11. (Use the diagram from earlier to locate pin 11. Then switch the power back on.
-
When prompted to login type:
Login: pi Password: raspberry -
Once you have logged in, type
startxto load the desktop. -
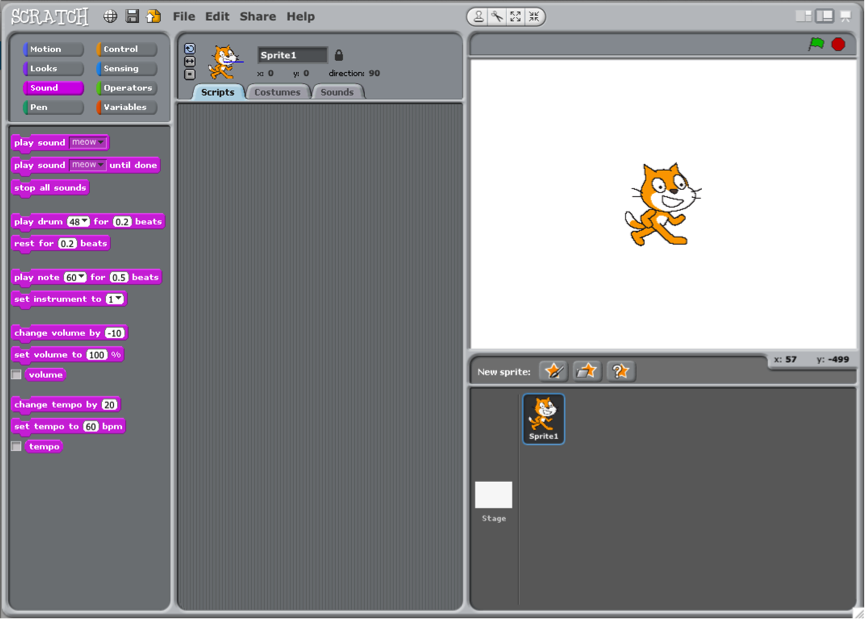
The desktop should have a ScratchGPIO icon. Double click it.
-
If prompted click OK when the remote sensor connections are enabled.
-
Right-click on the Scratch cat and choose delete from the menu.
Then click on the button for a new sprite and choose robot3 from the fantasy folder.
-
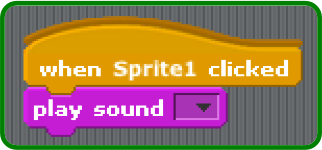
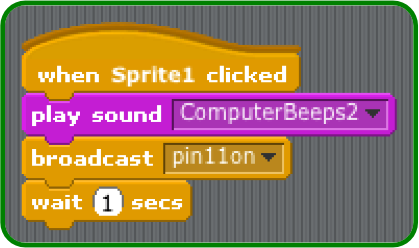
Click on control in the top left display. Drag the when Sprite1 clicked block onto the scripts area. Then click on Sound and drag the play sound block onto the scripts area and connect it to the control block.
-
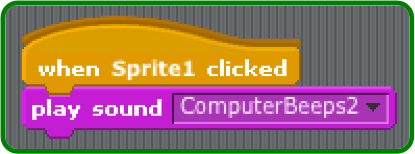
Click on the Sounds tab above the scripts area and then click on Import. Choose Electronic and then ComputerBeeps2. This will add it to the sounds tab.
-
Now go back to the scripts area by clicking on the scripts tab. Click on the drop down box next to play sound. Choose the sound you just imported from the menu.
-
Test that your program so far is working, by clicking on the robot sprite. It should beep! On older VGA monitors without speakers, you may need to plug headphones in to the Raspberry Pi to hear the beep.
-
Save your work so far by clicking on File and Save As. Name your file Robot and click OK.
-
Click on the control in the blocks palette and drag a broadcast block to your scripts area and attach it to the play sound block. Click on the drop down menu on the broadcast block and select new.
In the message name box type pin11on This instruction will tell the Raspberry Pi to light the LED.
-
Drag a wait 1 second block onto the scripts area and connect it to the broadcast block.
-
Test your program by clicking on the robot sprite. You should see the cardboard robot’s antenna light shine and stay on.
-
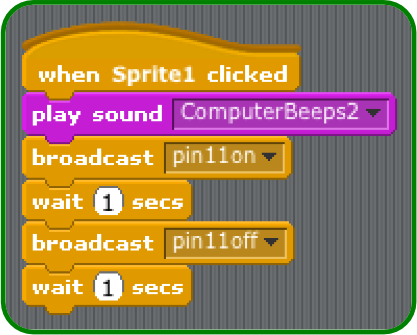
Drag another broadcast block onto your scripts area and connect it to the wait 1 second block. Click on the drop down menu on the broadcast block and select new.
In the message name box type pin11off This will switch off the light on the cardboard robot’s antenna.
-
Now add another wait 1 second block to the script.
-
Test your program again by clicking on the robot sprite. You should see the light on the cardboard robot’s antenna come on for 1 second and turn off for one second.
If you want to be more adventurous, try these experiments:
-
Connect another LED in the same way, to pin 12. Both LEDs need to have their short leg connected pin 6 (ground). To do this, you may find it easier to build your circuit using a breadboard, or twist two paper clips together.
-
Connect a buzzer, either instead of a LED, or in addition. You could use pin 13.
-
Write programs to flash and beep in different patterns.
-
Need more? Try the Pibrella add-on board in the kit. This has switches, LEDs, a buzzer, and a motor controller. Ask for details of how to use it.
Now you can control electronics with you Pi, you can add it to things you make. Below we show a simple carboard robot with a flashing antenna. If you got as far as using more than one LED or a buzzer, you could add these to the robot. Flashing eyes instead of the antenna?
(For a challenge: use 6 LEDs and a buzzer to make a dice that beeps for the partially sighted?)
First you need to make your robot, to do this you need colouring pencils, A4 paper, scissors, glue or sticky tape, a cardboard tube, plasticine or blu tack and a printer.
Activity Checklist:
-
On a sheet off A4 paper, draw or print your own robot design. It should be drawn portrait so it can be wrapped around your cardboard tube. Make sure it has an antenna!
-
Colour in the robot picture and cut it out carefully.
-
Wrap the robot around the cardboard tube length ways.
-
Glue or tape the robot in place.
-
Stick plasticine or blu tack behind the robot’s antenna inside the cardboard tube.
-
Push a pencil into the antenna to make a hole through the cardboard tube.
-
Remove the plasticine.
-
Put your circuit of jumper wires, LED, resistor and paper clip inside your cardboard tube. Push your LED through the hole in the tube to make the robot’s antenna.
-
Give your Robot a name and welcome it to the world.
Congratulations your robot is complete!
- Can you make the cardboard robot’s antenna stay on for longer?
- Can you make the light flash more than once?
- Record new sounds to play when your program plays.
Unless otherwise specified, everything in this repository is covered by the following licence:
Robot Antenna by the Raspberry Pi Foundation is licenced under a Creative Commons Attribution 4.0 International License.
Based on a work at https://github.com/raspberrypilearning/robot-antenna

