- select
use this template - clone this repo
├── README.md (what you are currently reading)
├── back-end (a basic express app)
├── front-end (a basic create-react-app)
└── package.json (necessary boilerplate for heroku deployment )
NOTE: - You will have 3 package.json files in this project
- Top level - necessary for heroku deployment: you don't need to do anything with this file, it is set up for you
- back-end - everything to do with the express/postgres backend
- front-end - everything to do with the create-react-app front-end
/back-end
cd back-endnpm installtouch .env
make sure you are on the same level as the package.json of the back-end directory
touch .env
PORT=3333
PG_HOST=localhost
PG_PORT=5432
PG_DATABASE=postgres
PG_USER=postgres
PG_PASSWORD=""
npm run db_initnpm run db_seed
Test app locally. If it does not work locally, it will not work on Heroku.
Fix bugs.
When ready:
heroku creategit add .git commit -m 'heroku deploymentgit push heroku main- if this does not work, go to heroku dashboard => deployment and add the remote
ie heroku git:remote -a <your-heroku-app-name>
Open your heroku app. You should see the Hello, world! message.
In the heroku dashboard, go to Overview choose configure add ons
In the search bar Quickly add add-ons - search for postgres - choose heroku postgres
- Choose hobby dev
- Note: even though hobby dev is free, you may be required to provide a credit card
- In new view, click on
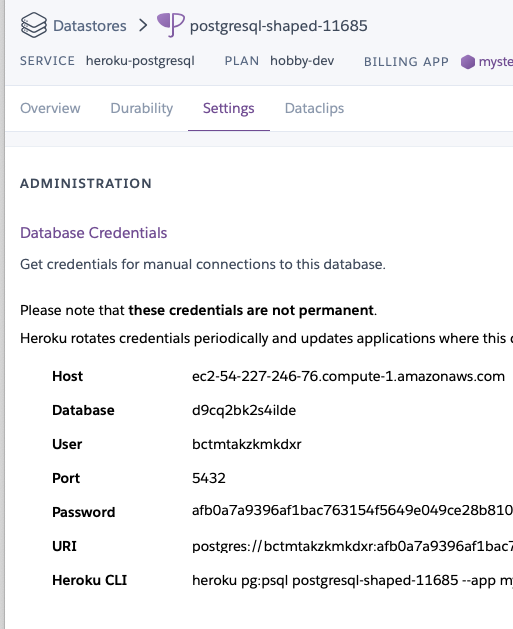
heroku Postgres / attached as DATABASE=> Settings
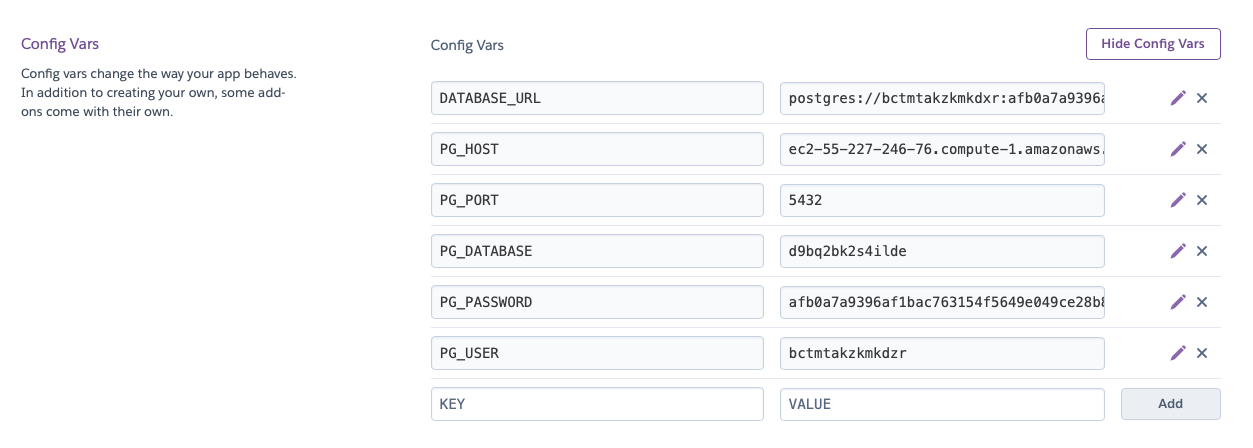
You will need to make these key value pairs in your heroku app
IMPORTANT
The keys must match perfectly with what is in your db/dbConfig.js file and your local .env
- Open a new tab/window and go to the main page of your heroku app choose settings
- Reveal Config Variables
- Add the variables
Note: these are false credentials and given for example only:
PG_HOST=ec2-55-227-246-76.compute-1.amazonaws.com
PG_PORT=5432
PG_DATABASE=d9bq2bk2s4ilde
PG_USER=bcwmtakzkmkdxr
PG_PASSWORD=afb0a7a9396af1bac763154f5649e049ce280658bef0ded7efde6
- make sure you are on the same directory level as your
package.jsonof yourback-enddirectory
Go back to the heroku database view => settings
-
copy
Heroku CLI(something likeheroku pg:psql postgresql-shaped-11685 --app mysterious-spires-49488) -
paste into your terminal
-
it should open a
pg shell
Run the following:
\i ./db/schema.sql- success should say
CREATE TABLE
- success should say
\i ./db/seed.sql- success should say
INSERT 0 7
- success should say
\q
This will insert the test table with the days of the week.
Later, when you have build out your app to have your schema and seed data, you will:
- edit the
db/schema.sqlfile to be your own - edit th
db/seed.sqlfile to be your own - reopen this shell and rerun these commands.
Note you should set up the
/front-end
-
cd front-end -
npm install -
npm start
src/util/apiURL.js
Replace the placeholder heroku app with your heroku app URL that you set up earlier
Make sure your back-end is still running. You should see an unordered list of the days of the week, coming from your back-end. If it does not work locally, it will not work when it is deployed. Keep debugging until it works
Go to netlify, choose New site from Git
- choose continuos deployment, GitHub.
- configure the netlify app on GitHub
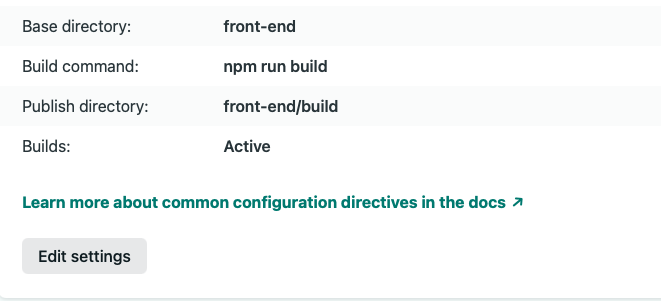
Follow the prompts to add this project repo to Netlify Once, authorized, configure to launch app from
- Base directory:
front-end - Build command:
npm run build - Publish directory:
build(may appear asfront-end/build)


