 Serratus Mountain, Squamish,BC
The SARS-CoV-2 pandemic will infect millions and has already crippled the global economy.
While there is an intense research effort to sequence SARS-CoV-2 isolates to understand the evolution of the virus in real-time, our understanding of where it originated is limited by the sparse characterization of other members of the Coronaviridae family (only 53/436 CoV sp. Genomes are available).
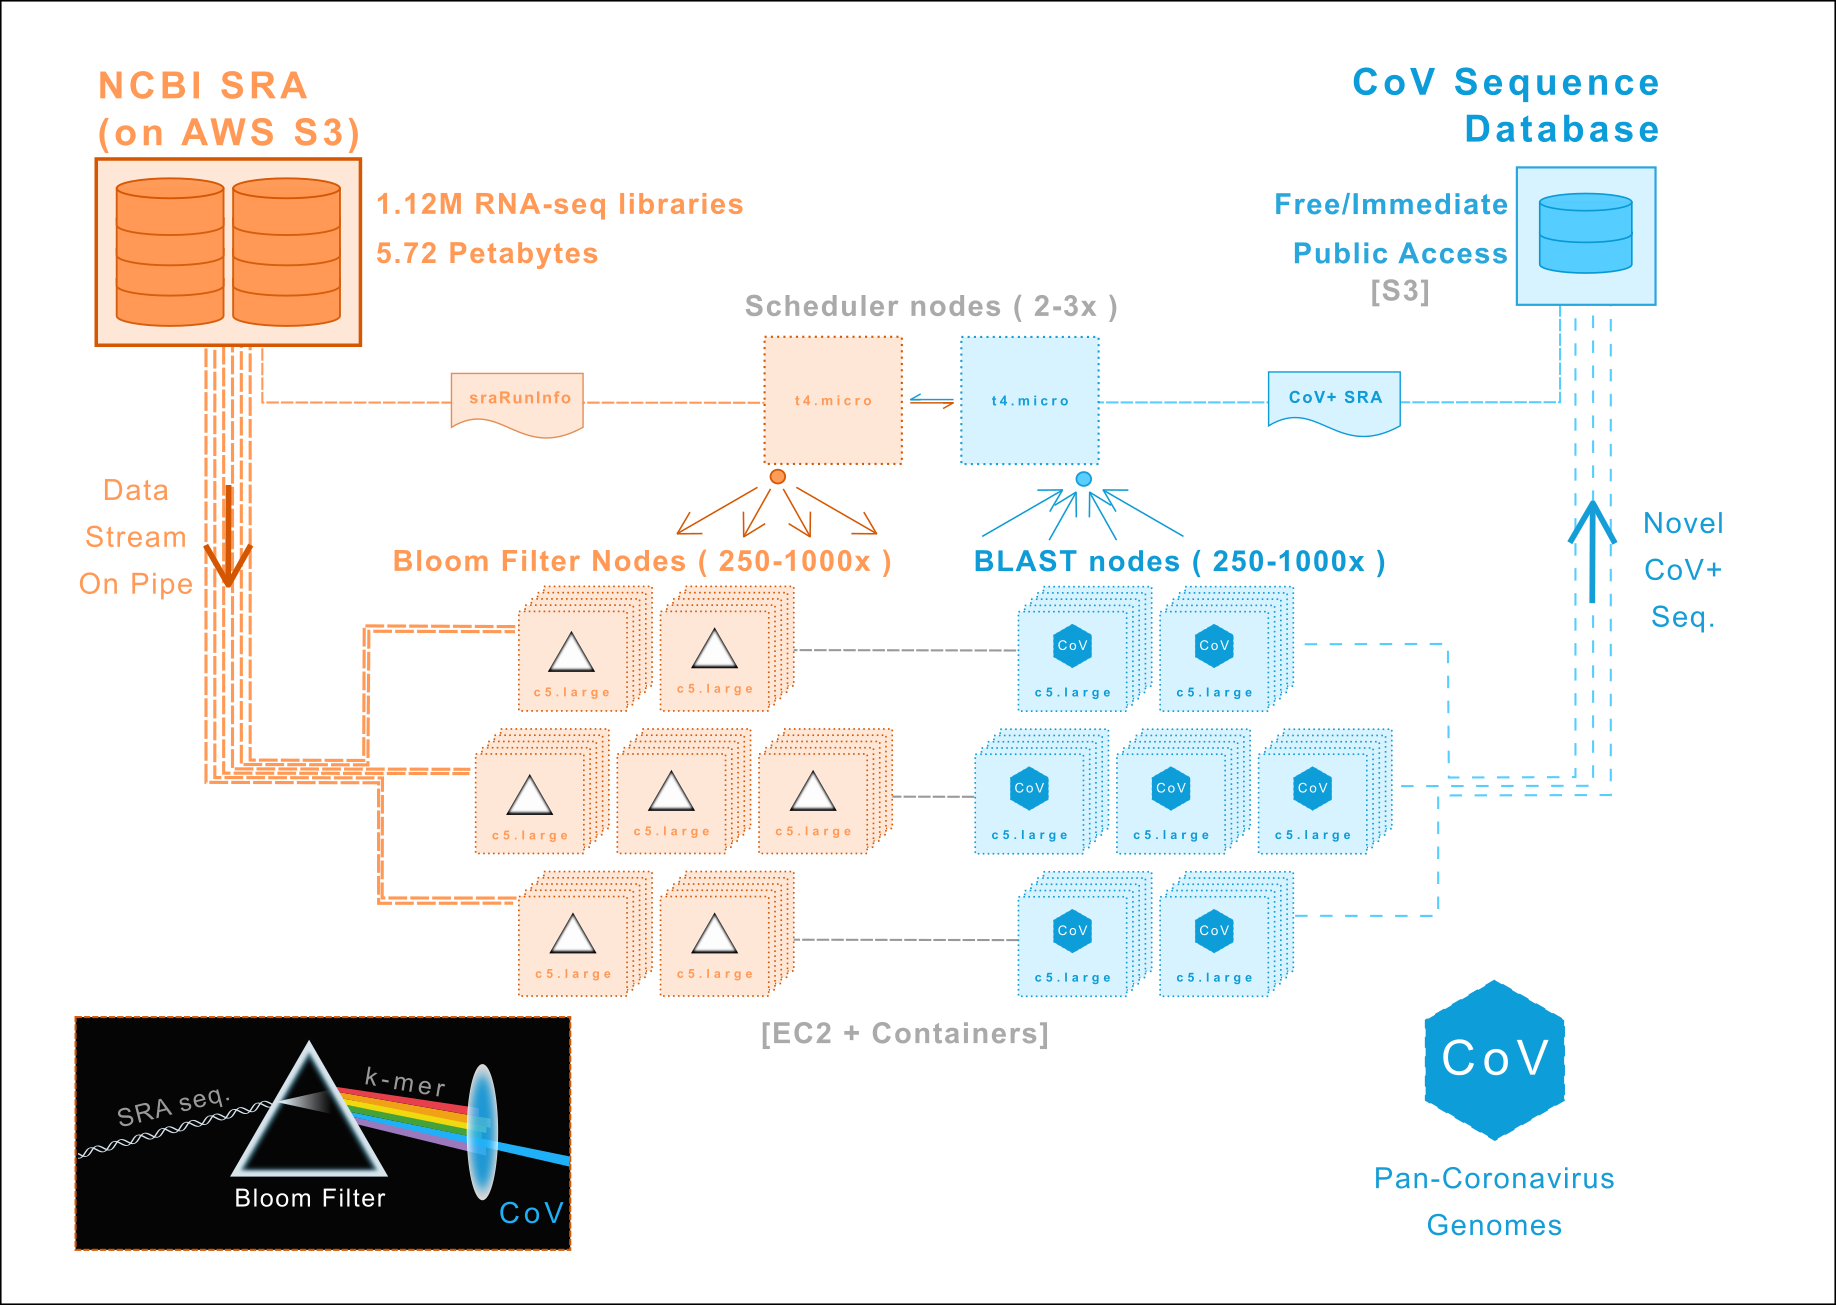
We are re-analyzing all RNA-sequencing data in the NCBI Short Read Archive to discover new members of Coronaviridae. Our initial focus is mammalian RNA-sequencing libraries followed by avian/vertebrate, metagenomic, and finally all 1.12M entries (5.72 petabytes).
data/README.md: README.md outlining location/acquisition of serratus data
docker/: Container make files and tokens
img/: Architecture/workflow diagrams
packer/: Standardized node images (ami)
scheduler/: Code for serratus head-node and sraRunInfo management
scripts/: Defined units of work performed in serratus
terraform/: Cloud resources / pipeline management
- S3 Bucket: s3://serratus-public/ (public-readable)
- AWS Batch workflow - Introduction
- AWS Batch workflow - github page
- SRAtoolkit in Cloud Computing
- NCBI SRA Data on S3
- S3 transfer optimization
- Paper on analyzing EC2 costs (2011)
- Pushing the limits of Amazon S3 Upload Performance
- Clever SRA alignment pipeline
- SARS-CoV-2 UCSC Genome Browser
- Interpretable detection of novel human viruses from genome sequencing data
- Virus detection from RNA-seq: proof of concept
- Bigsi: Bloom filter indexing of SRA/ENA for organism search
- Fast Search of Thousands of Short-Read Sequencing Experiments
- Ultra-fast search of all deposited bacterial and viral genomic data
- Sign up for an AWS account if you don't have one yet. You can use the free basic tier.
- Create an IAM Admin User with Access Key. For Access type, use Progammatic access.
- Note the Access Key ID and Secret values.
Set these as environment variables for the future steps. Run:
export AWS_ACCESS_KEY_ID="your_access_key"
export AWS_SECRET_ACCESS_KEY="your_secret_key"
First, download Packer. It comes as a single binary which you can just unzip. I extracted it to ~/.local/bin so that it ended up on my PATH.
Next, use it to build the AMI:
cd serratus/packer
/path/to/packer build docker-ami.json
cd ../..
This will start up a t3.nano, build the AMI, and then terminate it. Currently this takes about 2 minutes, which should cost well under a penny. The final line of STDOUT will be the region and AMI. Retain this information
us-east-1: ami-04c1625cf0bcb4159
Before starting, you'll need to setup a keypair on EC2. Make sure to use the us-east-1 region, as that's where the SRA data is stored. Keep the name of the keypair and the .pem file, you'll need them later.
You'll also need to find out your public IP. Try curl ipecho.net/plain; echo.
Open terraform/main/terraform.tfvars. There are three environment variables in this file:
dev_cidrs: Your public IP, followed by "/32"key_name: EC2 key pair namedockerhub_account: Where the docker images are stored. You can leave it as-is if you don't want to build the images.
The top-level module is in serratus/terraform/main. Change directory to there, run tf init, and then tf apply to create some infrastructure.
cd serratus/terraform/main
tf init
At the time of writing, this will create:
- a t3.nano, for the scheduler, with an Elastic IP
- an S3 bucket, to store intermediates
- an ASG for serratus-dl, using c5.large with 50GB of gp2.
- An ASG for serratus-align, using c5.large
- An ASG for serratus-merge, using t3.small
- Security groups and IAM roles to tie it all together.
All ASGs have a max size of 1. This can all be reconfigured in terraform/main/main.tf.
At the end of tf apply, it will output the scheduler's DNS address. Keep this for later.
By default, the scheduler exposes port 8000. This port is not exposed to the public internet because it doesn't support any authentication or encryption yet. You'll need to create an SSH tunnel to allow your local web-browser and terminal to connect.
$ scheduler_dns=<copied this from terraform>
$ ssh -i /path/to/key.pem -L 8000:localhost:8000 ec2-user@$scheduler_dns
Leave this terminal open. It will route requests from port 8000 on your local machine to the application running on the scheduler.
To test this, open a web browser at http://localhost:8000/jobs/. You should some table headings with no actual data. If so, the scheduler is ready to be loaded. The scheduler takes a few minutes to boot up. If you're seeing strange errors (eg. connection reset by peer), go make a cup of tea and come back in ten minutes.
Once the scheduler's up. Assuming you have an SraRunInfo.csv file (NCBI SRA > Send to: File), and you've successfully connected, you can load it with curl
$ curl -s -X POST -T /path/to/SraRunInfo.csv localhost:8000/jobs/add_sra_run_info/
This should respond with a short JSON indicating the number of rows inserted, and the total number in the scheduler.
In your web browser, refresh the status page. You should now see a list of accessions by state. If ASGs are online, they should start processing immediately. In a few seconds, the first entry will switch to "splitting" state, which means it's working.
To achieve our objective of providing high quality CoV sequence data to the global research effort, Serratus ensures:
- All software development is open-source and freely available (GPLv3)
- All sequencing data generated, raw and processed, will be freely available in the public domain in accordance with the Bermuda Principles of the Human Genome Project.
Serratus is an Open-Science project. We welcome all scientists to contribute.
Email (ababaian AT bccrc DOT ca) or join Slack
