This is a library for making E-Drum with Arduino.
Ver.0.7.6(5/1/2020) Work in progress.
This is a library for making E-Drum with Arduino.
By using it with Arduino MIDI Library, you can make E-drum.
Project Page :https://open-e-drums.com/
Blog :https://open-e-drums.tumblr.com/
YouTube :https://www.youtube.com/channel/UCNCDcIO26xL_NhI04QY-v4A
3D Models of Pad :https://www.thingiverse.com/RyoKosaka/designs
This software is an alpha version, and is unsupported. Use at your own risk.
- Single piezo pad, Dual piezo pad, 2-Zone cymbal, 3-Zone cymbal
- Compatible with Roland's 2 zone pads (PD Series)
- Compatible with YAMAHA's 3 zone cymbal(PCY135/PCY155) and Roland's 2 zone cymbals(CY12C/CY5/CY8)
- Compatible with SoftPot, FSR and Optical(TCRT5000) type hi-hat controllers and Roland's hihat(VH10/VH11)
- Sensing with MUX(4051 and 4067)
- Setting mode with LCD or OLED
- Setting mode with LCD Keypad Shield (DFRobot, HiLetgo)
- Sensitivity, Threshold, Scan Time, Mask Time, Note Number, Velocity Curve can be set with each pad
- Save setting values with EEPROM
- Works with ESP32 and Teensy and AVR boards such as UNO and MEGA.
- Install
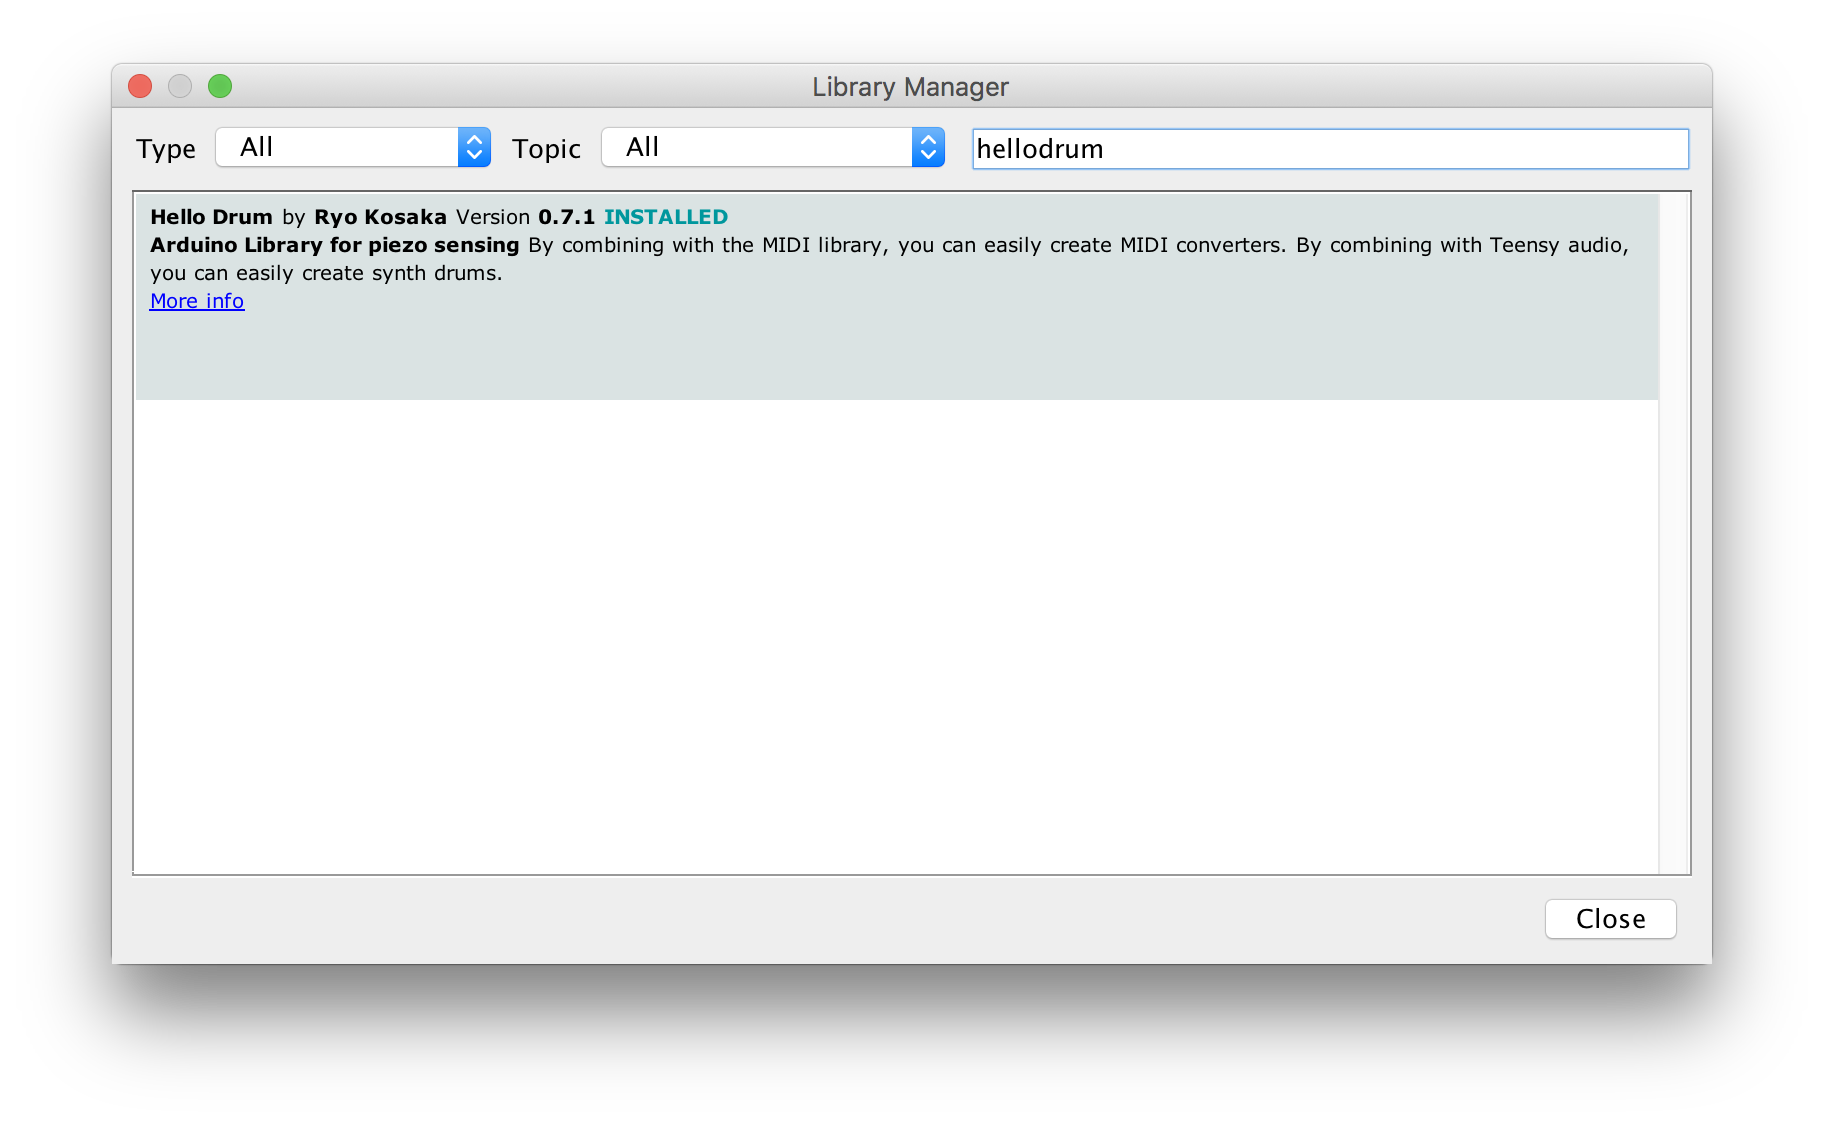
Use Arduino's Library Manager to install the library. Search for “hellodrum ”.
If you use MIDI, also install the MIDI Library.
-
Initialize EEPROM
If you want to use EEPROM to store the settings, you will need to initialize the EEPROM. Please write the sample code, example > EEPROM > InitializeEEPROM > InitializeEEPROM.ino, to your Arduino. Once it's written, the initialization is complete. -
Coding:
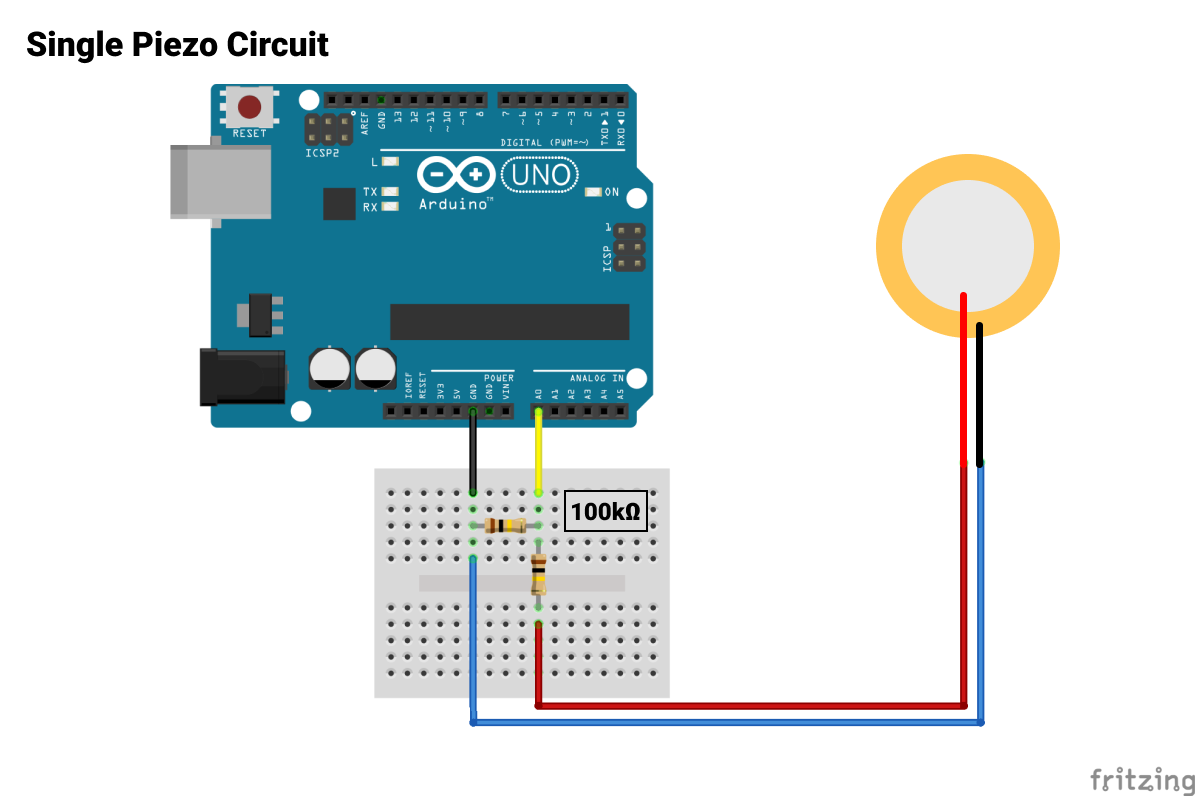
 #include <hellodrum.h>
 #include <MIDI.h>
 MIDI_CREATE_DEFAULT_INSTANCE();

 //Please name your piezo.
 //The piezo named snare is connected to the A0 pin
 HelloDrum snare(0);

 //Setting
 byte SNARE[6] = {
   80, //sensitivity
   10, //threshold
   20, //scantime
   20, //masktime
   38, //note
   1   //curve type
 };

 void setup()
 {
     MIDI.begin(10);
     snare.setCurve(SNARE[5]); //Set velocity curve
 }

 void loop()
 {
     //Sensing
     snare.singlePiezo(SNARE[0], SNARE[1], SNARE[2], SNARE[3]); //(sensitivity, threshold, scantime, masktime)

     //Sending MIDI signals
     if (snare.hit == true) {
         MIDI.sendNoteOn(SNARE[4], snare.velocity, 10);  //(note, velocity, channel)
         MIDI.sendNoteOff(SNARE[4], 0, 10);
     }
 }
-
Coding (MUX):
 #include <hellodrum.h>
 #include <MIDI.h>
 MIDI_CREATE_DEFAULT_INSTANCE();

 //Define MUX Pins
 HelloDrumMUX_4051 mux(2,3,4,0);//D2, D3, D4, A0

 //Please name your piezo.
 //The piezo named snare is connected to MUX 0 pin
 HelloDrum snare(0);

 //Setting
 byte SNARE[6] = {
   80,  //sensitivity
   10,  //threshold
   20,  //scantime
   20,  //masktime
   38,  //note
   1    //curve type
 };

 void setup()
 {
     MIDI.begin(10);
     snare.setCurve(SNARE[5]); //Set velocity curve
 }

 void loop()
 {
     //scanning all pin of mux
     mux.scan();

     //Sensing
     snare.singlePiezoMUX(SNARE[0], SNARE[1], SNARE[2], SNARE[3]); //(sensitivity, threshold, scantime, masktime)

     //Sending MIDI signals
     if (snare.hit == true) {
         MIDI.sendNoteOn(SNARE[4], snare.velocity, 10);  //(note, velocity, channel)
         MIDI.sendNoteOff(SNARE[4], 0, 10);
     }
 }
- Single Piezo Sensing

- Sensitivity (1 - 100)
- Threshold (1 - 100)
- Scan Time (1 - 100) milliseconds
- Mask Time (1 - 100) milliseconds
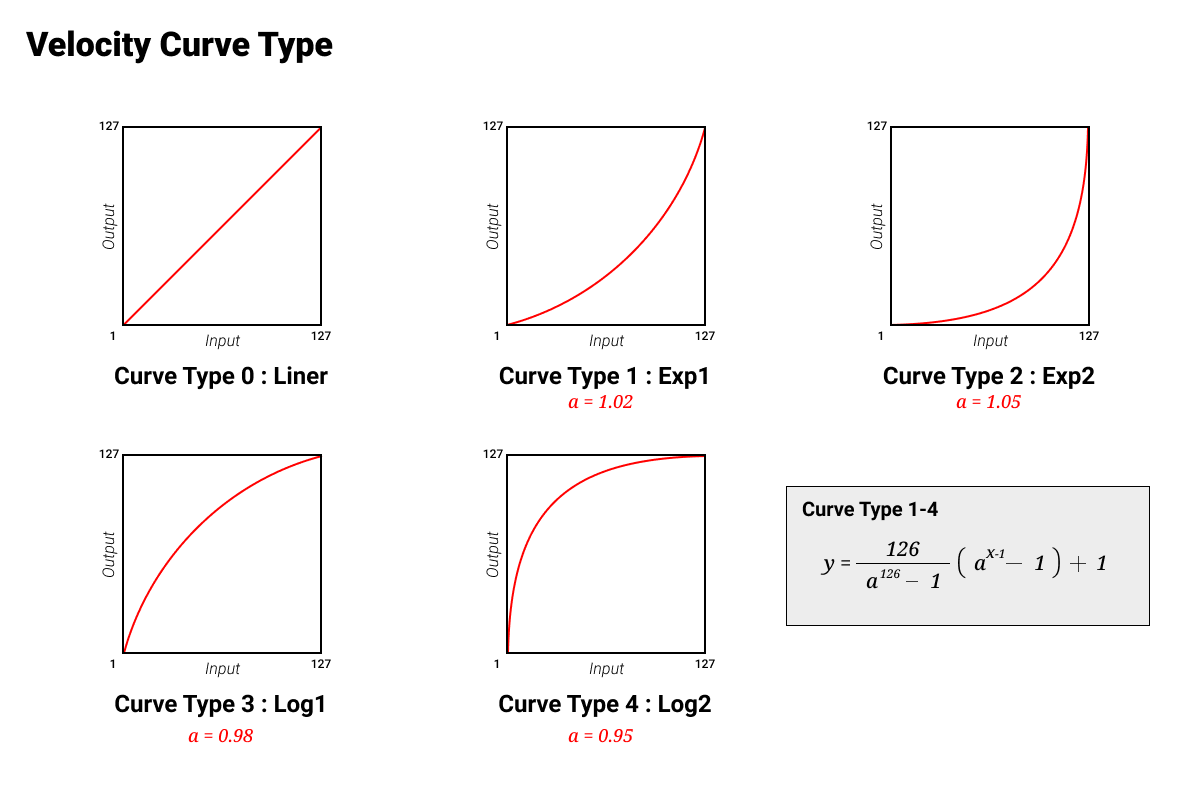
- Velocity Curve Type (0 - 4)
- Dual Piezo Sensing
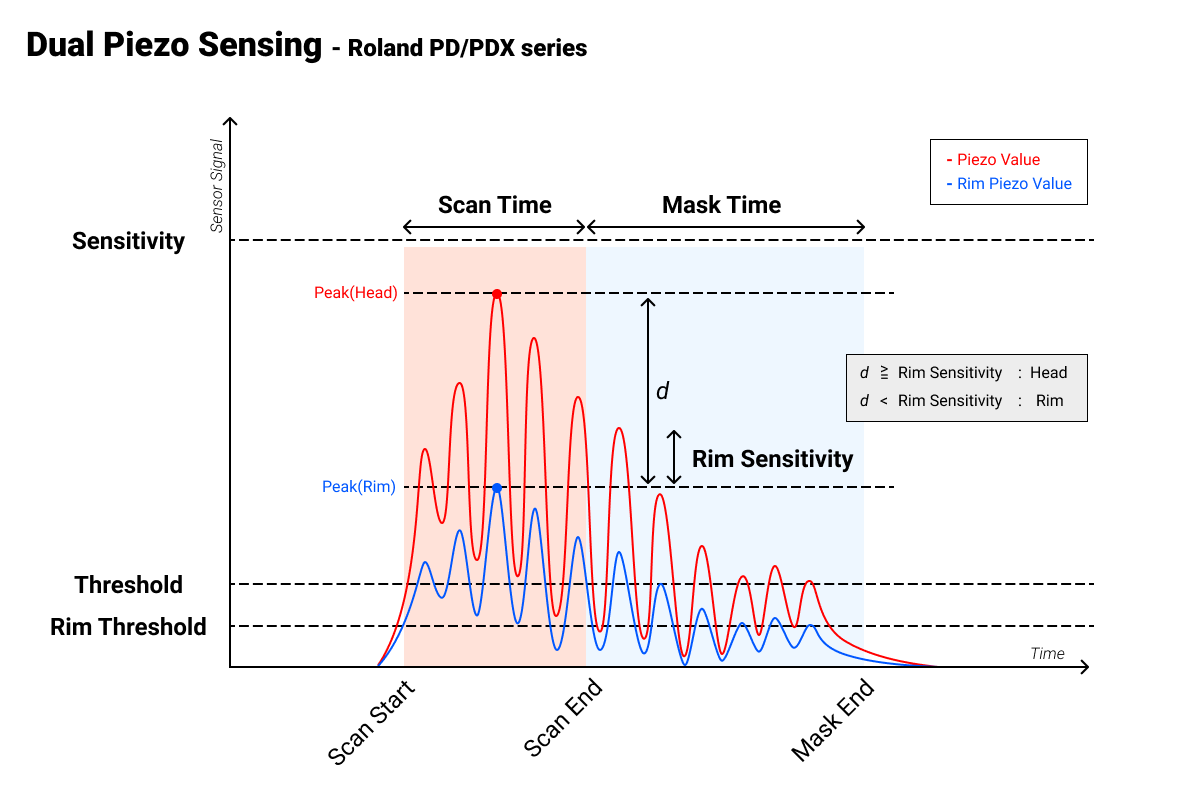
- Sensitivity (1 - 100)
- Threshold (1 - 100)
- Scan Time (1 - 100) milliseconds
- Mask Time (1 - 100) milliseconds
- Rim Sensitivity (1 - 100)
- Rim Threshold (1 - 100)
- Velocity Curve Type (0 - 4)
- 2-Zone Cymbal Sensing
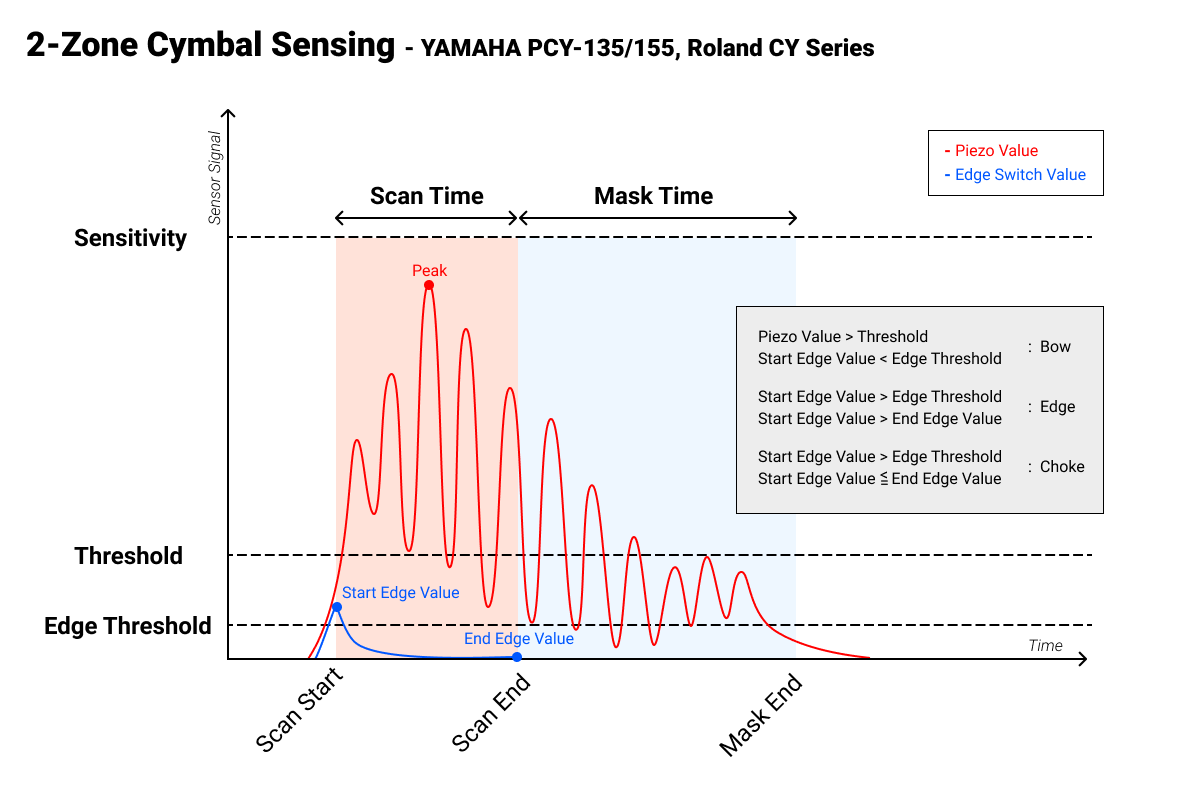
- Sensitivity (1 - 100)
- Threshold (1 - 100)
- Scan Time (1 - 100) milliseconds
- Mask Time (1 - 100) milliseconds
- Edge Threshold (1 - 100)
- Velocity Curve Type (0 - 4)
- 3-Zone Cymbal Sensing
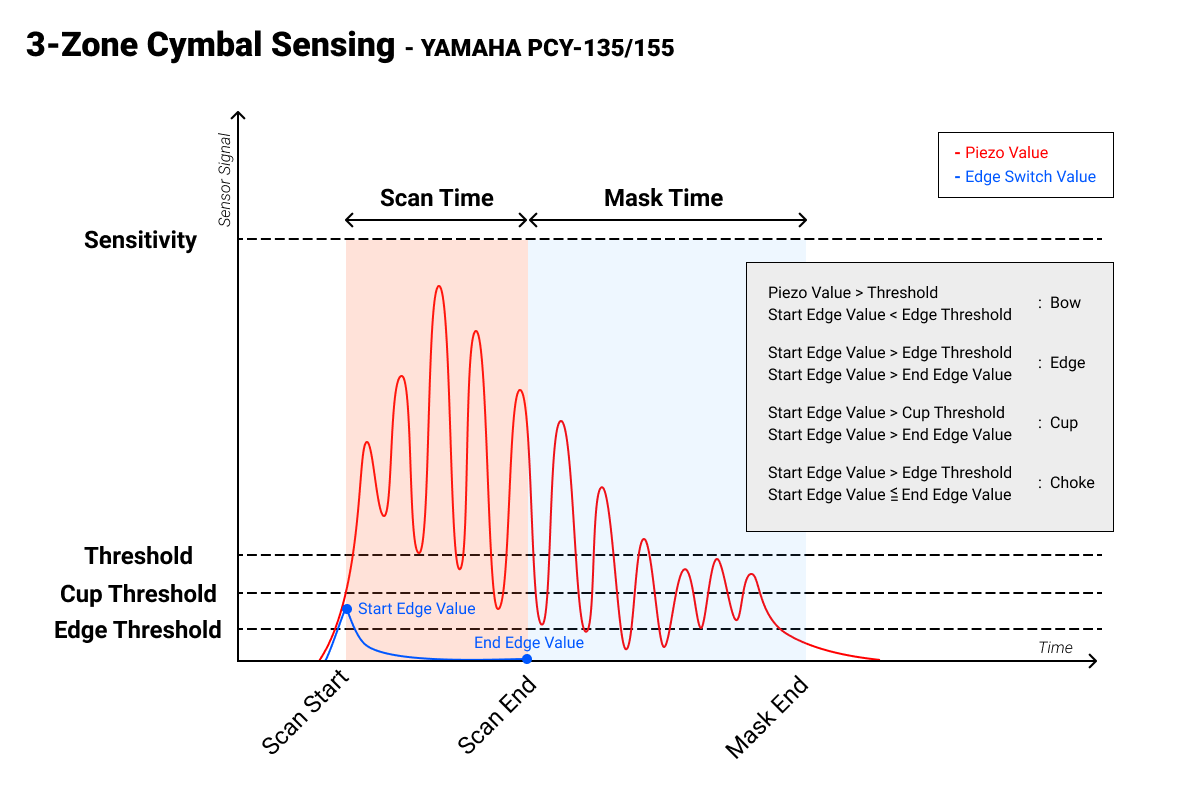
- Sensitivity (1 - 100)
- Threshold (1 - 100)
- Scan Time (1 - 100) milliseconds
- Mask Time (1 - 100) milliseconds
- Edge Threshold (1 - 100)
- Cup Threshold (1 - 100)
- Velocity Curve Type (0 - 4)
- Hihat Controller Sensing
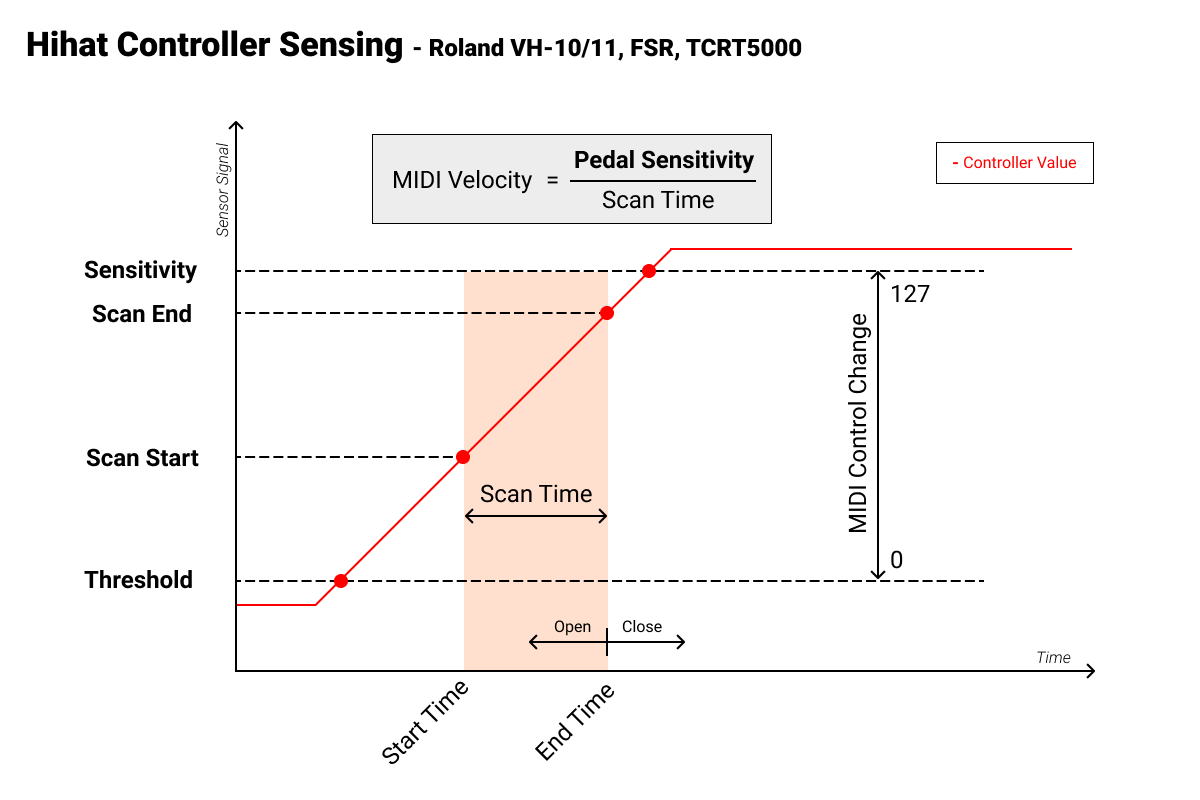
- Sensitivity (1 - 100)
- Threshold (1 - 100)
- Scan Start (1 - 100)
- Scan End (1 - 100)
- Pedal Sensitivity (1 - 100)
- Velocity Curve Type (0 - 4)
- Velocity Curve Type
- Single Piezo
- Single Piezo with Potentiometer

- Dual Piezo

- Roland PD series

- FSR

- Roland VH-10/VH-11

- TCRT5000

- Cymbals

- Roland PD-8

- Button

- LCD Keypad Shield

- Arduino UNO with MUX

- ESP32 with MUX

The STL data of pads from 6 inches to 12 inches, hi-hat controllers(https://www.thingiverse.com/RyoKosaka/designs)
- 0.7.6
- Bug fix for LCD and buttons
- Add and Update sample codes
- 0.7.5
- Bug fix for ESP32
- Bug fix for hihatControl()
- Update sample codes
- Add pullup mode to deal with floating pins (Beta)
- Add debug mode
- 0.7.4
- Add velocity curve function
- FSR() and TCRT5000() integrated into hihatControl()
- Update circuits
- Add circuit images
- Update sensing algorithm
- Add sensing figure
- Update sample code
- Organize the source code
- 0.7.3
- Update variables type
- Add button function for LCD keypad shield
- Add sample code "lcdShield.ino" for LCD keypad shield
- 0.7.2
- Update sample code
- Add Knob function
- Add sample code for Teensy
- 0.7.1
- Sensing with 16ch MUX(4067) is available
- Update sample code
- Organize folders and files
- Add library.properties
- Teensy3.2 has been tested
- 0.7.0
- Improved sensing
- Dual Piezo sensing available (Test)
- ESP32 EEPROM available
- Setting mode with I2C LCD or I2C OLED available
- Add sample code
- 0.6.0
- Sensing with MUX(4051) is available
- Add BLE MIDI sample code with ESP32
- Hihat Contorller with FSR is available
- 0.5.0
- Setting mode available
- Display function by LCD is available
- Saving function of setting items by EEPROM is available
- Improved sensing of TCRT 5000 hi-hat controller
- 0.1.0
- Work in progress
- rimGain
- retriggerCancel
- rotaryEncoder