Building a Let's Encrypt client from scratch
A step-by-step guide to building a LE/ACME client in <150 lines of code
This is a (pretty detailed) how-to on building a simple ACME client from scratch, able to issue real certificates from Let's Encrypt. I've skipped things like error handling, object orientedness, tests - but not much tweaking would be needed for the client to be production-ready.
The code for the finished client is in client.rb. I rewrote the client and this guide in May 2020 to bring it in-line with the latest (and theoretically finalized) ACME V2 spec.
About the guide
This guide assumes no particular knowledge of TLS/SSL, cryptography or ACME - a general understanding of programming, HTTP and REST APIs is probably needed. It would also be useful to have a vague idea of what Public-key cryptography is.
Hopefully this guide is useful to anyone looking to build a Let's Encrypt client, or anyone looking to understand more about how LE/ACME works. Following the guide, you should be able to create a fully fledged LE client and issue a valid certificate in less than an hour. The guide does assume you control a domain name.
Our specimen site is a static website powered by nginx, using DNSimple as the DNS provider (see Appendix 3: Our example site setup). The mechanics of how we pass LE's challenges are based on this sample setup - but treat these just as illustrative examples.
The guide and client code are all MIT licensed.
Technology
This example code is written in Ruby (I used 2.7.1), and is largely dependency free (apart from OpenSSL). We use HTTParty for more convenient API requests - but you could use vanilla Net::HTTP if you're a masochist 🙈. And we'll use additional gems to upload files and provision DNS records.
The choice of language is meant to be a background factor - the guide is (hopefully) illustrative & understandable even if you're not familiar with/interested in Ruby.
Credits
I heavily referenced Daniel Roesler's absolutely awesome acme-tiny and the ACME spec while writing this tutorial. I'd recommend checking out both as a supplement to this guide. Image credits at the bottom.
V1 → V2 migration
I've signposted any breaking (or notable) changes between V1 and V2 of the ACME spec/LE API with
Table of Contents
- Loading our client key-pair
- Constructing a Let's Encrypt API request
- Registering with Let's Encrypt
- Passing the challenge
- Issuing the certificate 🎉
- Appendix 1: Installing and testing the certificate
- Appendix 2: The trust chain & intermediate certificates
- Appendix 3: Our example site setup
- Appendix 4: Multiple subdomains
- Appendix 5: Key size
- Appendix 6: IDN support
- Appendix 7: Using EC client keys
- Appendix 8: Certificate expiry and revocation
- Further reading
- Image credits
- Author
- Changelog
1. Loading our client key-pair

The process of generating our certificate heavily depends on have a client key - or, more accurately key-pair (comprising our public key and private key).
We'll share our public key with Let's Encrypt when we register, and sign all our requests with our private key - Let's Encrypt can use our public key to ensure our requests are genuinely from us (that they've been signed by our private key). We'll never share our private key with Let's Encrypt. We won't share it with any 3rd parties; although our web-server (nginx in our example app) will need access to it in order to encrypt the data it sends to clients.
It's fine to use existing SSH keys, if you've already got them generated and they're long enough:
openssl rsa -in ~/.ssh/id_rsa -text -noout | head -n 1If you see Private-Key: (2048 bit) or Private-Key: (4096 bit) you're good to go (if you're interested, there's more info about key size in Appendix 5). Otherwise, we'll need to generate them:
ssh-keygen -m PEM -t rsa -b 4096Let's begin by loading our key-pair into Ruby:
require 'openssl'

client_key_path = File.expand_path('~/.ssh/id_rsa')
client_key = OpenSSL::PKey::RSA.new IO.read(client_key_path)
If our key is encrypted with a passphrase, we'll need to provide that as a 2nd argument:
client_key = OpenSSL::PKey::RSA.new(IO.read(client_key_path), 'letmein')2. Constructing a Let's Encrypt API request
The first, and probably hardest step, is constructing requests in the very particular format that Let's Encrypt demands. It's important to remember though, that in principle, the Let's Encrypt API is the same as any other API.
For example, using the Github API I can programmatically create an issue, by making a POST request to the target repo's /issues endpoint with a JSON payload that includes the issue title and body:
POST https://api.github.com/repos/alexpeattie/letsencrypt-fromscratch/issues

{
  "title": "Bad examples",
  "body": "The code examples in the guide are hard to understand!"
}
The key difference with the Let's Encrypt API is we can't just send our JSON payload in a nice human-readable format as above, because we'll be signing it with our client private key to prove our identity. This is what a request to the Let's Encrypt API looks like:
POST https://acme-v02.api.letsencrypt.org/directory/acme/new-acct

{
  "payload": "eyJyZXNvdXJjZSI6Im5ldy1jZXJ0IiwiY3NyIjoiTUlJRVhEQ0NBa1FDQVFBd0Z6RVZNQk1HQTFVRUF3d01abWxzWlhNdWNHVm5MbU52TUlJQ0lqQU5CZ2txaGtpRzl3MEJBUUVGQUFPQ0FnOEFNSUlDQ2dLQ0FnRUE2ZG9JNWdlc1VWZVV2czJXN1h3LV9JcDg2eFl3ZnV0MDVNWE1aYWpWa3lMS1lhNHpjdGs3Y2hIN1ZuQWsxVF9uTXNaM0hYTlQ3X0J0R1hkYnlJR0FqRXhpR3F4cm5LejJqSS1JTVRNU1RKSklmRVhDUVJqUkx2U0c2S3VYbXk2aGhkS3BLMkpRam10OTh0QmxUY0NxbFFKNGRZWV9oMVFCTmYwZmUwN3p4T24zUXlaeU9Da05GMkdGQmZoSWZqTGRuVXJCbDBSejlTSUhLZkZTWW13SldKMTBBLWJiNVdRM2FkUWlNWF83amhYWHVBdUdDZnRBZ2h1UGdPWjlTalJXYVBpalNkOUxERWk1Y2pCalFsN1o4a0ZKTnV0VndSQlNFTDFIQVVNWE9ndkxKLW5mVjV4Tm15VHdmYTRsdXV4WEtsVnpJZFlmZDRUZWV1NHhwUTAxb29vQ0dLRUVCZ3VMQzdQLUtjemg4MUxXaTZtcExIRVZwOTNzWi1QZDZvNlROMFlabVZjaUwtNlJpTGRXY2hUeEtkbjNvTS1UYmRBTUVxb3VmTU5JYkh6LUVHREFxUkhGOUxCTU43bFlPcWJ0dWFmcjduN1EtVmQxN19KTGIxcnpONVFmclZvd2o4cUJpUHlRUndXbDhqN2hiLVpCR1NpMlJNb0V3LWNURG1KYjIweWUwQXZrWHhqVmxqbTN1aGpWVWRHTEtTQ0dfM1I4V0VuWEI3akRTV3Zpd0NEdDFKLWtPSW5EOEVUcjFvVDJKWWJ5N0FsaS12R25jdjJRdlhSb010RG9MN3F0MmkzSHNNZzhORjFDSHVhRUQ3RXdiTEMwRTRpWnZfcUw2WW45endqMVZ2bUZtbjA3T1ItanVOYkFnUXAtb01XR1lORDFKMnRpSW5QV0RtVUNBd0VBQWFBQU1BMEdDU3FHU0liM0RRRUJDd1VBQTRJQ0FRREdPdjUxc1hlUWNSLVhYMmUtbDZfSEt1WjNfVTdKbTJmNWtMMWJvbkpwOUM0UExacVNZMzNDZE5FbE1BcEVRczFzLTVhWEJCemRYWWE1X05hTFB2cm5fRm5mb2d1cnJHOXV6cU1vT0QtMjMtUnd5QkNLZFpNQ3gyVmd0YWNFU3RiZ2RLamNMRnRNRVE4YnR1NHIxMXVKQWlrblRIQnk4V3ZmaHREVS1Da0FkT2FYZV8zMktKSVV4Z05LSzhiYnRVUGlFc21jd3VqUGVzUkprWUh1QWVKc2JFQkY5ekVZNjlCazZiZVZKUUpxRjR4VjhYYmJheGZSX1N6TG5NWnJZNFhoNDNXbGRPN1UzZm9BZHYtLWk3eTlDbDUxaTJRV1RZMHFGcGVmd19nUU93SFFWMW9BRWJ0OWwyYkgyNGEtZ2NKUE9RNEhTdTBEV0ZHaFdSVkVuMUJsQ01XMkxGQnp2elpzMGdIaFhnQ1psVnNGcE1nYndJMThBLTA4UjZvS2FRWC1fM2tDb0FIaXcxQ1pdanaVQ1ZVOVRZNXNUMVlnZXBJVzBkT0VHYXY3YUJMXzNCbk9HVzVlMlZ2LXN5aGVSZS1ORzhXTEZiOHRyc2hMYTRPOVVjS3h3Nzl0MjFGaEhUYXhIblJLcDhFR3p3M2ZoZElMUW42YVlkb0k4Wm9faGJJaUE0cEhoMXlCbGpLU2Q3Zk1xTzkzX3JxV2Y4NzRfd2Q4N3RhcDFmb1pyZ1dYMVU5Wm9ZUnhFZ0FQOVN1cUdrcTJVUl9ucU9CQl9XaVBPM2ZGcFc3cTB6UEp1QUtBNWZIdDdFRG1HUldkTWNGXzM0SDdNenZPQk4tckI2S3VZTUtzWXpkS1ZEMDhwUnhUVVhKc3Nrb2t2MVF3aGNmNklzdEFtMDJ6bjhfWHBRIn0",
  "protected": "eyJhbGciOiJSUzI1NiIsImp3ayI6eyJlIjoiQVFBQiIsImt0eTI6IlJTQSIsIm4iOiJ4VlpHX2g2QjMxNHRWX1VORy1LVUFfd2xkUnVSalh2ZGNMd3d0ek9TQkJqQTFhR2Etd2FiVlVqYXpmMkRyUFdIbGhpRmxmb20wc1YwSmdSMkFrNVlkbHI0T09UcVdDUTZtLTRMbmw3MUR2VXMtdThlUXdjTFBzcC1jY21SVzN2WUd1WG9TUDctVEVNOU1TZkFJLWplSjl2WGV5RFVHUURURDFGY0JjWmg4ODZ0UjZMd3lIQlViRTBhRDdJNUk2cEtyNWtuMjR1dG5YY1EwTE5vVE93anljZAv3emIta0dZSEtmSGRLNUNoeDFYTFVrWkl3N1NZcWVQVGNoY0JSc242V09ZTFotb3JUNEc1OENTTmJxcFdhNnFlUkRpakPNZ3VVWmZhSlB1WkxKbDhVTElodGltMGsxWTJlLVg4dENObi1xYWNyYWljVzZtUGRsUmNCVVhBelEifSwibm9uY2UiOiJidGY3SFpROHlvVERGNVphWjdaSnVGR05tOWR2cWhyNmdWVHR0NHZYbmFvIn0",
  "signature": "Mo1ZVEkT_QjsH4Yy98tTm3JEpsccnriVn5L18yjN2O1ea57V3apkDkkMb_3wleJ0YJskSuNrvtftJOC_-OqeT1_qbq4AjugEqMPle5I7VUAzshnh1DL7YiAgds5Fm06VtCuWUns5owF2MtVmjKMJHdHc9a_9-jilQsFWrTHEZgTt_ebBHazFpiEVcqoNCxhho-XxWZaHlvDOncJXUnqG0SWIa0OeM5Gm80jlPRlQoE5Wp6RqQvn1Fsb3NpzMUEQwD-s9JCvB4U2tQdpGLM5ynfbFwlgyS1AgKiQ4FLEftc55Yo9yOo0bXEugM7aDZS7-_TjqFD_N7r0IJHPp8fXrCQ"
}
This is what's called a JWS (JSON Web Signature), specifically a variant of "JWS Using Flattened JWS JSON Serialization" from RFC 7515. Scary stuff eh 👻?
Don't worry, it's not really as intimidating as it looks. In this section we'll explain the anatomy of these curious looking requests, and write code to make them ourselves.
a. The anatomy of a Let's Encrypt request
Let's look at our request again, this time, I'll truncate the encoded data a bit for readability:
POST https://acme-v02.api.letsencrypt.org/acme/new-acct

{
  "payload": "eyJyZXNvdXJjZSI6Im5ldy1jZ...",
  "protected": "eyJhbGciOiJSUzI1NiIsImp3a...",
  "signature": "Mo1ZVEkT_QjsH4Yy98tTm3JEp..."
}
Notice that we have three keys in the JSON we're POSTing to Let's Encrypt: "payload", "protected" and "signature". All requests we send to LE will contain only these keys, which each serve a distinct role.
⚠️ V2 breaking change: requests previously used to include an unprotected header (provided with the key"header").
"payload", as the name, implies is where the 'meat' of the request goes. Remember our Github example, where we provided the title and body of the issue we were creating? This is the kind of that goes into payload. If we're registering an account, the payload will contain our registration details (email, name, contact details etc.). If we're ordering a certificate, the payload will contain the domain names we're looking to secure.
⚠️ V2 breaking change: payload used to include the resource type with each request (e.g.{"resource":"new-reg"}); this is no longer the case in V2.
"protected" is short for 'integrity-protected header'; this is where we include some important metadata. First we confirm the URL we're requesting and include a nonce (see part d) - this makes it difficult for an attacker to try and redirect or replay our requests. We also include details about our public key - either by sending the important parts of the key in a special format, or a unique ID for the key which LE keeps on file. LE will then use the public key to verify the...
"signature" - this simply takes the previous two parts of the request ("payload" and "protected"), and cryptographically signs them. This means that if an attacker was to intercept our attack, change an element of the payload or header, then forward on the request, LE will recognize the tampering and reject the request.
b. Base64 all the things
One problem we'll run into is that when we sign our payload and header with our key, we might not get ASCII out, even if we're only putting ASCII in. We can see this for ourselves:
puts client_key.sign OpenSSL::Digest::SHA256.new, 'Hello world'
��ۉ��7�xM��\�AU=�KGQ��ao�:Q-H�WW�a_Ԇ����+a
                                          ���|X]�s}V�oya���'68L6����P�����f��yKV���
�I@���a��[�����C���VXM+�
                        ��oQ�@�B�"]Uzr�N�R]]{9;�N:��G�ӗaM�S��H�ŵq���Bq�9��  ��So�Q���tk�;����z��d�<=�� +B
_t�
   �����~����<˯ޤ
                �%�k��
To avoid dealing with non-ASCII characters we'll need to Base64 encode most of our data. The good news is Ruby comes with Base64 handling as part of the standard library:
Base64.urlsafe_encode64('test')
 #=> "dGVzdA=="
There is a small tweak we'll need to make to keep Let's Encrypt happy - removing the padding characters (=) from our encoded data:
Base64.urlsafe_encode64('test', padding: false)Let's wrap that in a helper method - we'll be using it a lot as we build our request:
def base64_le(data)
  Base64.urlsafe_encode64(data).delete('=')
end
A quick sidenote: Base64 is just encoding, not encryption. It's not meant to keep the details of our request secret, it's really just to avoid headaches with character encodings.
c. Payload
The payload will differ for each request - it's where we put any information that's important for the request we're making (e.g. our email address when we register a new account). The good news is that we simple apply our Base64 encoding and we're done:
base64_le '{"contact":["mailto:me@alexpeattie.com"]}'
 #=> "eyJjb250YWN0IjpbIm1haWx0bzptZUBhbGV4cGVhdHRpZS5jb20iXX0"
This a totally valid payload that we can send to Let's Encrypt. Obviously it'll be more convenient not to have to construct JSON strings by hand - so let's load in the JSON library (again part of the Ruby standard lib):
require 'json'

base64_le JSON.dump(contact: ['mailto:me@alexpeattie.com'])
 #=> "eyJjb250YWN0IjpbIm1haWx0bzptZUBhbGV4cGVhdHRpZS5jb20iXX0"
For further convenience, we can make our Base64 helper method smarter. If the data we pass in is an array or hash, it should JSONify the data before encoding it:
def base64_le(data)
  txt_data = data.respond_to?(:entries) ? JSON.dump(data) : data
  Base64.urlsafe_encode64(txt_data).delete('=')
end
That's all we need for our payload 😄! As well as providing information about the request we want to make, the payload will form one half of the data we'll be signing.
d. Protected header
We'll need to give Let's Encrypt two things for it to validate the authenticity of the request: our public key, and the cryptographic hashing algorithm we're using to generate the signature.
The protected header is where we include metadata which allows Let's Encrypt to validate the authenticity of our request, and makes the request more difficult forge, replay or redirect.
In the next section, we'll cryptographically sign our payload and header, to protect our request from tampering. The first thing we'll need to do is give LE a heads-up as to the particular signing algorithm we're planning to use. We'll use the RSA with SHA-256 algorithm (or more formally, RSA PKCS#1 v1.5 signature with SHA-256) - we specify this choice with the "alg" key:
def protected_header
  metadata = {
    alg: 'RS256'
  }

  base64_le(metadata)
end
(Currently LE supports a few other signing algorithms: ES256, ES384 and ES512 - but RS256 is by far the most popular choice. If you're interested in using elliptic curve signature algorithms - the ES* family - see Appendix 7).
Our choice of signing algorithm is one half of what LE will need to verify our signature - the other half is the public part of our signing key. There are two ways we'll bundle our public key into our protected header. When we set up our account for the first time, we'll send our public key as a JSON web key (JWK). JWK is a widely-used standard for sharing keys via JSON. Once we've registered our account and public key, LE will give use a unique key ID which we can use to reference our public key (which LE will store). For all subsequent requests, we'll just reference this key ID (kid).
⚠️ V2 breaking change: the use ofkidis one of the major departures from ACME V1. In V1 we'd send our JWK with each request, andkiddidn't exist.
Let's start with sending our public key as a JWK (which we'll do during account creation). The parts of the key we're interested in are the public key exponent (e) and the modulus (n). Helpfully our client_key has corresponding methods (client_key.e and client_key.n) - the only additionally steps we need to take are converting them to binary strings with to_s(2) (documented here), then (you guessed it), Base64 encoding them.
We'll additionally have to specify the key type (kty) of client_key - in our case, it's an RSA key. We'll wrap everything in a jwk convenience method:
def jwk
  {
    e: base64_le(client_key.e.to_s(2)),
    kty: 'RSA',
    n: base64_le(client_key.n.to_s(2)),
  }
end

def protected_header
  metadata = {
    alg: 'RS256',
    jwk: jwk
  }

  base64_le(metadata)
end
We can now send our public key in JWK format - but (typically) we'll only do this once. After creating our account, we'll need to instead use the unique key ID that LE will assign to our stored public key. When we pass this kid, we provide it in place of our jwk:
def protected_header(kid = nil)
  metadata = { alg: 'RS256' }

  if kid
    metadata.merge!({ kid: kid })
  else
    metadata.merge!({ jwk: jwk })
  end

  return base64_le(metadata)
end
Another important piece of metadata is the URL we're requesting - this will prevent an attacker from trying to sneakily redirect our request to another Let's Encrypt URL without the server noticing:
⚠️ V2 breaking change: the requirement to include the URL with each request is new in V2.
def protected_header(url, kid = nil)
  metadata = { alg: 'RS256', url: url }

  if kid
    metadata.merge!({ kid: kid })
  else
    metadata.merge!({ jwk: jwk })
  end

  return base64_le(metadata)
end
We're almost done, but there's one additional preventative method we'll use to protect against would-be attackers 👹...
e. Nonce
To protect against replay attacks, we'll add in a cryptographic nonce. The linked articles go into lots of detail, but a nonce is basically a one-time use code which we must attach to our request. It means if an attacker somehow sniffs out a request we made, and makes a carbon-copy duplicate request, the attackers attempt will fail (because the nonce has already been used).

Let's Encrypt provides us a nonce in the Replay-Nonce header of every request, so an efficient approach would be to save the nonce from each request, and use it for the subsequent one. LE also gives us a dedicated endpoint for fetching a new nonce (/acme/new-nonce) , so a lazier (but simpler) approach is to fetch fresh nonces from here for each request.
Ruby comes with the Net::HTTP library built in for making HTTP requests, but it's a bit cumbersome. To make our life easier, we'll use HTTParty - although this is by no means a necessity.
gem install httpartyrequire 'httparty'(Note: you can also grab the Gemfile provided in this repository, and bundle install to save yourself some typing.)
We'll send HTTParty's debug output to $stdout so we can see easily see the requests/responses happening:
HTTParty::Basement.default_options.update(debug_output: $stdout)Now we're ready to make a request to the new nonce endpoint. Because we only need the headers, we can just make a HEAD request:
ℹ️ V2 change: the new nonce endpoint is an addition in V2.
def nonce
  HTTParty.head('https://acme-v02.api.letsencrypt.org/acme/new-nonce')['Replay-Nonce']
end
(I'm hard-coding the new nonce endpoint here, which is bad practice 🙊. Don't worry, I'll fix it part g.)
This gives us the final piece of our integrity protected header:
def protected_header(url, kid = nil)
  metadata = { alg: 'RS256', nonce: nonce, url: url }

  if kid
    metadata.merge!({ kid: kid })
  else
    metadata.merge!({ jwk: jwk })
  end

  return base64_le(metadata)
end
f. Signature
The last step to construct our request is to prove its authenticity with a signature, generated using our client private key. First, let's consolidate everything we have so far:
require 'openssl'
require 'base64'
require 'json'
require 'httparty'

def base64_le(data)
  txt_data = data.respond_to?(:entries) ? JSON.dump(data) : data
  Base64.urlsafe_encode64(txt_data).delete('=')
end

client_key_path = File.expand_path('~/.ssh/id_rsa')
client_key = OpenSSL::PKey::RSA.new IO.read(client_key_path)

payload = { some: 'data' }

def jwk
  {
    e: base64_le(client_key.e.to_s(2)),
    kty: 'RSA',
    n: base64_le(client_key.n.to_s(2)),
  }
end

def protected_header(url, kid = nil)
  metadata = { alg: 'RS256', nonce: nonce, url: url }

  if kid
    metadata.merge!({ kid: kid })
  else
    metadata.merge!({ jwk: jwk })
  end

  return base64_le(metadata)
end

def nonce
  HTTParty.head('https://acme-v02.api.letsencrypt.org/acme/new-nonce')['Replay-Nonce']
end

request = {
  payload: base64_le(payload),
  protected: protected_header('/some-url')
}
As mentioned above, we'll be using the SHA-256 hash function for our signing:
hash_algo = OpenSSL::Digest::SHA256.newThe specific data we'll need to sign is simply our protected header and our payload, joined with a period:
request[:signature] = client_key.sign(hash_algo, [ request[:protected], request[:payload] ].join('.'))g. Making requests
⚠️ V2 breaking change: the LE API requires the correct Content-Type in POST requests as of March 2018.
Now we've built the request data just as Let's Encrypt wants, we have everything we need to start making requests. Per the ACME spec (Section 6.2):
Because client requests in ACME carry JWS objects in the Flattened JSON Serialization, they must have the "Content-Type" header field set to "application/jose+json"
So, our final request looks like this:
HTTParty.post(some_api_endpoint, body: JSON.dump(request), headers: { 'Content-Type' => 'application/jose+json' })
⚠️ V2 breaking change: the requirement for theContent-Type: application/jose+jsonheader is new in V2.
Let's put everything into a reusable method that can take an arbitrary URL and payload. We'll make the default payload an empty string - we'll use this default whenever we simply want to read a resource (rather than creating/updating anything). Usually we'd use a GET request for this (this is actually how it used to work), but since 2018 the best practice securely sign every request, even when we're just reading resources. The ACME spec calls this the "POST-as-GET" pattern:
def signed_request(url, payload: '', kid: nil)
  request = {
    payload: base64_le(payload),
    protected: protected_header(url, kid)
  }
  request[:signature] = base64_le client_key.sign(hash_algo, [request[:protected], request[:payload]].join('.'))

  HTTParty.post(url, body: JSON.dump(request), headers: { 'Content-Type' => 'application/jose+json' })
end
Let's also move client_key and hash_algo into their own methods. Here's everything we have so far:
HTTParty::Basement.default_options.update(debug_output: $stdout)

def client_key
  @client_key ||= begin
    client_key_path = File.expand_path('~/.ssh/id_rsa')
    OpenSSL::PKey::RSA.new IO.read(client_key_path)
  end
end

def header
  @header ||= {
    alg: 'RS256',
    jwk: {
      e: base64_le(client_key.e.to_s(2)),
      kty: 'RSA',
      n: base64_le(client_key.n.to_s(2))
    }
  }
end

def hash_algo
  OpenSSL::Digest::SHA256.new
end

def jwk
  {
    e: base64_le(client_key.e.to_s(2)),
    kty: 'RSA',
    n: base64_le(client_key.n.to_s(2)),
  }
end

def protected_header(url, kid = nil)
  metadata = { alg: 'RS256', nonce: nonce, url: url }

  if kid
    metadata.merge!({ kid: kid })
  else
    metadata.merge!({ jwk: jwk })
  end

  return base64_le(metadata)
end

def nonce
  HTTParty.head('https://acme-v02.api.letsencrypt.org/acme/new-nonce')['Replay-Nonce']
end

def signed_request(url, payload: '', kid: nil)
  request = {
    payload: base64_le(payload),
    protected: protected_header(url, kid)
  }
  request[:signature] = base64_le client_key.sign(hash_algo, [request[:protected], request[:payload]].join('.'))

  HTTParty.post(url, body: JSON.dump(request))
end
h. Fetching the endpoints
I mentioned above that we should avoid hard-coding the URLs our client uses - the best-practice is to instead a special /directory endpoint. This directory lists all the key endpoints we'll need to get started with our key actions (registering a user, authorizing a domain, issuing a certificate etc.):
{
  "keyChange": "https://acme-v02.api.letsencrypt.org/acme/key-change",
  "meta": {
    "caaIdentities": ["letsencrypt.org"],
    "termsOfService": "https://letsencrypt.org/documents/LE-SA-v1.2-November-15-2017.pdf",
    "website": "https://letsencrypt.org"
  },
  "newAccount": "https://acme-v02.api.letsencrypt.org/acme/new-acct",
  "newNonce": "https://acme-v02.api.letsencrypt.org/acme/new-nonce",
  "newOrder": "https://acme-v02.api.letsencrypt.org/acme/new-order",
  "revokeCert": "https://acme-v02.api.letsencrypt.org/acme/revoke-cert",
  "z93cEwMHcG8": "https://community.letsencrypt.org/t/adding-random-entries-to-the-directory/33417"
}
⚠️ V2 breaking change: several endpoints have been renamed, and LE has switched from kebab-case to camelCase.
(Note: unlike most of the API's endpoints, the directory is viewable without any kind of special signed request, you can just visit it in your browser).
The camel-cased keys in the JSON object indicate the action (newAccount for account registration, newOrder to order a certificate etc.), and the values are the URI we'll need to make a signed request to. Even though Cool URIs don't change, using the directory means we don't have to hard-code the endpoints - and so our client is more resilient to any changes Let's Encrypt might make (credit to @kelunik for originally suggesting this).
To avoid making repeated requests to the directory, let's make an endpoints method:
def endpoints
  @endpoints ||= HTTParty.get('https://acme-v02.api.letsencrypt.org/directory').to_h
end
I like to move the directory URI into a constant, to make it clear that this value shouldn't be changed at runtime:
DIRECTORY_URI = 'https://acme-v02.api.letsencrypt.org/directory'.freeze

def endpoints
  @endpoints ||= HTTParty.get(DIRECTORY_URI).to_h
end

def nonce
  HTTParty.head(endpoints['newNonce'])['Replay-Nonce']
end
The neat thing is that this DIRECTORY_URI is the only URI we need to hard-code; every other endpoint we can either pull from the directory, or from the API's responses. Another nice side-effect is we can very easily switch from the production Let's Encrypt API (the default used in this guide) to the LE staging environment:
DIRECTORY_URI = 'https://acme-staging-v02.api.letsencrypt.org/directory'.freezeCertificates generated by the staging environment won't be trusted by browsers, but it does have much more generous rate limits - so it can be handy when we're developing LE/ACME clients.
3. Registering with Let's Encrypt
OK, we've laid the foundations - let's make our first actual request to the Let's Encrypt API! The first step is to register our client public key with Let's Encrypt.
First, we should ensure the user has read and accepted the Let's Encrypt Terms of Service. We can skip this skip if we want to be naughty, but per the ACME spec:
Clients SHOULD NOT automatically agree to terms by default. Rather, they SHOULD require some user interaction for agreement to terms.
For our user interaction, we'll just print the ToS URL and get the user to confirm they're happy. We can grab the latest terms URL from the directory (under meta.termsOfService):
tos_url = endpoints['meta']['termsOfService']
accept_tos = "N"
until accept_tos == "Y"
  puts "Do you accept the LetsEncrypt terms? (#{ tos_url })"
  accept_tos = gets.upcase.chars.first
end
On to account creation! Since we're sending the public key with every request (in the header property of our JSON), we don't need to include much to register an account. In fact, we can register a valid account by just indicating that we accept the ToS:
new_registration = signed_request(endpoints['newAccount'], payload: {
  termsOfServiceAgreed: true
})
⚠️ V2 breaking change: the flow for accepting terms has changed. You used to be able to register an account, which would be inactive until the ToS were accepted. It's now mandatory to accept the terms at the point of account creation.
(Unsurprisingly, if termsOfServiceAgreed is anything other than true, we'll get a rejection).
We can optionally provide contact details (highly recommended), this will allow us to recover our key in case we lose it. We'll need to include the protocols for the contact details we provide, namely mailto: for email addresses (which is all that ACME/LE currently supports).
⚠️ V2 breaking change: ACME used to support adding telephone numbers with thetel:prefix, this seems to have been removed.
new_registration = signed_request(endpoints['newAccount'], payload: {
  termsOfServiceAgreed: true,
  contact: ['mailto:me@alexpeattie.com']
})
Note that Let's Encrypt will validate the domain the email address belongs to, so a made up email address will trigger a rejection.
Responses
Sending the request should give us back a successful response:
-> "HTTP/1.1 201 Created\r\n"
-> "Link: <https://letsencrypt.org/documents/LE-SA-v1.2-November-15-2017.pdf>;rel=\"terms-of-service\"\r\n"
-> "Location: https://acme-v02.api.letsencrypt.org/acme/acct/5895484\r\n"
...
reading 919 bytes...
{
  "key": {
    "kty": "RSA",
    "n": "wHSRCVc0AI_G36MePdFotkyrTIgzgVuDXFValp7Vm-Qu0mVdS06h_Gjulrwj1TseXbE5Q90qIPSCaHKhV4jr0ahq6qRam2LsBh3HfQz8A3eZ5AoVOlBg7xwBbYgA2QVYlfqQbHmlfu_ZSxk6oCHjtGg3ld6VsC_FG67Ab08uGAlXQyGtsOolo7AOcduJqdCG-jgWeaw_g0FH8kmO0GhG88m7m3H3Cbe0GjQr8Mvz-T43axln87tY3u21IbfWpoEM87JHUJ9z_Csx26Hgi7BObkUjJqXK3LCV9dnAKuQqNA2ewWd35zMCdE95TZ03vB21GlAM3o4orTUQERoWcmcMxl8vghRjlp1vH6_btPDGaN-dVLQ_AE0eTXeIPbGCM4Tb7wJsWkv0qtw1xXXe8kVQeBKcaMQrI1zaW0EB1kp0_NP9NdLMZnYVtsOOrOHpj42d6rIsYyv3EmQwYHArpQJFs335SmCoTFjKTu0NMhjLU0P6ERay7VINPCjoEJXd5D7QtO1BLrq5A2kV0LNT9pxeQkoQctRS9M3mNFvhvf2qnM6d4AJpysmGnH95a8VLTOUaxY_EXudD3sfmM0uCPEB_C-jRCHO8CRhDIVX_rPW-muQ_wAqrbm73r9_Wd5kO-jKsbnBXbiXLjcR06bjioHn4DGkCoi5viW64TsEPxexpn48",
    "e": "AQAB"
  },
  "contact": [
    "mailto:me@alexpeattie.com"
  ],
  "initialIp": "123.456.744.89",
  "createdAt": "2020-05-09T16:47:29Z",
  "status": "valid"
}
The successful response basically just echoes back to us our registration details. We can see the exponent + modulus (e and n) values of our public key included at the top, as well as the unique id of our new account. Most important is our unique account URL in the Location header, in our case: https://acme-v02.api.letsencrypt.org/acme/acct/5895484. This will serve as the identifier for our public key, so we won't need to send our exponent + modulus going forward. Let's save our kid for future requests:
kid = new_registration.headers['Location']Note that LE verifies the domains of emails we provide (by checking their DNS A record), so make sure it's a real domain, otherwise you'll get an 400 (Bad Request) response:
{
  "type": "urn:acme:error:malformed",
  "detail": "Error creating new registration :: Validation of contact mailto:alex@artichokesandarmadillos.com failed: Server failure at resolver",
  "status": 400
}
(We'll also hit a 400 error if we try and use an @example.com address, so if you're using client.rb be sure to enter in proper contact details). If we try and register the same key again we'll get an empty 200 (OK) response:
-> "HTTP/1.1 200 OK"
-> "Content-Type: application/problem+json"
-> "Location: https://acme-v02.api.letsencrypt.org/acme/acct/5895484"
...
reading 0 bytes...
-> ""
Note that our account URL (kid) is again sent to us in the Location header - so this can be useful if we need to fetch the kid for an existing public key/account
4. Passing the challenge

The next step is to inform Let's Encrypt which domain or subdomain we to provision a certificate for. In this guide I'm using the example le.alexpeattie.com. This is the first part of a multistep verification process to prove we're the legitimate owner of the domain:
- a). We place an order with LE
- b). LE gives us a challenge to prove we control the domain
- c) or d). We complete the HTTP- or DNS-based challenge, and notify LE that we're ready
- e). LE checks the challenge has been completed to it's satisfaction
- f). We verify that LE is happy the challenge has been passed 🏆
Challenges are how we prove a sufficient level of control over the identifier (domain name) in question. We can do this either by serving a specific response when LE hits a specific URL (which generally means uploading a file to our web-server), or by provisioning a DNS record. We'll need to use the latter type of challenge (DNS-based) if we want to issue a wildcard certificate.
⚠️ V2 breaking change: previous ACME versions provided challenges which leveraged the Server Name Indication extension of TLS to serve a special self-signed certificate. These challenges have been removed from the finalized ACME spec - partly due to a vulnerability affected TLS-SNI on shared hosting infrastructures (see here).tls-sni-01has now been superseded bytls-alpn-01, but that's beyond the scope of this guide.
a. Placing our order with Let's Encrypt
Asking LE to begin the process of certificate issuance is just a case of making another request to the LE API - this time to create a newOrder.
⚠️ V2 breaking change: we used to instead create an authorization directly. Now we create an order, and LE sends us a link to the authorization(s).
As you can probably guess, this means making a request to the newOrder endpoint. Beyond that just need tell LE what identifier (domain name) we want to authorize:
order = signed_request(endpoints['newOrder'], payload: {
  identifiers: [{
    type: 'dns',
    value: domain
  }]
}, kid: kid)
Note that for this signed_request, as we'll do for every request after registering, we provide the kid we saved earlier.
The ACME spec is designed to be flexible enough to authorize more than just domain names in the future - which is why we have to explicitly state we're authorizing a domain name with type: 'dns'. We could authorize the root domain with value: 'alexpeattie.com', or for all immediate subdomains (i.e. create a wildcard certificate) with value: '*.alexpeattie.com'. We can also provide a Punycode encoded IDN, see Appendix 6. As you can probably guess, since "identifiers" is an array, we could send through multiple explicit domains too.
b. Let's Encrypt gives us our challenges
Assuming the domain we sent was properly formatted, Let's Encrypt should return a response like this:
{
  "status": "pending",
  "expires": "2020-05-16T16:47:30Z",
  "identifiers": [
    {
      "type": "dns",
      "value": "le.alexpeattie.com"
    }
  ],
  "authorizations": [
    "https://acme-v02.api.letsencrypt.org/acme/authz-v3/4474222123"
  ],
  "finalize": "https://acme-v02.api.letsencrypt.org/acme/finalize/85702020/3301243121"
}
Our order's been successfully created, but it's initial status is "pending" which means we haven't proven to LE that we control the domain; we're aiming to change it to "ready" (so we can request our certificate) and then ultimately "valid" (once our certificate has been issued). LE also sends us some important URLs: our "authorizations" (1 for each of the "identifiers" in the last step) - this is what we'll use to fetch our challenges shortly. The "finalize" URL will issue the certificate once our challenge is passed.
Also notice that our order has an expiry date: 1 week after are order was placed. We need to validate our control of the requested the domain by then, otherwise this order will expire and we'll need to place a new one. The good news is that passing the challenge should only take a few minutes 😇.
Let's begin by looking at what's inside our "authorizations" URL. :
signed_request(order['authorizations'].first, kid: kid){
"identifier": {
"type": "dns",
"value": "le.example.com"
},
"status": "pending",
"expires": "2020-05-16T16:47:30Z",
"challenges": [
{
"type": "http-01",
"status": "pending",
"url": "https://acme-v02.api.letsencrypt.org/acme/chall-v3/4490201234/DAPqRQ",
"token": "uUhfwl5Tlf6F7vb49akkOhSqli0dqiFv3a9rPi0afk39"
},
{
"type": "dns-01",
"status": "pending",
"url": "https://acme-v02.api.letsencrypt.org/acme/chall-v3/4490201234/rgEuWQ",
"token": "uUhfwl5Tlf6F7vb49akkOhSqli0dqiFv3a9rPi0afk39"
},
{
"type": "tls-alpn-01",
"status": "pending",
"url": "https://acme-v02.api.letsencrypt.org/acme/chall-v3/4490201234/fV9rgQ",
"token": "uUhfwl5Tlf6F7vb49akkOhSqli0dqiFv3a9rPi0afk39"
}
]
}Notice this is the first time we're making a GET-like request (a POST-as-GET request, as explained above), where we don't include any payload.
We can see our "identifier" is echoed back to us, along with the authorization's "status" and "expiry" which matches that of our order. We're most only interested in the "challenges"; we're provided with three distinct challenges corresponding with the three means we can convince LE we own the domain:
- Crafting a specific HTTP response to a special endpoint for
http-01 - Provisioning a special DNS record for
dns-01 - Offering a specified temporary certificate for
tns-alpn-01(not covered in this guide)
When we created our newOrder we mentioned we'd be given one authorization URL for each identifier we provided. For the main tutorial we'll only handle the client sending a single domain/identifier (hence order['authorizations'].first) - see Appendix 4 for how we can extend our client to handle multiple identifiers. Next, we'll pick out our HTTP and DNS challenges:
challenges = signed_request(order['authorizations'].first, kid: kid)['challenges']

http_challenges, dns_challenges = ['http-01', 'dns-01'].map do |challenge_type|
  challenges.select { |challenge| challenge['type'] == challenge_type }
end
Each of our challenges has four components:
{
  "type": "http-01",
  "status": "pending",
  "url": "https://acme-v02.api.letsencrypt.org/acme/chall-v3/4490201234/DAPqRQ",
  "token": "uUhfwl5Tlf6F7vb49akkOhSqli0dqiFv3a9rPi0afk39"
}
⚠️ V2 breaking change:"url"has been renamed from"uri"in V2.
The "type" of the challenge is already familiar. The challenge's "status" will indicate ultimately indicate if we've passed the challenge (indicating we control the domain in question, and are thus eligible for a certificate). The "url" of the challenge will allow us to notify LE that we're ready to take the challenge, and to easily check if we've passed. Lastly, the "token" is a unique, unguessable, random value sent to us by LE that we'll need to incorporate into our challenge response to prove we control the domain. Exactly how we'll incorporate our token depends on which kind of challenge we're taking....
c. Option 1: Completing the http-01 challenge
Our first option is the http-01 challenge. To pass this we need to ensure that when LE makes a request to
http://<< Domain >>/.well-known/acme-challenge/<< Challenge token >>
They receive a specific response (more on that below). Our domain is le.alexpeattie.com, .well-known/acme-challenge/ is a fixed path defined by ACME, and our challenge token is uUhfwl5Tlf6F7vb49akkOhSqli0dqiFv3a9rPi0afk39, so the endpoint we'll need to serve the response from is:
http://le.alexpeattie.com/.well-known/acme-challenge/uUhfwl5Tlf6F7vb49akkOhSqli0dqiFv3a9rPi0afk39
Since our challenge relies on a static URL which incorporates our domain exactly, the http-01 challenge isn't suitable for issuing wildcard certificates - for that we'll have to use the the dns-01 challenge (see below).
The key authorization
First we'll create our key authorization: the special response LE expects to be served. It's quite simple - it's the challenge token and a 'thumbprint' of our public key joined with a period.
We're using the JSON Web Key standard to share details of our public key already (in the jwk field of our header). To generate the thumbprint we need to generate a digest of our JSON Web Key using SHA256, and Base64 encode it (see RFC 7638 for more).
Our final code for the thumbprint method looks like this:
def thumbprint
  key_digest = Digest::SHA256.digest(JSON.dump(jwk))
  base64_le(key_digest)
end
And for our final challenge response:
http_challenge_response = [http_challenge['token'], thumbprint].join('.')Uploading the challenge response
To prove to LE that we control a domain, http://example.com/.well-known/acme-challenge/<< Challenge token >> needs respond with << Challenge token >>.<< JWK thumbprint >>. Because this is just a toy client, we'll create the file locally, then upload it (using SCP) to our remote nginx server - a more usual approach would be to run the LE client on the server (so we can just write the necessary files directly to disk).
We'll use the net-scp gem for easier SCP uploads:
gem install net-scp
Since we're serving static files with nginx from /usr/share/nginx/html, so we'll first want to create the .well-known/acme-challenge directory:
ssh root@162.243.201.152 'mkdir -p /usr/share/nginx/html/.well-known/acme-challenge'
The code for uploading the challenge is quite straightforward:
require 'stringio'
require 'net/scp'

def upload(file_contents, remote_path)
  server_ip = '162.243.201.152' # see Appendix 3
  Net::SCP.upload!(server_ip, 'root', StringIO.new(file_contents), remote_path)
end

# ..
destination_dir = '/usr/share/nginx/html/.well-known/acme-challenge/'

upload(http_challenge_response, destination_dir + http_challenge['token'])
Our simple nginx setup (see Appendix 3) serves static files (if they exist) for any endpoint, so this should be all we need to ensure that a request to http://le.alexpeattie.com/.well-known/acme-challenge/w2iwBwQq2ByOTEBm6oWtq5nNydu3Oe0tU_H24X-8J10 returns our key authorization as its response (we could easily test this by going to the URL in a browser).
d. Option 2: Completing the dns-01 challenge
The dns-01 challenge was introduced at the beginning of 2016, allowing us to authorize our domain(s) by provisioning DNS records. The key differences between the http-01 challenge and the dns-01 challenge are:
- We'll add a DNS TXT record rather than uploading a file
- Rather than using "raw" key authorization as the record's contents, we'll use its (Base64 encoded) SHA-256 digest (see below)
There are lots of ways to add the required DNS record - most DNS services provide a web interface (instructions for common providers here) - we'll be programmatically adding a record using the DNSimple API & associated gem.
The key ingredients of a DNS record are its type, name and value/contents. The type of the record is TXT, which is designed for adding arbitrary text data to a DNS zone. The name of the record takes the format _acme-challenge.subdomain.example.com. The root domain name is appended to a record's name automatically, so we just need to provide the name as _acme-challenge.subdomain or just _acme-challenge if we're authorizing the root domain or issuing a wildcard certificate:
# to authorize le.alexpeattie.com
record_name = '_acme-challenge.le'

# to authorize alexpeattie.com or *.alexpeattie.com
record_name = '_acme-challenge'
To construct the contents of our record, we'll start by creating our "raw" challenge response in the same manner as in the http-01 challenge:
raw_challenge_response = [dns_challenge['token'], thumbprint].join('.')Additionally, for the dns-01 we'll need to digest the challenge response, and run it through our base64_le method:
dns_challenge_response = base64_le(hash_algo.digest raw_challenge_response)Adding the record
We'll use the dnsimple-ruby gem to add our TXT record:
gem install dnsimpleWe'll also need to get our API account token from the DNSimple web interface. Then using the gem to add the TXT record, with the correct record name & content. We'll set a relatively low TTL (time to live) of 60 seconds, because we don't want our resolvers to cache the record for long - in case we need to redo the challenge, for example.
require 'dnsimple'

dnsimple = Dnsimple::Client.new(access_token: ENV['DNSIMPLE_ACCESS_TOKEN'])
account_id = dnsimple.identity.whoami.data.account.id

challenge_record = dnsimple.domains.create_record(account_id, 'alexpeattie.com', {
  record_type: 'TXT',
  name: record_name,
  content: dns_challenge_response,
  ttl: 60
})
(If you see a NoMethodError (undefined method 'id' for nil:NilClass) on the account_id line, you might be using a user token rather than an account token).
Lastly, we'll use Ruby's Resolv library (part of the Standard Library) to wait until the challenge record's been added:
loop do
  resolved_record = Resolv::DNS.open { |r| r.getresources(record_name + '.alexpeattie.com', Resolv::DNS::Resource::IN::TXT) }[0]
  break if resolved_record && resolved_record.data == challenge_response

  sleep 5
end
e. Telling LE we've completed the challenge
To tell LE we've completed the challenge, we need to make a request to the challenge URL we got earlier (https://acme-v02.api.letsencrypt.org/acme/chall-v3/4490201234/DAPqRQ or https://acme-v02.api.letsencrypt.org/acme/chall-v3/4490201234/rgEuWQ).
It's fairly arbitrary what we ought to send to LE to indicate we're ready to have our challenged checked. Per the spec, we just send an empty JSON body ({}) as our payload:
signed_request(http_challenge['url'], payload: {}, kid: kid) # or dns_challenge['url']
⚠️ V2 breaking change: previously we would send the key authorization to indicate our challenge was ready to be checked.
f. Wait for LE to acknowledge the challenge has been passed
Finally it's just a case of polling the challenge URL we've been given and wait for its status to become "valid". If it's still "pending" we'll sleep for 2 seconds then try again. Any other status means something's gone wrong 😭.
loop do
  challenge_result = signed_request(http_challenge['url'], kid: kid) # or dns_challenge['url']

  case challenge_result['status']
    when 'valid' then break
    when 'pending' then sleep 2
    else raise "Challenge attempt #{ challenge_result['status'] }: #{ challenge_result['error']['details'] }"
  end
end
If we chose the DNS challenge, we should also clean up after ourselves by deleting the record (so our challenge attempt doesn't interfere with future challenge attempts, which will also require TXT records using the _acme-challenge.le name):
dnsimple.zones.delete_zone_record(account_id, 'alexpeattie.com', challenge_record.data.id)As a final sanity check, let's re-request our original order. We should now see our order's status has changed to "ready":
order = signed_request(order.headers['Location'], kid: kid)
raise("Unexpected order status (should be ready)") unless order['status'] == 'ready'
{
"status": "ready",
"expires": "2020-05-16T16:47:30Z",
"identifiers": [
{
"type": "dns",
"value": "le.alexpeattie.com"
}
],
"authorizations": [
"https://acme-v02.api.letsencrypt.org/acme/authz-v3/4474222123"
],
"finalize": "https://acme-v02.api.letsencrypt.org/acme/finalize/85702020/3301243121"
}Lastly, we can issue our certificate by sending a properly formed request to our order's `"finalize" endpoint.
5. Issuing the certificate 🎉
We've proven to Let's Encrypt we control the domain, which means we can now get our certificate. We'll need to generate a Certificate signing request (CSR). The CSR includes the public part of the key-pair tied to the certificate - secure traffic will be encrypted with the corresponding private part of the key-pair.
It's best to create a new key-pair for our CSR. We can generate it on the command line (as for the client key-pair), or with Ruby:
domain_key = OpenSSL::PKey::RSA.new(4096)
IO.write('domain.key', domain_key.to_pem)*You might alternatively want to use a 2048 bit key (see Appendix 5 for more).
Next we turn to Ruby's OpenSSL module to generate our CSR:
csr = OpenSSL::X509::Request.new
csr.public_key = domain_key.public_key

alt_name = OpenSSL::X509::ExtensionFactory.new.create_extension("subjectAltName", "DNS: le.alexpeattie.com")
extensions = OpenSSL::ASN1::Set([OpenSSL::ASN1::Sequence([alt_name])])
csr.add_attribute OpenSSL::X509::Attribute.new('extReq', extensions)

csr.sign domain_key, hash_algo
This snippet is admittedly a bit impenetrable. The key points are that we indicate the domain name ("DNS: le.alexpeattie.com") then sign our CSR with our domain_key. We could also generate a CSR on the command line:
openssl req -new -sha256 -subj "/CN=le.alexpeattie.com" -key domain.key -addext "subjectAltName = DNS:le.alexpeattie.com"
⚠️ V2 breaking change: in the previous version of this guide we indicated the domain with only a Common Name in our CSR'sSubjectfield rather than usingsubjectAltName. This is now deprecated by browsers (Chrome 58 will display a certificate error for certificates that do this) and is no supported for LE certificate issuance.
LE needs us to send CSR in binary (.der) format - Base64 encoded of course - to our order's "finalize" endpoint:
finalized_order = signed_request(order['finalize'], payload: {
  csr: base64_le(csr.to_der),
}, kid: kid)
⚠️ V2 breaking change: previously, certificate issuance was done with a static "new certificate" endpoint, rather than the order's"finalize"URL
We're given back an updated instance of our original order with a new "certificate" key. This URL points to our ready-to-use certificates, including all the necessary intermediate certificates - all we need to do is download it (using one last GET-as-POST request):
IO.write("certificate.pem", signed_request(finalized_order['certificate'], kid: kid).body)ℹ️ V2 change: previously, we had to do much more work to get our certificate ready to use, manually coercing it into a valid PEM format and manually fetching the intermediate certificates. In V2, Let's Encrypt does all that for us and returns a valid
application/pem-certificate-chainresponse.
That's it - we're done with our client and have our certificate (valid for the next 90 days) that will be accepted by all major browsers 🎉! Completed authorizations are valid for 30 days, so we can renew our certificate without needing to take a challenge during that period.
⚠️ V2 breaking change: completed authorizations used to be valid for much longer (300 days). And a word of caution even with the shortened 30 day grace period, as Matt Nordhoff notes "an ACME client should always be prepared to validate again, rather than counting on authz reuse".
This is the end of the main part of the guide, if you're interesting in the logistics of installing the certificate, keep reading...
Appendix 1: Installing and testing the certificate
Installation (with nginx)
Now we have our certificate, it's just a case of uploading it along with our private key and tweaking our nginx configuration to enable TLS. As with our HTTP challenge response, we can upload the necessary files with SCP using our upload helper method:
upload('chained.pem', '/etc/nginx/le-alexpeattie.pem')
upload('domain.key', '/etc/nginx/le-alexpeattie.key')
Then we'll need to point our nginx.conf to our certificate and key:
server {
  listen 443 ssl deferred;
  server_name le.alexpeattie.com;

  ssl_certificate /etc/nginx/le-alexpeattie.pem;
  ssl_certificate_key /etc/nginx/le-alexpeattie.key;
}
That's theoretically all we need, but we can improve on nginx's defaults for better security and performance. We'll use the settings recommended by https://syslink.pl/cipherlist/ (click "Yes, give me a ciphersuite that works with legacy / old software." if you need to support older browsers) and a couple of extra headers recommended by securityheaders.io. We'll use Google's DNS server (8.8.8.8) as our resolver (recommended for OSCP stapling on nginx):
ssl_protocols TLSv1 TLSv1.1 TLSv1.2;
ssl_prefer_server_ciphers on;
ssl_ciphers "EECDH+AESGCM:EDH+AESGCM:AES256+EECDH:AES256+EDH";
ssl_ecdh_curve secp384r1;
ssl_session_cache shared:SSL:10m;
ssl_session_tickets off;
ssl_stapling on;
ssl_stapling_verify on;
resolver 8.8.8.8;
resolver_timeout 5s;
# add_header Strict-Transport-Security "max-age=63072000; preload" always;
add_header X-Frame-Options DENY always;
add_header X-Content-Type-Options nosniff always;
add_header X-XSS-Protection "1; mode=block" always;
add_header Content-Security-Policy "default-src https: data: 'unsafe-inline' 'unsafe-eval'" always;
(Note: that the Content-Security-Policy header will prevent assets being loaded over HTTP - this is recommended, but could break some sites. Read more about CSPs here)
We should keep the line enabling the Strict-Transport-Security header commented out until we're happy our HTTPS setup is working (as visitor's won't be able to access our non-HTTPS site once it's activated).
We can harden our configuration by dropping support for TLS < v1.2 - although that does have implications for supporting older browsers. If we happy to target just older browsers, we should also allow only cipher suites with a minimum 256-bit key length for AES (the symmetric cipher):
ssl_protocols TLSv1.2;
ssl_prefer_server_ciphers on;
ssl_ciphers "AES256+EECDH:AES256+EDH";
Unless we're using an ECDSA certificate (see Appendix 5) we should also generate a stronger DH parameter - nginx uses a 1024-bit prime which has been shown to be potentially vulnerable to state level adversaries (https://weakdh.org). Ideally our DH parameter shouldn't be smaller than our key size (i.e. 4096-bit or 2048-bit). We can generate a DH parameter like so:
ssh root@162.243.201.152

cd /etc/nginx
openssl dhparam -out dhparam.pem 4096
Bear in mind, the above is slooow (it took about 30 minutes for me) - so an alternative is to take a pre-generated prime from here:
curl -o dhparam.pem https://2ton.com.au/dhparam/4096/`shuf -i 0-127 -n 1`
openssl dhparam -in dhparam.pem -noout -text | head -n 1
#=>    PKCS#3 DH Parameters: (4096 bit)
Either way we'll need to tell nginx to use our stronger DH parameter:
ssl_dhparam /etc/nginx/dhparam.pem;Lastly, we can redirect all HTTP traffic to our HTTPS endpoint:
server {
  listen 80;
  server_name le.alexpeattie.com;
  return 301 https://$host$request_uri;
}
Our final nginx.conf looks like this:
events {
  worker_connections  1024;
}

http {
  sendfile on;
  server_tokens off;
  root /usr/share/nginx/html;

  ssl_protocols TLSv1.2;
  ssl_prefer_server_ciphers on;
  ssl_ciphers "AES256+EECDH:AES256+EDH";
  ssl_ecdh_curve secp384r1;
  ssl_session_cache shared:SSL:10m;
  ssl_session_tickets off;
  ssl_stapling on;
  ssl_stapling_verify on;
  resolver 8.8.8.8;
  resolver_timeout 5s;
  add_header Strict-Transport-Security "max-age=63072000; preload";
  add_header X-Frame-Options DENY;
  add_header X-Content-Type-Options nosniff;

  server {
    listen 443 ssl deferred;
    server_name le.alexpeattie.com;

    ssl_certificate /etc/nginx/le-alexpeattie.pem;
    ssl_certificate_key /etc/nginx/le-alexpeattie.key;
    ssl_dhparam /etc/nginx/dhparam.pem;
    ssl_trusted_certificate /etc/nginx/le-alexpeattie.pem;
  }

  server {
    listen 80;
    server_name le.alexpeattie.com;
    return 301 https://$host$request_uri;
  }
}
Testing
Lastly let's run some tests to ensure our certificates are correctly and securely installed. There are a few tools out there, Qualys SSL Server Test is the most widely used. Using our new certificate with the strict cipher list, with either an ECDSA certificate or a standard certificate with a 4096-bit DH param we'll net top marks with a perfect A+ score:

Using cipherli.st's recommended ciphers, we'll score fractionally lower, with 90 points Cipher Strength:

We also do well on securityheader.io test:

As the report points out, we can harden our set up even further by implementing HTTP Public Key Pinning which could protect us if, for instance, Let's Encrypt itself was successfully attacked. However, this is currently considered quite advanced: as Peter Eckersley warns "HPKP pinning carries an inherent risk of bricking your site". But he does give some detailed best practices for the brave souls who do want to implement it.
Some other useful testing tools:
- revocationcheck.com - Useful for debugging OSCP
- testssl.sh and cipherscan - Command line TLS testing tools
- High-Tech Bridge SSL Server Security Test - A decent alternative to SSL Labs's tool. Advocates weaker ciphers because of HIPAA guidance though.
Appendix 2: The trust chain & intermediate certificates
The trusted status of a certificate (what gives us the green padlock) stems from a relatively small set of trusted Certificate Authorities (CAs) with corresponding "Root certificates". These are stored in the "trust stores" of browsers or operating systems. We can see Mac OS's trusted roots by going to Keychain Access -> System Roots for example:
If our certificate has been issued by a trusted CA (in our trust store) that certificate is trusted. If the CA isn't in our trust store, we can check if certificate of that CA was issued by a trusted root CA. A certificate issued by a CA, issued by another CA which was issued by a trusted CA is trusted, and so on. The trust chain can involve as many untrusted or "intermediate" CAs as we want, as long as it ultimately goes back to a trusted (root CA).
If it's still unclear, imagine Alice & Bob are having a birthday party. Guests who are invited by Alice or Bob can in turn invite other guests - those guests can invite other guests and so on. At the party, only guests who can prove their invitation leads back to Alice and Bob are trusted:
- Carol ← invited by Bob = trusted ✅
- Doug ← invited by Steve ← invited by Alice = trusted ✅
- Fred ← invited by Gerard ← invited by Eve = untrusted ⛔
At the party, a guest would have to provide information so we could verify the chain of invites led back to Alice or Bob. In the same way, a certificate should provide information about the chain of certificates (called the trust chain) which lead back to a trusted root CA.
Let's Encrypt has it's own root CA: ISRG Root X1, which is now widely trusted by browsers and operating systems. Since trusted root certificates are so powerful, it's best practice to directly sign certificates with them sparingly - instead LE will use their root certificate to sign an "intermediate certificate", which will then sign certificates for end-users. So our chain looks like this:
- Our certificate ← issued by Let's Encrypt's intermediate CA ← issued by Let's Encrypt's root CA (trusted by our browser/OS)
So our complete trust chain should include our certificate, the certificate of Let's Encrypt's intermediate CA (Let’s Encrypt Authority X3), and optionally Let's Encrypt's trusted root certificate. In reality there's no point making the client download the root certificate - it needs to already be in the trust store anywhere. As RFC 2246 says:
Because certificate validation requires that root keys be distributed independently, the self-signed certificate which specifies the root certificate authority may optionally be omitted from the chain, under the assumption that the remote end must already possess it in order to validate it in any case.
So basically we just need to concatenate our certificate with Let's Encrypt CA's certificate and we have a complete chain of trust* 👍.
| FF 44 | Chrome 48 | IE 11 | Safari 7.1 | iOS 8 (Safari) | Windows Phone 8.1 | Android 6 |
|---|---|---|---|---|---|---|
| ✅ | ✅ | ✅ | ✅ | ✅ | ✅ | ✅ |
*Some servers (like Apache) might want us to provide the our certificate and the rest of the trust chain separately. In this case the rest of the chain would just be the LE intermediate certificate.
Missing certificate chain
If we were only to provide our certificate without LE's intermediate certificate, we have a broken chain of trust. Most browsers can actually recover from this. LE certificates leverage Authority Information Access which embeds information about the trust chain even if we (system admins) forget to provide it.
We shouldn't rely on this though, most mobile browsers don't support AIA - nor does Firefox (who have explicitly said they won't be adding it).
Here's the result you'll get without providing the intermediate certificate:
| FF 44 | Chrome 48 | IE 11 | Safari 7.1 | iOS 8 (Safari) | Windows Phone 8.1 | Android 6 |
|---|---|---|---|---|---|---|
| ⛔ | ✅ | ✅ | ✅ | ⛔ | ⛔ | ⛔ |
As of V2, Let's Encrypt already issues us with a complete certificate chain - so we'd actually have to make an effort to omit the necessary intermediate certificate.
Appendix 3: Our example site setup
Below are the instructions to recreate the site setup used as the exemplar in this guide. You'll need:
- A domain name you control
- A DNSimple account (from $5/month, 30 day trial)
- A DigitalOcean droplet (from $5/month)
1. Point our domain's nameservers to DNSimple
Digital Ocean has good instructions that cover common registrars. We'll want to point the nameservers to ns1.dnsimple.com, ns2.dnsimple.com, ns3.dnsimple.com and ns4.dnsimple.com. You'll need to copy over any existing records from your previous DNS provider.
2. Create our nginx server
First we'll need to create our droplet. We'll use a $5/month Ubuntu droplet:

We'll also want to add our local machine's SSH key(s). We want to paste the public part of our key (e.g. cat ~/.ssh/id_rsa.pub):

Once our machine has been provisioned, take a note of the public IP, in this case 162.243.201.152:

Using the IP, we'll SSH into our new box and install nginx:
ssh root@162.243.201.152

add-apt-repository ppa:nginx/stable
apt-get update
apt-get install nginx
A configuration like the below will be sufficient for passing the challenges - we'll update it when we actually install our certificate. This needs to go in /etc/nginx/nginx.conf:
events {
  worker_connections  1024;
}

http {
  sendfile on;
  server_tokens off;
  root /usr/share/nginx/html;

  server {
    listen 80;
    server_name le.alexpeattie.com;
  }
}
Lastly we'll restart nginx:
sudo service nginx restart4. Point our subdomain to DigitalOcean
Log in to DNSimple, go to Domains and hit DNS in the sidebar:

The click + Manage records. We want to add an A record:

We'll need to enter the name (our subdomain le) and set Address to our droplet's Public IP:

We should be ready to go, and the domain (e.g. <le.alexpeattie.com>) should serve the default nginx welcome page. We might have to wait a while for our DNS changes to propagate.

Once we've been issued our certificate, we can install it following the steps in Appendix 1.
Appendix 4: Multiple subdomains
Let's Encrypt can issue a single certificates which cover multiple, using the SubjectAltName extension. At the time of writing, Let's Encrypt supports a maximum of 100 SANs per certificate (full LE rate limits are detailed here).
LE has quite conservative per-domain rate limits right now (20 distinct certificates per domain per week) - so using SANs is crucial if you have lots of subdomains to secure*.
A common use-case is having a single certificate cover the naked domain and www. prefix. We have to authorize both domains; LE doesn't take it for granted that if we control the root domain we also control the www. subdomain or vice-versa.
domains = %w(example.com www.example.com)

order = signed_request(endpoints['newOrder'], payload: {
  identifiers: domains.map { |domain| {
    type: 'dns',
    value: domain
  } }
}, kid: kid)

domains.zip(order['authorizations']).each do |domain, auth|
  challenges = signed_request(auth, kid: kid)['challenges']
  #.. rest of challenge passing code
end
Once we've authorized all the subdomains we want to include in the certificate, we pass a comma separated list of of DNS identifiers for our CSR's subjectAltName:
alt_names = domains.map { |domain| "DNS:#{domain}" }.join(', ')

extension = OpenSSL::X509::ExtensionFactory.new.create_extension('subjectAltName', alt_names, false)
csr.add_attribute OpenSSL::X509::Attribute.new(
  'extReq',
  OpenSSL::ASN1::Set.new(
    [OpenSSL::ASN1::Sequence.new([extension])]
  )
)
That's all you need to get certificates to cover multiple host names. You can find the full code of the example in multiple_subdomains.rb.
*If you're running a site that, say, assigns thousands of subdomains to end users, you may be out of luck since "you can [only] issue certificates containing up to 2,000 unique subdomains per week" (source). The only current work-around is to get your domain added to Public Suffix list - which LE treats as a special case. You'll need to issue a wildcard certificate instead.
Appendix 5: Key size
Broadly speaking, key size means how hard a key is to crack. Longer keys offer more security, but their bigger size leads to a somewhat slower TLS handshake.

We don't have a very broad choice when it comes to choosing key size. 2048 bits has effectively been an enforced minimum since the beginning of 2014; 4096 bits is the upper bound. 4096 bits is favored by some, but is far from the standard right now. It's anticipated that 2048-bit keys will be considered secure until about 2030.
2048 is the default key size for certbot. But you will need a 4096 bit key to score perfectly on the Key SSL Labs' test, and there are lively discussions advocating the LE default be raised to 4096 or 3072. CertSimple did an awesome, detailed rundown of the benefits of different key sizes, and basically concluded "it depends".
We will need a key size of 4096 bits to get a perfect SSL Labs score. Not all cloud providers support key sizes above 2048 bits though, AWS CloudFront being a notable example. If you want or need to use a 2048-bit key, you can specify the key length like so:
domain_key = OpenSSL::PKey::RSA.new(2048)ECDSA keys
If you really care about picking a good key, you might not want to use RSA at all. ECDSA (Elliptic Curve Digital Signature Algorithm) which gives a much better size vs. security trade-off. A 384 bit ECDSA is considered equivalent to a 7680 bit RSA key, and will also give a perfect SSL Labs score. More importantly, a number recently discovered SSL vulnerabilities (DROWN, Logjam, FREAK) target RSA-specific vulnerabilities which are not present in ECDSA certificates.
Creating an ECDSA CSR is mechanically almost identical to using an RSA key - we just need to set csr.public_key to domain_key, rather than domain_key.public_key:
domain_key = OpenSSL::PKey::EC.new('secp384r1').generate_key
IO.write('domain.key', domain_key.to_pem)

csr = OpenSSL::X509::Request.new
csr.subject = OpenSSL::X509::Name.new(['CN', 'le.alexpeattie.com'])
csr.public_key = domain_key
csr.sign domain_key, OpenSSL::Digest::SHA256.new
ECDSA is pretty well supported: Windows Vista and up, OS X 10.9, Android 3 and iOS 7*
*Source: CertSimple: What web developers should know about SSL but probably don't
Appendix 6: IDN support
Since October 2016 Let's Encrypt has supported Internationalized Domain Names (IDNs). When providing an IDN as the identifier's value in our new-authz request, and when setting the subject of the CSR, we need to use the Punycode representation of the IDN. For example, müller.de would become xn--mller-kva.de.
You can do the conversion with an online service like Punycoder or with a gem like SimpleIDN:
require 'simpleidn'

domain = SimpleIDN.to_unicode('müller.de')
=> 'xn--mller-kva.de'
Appendix 7: Using EC client keys
As well as support ECDSA-based certificates (see above), since 2016 Let's Encrypt has supported ECDSA for client (A.K.A account) keys. We'll have to make a few non-trivial modifications to our client to get EC client keys working though.
First, we'll need an EC keypair:
openssl ecparam -genkey -name prime256v1 -noout -out ec-private.pem
openssl ec -in ec-private.pem -pubout -out ec-public.pem
Then, we'll need to change our client_key method to load our EC private key.
OpenSSL::PKey::EC.new IO.read(client_key_path)Simple enough so far, unfortunately, things begin to get a bit complicated. For starters, we previously only had to worry about a single signing algorithm: RSA + SHA256 (you might remember we refer to it as 'RS256' in our header method). We'll always use the SHA256 digest algorithm, regardless of the length of our RSA key.
With EC keys though, we'll use a different hashing algorithm depending on the curve used/key length (different curves = different key lengths):
| Algorithm | Curve name (JWK) | Curve name (OpenSSL) | Key length (bits) | Hashing algorithm |
|---|---|---|---|---|
| ES256 | P-256 | prime256v1 (or secp256r1) |
256 | SHA-256 |
| ES384 | P-384 | secp384r1 |
384 | SHA-384 |
| ES512 | P-521 | secp521r1 |
521 | SHA-512 |
Note that all the ES* use the standard "NIST curves". Some people are suspicious that the NIST curves, particularly P-256 (more commonly known outside of a JWK context as secp256r1), could be vulnerable to state-level attackers (due to a hypothesised backdoor). Some crypto implementations (notably Bitcoin) prefer an alternative curve to secp256r1 called secp256k1. However, this isn't supported by JWK, so generating a key like this:
openssl ecparam -genkey -name secp256k1 -noout -out ec-private.pemwill ultimately lead to a "Parse error reading JWS" error from Let's Encrypt. There is a draft proposal to add a new "P-256k" curve to the JWK standard - but until that's adopted, stick to ES512 if you're worried.
Eagle-eyed readers might spot something odd about the ES512: we have a key 521 bits long, but the associated digest size is 512 bits. It's not a typo, and it does make things a bit more awkward; we can't assume that key size = digest size. We can get the key's bit length/curve using client_key.group.degree, so let's write a method to get the associated digest size:
def digest_size
  { 256 => 256, 384 => 384, 521 => 512 }[client_key.group.degree]
end
With this in place we can modify our hash_algo method to dynamically fetch the correct Digest class to match up with our EC key:
def hash_algo
  OpenSSL::Digest.const_get("SHA#{digest_size}").new
end
Next, we need to modify our protected_header and jwk methods. In the former, we need to change our alg value to "ES" + digest_size (e.g. "ES256"):
def protected_header(url, kid = nil)
  metadata = { alg: "ES#{ client_key.group.degree }", nonce: nonce, url: url }
  #...
In jwk we'll ditching be ditching our "e" and "n" keys (they're specific to RSA keys), and we'll need to add a "crv" key to indicate the EC key's curve name. As we can see from the table above, for the curves we're concerned with, it's just the key's bit length prefixed with "P-". kty (key type) is simply "EC":
def jwk
  @jwk ||= begin
    {
      crv: "P-#{ client_key.group.degree }",
      kty: 'EC'
    }
  end
end
Before we go any further, let's add a helper method which splits a string into pieces of a certain length (this will come in handy later):
def split_into_pieces(str, opts = {})
  str.chars.each_slice(opts[:piece_size]).map(&:join)
end

# example:
split_into_pieces("abcdef", piece_size: 2)
# => ['ab', 'cd', 'ef']
Next, we have to add the public part of the key into the header. Running client_key.public_key.inspect we see something like:
"#<OpenSSL::PKey::EC::Point:0x007fad4209d728 #...The public part of an EC key is called a "public key curve point", and it's literally a point in 2-dimensional space. We need to provide the x and y coordinates of this point, again this is a little bit tricky. First, let's convert our public key to a hexidecimal string:
pub_key_hex = client_key.public_key.to_bn.to_s(16)
# => "04170BD2669BB4EA2DDFAD293F9B3F47703F671139F8C1FDE643ECC3B46DB519AA4BCAD1FB47566BC9C0730D5F6EE9C5FDA8D2DCF419F90C0BA6CFB669D80B80F9"
Andreas M. Antonopoulos, gives a good explanation of what we're looking at:
As we saw previously, the public key is a point on the elliptic curve consisting of a pair of coordinates (x,y). It is usually presented with the prefix
04followed by two 256-bit numbers, one for the x coordinate of the point, the other for the y coordinate. The prefix04is used to distinguish uncompressed public keys from compressed public keys that begin with a02or a03.
We don't really care about the 04 prefix - once we've got rid of that, we'll need to split our long hexidecimal sequence in half, to extract the x and y values.
First, let's use our split_into_pieces to break it up into the individual octets:
pub_key_octets = split_into_pieces(pub_key_hex, piece_size: 2)Next we'll drop our first octet (04), and split our sequence in half:
pub_key_octets.shift # drop the first octet (which just indicates key is uncompressed)
x_octets, y_octets = pub_key_octets.each_slice(pub_key_octets.size / 2).to_a
Lastly, we'll convert our hex values to binary data using the pack method (see To Hex and Back (With Ruby) for a detailed explanation):
x = x_octets.map(&:hex).pack('c*')
y = y_octets.map(&:hex).pack('c*')
We can shorten our code a bit by converting to binary first, and reusing our split_into_pieces method:
coords_binary_data = pub_key_octets.map(&:hex).pack('c*')
x, y = split_into_pieces(coords_binary_data, piece_size: coords_binary_data.size / 2)
Lastly, we'll need to Base64 encode our x and y values before sending them over the wire:
{
  crv: "P-#{ client_key.group.degree }",
  x: base64_le(x),
  kty: 'EC',
  y: base64_le(y)
}
To recap, our jwk method now looks like this:
def jwk
  @jwk ||= begin
    pub_key_hex = client_key.public_key.to_bn.to_s(16)
    pub_key_octets = split_into_pieces(pub_key_hex, piece_size: 2)

    pub_key_octets.shift # drop the first octet (which just indicates key is uncompressed)
    coords_binary_data = pub_key_octets.map(&:hex).pack('c*')
    x, y = split_into_pieces(coords_binary_data, piece_size: coords_binary_data.length / 2)

    {
      crv: "P-#{ client_key.group.degree }",
      kty: 'EC',
      x: base64_le(x),
      y: base64_le(y)
    }
  end
end
Worn out yet 😅? There's one last step: we have to update how our signature is generated. When we sign a value using RSA, the signature is a single value σ, which is really just one long integer (see Digital signature on Wikipedia). But DSA (which we use with EC keys) returns a pair of integers, typically denoted r and s (see Wikipedia's DSA article), so we'll need to make a few modifications to allow for this. We sign as normal:
signature = client_key.sign(hash_algo, [request[:protected], request[:payload]].join('.'))But from this signature we need to extract the value of (r, s) as binary strings. The signature is ASN.1 encoded, so we'll first decode it and convert it to an array (of two elements, i.e. r and s):
decoded_signature = OpenSSL::ASN1.decode(signature).to_aThen we'll map the values of r and s as binary strings:
r, s = decoded_signature.map { |v| v.value.to_s(2) }Finally, we set the "signature" field in our JSON request to r and s concatenated together, and Base64 encoded:
request[:signature] = base64_le(r + s)All the changes we needed to make are collected below (also see ec_client.rb):
def client_key
  @client_key ||= begin
    client_key_path = File.expand_path('./ec-private.pem')
    OpenSSL::PKey::EC.new IO.read(client_key_path)
  end
end

def split_into_pieces(str, opts = {})
  str.chars.each_slice(opts[:piece_size]).map(&:join)
end

def jwk
  @jwk ||= begin
    pub_key_hex = client_key.public_key.to_bn.to_s(16)
    pub_key_octets = split_into_pieces(pub_key_hex, piece_size: 2)

    pub_key_octets.shift # drop the first octet (which just indicates key is uncompressed)
    coords_binary_data = pub_key_octets.map(&:hex).pack('c*')
    x, y = split_into_pieces(coords_binary_data, piece_size: coords_binary_data.length / 2)

    {
      crv: "P-#{ client_key.group.degree }",
      kty: 'EC',
      x: base64_le(x),
      y: base64_le(y)
    }
  end
end

def digest_size
  { 256 => 256, 384 => 384, 521 => 512 }[client_key.group.degree]
end

def hash_algo
  OpenSSL::Digest.const_get("SHA#{digest_size}").new
end

def protected_header(url, kid = nil)
  metadata = { alg: "ES#{ client_key.group.degree }", nonce: nonce, url: url }

  if kid
    metadata.merge!({ kid: kid })
  else
    metadata.merge!({ jwk: jwk })
  end

  return base64_le(metadata)
end

def signed_request(url, payload: '', kid: nil)
  request = {
    payload: base64_le(payload),
    protected: protected_header(url, kid)
  }
  signature = client_key.sign(hash_algo, [request[:protected], request[:payload]].join('.'))
  decoded_signature = OpenSSL::ASN1.decode(signature).to_a

  r, s = decoded_signature.map { |v| v.value.to_s(2) }

  request[:signature]  = base64_le(r + s)
  HTTParty.post(url, body: JSON.dump(request), headers: { 'Content-Type' => 'application/jose+json' })
end
Appendix 8: Certificate expiry and revocation
A fun factoid: Let's Encrypt certificates are technically only valid of 89 days and 23 hours, not for a whole 90 days. This is because LE backdates certificates by 1 hour to ensure the certificates can be validated immediately by clients whose clocks might be slightly out. Therefore a certificate issued on August 1st 12:34 will expire October 30th 11:34.
The validity period for Let's Encrypt certificates are relatively short. Per the CA/Browser Forum Baseline Requirements, Section 6.3.2:
Subscriber Certificates issued after 1 March 2018 MUST have a Validity Period no greater than 825 days. Subscriber Certificates issued after 1 July 2016 but prior to 1 March 2018 MUST have a Validity Period no greater than 39 months.
Accordingly, most commercial providers offer certificates with 1, 2 or 3 year validity periods (see GlobalSign's article on Maximum Certificate Validity). LE states the primary reasons for the shorter lifetime are:
- Shorter lifetimes decrease the compromise window in situations like Heartbleed
- Offering free certificates with a shorter lifetime provides encouragement for operators to automate issuance.
- Let's Encrypt's total capacity is bound by its OCSP signing capacity, and LE is required to sign OCSP responses for each certificate until it expires. Shorter expiry period means less overhead for certificates that were issued and then discarded, which in turn means higher total issuance capacity.
(Source: Pros and cons of 90-day certificate lifetimes)
Let's Encrypt will send email reminders to the address(es) provided in the contacts field of your newAccount payload, at the following times:
- 20 days before the date of expiry
- 10 days before the date of expiry
- 1 day before the expiry.
Additionally, various tools exist to monitor your certificates and alert you about upcoming expiries, including hosted services like LetsMonitor and Keychest or standalone applications like certinel. Dan Cvrcek posted a fairly extensive list on the LE forums.
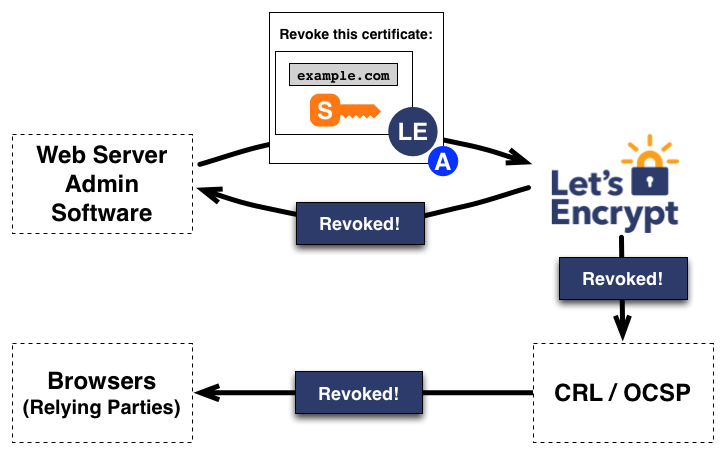
If the private keys of our certificates get compromised, we need to disable certificates before they expire. In these cases we can explicitly revoke certificates; as the diagram above shows, to do this we make a signed request to LE which includes the certificate to be revoked. LE then propagates the revocation to certificate revocation lists and OCSP responders, which in turns should ensure browsers won't accept requests signed by the revoked certificate (especially if OCSP stapling is enabled, see Appendix 1).
There are a number of different ways to perform a revocation, depending on which keys you have access to.
Scenario 1: You have access to the private key for the certificate
Revocation requests are different from other ACME request in that they can be signed either with an account key pair or the key pair in the certificate. If we still have access to this key, we can simply load it in as our client key:
client_key_path = File.expand_path('~/Desktop/domain.key')
OpenSSL::PKey::RSA.new IO.read(client_key_path)
For our payload, we'll need the certificate in question. Since we have our private key locally, we'll assume the certificate is locally available too (though see Scenario 2 for alternative approaches):
cert_path = File.expand_path('~/Desktop/certificate.pem')

# Code for loading a chained certificate taken from https://github.com/ruby/openssl/issues/288
CERTIFICATE_PATTERN = /-----BEGIN CERTIFICATE-----.*?-----END CERTIFICATE-----/m

certificate_chain = IO.read(cert_path).scan(CERTIFICATE_PATTERN).map { |cert| OpenSSL::X509::Certificate.new(cert) }

# The leaf certificate is first in the chain
certificate = certificate_chain.first
To revoke our certificate, we'll need to send a Base64 encoded version of the certificate in DER format, optionally along with an integer indicating the reason for the revocation:
new_registration = signed_request(endpoints['revokeCert'], {
  certificate: base64_le(certificate.to_der),
  reason: 1
})
Reason codes are defined in RFC 5280 although only a subset are valid for use with LE, as summarized below:
| Code | Reason | Valid for LE? |
|---|---|---|
| 0 | Unspecified | ✅ |
| 1 | Key compromise | ✅ |
| 2 | CA compromise | ⛔ |
| 3 | Affiliation changed | ✅ |
| 4 | Superseded | ✅ |
| 5 | Cessation of operation | ✅ |
| 6 | Certificate hold | ⛔ |
| 8 | Privilege withdrawn | ⛔ |
| 9 | Remove from CRL | ⛔ |
| 10 | AA compromise | ⛔ |
Scenario 2: You don't have access to the private key for the certificate, but you still have access to the client key for the account which issued the certificate
If the authorizations are still valid for the certificate's domain (i.e. the certificate is less that 30 days old, as of April 2017), you can revoke the certificate as above, but using your existing account key:
client_key_path = File.expand_path('~/.ssh/id_rsa')

# ...

new_registration = signed_request(endpoints['revokeCert'], {
  certificate: base64_le(certificate.to_der),
  reason: 1
})
Note that you still need to provide the certificate in DER format, even if you're not providing the certificate's corresponding private key. You can always fetch the certificate programmatically like so:
uri, certificate = URI.parse("https://example.com"), nil
http = Net::HTTP.new(uri.host, uri.port)
http.use_ssl = true
http.verify_mode = OpenSSL::SSL::VERIFY_PEER
http.start { |h| certificate = h.peer_cert }
Note that if it's been 30 days since you issued the certificate, the account key won't help you, and you're in an equivalent position to Scenario 3.
Scenario 3: You don't have access to the client key for the account which issued the certificate, or the private key for the domain, but you still control the certificate's domain(s)
Per Let's Encrypt's article on revocation:
If someone issued a certificate after compromising your host or your DNS, you’ll want to revoke that certificate once you regain control. In order to revoke the certificate, Let’s Encrypt will need to ensure that you control the domain names in that certificate (otherwise people could revoke each other’s certificates without permission)! To validate this control, Let’s Encrypt uses the same methods it uses to validate control for issuance: you can put a value in a DNS TXT record, put a file on an HTTP server, or offer a special TLS certificate.
In other words, you'll need to create a new account, pass the challenges for the domain(s) of the compromised certificate (see Section 4), then revoke the certificate as in Scenario 2, but using the account key for your newly created and authorized account.
Further reading
TLS/SSL in general
- Bulletproof SSL and TLS - wonderful ~500 page book, goes into great detail about everything you might want to know about SSL/TLS
- SSL/TLS Deployment Best Practices - By the same author as Bulletproof, an up-to-date and thorough checklist
- TLS chapter in High Performance Browser Networking - like the TL;DR of Bulletproof, covers all the fundamentals, plus more recent developments like OCSP stapling, HSTS etc.
- OWASP's TLS Cheat Sheet - An excellent list of do's and don't relating to SSL/TLS
- Modern SSL/TLS Best Practices for Fast, Secure Websites (PDF, registration required) - decent white paper, with loads of visuals, up-to-date best practice recommendations
- SSL Best Practices: a Quick and Dirty Guide - top-level, reasonably recent (2015) best practices guide.
- How does SSL/TLS work? - Good StackExchange answer
- TLS in HTTP/2
Let's Encrypt
- ACME spec - technical spec of the ACME protocol (which LE is built on)
- acme-tiny - a < 200 line Python client that served as the inspiration for this guide. The source code is v. readable + well commented
- Let's Encrypt - How It Works - official LE article
- Let's Encrypt Overview - good detailed article written back in 2015 when LE was starting out
- Let's Encrypt - A Certificate Authority To Encrypt the Entire Web (video)
- Using Free SSL/TLS Certificates from Let's Encrypt with NGINX
- Pros and cons of 90-day certificate lifetimes
Image credits
Author

Alex Peattie / alexpeattie.com / @alexpeattie
Changelog
Version 2.0 - May 12 2020
- Big update, rewrite the guide and client to conform to the new V2 API/RFC 8555
- Add support for wildcard certificates in the client and guide
- Upgrade to Ruby 2.7
- Migrate away from the legacy DNSimple API/gem
- Add more detail on certificate revocation (including reason codes), and EC curves
- Lots of other info updated, e.g. rate limit changes, LE root certificate becoming trusted
Version 1.2 - Aug 7 2017
- Add Appendix 7 explaining how to use EC client keys
- Add Appendix 8 about certificate expiry and revocation
- Add note about terms of service URL now being available via the directory
- Update Appendix 4 with up-to-date rate limits, note about forthcoming wildcard certs
Version 1.1 - Nov 19 2016
- Use the directory and response headers, rather than hardcoding URIs (closes #1)
- Add Appendix 6 about newly supported Internationalized Domain Names
- Change reference to official Let's Encrypt client → certbot
- Specify a TTL for DNS challenge record
- Add note about certificate and authorization validity periods
- Consistently prefer single quotes in all Ruby code
- Remove example domains for the various certificate types
- Added a couple more tools to the Testing section
- Add Changelog & Author section
- Harden example nginx config with additional security headers
Version 1.0 - Mar 29 2016
- Initial release