This sample demonstrates the basic interaction of a SaaS solution with Azure Marketplace. It does not have any SaaS functionality — it is a bare bones approach focusing on the marketplace integration.
First, disclaimers:
- My intent with this sample is to demonstrate the integration concepts, and highlight a possible solution that may address a common scenario.
- This is sample quality code, and does not implement many important aspects for production level, such as exception handling, transient faults, proper logging etc. Please use it as a learning tool, and write your own code.
- I make frequent changes to this repo as I discover new things with the marketplace API. Please check back often.
- I tried not to take any dependencies on 3rd party libraries, and tried to keep it as "pure" as possible, so no SPA, no client side MVC, fancy UI, or other .NET packages other than JSON.NET, and SendGrid, so we can focus on the solution.
You can also find a short video published on the Azure Friday channel to see the experience and a brief explanation.
In the sections below you will find:
- A Sample for Azure Marketplace SaaS Integration
- Integrating a Software as a Solution with Azure Marketplace
- Scenario for the Sample
- Running the Sample
- Creating a Web Application on Azure App Service and Deploy the Sample
- Registering Azure Active Directory Applications
- Creating and Configuring a SendGrid Account
- Creating a Storage Account
- Change the Configuration Settings
- Create an Offer on Commercial Marketplace Portal in Partner Center
- Example Offer Setup in Commercial Marketplace Portal
- Signing Up for Your Offer
- Notes
Let's first start with mentioning how to integrate a SaaS solution with Azure Marketplace.
Many different types of solution offers are available on Azure Marketplace for the customers to subscribe. Those different types include options such as virtual machines (VMs), solution templates, and containers, where a customer can deploy the solution to their Azure subscription. Azure Marketplace also provides the option to subscribe to a Software as a Service (SaaS) solution, which runs in an environment other than the customer's subscription.
A SaaS solution publisher needs to integrate with the Azure Marketplace commerce capabilities for enabling the solution to be available for purchase.
Azure Marketplace talks to a SaaS solution on two channels:
- Landing Page: The Azure Marketplace sends the subscriber to this page maintained by the publisher to capture the details for provisioning the solution for the subscriber. The subscriber is on this page for activating or modifying the subscription.
- Webhook: This is an endpoint where the Azure Marketplace notifies the solution of events, such as subscription cancellation or modification, or a suspend request for the subscription, should the customer's payment method become unusable.
The SaaS solution in turn uses the REST API exposed on the Azure Marketplace side to perform corresponding operations. Those can be activating, cancelling, or updating a subscription.
To summarize, we can talk about three interaction areas between the Azure Marketplace and the SaaS solution,
- Landing Page
- Webhook Endpoint
- Marketplace REST API Interactions

On this page, the subscriber provides additional details to the publisher so the publisher can provision required resources for the new subscription. A publisher provides the URL for this page when registering the offer for Azure Marketplace.
The publisher can collect other information from the subscriber to onboard the customer, and provision additional resources as needed. The publisher's solution can also ask for consent to access other resources owned by the customer, and protected by AAD, such as Microsoft Graph API, Azure Management API, etc.
⚠️ IMPORTANT: the subscriber can access this page after subscribing to an offer to make changes to his/her subscription, such as upgrading, downgrading, or any other changes to the subscription from Azure portal.
This page should authenticate a subscriber through Azure Active Directory (AAD) using the OpenID Connect flow. The publisher should register a multi-tenant AAD application for the landing page.
The Azure Marketplace calls this endpoint to notify the solution for the events happening on the marketplace side. Those events can be the cancellation or modification of the subscription through Azure Marketplace, or suspending it because of the unavailability of a customer's payment method. A publisher provides the URL for this webhook endpoint when registering the offer for Azure Marketplace.
⚠️ IMPORTANT: This endpoint is not protected. The implementation should call the marketplace REST API to ensure the validity of the event.
The Fulfillment API is documented here for subscription integration, and the usage based Metered Billing API documentation is here.
The publisher should register an AAD application and provide the AppID
(ClientId) and the Tenant ID (AAD directory where the app is registered)
during registering the offer for the marketplace.
The solution is put on a whitelist so it can call the marketplace REST API with those details. A client must use service-to-service access token request of the client credential workflow, and with the v1 Azure AD endpoint. Use the Marketplace Fulfillment API V2.0's resource ID, '20e940b3-4c77-4b0b-9a53-9e16a1b010a7' for the resource parameter
There needs to be a one-to-one match between the publisher account and the
application. If a publisher has multiple SaaS offers under the same publisher
account, all of those offers need to use the same Tenant Id and AppId.
If you have multiple publisher accounts, please do not use the Tenant Id and
AppId combination for offers under different publisher accounts.
Please note the different requirements for the Azure AD interaction for the landing page and calling the APIs. I recommend two separate AAD applications, one for the landing page, and one for the API interactions, so you can have proper separation of concerns when authenticating against Azure AD.
This way, you can ask the subscriber for consent to access his/her Graph API, Azure Management API, or any other API that is protected by Azure AD on the landing page, and separate the security for accessing the marketplace API from this interaction as good practice.
Let's go through the steps of activating a subscription to an offer.

- Customer subscribes to an offer on Azure Marketplace.
- Commerce engine generates a marketplace token for the landing page. This is an opaque token, unlike a JSON Web Token (JWT) that is returned when authenticating against Azure AD, and does not contain any information. It is just an index to the subscription and used by the resolve API to retrieve the details of a subscription. This token is available when the user clicks "Configure Account" for an inactive subscription or "Manage Account" for an active subscription.
- Customer clicks on "Configure Account" (new and not activated subscription) or "Manage Account" (activated subscription) and accesses the landing page.
- Landing page asks the user to logon using Azure AD OpenID Connect flow.
- Azure AD returns the
id_token. There needs to be additional steps for validating theid_token— just receiving anid_tokenis not enough for authentication. Also, the solution may need to ask for authorization to access other resources on behalf of the user. We are not covering them for brevity and ask you to refer to the related Azure AD documentation. - Solution asks for an access token using the service-to-service access token request of the client credential workflow to be able to call the API.
- Azure AD returns the access token.
- Solution prepends
"Bearer "(notice the space) to the access token, and adds it to theAuthorizationheader of the outgoing request. We are using the marketplace token previously received on the landing page to get the details of the subscription using the resolve API. - The subscription details are returned.
- Further API calls are made, again using the access token obtained from the Azure AD, in this case to activate the subscription.
This sample can be a good starting point, assuming the solution does not have requirements of providing a native experience for cancelling or updating a subscription by a customer.
It exposes a landing page that can be customized for branding. It provides a webhook endpoint for processing the incoming notifications from the Azure Marketplace. It also provides a privacy policy and support page to meet the partner center requirements. The rest of the integration is done via emails.
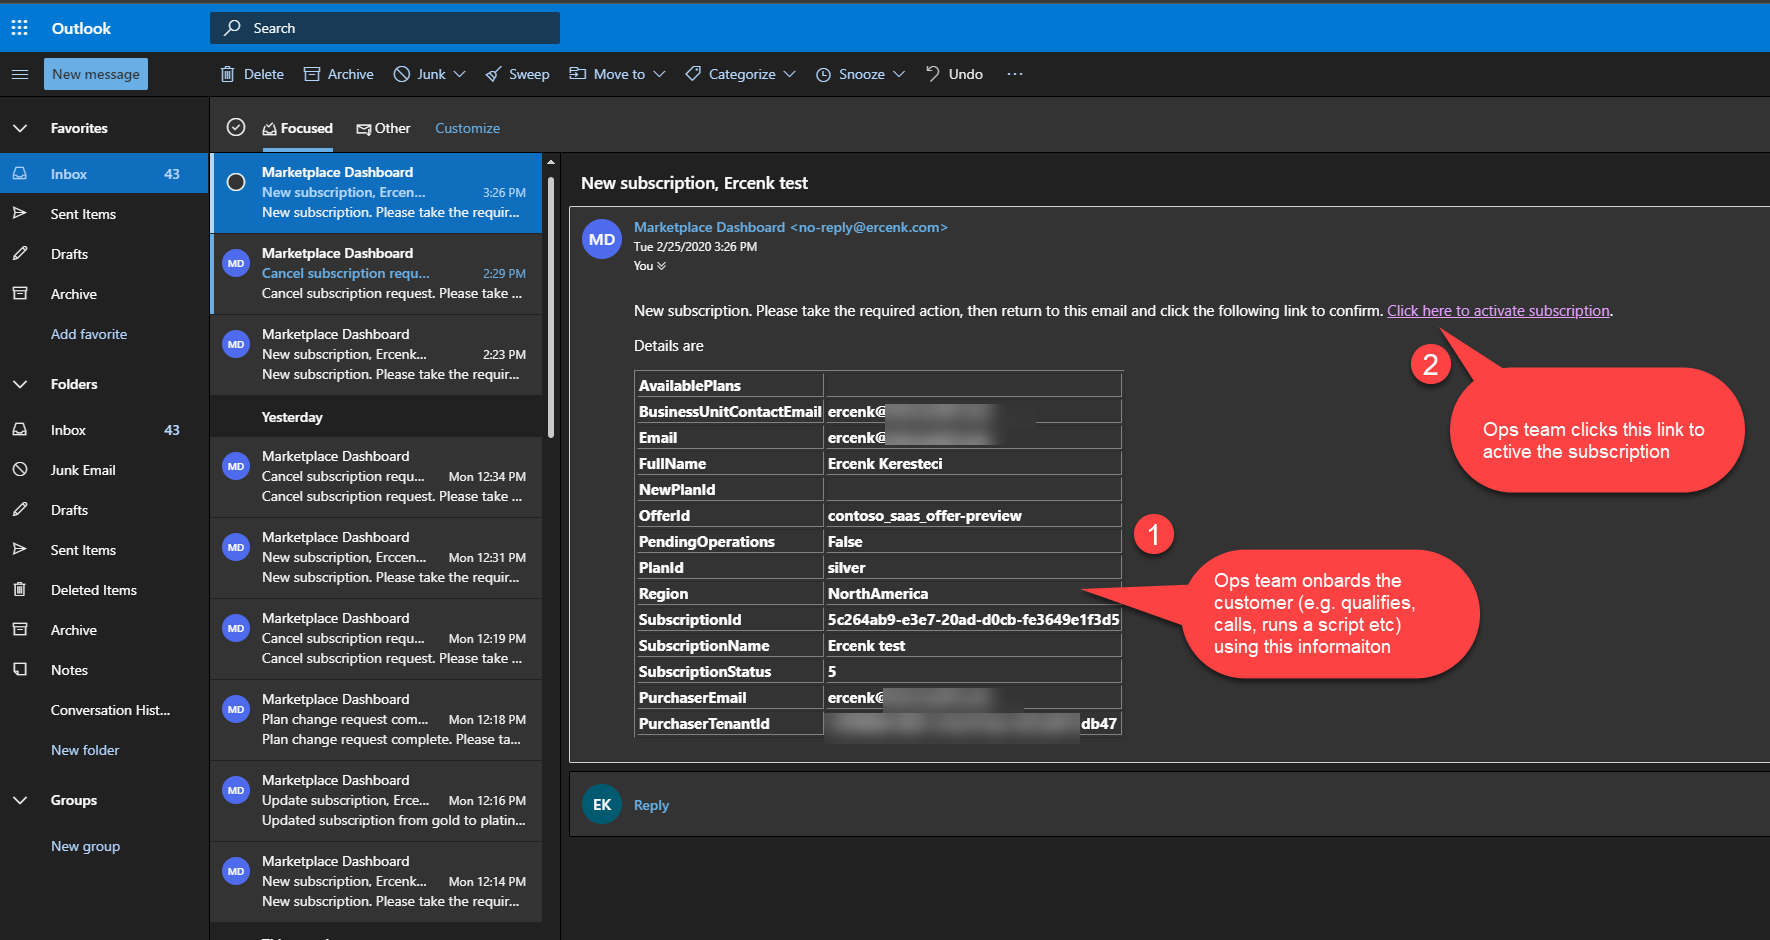
The landing page can also used for adding new fields to gather more information from the subscriber; for example: what is the favored region. When a subscriber provides the details on the landing page, the solution generates an email to the configured operations contact. The operations team then provisions the required resources, onboards the customer using their internal processes, and then comes back to the generated email and clicks on the link in the email to activate the subscription.
Please see my overview for the integration points in Integrating a Software as a Solution with Azure Marketplace.

Remember, this scenario is useful when there is a human element in the mix, for situations such as:
- A script needs to be run manually for provisioning resources for a new customer as part of the onboarding process.
- A team needs to qualify the purchase of the customer for reasons like ITAR certification, etc.
- The prospective customer is on the Azure Portal going through the Azure Marketplace in-product experience. They find the solution and subscribe to it after deciding on a plan. A placeholder resource is deployed on the customer's (subscriber's) Azure subscription for the new offer subscription. Note: Please notice the overloaded use of the "subscription", there are two subscriptions at this moment, the customer's Azure subscription and the subscription to the SaaS offer. I will use subscription only when I refer to the subscription to the offer from now on.
- Subscriber clicks on the Configure Account button on the new subscription, and gets transferred to the landing page.
- Landing page uses Azure Active Directory (with OpenID Connect flow) to log the user on.
- Landing page uses the SDK to resolve the subscription to get the details, using the marketplace token on the landing page URL token parameter.
- SDK gets an access token from Azure Active Directory (AAD).
- SDK calls resolve operation on the Fulfillment API, using the access token as a bearer token.
- Subscriber fills in the other details on the landing page that will help the operations team to kick of the provisioning process. The landing page asks for a deployment region, as well as the email of the business unit contact. The solution may be using different data retention policies based on the region (e.g. GDPR in Europe), or the solution may be depending on a completely different identity provider (IP), such as something in-house developed, and may be sending an email to the business unit owner asking them to add the other end users to the solution's account management system. Please keep in mind that the person subscribing, that is the purchaser (having access to the Azure subscription) can be different than the end users of the solution.
- Subscriber completes the process by submitting the form on the landing page. This sends an email to the operations team email address (configured in the settings).
- Operations team takes the appropriate steps (qualifying, provisioning resources, etc.).
- Once complete, operation team clicks on the activate link in the email.
- The sample uses the SDK to activate the subscription.
- SDK gets an access token from Azure Active Directory (AAD).
- SDK calls the
activateoperation on the Fulfillment API. - The subscriber may eventually unsubscribe from the subscription by deleting it, or may stop fulfilling their monetary commitment to Microsoft.
- The commerce engine sends a notification on the webhook at this time, to notify the publisher know about the situation.
- The sample sends an email to the operations team, notifying the team about the status.
- The operations team may de-provision the customer.
I am assuming you have already cloned the code in this repo. Open the solution in Visual Studio, and follow the steps for deploying the solution starting from this step.
The following is how my Visual Studio Publish profile looks:

I usually maintain a separate Azure Active Directory tenant (directory) for my application registrations. If you want to register the apps on your default directory, you can skip the following steps and go directly to Registering the Apps.
-
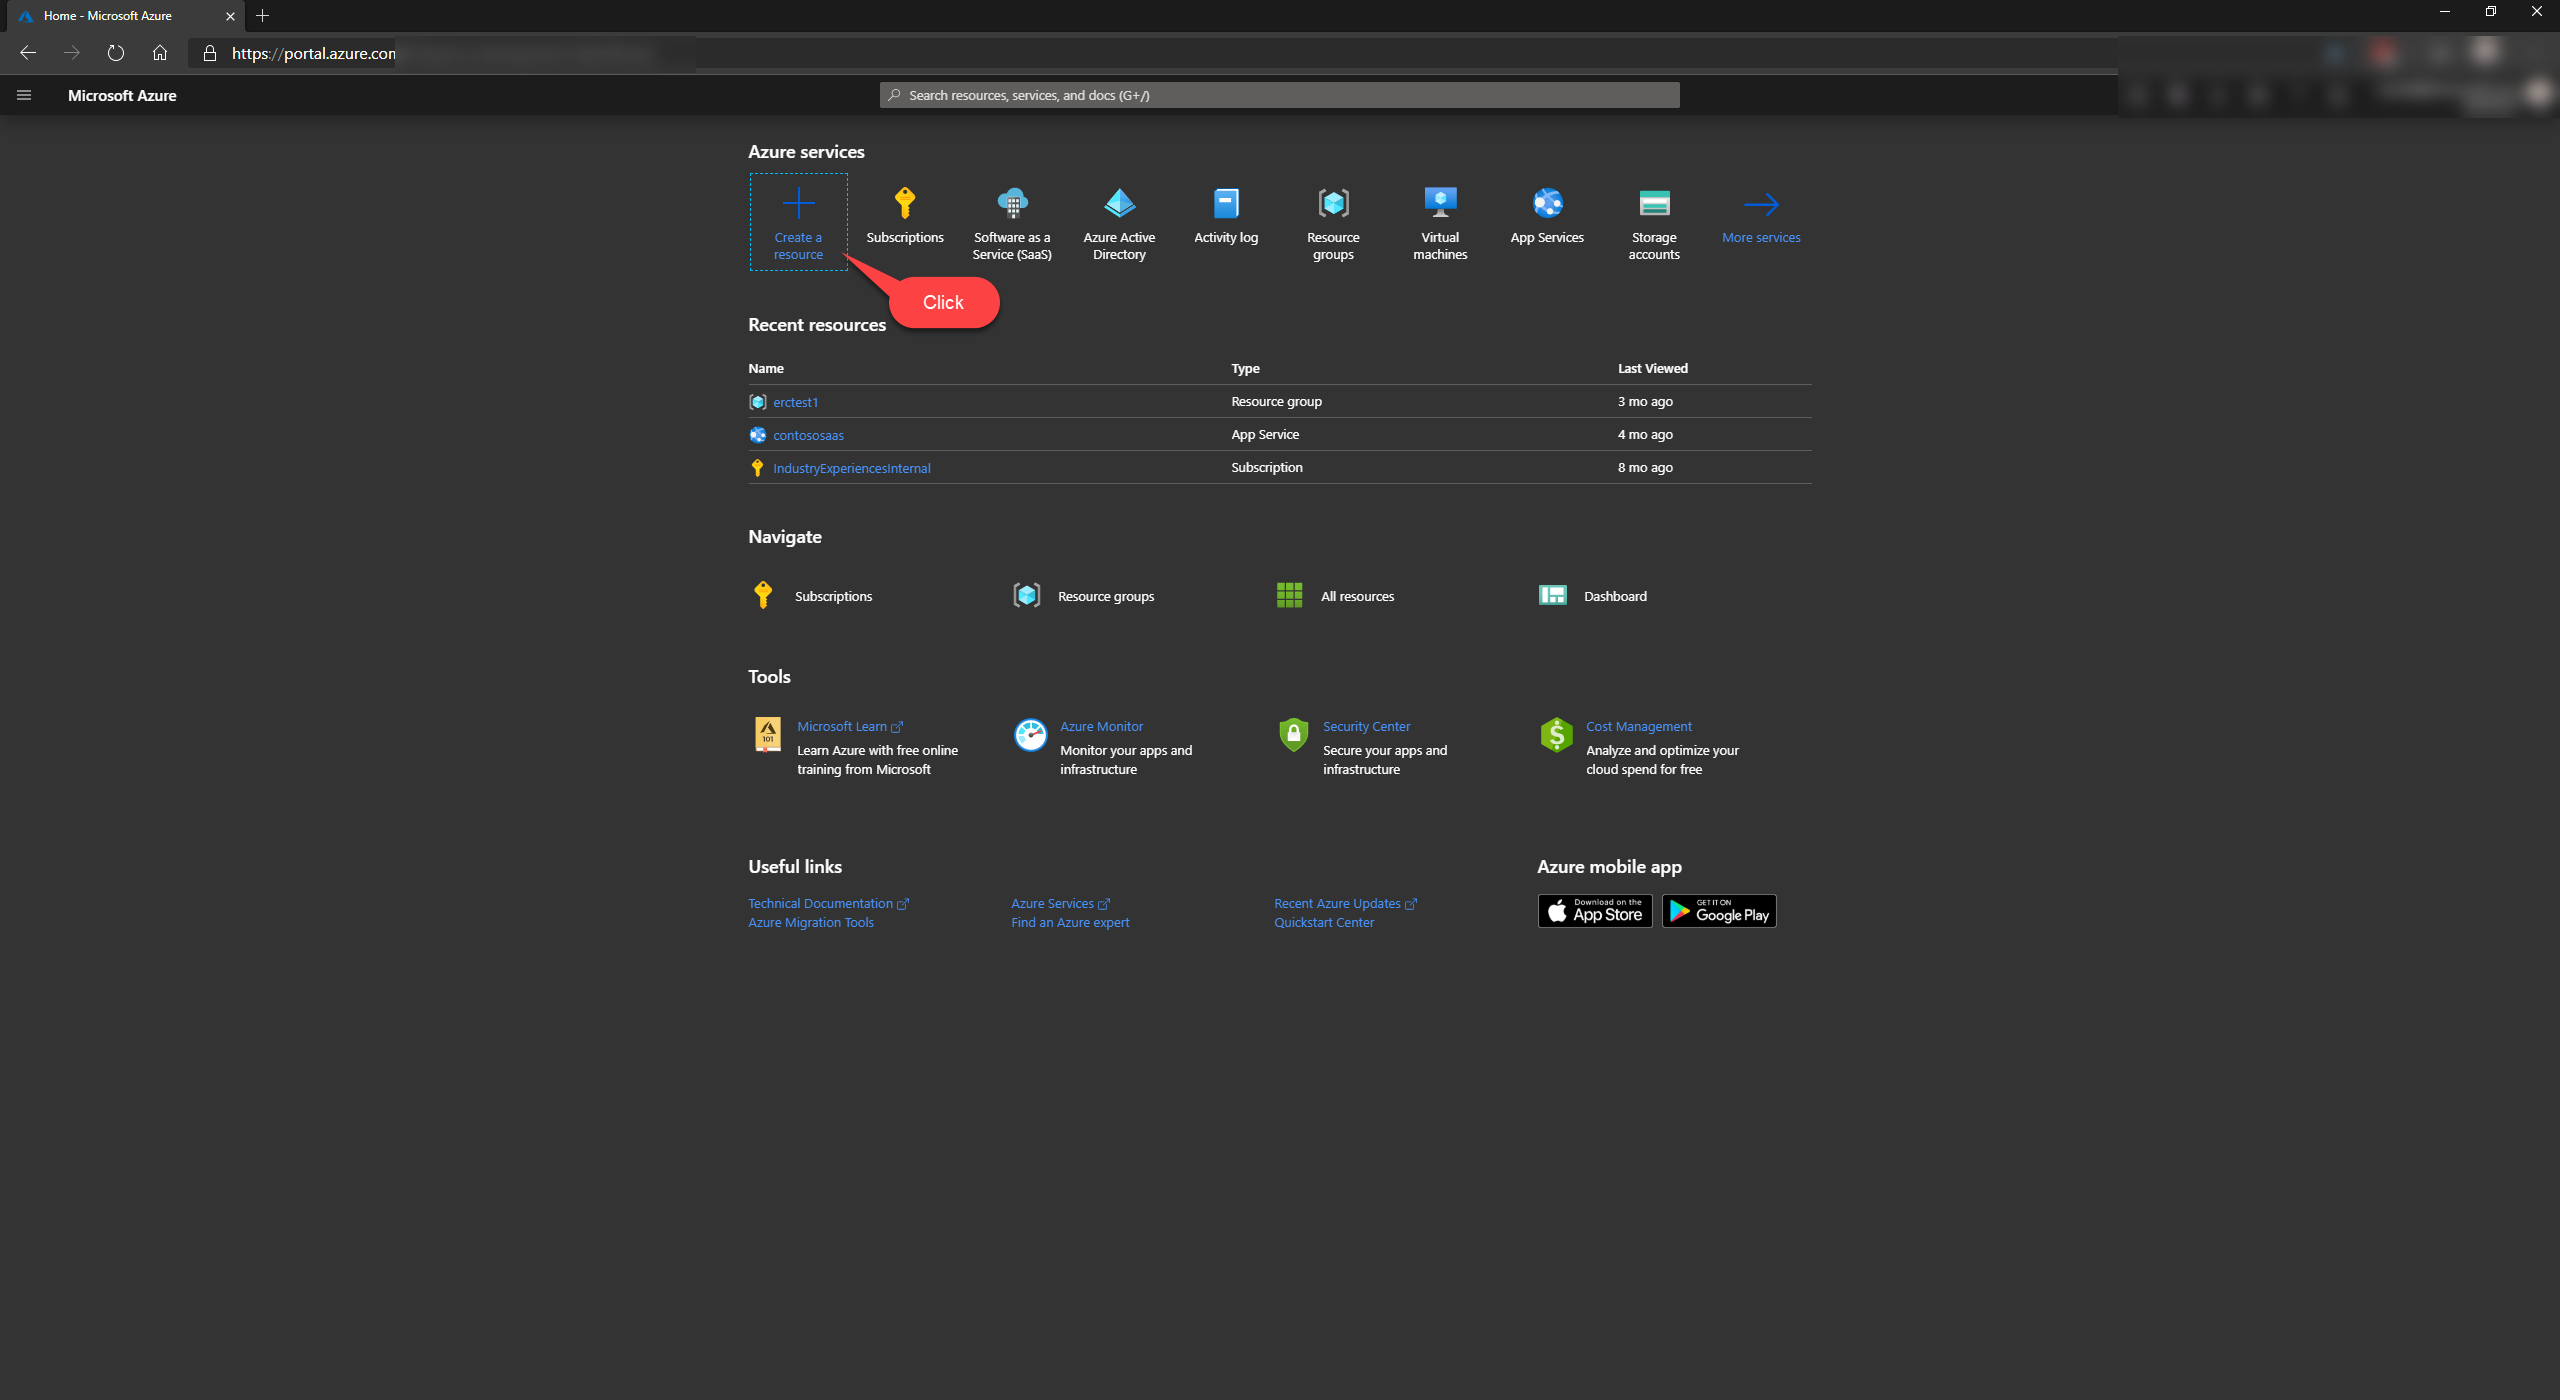
Login to the Azure Portal.
-
Click
Create a Resourceand type inAzure Active Directoryin the search box: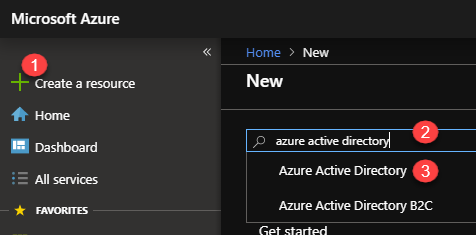
Select
Create Directorythen fill in the details as you see fit after clicking theCreatebutton -
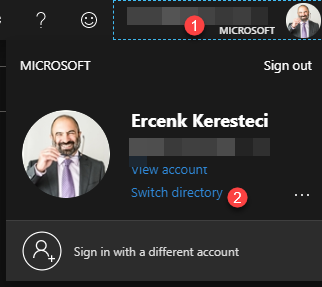
Switch to the new directory.
-
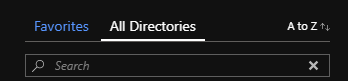
Select the new directory, if it does not show under "Favorites" check "All directories":
-
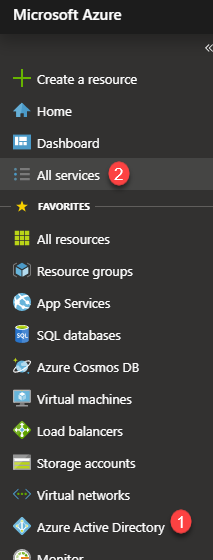
Once you switch to the new directory (or if you have not created a new one, and decided to use the existing one instead), select the Active Directory service (1 on the image below). If you do not see it, find it using "All services" (2 on the image below).
-
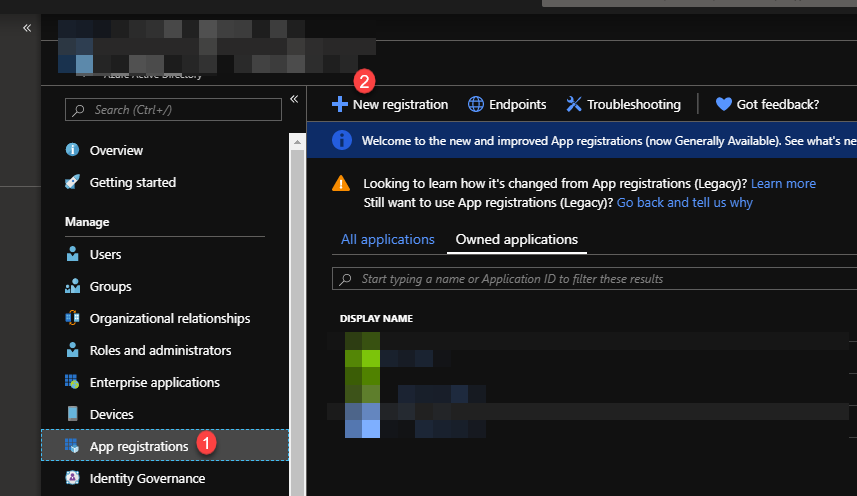
Click on "App registrations", and select "New registration". You will need to create two apps.


As I mentioned in the landing page and webhook sections above, I recommend registering two applications:
-
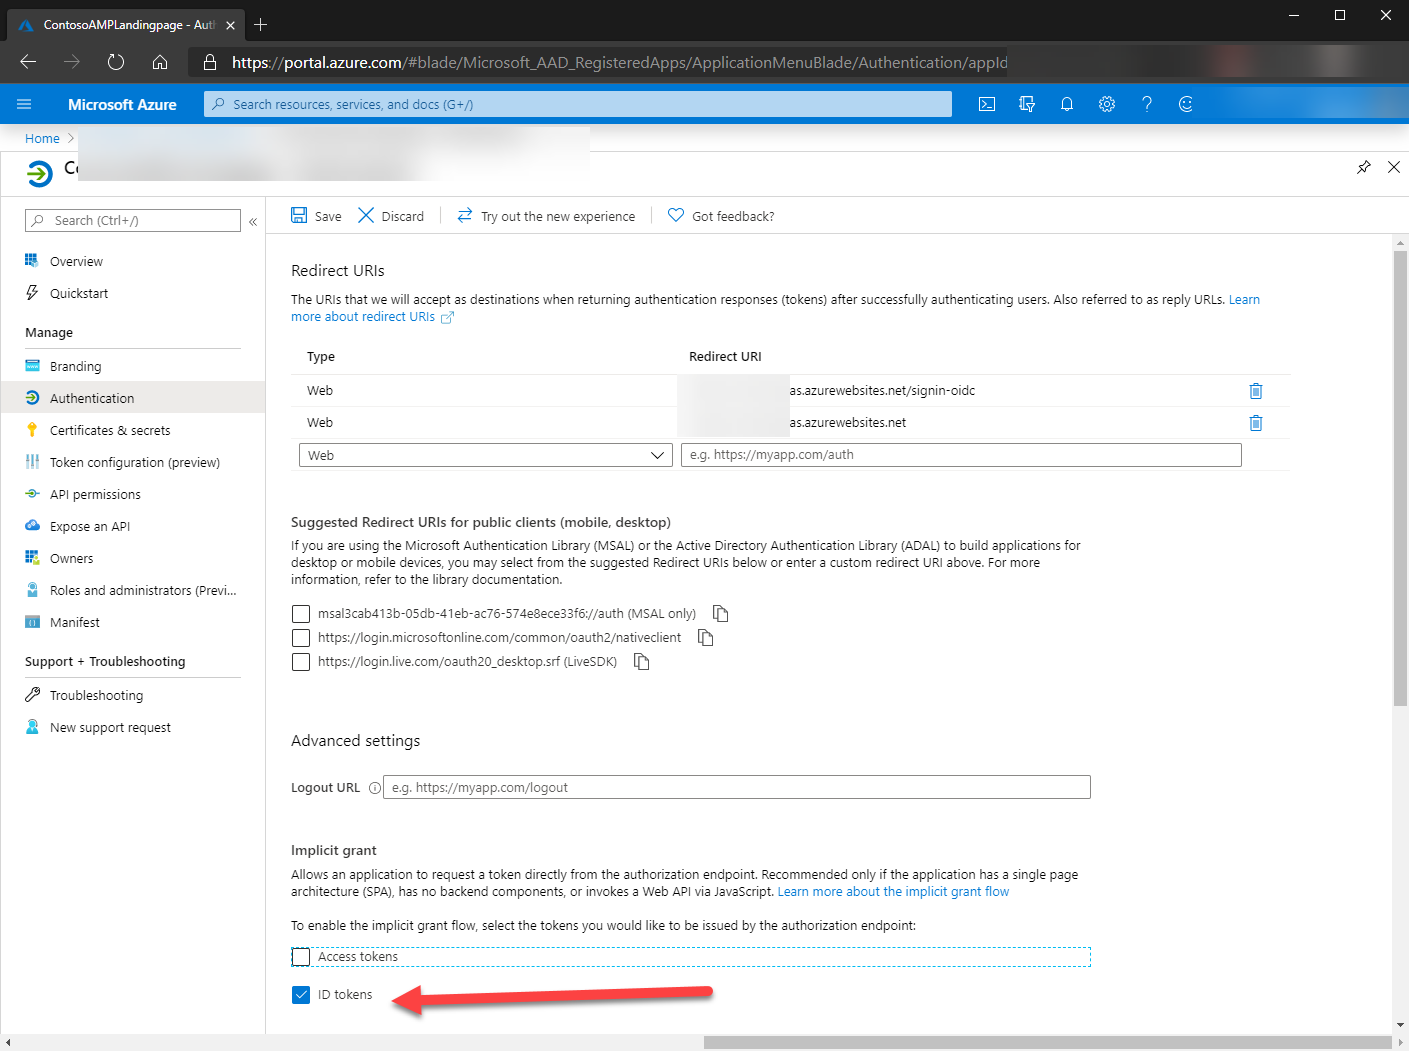
For the Landing Page: Azure Marketplace SaaS offers are required to have a landing page, authenticating through Azure Active Directory. Register it as described in the documentation. Make sure you register a multi-tenant application, you can find the differences in the documentation. Select the "ID tokens" on the "Authentication" page. Also, add two Redirect URLs: the base
/URL of the web app and another web app URL with/signin-oidcadded. -
To authenticate Azure Marketplace Fulfillment APIs, you can register a single tenant application.

Follow the steps in the
tutorial,
and grab an API Key. Set the value of the ApiKey in the configuration section,
"Dashboard:Mail", either using the user-secrets method or in the
appconfig.json file.
Create an Azure Storage account following the steps here. The solution uses the storage account to keep references to the operations returned by actions done on the fulfillment API, as well as offering a place to store Leads generated from the Marketplace offer (via Table Storage).
You will need to modify the settings with the values for the services you have created above.
You will need to replace the values marked as CHANGE, either by editing the
appconfig.json file in the solution, or by using dotnet user-secrets (see
notes at the bottom of this document for more instruction).
| Setting | Change/Keep | Notes |
|---|---|---|
| AzureAd:Instance | Keep | The landing page is using a multi-tenant app. Keep the instance value |
| AzureAd:Domain | Change | You can find this value on the "Overview" page of the Active Directory you have registered your applications in. If you are not using a custom domain, it is in the format of <tenant name>.onmicrosoft.com |
| AzureAd:TenantId | Keep | Common authentication endpoint, since this is a multi-tenant app |
| AzureAd:ClientId | Change | Copy the clientId of the multi-tenant app from its "Overview" page |
| AzureAd:CallbackPath | Keep | Default oidc sign in path |
| AzureAd:SignedOutCallbackPath | Keep | Default sign out path |
| FulfillmentClient:AzureActiveDirectory:ClientId | Change | Copy the clientId of the single-tenant app from its "Overview" page. This AD app is for calling the Fulfillment API |
| FulfillmentClient:AzureActiveDirectory:TenantId | Change | Copy the tenantId of the single-tenant app from its "Overview" page. |
| FulfillmentClient:AzureActiveDirectory:AppKey | Change | Go to the "Certificates & secrets" page of the single-tenant app you have registered, create a new client secret, and copy the value to the clipboard, then set the value for this setting. |
| FulfillmentClient:FulfillmentService:BaseUri | Keep | The Azure Marketplace API endpoint. |
| FulfillmentClient:FulfillmentService:ApiVersion | Change | Change if you want to hit the production or mock API. 2018-08-31 is for production, 2018-09-15 is for mock API |
| FulfillmentClient:OperationsStoreConnectionString | Change | Copy the connection string of the storage account you have created in the previous step. Please see SDK documentation for details |
| Dashboard:Mail:OperationsTeamEmail | Change | The sample sends emails to this address. |
| Dashboard:Mail:FromEmail | Change | Sendgrid requires a "from" email address when sending emails. |
| Dashboard:Mail:ApiKey | Change | Sendgrid API key. |
| Dashboard:DashboardAdmin | Change | Change it to the email address you are logging on to the dashboard. Only the users with the domain name of this email is authorized to use the dashboard to display the subscriptions. |
| Dashboard:ShowUnsubscribed | Change | Change true or false, depending on if you want to see the subscriptions that are not active. |
Once your AAD directory, AAD applications, and web application are setup and ready to use, an offer must be created in the Commercial Marketplace Portal in the Microsoft Partner Center.
Documentation on creating an offer can be found on Microsoft Docs: Create a New Saas Offer in the Commercial Marketplace. Documentation is also available for all fields and pages for the offer on Docs as well.
You will need the following information to complete the offer:
- AAD Application ID (also called Client ID) from the Single-Tenant Application
- AAD Tenant ID hosting the AAD Single-Tenant
- URLs from the Azure AppService web application:
- The Base URL
/ - The Landing Page
/landingpage - The Webhook Endpoint
/webhook - The Privacy Policy
/privacy - The Support Page
/support
- The Base URL
- Storage Account Connection String
Additionally, you will need assets, such as logos and screenshots, to complete
the offer listing as well. They can be found in this code repository under
/resources.
These are sample configuration values for the offer to pass certification of the sample SaaS solution to help you get started with a sample offer.
⚠️ IMPORTANT: This is just meant to be a sample. You will need to make adjustments based on your specific offer, even for this sample (e.g. contact information). Real information needs to be entered; using "Lorem ipsum" style information will not pass the certification steps if you want to preview your offer in the marketplace. Again, reference the Microsoft Docs for a more thorough overview of each section.

-
Selling Through Microsoft: to simplify for this sample, choose "Yes".
-
Customer Leads: unless you already have a CRM or other system setup that you'd like to use, choose Azure Table storage and use the connection string for the storage account you created earlier:
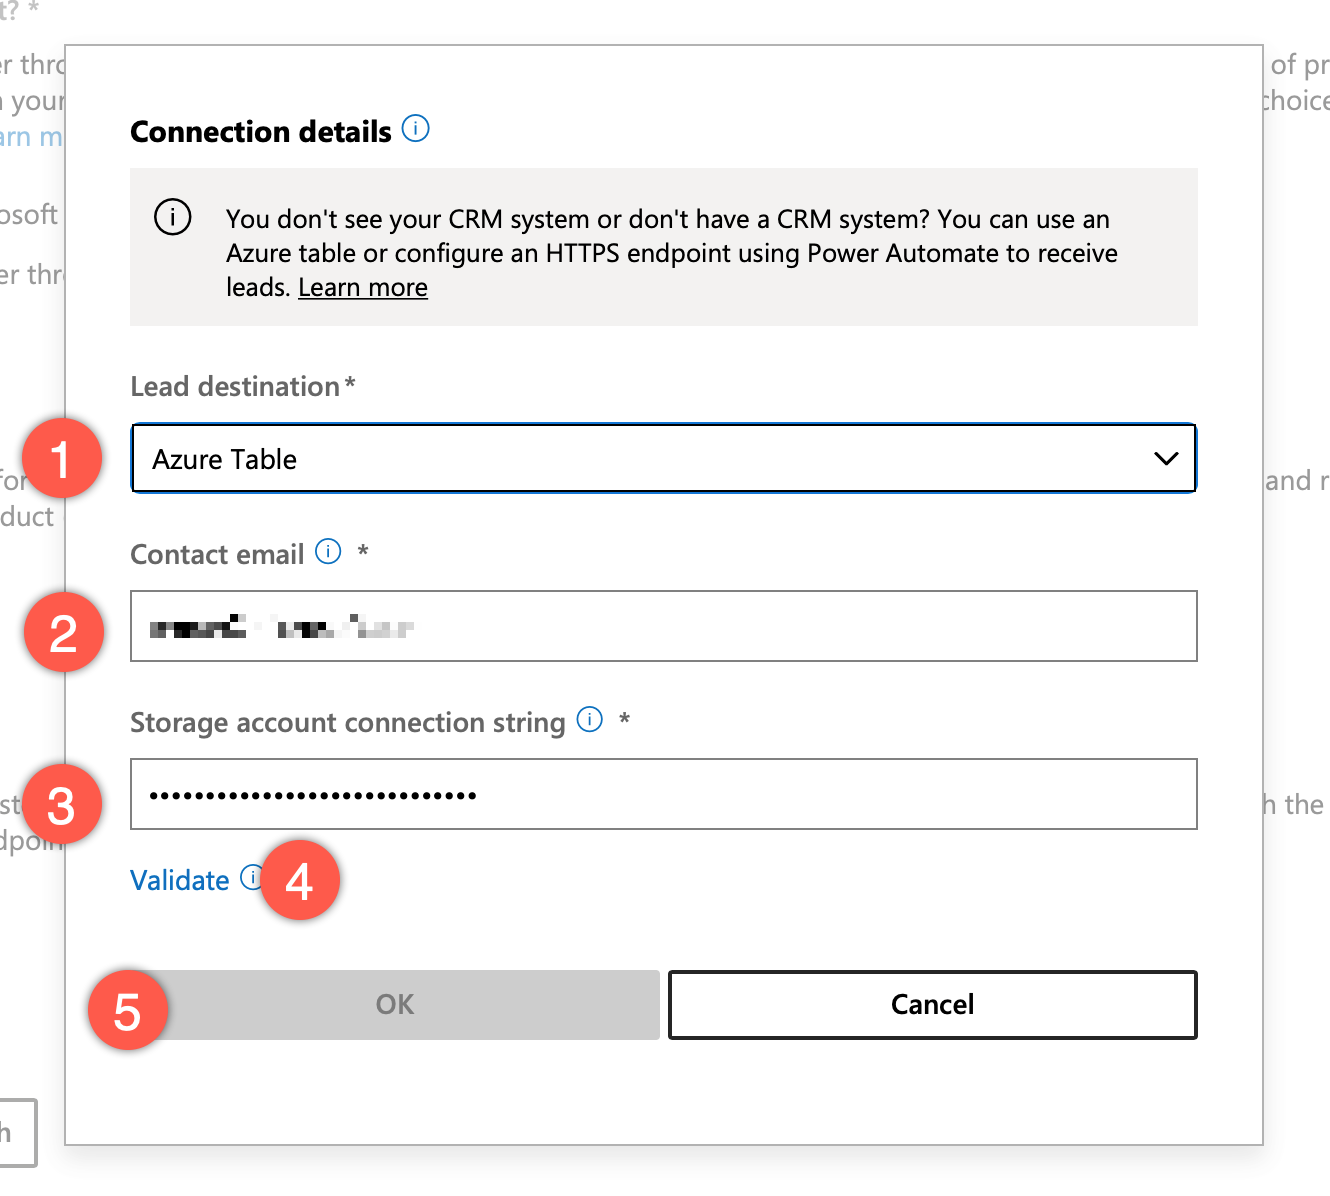
- Lead Destination: Azure Table.
- Contact Email: your email address.
- Storage Account Connection String: the connection string for the storage account you created earlier.
- Validate: ensure you can actually connect to the storage account.
- OK: close the dialog and you're set.
-
Save Draft: Between each screen, be sure to save a draft.


- Category: choose any category. Web is appropriate for this sample.
- Industried: again, choose any.
- Legal: optional, but choosing the Standard Contract may help with the certification process.
- Save Draft: as always, save a draft.
This is where most of your configuration for the offer will be. Pay attention to all the fields, taking care to fill them out as fully as you can.

- Name: the name of your offer. This is what will be listed in the Marketplace. Since this is just a demo, something along the lines of Marketplace Demo - {YOUR ORG NAME} could work here.
- Search Results Summary: this is the text that shows when you search for your offer in the marketplace – a short sentence should suffice.
- Description: this needs to be a real description (i.e. no Lorem Ipsum). Feel free to use something similar to what's in the screenshot above.
- Getting Started Instructions: again, this needs to be real text. Also feel free to use something similar to what's in the screenshot above.
- Search Keywords: add your organization name, "marketplace demo", or something similar.
- Privacy Policy Link: This needs to be your web application's privacy
policy URL that was called out earlier. It will be in the format of
https://{YOUR_APP_SERVICE_NAME}.azurewebsites.net/privacy. - Contact Information: Use your details for Name, Email, and Phone
for both the Support Contact and Engineering Contact sections. For
Support URL, you'll need to use the support URL that was called out
earlier. It will be in the format of
https://{YOUR_APP_SERVICE_NAME}.azurewebsites.net/support. - Supporting Documents: upload the PDF
resources/OfferListing-SupportDocuments-SupportInformation.pdfprovided in this repository and name it "Support Information". - Marketplace Media - Logos: upload all logos using the PNG files provided
under
resources/in this repository. They are named according to their sizes. - Marketplace Media - Screenshots: a screenshot has been provided under
the
resources/directory – name it "All Offer Subscriptions". - Save Draft: as always, save a draft when finished editing the page.

- Azure Active Directory or Microsoft Account Email Address: add any AAD or Microsoft account email addresses that you would like to access this application. These will be the accounts that have access to viewing the offer in its preview phase. At a minimum, add your own account.
- Add Another Email: if there are others you'd like to see the offer in the preview phase, add up to 10 total accounts.
- Save Draft: save before moving forward.
This page has the landing page and webhook configuration for your offer that was deployed in earlier steps.

- Landing Page URL: this is the Landing Page URL that was called out
earlier. It will be in the format of
https://{YOUR_APP_SERVICE_NAME}.azurewebsites.net/LandingPage. - Connection Webhook: this is the Webhook Endpoint URL that was called out
earlier. It will be in the format of
https://{YOUR_APP_SERVICE_NAME}.azurewebsites.net/webhook. - Azure Active Directory Tenant ID: the Tenant ID hosting the Single-Tenant Application.
- Azure Active Directory Application ID: the Application (Client) ID from the Single-Tenant Application that was created.
- Save Draft: save the current page.

- Create New Plan: add a new plan to the offer to allow for signing up. We'll add one that's $0 to avoid billing.
- Selecting Previous Plan: if you've already created a plan, you can edit them by selecting from the list.
- Stop Selling: if you need to "remove" a plan, you can stop selling it.
Creating a new plan:
-
Plan Listing:

- Plan Name: choose a plan name that will be listed when selecting it in the subscription process.
- Plan Description: a basic, real description is required for certification.
- Save Draft
-
Pricing and Availability:
-
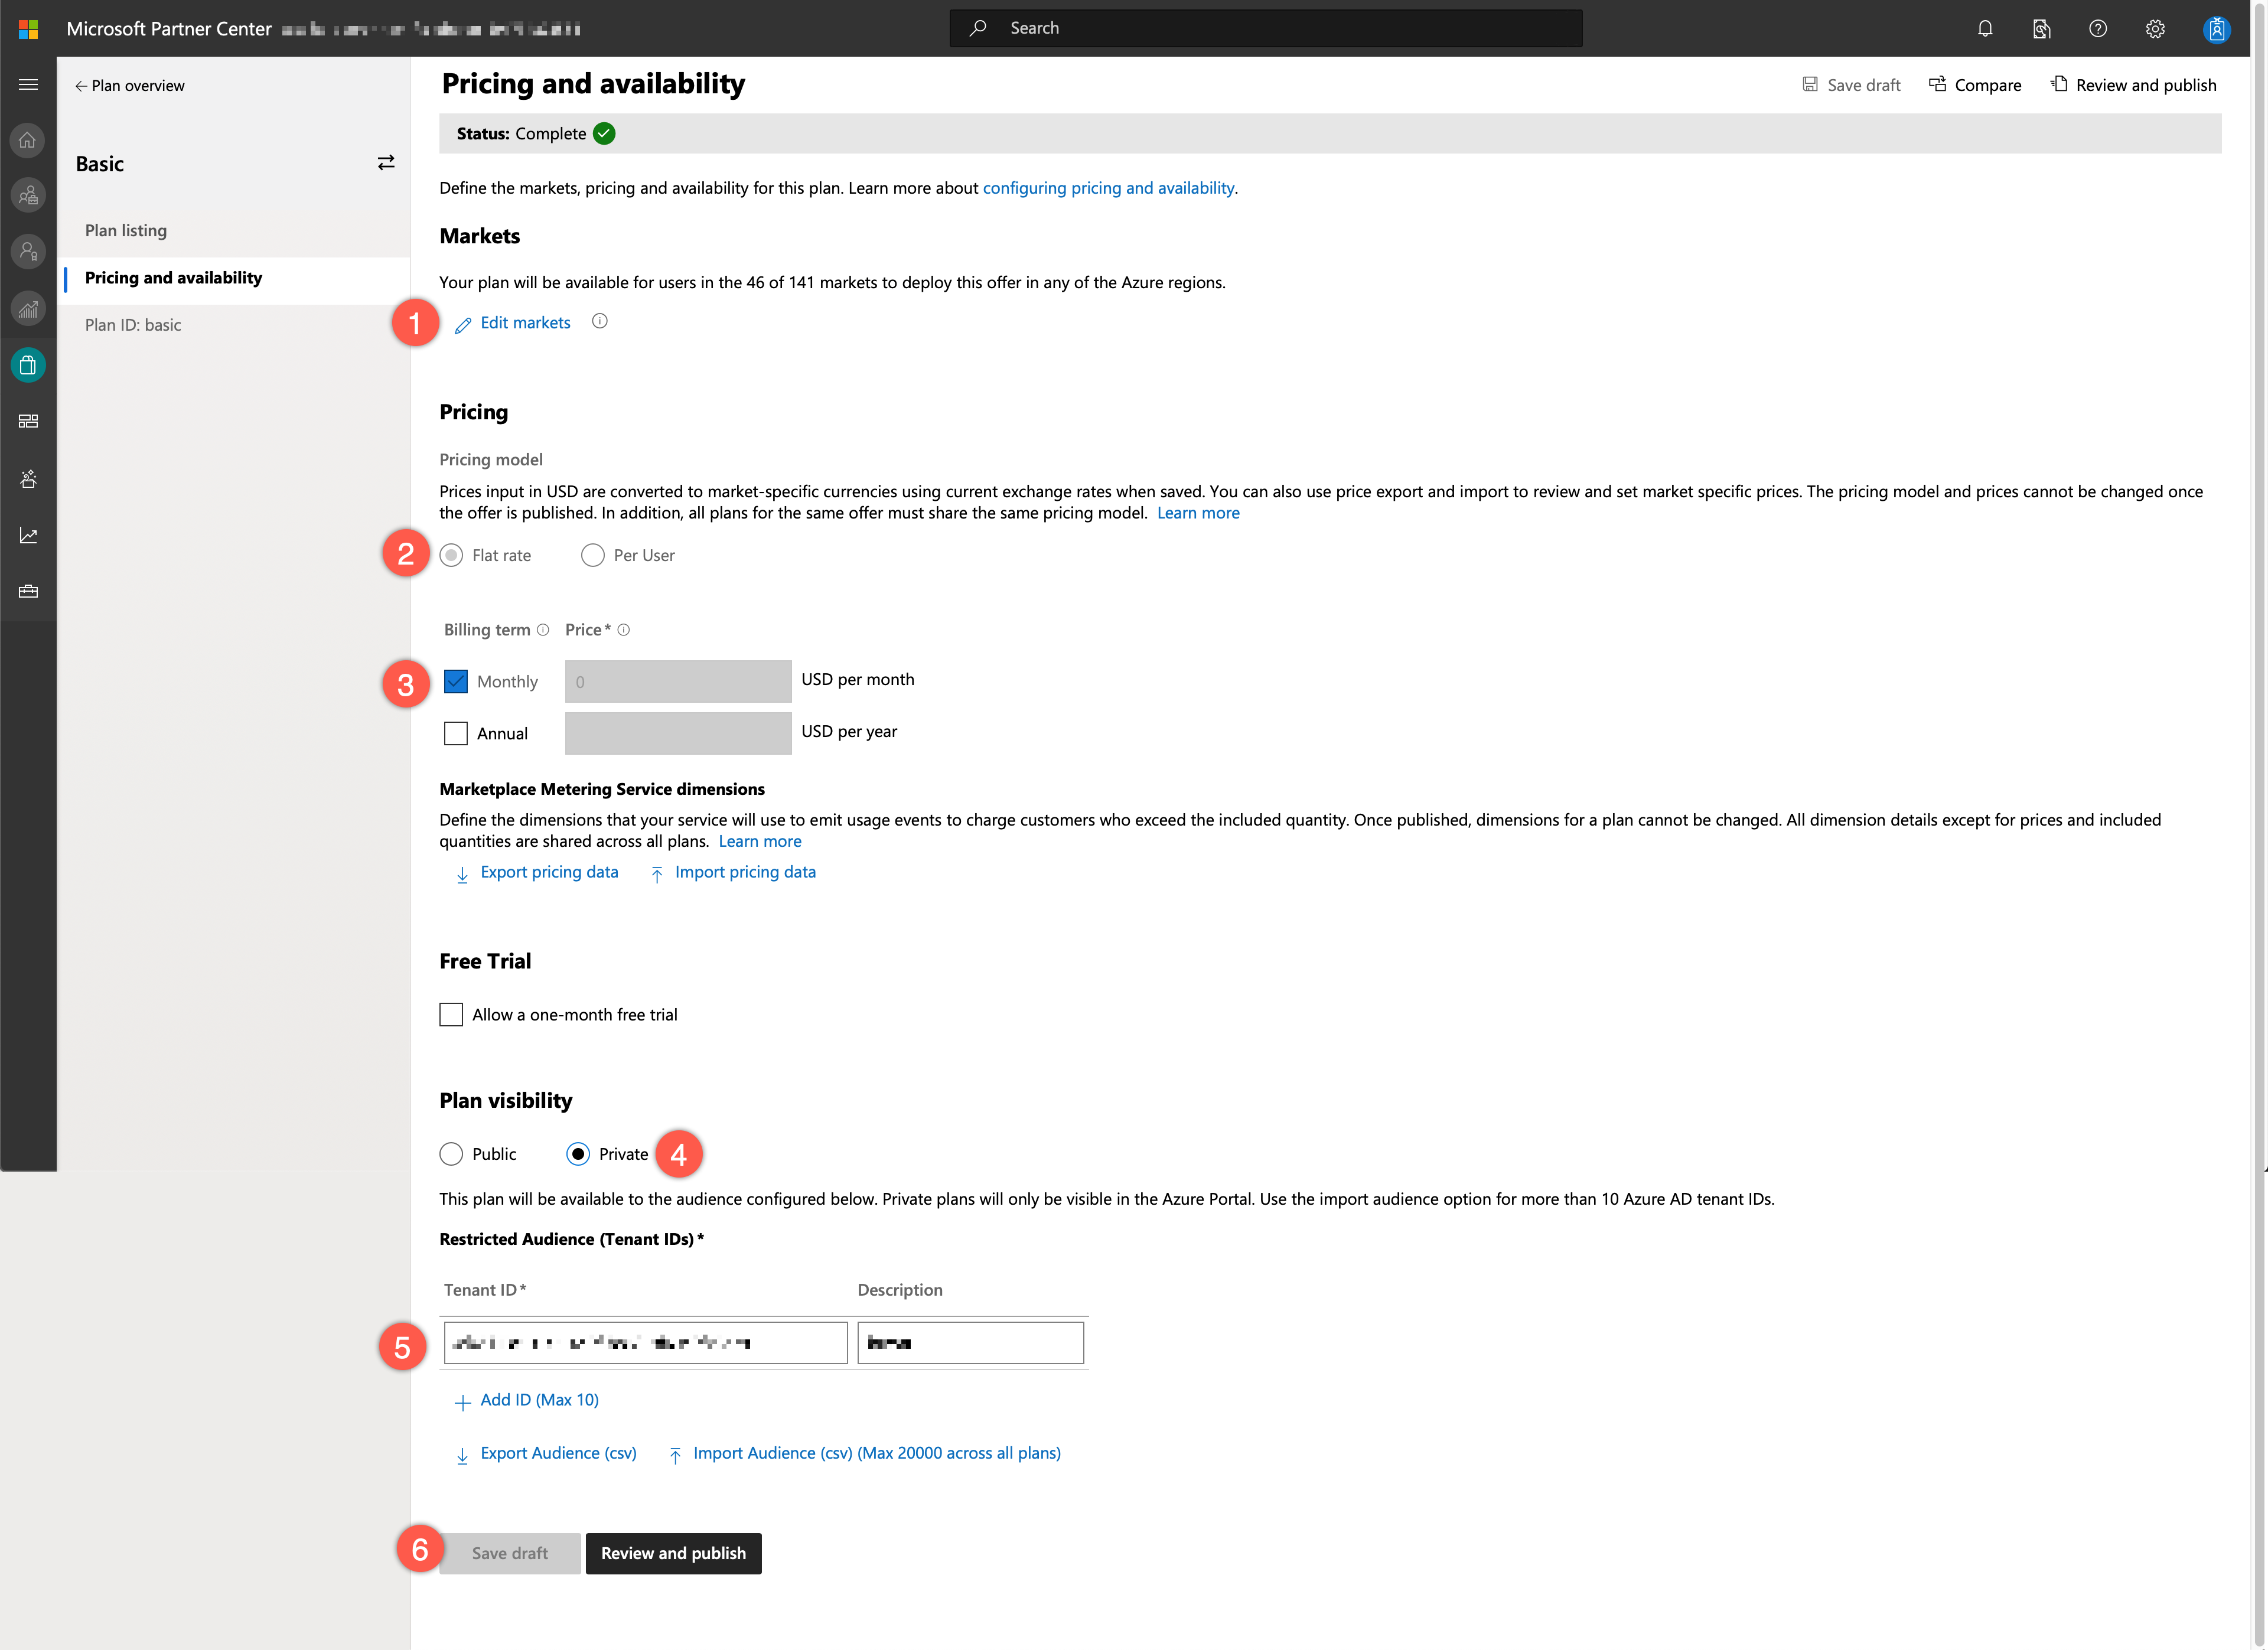
Markets: Choose the markets in which this plan will be available:
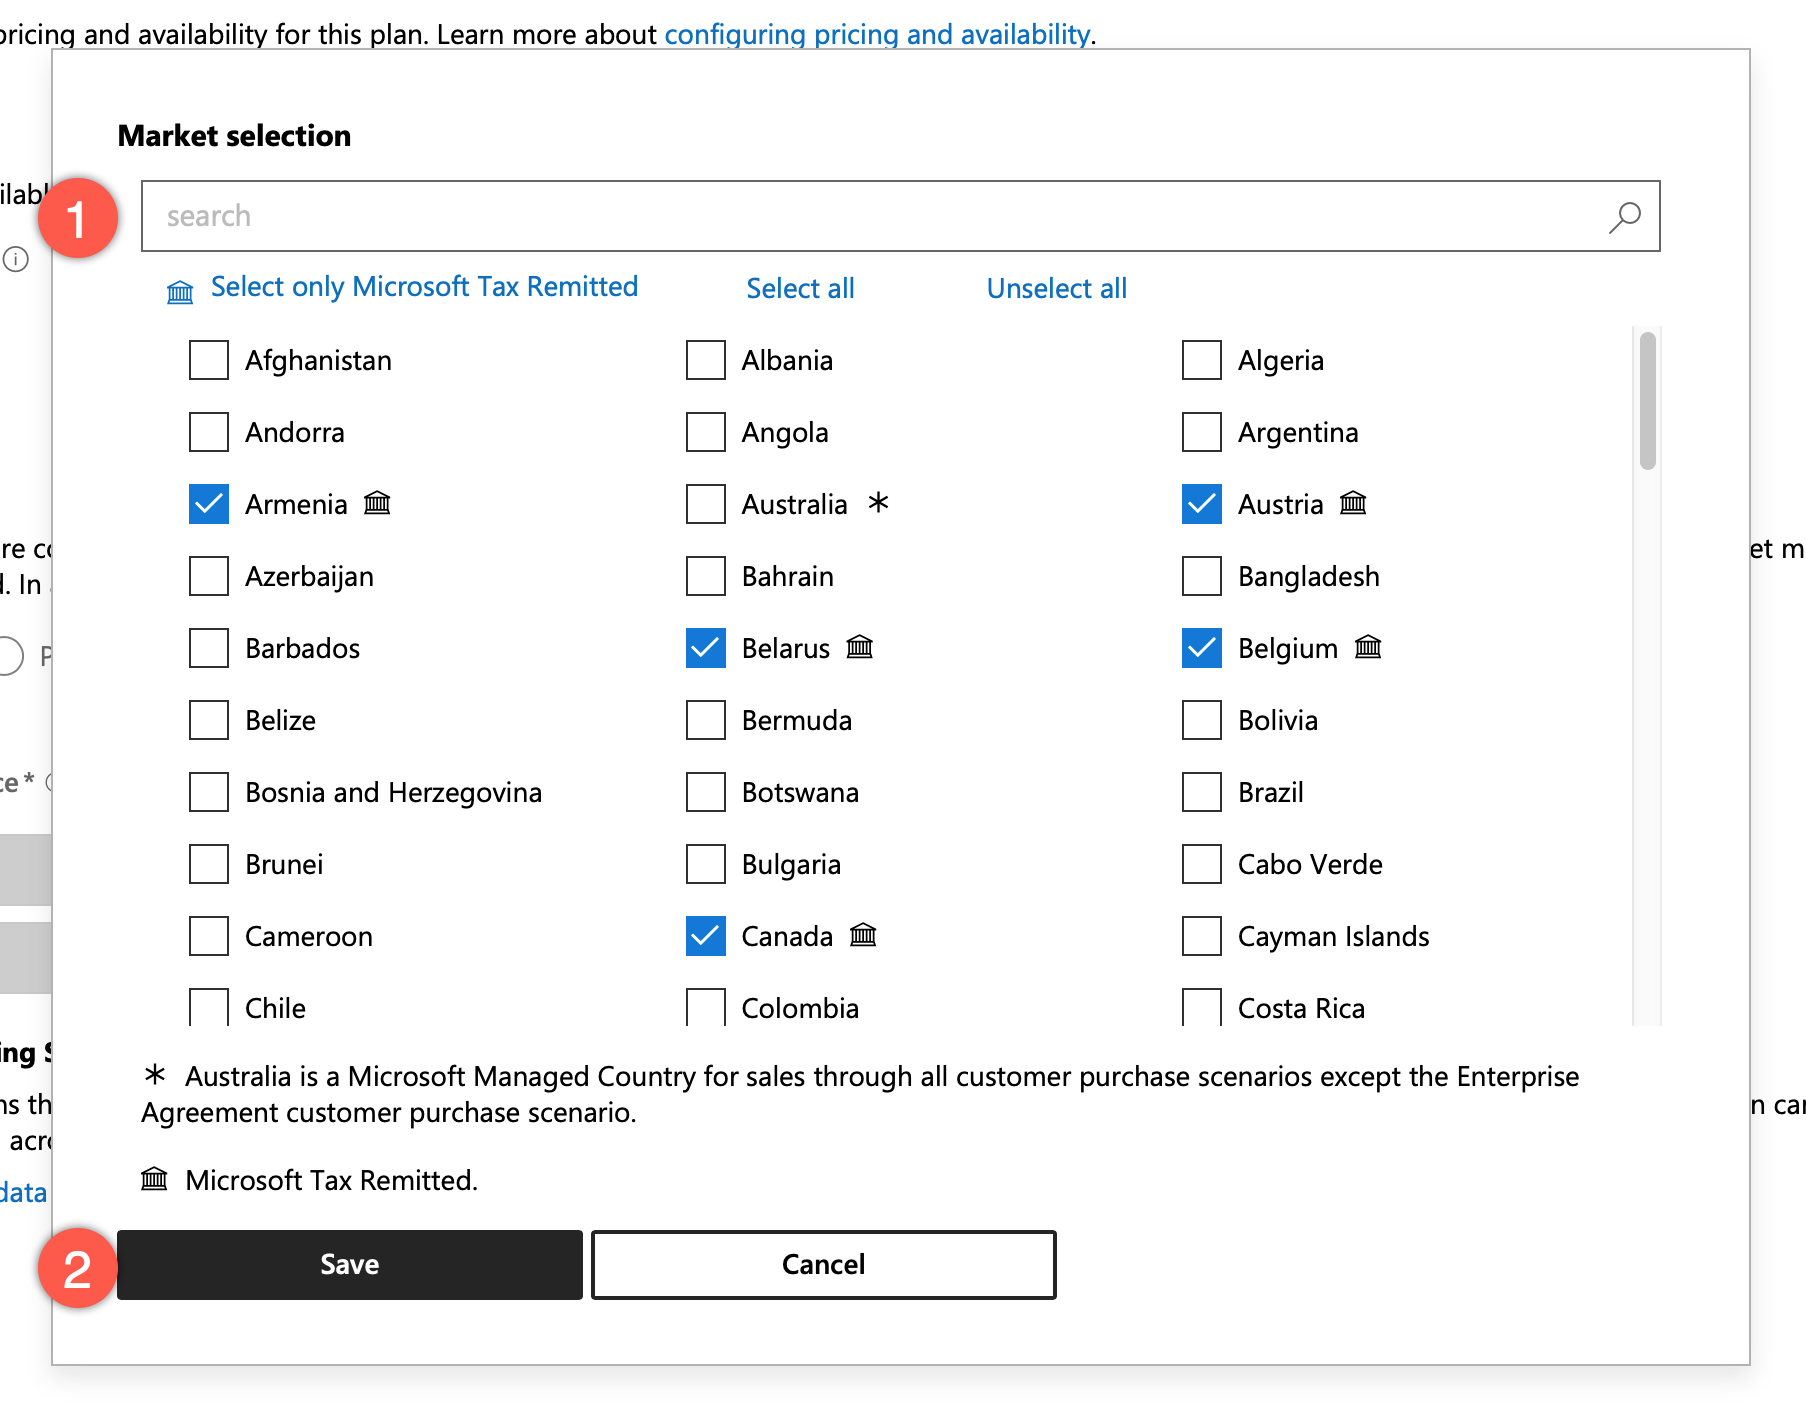
- Market Selection: Search for your current market(s).
- Save: save to close the dialog with your selection.
-
Pricing - Pricing Model: choose "Flat Rate".
-
Pricing - Billing Term: choose "Monthly" and set the cost to $0.
-
Plan Visibility: set to "Private".
-
Restricted Audience: use the Tenant ID that hosts the Single-Tenant and Multi-Tenant AAD applications (the same that was used in previous steps).
-
Save Draft
-


Nothing needs to be configured here for the purpose of this solution.
Nothing needs to be configured here for the purpose of this solution.
Under Offer Overview, verify that all available information looks correct.
Then choose to Review and Publish the offer to start the certification
process. Correct any errors that come back and work to the Publisher Signoff
step; this is where you'll be able to sign up for your offer before going live
(with your real SaaS offer in the future).

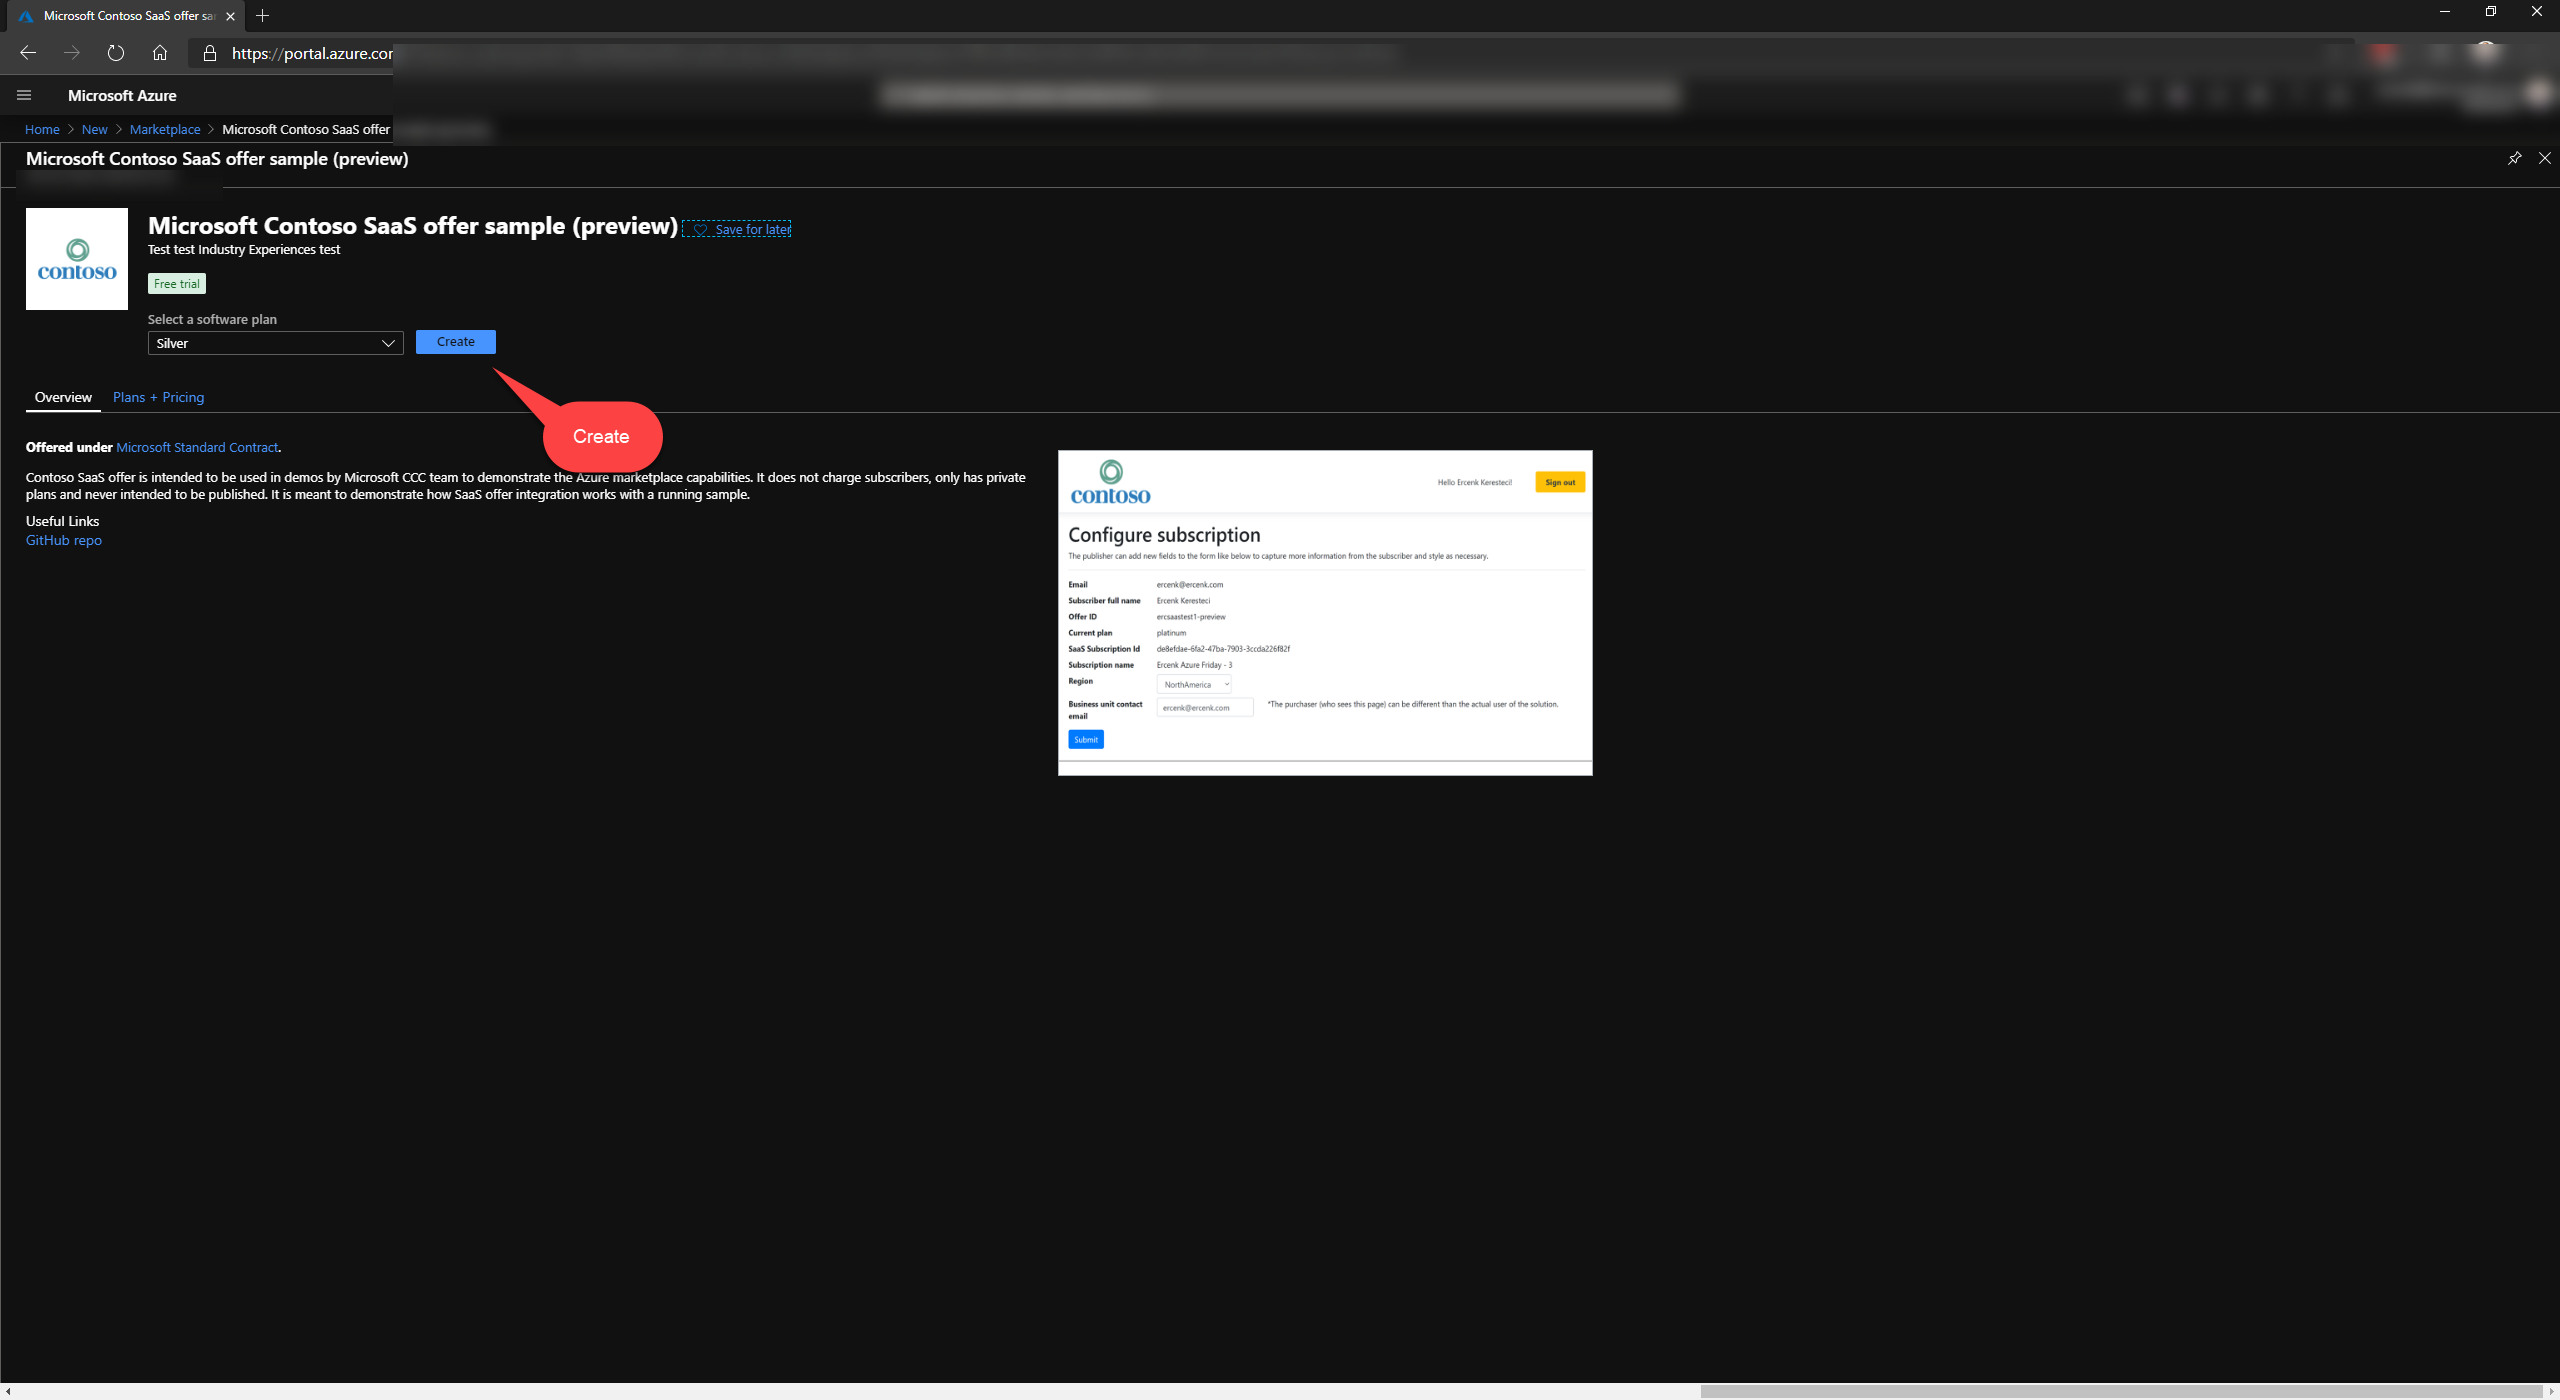
Customer searches for the offer on Azure Portal
-
Go to Azure Portal and add a resource
-
Find the search text box

-
Type in your offer name
-
Select the plan
-
Subscribe
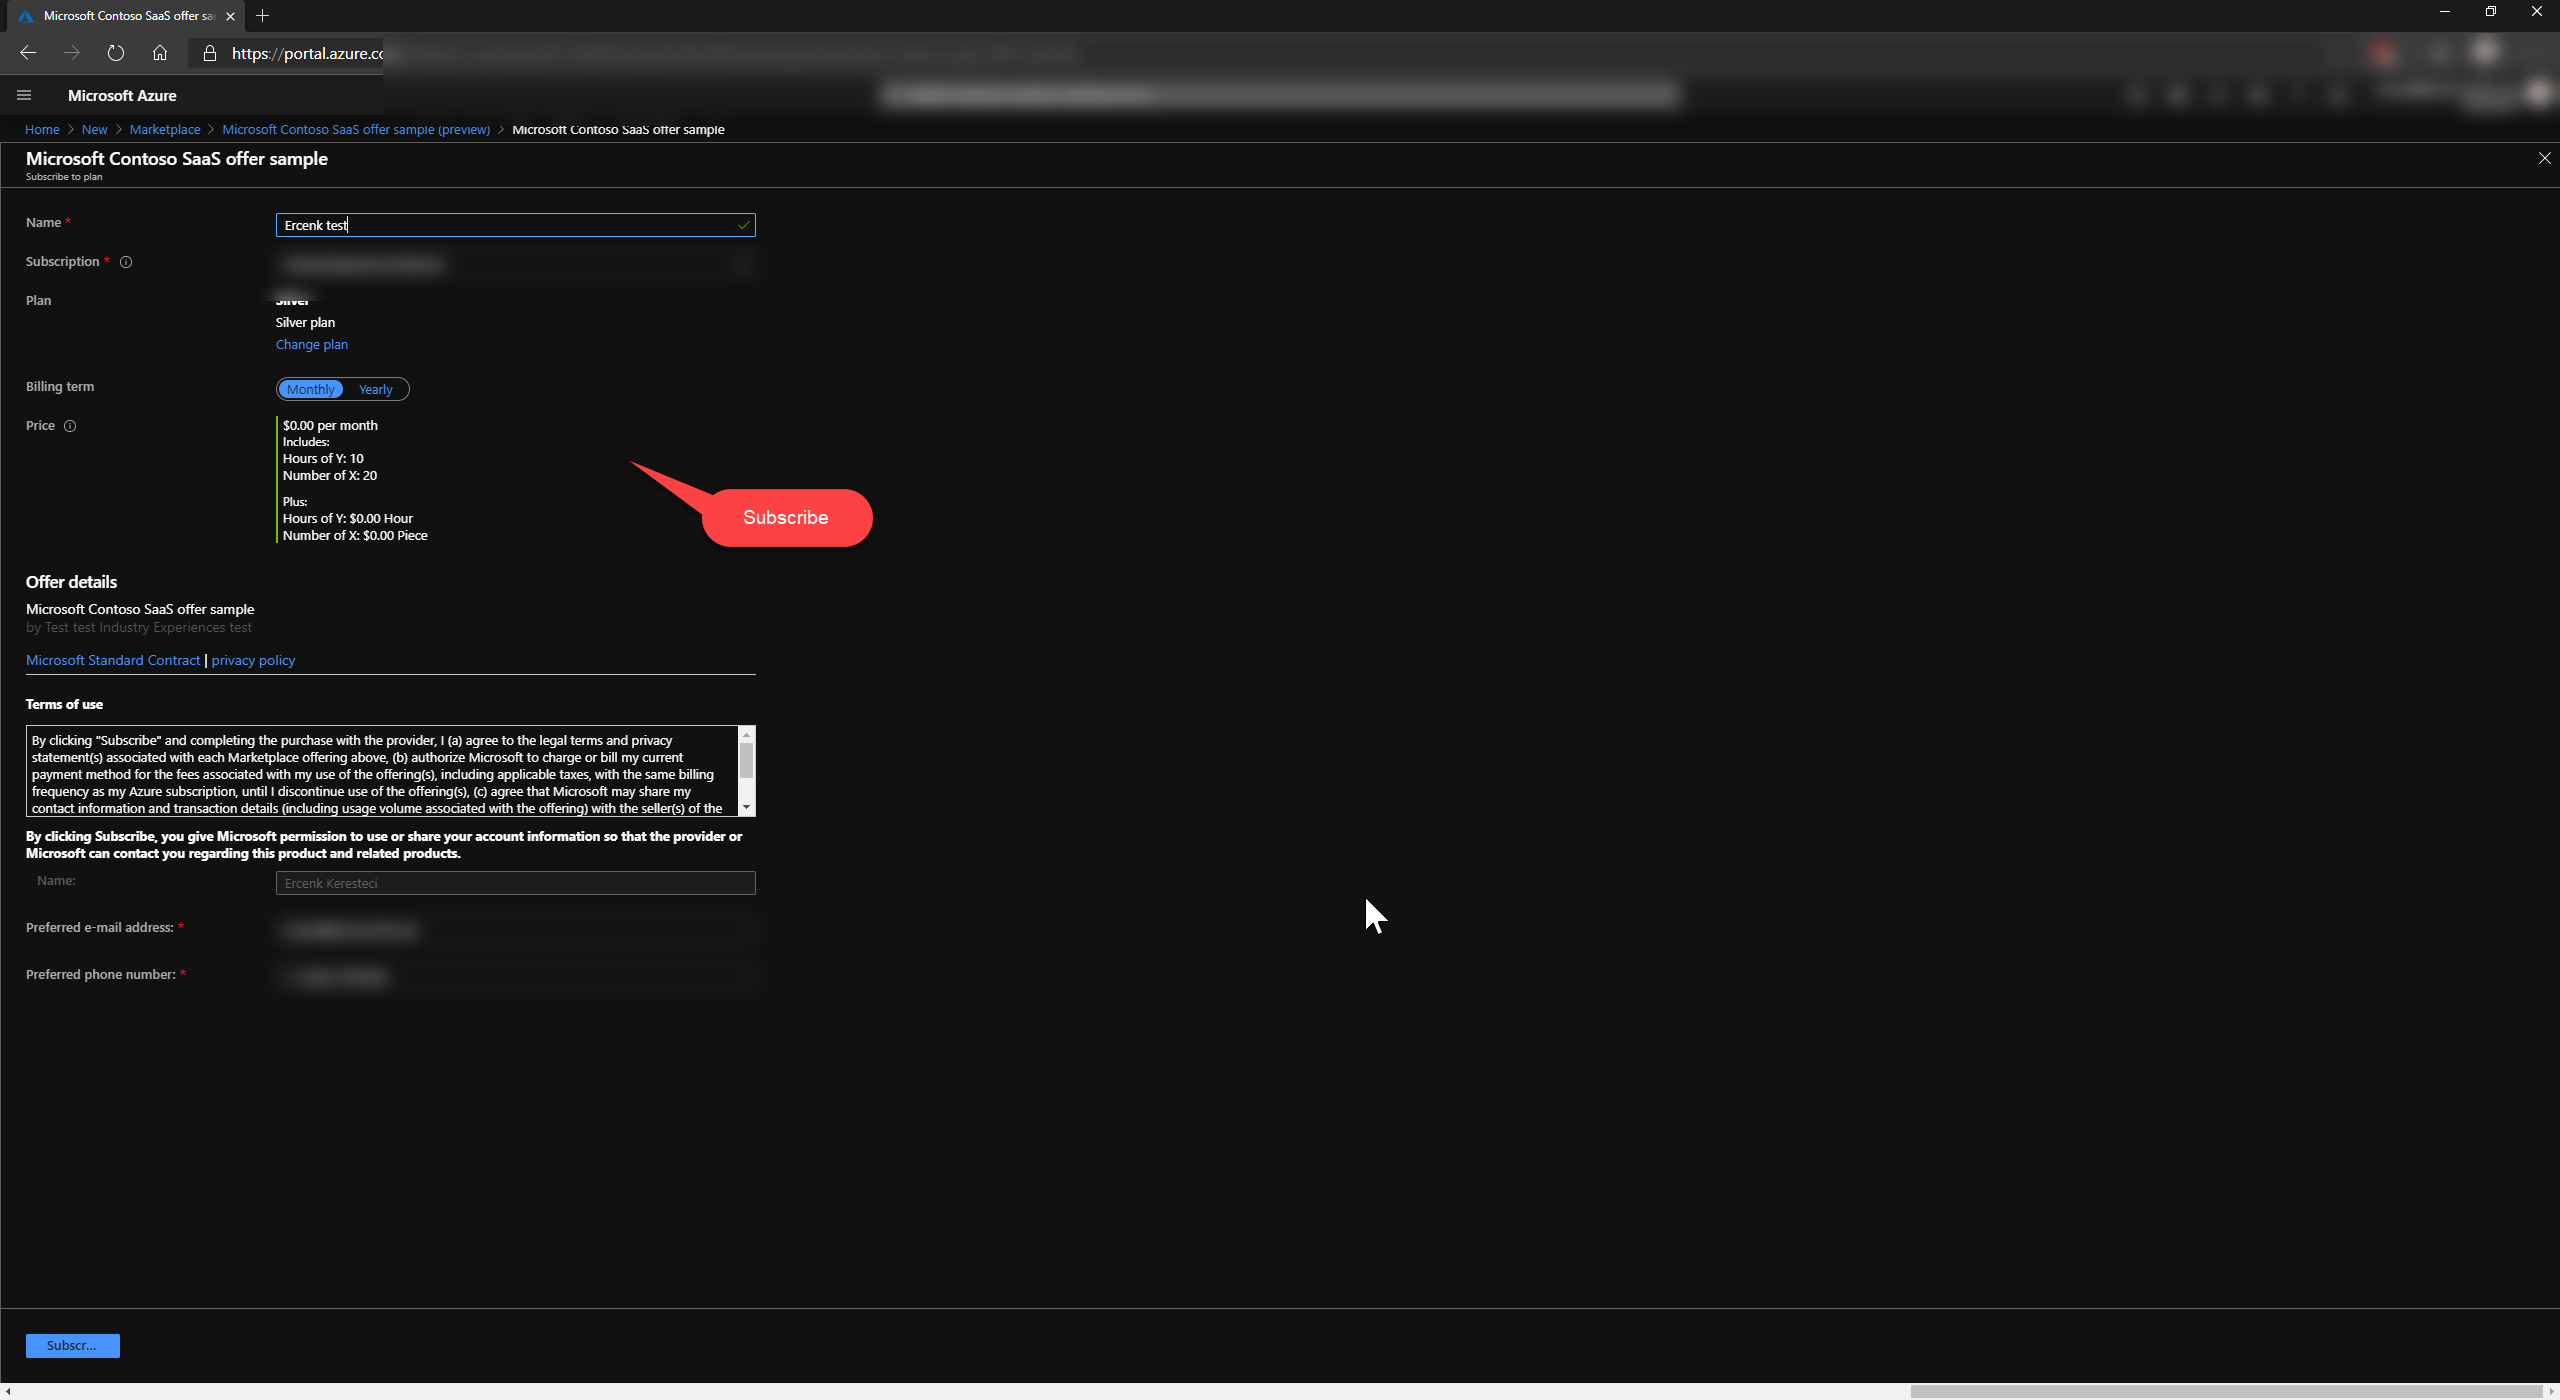
-
Find the subscription after the deployment is complete, and go the subscription
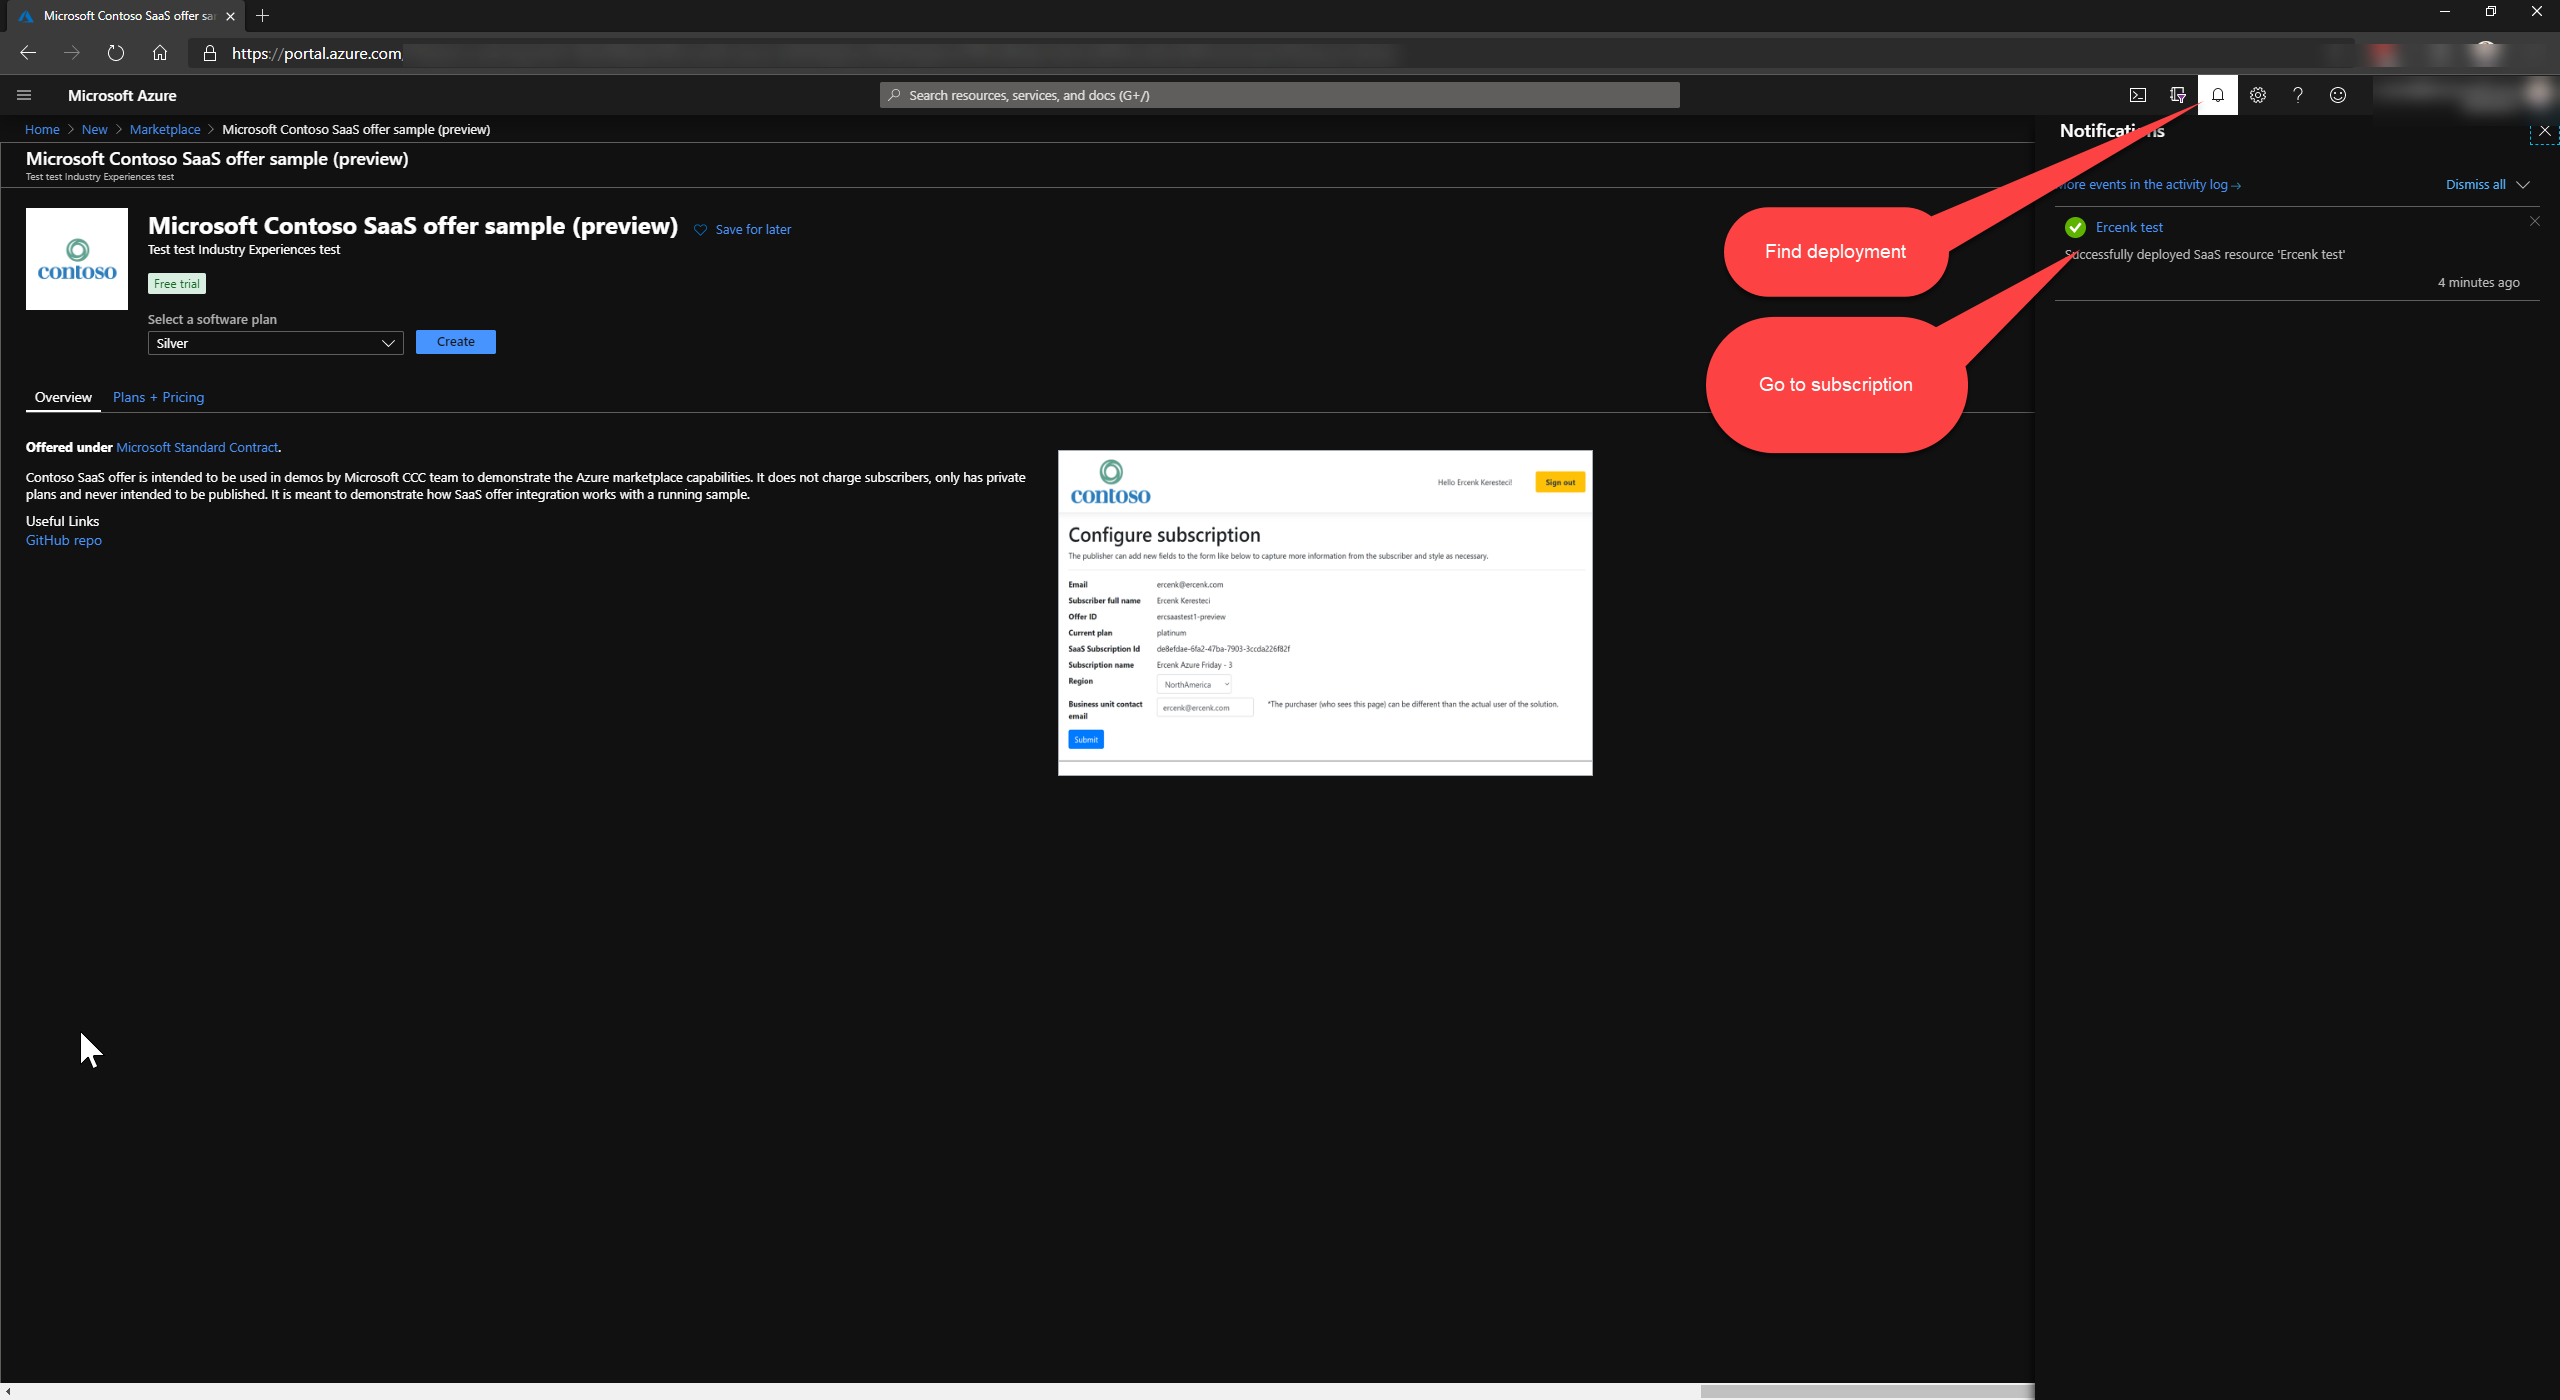
-
Subscription details, notice it is not active yet
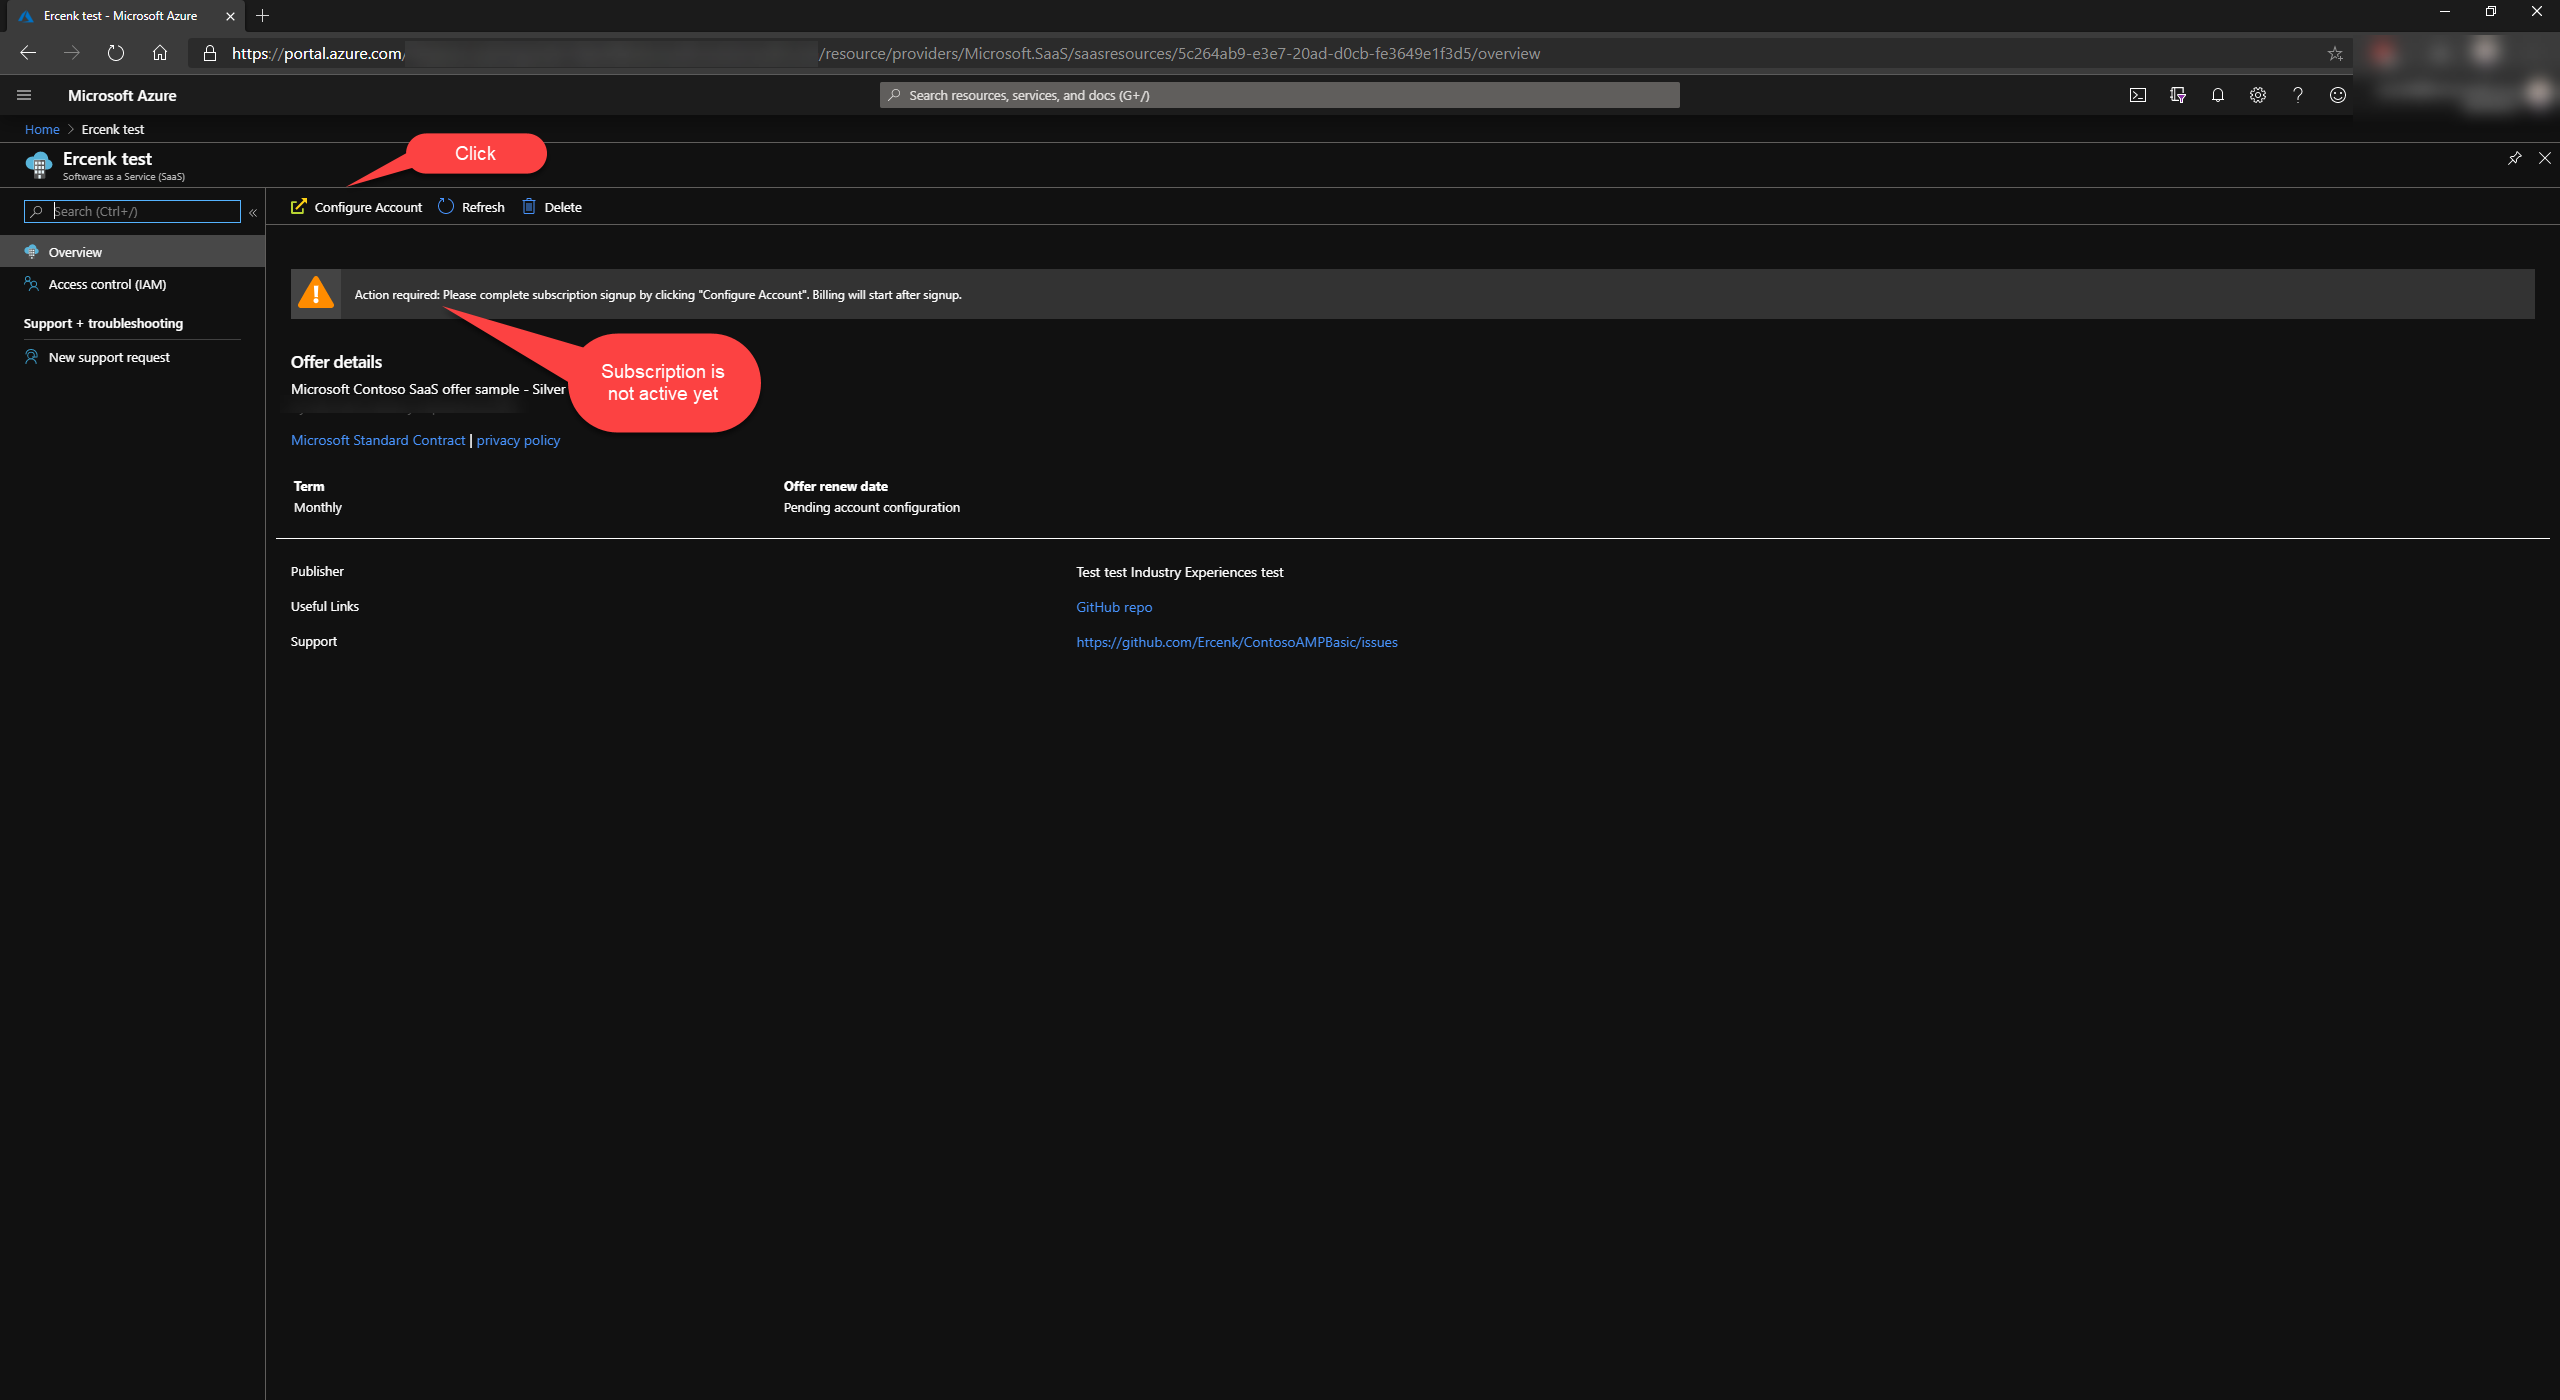
-
Landing page

-
Purchaser submits the form, and Contoso ops team receives an email
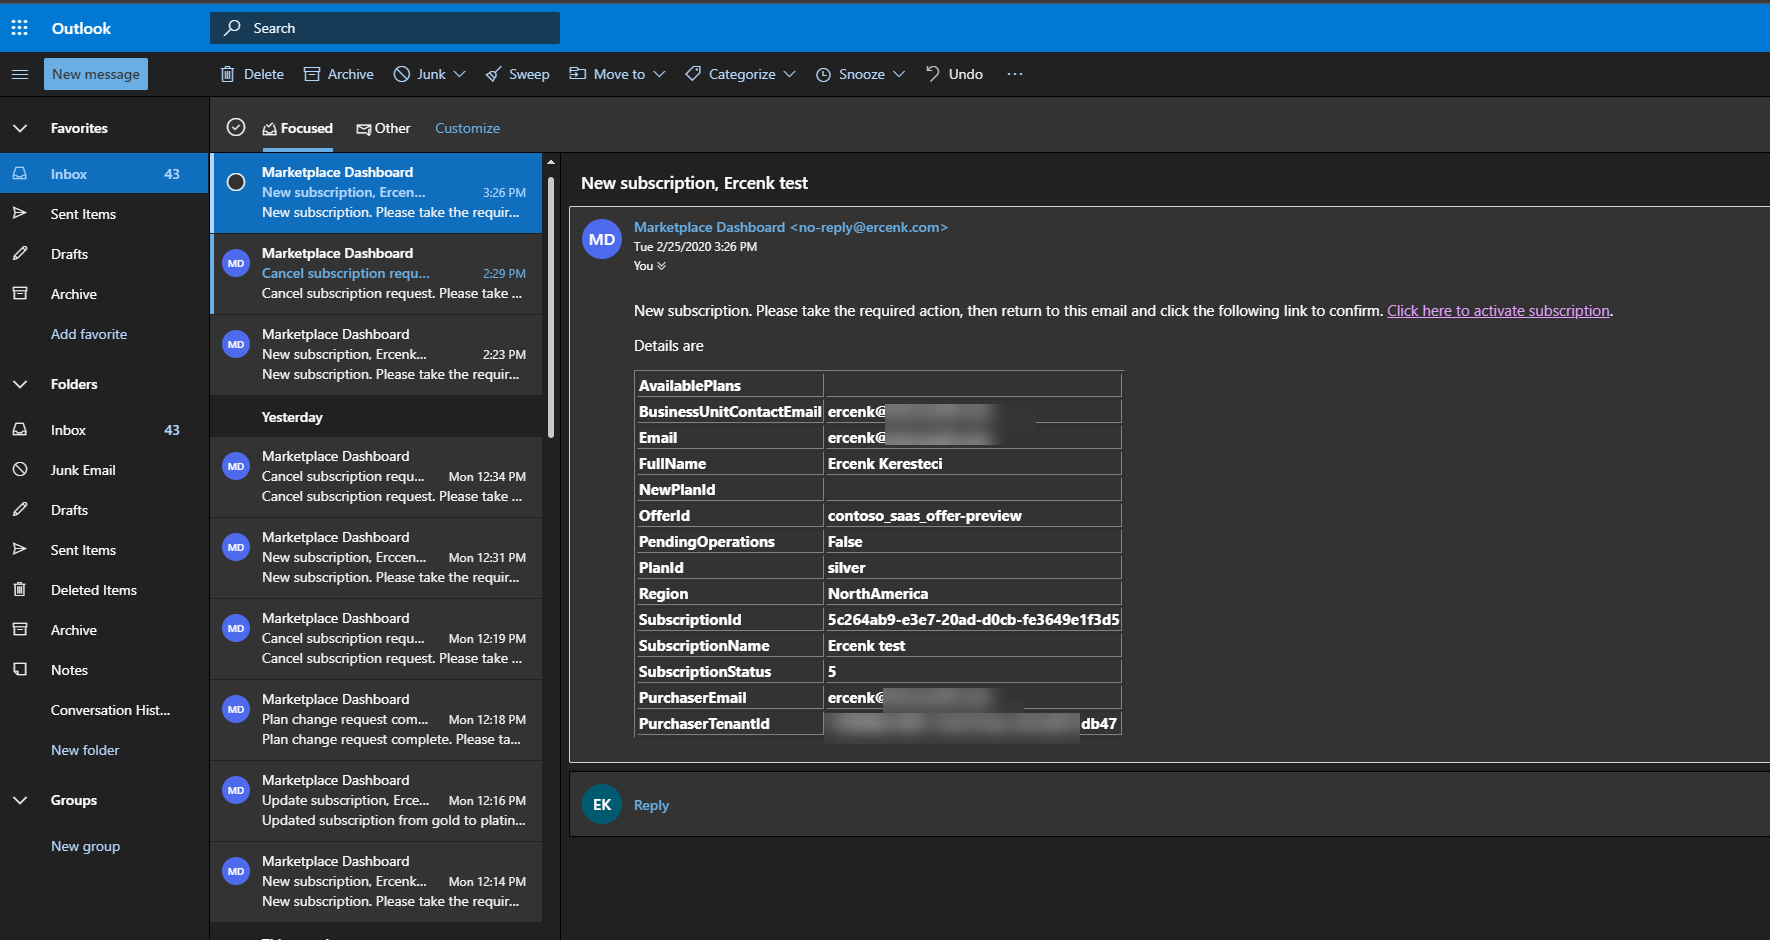
-
Contoso team takes the appropriate action to qualify and onboard the customer


Secrets such as API keys are managed through "dotnet user-secrets" command. For example, to set the value for "FulfillmentClient:AzureActiveDirectory:AppKey" use the following command:
dotnet user-secrets set "FulfillmentClient:AzureActiveDirectory:AppKey" "secret here"Please see the user secrets documentation for more details.
Alternatively, if you are not going to publish your code, and will just keep the code on your computer, you can also modify the appsettings.json to add your secrets.
I have an experimental API client I posted on a different repo that implements the API interactions as well as encapsulates the webhook interaction. Please take a look at this repo.