This project contains code to train a model that automatically plays the first level of Super Mario World using only raw pixels as the input (no hand-engineered features). The used technique is deep Q-learning, as described in the Atari paper (Summary), combined with a Spatial Transformer.
The training method is deep Q-learning with a replay memory, i.e. the model observes sequences of screens, saves them into its memory and later trains on them, where "training" means that it learns to accurately predict the expected action reward values ("action" means "press button X") based on the collected memories. The replay memory has by default a size of 250k entries. When it starts to get full, new entries replace older ones. For the training batches, examples are chosen randomly (uniform distribution) and rewards of memories are reestimated based on what the network has learned so far.
Each example's input has the following structure:
- The last T actions, each as two-hot-vectors. (Two, because the model can choose two buttons: One arrow-button and one of A/B/X/Y.)
- The last T screenshots, each downscaled to size 32x32 (grayscale, slightly cropped).
- The last screenshot, at size 64x64 (grayscale, slightly cropped).
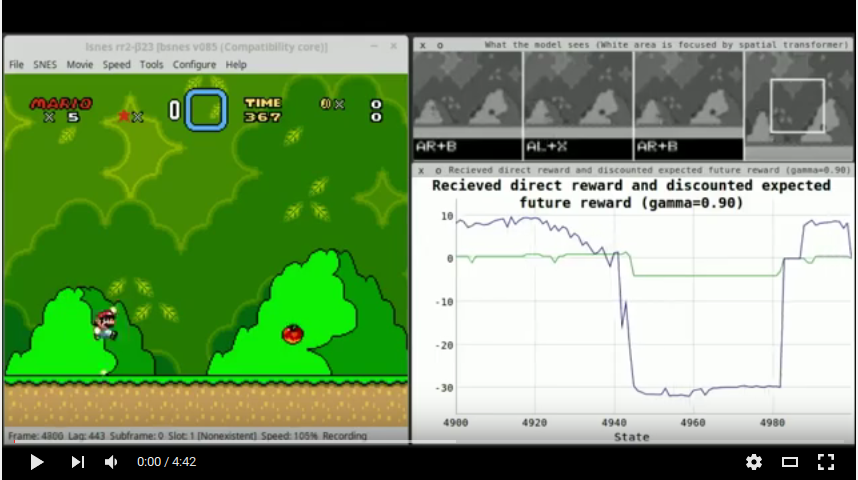
T is currently set to 4 (note that this includes the last state of the sequence). Screens are captured at every 5th frame. Each example's output are the action reward values of the chosen action (received direct reward + discounted Q-value of the next state). The model can choose two actions per state: One arrow button (up, down, right, left) and one of the other control buttons (A, B, X, Y). This is different from the Atari-model, in which the agent could only pick one button at a time. (Without this change, the agent could theoretically not make many jumps, which force you to keep the A button pressed and move to the right.) As the reward function is constructed in such a way that it is almost never 0, exactly two of each example's output values are expected to be non-zero.
The agent gets the following rewards:
- X-Difference reward:
+0.5if the agent moved to the right,+1.0if it moved fast to the right (8 pixels or more compared to the last game state),-1.0if it moved to the left and-1.5if it moved fast to the left (-8 pixels or more). - Level finished:
+2.0while the level-finished-animation is playing. - Death:
-3.0while the death animation is playing.
The gamma (discount for expected/indirect rewards) is set to 0.9.
Training the model only on score increases (like in the Atari paper) would most likely not work, because enemies respawn when their spawning location moves outside of the screen, so the agent could just kill them again and again, each time increasing its score.
A selective MSE is used to train the agent. That is, for each example gradients are calculated just like they would be for a MSE. However, the gradients of all action values are set to 0 if their target reward was 0. That's because each example contains only the received reward for one pair of chosen buttons (arrow button, other button). Other pairs of actions would have been possible, but the agent didn't choose them and so the reward for them is unclear. Their reward values (per example) are set to 0, but not because they were truely 0, but instead because we don't know what reward the agent would have received if it had chosen them. Backpropagating gradient for them (i.e. if the agent predicts a value unequal to 0) is therefore not reasonable.
This implementation can afford to differentiate between the chosen and not chosen buttons (in the target vector) based on the reward being unequal to 0, because the received reward of a chosen button is (here) almost never exactly 0 (due to the construction of the reward function). Other implementations might need to take more care of this step.
The policy is an epsilon-greedy one, which starts at epsilon=0.8 and anneals that down to 0.1 at the 400k-th chosen action. Whenever according to the policy a random action should be chosen, the agent throws a coin (i.e. 50:50 chance) and either randomizes one of its two (arrows, other buttons) actions or it randomizes both of them.
The model consists of three branches:
- Action history: Lists previously chosen actions. Added so that the network can e.g. learn that it should release the A-button on the ground sometimes (keeping it pressed non-stop will prevent Mario from jumping). Also added so that the network can learn to keep A pressed for long/high jumps.
- This branch just uses one linear hidden layer.
- Screenshot history: Lists the screenshots of the state chain (including the last state). All screenshots are downscaled to 32x32 (grayscale). This branch is intended to let the network spot movements.
- This branch uses a few strided convolutional layers.
- Some RNN-architecture might be better here.
- Last screenshot: This branch receives the last state's screenshot in 64x64 (grayscale). It is intended to let the network make in-depth decisions based on the current state.
- It has one sub-branch that applies convolutions to the whole image.
- It has one sub-branch that applies convolutions to an area of interest, using a Spatial Transformer to extract that area.
At the end of the branches, everything is merged to one vector, fed through a hidden layer, before reaching the output neurons. These output neurons predict the expected reward per pressed button.
Overview of the network:

The Spatial Transformer requires a localization network, which is shown below:

Both networks have overall about 6.6M parameters.
The agent is trained only on the first level (first to the right in the overworld at the start). Other levels suffer significantly more from various difficulties with which the agent can hardly deal. Some of these are:
- Jumping puzzles. The agent will usually just jump to right and straight into its death.
- Huge cannons balls. To get past them you have to jump on them or duck under them (big mario) or walk under them (small mario). Jumping on top of them is even rather hard for a human novice player. Ducking or walking under them is very hard for the agent due to the epsilon-greedy policy, which will randomly make mario jump and then instantly die.
- High walls/tubes. The agent has to keep A pressed to get over them. Again, hard to learn and runs contrary to epsilon-greedy.
- Horizontal tubes. These are sometimes located at the end of areas and you are supposed to walk into them to get to the next area. The agent has a tendency to instead jump on them (because it loves to jump) and then keep walking to the right, hitting the wall.
The first level has hardly any of these difficulties and therefore lends itself to DQN, which is why it is used here. Training on any level and then testing on another one is also rather difficult, because each level seems to introduce new things, like new and quite different enemies or new mechanics (climbing, new items, objects that squeeze you to death, etc.).
- Ubuntu.
- Quite some time. This is not an easy install.
- Around 2GB of disk space for the network and replay memory.
- An NVIDIA GPU with 4+ GB of memory.
- CUDA. Version 7 or newer should do.
- CUDNN. Version 4 or newer should do.
- Make sure that you have lua 5.1 installed. I had problems with 5.2 in torch.
- Make sure that you have gcc 4.9 or higher installed. The emulator will compile happily with gcc <4.9, but then sometimes throw errors when you actually use it.
- Install torch.
- Follow the steps from torch.ch
- Make sure that the following packages are installed (
luarocks install packageName):nn,cudnn,paths,image,display. display is usually not part of torch.
- Install the spatial transformer module for torch:
- Clone the stnbhdw repository to some directory:
git clone https://github.com/qassemoquab/stnbhwd.git - Switch to that directory:
cd stnbhwd - Compile the module:
luarocks make stnbhwd-scm-1.rockspec
- Clone the stnbhdw repository to some directory:
- Install SQLite3
sudo apt-get install sqlite3 libsqlite3-devluarocks install lsqlite3
- Compile the emulator:
- Download the source code of lsnes rr2 beta23. Not version rr1! (Note that other emulators than lsnes will likely not work with the code in this repository.)
- Extract the emulator source code and open the created directory.
- Open
source/src/libray/lua.cppand insert the following code undernamespace {:This makes the emulator run in lua 5.1. Newer versions (than beta23) of lsnes rr2 might not need this.#ifndef LUA_OK #define LUA_OK 0 #endif #ifdef LUA_ERRGCMM REGISTER_LONG_CONSTANT("LUA_ERRGCMM", LUA_ERRGCMM, CONST_PERSISTENT | CONST_CS); #endif - Open
source/include/core/controller.hppand change the functiondo_button_actionfrom private to public. Simply cut the linevoid do_button_action(const std::string& name, short newstate, int mode);in theprivate:block and paste it into thepublic:block. - Open
source/src/lua/input.cppand beforelua::functions LUA_input_fns(...(at the end of the file) insert:This method was necessary to actually press buttons from custom lua scripts. All of the emulator's default lua functions for that would just never work, becauseint do_button_action(lua::state& L, lua::parameters& P) { auto& core = CORE(); std::string name; short newstate; int mode; P(name, newstate, mode); core.buttons->do_button_action(name, newstate, mode); return 1; }core.lua2->input_controllerdataapparently never gets set (which btw will let these functions silently fail, i.e. without any error). - Again in
source/src/lua/input.cpp, at the blocklua::functions LUA_input_fns(..., adddo_button_actionto the lua commands that can be called from lua scripts loaded in the emulator. To do that, change the line{"controller_info", controller_info},to{"controller_info", controller_info}, {"do_button_action", do_button_action},. - Switch back to
source/. - Compile the emulator with
make.- You might might encounter problems during this step that will require lots of googling to solve. No better way here.
- If you encounter problems with portaudio, deactivate it in the file
options.build. - If you encounter problems with something like libwxgtk, then install package
libwxgtk3.0-devand not version 2.8-dev, as that package's official page might tell you to do.
- From
source/executesudo cp lsnes /usr/bin/ && sudo chown root:root /usr/bin/lsnes. After that, you can start lsnes by simply typinglsnesin a console window.
- Now create a ramdisk. That will be used to save screenshots from the game (in order to get the pixel values). Do the following:
sudo mkdir /media/ramdisksudo chmod 777 /media/ramdisksudo mount -t tmpfs -o size=128M none /media/ramdisk && mkdir /media/ramdisk/mario-ai-screenshots- Note: You can choose a different path. Then you will have to change
SCREENSHOT_FILEPATHinconfig.lua. - Note: You don't have to use a ramdisk, but your hard drive will probably not like the constant wear from lots of screenshots being saved.
- Clone this repository via
git clone https://github.com/aleju/mario-ai.git. cdinto the created directory.- Download a Super Mario World (USA) ROM.
- Start lsnes (from the repository directory) by using
lsnesin a terminal window. - In the emulator, go to
Configure -> Settings -> Advancedand set the lua memory limit to 1024MB. (Only has to be done once.) - Configure your controller buttons (
Configure -> Settings -> Controller). Play until the overworld pops up. There, move to the right and start that level. Play that level a bit and save a handful or so of states via the emulator'sFile -> Save -> Stateto the subdirectorystates/train. Name doesn't matter, but they have to end in.lsmv. (Try to spread the states over the whole level.) - Start the display server by opening a command window and using
th -ldisplay.start. If that doesn't work you haven't installed display yet, useluarocks install display. - Open the display server output by opening
http://localhost:8000/in your browser. - Now start the training via
Tools -> Run Lua script...and selecttrain.lua. - Expected training time: Maybe 10 hours, less with good hardware. (About 0.5M actions.)
- You can stop the training via
Tools -> Reset Lua VM. - If you want to restart the training from scratch (e.g. for a second run), you will have to delete the files in
learned/. Note that you can keep the replay memory (memory.sqlite) and train a new network with it.
You can test the model using test.lua. Don't expect it to play amazingly well. The agent will still die a lot, even more so if you ended the training on a bad set of parameters.