


THIS PROJECT WAS MADE TO LEARN TO USE MANY-TO-MANY RELATIONSHIPS WITH THE SQLALCHEMY ORM
Learn REST API with Flask, Mysql and Docker
Table of Contents
About The Project
At the beginning of my career I had problems like these and today I share what I know to make your path in software development easier. In this installment I show you how to use the orm called flask-sqlalchemy with many to many tables in which we have a bridge table. If you want to know about bridge tables: Bridge Tables
Purpose of the project 🚀
This project is made with the intention of teaching how to use Docker with the backend technologies Flask and Mysql in the project we are going to take into account the following points:
- Create a database with normalized tables via bridge tables
- Make a many to many relationship between tables.
- handling many to many relationships with the flask sqlalchemy ORM.
- Create the dockerfile that will have the necessary instructions to create a Python image that will later be converted into a single application.
- Docker Compose allows you through YAML files to instruct the Docker Engine to perform tasks, programmatically. Here we will install the mysql image, declare the environment variables for both mysql and Flask, and also declare the volumes.
- We will add the list of requirements in a requirements.txt file that will be executed automatically within the Dockerfile
Built With
This section should list any major frameworks that you built your project using. Leave any add-ons/plugins for the acknowledgements section. Here are a few examples.
Libraries
SQLAlchemy (Offers an ORM along with a Core)
The Python SQL Toolkit and Object Relational Mapper SQLAlchemy is the Python SQL toolkit and Object Relational Mapper that gives application developers the full power and flexibility of SQL.
Flask-Marshmallow (Serializer)
Flask-Marshmallow is a thin integration layer for Flask (a Python web framework) and marshmallow (an object serialization/deserialization library) that adds additional features to marshmallow, including URL and Hyperlinks fields for HATEOAS-ready APIs. It also (optionally) integrates with Flask-SQLAlchemy.
Flask-SQLAlchemy
Flask-SQLAlchemy is an extension for Flask that adds support for SQLAlchemy to your application. It aims to simplify using SQLAlchemy with Flask by providing useful defaults and extra helpers that make it easier to accomplish common tasks.
Flask JWT
JSON Web Tokens (or JWTs) provide a means of transmitting information from the client to the server in a stateless, secure way. On the server, JWTs are generated by signing user information via a secret key, which are then securely stored on the client. This form of auth works well with modern, single page applications.
Getting Started
To check your rest api
Insomnia
With their streamlined API client, you can quickly and easily send REST, SOAP, GraphQL, and GRPC requests directly within Insomnia. Link to visit insomnia website: - Link
Postman
Postman is a collaboration platform for API development. Postman's features simplify each step of building an API and streamline collaboration so you can create better APIs—faster. Link to visit postman website: - Link
Prerequisites
For this project you need to have Docker and Docker compose installed
- Link to install Docker engine: Linux - Windows or Mac
- After installing docker engine install docker compose Linux Windows Mac
- To obtain my repository you must create a folder in a desired directory and within this folder open a terminal or use cmd in the case of windows.
- Clone the repo
git remote add origin git@github.com:aldomatus/python_sqlalchemy_mysql_docker_many-to-many - Make the pull request from a branch called main
git pull origin main --allow-unrelated-histories -
In the folder where docker-compose.yml is located, open a terminal (the same address where you ran the previous line) and write the following command to build the image.
docker-compose build -
Once the previous execution is finished, you must run the services made in the build.
docker-compose up -
Now we are ready to work and query from sql alchemy
-
If all goes well, our application should already be executing the main.py file with python using the mysql database, now we just have to check by entering the following link in our browser:
- You should have a response like this:
{"message": 'Welcome to my API'} - we add our environment variables from flask
- We run the requirements file so that our libraries are installed
- We expose the port to use which is 5000
- With CMD we start Flask
- we download the image
- volumes
- Environment Variables
- ports
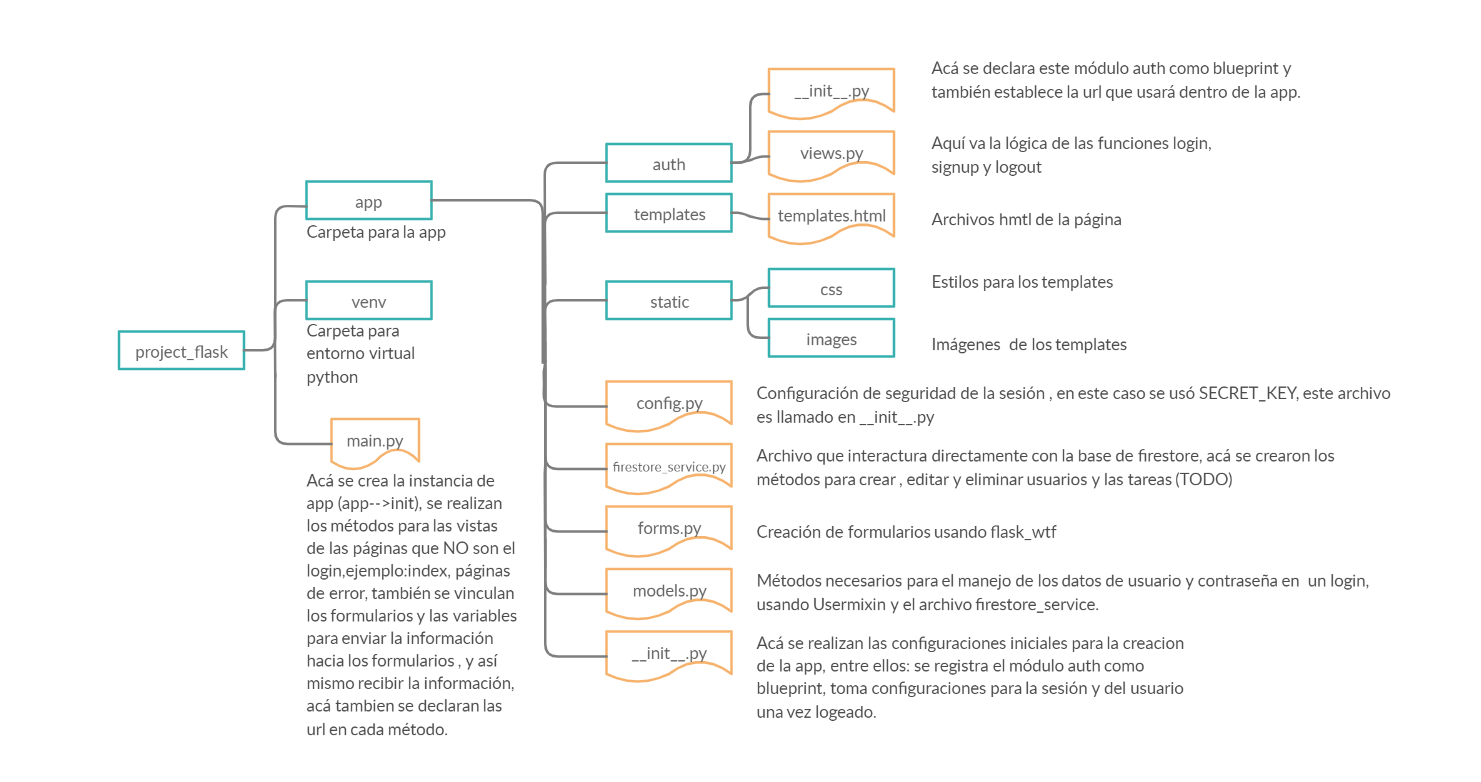
- The blue squares represent folders and the yellow figures are the files
- Fork the Project
- Create your Feature Branch (
git checkout -b feature/AmazingFeature) - Commit your Changes (
git commit -m 'Add some AmazingFeature') - Push to the Branch (
git push origin feature/AmazingFeature) - Open a Pull Request
knowing our data
To start, the project is a kind of YouTube in which we are going to have users and channels, among them we can make the relationship many to many because many users are subscribed to many channels and many channels have many users. We will have three tables: users, channels and a third that will inform us of the subscriptions of each user. In the third table we will join the primary keys of each table (users and channels)

Entity relationship model
For the construction of the database, the relationship entity model was made with which the relationships between each table were deduced.

Installation 🖥
git branch -m main is the command to rename the branch
http://localhost:5000/
Description of the files 💼 🐳
flask
Flask-SQLAlchemy==2.4.4
SQLAlchemy==1.3.20
pymysql
marshmallow-sqlalchemy
Flask-Migrate==2.5.3
Flask-Script==2.0.6
Flask-Cors==3.0.9
requests==2.25.0
flask-marshmallow
pika==1.1.0
requirements.txt
In our requirements file we write the flask libraries, the connection libraries for msql and with which we are going to manage the SQL data
flask
Flask-SQLAlchemy==2.4.4
SQLAlchemy==1.3.20
flask-login==0.4.1
pymysql
marshmallow-sqlalchemy
flask-marshmallow
Dockerfile 🐳
Create the dockerfile that will have the necessary instructions to create a Python image that will later be converted into a single application.
FROM python:3.7-alpine
ENV PYTHONUNBUFFERED 1
RUN mkdir /code
WORKDIR /code
ENV FLASK_APP=src/main.py
ENV FLASK_RUN_HOST=0.0.0.0
RUN apk add --no-cache gcc musl-dev linux-headers
COPY requirements.txt requirements.txt
RUN pip install -r requirements.txt
EXPOSE 5000
COPY . .
CMD ["flask", "run"]
Docker-compose 🐳🐳🐳
Docker Compose allows you through YAML files to instruct the Docker Engine to perform tasks, programmatically. Here we will install the mysql image, declare the environment variables for both mysql and Flask, and also declare the volumes.
version: "3.8"

services:
  db:
    image: mysql:5.7
    volumes:
      - .dbdata:/var/lib/mysql
    restart: always
    environment:
      MYSQL_ROOT_PASSWORD: root
      MYSQL_DATABASE: youtube
      MYSQL_PASSWORD: root
    ports:
      - 3308:3306

  backend:
    build:
      context: .
      dockerfile: Dockerfile
    ports:
      - "5000:5000"

    volumes:
      - .:/code
    depends_on:
      - db

    env_file: .env
.env file 🌍
This file contains our environment variables that will be read by the dockerfile.
FLASK_DEBUG=True
FLASK_APP=src/main.py
FLASK_RUN_HOST=0.0.0.0
ALLOWED_HOSTS=127.0.0.1,localhost
Project structure
To make the modularization of our project we can make use of blueprints
.
├── docker-compose.yml
├── Dockerfile
├── ERM.drawio
├── README.md
├── requirements.txt
├── src
│   ├── app
│   │   ├── channels
│   │   ├── config.py
│   │   ├── __init__.py
│   │   ├── models.py
│   │   ├── __pycache__
│   │   ├── subs
│   │   └── users
│   ├── __init__.py
│   ├── main.py
│   └── __pycache__
└── venv
Use of Blueprints
Blueprints: they are a series of routes that we can integrate into our application but in another directory that is, it will allow me to modulate the application into small applications that do specific things such as authentication or the welcome part, or if we have a task dashboard for Example we would also create a blueprint for the specific tasks and it is easier to handle.
Usage
Description of the MOdels code
init.py
First we create a file inside our app folder which will be called init.py this file indicates that the folder is a module, therefore here we can initialize our app
from flask import Flask
from .config import Config

def create_app():
    app = Flask(__name__)
    app.config.from_object(Config)

    return app
config.py
We create a file called config inside our app folder where we configure the connection to the database
class Config():
    #-------------------database connection------------
    SQLALCHEMY_DATABASE_URI = 'mysql+pymysql://root:root@db/youtube'
    SQLALCHEMY_TRACK_MODIFICATIONS = False
    SECRET_KEY = 'youtube'
main.py
In our main.py that is located in the src folder, we make an instance of our app with create_app which we import from src.app, then we import our blueprints and register them, finally we make an instance of SQLAlchemy and Marshmallow to handle our data API and database.
# Flask libraries
from src.app import create_app
from flask import Flask, blueprints, jsonify
from flask_sqlalchemy import SQLAlchemy
from flask_marshmallow import Marshmallow

app = create_app()

# ------------Registro de los blueprints----
from src.app.users.users import users
from src.app.channels.channels import channels
from src.app.subs.subs import subs
from src.app.home.home import home

app.register_blueprint(users)
app.register_blueprint(channels)
app.register_blueprint(subs)
app.register_blueprint(home)

#--------Instances SQLALchemy and Marshmallow---------
db = SQLAlchemy(app)
ma = Marshmallow(app)
Models.py 👨 ▶️
Inside our app folder we have a file called models.py which contains the models to handle the database tables, the models will help us to create the tables, insert, modify and delete data.
from src.main import db, ma

#---------Models--------------------------

subs = db.Table('subs',
    db.Column('user_id', db.Integer, db.ForeignKey('users.user_id')),
    db.Column('channel_id', db.Integer, db.ForeignKey('channels.channel_id'))
)
#------------User Model-----------------
class User(db.Model):
    __tablename__= 'users'
    user_id = db.Column(db.Integer, primary_key=True)
    name = db.Column(db.String(20))
    subscriptions = db.relationship('Channel', secondary=subs, backref=db.backref('subscribers', lazy='dynamic'))

    def __init__(self, name):
        self.name = name

class UserSchema(ma.Schema):
    class Meta:
        fields = ("user_id", "name")

user_schema = UserSchema()
users_schema = UserSchema(many = True)

#------------Channel Model-----------------
class Channel(db.Model):
    __tablename__= 'channels'
    channel_id = db.Column(db.Integer, primary_key=True)
    name = db.Column(db.String(20))

    def __init__(self, name):
        self.name = name

class ChannelSchema(ma.Schema):
    class Meta:
        fields = ("channel_id", "name")

channel_schema = ChannelSchema()
channels_schema = ChannelSchema(many = True)

db.create_all()
User model 👨
Our first model is the user one which contains a column called user_id, in this column we will save our primary keys, another column is name where we will save the names of the users, in the model you can see a variable called subscriptions, it will not be converted in a column of the users table, it will only serve to maintain the relationship that we must have with channel when a user signs up for a channel.
#------------User Model-----------------
class User(db.Model):
    __tablename__= 'users'
    user_id = db.Column(db.Integer, primary_key=True)
    name = db.Column(db.String(20))
    subscriptions = db.relationship('Channel', secondary=subs, backref=db.backref('subscribers', lazy='dynamic'))

    def __init__(self, name):
        self.name = name

class UserSchema(ma.Schema):
    class Meta:
        fields = ("user_id", "name")

user_schema = UserSchema()
users_schema = UserSchema(many = True)
Channel model ▶️
Our channel model contains a column called channel_id, in this column we will store our primary keys, another column is name where we will store the names of the channels. Then we have the ChannelSchema class, which is responsible for outlining the models to work serialization with the API.
#------------Channel Model-----------------
class Channel(db.Model):
    __tablename__= 'channels'
    channel_id = db.Column(db.Integer, primary_key=True)
    name = db.Column(db.String(20))

    def __init__(self, name):
        self.name = name

class ChannelSchema(ma.Schema):
    class Meta:
        fields = ("channel_id", "name")

channel_schema = ChannelSchema()
channels_schema = ChannelSchema(many = True)
Bridge Table 🌉
This is our bridge table does not need a class, in this class we will save the relationships between users and channels, joining a user_id with a channel_id, in this way we will know which users are subscribed with which channels
subs = db.Table('subs',
    db.Column('user_id', db.Integer, db.ForeignKey('users.user_id')),
    db.Column('channel_id', db.Integer, db.ForeignKey('channels.channel_id'))
)
This is how our tables will look
Database changed
mysql> SELECT * FROM users;
+---------+------+
| user_id | name |
+---------+------+
|       1 | Aldo |
+---------+------+
1 row in set (0.00 sec)

mysql> SELECT * FROM channels;
+------------+-------------+
| channel_id | name        |
+------------+-------------+
|          1 | The Beatles |
+------------+-------------+
1 row in set (0.00 sec)

mysql> SELECT * FROM subs;
+---------+------------+
| user_id | channel_id |
+---------+------------+
|       1 |          1 |
+---------+------------+
1 row in set (0.00 sec)
Add a subscription 🔔
To create the subscription API we have to make use of the post method where we will receive the user_id which is the primary key of the user and the channel_id which is the primary key of the channel.
Save our subscriptions
The most important are the following lines because with them we are going to save the subscription records in our database :
        channel.subscribers.append(user)
        db.session.commit()

        return jsonify({'message': 'You are subscribed!'})
REST API code 👨💻
users API 👨
Our user API receives the user's name through a post, outlines it with marshmallow and saves it in the database. I have a fake log file for testing 🧪🧪🧪
{
  "name": "Aldo"
}
channel API ▶️
Our user API receives the channel's name through a post, outlines it with marshmallow and saves it in the database. I have a fake log file for testing 🧪🧪🧪
{
  "name": "The Beatles"
}
All API subs code 🔔
Our user API receives the user's id (user_id) and channel's id (channel_id) through a post, outlines it with marshmallow and saves it in the database. I have a fake log file for testing 🧪🧪🧪
{
  "user_id": "1",
  "channel_id": "1"
}
from flask import request, jsonify, Blueprint
subs = Blueprint('subs', __name__)
@subs.route('/subs', methods=['GET'])
def users_regards():
return jsonify({'message': 'Welcome!'})
@subs.route('/sub', methods=['GET','POST'])
def create_sub():
from src.app.models import Channel
from src.app.models import User
from src.main import db
# Receive requests
if request.method == 'POST':
user_id = request.json['user_id']
channel_id = request.json['channel_id']
user = User.query.filter_by(user_id=user_id).first()
channel = Channel.query.filter_by(channel_id=channel_id).first()
channel.subscribers.append(user)
db.session.commit()
return jsonify({'message': 'You are subscribed!'})
Roadmap
See the open issues for a list of proposed features (and known issues).
Contributing
Contributions are what make the open source community such an amazing place to be learn, inspire, and create. Any contributions you make are greatly appreciated.
License
Distributed under the MIT License. See LICENSE for more information.
Contact
Aldo Matus - Linkedin Facebook
Project Link: Repository