Microsoft R with Spark on HDInsight Tutorial at MLADS
Instructors: Debraj GuhaThakurta, Mario Inchiosa, Katherine Zhao, Ali Zaidi
Course Scripts: aka.ms/mlads_spark
Requirements
Deploying to Azure
Using the Portal
Documentation Page: Getting started with R Server on HDInsight
-
Sign in to the Azure portal.
-
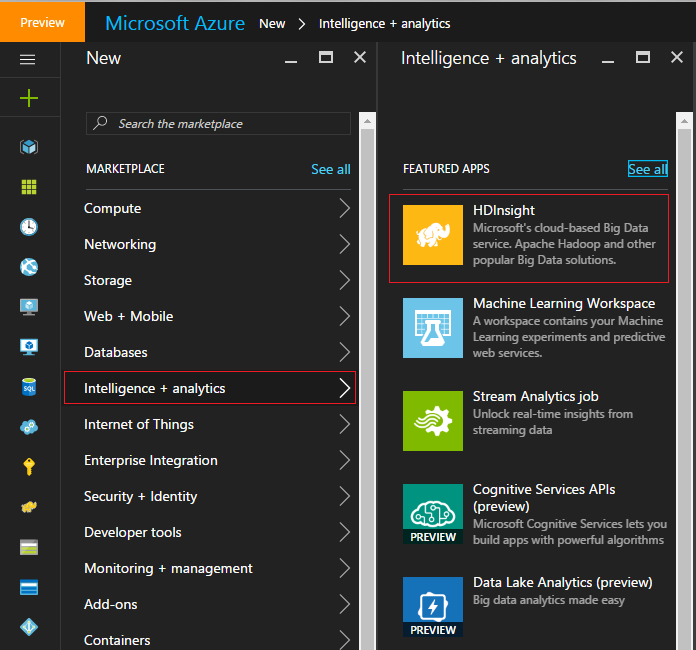
Select NEW, Intelligence + analytics, and then HDInsight.
-
IMPORTANT: Don't pick the option for the new "simpler, faster way to create clusters".
-
Enter a name for the cluster in the Cluster Name field. If you have multiple Azure subscriptions, use the Subscription entry to select the one you want to use.
-
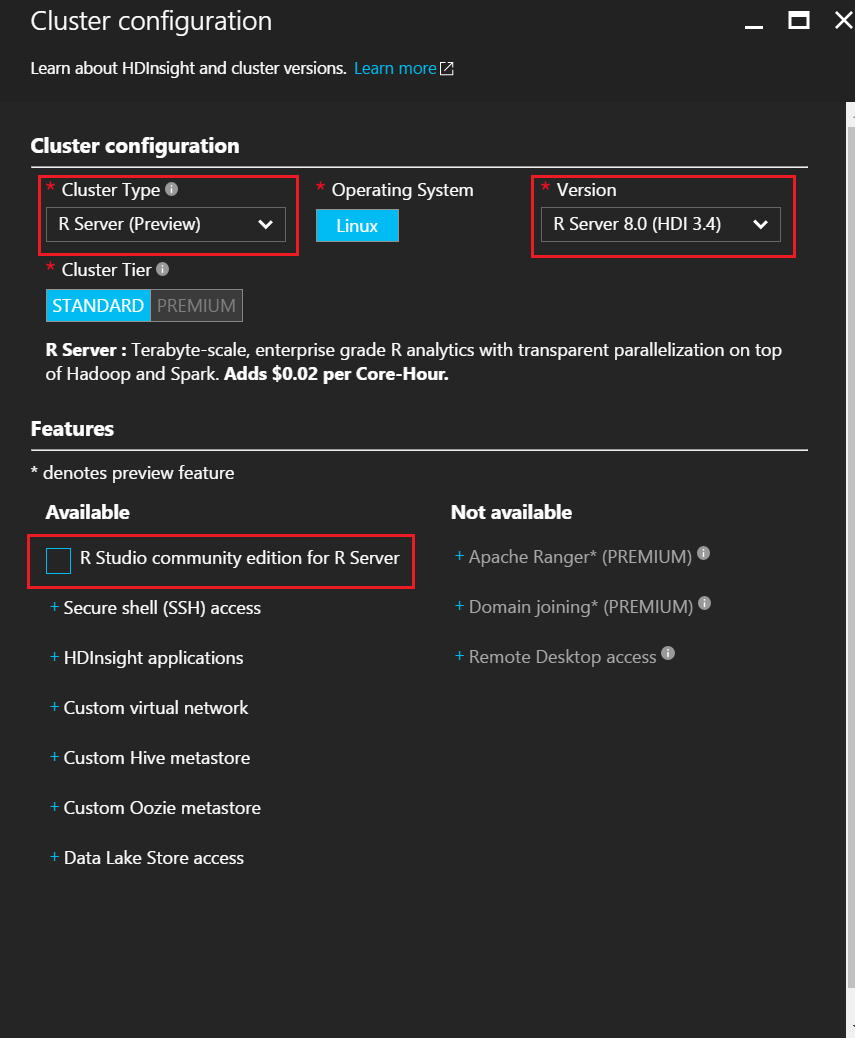
Select Select Cluster Type. On the Cluster Type blade, select the following options:
- Cluster Type: R Server
- Version: R Server 8.0 (HDI 3.4)
- DO NOT SELECT R Server 9.0
- Deselect "RStudio Server Community edition" install option
- our script will install RStudio Server for you
- Leave the other options at the default values, then use the Select button to save the cluster type.
-
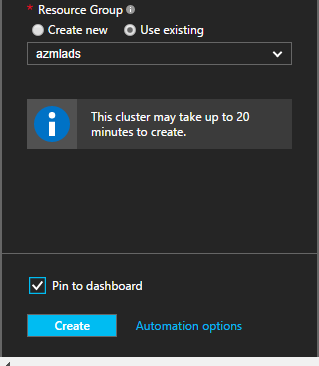
Select Resource Group to see a list of existing resource groups and then select the one to create the cluster in. Or, you can select Create New and then enter the name of the new resource group. A green check will appear to indicate that the new group name is available.
[AZURE.NOTE] This entry will default to one of your existing resource groups, if any are available.
Use the Select button to save the resource group.
-
Select Credentials, then enter a Cluster Login Username and Cluster Login Password.
IMPORTANT!
- Enter
adminas your Cluster Login Username and set a password. - For SSH credentials, set
remoteuseras your SSH Username, and select password as your authentication type. - SSH is used to remotely connect to the cluster using a Secure Shell (SSH) client.
- If you use anything other than
remoteuseras your ssh username, you will not be able to run the download scripts.
Use the Select button to save the credentials.
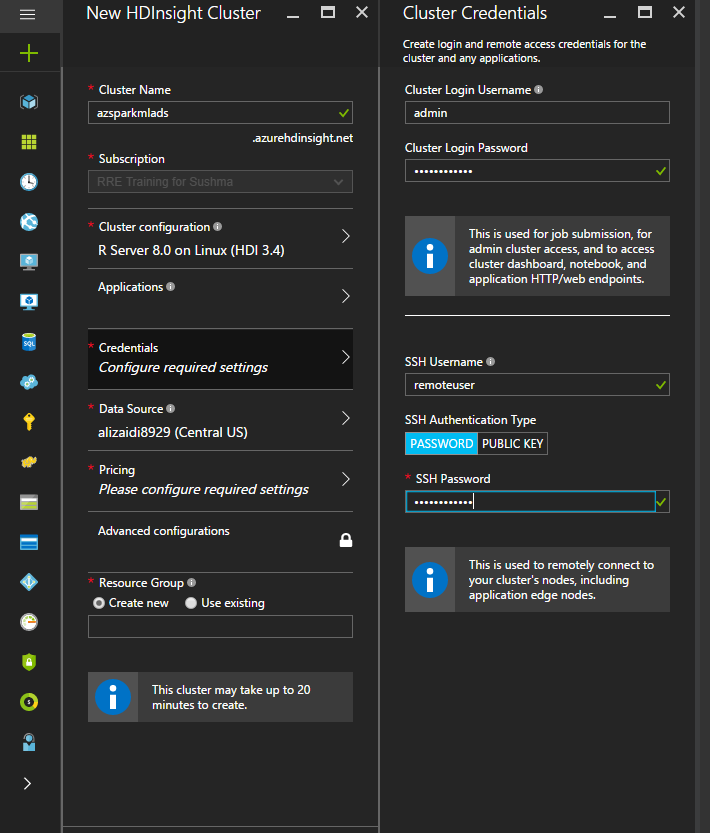
- Enter
-
Select Data Source to select a data source for the cluster.
-
Either select an existing storage account by selecting Select storage account and then selecting the account, or create a new account using the New link in the Select storage account section.
-
If you select New, you must enter a name for the new storage account. A green check will appear if the name is accepted.
-
The Default Container will default to the name of the cluster. Leave this as the value.
-
Select Location to select the region to create the storage account in.
-
[AZURE.IMPORTANT] Selecting the location for the default data source will also set the location of the HDInsight cluster. The cluster and default data source must be located in the same region.
-
Use the Select button to save the data source configuration.
-
-
-
Select Node Pricing Tiers to display information about the nodes that will be created for this cluster. Unless you know that you'll need a larger cluster, leave the number of worker nodes at the default of
4. The estimated cost of the cluster will be shown within the blade.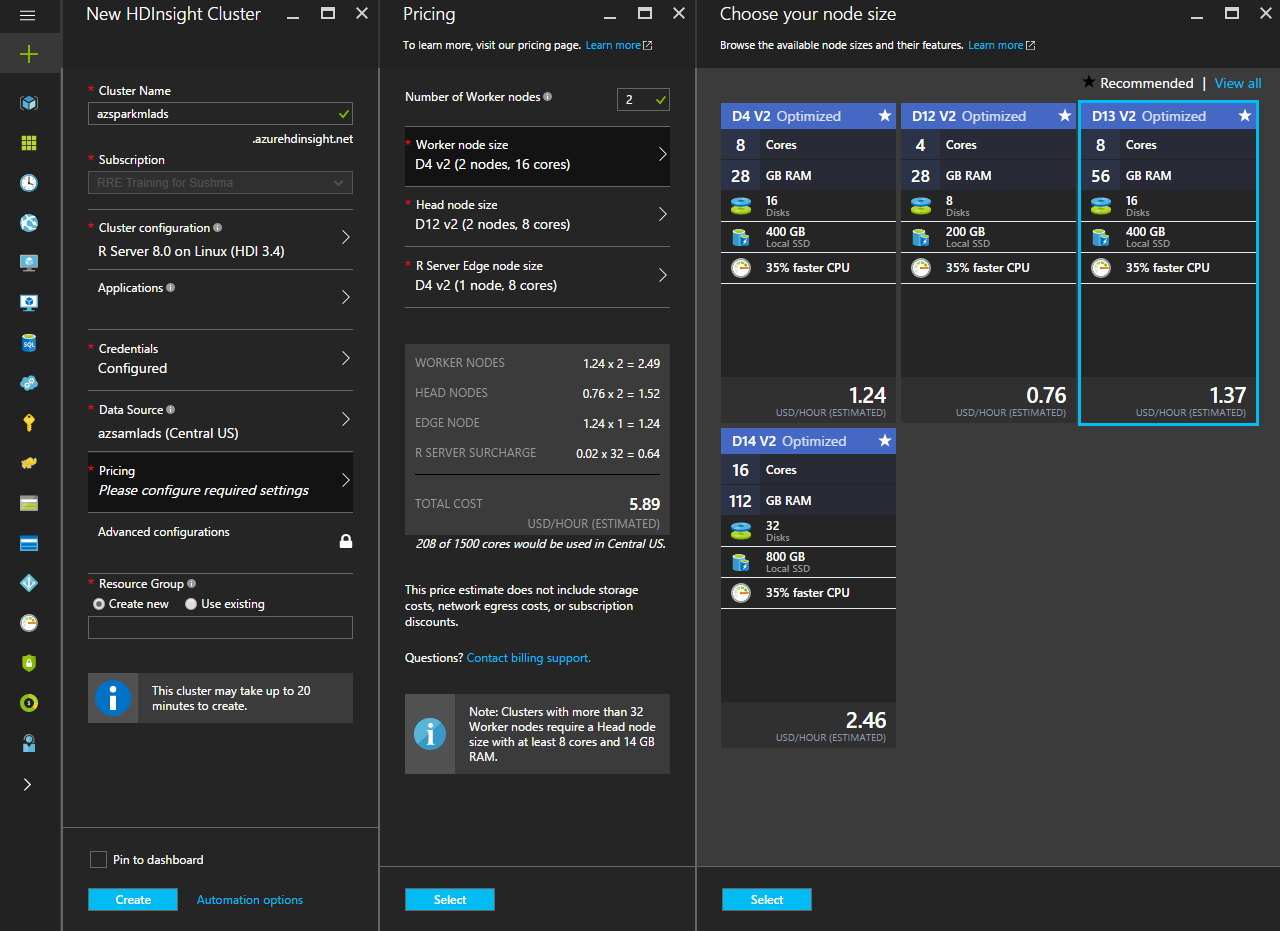
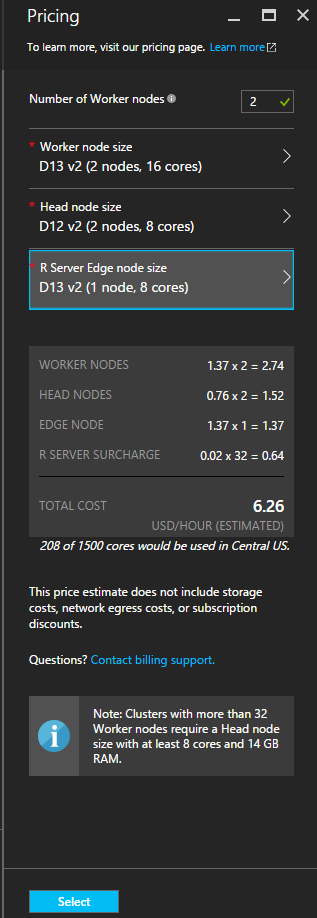
Use the Select button to save the node pricing configuration.
-
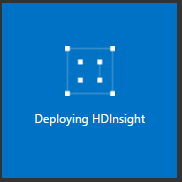
On the New HDInsight Cluster blade, make sure that Pin to Dashboard is selected, and then select Create. This will create the cluster and add a tile for it to the Startboard of your Azure Portal. The icon will indicate that the cluster is creating, and will change to display the HDInsight icon once creation has completed.
While provisioning, you'll see the following tile on your dasboard:
[AZURE.NOTE] It will take some time for the cluster to be created, usually around 15~40 minutes. Use the tile on the Startboard, or the Notifications entry on the left of the page to check on the creation process.
SSH Into Edge Node
Please be aware that you won't access R Server through the head/master/name node, but on the edge node
-
Find the edge node SSH address by selecting your cluster then, select the Secure Shell (SSH) blade on the left. Copy the SSH endpoint for the edge node, not the head node!!

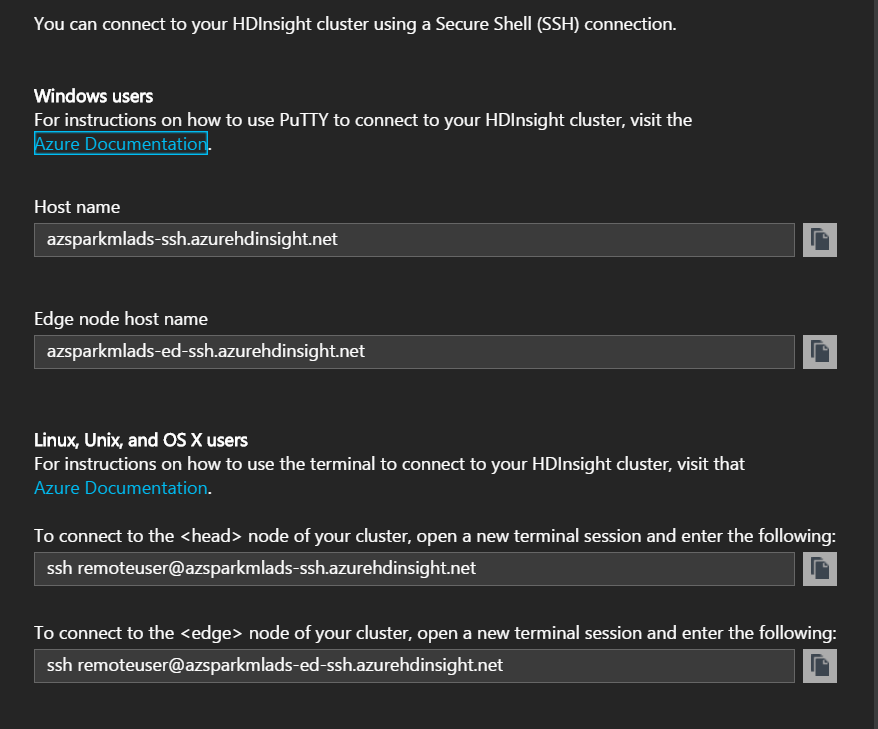
-
Connect to the edge node using an SSH client. You can ignore SSH keys for the purposes of this lab. In production it is highly recommended that you use SSH keys rather than username/password authentication.
-
Enter your SSH username and password.
-
Once you are connected, become a root user on the cluster. In the SSH session, use the following command.
sudo su - -
Download the custom script to install all the prerequisites. Use the following command.
wget https://raw.githubusercontent.com/akzaidi/mlads_spark_tutorial/master/downloadRun.sh -
Change the permissions on the custom script file and run the script. Use the following commands.
chmod +x downloadRun.sh ./downloadRun.sh -
Create an SSH tunnel to the cluster by mapping
localhost:8787on the HDInsight cluster to the client machine. You must create an SSH tunnel before opening a new browser session.-
On a Linux client or a Windows client (using Cygwin), open a terminal session and use the following command.
ssh -L 8787:localhost:8787 remoteuser@CLUSTERNAME-ed-ssh.azurehdinsight.netReplace USERNAME with an SSH user for your HDInsight cluster, and replace CLUSTERNAME with the name of your HDInsight cluster
-
On a Windows client create an SSH tunnel PuTTY.
-
Open PuTTY, and enter your connection information. If you are not familiar with PuTTY, see Use SSH with Linux-based Hadoop on HDInsight from Windows for information on how to use it with HDInsight.
-
In the Category section to the left of the dialog, expand Connection, expand SSH, and then select Tunnels.
-
Provide the following information on the Options controlling SSH port forwarding form:
- Source port - The port on the client that you wish to forward. For example, 8787.
- Destination - The destination that must be mapped to the local client machine. For example, localhost:8787.

-
Click Add to add the settings, and then click Open to open an SSH connection.
-
When prompted, log in to the server. This will establish an SSH session and enable the tunnel.
-
-
-
Open a web browser and enter the following URL based on the port you entered for the tunnel.
http://localhost:8787/
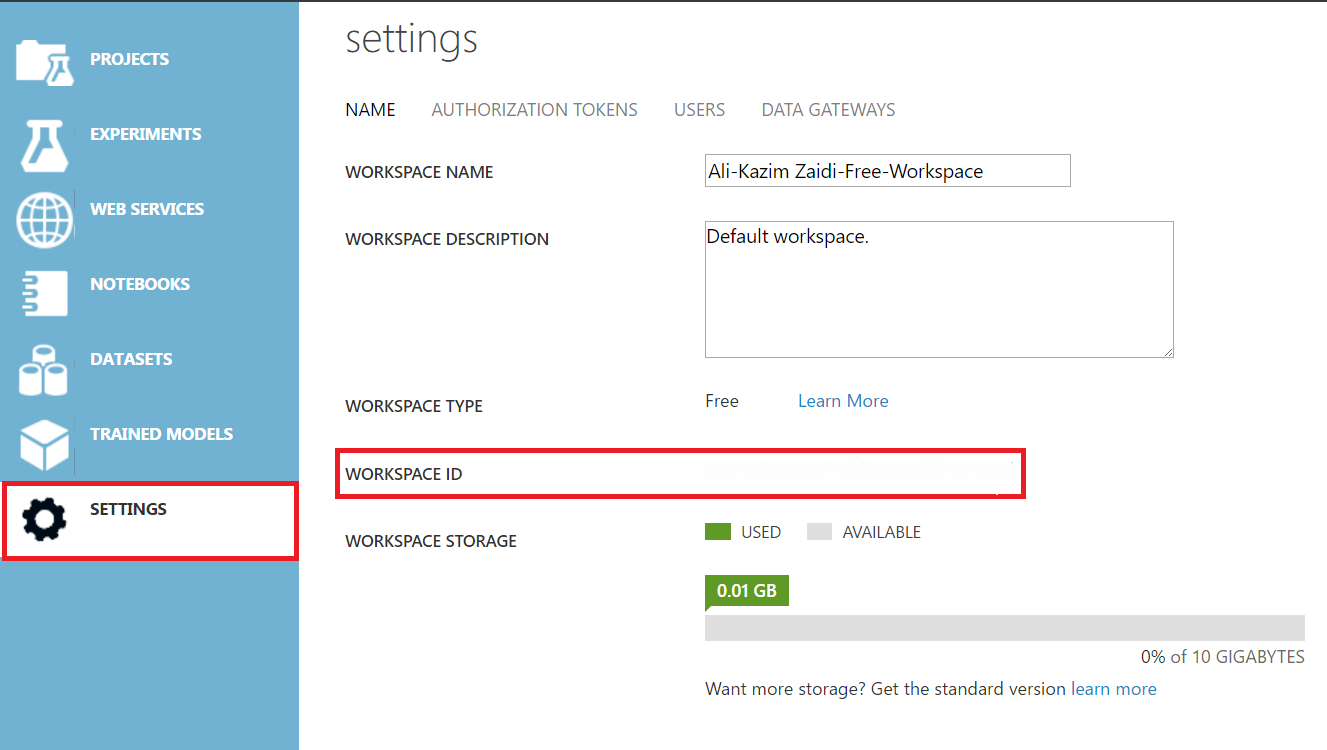
Create Azure ML Workspace
The Operationalization script, 3-Deploy-Score-Subset.r, creates and deploys a web service in an Azure Machine Learning workspace. Edit azureml-settings.json to include the "id" and "authorization_token" of your workspace. Instructions for creating an Azure Machine Learning workspace are available [here].(https://docs.microsoft.com/en-us/azure/machine-learning/machine-learning-create-workspace). Workspace ID and Authorization Tokens can be found in the "Name" and "Authorization Tokens" listings under the Settings tab in Azure Machine Learning Studio.
- Create a workspace using the instructions provided in the link above.
- Get your workspace id and keys from the settings pane (tokens in the Authorization Tokens tab)
Verify Your Cluster
To verify that your cluster is properly set up, run the verification script as follows:
cd /home/remoteuser
sudo chmod +x verification.sh
./verification.sh
Verification should complete in a couple of minutes, and the file /home/remoteuser/verification.csv will be created on the edge node. If verification succeeded, verification.csv should have the following contents:
remoteuser@ed0-azspar:~$ head verification.csv
"hdfsFiles","edgeMRSFiles","edgeSparklyRFiles","sparkHPCJob","sparkHPAJob","azureMLExists","rstudioRunning"
TRUE,TRUE,TRUE,TRUE,TRUE,TRUE,TRUE
To troubleshoot verification, a directory called /tmp/verif is created on the edge node. This directory contains a log of the verification script’s execution.