</head>

Estimated time needed: 40 minutes
In this lab, you will be introducted to the use basic Unix commands related to the following categories:
- General purpose commands.
- Directory management commands.
- File management commands.
- Access control commands.
- Text processing commands.
- Networking commands.
Skills Network Cloud IDE (based on Theia and Docker) provides an environment for hands on labs for course and project related labs. Theia is an open source IDE (Integrated Development Environment), that can be run on desktop or on the cloud. to complete this lab, we will be using the Cloud IDE based on Theia.
Please be aware that sessions for this lab environment are not persisted. Every time you connect to this lab, a new environment is created for you. Any data or files you may have saved in the earlier session would get lost. Plan to complete these labs in a single session, to avoid losing your data.
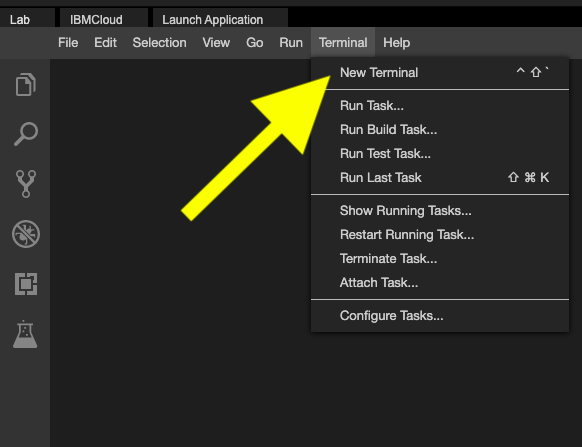
Open a new terminal, by clicking on the menu bar and selecting Terminal->New Terminal, as in the image below.
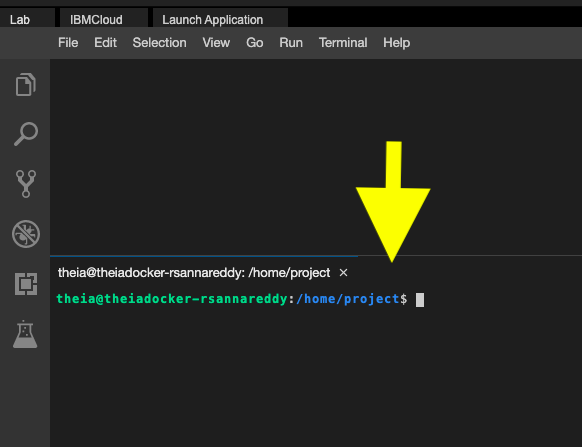
This will open a new terminal at the bottom of the screen as in the image below.
Run the commands below on the newly opened terminal. (You can copy the code by clicking on the little copy button on the bottom right of the codeblock below and then paste it, wherever you wish.)
1.1. Display the name of the current user
whoami
ebnfwhoami
It will display the user name as theia. You are logged into this lab as theia.
You can get a list of currently logged in users using the command 'who'. But this command doesn't work in theia environment yet.
1.2. Know the user and group identity information
id
This command displays the user id and group id information of the current user.
applescriptid
It will display the uid(user id) and gid(group id) for the user theia.
1.3. Display date and time
date
The date command displays current date and time.
applescriptdate
It has several options which help you get date in your favourite format.
The following command displays current date in mm/dd/yy format.
applescriptdate "+%D"
Here are some of the popular format specifiers that you can try out.
| Specifier | Explaination |
|---|---|
| %d | Display the day of the month (01 to 31) |
| %h | Displays abbreviated month name (Jan to Dec) |
| %m | Displays the month of year (01 to 12) |
| %Y | Display four-digit year |
| %T | Display the time in 24 hour format as HH:MM:SS |
| %H | Display the hour |
1.4. List the files and directories
ls
List the files and directories in the current directory.
ebnfls
You many not get any output if your directory is empty.
The following command will list all the files in the /bin directory.
jboss-clils /bin
List all files starting with b in the /bin directory.
awkls /bin/b*
List all files ending with r in the /bin directory.
awkls /bin/*r
1.5. Get basic information about the operating system
uname
By default the command prints the kernel name.
ebnfuname
You will see Linux printed in the output.
Using the -a opton prints all the system information in the following order: Kernel name, network node hostname, kernel release date, kernel version, machine hardware name, hardware platform, operating system.
cssuname -a
1.6. Get information about active processes
ps
ps lists the processes that are currently running and their PIDs (process ids).
ebnfps
The output contains the processes that are owned by you.
The -e option displays all the processes running on the system. The includes processes owned by other users also.
ebnfps -e
1.7. Get information on the running processes and system resources
top
top command provides a dynamic real-time view of the running system.
It shows the summary information of the system and the list of processes or threads which are currently managed by the Kernel.
It gives information related to cpu and memory usage per process.
coqtop
Here is a sample output.

When started for the first time, you'll be presented with the following elements on the main top screen.
- Summary Area. - shows information like system uptime, number of users, load average, memory usage etc.
- Fields/Columns Header.
- Task Area.
The output keeps refreshing until you press 'q' or Ctrl+c
If you want to exit automatically after a specified number of repetitions, use the -n option as in the following example:
apachetop -n 10
using 'top' we can find out which process is consuming the most resources. You can press the following keys while 'top' is running to sort the list :
M - sort by memory usage
P - sort by CPU usage
N - sort by process ID
T - sort by the running time
1.8. Display Messages
echo
echo command displays the given text on the screen.
bashecho "Welcome to the linux lab"
These special characters help you better format your output.
| Special Character | Meaning |
|---|---|
| \n | Represents a newline character |
| \t | A tab character |
Use the -e option of the echo command when working with special characters.
bashecho -e "This will be printed \nin two lines"
1.9. Download a file from the internet.
wget
wget command helps you to donwload a file at a given url.
This command download the file usdoi.txt from the given url.
awkwget https://cf-courses-data.s3.us.cloud-object-storage.appdomain.cloud/IBM-DB0250EN-SkillsNetwork/labs/Bash%20Scripting/usdoi.txt
Verify using the ls command.
ebnfls
1.10. View the Reference Manual
man
man command displays the user manual of the command given as argument.
For example, to see the manual page of 'ls' command, use:
powershellman ls
2.1. Print the name of your current working directory.
pwd
bashpwd
This will print /home/project.
2.2. Create a directory
mkdir
mkdir creates a new directory.
To create a directory named 'scripts' in your current directory, run the following command.
arduinomkdir scripts
Use the ls command to verify if the scripts directories got created.
ebnfls
2.3. Change your current working directory.
cd
To get into the directory scripts directory, run the command below .
bashcd scripts
Use the pwd command to verify if your current working directory has changed.
bashpwd
If you use cd without any directory name, it will move you back to your home directory.
bashcd
Use the pwd command to verify if your current working directory has changed.
bashpwd
Run the command below to move to the parent directory. .. is a shortcut that refers to the parent directory of your current directory.
gamscd ..
2.4. Get a list of files in a directory
ls
Lists the files in the current directory or the directory given as argument.
ebnfls -l
Prints a long list of files that has additional information compared to the simple ls command.
Here are some popular options that you can try with the ls command.
| Option | Description |
|---|---|
| -a | list all the files including hidden files |
| -d | list directories themselves, not their contents |
| -h | with -l and -s, print sizes like 1K, 234M, 2G etc |
| -l | long listing of files which include information about permission, owner, size etc |
| -F | classify files by appending type indcator like ,/ etc. to file names |
| -r | reverse order while sorting |
| -S | sort by file size, largest first |
| -t | sort by time, newest first |
Get a long listing of all files in /etc, including hidden files, if any.
jboss-clils -la /etc
To list the files based on modifcation time, use -t option.
The most recently modified file will be on top.
This is more frequently used with -l option.
powershellls -lt
To view the current directory attributes instead of their contents, use the following command. If you want any other directory's attributes, provide the directory name as argument.
jboss-clils -ld /etc
To list the files sorted by file size in descending order, use -S option.
statals -lS
To get the files sorted by file size in ascending order, add -r option.
ebnfls -lrS
2.5. Delete directory
rmdir
rmdir removes a directory.
Let us create a dummy directory in the the /tmp folder .
awkmkdir /tmp/dummy
Verify by using the ls command.
jboss-clils /tmp
Delete the dummy directory
awkrmdir /tmp/dummy
Verify by using the ls command.
jboss-clils /tmp
Note: Before removing any directory make sure that you do not have any files or sub directories.
2.6. Search and locate files
find
Find command is used to search for files in a directory. You can search for files based on different categories like file name, file type, owner, size, timestamps etc.
Find command conducts the search in the entire directory tree starting from the directory name given.
This command finds all txt files in the subfolders of the /etc directory.
routerosfind /etc -name '.txt'
Along with the listing of txt files, you may get some Permission denied errors.
That is normal, as you have limited access on the lab machine.
2.7. Display the amount of disk space available on file systems
df
The 'df' command displays the information of device name, total blocks, total disk space, used disk space, available disk space and mount points on a file system.
Without any arguments, the commands shows the information for all currently mounted file systems.
ebnfdf
Use the -h option to view the disk space usage in human readable format, i.e, in megabytes, gigabytes etc.
ebnfdf -h
3.1. Display file contents
cat
cat command displays contents of files.
The following command prints the content of the file usdoi.txt which you have downloaded earlier.
ebnfcat usdoi.txt
If you get a file not found error, then run these commands.
cd takes you to your home directory.
wget download the file.
cat will print the file onto the screen.
awkcd wget https://cf-courses-data.s3.us.cloud-object-storage.appdomain.cloud/IBM-DB0250EN-SkillsNetwork/labs/Bash%20Scripting/usdoi.txt cat usdoi.txt
3.2. Display file contents page-wise
more
The more command displays the file contents page by page.
Press spacebar to display the next page.
dosmore usdoi.txt
3.3. Display first few lines of a file
head
Print the first 10 lines of the file usdoi.txt.
ebnfhead usdoi.txt
You can specify the number of lines to be printed.
Print the first 3 lines of the file usdoi.txt.
apachehead -3 usdoi.txt
3.4. Display last lines of a file
tail
Print the last 10 lines of the file usdoi.txt.
ebnftail usdoi.txt
You can specify the number of lines to be printed.
Print the last 2 lines of the file usdoi.txt.
apachetail -2 usdoi.txt
3.5. Copy files
cp
Copy usdoi.txt into a file named usdoi-backup.txt.
styluscp usdoi.txt usdoi-backup.txt
Use ls command to verify if the copy was successful.
ebnfls
The command below copies the content of /etc/passwd to a file named 'users.txt' under the current directory.
awkcp /etc/passwd users.txt
Use ls command to verify if the copy was successful.
ebnfls
3.6. Move, Rename a file
mv
mv command moves a file from one directory to another.
While moving a file, if the target file is existing, it is overwritten.
If the source and target directories are same, it works like rename operation.
Rename users.txt as user-info.txt
nginxmv users.txt user-info.txt
Use ls command to verify.
ebnfls
Move user-info.txt to the /tmp directory
nginxmv user-info.txt /tmp
Use ls command to verify.
ebnfls
jboss-clils -l /tmp
3.7. Create a blank file
touch
Create an empty file named myfile.txt
ebnftouch myfile.txt
Use ls command to verify.
ebnfls -l
If the file already exists, the touch command updates the access timestamp of the file.
ebnftouch usdoi.txt
Use ls command to verify.
ebnfls -l
3.8. Remove files
rm
The rm command is ideally used along with the -i option, which makes it ask for confirmation before deleting.
Remove the file myfile.txt. Press y to confirm deletion, or n to cancel
stylusrm -i myfile.txt
Use ls command to verify.
ebnfls -l
3.9. Create and manage file archives
tar
tar command allows you to copy multiple files and directories into a single archive file.
The following command creates an archive of the entire '/bin' directory into a file named bin.tar.
The options used are as follows:
| Option | Description. |
|---|---|
| -c | Create new archive file |
| -v | Verbosely list files processed |
| -f | Archive file name |
mipsasmtar -cvf bin.tar /bin
To see the list of files in the archive, use -t option:
ebnftar -tvf bin.tar
To untar the archive or extract files from the archive, use -x option:
ebnftar -xvf bin.tar
Use ls command to verify that the folder bin is extracted.
ebnfls -l
3.10. Package and compress archive files
zip
zip command allows you to compress files.
The following command creates a zip named config.zip and of all the files with extension .conf in the /etc directory.
awkzip config.zip /etc/*.conf
The -r option can be used to zip the entire folder.
The following command creates an archive of the '/bin' directory.
pythonzip -r bin.zip /bin
3.11. Extract, list, or test compressed files in a ZIP archive
unzip
The following command lists the files of the archive called 'config.zip'
arduinounzip -l config.zip
The following command extracts all the files in the archive bin.zip.
pythonunzip bin.zip
You should see a folder named bin created in your directory.
Each file/directory has permissions set for the file owner, group owner and others.
The following permissions are set for each file:
| Permission | symbol |
|---|---|
| read | r |
| write | w |
| execute | x |
To see the permissions currently set for a file, run ls -l command.
For example, to see the permissions for a file named 'usdoi.txt' in your current directory, run:
ebnfls -l usdoi.txt
A sample output looks like:
-rw-r--r-- 1 theia theia 8121 May 31 16:45 usdoi.txt
The permissions set here are 'rw-r--r--'
Here, owner has read and write permissions, group owner has read permission and others also have read permission.
4.1 chmod
chmod command lets you change the permissions set for a file.
The change of permissions is specified with the help of a combination of the following characters:
| Option | Description. |
|---|---|
| r, w and x | representing read, write and execute permissions respectively |
| u,g and o | representing user categories owner, group and others respectively |
| +, - | representing grant and revoke operations respectively |
The command below removes read permission for all (user,group and other) on usdoi.txt.
ebnfchmod -r usdoi.txt
Verify the changed permissions.
ebnfls -l usdoi.txt
Add read access to all on usdoi.txt.
ebnfchmod +r usdoi.txt
Verify the changed permissions.
ebnfls -l usdoi.txt
To remove the read permission for 'others' category.
ebnfchmod o-r usdoi.txt
Verify the changed permissions.
ebnfls -l usdoi.txt
5.1. Count lines, words or characters
wc
If you want to find the number of lines, words and characters in a file, for example 'usdoi.txt'.
ebnfwc usdoi.txt
The output contains the number of lines followed by number of words followed by number of characters in the file.
Print only the number of lines in 'usdoi.txt'.
ebnfwc -l usdoi.txt
Print only the number of words in 'usdoi.txt'.
ebnfwc -w usdoi.txt
Print only the number of characters in 'usdoi.txt'.
ebnfwc -c usdoi.txt
5.2. Perform search operations within the text
grep
grep command allows you to specify patterns and search for lines matching the pattern, from the input text.
The following command prints all lines in the file usdoi.txt which contain the word people.
ebnfgrep people usdoi.txt
Some of the frequently used options of grep are:
| Option | Description. |
|---|---|
| -n | Along with the matching lines, print the line numbers also |
| -c | Get the count of matching lines |
| -i | Ignore the case of the text while matching |
| -v | Print all lines which do not contain the pattern |
| -w | Match only if the pattern matches whole words |
Prints all lines from the /etc/passwd file, which do not contain the pattern login.
gradlegrep -v login /etc/passwd
6.1. Show the system's host name
hostname
To view the current host name, run the command below .
ebnfhostname
You can use the -i option to view the IP adrress of the host:
csshostname -i
6.2. Test if a host is reachable
ping
Check if www.google.com is reachable. The command keeps sending data packets to the www.google.com server and prints the response it gets back. (Press Ctrl+C to stop pinging)
stylusping www.google.com
If you want to ping only for a limited number of times, use -c option.
stylusping -c 5 www.google.com
6.3. Display network interface configuration
ifconfig
Configures or displays network interface parameters for a network.
Display the configuration of all network interfaces of the system:
ebnfifconfig
Display the configuration of the ethernet adapter.
apacheifconfig eth0
eth0 is usually the primary network interface that connects your server to the network.
You can see your server's ip address in the line number 2 after the word inet.
6.4. Transfer data from or to a server
curl
Access the file at the given url and display the contents on to the screen.
awkcurl https://cf-courses-data.s3.us.cloud-object-storage.appdomain.cloud/IBM-DB0250EN-SkillsNetwork/labs/Bash%20Scripting/usdoi.txt
Access the file at the given url and save it in the current directory.
awkcurl -O https://cf-courses-data.s3.us.cloud-object-storage.appdomain.cloud/IBM-DB0250EN-SkillsNetwork/labs/Bash%20Scripting/usdoi.txt
- Problem:
Display the content of /home directory.
Click here for Hint
Use 'ls' command.
Click here for Solution
jboss-clils /home
- Problem:
Ensure that you are in your home directory.
Click here for Hint
Use 'cd' to move to the home directory and then use 'pwd' to verify'.
Click here for Solution
bashcd pwd
- Problem:
Create a new directory called 'final' in your home directory.
Click here for Hint
Use 'mkdir' command.
Click here for Solution
arduinomkdir final
- Problem:
View the permissions of the newly created directory 'final'.
Click here for Hint
Use -d and -l options of the ls command.
Click here for Solution
actionscriptls -ld final
- Problem:
Create a new blank file named 'display.sh' in the
finaldirectory
Click here for Hint
use 'cd and 'touch' commands.
Click here for Solution
statacd final touch display.sh
- Problem:
Copy
display.shasreport.sh.
Click here for Hint
Use the cp command.
Click here for Solution
statacp display.sh report.sh
- Problem:
Delete the file 'display.sh'.
Click here for Hint
Use 'rm' command.
Click here for Solution
statarm -i display.sh
- Problem:
List the files in /etc directory in the ascending order of their access time.
Click here for Hint
Use the ls command with right options.
Click here for Solution
jboss-clils -ltr /etc
- Problem:
Display the current time.
Click here for Hint
Use the format option '%T' of the date command.
Click here for Solution
applescriptdate "+%T"
- Problem:
Display the number of lines in the /etc/passwd file.
Click here for Hint
use the wc command with right option.
Click here for Solution
awkwc -l /etc/passwd
- Problem:
Display the lines that contain the string 'not installed' in /var/log/bootstrap.log page-wise.
Click here for Hint
use the grep and more commands.
Click here for Solution
statagrep "not installed" /var/log/bootstrap.log | more
- Problem:
https://cf-courses-data.s3.us.cloud-object-storage.appdomain.cloud/IBM-DB0250EN-SkillsNetwork/labs/Bash%20Scripting/top-sites.txtcontains most popular websites. Find out all the websites that have the wordorgin them.
Click here for Hint
use the wget command to download the file.
use the grep command to search
Click here for Solution
awkwget https://cf-courses-data.s3.us.cloud-object-storage.appdomain.cloud/IBM-DB0250EN-SkillsNetwork/labs/Bash%20Scripting/top-sites.txt grep org top-sites.txt
Ramesh Sannareddy
Rav Ahuja
| Date (YYYY-MM-DD) | Version | Changed By | Change Description |
|---|---|---|---|
| 2021-05-30 | 0.1 | Ramesh Sannareddy | Created initial version of the lab |
Copyright (c) 2021 IBM Corporation. All rights reserved.
<script>window.addEventListener('load', function() { snFaculty.inject(); });</script> <script src="https://skills-network-assets.s3.us.cloud-object-storage.appdomain.cloud/scripts/inject.43989f87.js"></script> <script src="https://unpkg.com/@highlightjs/cdn-assets@10.7.1/highlight.min.js"></script> <script src="https://unpkg.com/highlightjs-badge@0.1.9/highlightjs-badge.min.js"></script> <style> @media print { .code-badge { display: none; } } .code-badge-pre { position: relative; } .code-badge { display: flex; flex-direction: row; white-space: normal; background: transparent; background: #333; color: white; font-size: 0.875em; opacity: 0.5; transition: opacity linear 0.5s; border-radius: 0 0 0 7px; padding: 5px 8px 5px 8px; position: absolute; right: 0; top: 0; } .code-badge.active { opacity: 0.8; } .code-badge:hover { opacity: .95; } .code-badge a, .code-badge a:hover { text-decoration: none; } .code-badge-language { margin-right: 10px; font-weight: 600; color: goldenrod; } .code-badge-copy-icon { font-size: 1.2em; cursor: pointer; padding: 0 7px; margin-top:2; } .fa.text-success:{ color: limegreen !important } </style><div class="code-badge">
<div class="code-badge-language">{{language}}</div>
<div title="Copy to clipboard">
<i class="{{copyIconClass}} code-badge-copy-icon"></i>
</div>
</div>