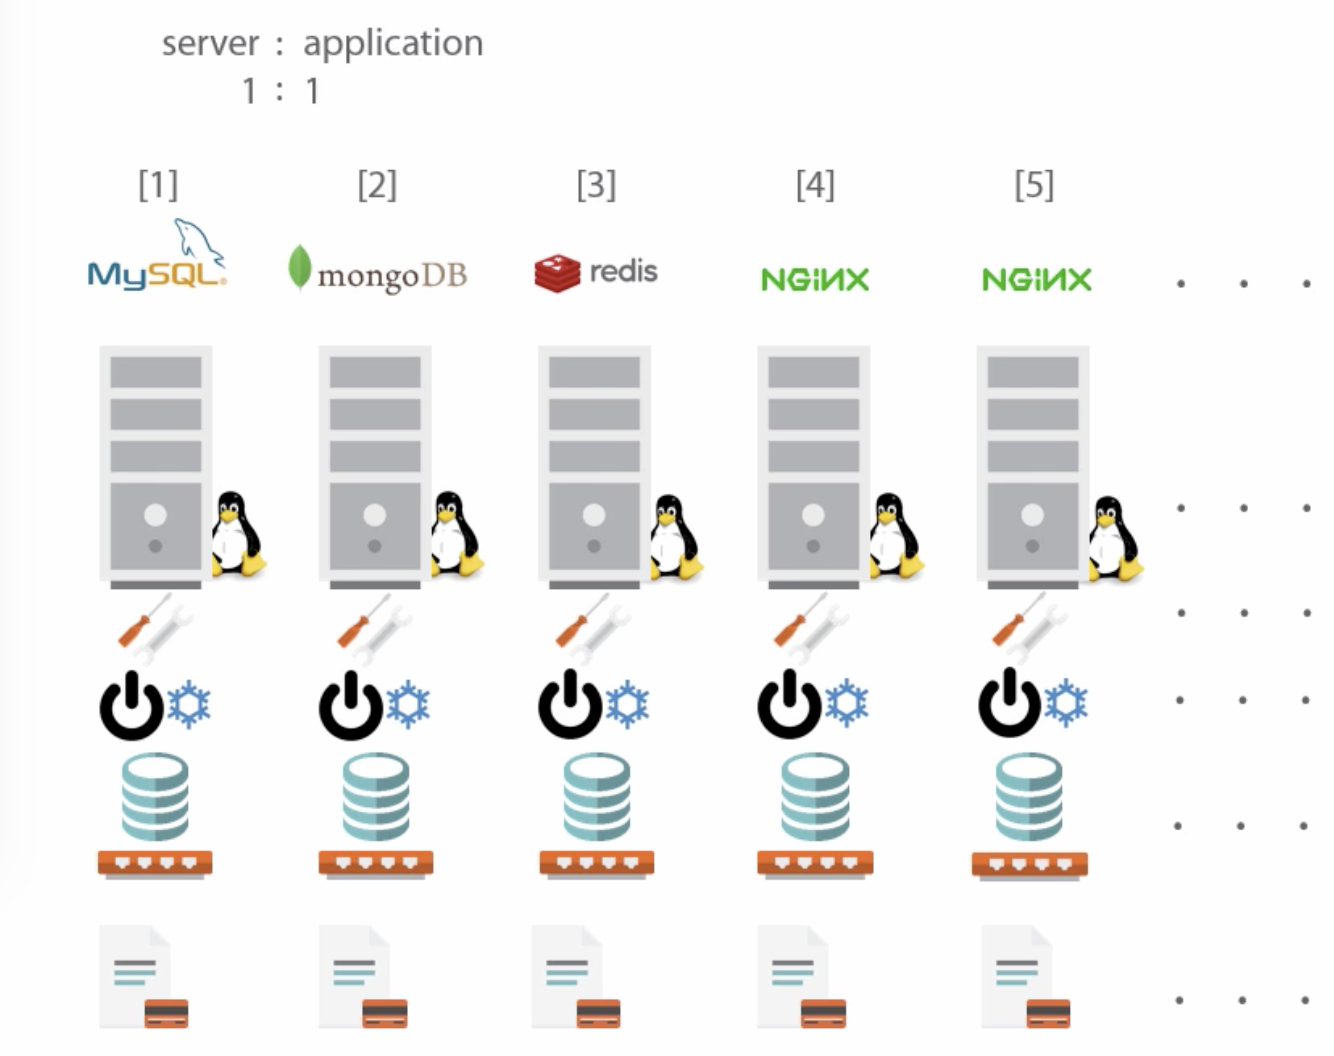
- Bare-metal hosting has a 1:1 relationship between server and application
- Requires lots of infrastructure and management
- Waste of resources because server resources are used little, high TCO
- It's hard to move apps to other servers
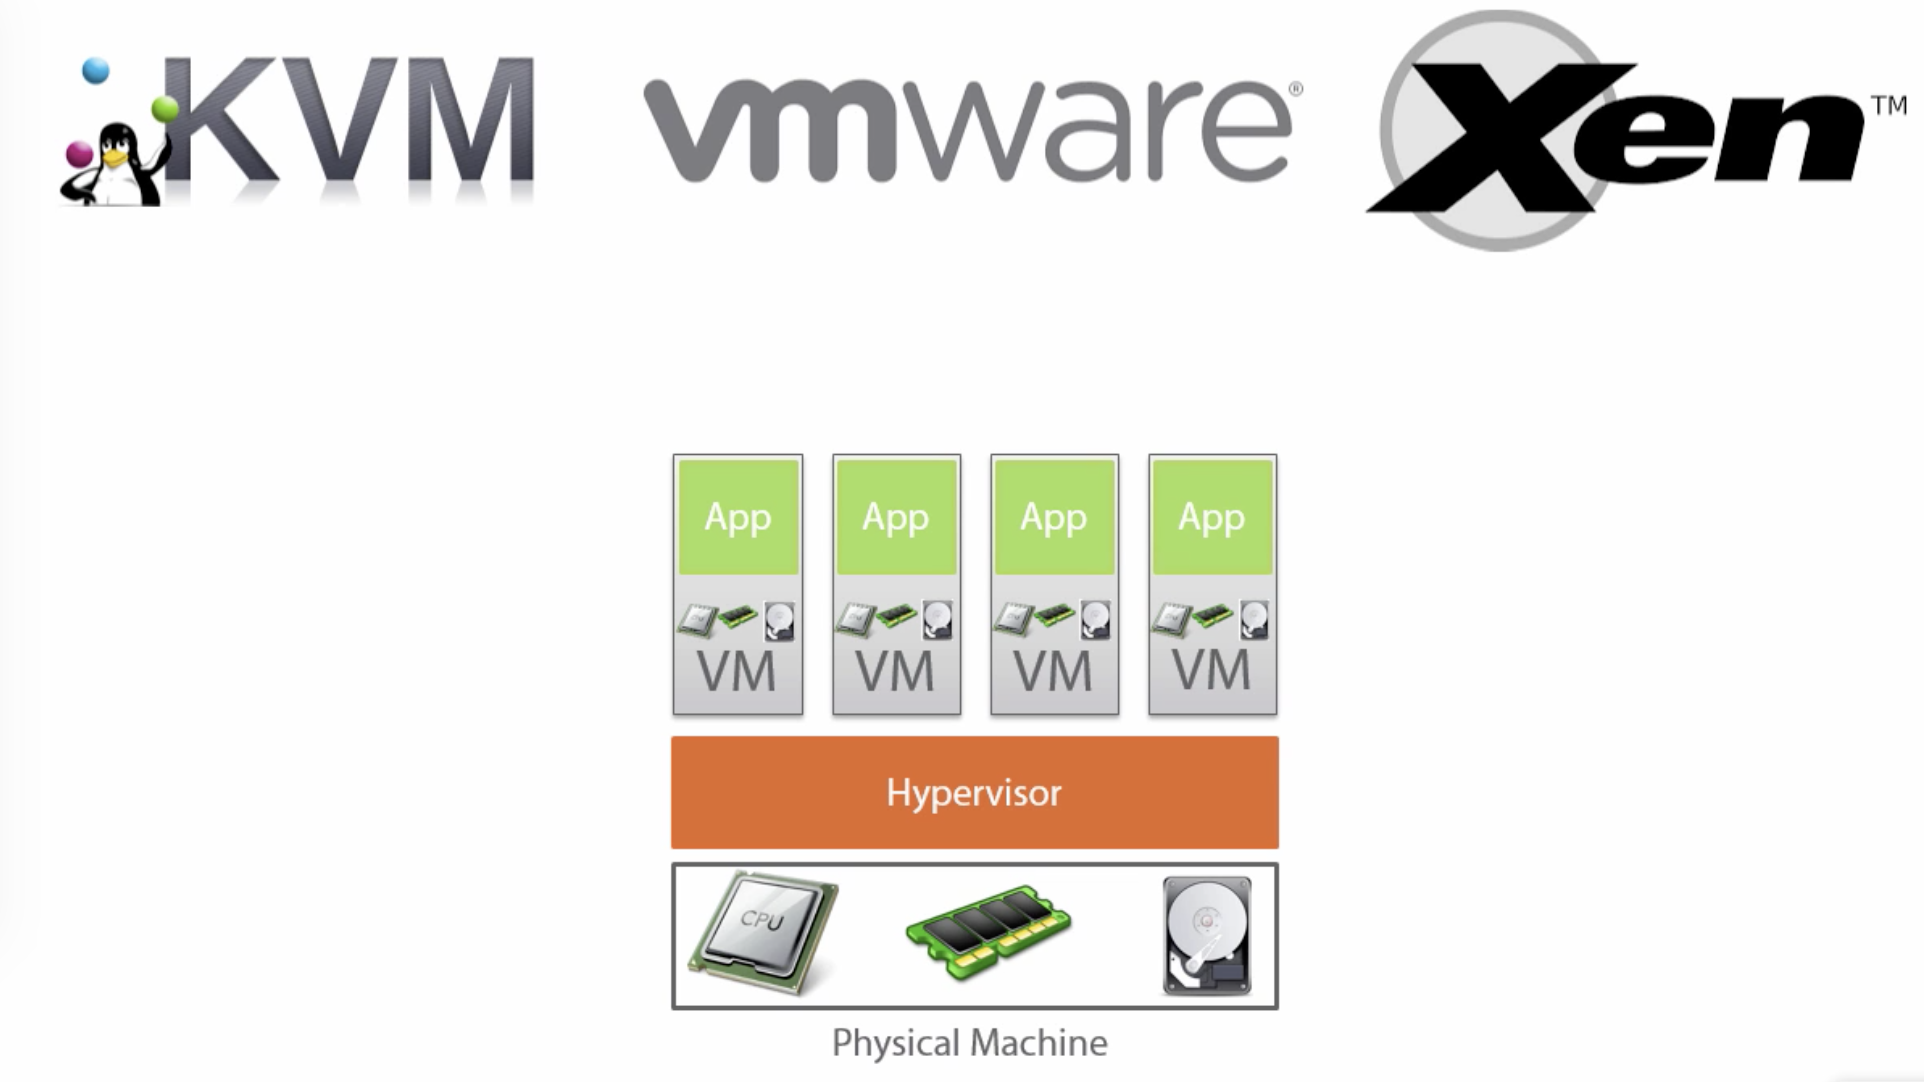
- Virtual Machines share hardware through Hypervisor, but not OSes
- VMs require OS licensing and management
- 1 app per Virtual Machine
- Led to higher resource utilization, but still with overhead
- Hard to scale applications to other servers
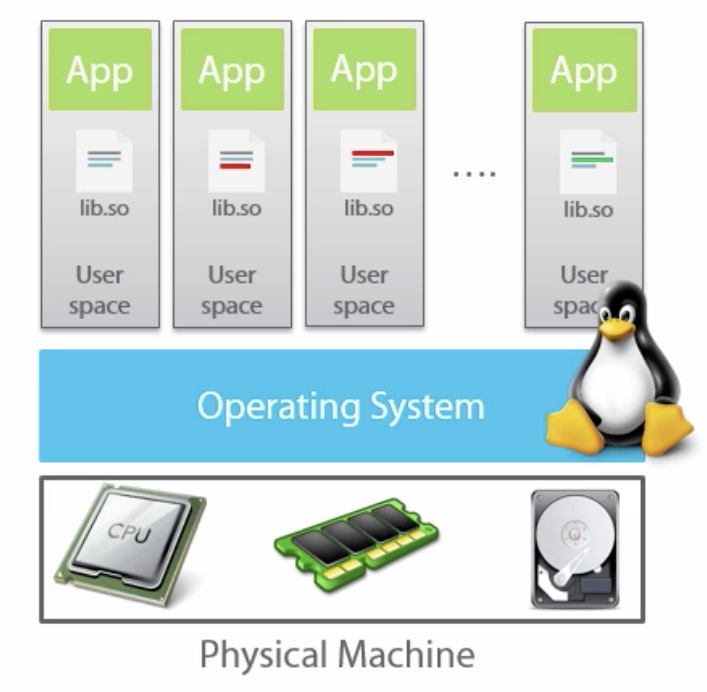
- Docker by default only shares the kernel with the host OS
- 1 app per container
- Docker is very lightweight, runs on Linux and Windows 10 or Server 2016 hosts
- Docker abstracts the file system and network from the container
- Containers share CPU, RAM, storage, network
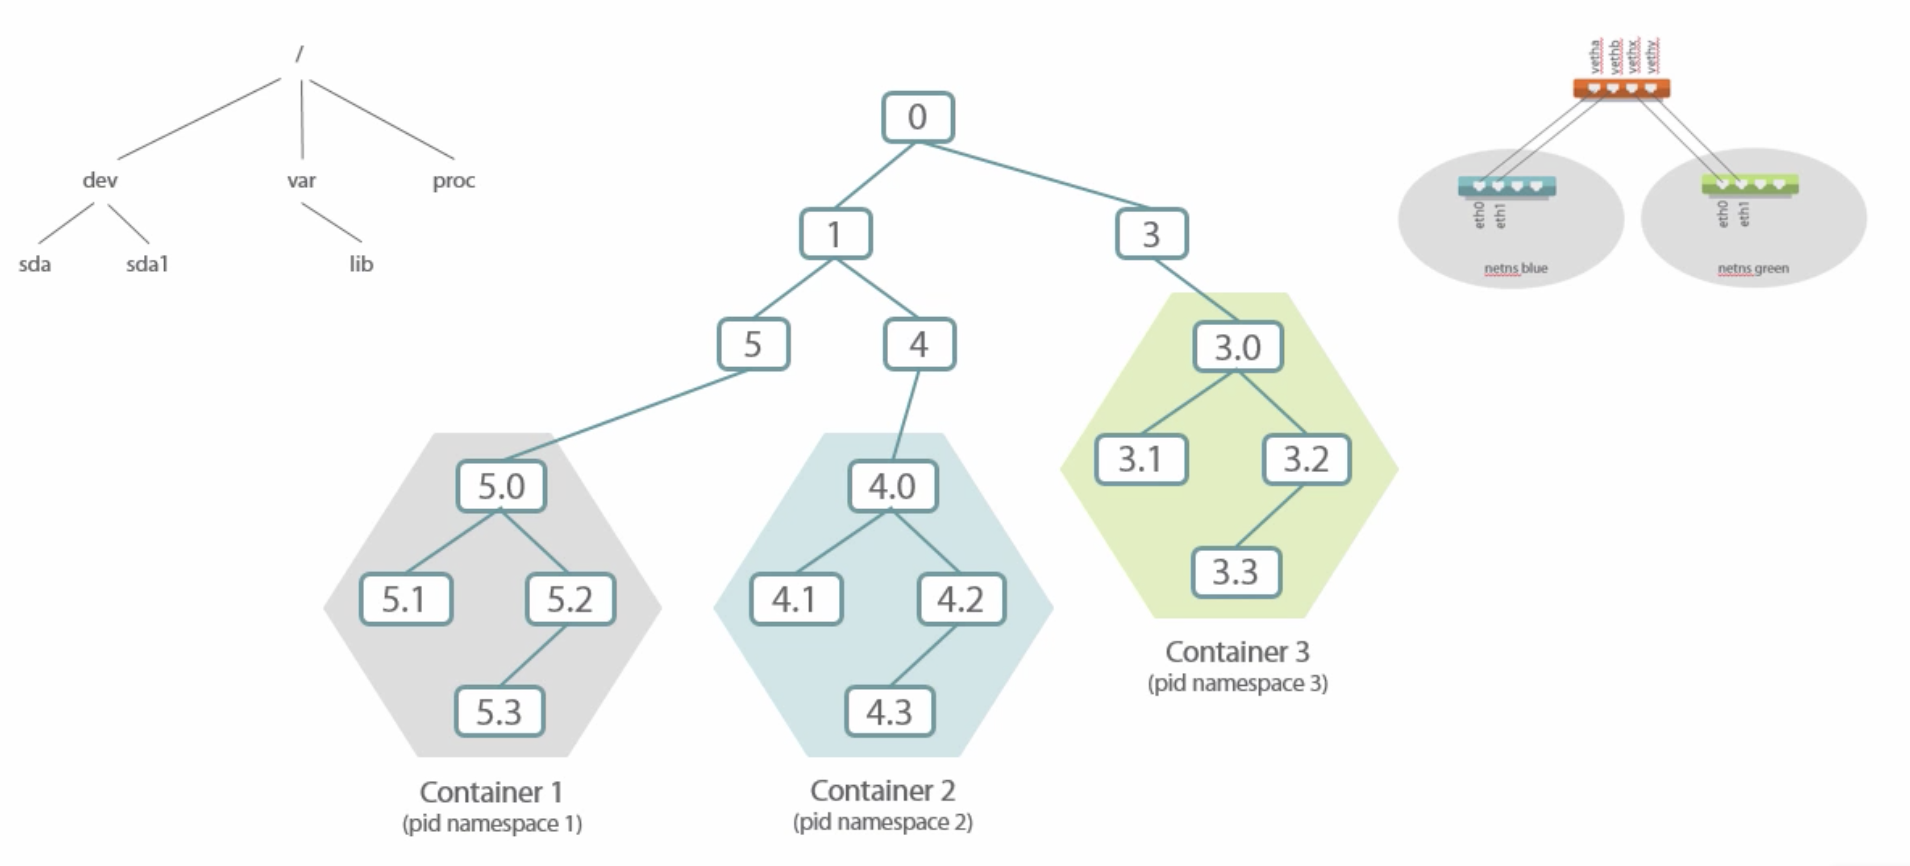
- Isolation is done by several Linux Kernel User Spaces
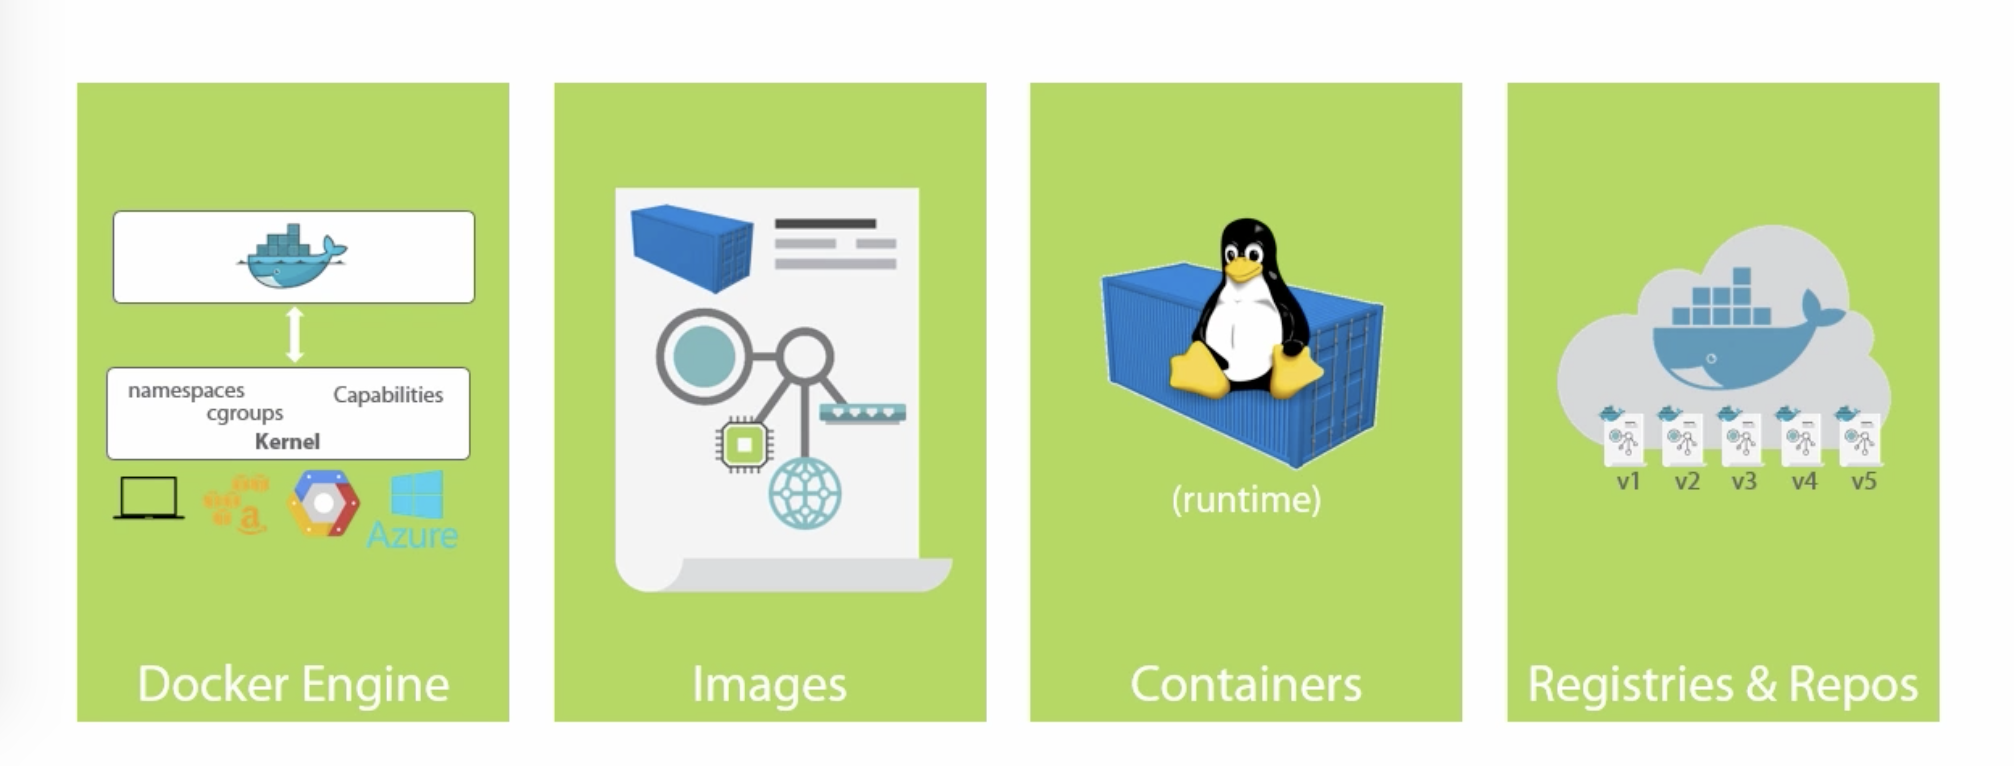
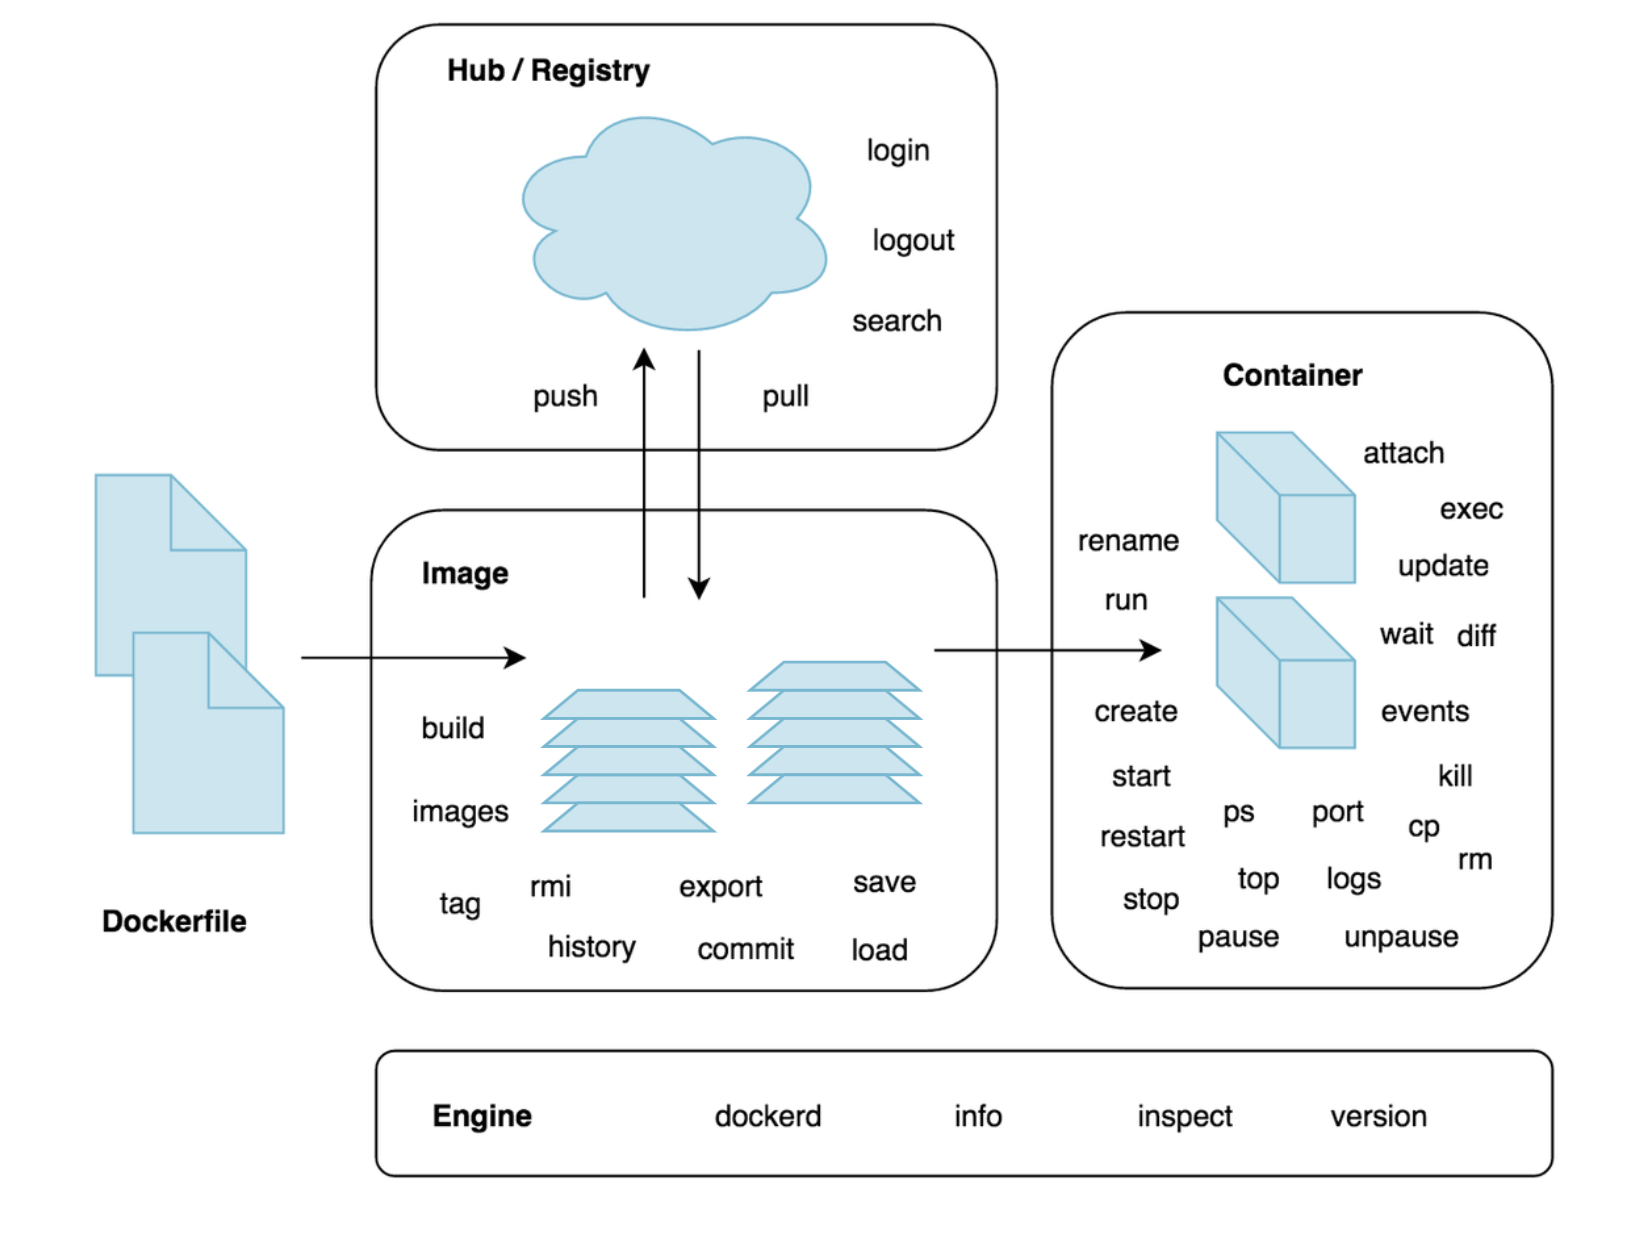
- Docker Engine runs containers
- Listens to local UNIX socket by default (
/var/run/docker.sock)
- Listens to local UNIX socket by default (
- We interact with the Docker Client which talks to a local or remote Docker
Engine
export DOCKER_HOST=...to talk to remote engine listening on TCP port- Add users to
dockergroup to allow non-root users access to the docker UNIX socket - The client provides entrypoints to the engine's features, e.g. for image
handling through
docker image <command>and container handling throughdocker container <command>. There are legacy commands that still can be used, e. g.docker pull==docker image pullanddocker run==docker container run.
$ docker --version
Docker version 26.0.0, build 2ae903e

$ docker info
Client: Docker Engine - Community
 Version:    26.0.0
 Context:    default
 Debug Mode: false
 Plugins:
  buildx: Docker Buildx (Docker Inc.)
    Version:  v0.13.1
    Path:     /usr/libexec/docker/cli-plugins/docker-buildx
  compose: Docker Compose (Docker Inc.)
    Version:  v2.25.0
    Path:     /usr/libexec/docker/cli-plugins/docker-compose

Server:
 Containers: 51
  Running: 49
  Paused: 0
  Stopped: 2
 Images: 49
 Server Version: 26.0.0
 Storage Driver: overlay2
  Backing Filesystem: xfs...
Commands shown:
docker run <image>
docker run -it <image> <command>
docker run -d <image> <command>
docker attach
# Ctrl+P,Q to detach
docker stop <container>
docker kill <container>
docker images
docker ps -a
docker pull <image>
docker pull <image:tag>- Images are sharable blueprints for containers
- Images provide the root file system for containers
- Containers are created from images
- Images can be thought of as stopped containers
- An image can be addressed by
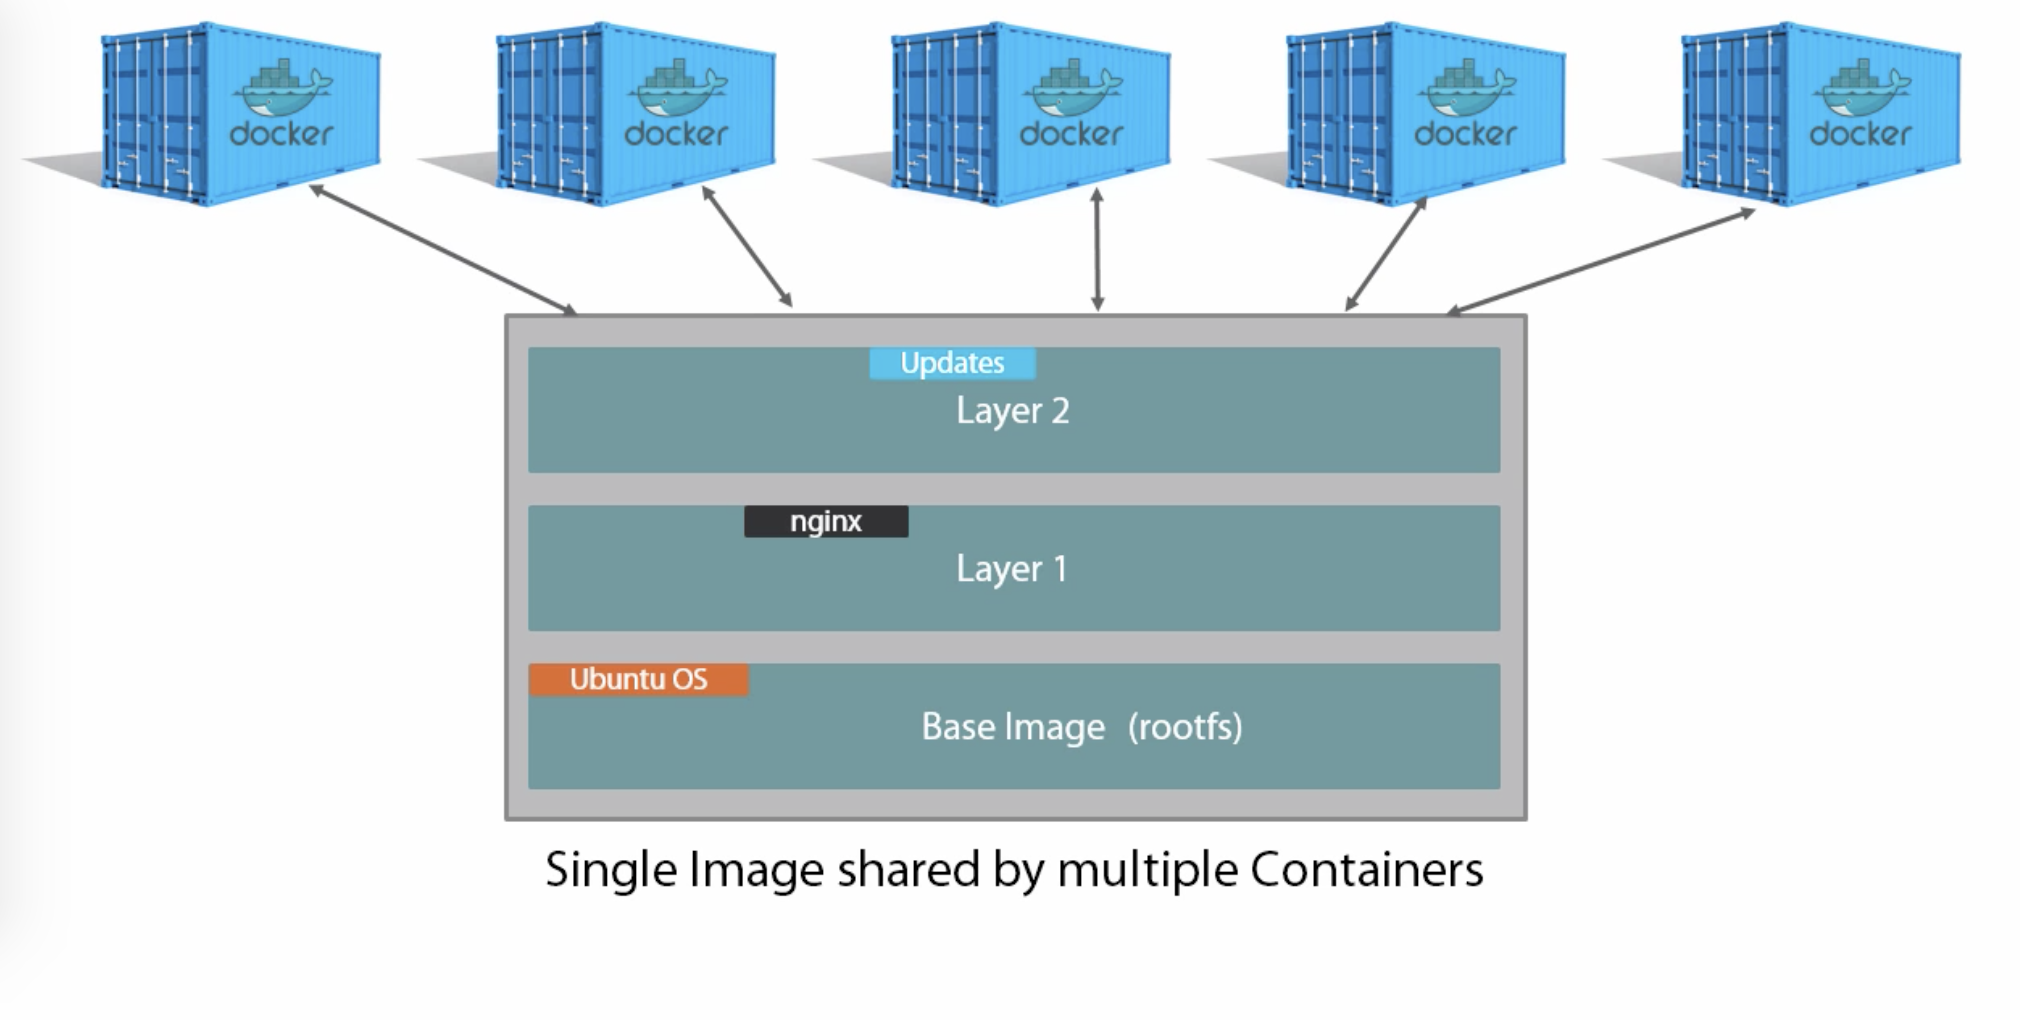
ID(e.g.15895ef0b3b2) orname:tag(e.g.fedora:latest) - Containers share images, e.g. if you create 2 containers from 1 image, the image will be reused and not downloaded again
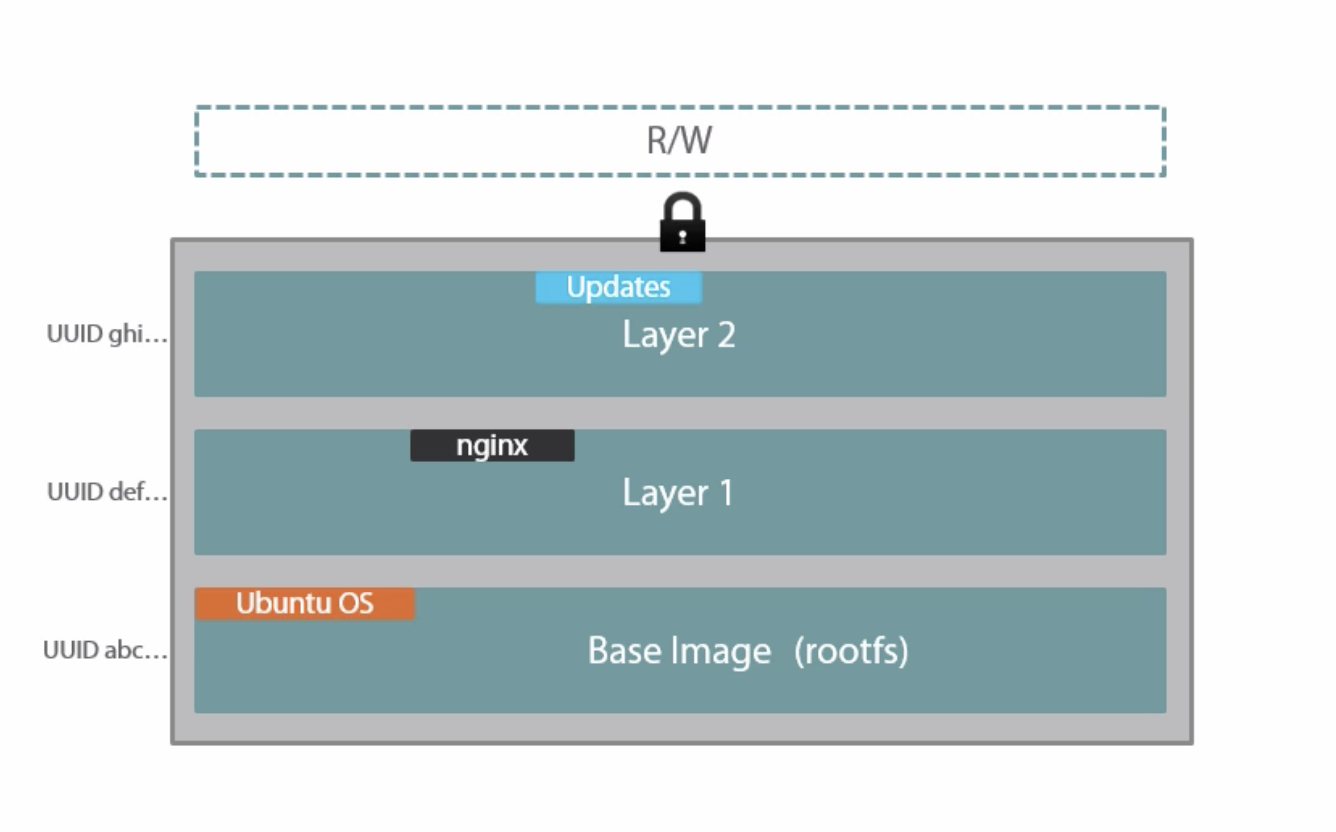
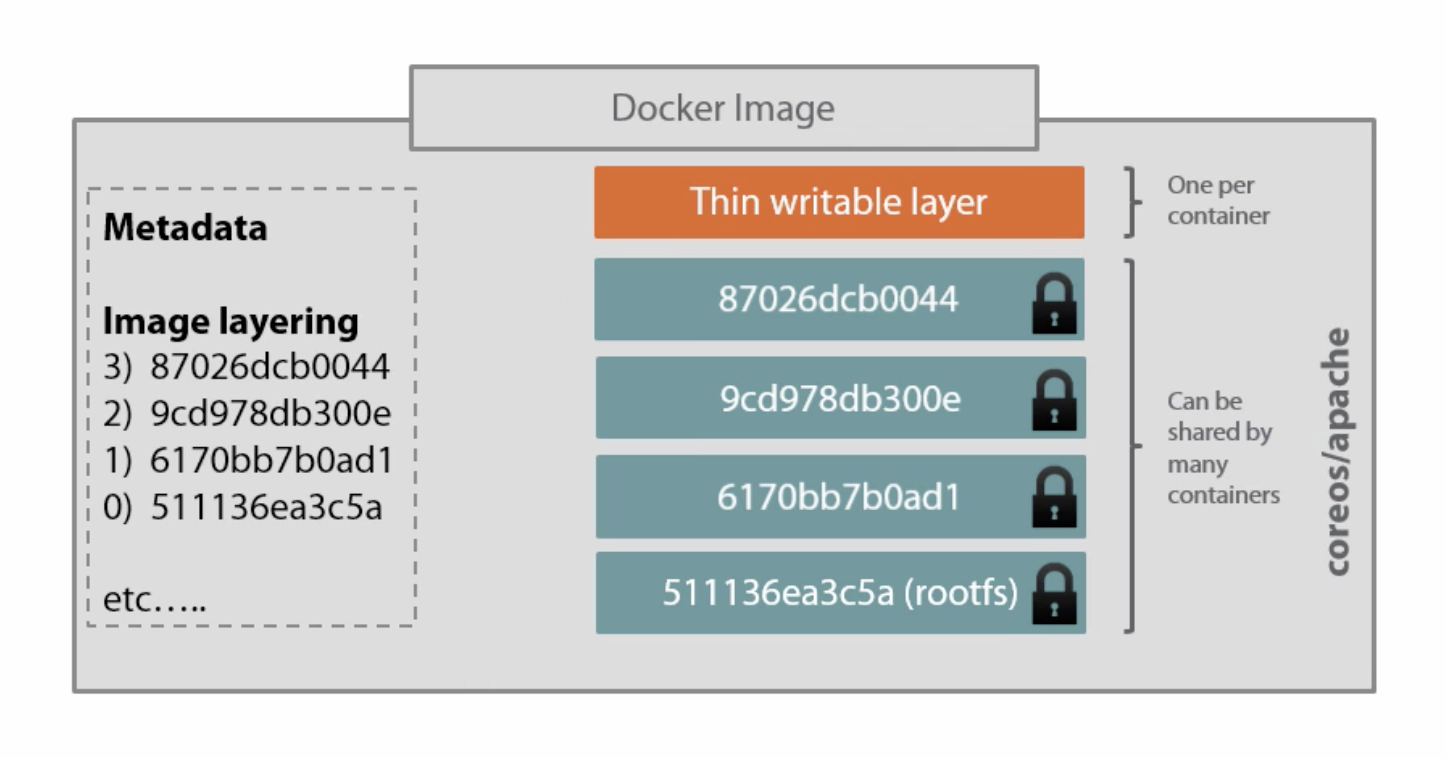
- Images are composed of read-only layers
- File modifications made by the container cause changes in the writeable layer for that specific container (~ Copy-on-write file system)
- This provides isolation per container
- Immutability is king (almost anywhere in docker)
- Images can be created on one machine and run on another machine, e.g.
- Create images in CI
docker pushto internal image registry- Deploy to production servers using
docker pull/docker run
- Definition construct
- Read-only
- Mostly bare-bones (depends on image, OS images don't have all usual commands
installed like
ping) - Special container Linux images, e.g. Alpine Linux which is just 5 MB or single-binary Go images
- Comprised of layers
- Downloaded from a registry, e.g. hub.docker.com
- Stored locally in
/var/lib/docker(depending on storage driver) - Tags are used to specify other versions than
latest
- Layers are union-mounted into a single file system
- Higher layers win over lower layers
- Combined read-only, single view
- Different drivers available (
aufs,devicemapper, ...)
Commands shown:
docker pull <image>
docker pull -a <image>
docker images
docker history <image>
docker rmi <image>- Run the
hello-worldimage in a new container - Remove the container
- Remove the image
- Also try it the other way around!
-
Runtime construct
-
Get an auto-generated name assigned unless
docker run --name <name> -
File system modifications happen in the container-specific writable layer
-
Root process gets PID 1, container exits when PID 1 exits
- Further control with
docker stop(sendsSIGTERMto PID 1),docker kill(sendsSIGKILLto PID 1) anddocker restart
- Further control with
-
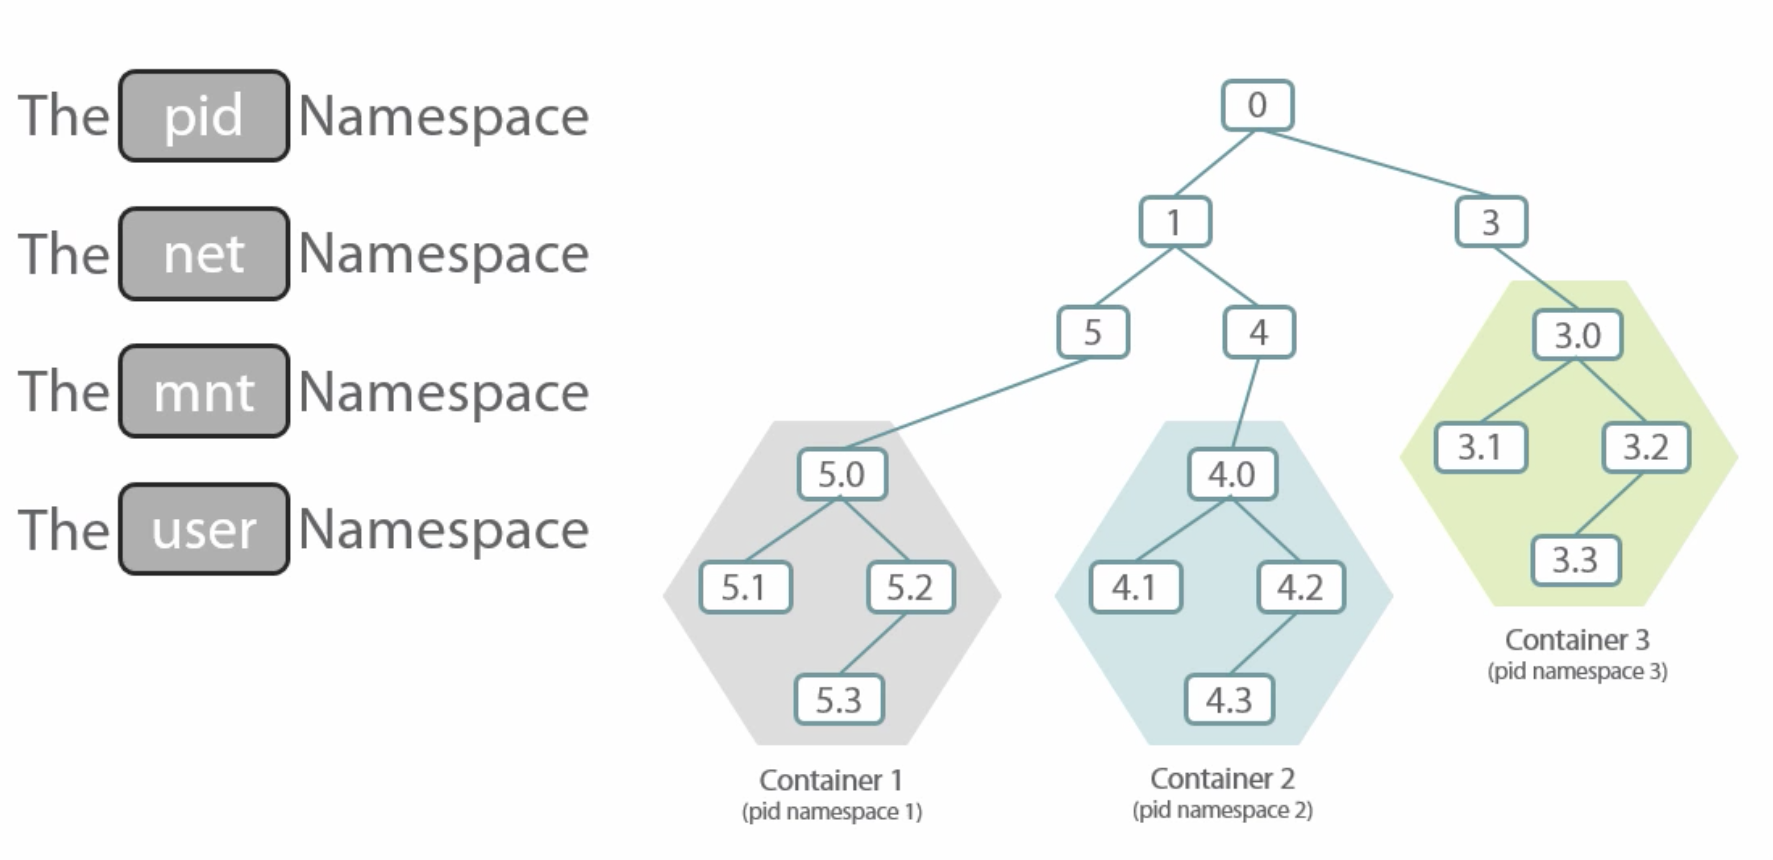
Have an isolated:
- process tree,
- network stack (routing table, ports),
- mounts,
- users (e.g. root inside the container, but not outside),
which are realized using Kernel Namespaces
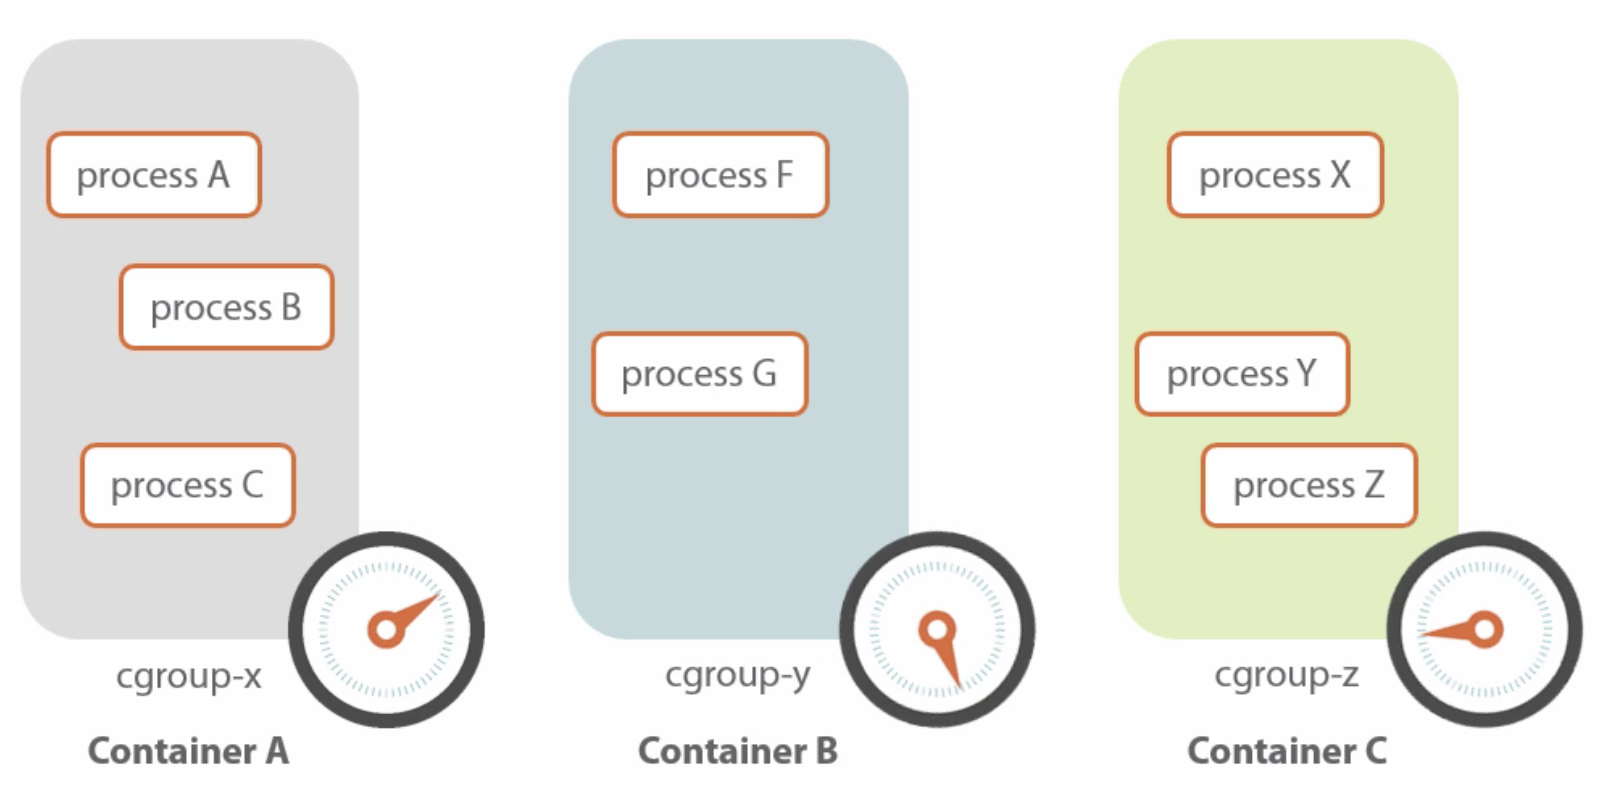
-
Kernel
cgroups are used to limit resource usage (CPU, network, etc.) -
Kernel capabilities can be used to give a container more or less permissions, e.g. bind to low-numbered port
-
PID 1 is most often not
init, so child processes are not terminated gracefully -
You need to cater for PID 1 processes that start other processes
Commands shown:
docker run --name <name> <image> <command>
docker run -it <image> <command>
docker run -d <image> <command>
docker run --rm <image>
docker exec -it <container> <command>
docker top <container>
docker attach <container>

docker start <container>
docker stop <container>
docker restart <container>

docker ps
docker ps -a
docker rm <container>

docker create --name <container> <image>
docker tag <image> <tag>
docker inspect <container>
docker port <container>
docker logs [-f] <container>

docker commit <container> <image>[:<tag>]
docker save -o <file> <image>
tar -tf <file>
docker rmi <image>
docker load -i <file>

docker run -p <public port>:<internal port> <image>
docker run -v <local path>:<container path> <image>- Pull the
alpineimage - List all images
- Run the
alpineimage withping 8.8.8.8command - List running containers
- Show/follow the output from the running
ping - Stop container
- Start container
- Step into the container, list all processes
- Start an
ubuntucontainer and step into it - Install
curland exit - List all containers
- Commit the changed container creating a new image
- List all images
- Name the new image
curl_example:1.0 - Run the new image with
curl https://www.google.com
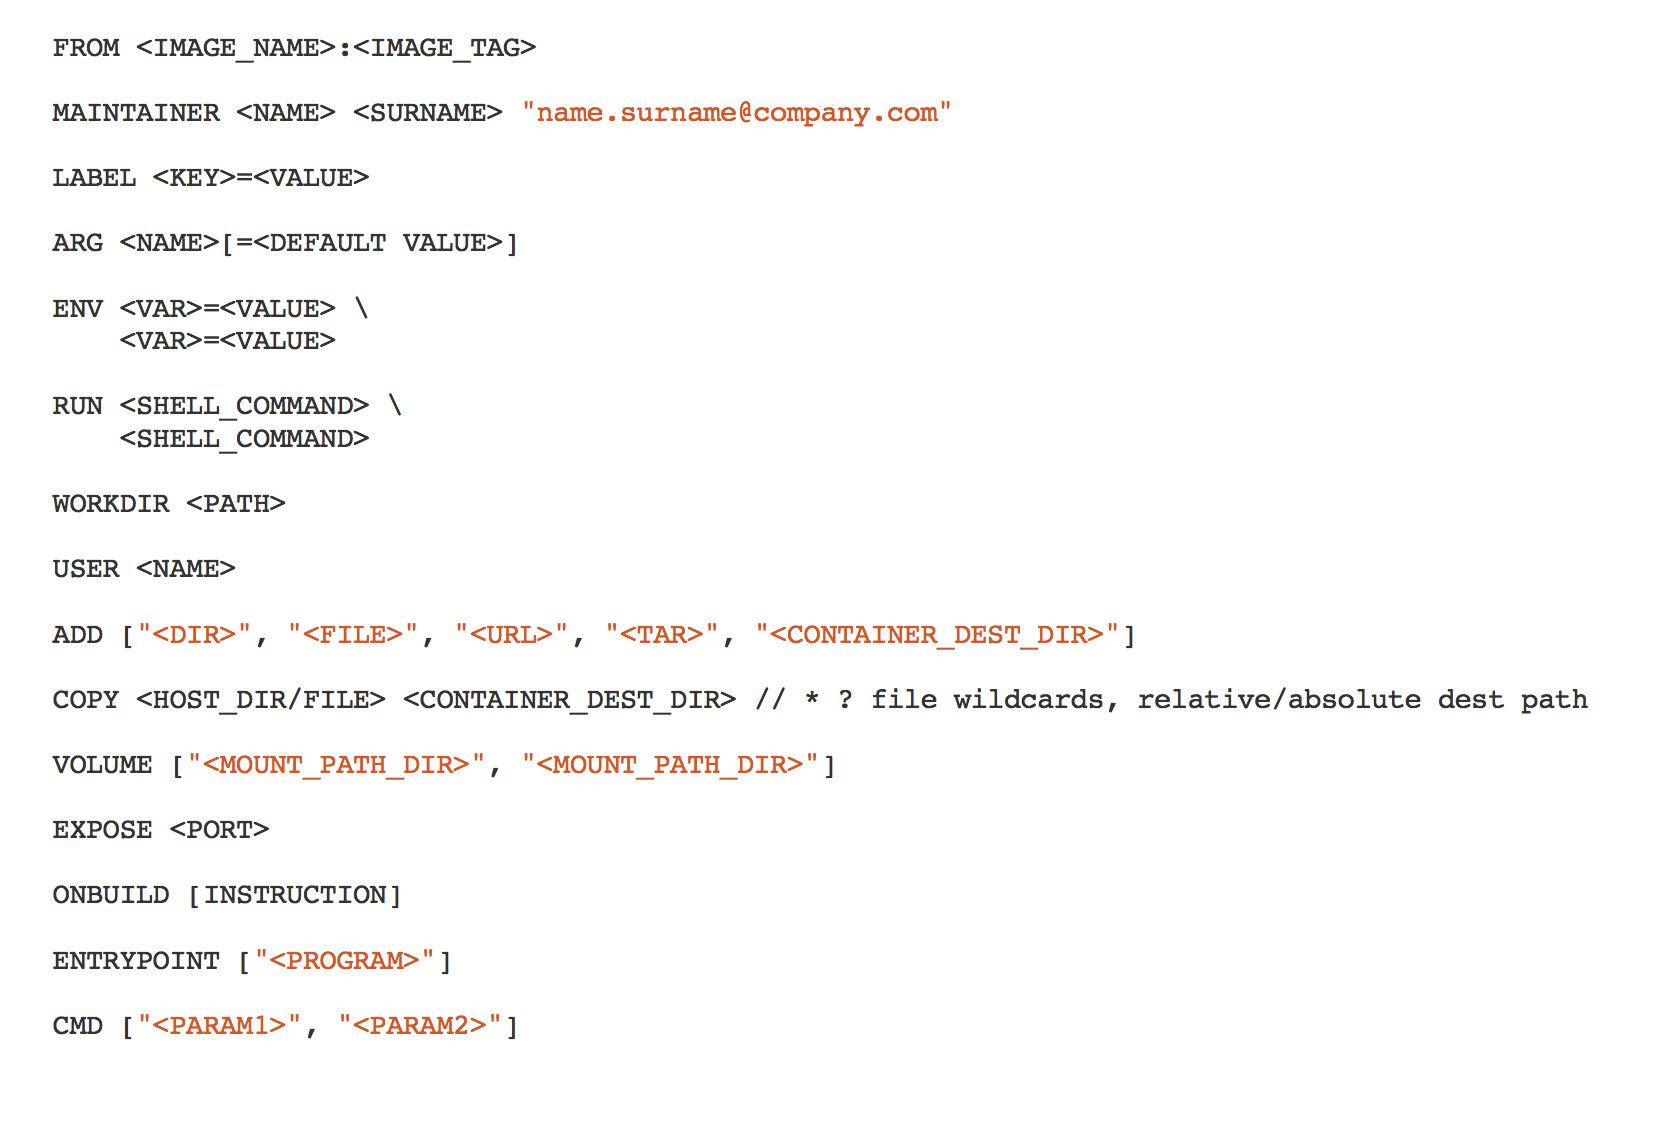
- Plain-text file named
Dockerfile(casing matters!) - Defines how to build an image
- Requires
FROM <base image>[:<tag>](which can bescratch) - Allows to specify e.g.:
- Define metadata using labels (
LABEL maintainer "<name and email>") - Files to be copied to the image:
COPY,ADD - Additional packages to be installed:
RUN - Define published ports:
EXPOSE - Automatically-created volumes:
VOLUMES - User running PID 1:
USER - Define environment variables:
ENV - Process running PID 1:
ENTRYPOINT,CMD # Comments
- Define metadata using labels (
- Each line == one image layer (i.e.
docker commitafter each line) - Build intermediates are cached locally, using checksums for
COPYandADD,RUNis cached based on line followingRUN - Build can be parameterized using build context directory and
BUILD_ARGs - To reduce the size of the build context, use
.dockerignorefiles
- Allows you to specify default arguments unless some are provided on the
command line with
docker run <image> <args> - Example Dockerfile and
ENTRYPOINTscript - Here
./docker-entrypoint.sh teamcity-server runis the default - But you may also run
docker run -it agross/teamcity bash
-
Containers should be ephemeral
-
Use a
.dockerignorefile -
Use small base images (e.g. Alpine)
-
Reuse base images across your organization
-
Use tagged base images
-
Use tagged app images
-
Group common operations into a single layer
-
Avoid installing unnecessary packages or keeping temporary files
-
Clean up after yourself in the same
RUNstatement -
Run only one process per container (try to avoid
supervisordand the like) -
Minimize the number of layers
-
Sort multi-line arguments and indent 4 spaces:
RUN apt-get update && apt-get install --yes \ cvs \ git \ mercurial \ subversion -
FROM: Use current official repositories -
RUN: Split long or complexRUNstatements across multiple lines separatedRUN command-1 && \ command-2 && \ command-3 -
Avoid distribution updates à la
RUN apt-get upgrade -
Use the JSON array format for
CMDto prevent an additional shell as PID 1CMD ["executable", "param1", "param2", "..."] CMD ["apache2", "-DFOREGROUND"] CMD ["perl", "-de0"] CMD ["python"] CMD ["php", "-a"]
-
Use
ENTRYPOINTonly when required -
EXPOSEthe usual ports for your applications -
Prefer
COPYoverADD -
Leverage the build cache, disable if necessary:
docker build --no-cache=true -t <image>[:<tag>] .# Will use cache unless requirements.txt change. COPY requirements.txt /tmp/ RUN pip install --requirement /tmp/requirements.txt # Will use cache unless any file changes. COPY . /tmp/
-
Do not use
ADDto download files, although it's possible. UseRUNwithcurl,unzip/...andrminstead to keep images small:# Bad - 3 layers. ADD http://example.com/big.tar.xz /usr/src/things/ RUN tar -xJf /usr/src/things/big.tar.xz -C /usr/src/things RUN make -C /usr/src/things all # Good - 1 layer. RUN mkdir -p /usr/src/things \ && curl -SL http://example.com/big.tar.xz \ | tar -xJC /usr/src/things \ && make -C /usr/src/things all
-
Use
gosuwhen required to run as non-root -
Have integration tests
-
Develop the
Dockerfilein a running container, REPL-style -
Include a
HEALTHCHECKin the Dockerfile or run containers with--health-{cmd,interval,timeout,retries} -
Define directories that will contain persistent data with
VOLUMEs -
Use multi-stage builds if you have SDK requirements for the build that you do not need for production
Commands shown:
docker build .
docker build --tag <image>:<tag> .
docker build --build-arg <arg>=<value>
docker run --env <var>=<value>
docker run -p <external port>:<internal port> <image>
docker run -p <external port>:<internal port>/udp <image>
docker run -p <ip address>:<external port>:<internal port> <image>
docker run -P <image>
docker port <container>- Repeat the steps from Exercise 3 above using a Dockerfile
- Create a
Dockerfilefor https://github.com/agross/docker-hello-app - Build docker image
- Run container from image
- Open web site at http://localhost:8080
- Stop container from Exercise 5
- Run container from image, with a custom environment variable
THE_ANSWER=42 - Open web site at http://localhost:8080 and see if
THE_ANSWERis there
-
Stop container from Exercise 5
-
Create a new file
index.jadein the current directory:html body Content from the host
-
Start a new container, but overlay the
/app/views/directory with the directory that contains theindex.jadefile above -
Refresh browser and check if "Content from the host" is displayed
-
Enter the running container and change the contents of
/app/views/index.jade(e.g. usingecho) -
Refresh browser
-
Check the contents of
index.jadeon your host
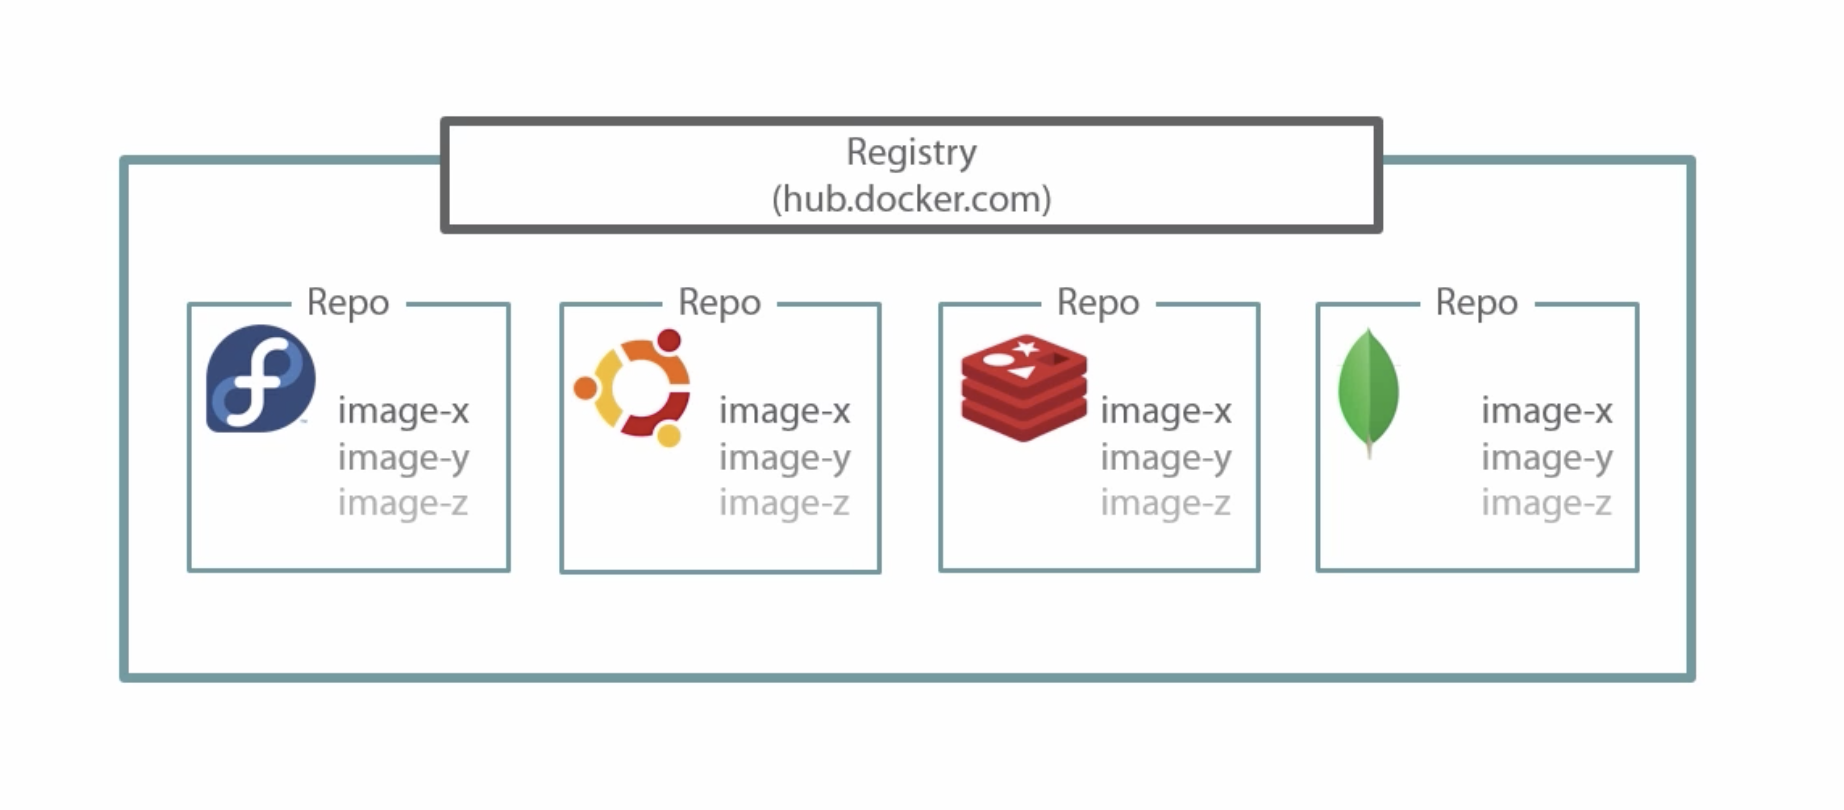
- Provide docker images for download
- hub.docker.com is the default registry used by the Docker Client
- Accounts are free
- Public repos: Readable by anyone, writable by you
- You need to log in using
docker login [<server>](login info is persisted) if you want to usedocker push <image> - Images need to be tagged
<hub user name>/<repo>[:<tag>]to be able to push - Builds can be automated using e.g. web hooks and GitHub Integrations
- Can be self-hosted:
docker run -d -p 5000:5000 --name registry registry - Docker Hub Enterprise for internal hosting
docker login [<server>]
docker push <image>- Create an account at hub.docker.com
- Create a new repo named
hellounder your user account on Docker Hub - Tag the image created in Exercise 5 as
<hub user name>/hello - Log in to Docker Hub using the Docker Client
- Push the tagged image
- Check
https://hub.docker.com/r/<hub user name>/hello/tags/for your uploaded image - Locally remove the tagged image
- Run the image just pushed to Docker Hub
- Alternative to bind-mounts
- Volume survives removing containers using it
- These can be shared
- Consider data corruption possibility when multiple containers write to a shared volume!
docker volume ls
docker volume create <name>

docker run -d <image>
docker run -d -v <name>:<mount point> <image> <command>- Create persistent volume named
pings - Run
alpinewithsh -c 'ping 8.8.8.8 > /data/ping.txt'with/databeing mounted to thepingsvolume - Run another
alpinecontainer that mountspingsand inspectpings.txtcontents usingtail -f
- 1 app per container -- how to proxy a node app behind nginx?
- 1 nginx container
- n app containers
- nginx needs access to the IPs/ports of the app containers
- Docker networks isolate apps from each other
- Each network gets its own DNS server
- Docker creates a default network (used unless specified otherwise), but you
can create more and assign them using
--network
-
Create a network named
hello -
Run two instances of
agross/helloon thehellonetwork, but--namethem differently (oneandtwo) and to not publish ports -
Inspect
oneandtwo, look for network settings -
Inspect the
hellonetwork -
Step into either
oneortwoand try topingthe other -
Run nginx on the
hellonetworkdocker run --rm -d --name nginx --network hello -p 80:80 nginx
-
Browse http://localhost to verify that nginx is working
-
Stop nginx
-
Write a nginx config file (
hello.conf) that usesoneandtwoas upstreams:upstream hello { server one:8080; server two:8080; } server { listen 80; location / { proxy_pass http://hello; } } -
Restart nginx, this time with the conf above bind-mounted to
/etc/nginx/conf.d/default.confdocker run -d --name nginx --network hello -p 80:80 -v $PWD/hello.conf:/etc/nginx/conf.d/default.conf nginx -
Browse http://localhost again and refresh a few times
- We use WordPress as an example
- WordPress requires MySQL or MariaDB (MySQL fork)
-
Download
wordpressandmariadb -
Create a new network for both apps
-
Run a MariaDB container on the network from step 2 and inject some environment variables:
MARIADB_ROOT_PASSWORD=secret
MARIADB_DATABASE=wordpress
MARIADB_USER=wordpress
MARIADB_PASSWORD=wordpress
Is there a better way than multiple
--envparameters? Hint: Use a file. -
Run WordPress on the network from step 2 and tell it where it can find the database server:
WORDPRESS_DB_HOST=<mariadb container name>:3306
WORDPRESS_DB_USER=wordpress
WORDPRESS_DB_PASSWORD=wordpress
-
Browse http://localhost and create a WordPress site. Did you forget to publish ports? ;-)
-
Restart the WordPress container to see if your installation was persisted
-
Congratulations, you just emulated
docker-compose!
- Development environments:
- Running web apps in an isolated environment is crucial
- The compose file allows to document service dependencies
- Multi-page “developer getting started guides” can be avoided
- Automated testing environments
- Create & destroy isolated testing environments easily
- Concurrent builds do not interfere
- Production
- All config items are in one place
- Passwords are near-meaningless
- Services do not interfere
-
docker composecreates a per-composition network by default, named after the current directory (unlessdocker compose -p <name> ...is specified). -
When
docker compose upruns it finds any containers from previous runs and reuses the volumes from the old container (i.e. data is restored). -
When a service restarts and nothing has changed,
docker composereuses existing containers because it caches the configuration bits that were used to create a container. -
Variables in the
docker-compose.yamlfile can be used to customize the composition for different environments.web: ports: - "${EXTERNAL_PORT}:5000"
-
Override settings for different environments, e.g.
production.ymlcontaining changes specific for production:docker compose -f docker-compose.yml -f production.yml up -d
-
You can scale services with
docker-compose scale <service>=<instances>
Since WordPress cannot run without a database connection we need to ensure that the database is ready to accept connections before WordPress starts. But Docker does not really care about startup order and service readiness. There are several solutions to this problem. Some involve using external tools like:
- wait-for-it.sh https://github.com/vishnubob/wait-for-it or
- dockerize https://github.com/jwilder/dockerize.
Using these external tools require you to change a container's ENTRYPOINT or
CMD (depending on how the image defines those). This change involves defining
the dependency using the external tool and also telling the external tool what
it means to start e.g. WordPress.
Docker's builtin method, which is only available to docker-compose.yaml files
using version: 2 (e.g 2.x), is to define a HEALTHCHECK-based dependency.
Here the dependent container (database) must define healthiness and the
depending container (WordPress) can then define its dependency to be satisfied
if the dependent is healthy.
services:
 db:
   image: mysql

   # MySQL does not come with a HEALTHCHECK, so we need to define our own.
   healthcheck:
     # This check tests weather MySQL is ready to accept connections.
     test: ["CMD", "mysql", "--user", "root", "--password=secret", "--execute", "SELECT 1;"]
     # Allow 15 seconds for MySQL initialization before running the first check.
     start_period: 15s

 app:
   image: wordpress

   # Start the WordPress container after the database is healthy.
   depends_on:
     db:
       condition: service_healthy
You may use either method in the next exercise.
-
Create a directory
my-wordpressand enter it -
Create a new
docker-compose.yaml -
Paste the following:
services:
  mariadb:
    image: mariadb
    environment:
      MARIADB_ROOT_PASSWORD: secret
    volumes:
      - ./wp/db/conf:/etc/mysql/conf.d:ro
      - ./wp/db/data:/var/lib/mysql

    # Required because of "condition: service_healthy" below.
    healthcheck:
      test: ["CMD", "mariadb", "-uroot", "-psecret", "-e", "SELECT 1;"]
      start_period: 5s
      interval: 5s

  wordpress:
    image: wordpress:php7.0

    # Define "db" alias for the mariadb service.
    links:
      - mariadb:db

    environment:
      WORDPRESS_DB_HOST: db
      WORDPRESS_DB_PASSWORD: secret
    ports:
      - 80:80
    restart: always
    volumes:
      - ./wp/data:/var/www/html/wp-content

    # Define startup order.
    depends_on:
      mariadb:
        condition: service_healthy
      smtp:
        condition: service_started

  smtp:
    image: mwader/postfix-relay
    restart: always
    environment:
      POSTFIX_myhostname: example.com
-
Run
docker compose up -
Create a new WordPress site
-
Inspect running docker containers. What do you see?
-
Inspect docker networks. What do you see?
-
Have the composition from Exercise 11 running
-
Change
docker-compose.yamlsuch that thephp7.1tag is used forwordpress -
Rebuild and restart the WordPress container:
docker compose up --no-deps -d wordpress
- Scale
mariadbto 2 instances - Step into
mariadbusingdocker compose exec. In which instance did you step? - Restart the composition. How many
mariadbinstances are there? - Pause and unpause the application
- Tear
downthe application and remove all containers, networks, etc.
- Have a look at the
logsfor the composition and for a single service - Step into the WordPress container and kill all Apache processes
with
kill $(pgrep -f apache). Is the container restarted? Why? - Retrieve the public port for WordPress
-
Stop the service from Exercise 11 (
docker compose stop) -
Add a new top-level section:
volumes:
  wp-db-conf:
  wp-db-data:
  wp-data:
-
Change all
volumes:to use volume mounts instead of bind mounts. E.g.- ./wp/mariadb/data:/var/lib/mysqlbecomes- wp-db-data:/var/lib/mysql -
Start the service again
-
Browse http://localhost. Is the WordPress site still available? Why? What should have been done in addition to changing the configuration?
- Assume
agross/helloneeds a database - Can you think of a
docker-compose.yamlfile that builds a composition ofagross/hello's source code at https://github.com/agross/docker-hello and e.g. MariaDB?
