- Lab 1
- Access cluster
- Install Knox
- Security w/o kerberos
- Lab 2
- Review use case
- AD overview
- Configure Name Resolution & AD Certificate
- Setup Access to Active Directory Server
- Enable Active Directory Authentication for Ambari
- Lab 3
- Kerborize cluster
- Setup AD/Operating System Integration using SSSD - AD KDC
- Lab 4
- Ambari Server Security
- Kerberos for Ambari
- Ambari server as non-root
- Ambari Encrypt Database and LDAP Passwords
- SSL For Ambari server
- SPNEGO
- Ambari Server Security
- Lab 5
- Ranger install pre-reqs
- Ranger install
- Lab 6a
- Ranger KMS install
- Add a KMS on another node
- Lab 6b
- HDFS encryption exercises
- Move Hive warehouse to EZ
- Lab 7
- Secured Hadoop exercises
- HDFS
- Hive
- HBase
- Sqoop
- Drop Encrypted Hive table
- Secured Hadoop exercises
- Lab 8
- Configure Knox to authenticate via AD
- Utilize Knox to Connect to Hadoop Cluster Services
- WebHDFS
- Hive
- Lab 9
- Configure Ambari views for kerberos
Credentials will be provided for these services by the instructor:
- SSH
- Ambari
-
Download ppk from here
-
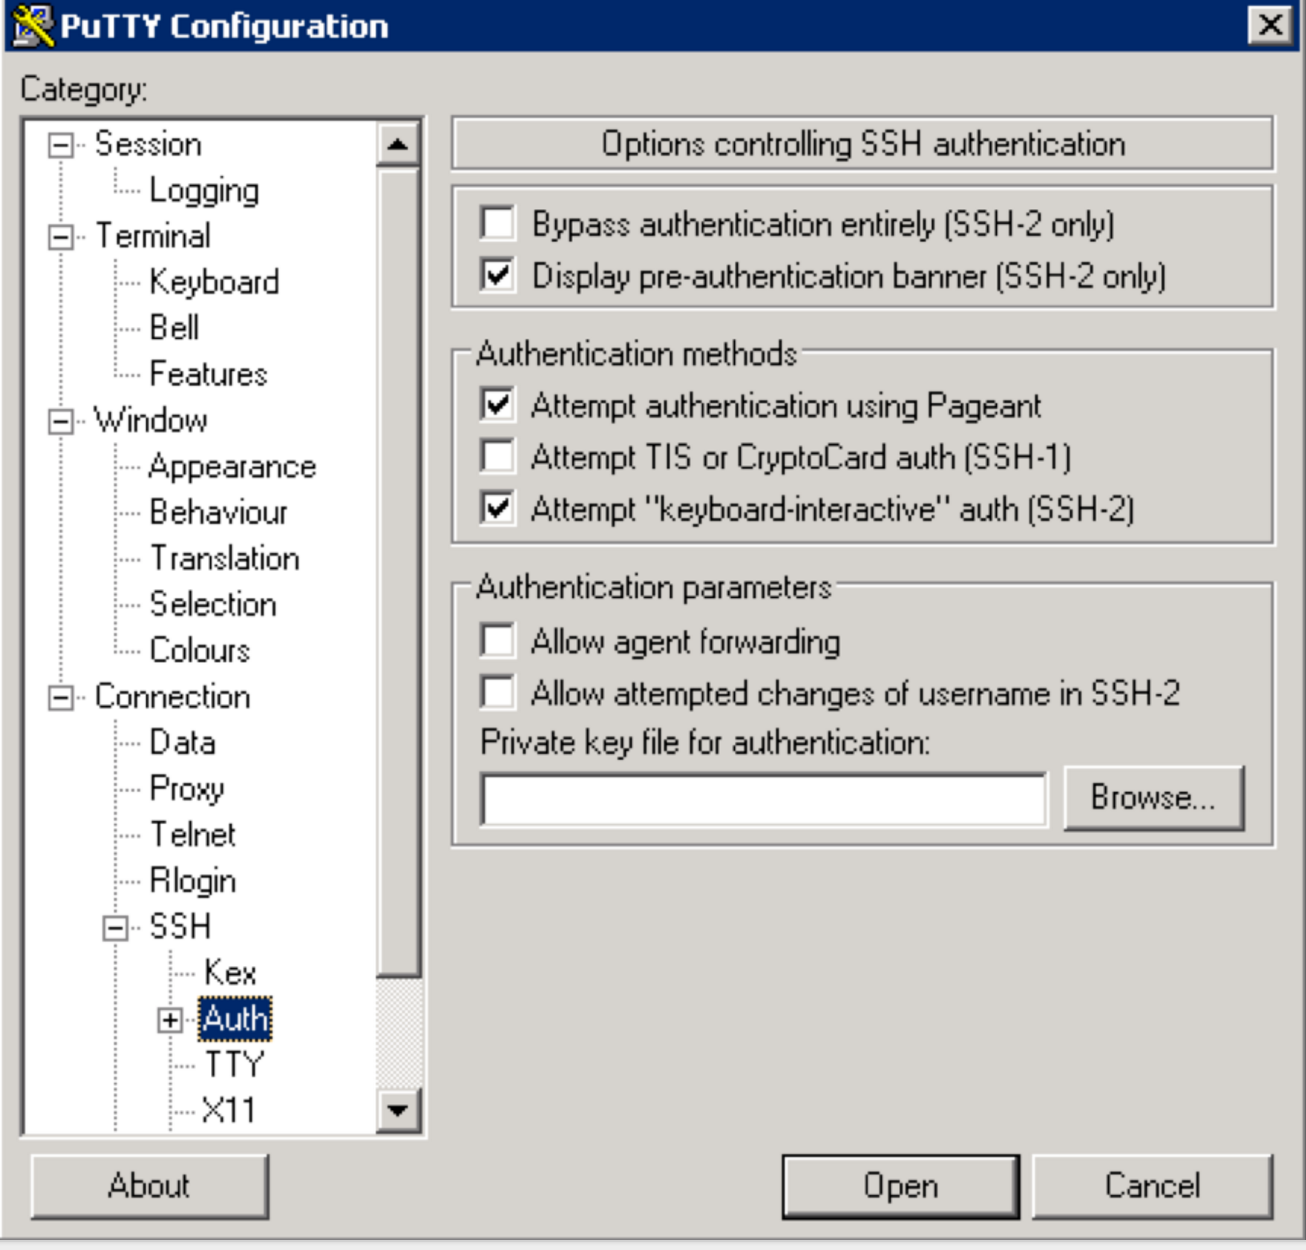
Use putty to connect to your node using the ppk key:
- Connection > SSH > Auth > Private key for authentication > Browse... > Select training-keypair.ppk
- Connection > SSH > Auth > Private key for authentication > Browse... > Select training-keypair.ppk
-
Make sure to click "Save" on the session page before logging in
- SSH into Ambari node of your cluster using below steps:
- Right click this pem key > Save link as > save to Downloads folder
- Copy pem key to ~/.ssh dir and correct permissions
cp ~/Downloads/training-keypair.pem ~/.ssh/ chmod 400 ~/.ssh/training-keypair.pem - Login to the Ambari node of the cluster you have been assigned by replacing IP_ADDRESS_OF_AMBARI_NODE below with Ambari node IP Address (your instructor will provide this)
ssh -i ~/.ssh/training-keypair.pem centos@IP_ADDRESS_OF_AMBARI_NODE
- To change user to root you can:
sudo su -
-
Similarly login via SSH to each of the other nodes in your cluster as you will need to run commands on each node in a future lab
-
Tip: Since in the next labs you will be required to run the same set of commands on each of the cluster hosts, now would be a good time to setup your favorite tool to do so: examples here
- On OSX, an easy way to do this is to use iTerm: open multiple tabs/splits and then use 'Broadcast input' feature (under Shell -> Broadcast input)
- If you are not already familiar with such a tool, you can also just run the commands on the cluster, one host at a time
-
Login to Ambari web UI by opening http://AMBARI_PUBLIC_IP:8080 and log in with admin/BadPass#1
-
You will see a list of Hadoop components running on your cluster on the left side of the page
- They should all show green (ie started) status. If not, start them by Ambari via 'Service Actions' menu for that service
-
Following are useful techniques you can use in future labs to find your cluster specific details:
- From SSH terminal, how can I find the cluster name?
#run on ambari node to fetch cluster name via Ambari API PASSWORD=BadPass#1 output=`curl -u admin:$PASSWORD -i -H 'X-Requested-By: ambari' http://localhost:8080/api/v1/clusters` cluster=`echo $output | sed -n 's/.*"cluster_name" : "\([^\"]*\)".*/\1/p'` echo $cluster- From SSH terminal, how can I find internal hostname (aka FQDN) of the node I'm logged into?
$ hostname -f ip-172-30-0-186.us-west-2.compute.internal- From SSH terminal, how can I to find external hostname of the node I'm logged into?
$ curl icanhazptr.com ec2-52-33-248-70.us-west-2.compute.amazonaws.com- From SSH terminal, how can I to find external (public) IP of the node I'm logged into?
$ curl icanhazip.com 54.68.246.157-
From Ambari how do I check the cluster name?
- It is displayed on the top left of the Ambari dashboard, next to the Ambari logo. If the name appears truncated, you can hover over it to produce a helptext dialog with the full name

- It is displayed on the top left of the Ambari dashboard, next to the Ambari logo. If the name appears truncated, you can hover over it to produce a helptext dialog with the full name
-
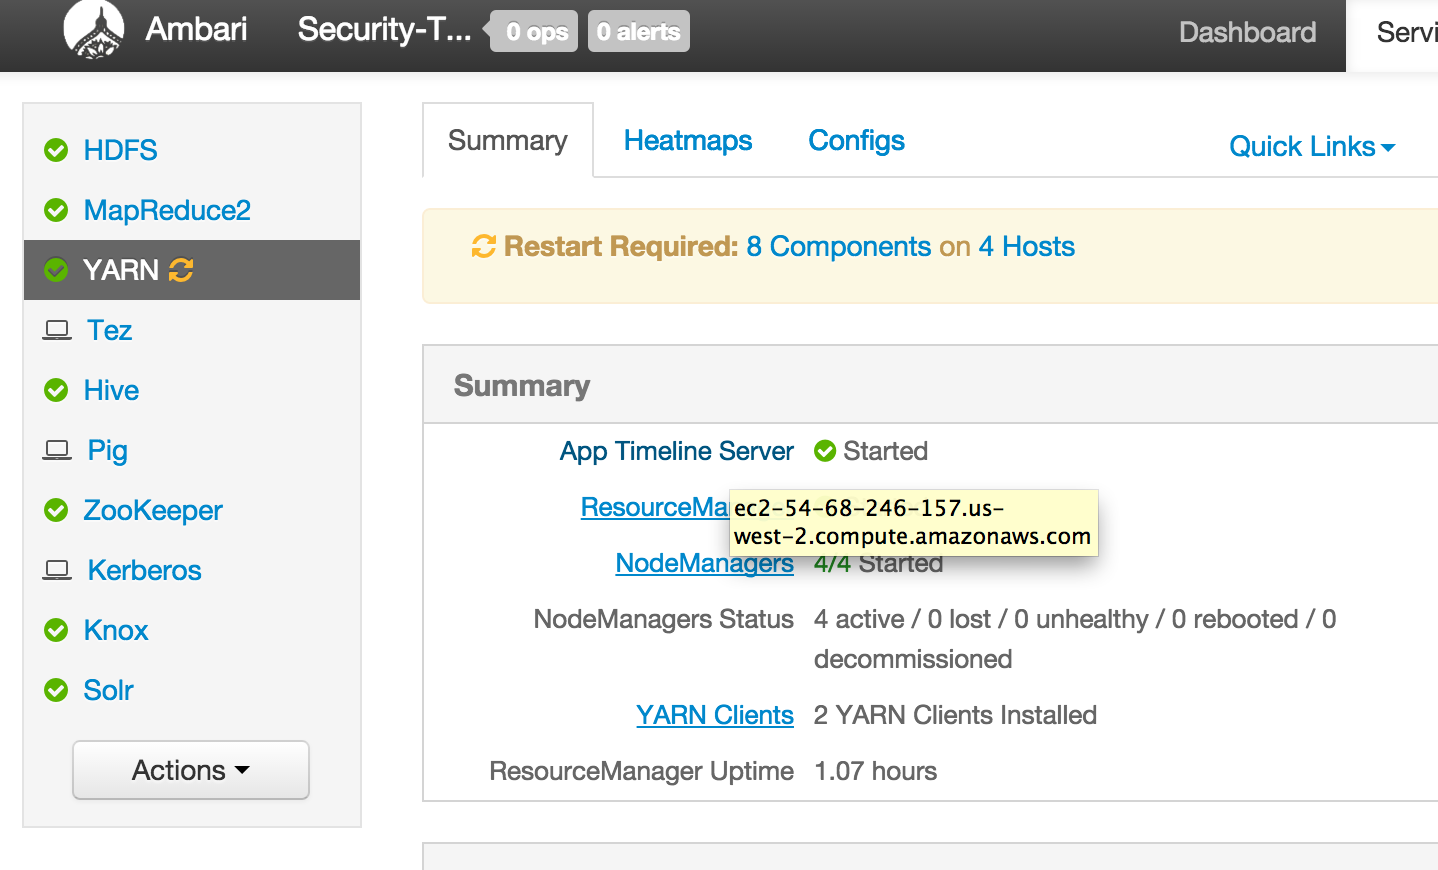
From Ambari how can I find external hostname of node where a component (e.g. Resource Manager or Hive) is installed?
- Click the parent service (e.g. YARN) and hover over the name of the component. The external hostname will appear.
- Click the parent service (e.g. YARN) and hover over the name of the component. The external hostname will appear.
-
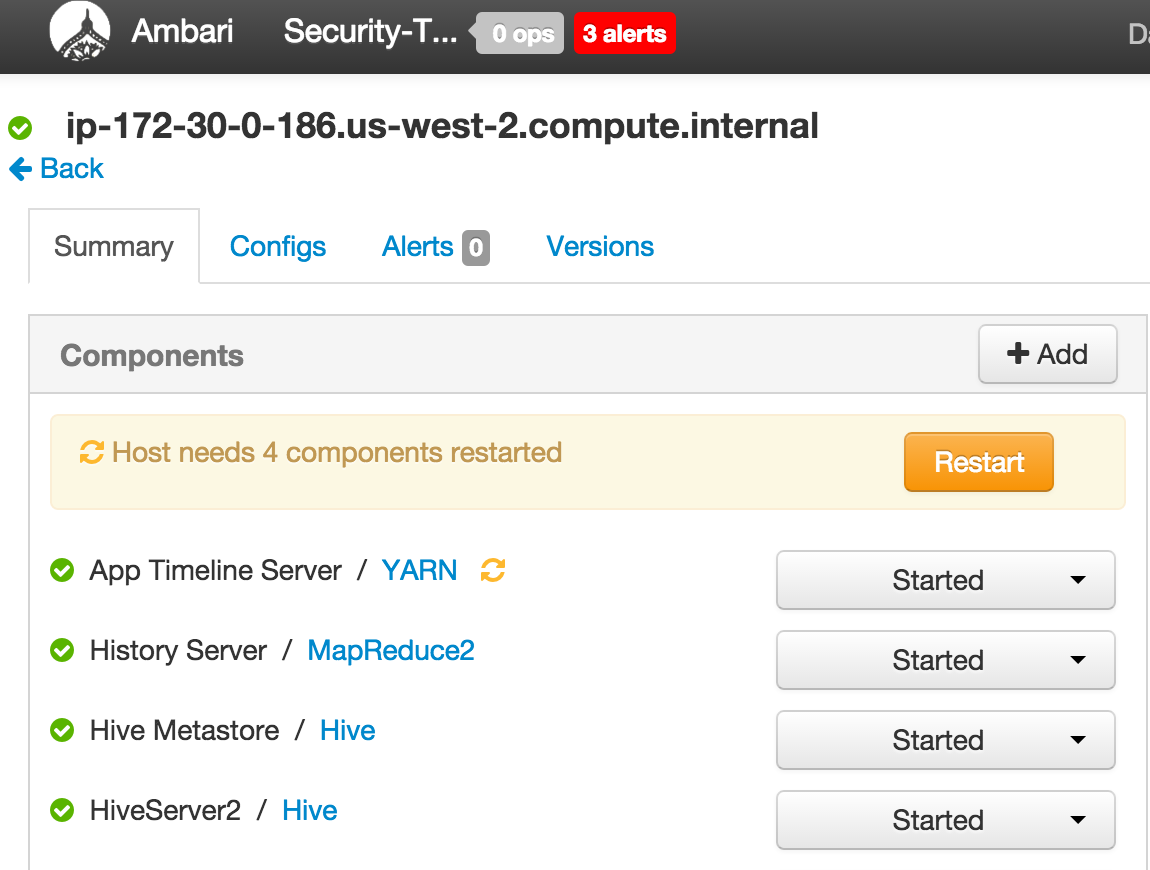
From Ambari how can I find internal hostname of node where a component (e.g. Resource Manager or Hive) is installed?
- Click the parent service (e.g. YARN) and click on the name of the component. It will take you to hosts page of that node and display the internal hostname on the top.
- Click the parent service (e.g. YARN) and click on the name of the component. It will take you to hosts page of that node and display the internal hostname on the top.
-
In future labs you may need to provide private or public hostname of nodes running a particular component (e.g. YARN RM or Mysql or HiveServer)
-
Run below on the node where HiveServer2 is installed to download data and import it into a Hive table for later labs
- You can either find the node using Ambari as outlined in Lab 1
- Download and import data
cd /tmp wget https://raw.githubusercontent.com/HortonworksUniversity/Security_Labs/master/labdata/sample_07.csv wget https://raw.githubusercontent.com/HortonworksUniversity/Security_Labs/master/labdata/sample_08.csv- Create user dir for admin, sales1 and hr1
sudo -u hdfs hadoop fs -mkdir /user/admin sudo -u hdfs hadoop fs -chown admin:hadoop /user/admin sudo -u hdfs hadoop fs -mkdir /user/sales1 sudo -u hdfs hadoop fs -chown sales1:hadoop /user/sales1 sudo -u hdfs hadoop fs -mkdir /user/hr1 sudo -u hdfs hadoop fs -chown hr1:hadoop /user/hr1- Now create Hive table in default database by
- Start beeline shell from the node where Hive is installed:
beeline -u "jdbc:hive2://localhost:10000/default"
- At beeline prompt, run below:
CREATE TABLE `sample_07` (
`code` string ,
`description` string ,
`total_emp` int ,
`salary` int )
ROW FORMAT DELIMITED FIELDS TERMINATED BY '\t' STORED AS TextFile;
load data local inpath '/tmp/sample_07.csv' into table sample_07;
CREATE TABLE `sample_08` (
`code` string ,
`description` string ,
`total_emp` int ,
`salary` int )
ROW FORMAT DELIMITED FIELDS TERMINATED BY '\t' STORED AS TextFile;
load data local inpath '/tmp/sample_08.csv' into table sample_08;
-
Notice that in the JDBC connect string for connecting to an unsecured Hive while its running in default (ie binary) transport mode :
- port is 10000
- no kerberos principal was needed
-
This will change after we:
- enable kerberos
- configure Hive for http transport mode (to go through Knox)
- On your unsecured cluster try to access a restricted dir in HDFS
hdfs dfs -ls /tmp/hive
## this should fail with Permission Denied
- Now try again after setting HADOOP_USER_NAME env var
export HADOOP_USER_NAME=hdfs
hdfs dfs -ls /tmp/hive
## this shows the file listing!
- Unset the env var and it will fail again
unset HADOOP_USER_NAME
hdfs dfs -ls /tmp/hive
- From node running NameNode, make a WebHDFS request using below command:
curl -sk -L "http://$(hostname -f):50070/webhdfs/v1/user/?op=LISTSTATUS"
- In the absence of Knox, notice it goes over HTTP (not HTTPS) on port 50070 and no credentials were needed
-
From Ambari notice you can open the WebUIs without any authentication
- HDFS > Quicklinks > NameNode UI
- Madreduce > Quicklinks > JobHistory UI
- YARN > Quicklinks > ResourceManager UI
-
This should tell you why kerberos (and other security) is needed on Hadoop :)
-
Login to Ambari web UI by opening http://AMBARI_PUBLIC_IP:8080 and log in with admin/BadPass#1
-
Use the 'Add Service' Wizard to install Knox (if not already installed)
- Ideally you would install on a node where Ambari or Hive are not installed or one that has the least components enabled to spread the load
- When prompted for the
Knox Master Secret, set it toknox - Do not use password with special characters (like #, $ etc) here as it seems beeline has problems with it
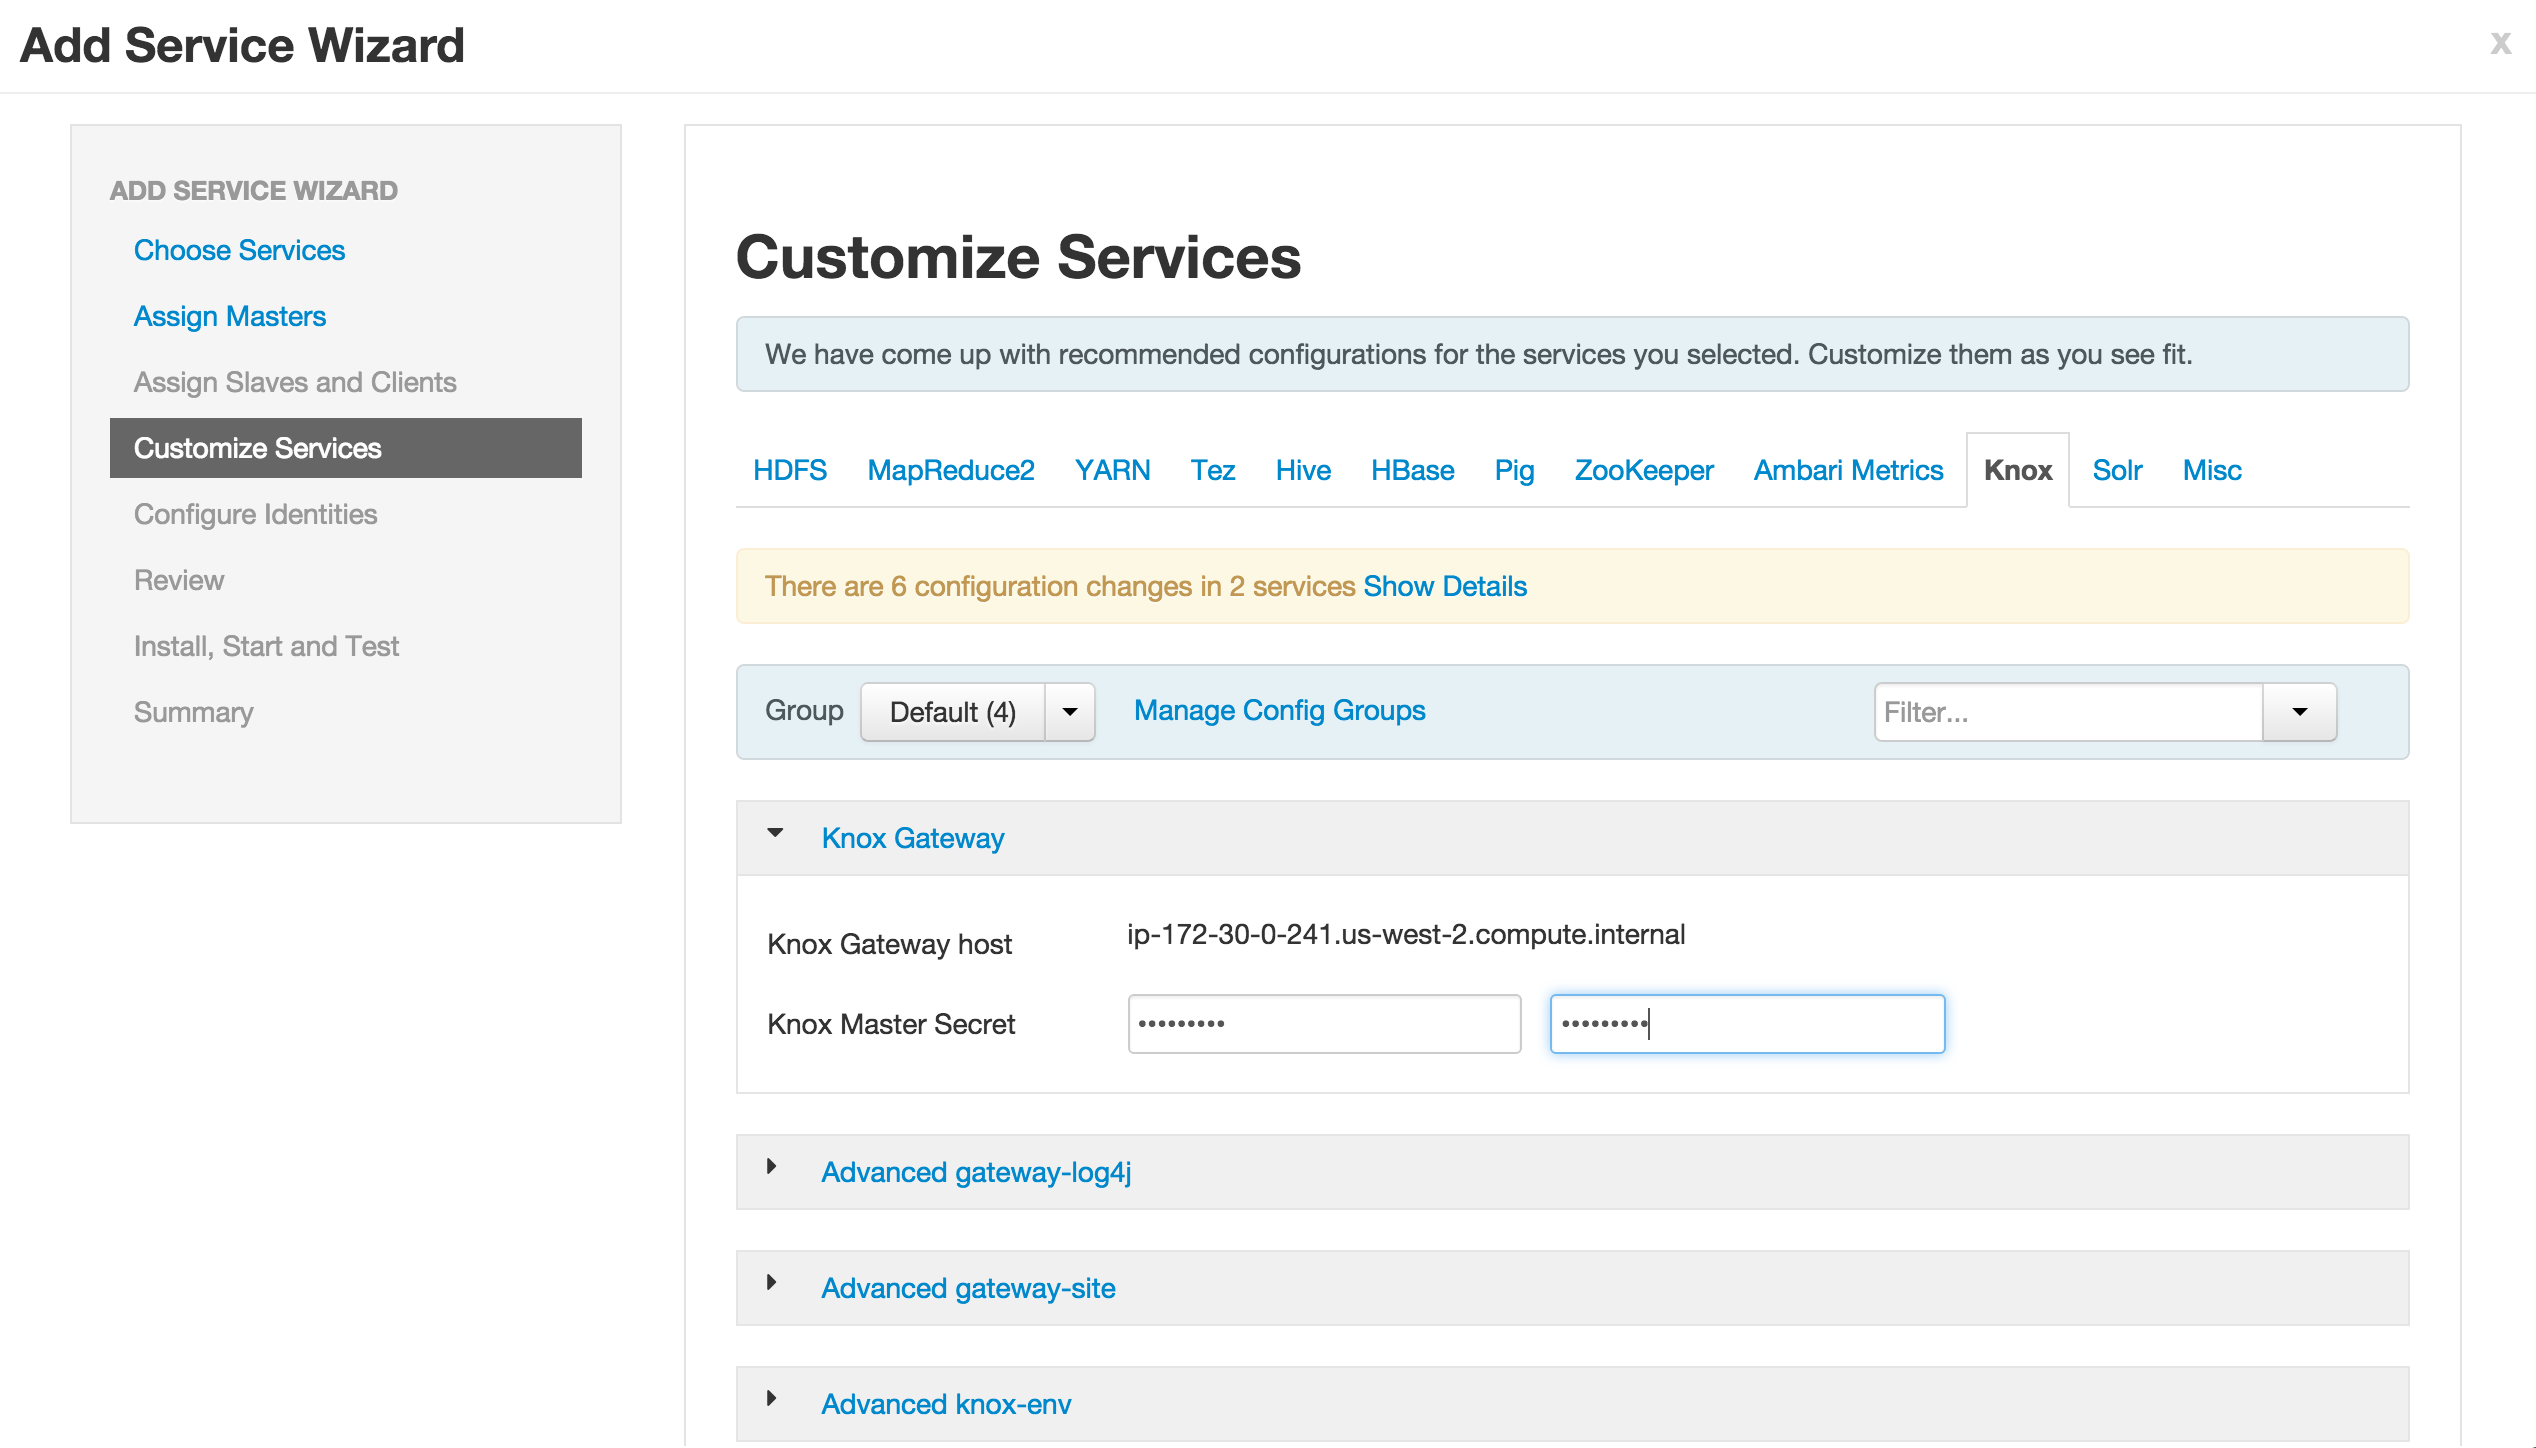
- Click Next > Proceed Anyway > Deploy to accept all defaults
-
We will use Knox further in a later exercise.
-
After the install completed, Ambari will show that a number of services need to be restarted. Ignore this for now, we will restart them at a later stage.
-
Ensure Tez is installed on all nodes where Pig clients are installed. This is done to ensure Pig service checks do not fail later on.
-
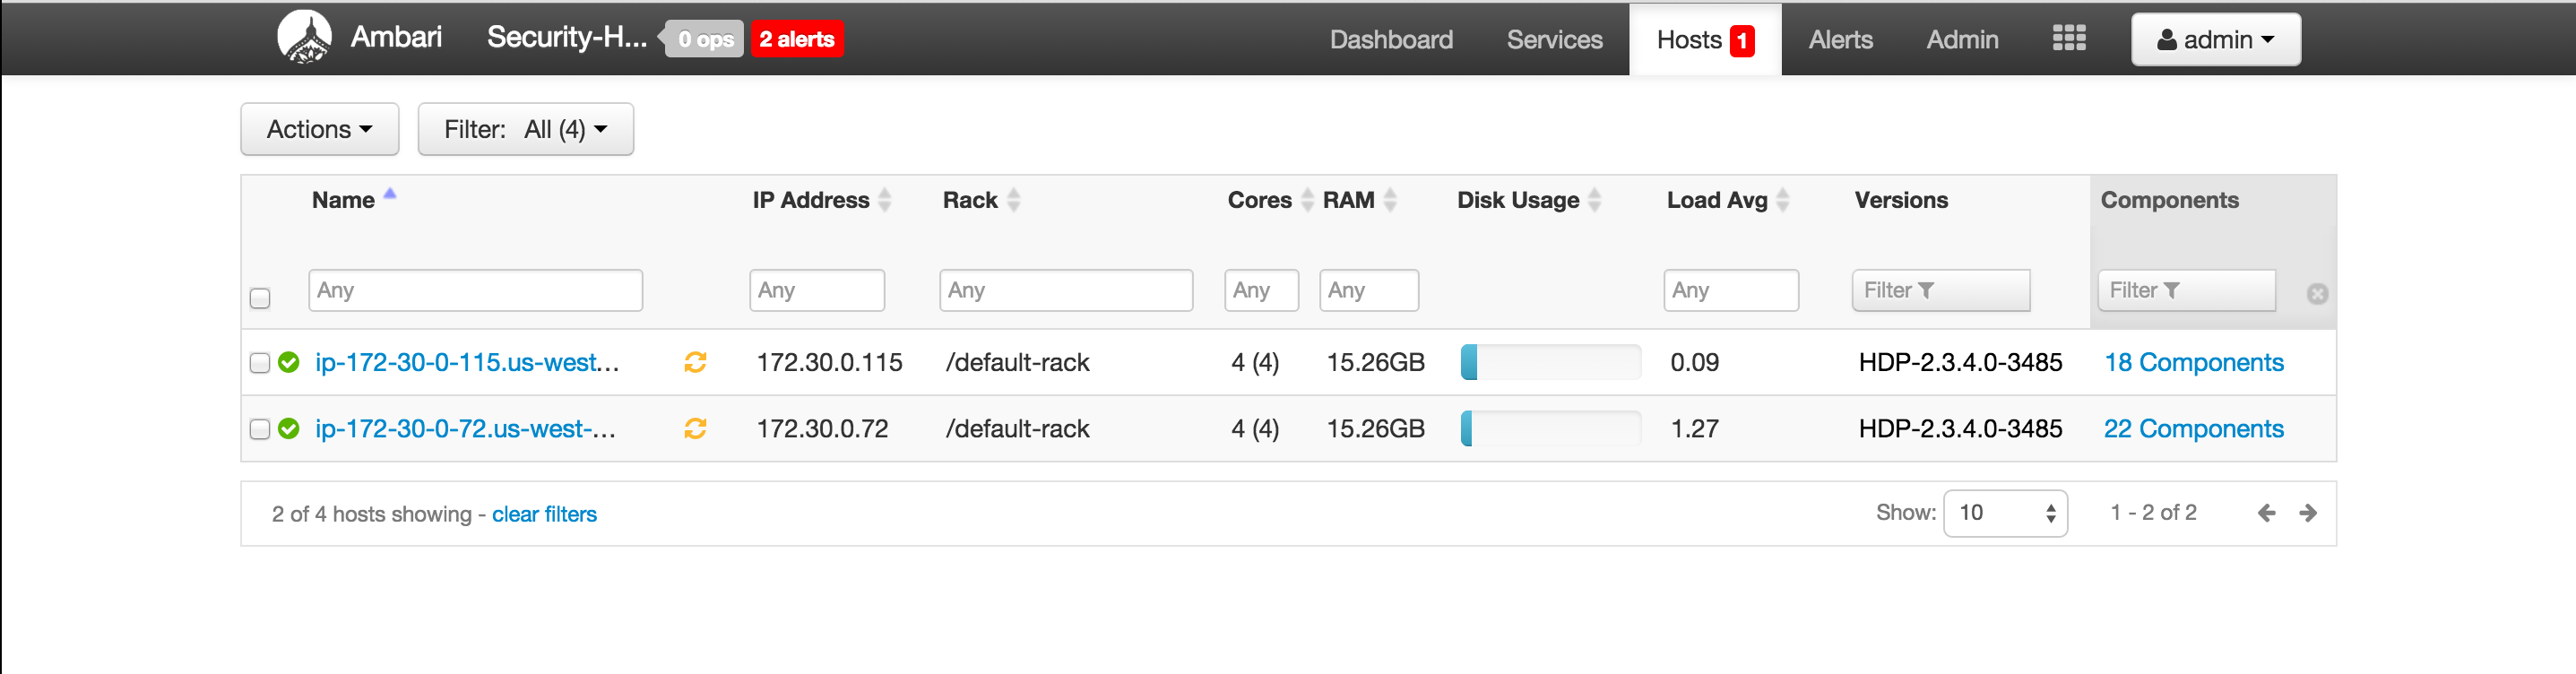
Ambari > Pig > click the 'Pig clients' link
-
This tell us which nodes have Pig clients installed
-
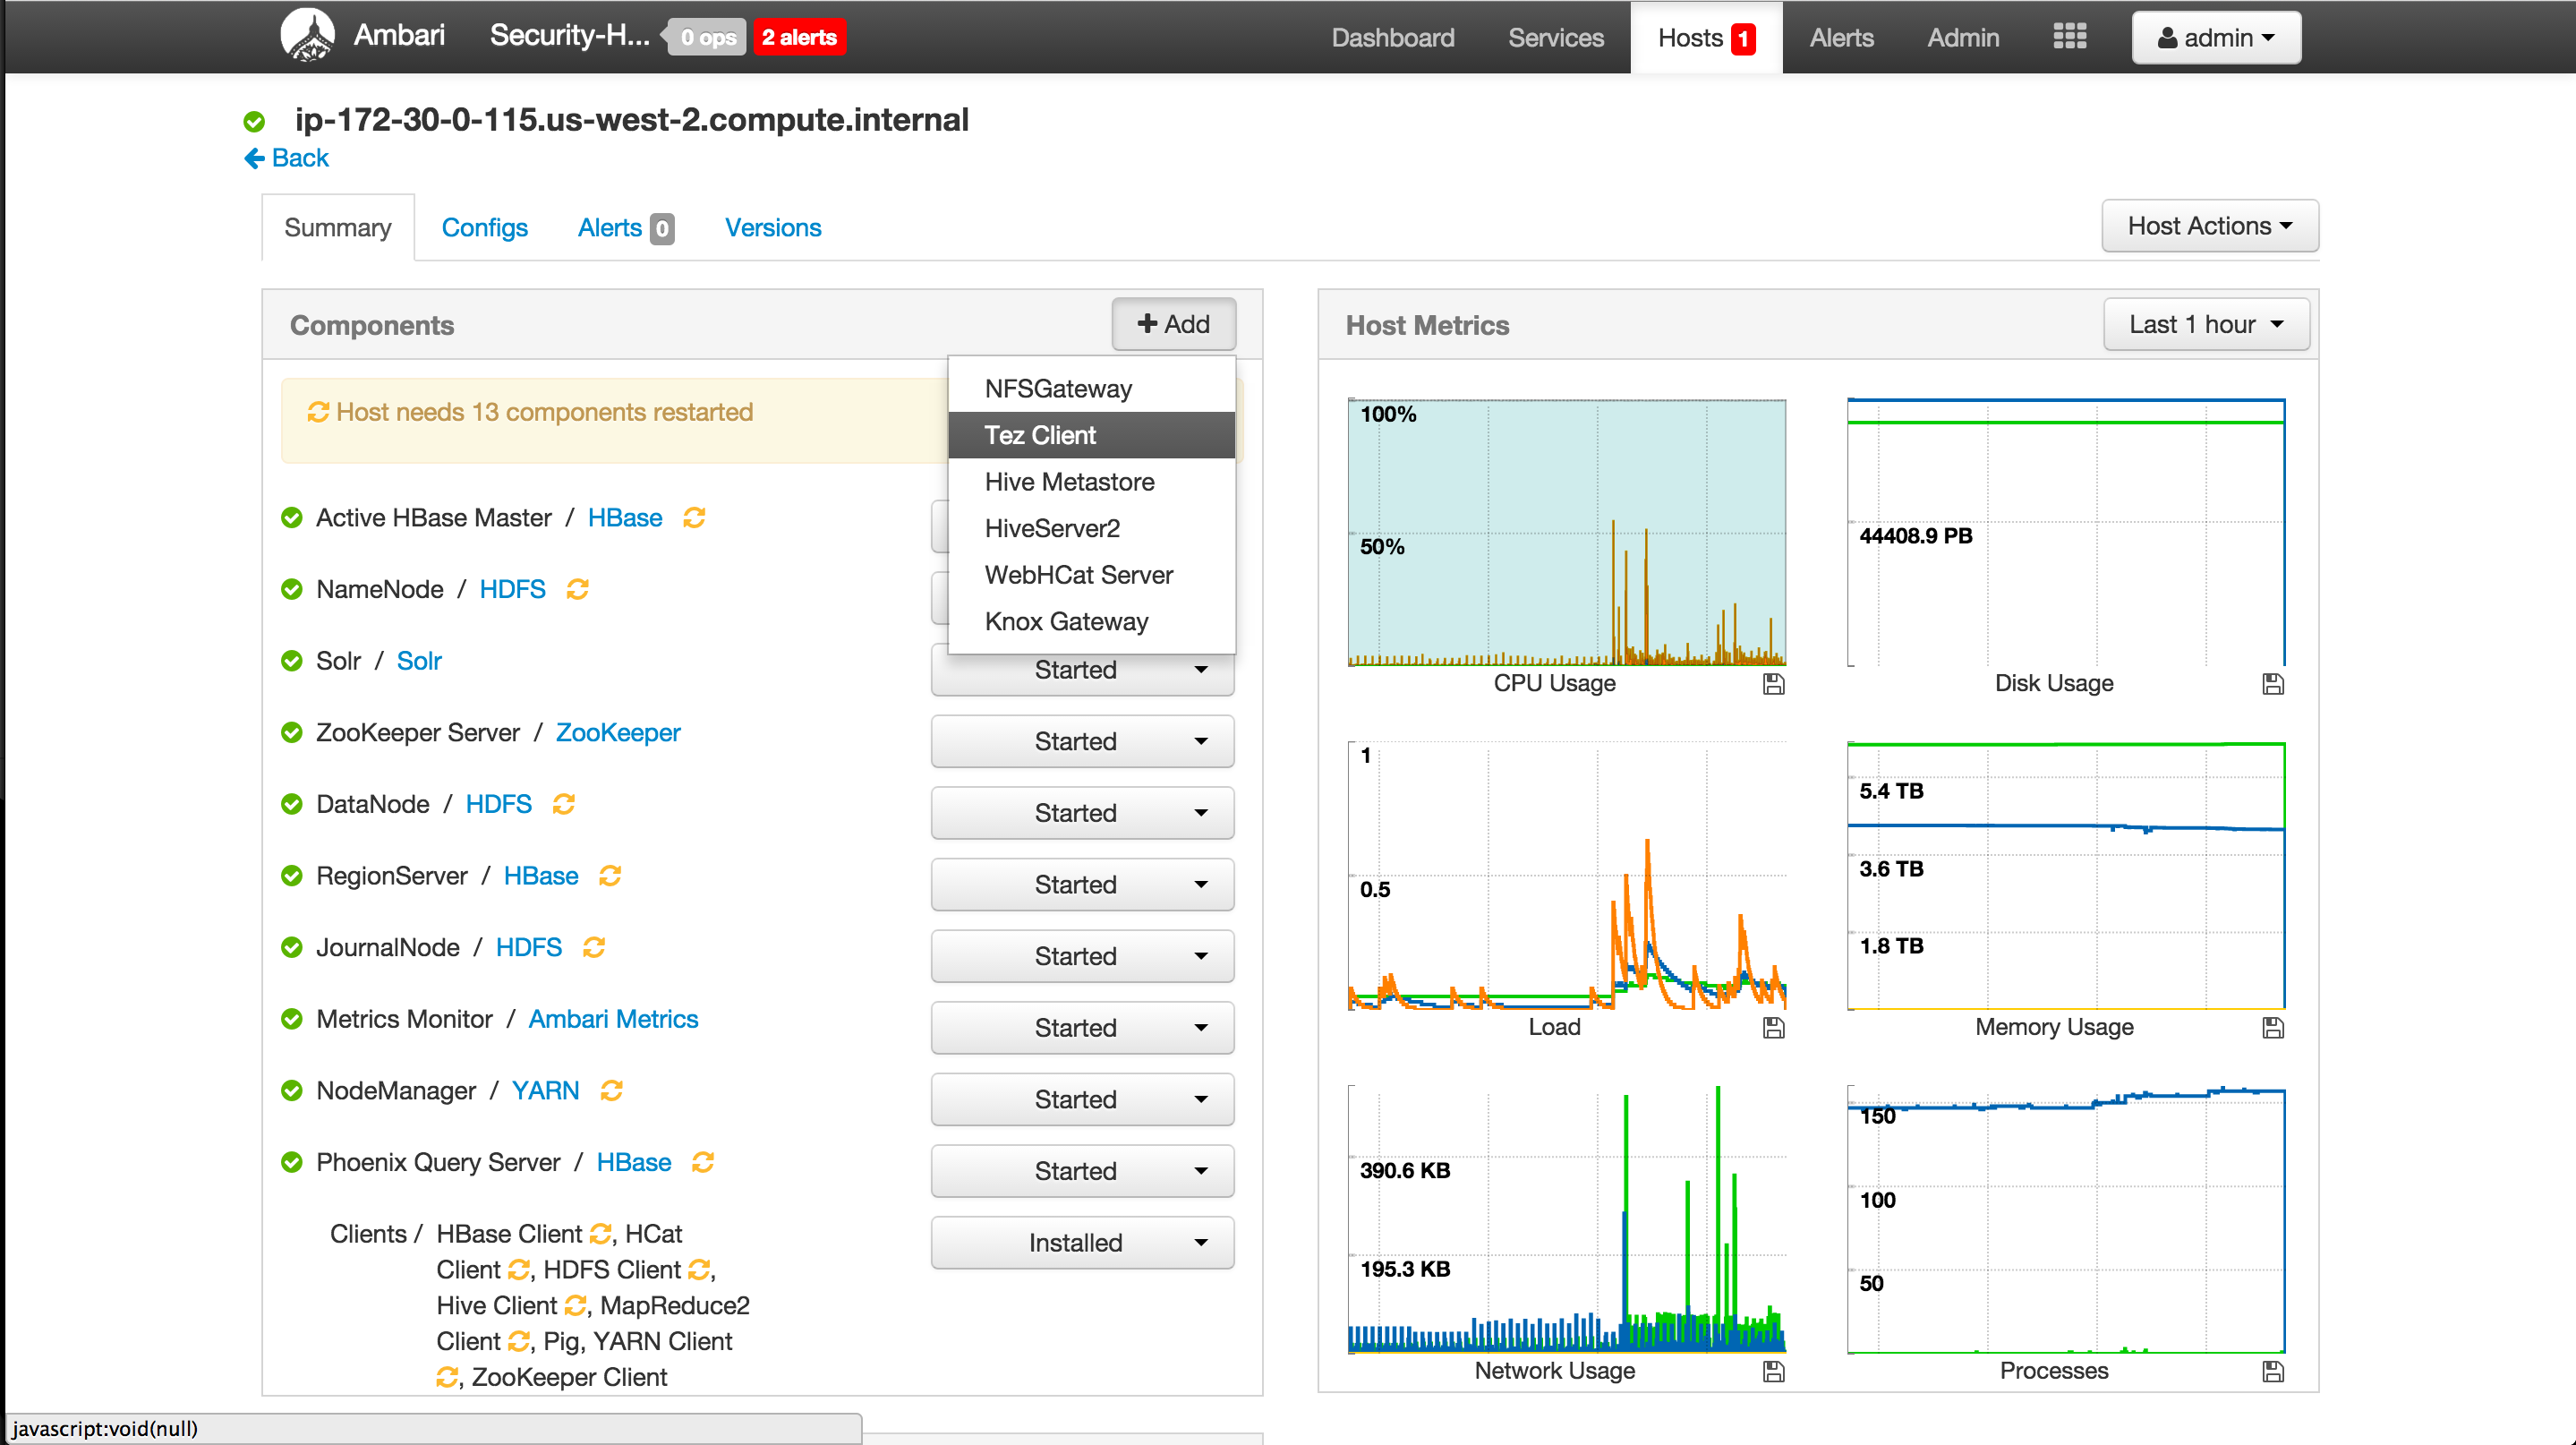
For each node that has Pig installed:
- Click on the hyperlink of the node name to view that shows all the services running on that particular node
- Click '+Add' and select 'Tez client' > Confirm add
- If 'Tez client'does not appear in the list, it is already installed on this host, so you can skip this host
- If 'Tez client'does not appear in the list, it is already installed on this host, so you can skip this host
Use case: Customer has an existing cluster which they would like you to secure for them
-
Current setup:
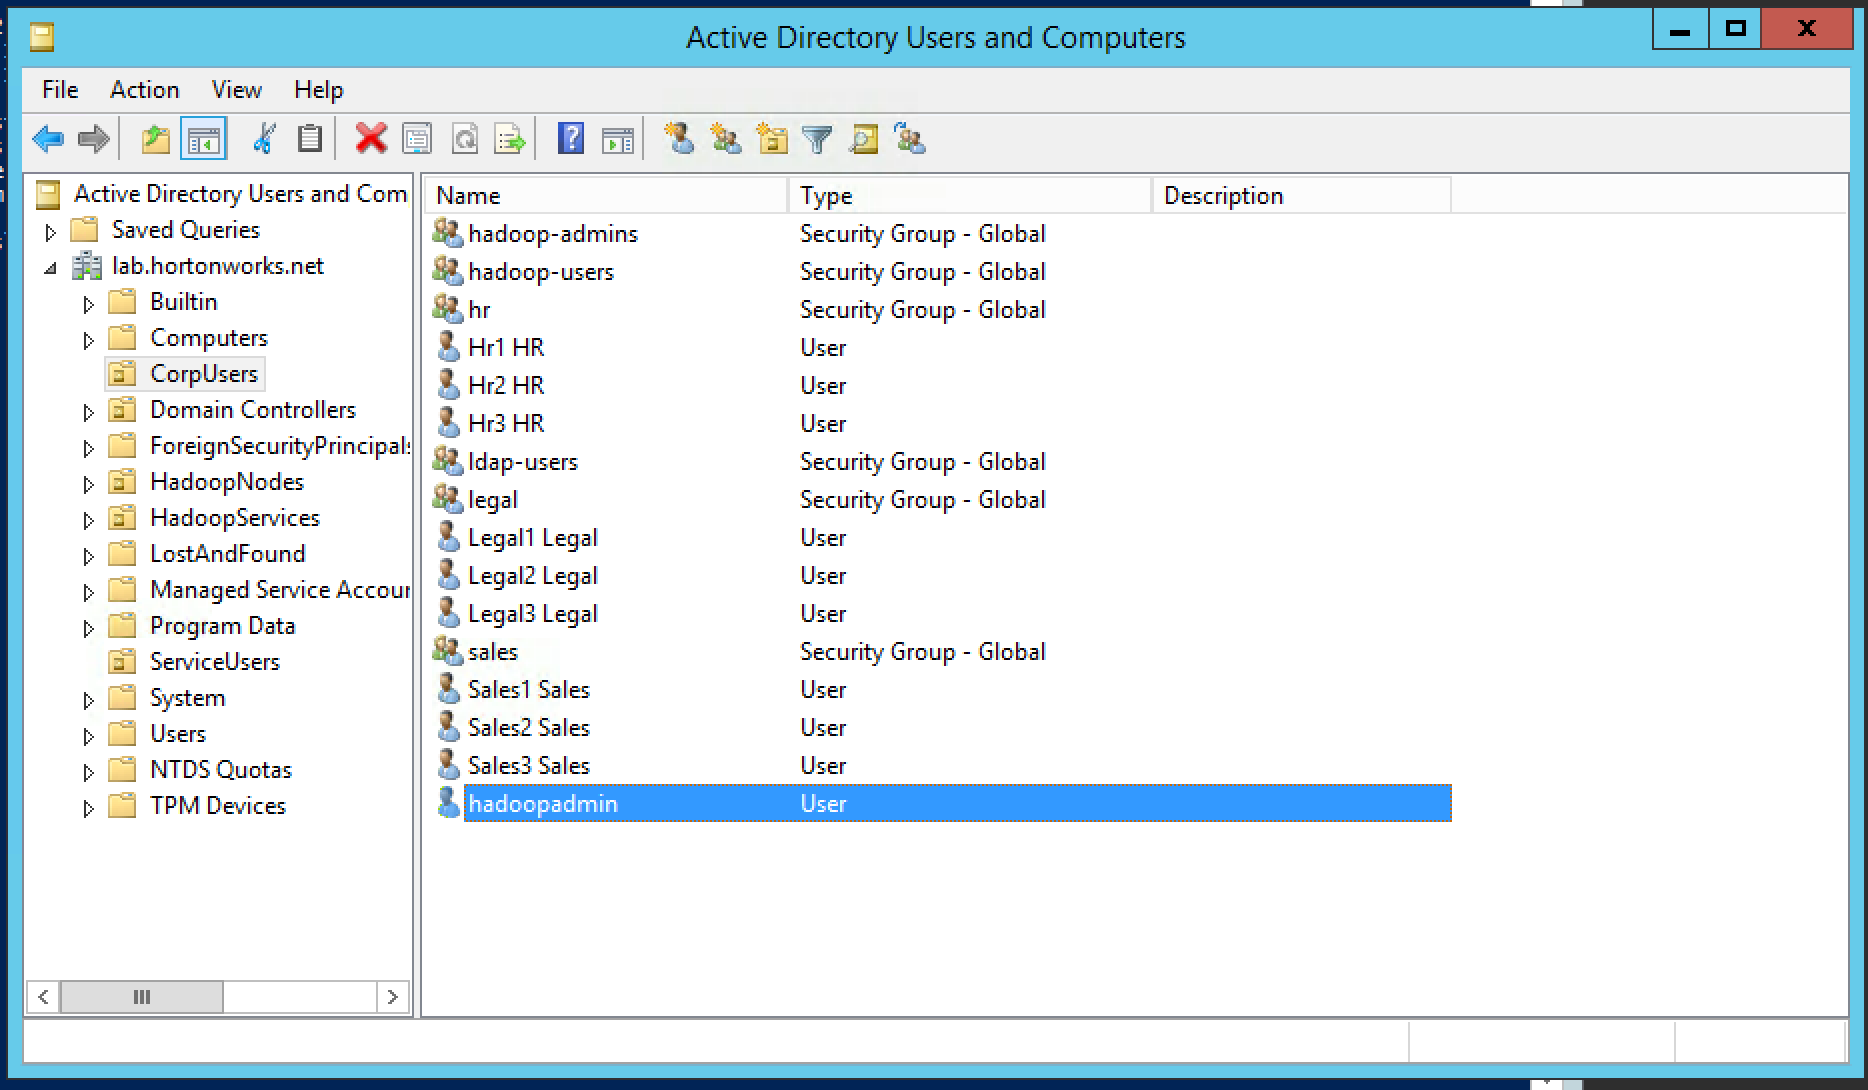
- The customer has multiple organizational groups (i.e. sales, hr, legal) which contain business users (sales1, hr1, legal1 etc) and hadoopadmin
- These groups and users are defined in Active Directory (AD) under its own Organizational Unit (OU) called CorpUsers
- There are empty OUs created in AD to store hadoop principals/hadoop nodes (HadoopServices, HadoopNodes)
- Hadoopadmin user has administrative credentials with delegated control of "Create, delete, and manage user accounts" on above OUs
- Hadoop cluster running HDP has already been setup using Ambari (including HDFS, YARN, Hive, Hbase, Solr, Zookeeper)
-
Goals:
- Integrate Ambari with AD - so that hadoopadmin can administer the cluster
- Integrate Hadoop nodes OS with AD - so business users are recognized and can submit Hadoop jobs
- Enable kerberos - to secured the cluster and enable authentication
- Install Ranger and enable Hadoop plugins - to allow admin to setup authorization policies and review audits across Hadoop components
- Install Ranger KMS and enable HDFS encryption - to be able to create encryption zones
- Encrypt Hive backing dirs - to protect hive tables
- Configure Ranger policies to:
- Protect /sales HDFS dir - so only sales group has access to it
- Protect sales hive table - so only sales group has access to it
- Protect sales HBase table - so only sales group has access to it
- Install Knox and integrate with AD - for perimeter security and give clients access to APIs w/o dealing with kerberos
- Enable Ambari views to work on secured cluster
We will run through a series of labs and step by step, achieve all of the above goals
-
Active Directory will already be setup by the instructor. A basic structure of OrganizationalUnits will have been pre-created to look something like the below:
-
CorpUsers OU, which contains:
- business users and groups (e.g. it1, hr1, legal1) and
- hadoopadmin: Admin user (for AD, Ambari, ...)
-
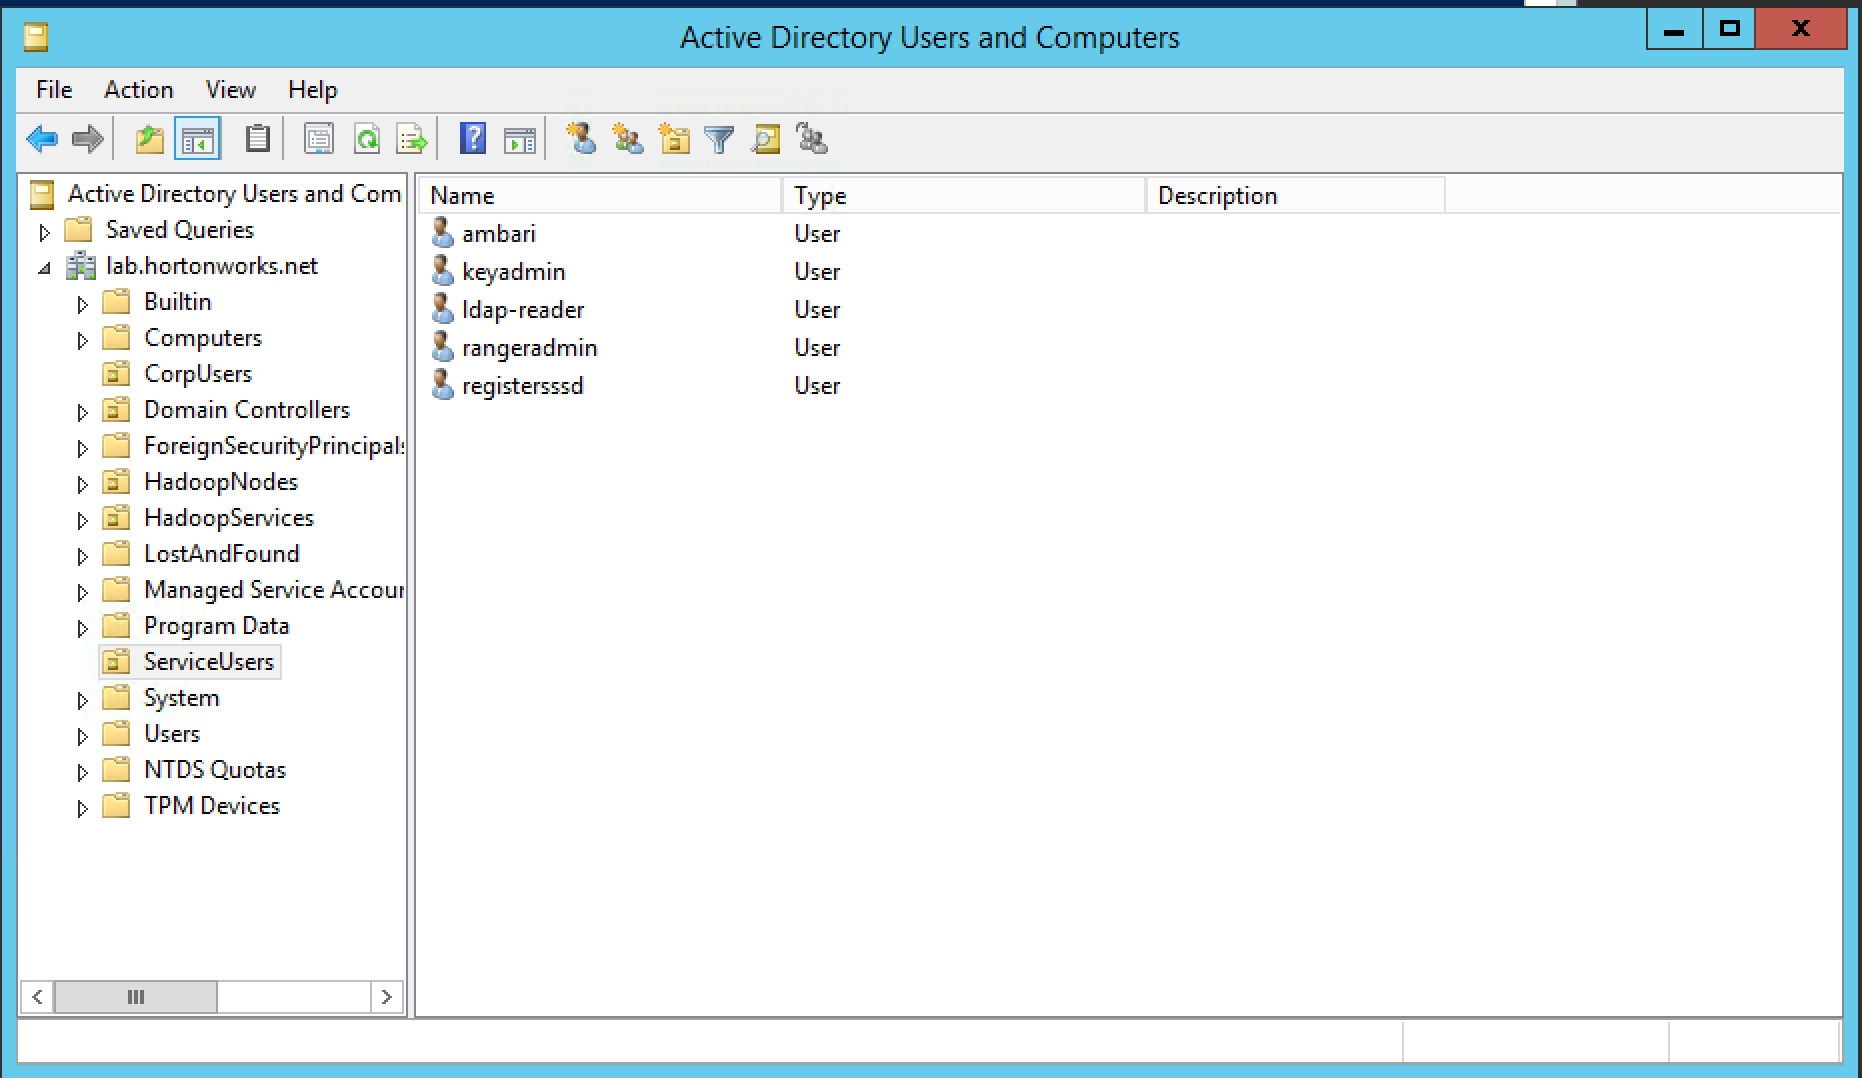
ServiceUsers OU: service users - that would not be created by Ambari (e.g. rangeradmin, ambari etc)
-
HadoopServices OU: hadoop service principals (will be created by Ambari)
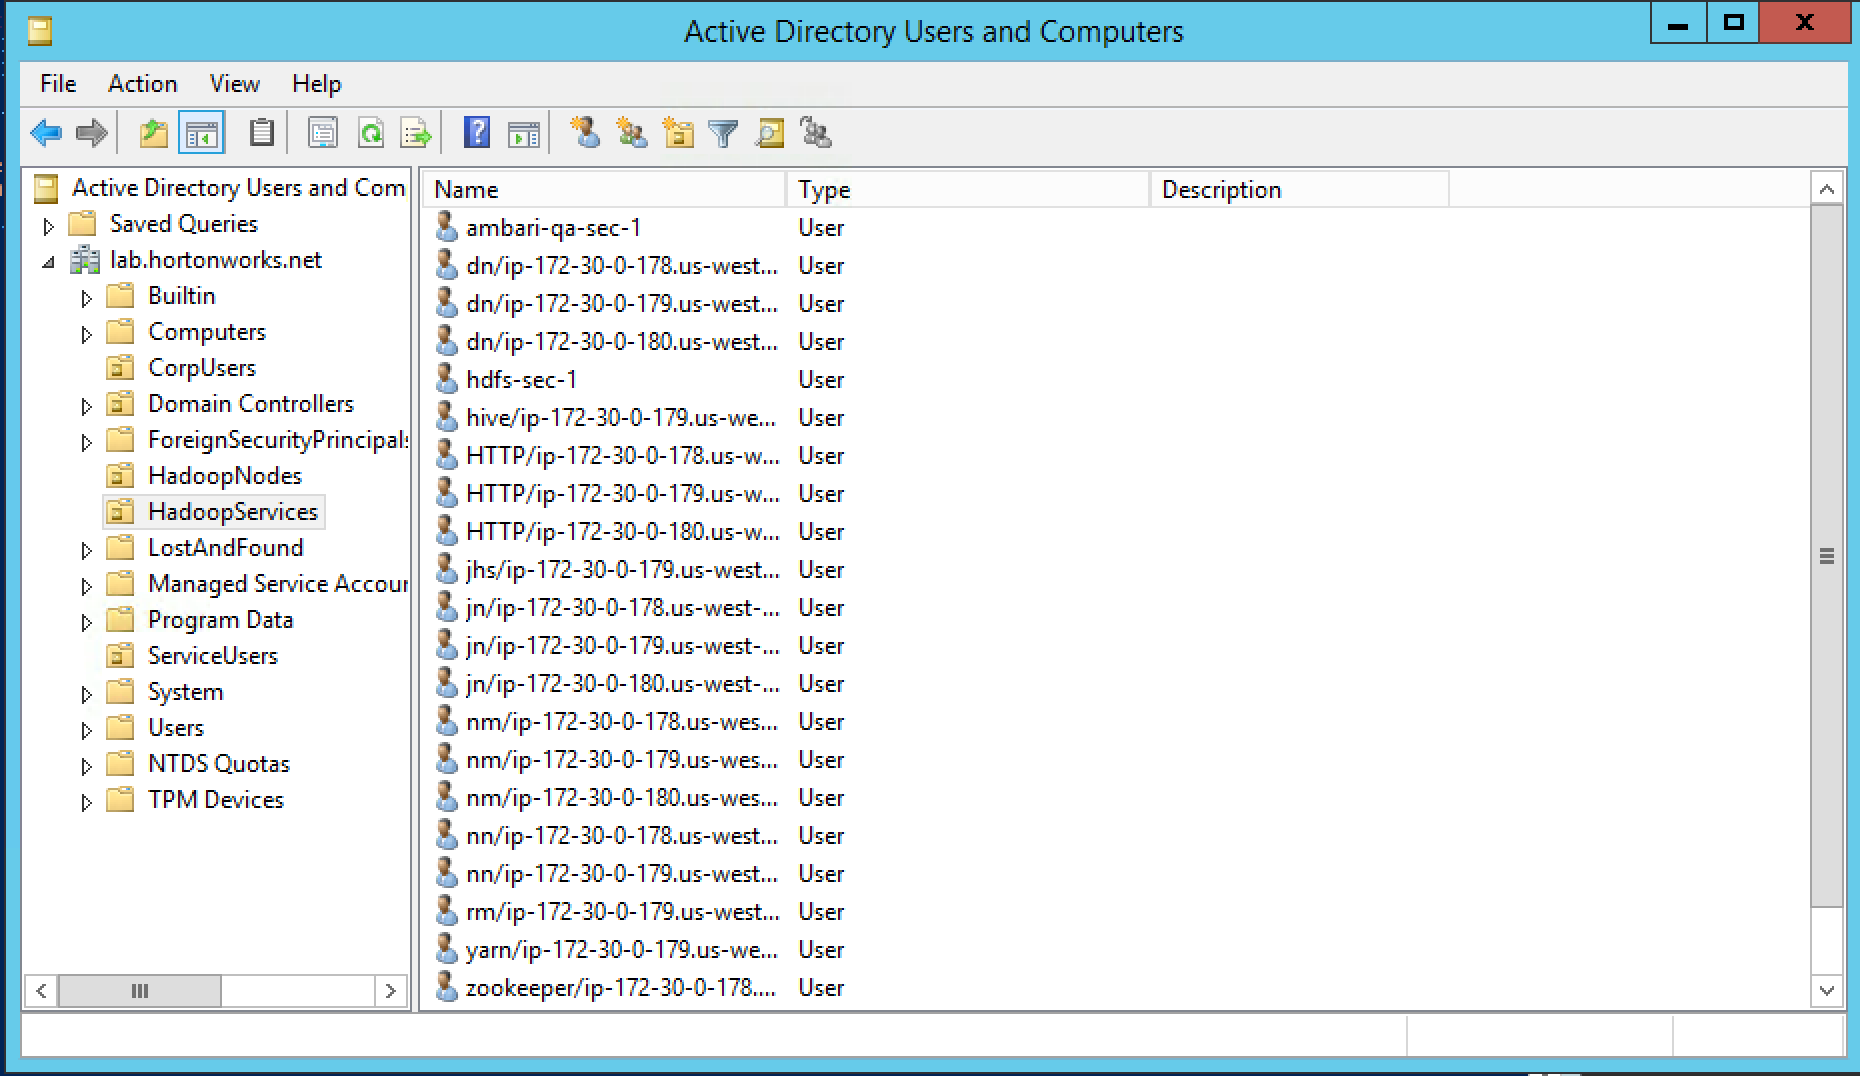
-
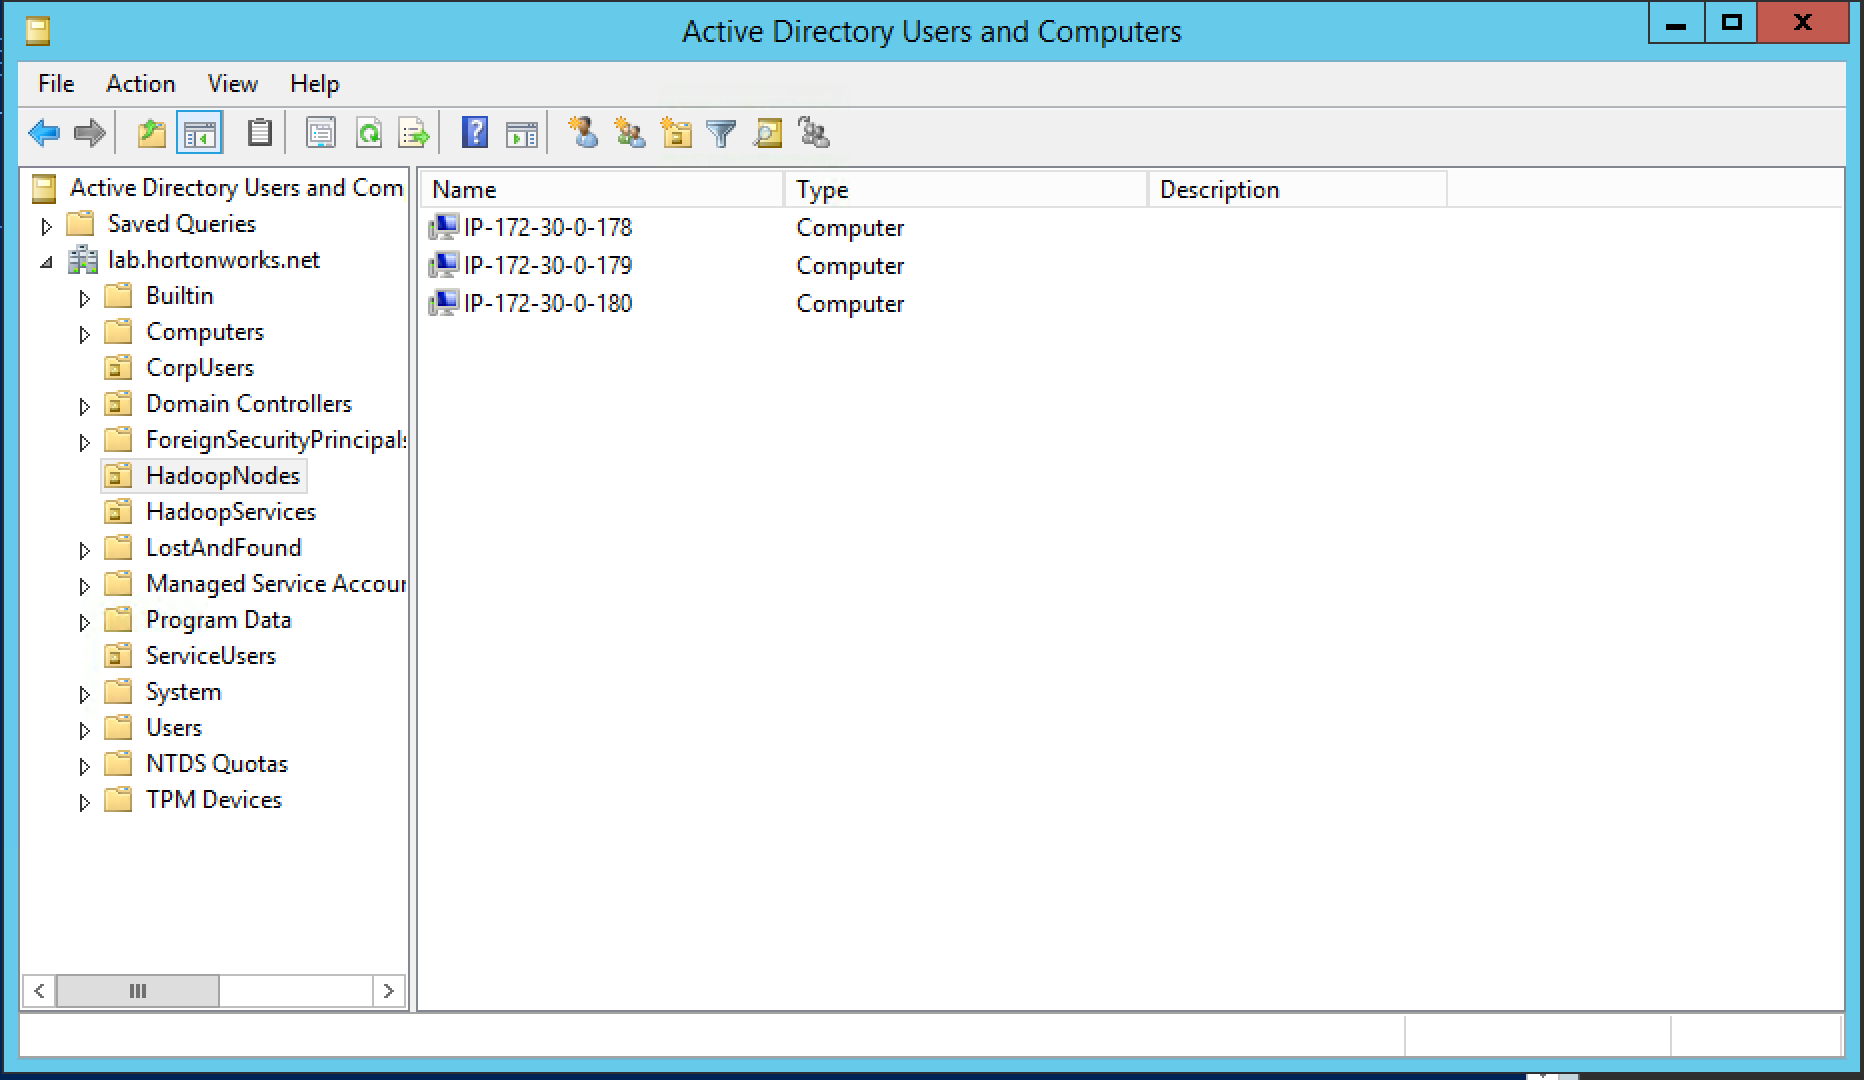
HadoopNodes OU: list of nodes registered with AD
-
-
In addition, the below steps would have been completed in advance per doc:
- Ambari Server and cluster hosts have network access to, and be able to resolve the DNS names of, the Domain Controllers.
- Active Directory secure LDAP (LDAPS) connectivity has been configured.
- Active Directory User container for principals has been created and is on-hand. For example, "ou=HadoopServices,dc=lab,dc=hortonworks,dc=net"
- Active Directory administrative credentials with delegated control of "Create, delete, and manage user accounts" on the previously mentioned User container are on-hand. e.g. hadoopadmin
-
For general info on Active Directory refer to Microsoft website here
Run below on all nodes
- Add your Active Directory's internal IP to /etc/hosts (if not in DNS). Make sure you replace the IP address of your AD from your instructor below.
- Change the IP to match your ADs internal IP
ad_ip=GET_THE_AD_IP_FROM_YOUR_INSTRUCTOR
echo "${ad_ip} ad01.lab.hortonworks.net ad01" | sudo tee -a /etc/hosts
- Add your CA certificate (if using self-signed & not already configured)
- In this case we have pre-exported the CA cert from our AD and made available for download.
cert_url=https://raw.githubusercontent.com/HortonworksUniversity/Security_Labs/master/extras/ca.crt
sudo yum -y install openldap-clients ca-certificates
sudo curl -sSL "${cert_url}" -o /etc/pki/ca-trust/source/anchors/hortonworks-net.crt

sudo update-ca-trust force-enable
sudo update-ca-trust extract
sudo update-ca-trust check
-
Test certificate & name resolution with
ldapsearch
sudo tee -a /etc/openldap/ldap.conf > /dev/null << EOF TLS_CACERT /etc/pki/tls/cert.pem URI ldaps://ad01.lab.hortonworks.net ldap://ad01.lab.hortonworks.net BASE dc=lab,dc=hortonworks,dc=net EOF
##test connection to AD using openssl client openssl s_client -connect ad01:636 </dev/null
ldapsearch -W -D ldap-reader@lab.hortonworks.net
**Make sure to repeat the above steps on all nodes**


### Setup Ambari/AD sync

Run below on only Ambari node:

- Add your AD properties as defaults for Ambari LDAP sync into the bottom of ambari.properties
- The below commands are just appending the authentication properties to bottom of the ambari.properties file. If you prefer, you can manually edit the file too
ad_dc="ad01.lab.hortonworks.net" ad_root="ou=CorpUsers,dc=lab,dc=hortonworks,dc=net" ad_user="cn=ldap-reader,ou=ServiceUsers,dc=lab,dc=hortonworks,dc=net"
sudo tee -a /etc/ambari-server/conf/ambari.properties > /dev/null << EOF authentication.ldap.baseDn=${ad_root} authentication.ldap.managerDn=${ad_user} authentication.ldap.primaryUrl=${ad_dc}:389 authentication.ldap.bindAnonymously=false authentication.ldap.dnAttribute=distinguishedName authentication.ldap.groupMembershipAttr=member authentication.ldap.groupNamingAttr=cn authentication.ldap.groupObjectClass=group authentication.ldap.useSSL=false authentication.ldap.userObjectClass=user authentication.ldap.usernameAttribute=sAMAccountName EOF
- Make sure the above LDAP authentication entries were added to ambari.properties
tail -n 20 /etc/ambari-server/conf/ambari.properties
- Run Ambari LDAP sync.
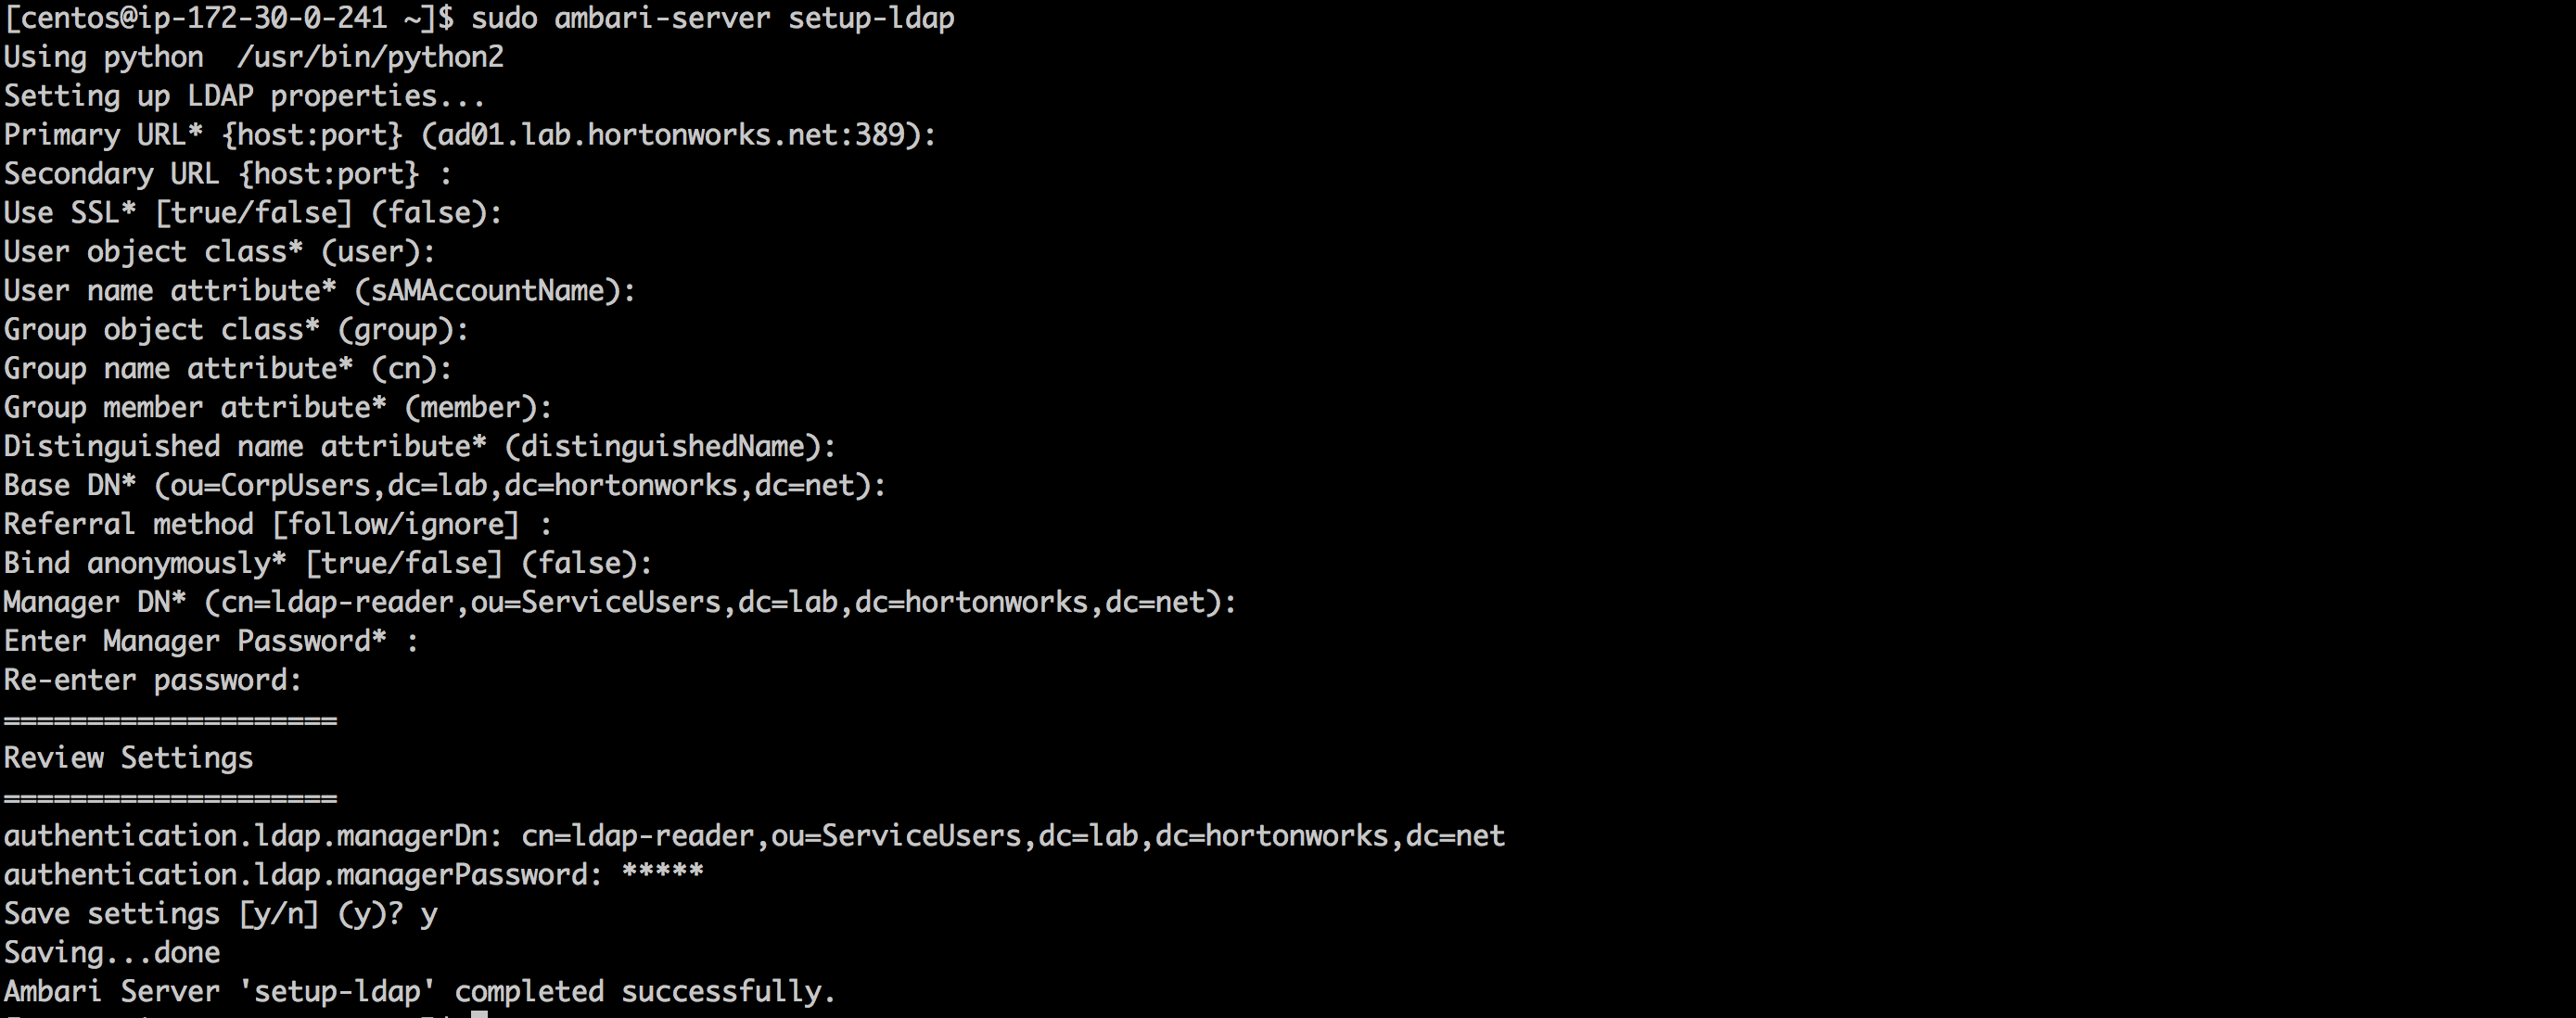
- Run below to setup AD sync.
- Press *enter key* at each prompt to accept the default value being displayed
- When prompted for 'Manager Password' at the end, enter password : BadPass#1
sudo ambari-server setup-ldap
- Restart Ambari server. When you do this, the agent will likely go down so restart it as well.
sudo ambari-server restart sudo ambari-agent restart
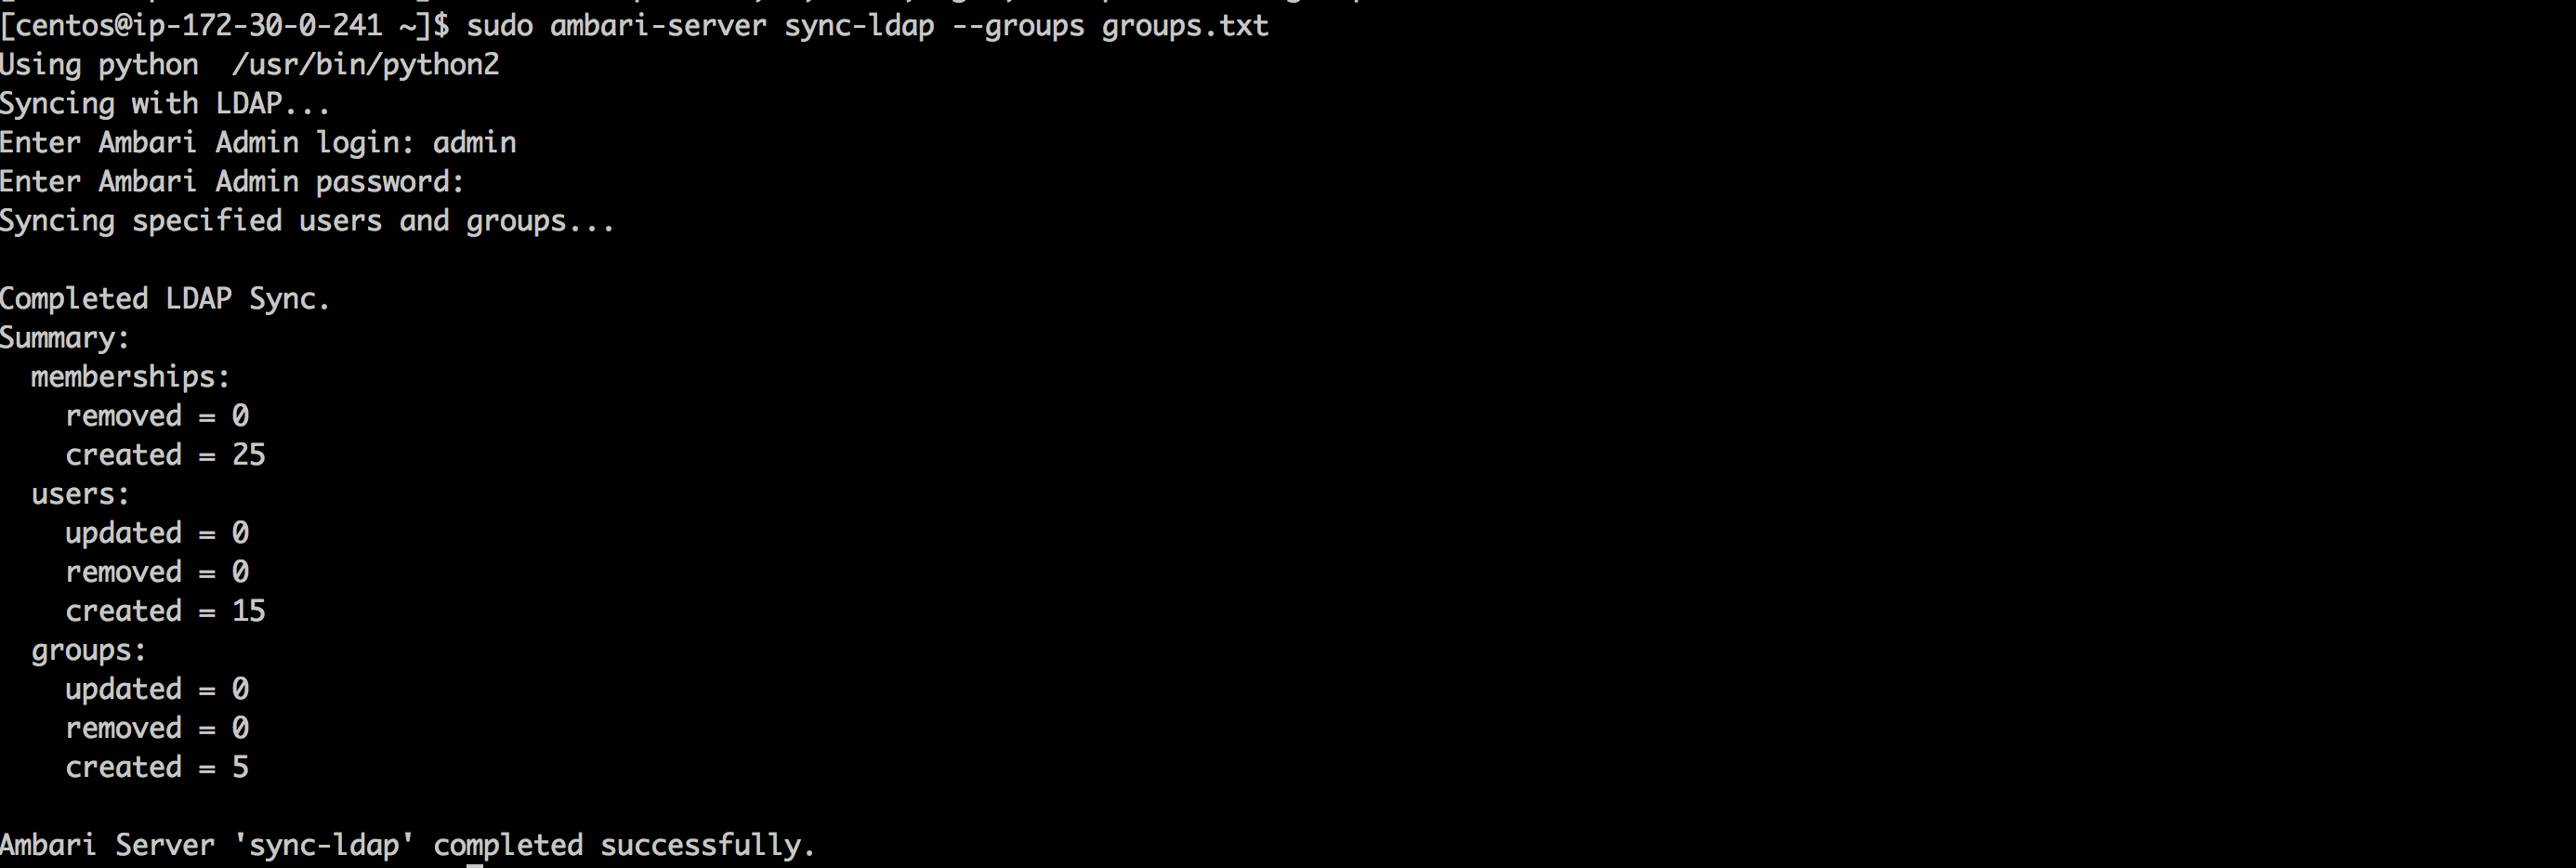
- Run LDAPsync to sync only the groups we want
- When prompted for user/password, use the *local* Ambari admin credentials (i.e. admin/BadPass#1)
echo hadoop-users,hr,sales,legal,hadoop-admins > groups.txt sudo ambari-server sync-ldap --groups groups.txt
- This should show a summary of what objects were created
- Give 'hadoop-admin' admin permissions in Ambari to allow the user to manage the cluster
- Login to Ambari as your local 'admin' user (i.e. admin/BadPass#1)
- Grant 'hadoopadmin' user permissions to manage the cluster:
- Click the dropdown on top right of Ambari UI
- Click 'Manage Ambari'
- Under 'Users', select 'hadoopadmin'
- Change 'Ambari Admin' to Yes
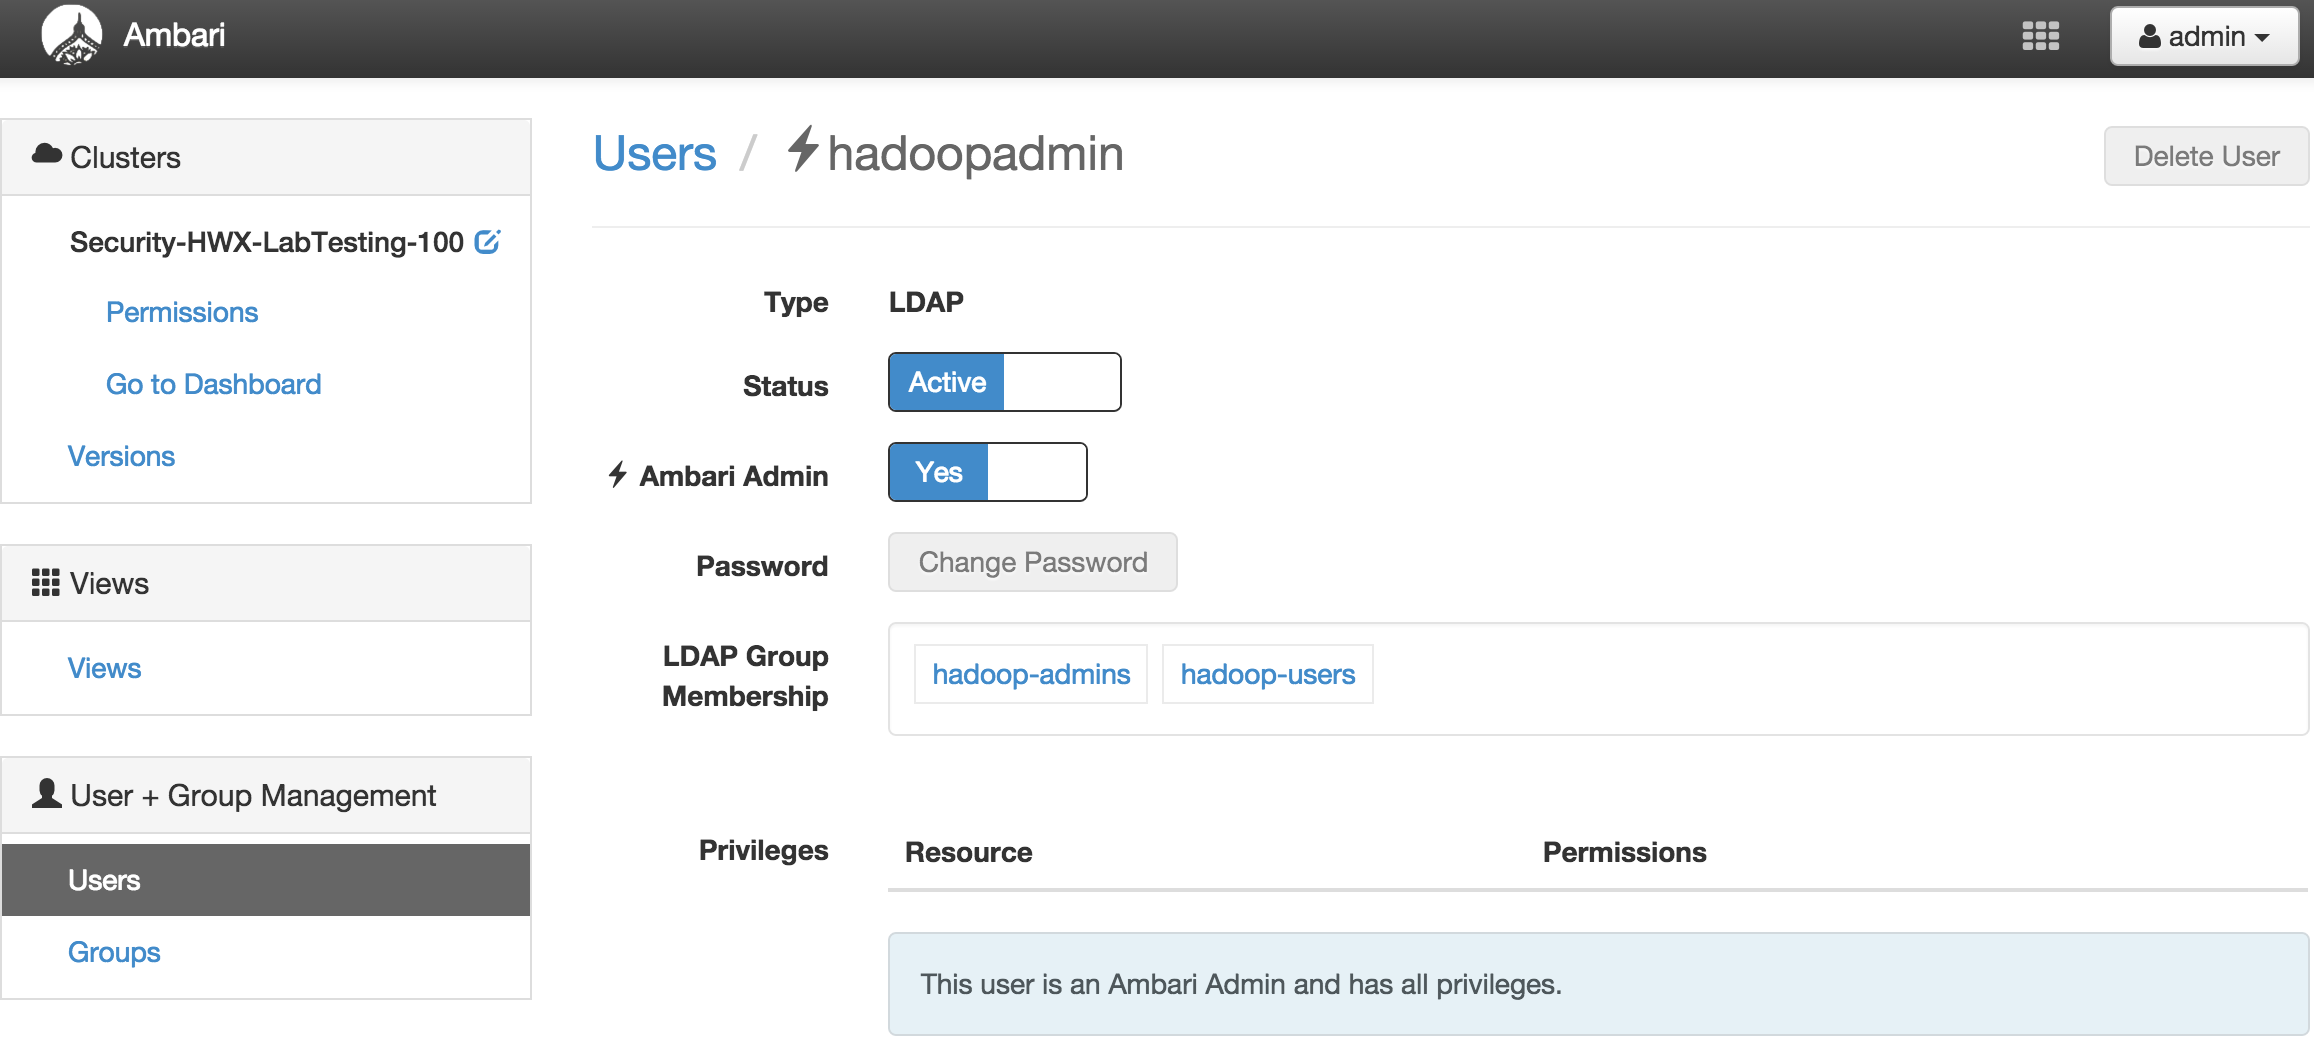
- Sign out and then log back into Ambari, this time as 'hadoopadmin' and verify the user has rights to monitor/manage the cluster
- (optional) Disable local 'admin' user using the same 'Manage Ambari' menu
# Lab 3
## Kerberize the Cluster
### Run Ambari Kerberos Wizard against Active Directory environment
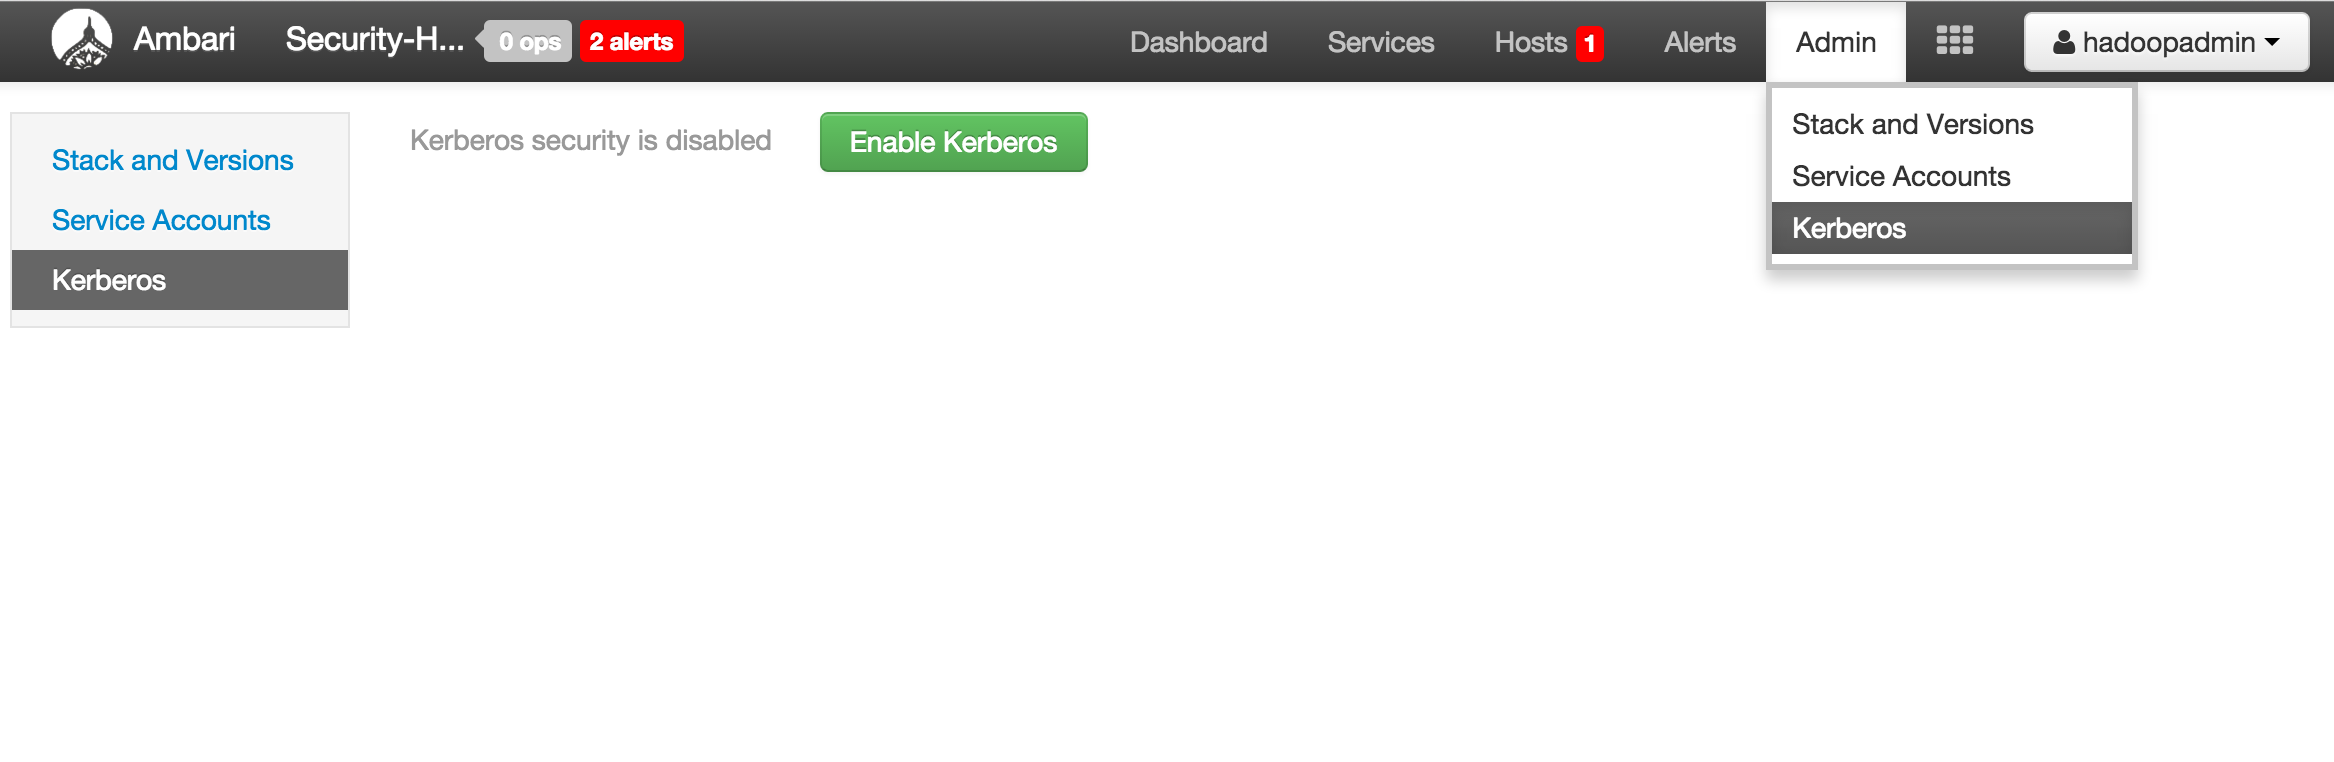
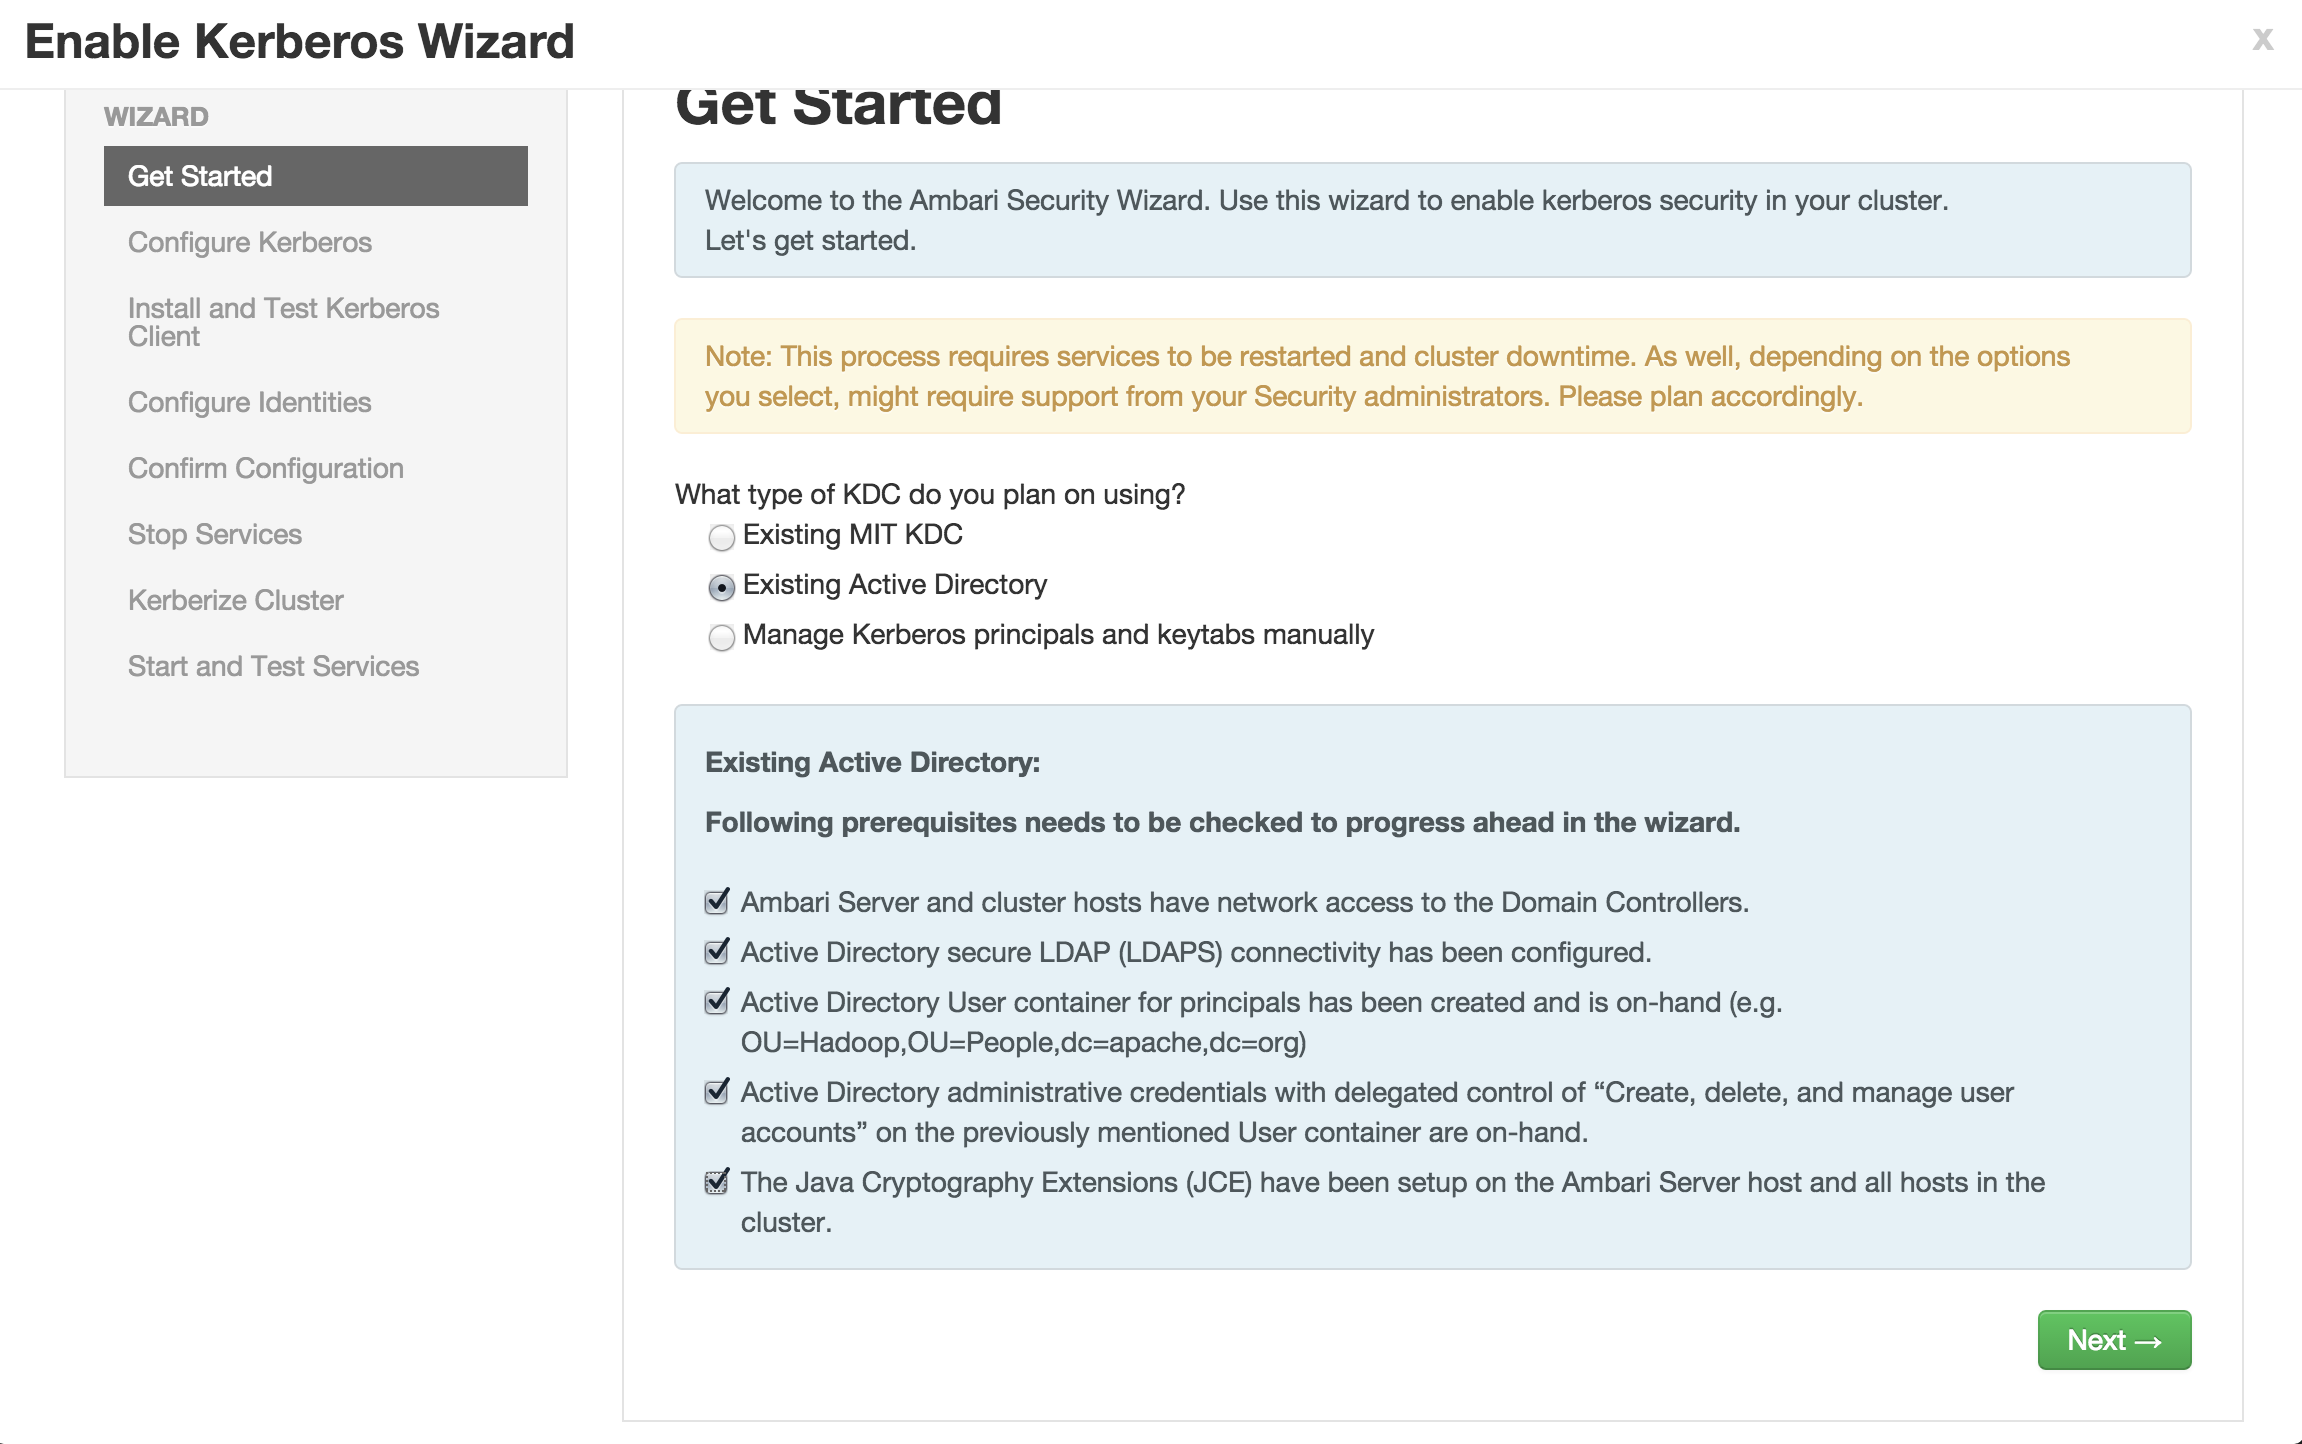
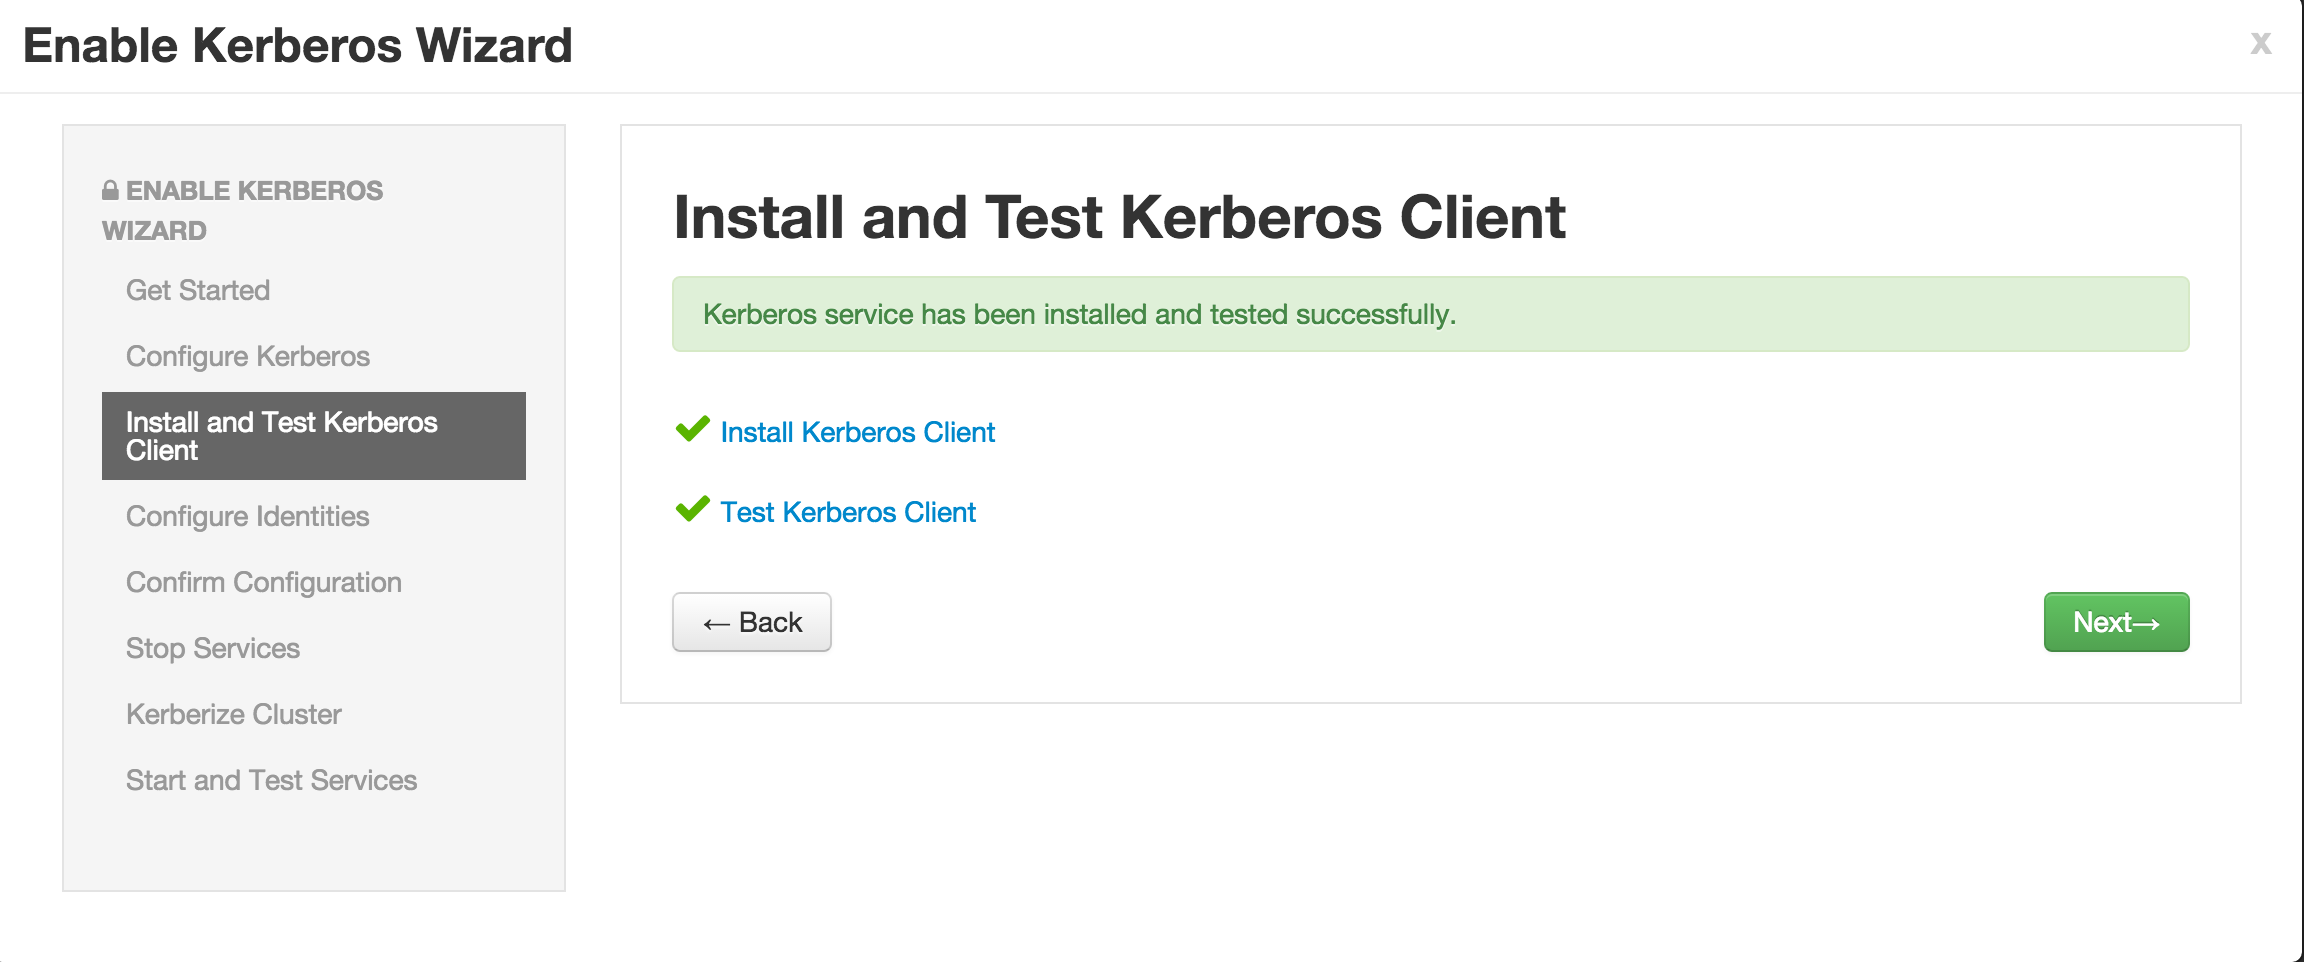
- Enable kerberos using Ambari security wizard (under 'Admin' tab > Kerberos > Enable kerberos > proceed).
- Select "Existing Active Directory" and check all the boxes
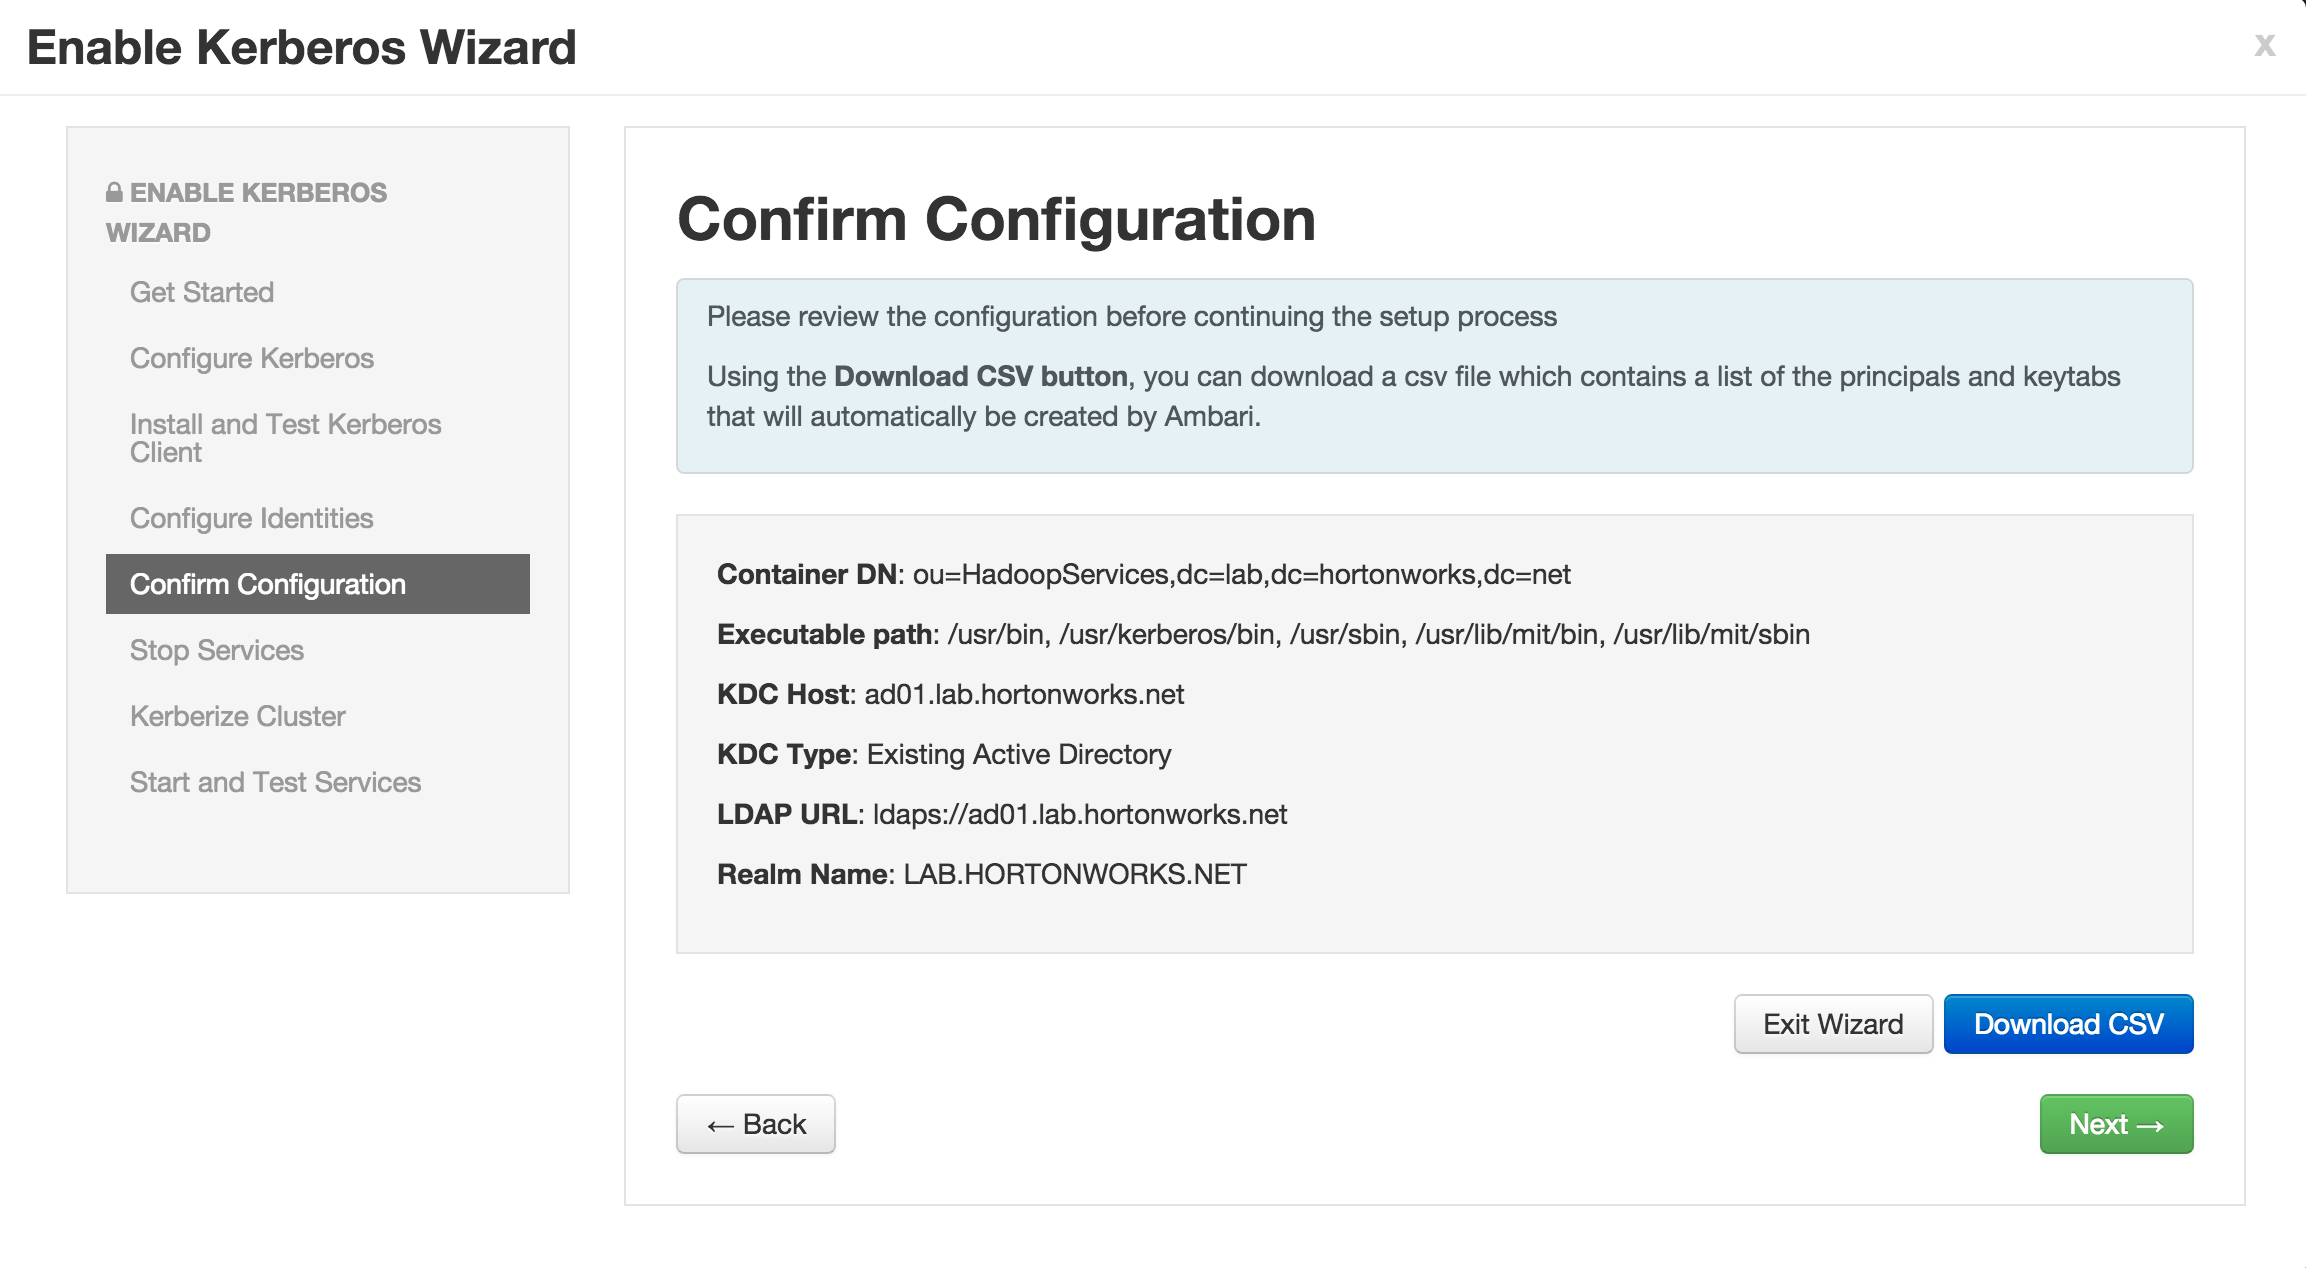
- Enter the below details:
- KDC:
- KDC host: `ad01.lab.hortonworks.net`
- Realm name: `LAB.HORTONWORKS.NET`
- LDAP url: `ldaps://ad01.lab.hortonworks.net`
- Container DN: `ou=HadoopServices,dc=lab,dc=hortonworks,dc=net`
- Domains: `us-west-2.compute.internal,.us-west-2.compute.internal`
- Kadmin:
- Kadmin host: `ad01.lab.hortonworks.net`
- Admin principal: `hadoopadmin@LAB.HORTONWORKS.NET`
- Admin password: `BadPass#1`
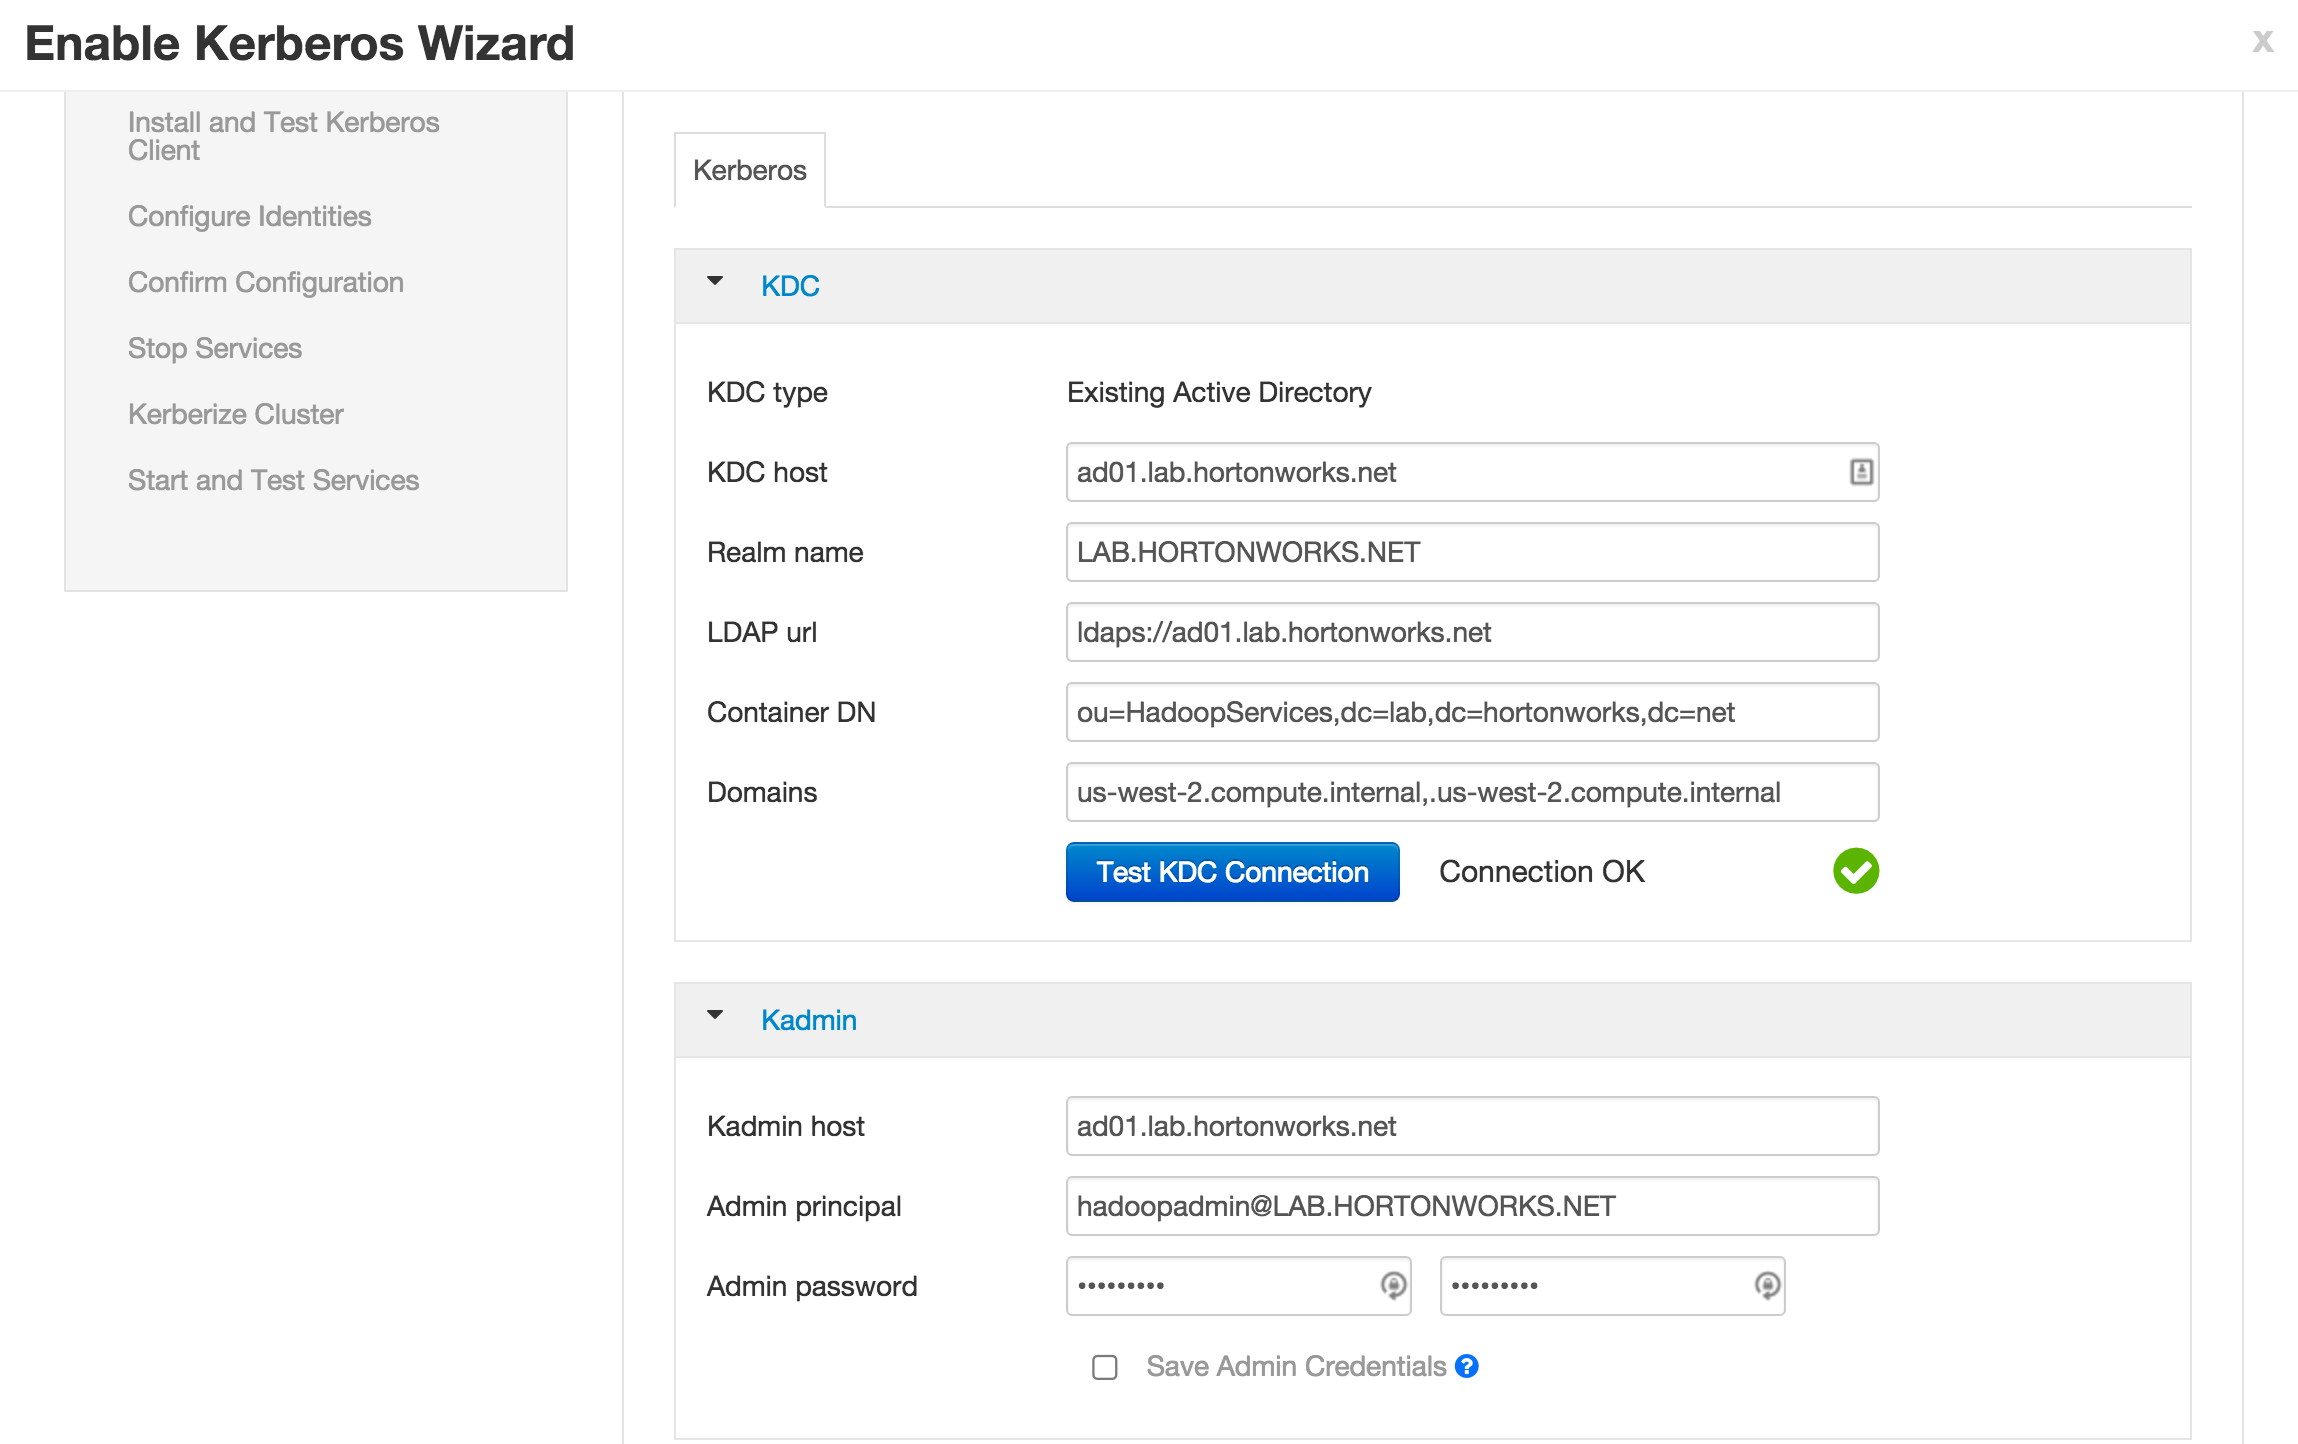
- Notice that the "Save admin credentials" checkbox is grayed out. We will enable that later.
- Sometimes the "Test Connection" button may fail (usually related to AWS issues), but if you previously ran the "Configure name resolution & certificate to Active Directory" steps *on all nodes*, you can proceed.
- Now click Next on all the following screens to proceed with all the default values

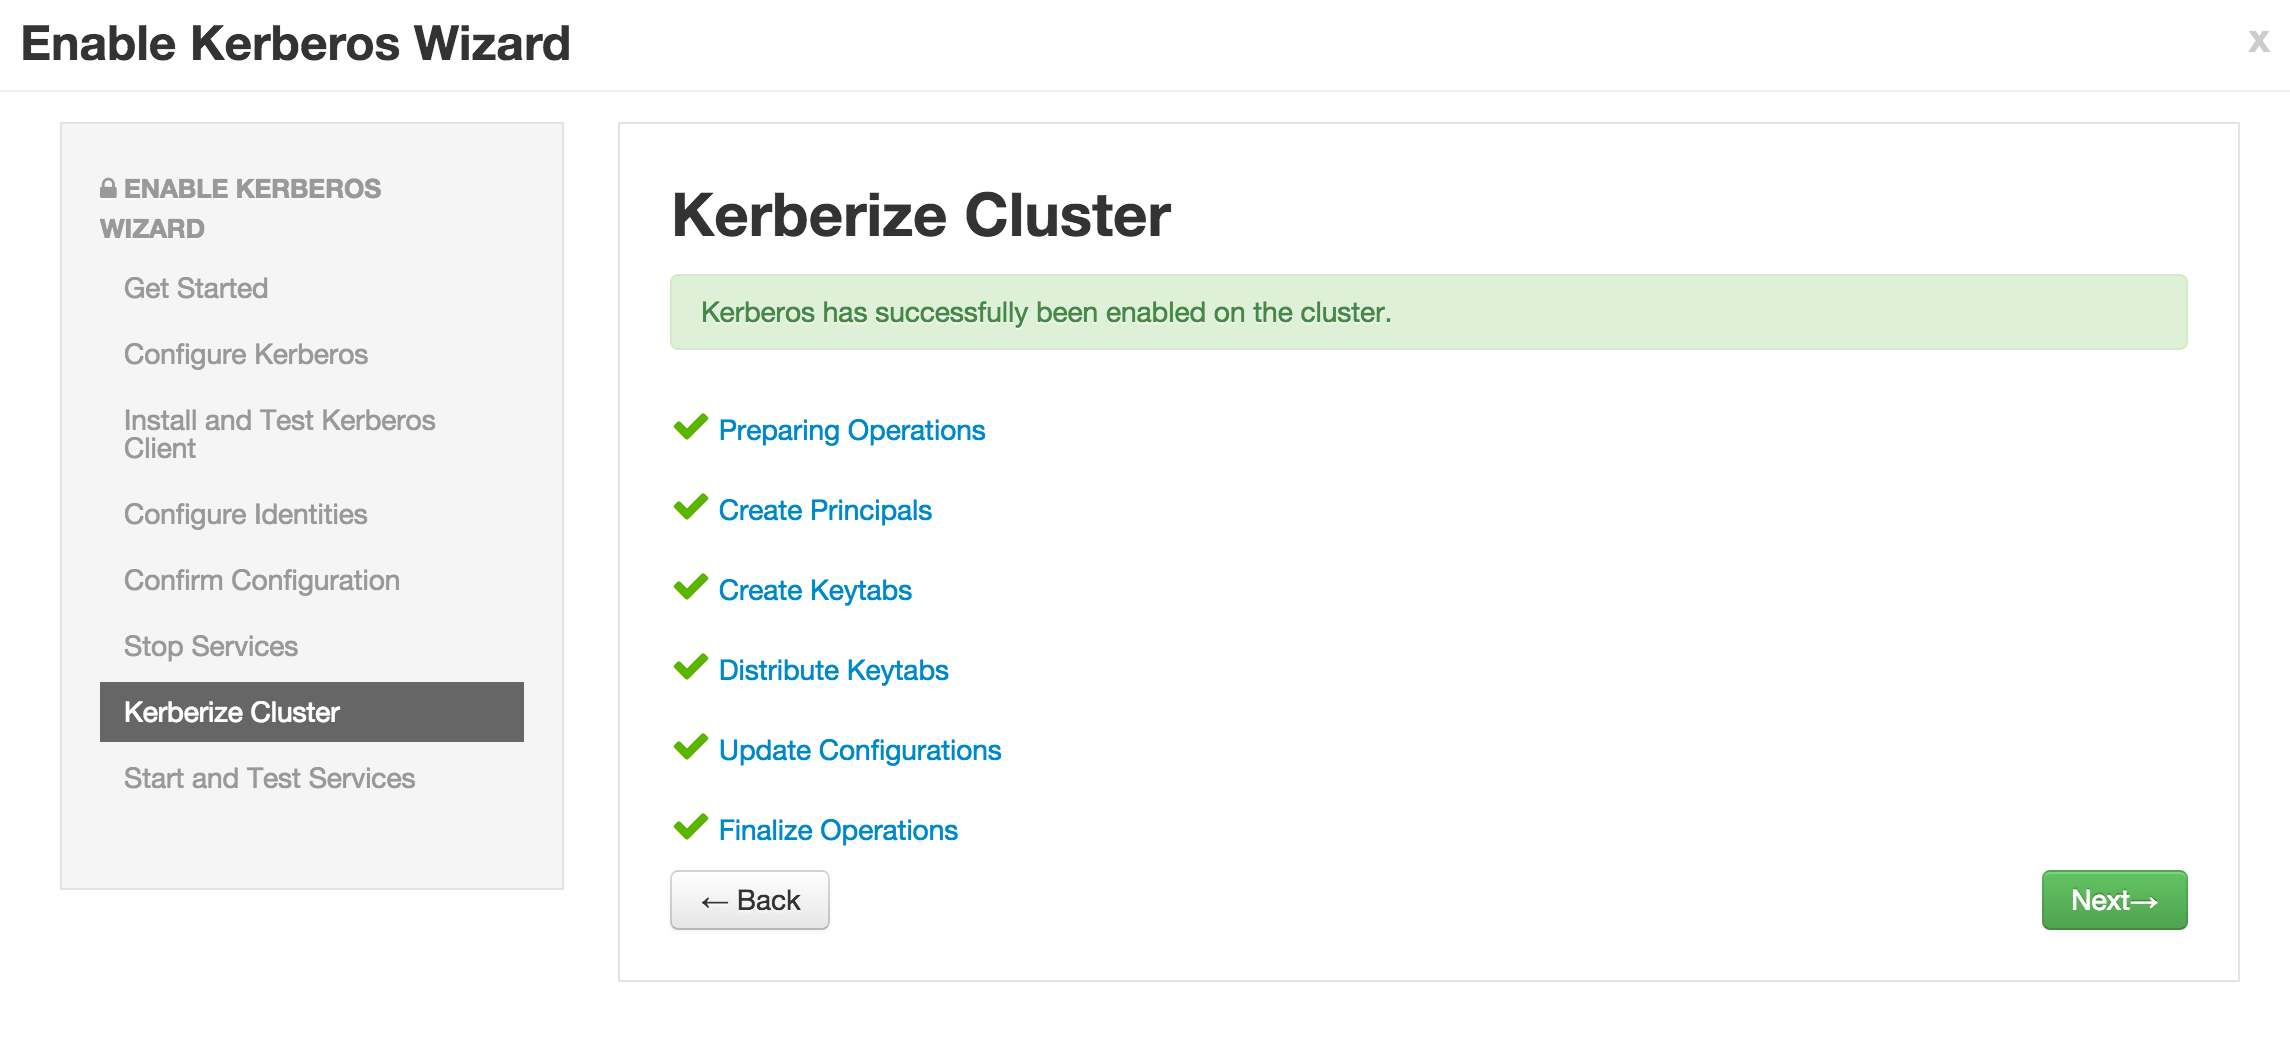
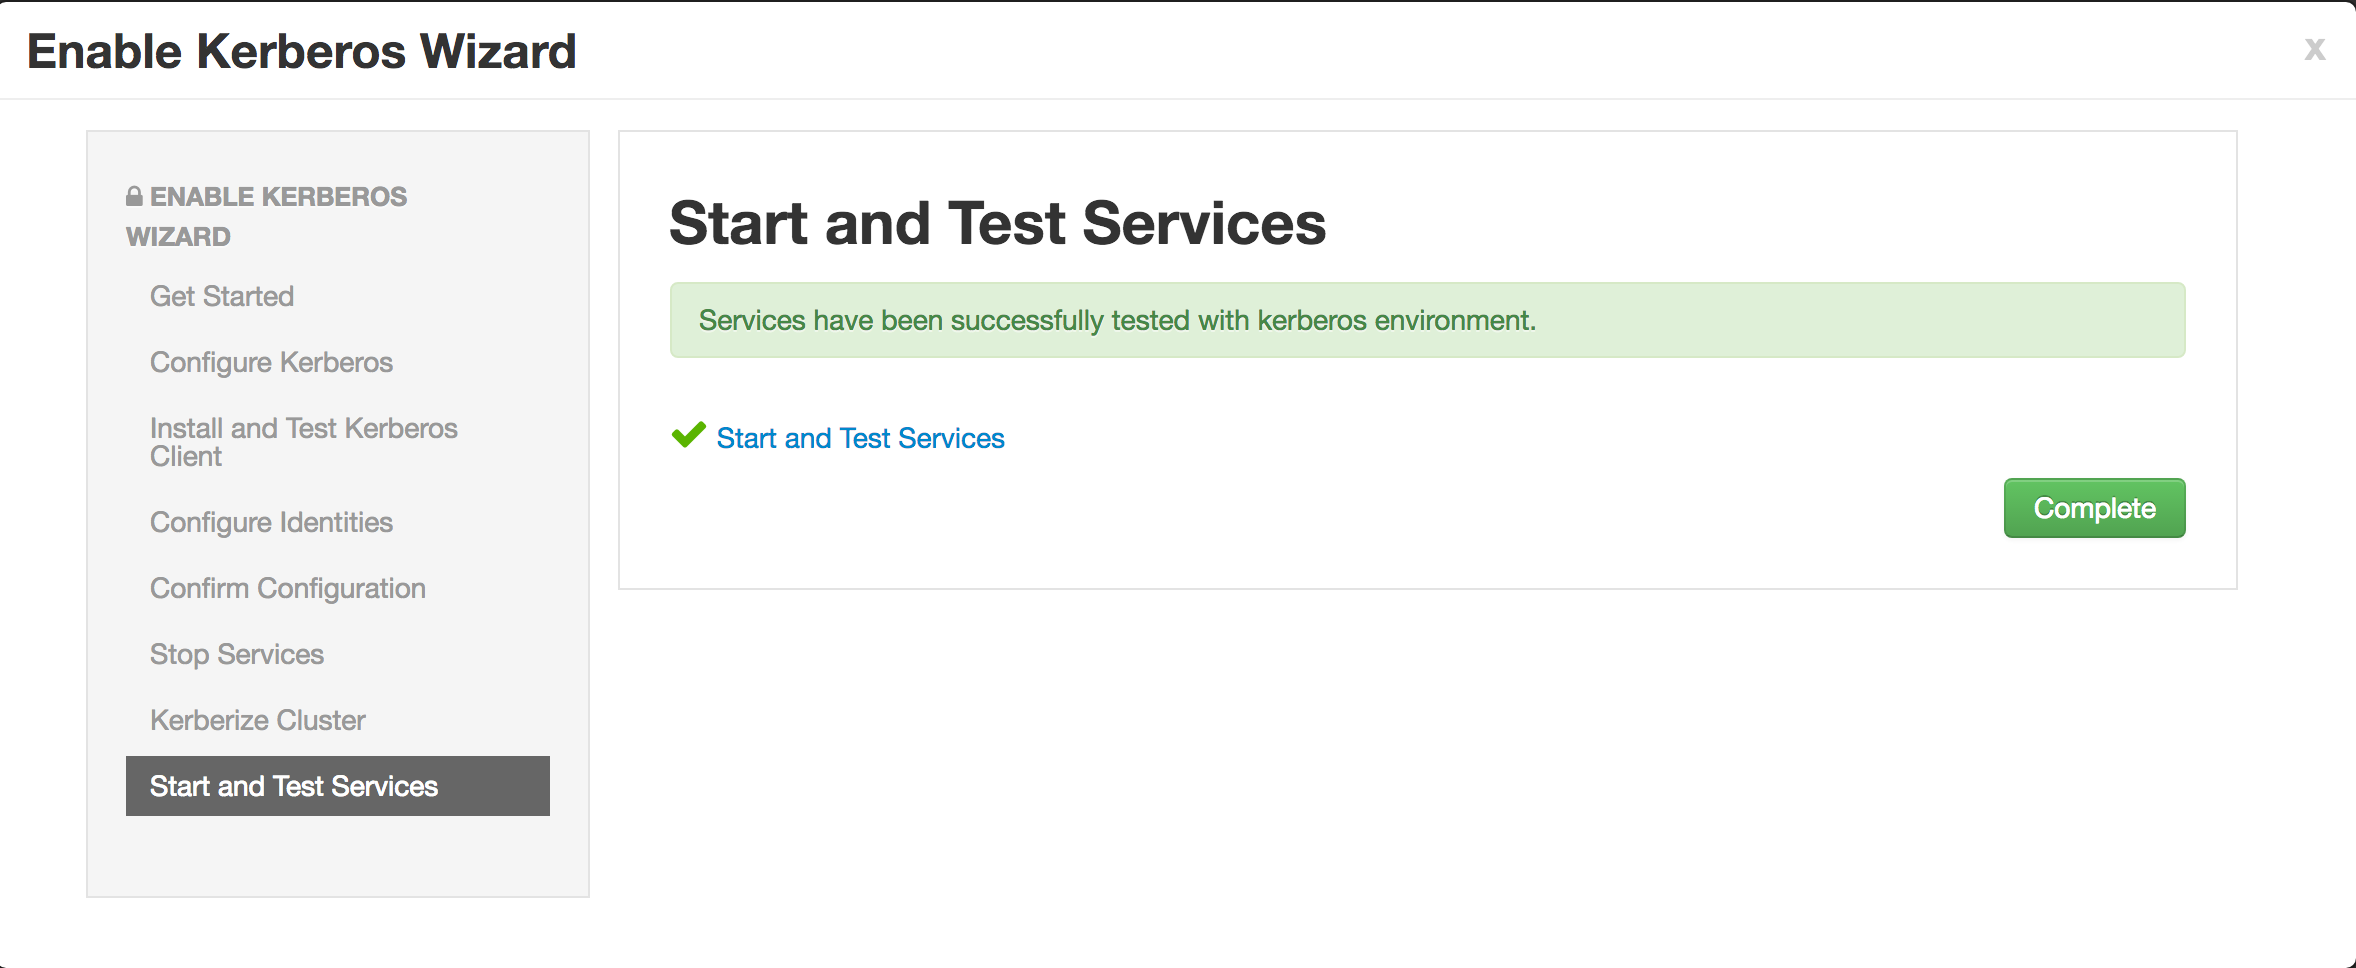
- Note if the wizard fails after completing more than 90% of "Start and test services" phase, you can just click "Complete" and manually start any unstarted services (e.g. WebHCat or HBase master)
- Check the keytabs directory and notice that keytabs have been generated here:
ls -la /etc/security/keytabs/
- Run a `klist -kt` one of the service keytab files to see the principal name it is for. Sample output below (*executed on host running Namenode*):
$ sudo klist -kt /etc/security/keytabs/nn.service.keytab Keytab name: FILE:/etc/security/keytabs/nn.service.keytab KVNO Timestamp Principal
0 02/09/2016 18:04:44 nn/ip-172-30-0-181.us-west-2.compute.internal@LAB.HORTONWORKS.NET 0 02/09/2016 18:04:44 nn/ip-172-30-0-181.us-west-2.compute.internal@LAB.HORTONWORKS.NET 0 02/09/2016 18:04:44 nn/ip-172-30-0-181.us-west-2.compute.internal@LAB.HORTONWORKS.NET 0 02/09/2016 18:04:44 nn/ip-172-30-0-181.us-west-2.compute.internal@LAB.HORTONWORKS.NET 0 02/09/2016 18:04:44 nn/ip-172-30-0-181.us-west-2.compute.internal@LAB.HORTONWORKS.NET
- Notice how the service keytabs are divided into the below 3 parts. The instance here is the FQDN of the node so these keytabs are *host specific*.
{name of entity}/{instance}@{REALM}.
- Run a `klist -kt` on one of the headless keytab files to see the principal name it is for. Sample output below (*executed on host running Namenode*):
$ sudo klist -kt /etc/security/keytabs/hdfs.headless.keytab Keytab name: FILE:/etc/security/keytabs/hdfs.headless.keytab KVNO Timestamp Principal
0 02/09/2016 18:04:44 hdfs-Security-HWX-LabTesting-100@LAB.HORTONWORKS.NET 0 02/09/2016 18:04:44 hdfs-Security-HWX-LabTesting-100@LAB.HORTONWORKS.NET 0 02/09/2016 18:04:44 hdfs-Security-HWX-LabTesting-100@LAB.HORTONWORKS.NET 0 02/09/2016 18:04:44 hdfs-Security-HWX-LabTesting-100@LAB.HORTONWORKS.NET 0 02/09/2016 18:04:44 hdfs-Security-HWX-LabTesting-100@LAB.HORTONWORKS.NET
- Notice how the headless keytabs are divided into the below 3 parts. These keytabs are *cluster specific* (i.e one per cluster)
{name of entity}-{cluster}@{REALM}.
### Setup AD/OS integration via SSSD

- Why?
  - Currently your hadoop nodes do not recognize users/groups defined in AD.
  - You can check this by running below:
id it1 groups it1 hdfs groups it1
- Pre-req for below steps: Your AD admin/instructor should have given 'registersssd' user permissions to add the workstation to OU=HadoopNodes (needed to run 'adcli join' successfully)

- *Note: the below is just a sample way of using SSSD.  It will vary completely by environment and needs tuning and testing for your environment.*

- Run the steps in this section **on each node**
ad_user="registersssd" ad_domain="lab.hortonworks.net" ad_dc="ad01.lab.hortonworks.net" ad_root="dc=lab,dc=hortonworks,dc=net" ad_ou="ou=HadoopNodes,${ad_root}" ad_realm=${ad_domain^^}
sudo kinit ${ad_user}
sudo yum makecache fast sudo yum -y -q install epel-release ## epel is required for adcli sudo yum -y -q install sssd oddjob-mkhomedir authconfig sssd-krb5 sssd-ad sssd-tools sudo yum -y -q install adcli
#paste all the lines in this block together, in one shot
sudo adcli join -v
--domain-controller=${ad_dc}
--domain-ou="${ad_ou}"
--login-ccache="/tmp/krb5cc_0"
--login-user="${ad_user}"
-v
--show-details
#paste all the lines in this block together, in one shot sudo tee /etc/sssd/sssd.conf > /dev/null <<EOF [sssd]
services = nss, pam, ssh, autofs, pac config_file_version = 2 domains = ${ad_realm} override_space = _
[domain/${ad_realm}]
id_provider = ad
ad_server =
[nss] memcache_timeout = 3600 override_shell = /bin/bash EOF
sudo chmod 0600 /etc/sssd/sssd.conf sudo service sssd restart sudo authconfig --enablesssd --enablesssdauth --enablemkhomedir --enablelocauthorize --update
sudo chkconfig oddjobd on sudo service oddjobd restart sudo chkconfig sssd on sudo service sssd restart
sudo kdestroy
- Confirm that your nodes OS can now recognize AD users
id sales1 groups sales1
### Refresh HDFS User-Group mappings

- Once the above is completed on all nodes you need to refresh the user group mappings in HDFS & YARN by running the below commands

- Restart HDFS service via Ambari. This is needed for Hadoop to recognize the group mappings (else the `hdfs groups` command will not work)

- Execute the following on the Ambari node:
export PASSWORD=BadPass#1
#detect name of cluster
output=curl -u hadoopadmin:$PASSWORD -i -H 'X-Requested-By: ambari' http://localhost:8080/api/v1/clusters
cluster=echo $output | sed -n 's/.*"cluster_name" : "\([^\"]*\)".*/\1/p'
#refresh user and group mappings sudo sudo -u hdfs kinit -kt /etc/security/keytabs/hdfs.headless.keytab hdfs-${cluster} sudo sudo -u hdfs hdfs dfsadmin -refreshUserToGroupsMappings
- Execute the following on the node where the YARN ResourceManager is installed:
sudo sudo -u yarn kinit -kt /etc/security/keytabs/yarn.service.keytab yarn/$(hostname -f)@LAB.HORTONWORKS.NET sudo sudo -u yarn yarn rmadmin -refreshUserToGroupsMappings
- kinit as an end user
kinit hr1
- check the group mappings
hdfs groups yarn rmadmin -getGroups hr1
- output should look like below, indicating both OS-level and hadoop-level group mappings :
$ hdfs groups hr1@LAB.HORTONWORKS.NET : domain_users hr hadoop-users $ yarn rmadmin -getGroups hr1 hr1 : domain_users hr hadoop-users
- remove kerberos ticket
kdestroy
### Test OS/AD integration and Kerberos security

- Login as sales1 user and try to access the same /tmp/hive HDFS dir
sudo su - sales1
hdfs dfs -ls /tmp/hive
#authenticate kinit ##enter BadPass#1
klist
hdfs dfs -ls /tmp/hive
#Now try to get around security by setting the same env variable export HADOOP_USER_NAME=hdfs hdfs dfs -ls /tmp/hive
#log out as sales1 logout
- Notice that now that the cluster is kerberized, we were not able to circumvent security by setting the env var

--------------

# Lab 4

## Security options for Ambari

Reference: Doc available [here](http://docs.hortonworks.com/HDPDocuments/Ambari-2.2.0.0/bk_Ambari_Security_Guide/content/ch_amb_sec_guide.html)

### Kerberos for Ambari

- Setup kerberos for Ambari
  - Required to configure Ambari views for kerberos

- Run below on Ambari node

- Download keytab
cd /etc/security/keytabs/ sudo wget https://github.com/HortonworksUniversity/Security_Labs/raw/master/extras/ambari.keytab sudo chown ambari:hadoop ambari.keytab sudo chmod 400 ambari.keytab
- Confirm the keytab can be used to successfully kinit as ambari
sudo kinit -kVt /etc/security/keytabs/ambari.keytab ambari
- Stop Ambari and start security setup guide
sudo ambari-server stop sudo ambari-server setup-security
- Enter below when prompted (sample output shown below):
  - choice: `3`
  - principal: `ambari@LAB.HORTONWORKS.NET`
  - keytab path: `/etc/security/keytabs/ambari.keytab`

- Sample output:
Choose one of the following options: [1] Enable HTTPS for Ambari server. [2] Encrypt passwords stored in ambari.properties file. [3] Setup Ambari kerberos JAAS configuration. [4] Setup truststore. [5] Import certificate to truststore.
Enter choice, (1-5): 3 Setting up Ambari kerberos JAAS configuration to access secured Hadoop daemons... Enter ambari server's kerberos principal name (ambari@EXAMPLE.COM): ambari@LAB.HORTONWORKS.NET Enter keytab path for ambari server's kerberos principal: /etc/security/keytabs/ambari.keytab Ambari Server 'setup-security' completed successfully.
- Restart Ambari to changes to take affect
sudo ambari-server restart sudo ambari-agent restart
### Ambari server as non-root
- To setup Ambari server as non-root run below on Ambari-server node:
sudo ambari-server setup
- Then enter the below at the prompts:
  - OK to continue? y
  - Customize user account for ambari-server daemon? y
  - Enter user account for ambari-server daemon (root):ambari
  - Do you want to change Oracle JDK [y/n] (n)? n
  - Enter advanced database configuration [y/n] (n)? n

- Sample output:
$ sudo ambari-server setup Using python /usr/bin/python2 Setup ambari-server Checking SELinux... SELinux status is 'enabled' SELinux mode is 'permissive' WARNING: SELinux is set to 'permissive' mode and temporarily disabled. OK to continue [y/n] (y)? y Customize user account for ambari-server daemon [y/n] (n)? y Enter user account for ambari-server daemon (root):ambari Adjusting ambari-server permissions and ownership... Checking firewall status... Redirecting to /bin/systemctl status iptables.service
Checking JDK... Do you want to change Oracle JDK [y/n] (n)? n Completing setup... Configuring database... Enter advanced database configuration [y/n] (n)? n Configuring database... Default properties detected. Using built-in database. Configuring ambari database... Checking PostgreSQL... Configuring local database... Connecting to local database...done. Configuring PostgreSQL... Backup for pg_hba found, reconfiguration not required Extracting system views... ....... Adjusting ambari-server permissions and ownership... Ambari Server 'setup' completed successfully.
- Create proxy user settings for ambari user to enable it to become a super user on all hosts (more details on this later):
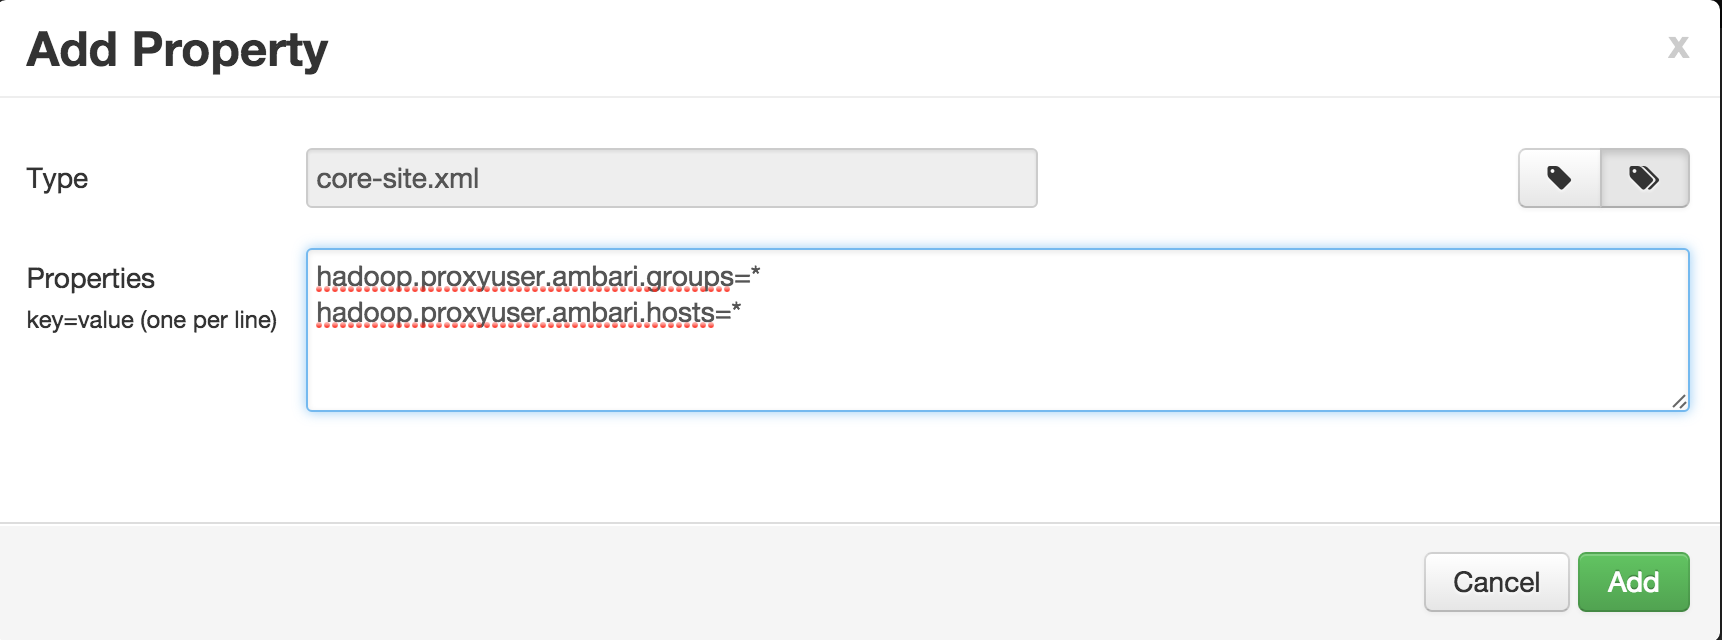
- Ambari > HDFS > Configs > Advanced > Custom core-site > Add property > Bulk mode:
hadoop.proxyuser.ambari.groups=* hadoop.proxyuser.ambari.hosts=*
- Save and restart HDFS
- Ambari will show that other components need restarting too but you can proceed without restarting those for now to save time (we will restart those later)
- For now we will skip configuring Ambari Agents for Non-Root
### Ambari Encrypt Database and LDAP Passwords
- Needed to allow Ambari to cache the admin password. Run below on Ambari-server node:
- To encrypt password, run below
sudo ambari-server stop sudo ambari-server setup-security
- Then enter the below at the prompts:
  - enter choice: 2
  - provide master key: BadPass#1
  - re-enter master key: BadPass#1
  - do you want to persist? y

- Then start ambari
sudo ambari-server start
- Sample output
Choose one of the following options: [1] Enable HTTPS for Ambari server. [2] Encrypt passwords stored in ambari.properties file. [3] Setup Ambari kerberos JAAS configuration. [4] Setup truststore. [5] Import certificate to truststore.
Enter choice, (1-5): 2 Please provide master key for locking the credential store: Re-enter master key: Do you want to persist master key. If you choose not to persist, you need to provide the Master Key while starting the ambari server as an env variable named AMBARI_SECURITY_MASTER_KEY or the start will prompt for the master key. Persist [y/n] (y)? y Adjusting ambari-server permissions and ownership... Ambari Server 'setup-security' completed successfully.
### SSL For Ambari server

- Enables Ambari WebUI to run on HTTPS instead of HTTP

#### Create self-signed certificate

- Note down Ambari node public hostname
curl icanhazptr.com
- Commands and sample output below (to be run on ambari node):
  - Note that for 'Common Name' you should enter the public hostname of Ambari node
$ cd $ sudo openssl genrsa -out ambari.key 2048 Generating RSA private key, 2048 bit long modulus ....+++ .........+++ e is 65537 (0x10001)
$ sudo openssl req -new -key ambari.key -out ambari.csr You are about to be asked to enter information that will be incorporated into your certificate request. What you are about to enter is what is called a Distinguished Name or a DN. There are quite a few fields but you can leave some blank For some fields there will be a default value, If you enter '.', the field will be left blank.
Country Name (2 letter code) [XX]:US State or Province Name (full name) []:CA Locality Name (eg, city) [Default City]:Santa Clara Organization Name (eg, company) [Default Company Ltd]:Hortonworks Organizational Unit Name (eg, section) []:Sales Common Name (eg, your name or your server's hostname) []:YOUR_PUBLIC_HOSTNAME Email Address []:
Please enter the following 'extra' attributes to be sent with your certificate request A challenge password []:BadPass#1 An optional company name []:
$ sudo openssl x509 -req -days 365 -in ambari.csr -signkey ambari.key -out ambari.crt Signature ok subject=/C=US/ST=CA/L=Santa Clara/O=Hortonworks/OU=Sales/CN=ec2-52-36-87-146.us-west-2.compute.amazonaws.com Getting Private key
- This generates:
  - certificate: ambari.crt
  - private key: ambari.key

- Copy the 3 files into a new folder called ssl under /etc/security (ambari.key, ambari.csr, ambari.crt)
sudo mkdir /etc/security/ssl sudo cp ambari.* /etc/security/ssl sudo chmod 400 /etc/security/ssl/*
- Proceed onto next section to enable HTTPS for Ambari using the self signed certificate we created

#### Setup SSL for Ambari server

- Stop Ambari server
sudo ambari-server stop
- Setup HTTPS for Ambari and point it to port 8444
  - We are changing it from default of 8443 to avoid potential clashes with Knox
Choose one of the following options: [1] Enable HTTPS for Ambari server. [2] Encrypt passwords stored in ambari.properties file. [3] Setup Ambari kerberos JAAS configuration. [4] Setup truststore. [5] Import certificate to truststore.
Enter choice, (1-5): 1 Do you want to configure HTTPS [y/n] (y)? y SSL port [8443] ? 8444 Enter path to Certificate: /etc/security/ssl/ambari.crt Enter path to Private Key: /etc/security/ssl/ambari.key Please enter password for Private Key: BadPass#1 Importing and saving Certificate...done. Adjusting ambari-server permissions and ownership...
- Start ambari back up
sudo ambari-server start
- Now you can access Ambari on **HTTPS** on port 8444 e.g. https://ec2-52-32-113-77.us-west-2.compute.amazonaws.com:8444
- If you were not able to access the Ambari UI, make sure you are trying to access *https* not *http*
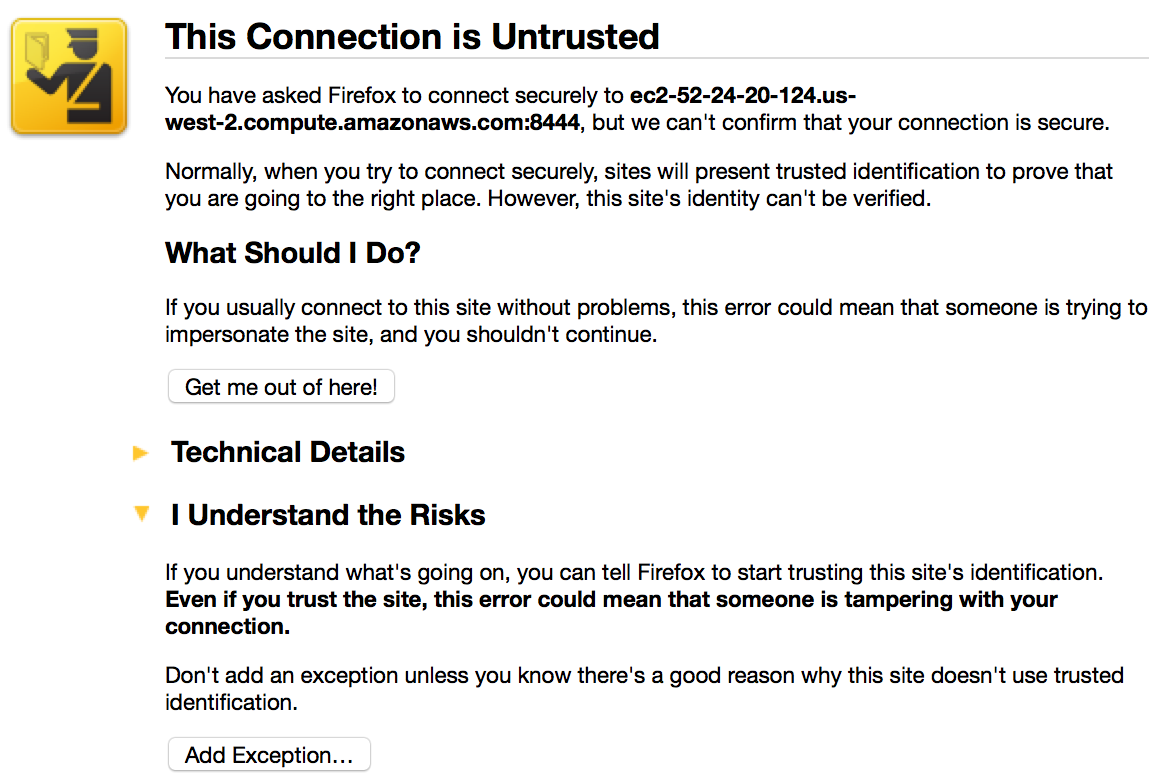
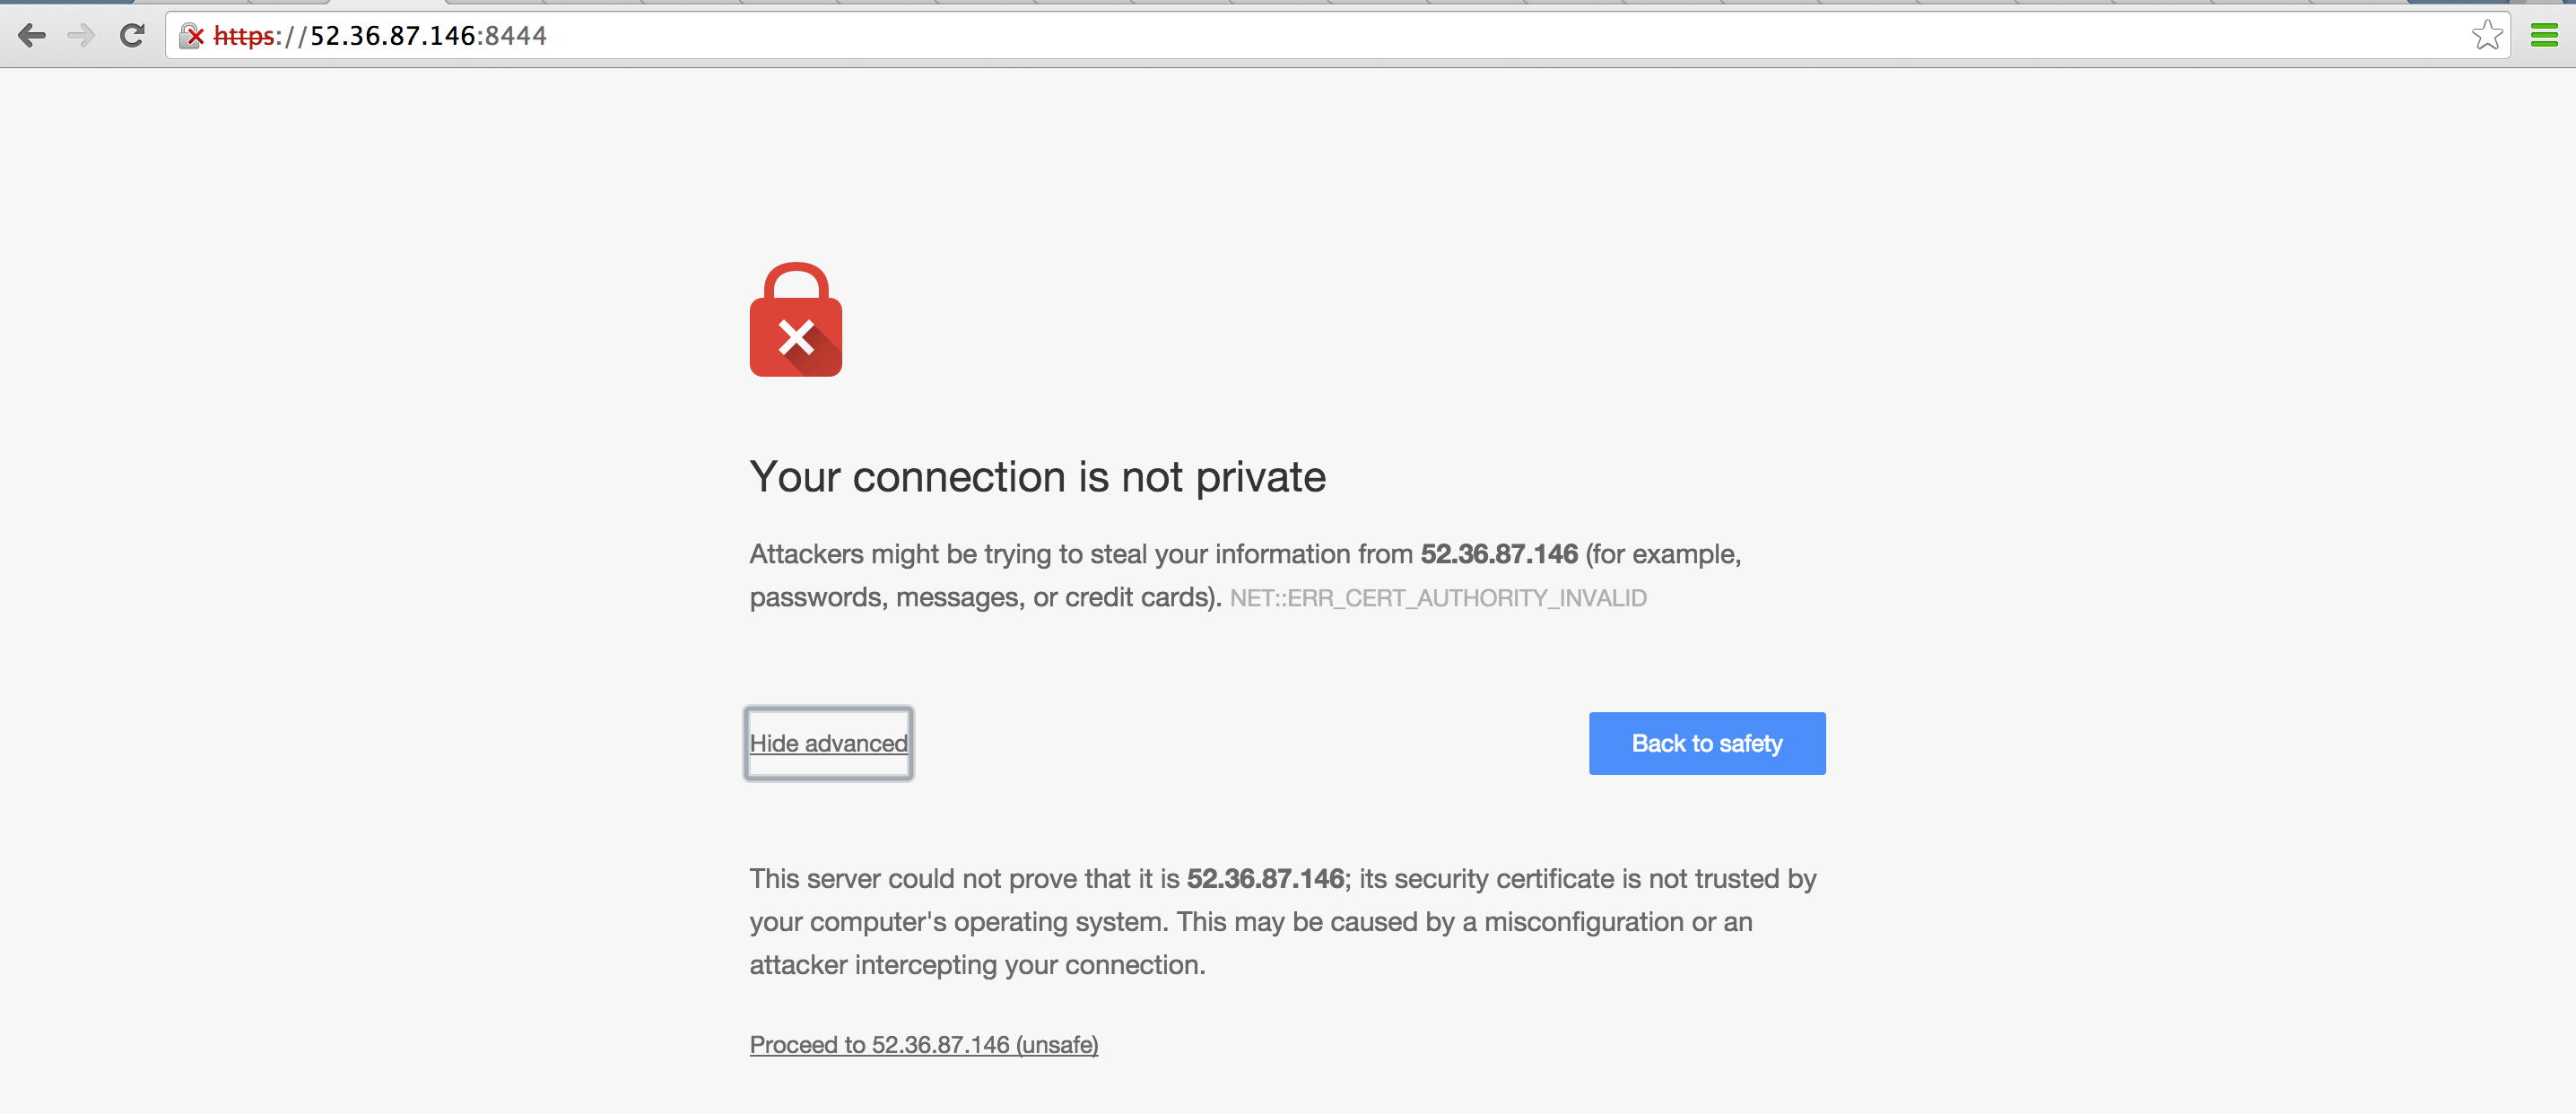
- Note that the browser will not trust the new self signed ambari certificate. You will need to trust that cert first.
- If Firefox, you can do this by clicking on 'i understand the risk' > 'Add Exception...'
- If Chome, you can do this by clicking on 'Advanced' > 'Proceed to xxxxxx'
### Enabling SPNEGO Authentication for Hadoop
- Needed to secure the Hadoop components webUIs (e.g. Namenode UI, JobHistory UI, Yarn ResourceManager UI etc...)
- Run steps on ambari server node
- Create Secret Key Used for Signing Authentication Tokens
sudo dd if=/dev/urandom of=/etc/security/http_secret bs=1024 count=1 sudo chown hdfs:hadoop /etc/security/http_secret sudo chmod 440 /etc/security/http_secret
- Place the file in Ambari resources dir so it gets pushed to all nodes
sudo cp /etc/security/http_secret /var/lib/ambari-server/resources/host_scripts/ sudo ambari-server restart
- Wait 30 seconds for the http_secret file to get pushed to all nodes under /var/lib/ambari-agent/cache/host_scripts

- On non-Ambari nodes, once the above file is available, run below to put it in right dir and correct its permissions
sudo cp /var/lib/ambari-agent/cache/host_scripts/http_secret /etc/security/ sudo chown hdfs:hadoop /etc/security/http_secret sudo chmod 440 /etc/security/http_secret
- In Ambari > HDFS > Configs, set the below
  - Under Advanced core-site:
    - hadoop.http.authentication.simple.anonymous.allowed=false

  - Under Custom core-site, add the below properties (using bulk add tab):
hadoop.http.authentication.signature.secret.file=/etc/security/http_secret hadoop.http.authentication.type=kerberos hadoop.http.authentication.kerberos.keytab=/etc/security/keytabs/spnego.service.keytab hadoop.http.authentication.kerberos.principal=HTTP/_HOST@LAB.HORTONWORKS.NET hadoop.http.authentication.cookie.domain=lab.hortonworks.net hadoop.http.filter.initializers=org.apache.hadoop.security.AuthenticationFilterInitializer
- Save configs
- Restart all services that require restart (HDFS, Mapreduce, YARN, HBase)
- Now when you try to open any of the web UIs like below you will get `401: Authentication required`
- HDFS: Namenode UI
- Mapreduce: Job history UI
- YARN: Resource Manager UI
### Ambari views
Ambari views setup on secure cluster will be covered in later lab ([here](https://github.com/HortonworksUniversity/Security_Labs#other-security-features-for-ambari))
------------------
# Lab 5
## Ranger install
Goal: In this lab we will install Apache Ranger via Ambari and setup Ranger plugins for Hadoop components: HDFS, Hive, Hbase, YARN, Knox. We will also enable Ranger audits to Solr and HDFS
### Ranger prereqs
##### Create & confirm MySQL user 'root'
Prepare MySQL DB for Ranger use.
- Run these steps on the node where MySQL/Hive is located. To find this, you can either:
- use Ambari UI or
- Just run `mysql` on each node: if it returns `mysql: command not found`, move onto next node
- `sudo mysql`
- Execute following in the MySQL shell. Change the password to your preference.
```sql
CREATE USER 'root'@'%';
GRANT ALL PRIVILEGES ON *.* to 'root'@'%' WITH GRANT OPTION;
SET PASSWORD FOR 'root'@'%' = PASSWORD('BadPass#1');
SET PASSWORD = PASSWORD('BadPass#1');
FLUSH PRIVILEGES;
exit
- Confirm MySQL user:
mysql -u root -h $(hostname -f) -p -e "select count(user) from mysql.user;"- Output should be a simple count. Check the last step if there are errors.
- Run this on Ambari node
- Add MySQL JAR to Ambari:
sudo ambari-server setup --jdbc-db=mysql --jdbc-driver=/usr/share/java/mysql-connector-java.jar- If the file is not present, it is available on RHEL/CentOS with:
sudo yum -y install mysql-connector-java
- If the file is not present, it is available on RHEL/CentOS with:
This should already be installed on your cluster. If not, refer to appendix here
-
Once Solr is installed, run below to set it up for Ranger audits. Steps are based on http://docs.hortonworks.com/HDPDocuments/HDP2/HDP-2.3.2/bk_Ranger_Install_Guide/content/solr_ranger_configure_solrcloud.html
-
Run on all nodes where Solr was installed.
- (To check, you can either use amabri UI or check for solr dir on each node:
ls /opt/lucidworks-hdpsearch/solr)
- (To check, you can either use amabri UI or check for solr dir on each node:
export JAVA_HOME=/usr/java/default
export host=$(curl -4 icanhazip.com)

sudo wget https://issues.apache.org/jira/secure/attachment/12761323/solr_for_audit_setup_v3.tgz -O /usr/local/solr_for_audit_setup_v3.tgz
cd /usr/local
sudo tar xvf solr_for_audit_setup_v3.tgz
cd /usr/local/solr_for_audit_setup
sudo mv install.properties install.properties.org

sudo tee install.properties > /dev/null <<EOF
#!/bin/bash
JAVA_HOME=$JAVA_HOME
SOLR_USER=solr
SOLR_INSTALL=false
SOLR_INSTALL_FOLDER=/opt/lucidworks-hdpsearch/solr
SOLR_RANGER_HOME=/opt/ranger_audit_server
SOLR_RANGER_PORT=6083
SOLR_DEPLOYMENT=solrcloud
SOLR_ZK=localhost:2181/ranger_audits
SOLR_HOST_URL=http://$host:\${SOLR_RANGER_PORT}
SOLR_SHARDS=1
SOLR_REPLICATION=2
SOLR_LOG_FOLDER=/var/log/solr/ranger_audits
SOLR_MAX_MEM=1g
EOF
sudo ./setup.sh
- create ZK dir - only needs to be run from one of the Solr nodes
sudo /opt/ranger_audit_server/scripts/add_ranger_audits_conf_to_zk.sh
- if you installed Solr via Ambari, skip this step. Otherwise, run this on each Solr node to start the service in Cloud mode
sudo /opt/ranger_audit_server/scripts/start_solr.sh
- Create collection - only needs to be run from one of the Solr nodes
sudo sed -i 's,^SOLR_HOST_URL=.*,SOLR_HOST_URL=http://localhost:6083,' \
   /opt/ranger_audit_server/scripts/create_ranger_audits_collection.sh

sudo /opt/ranger_audit_server/scripts/create_ranger_audits_collection.sh
-
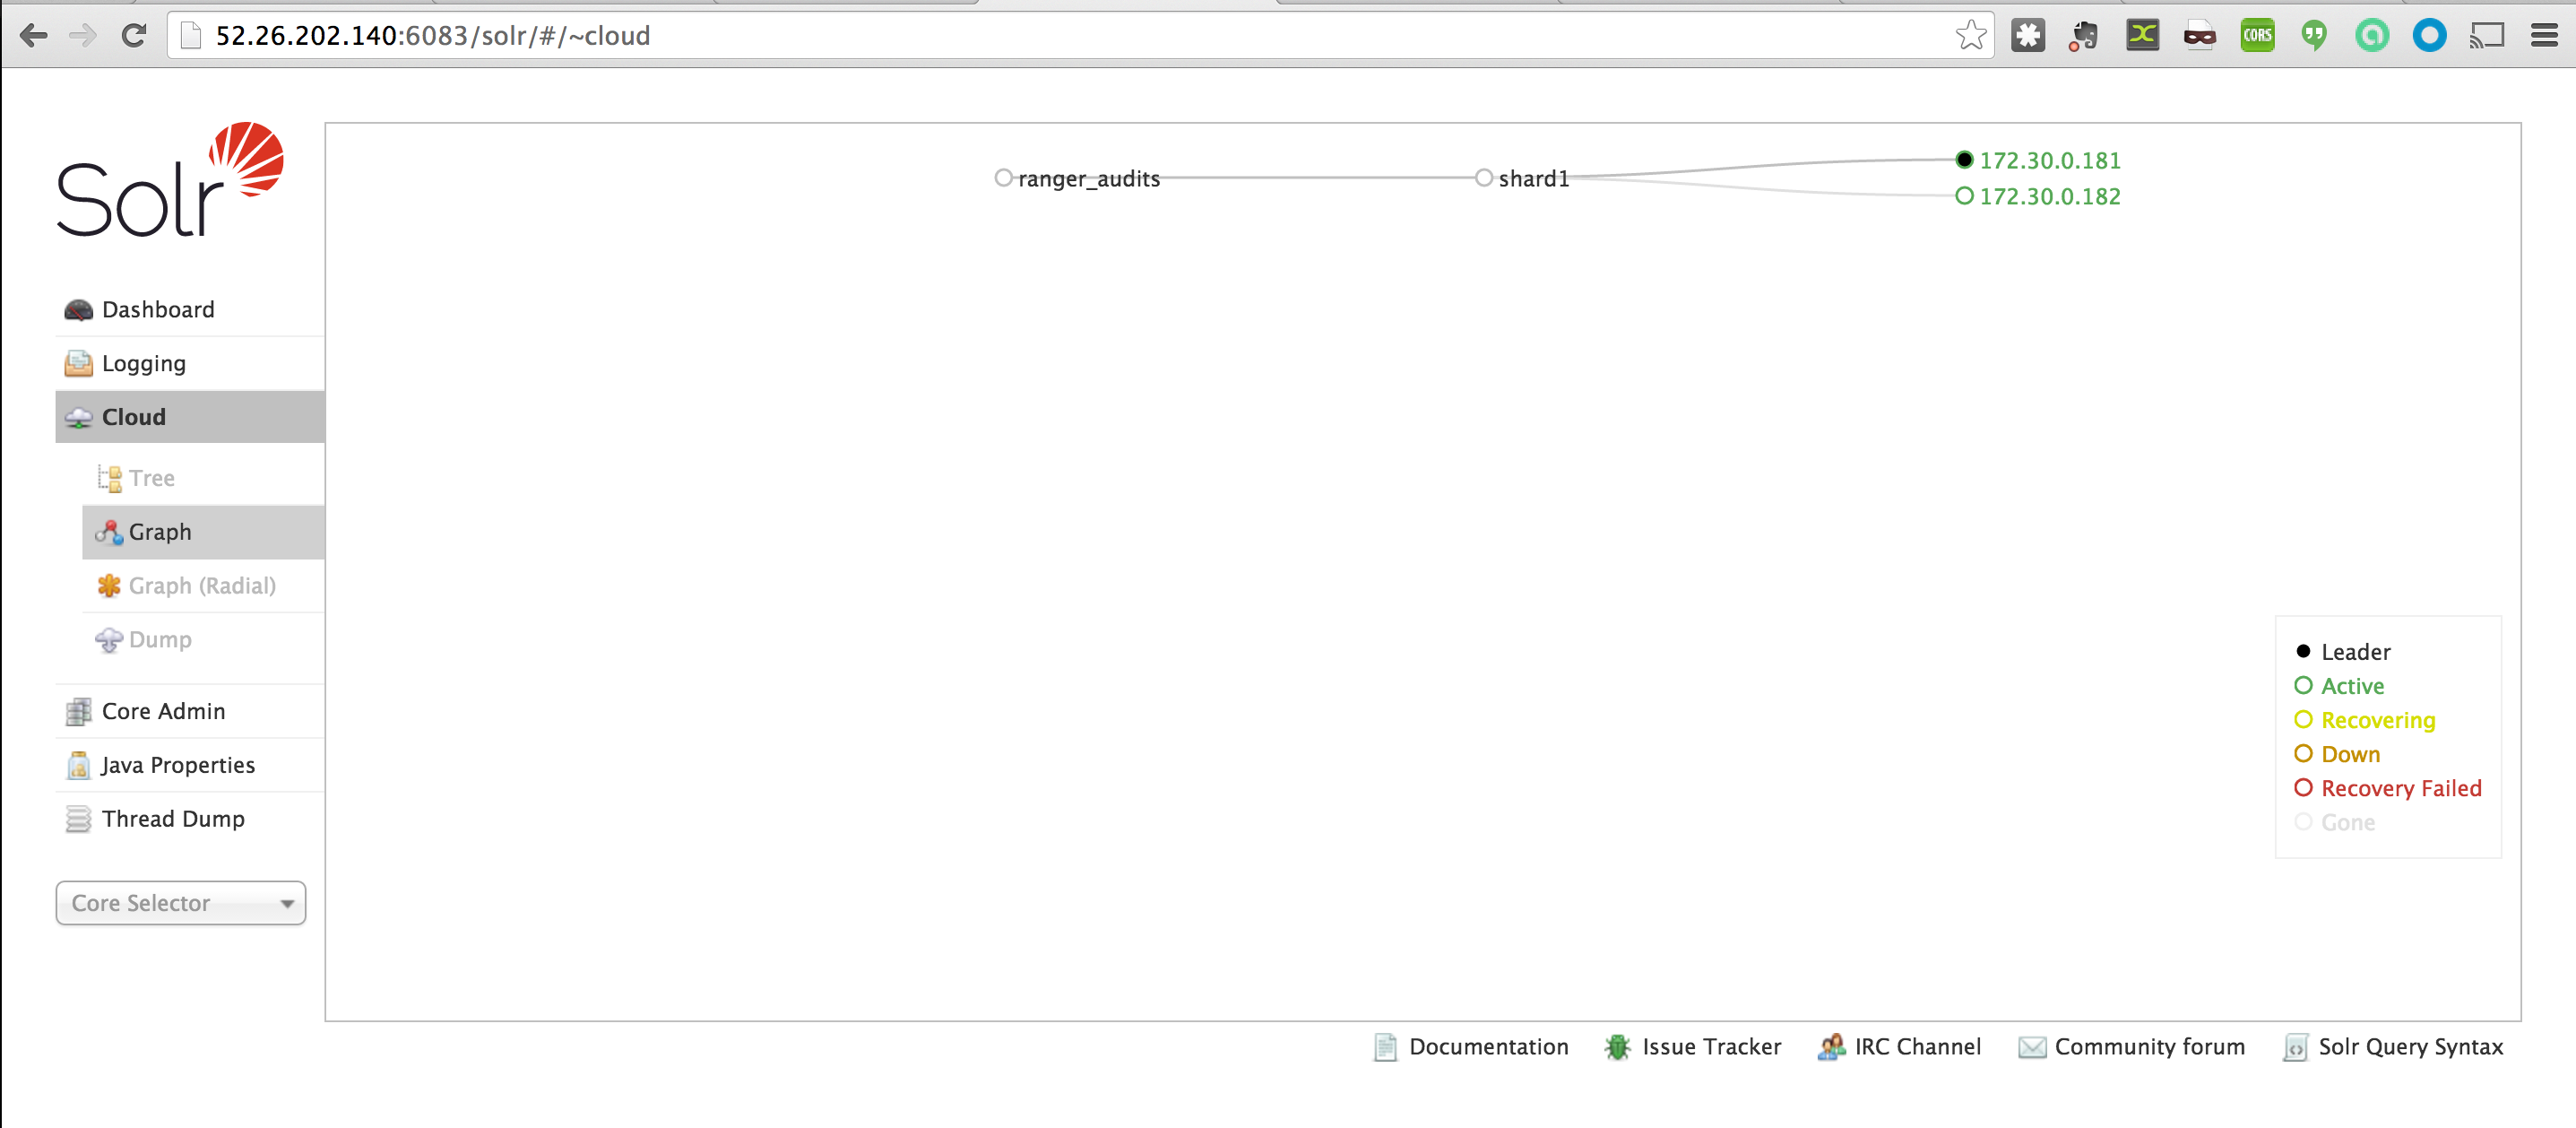
Now you should access Solr webui http://PublicIPofAnySolrNode:6083/solr
- Click the Cloud > Graph tab to find the leader host i.e. the dark dot (172.30.0.181 in below example)
- Usually the leader node is the one where the collection was created from
- Usually the leader node is the one where the collection was created from
- Click the Cloud > Graph tab to find the leader host i.e. the dark dot (172.30.0.181 in below example)
-
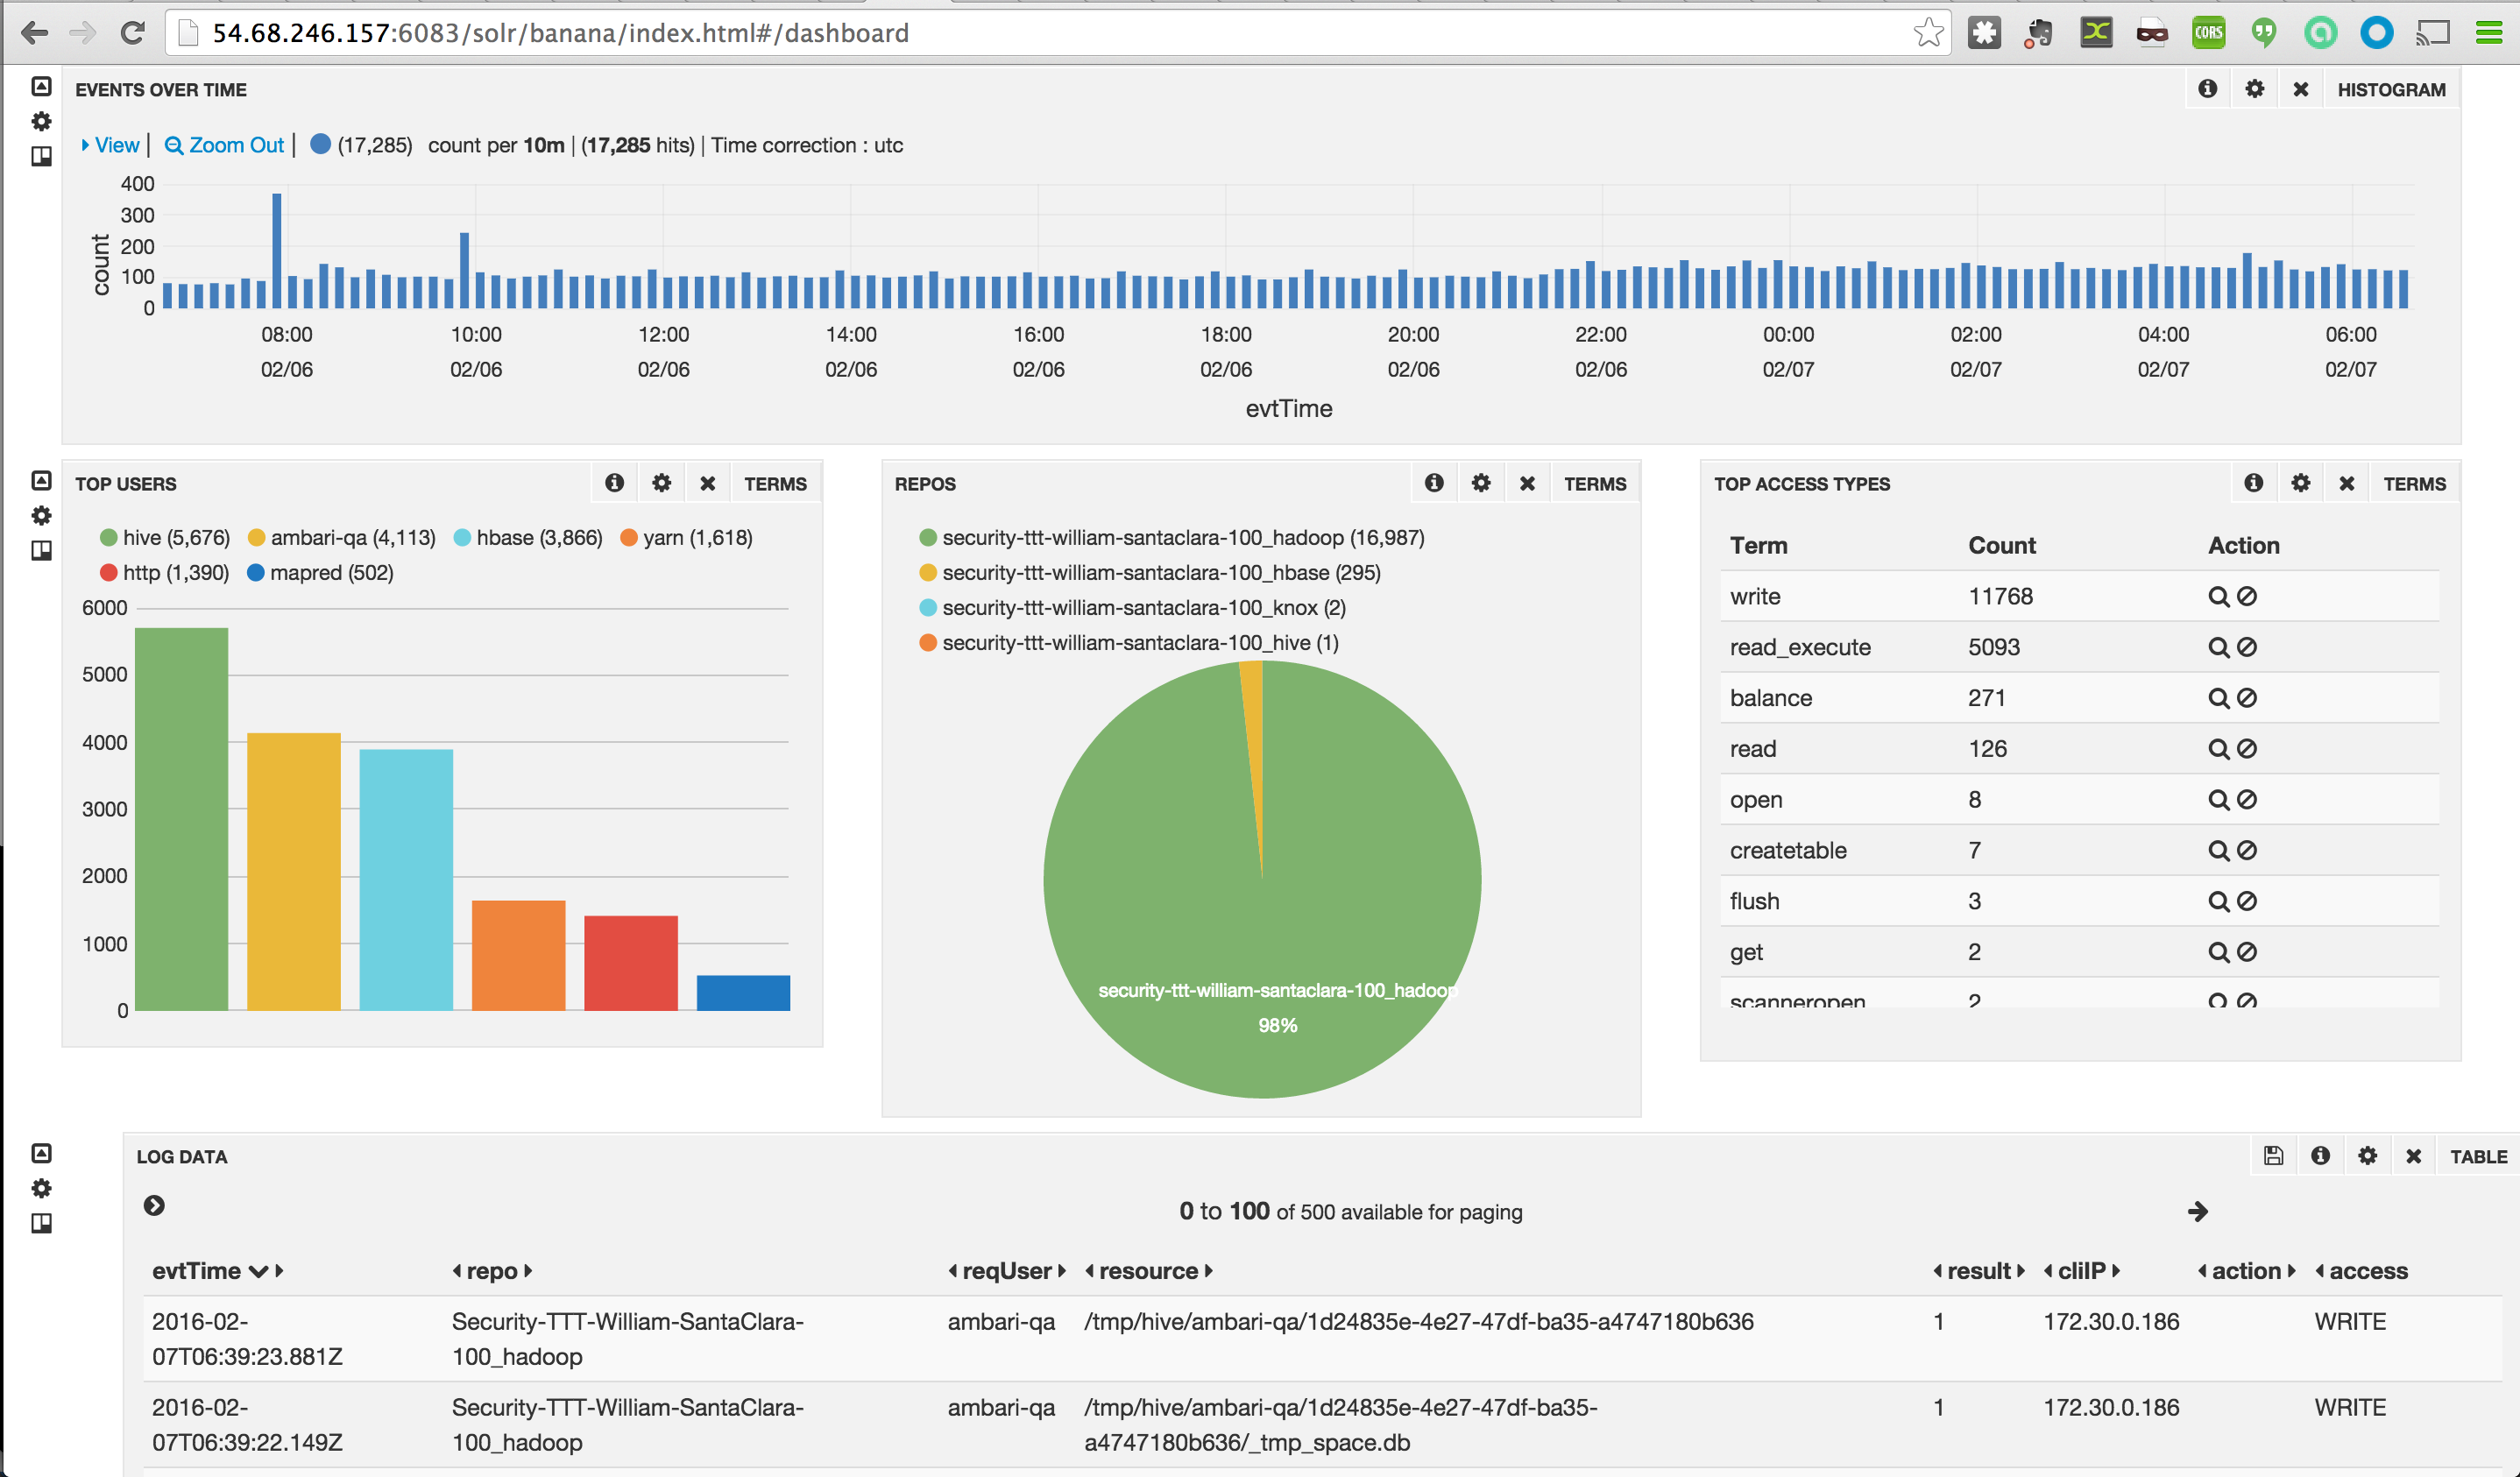
(Optional) - From the the leader node host, install SILK (banana) dashboard to visualize audits in Solr
export host=$(curl -4 icanhazip.com)
sudo wget https://raw.githubusercontent.com/HortonworksUniversity/Security_Labs/master/extras/default.json -O /opt/lucidworks-hdpsearch/solr/server/solr-webapp/webapp/banana/app/dashboards/default.json
sudo chown solr:solr /opt/lucidworks-hdpsearch/solr/server/solr-webapp/webapp/banana/app/dashboards/default.json
# access banana dashboard at http://SolrLeaderNodeIP:6083/solr/banana/index.html
-
if you are not able to see the dashboard, make sure you ran previous step on the Solr leader node
-
At this point you should be able to:
- Access Solr webui for ranger_audits collection at http://SolrLeaderNodeIP:6083/solr/#/ranger_audits_shard1_replica1.
- This is currently empty but will be where Ranger audits will get stored
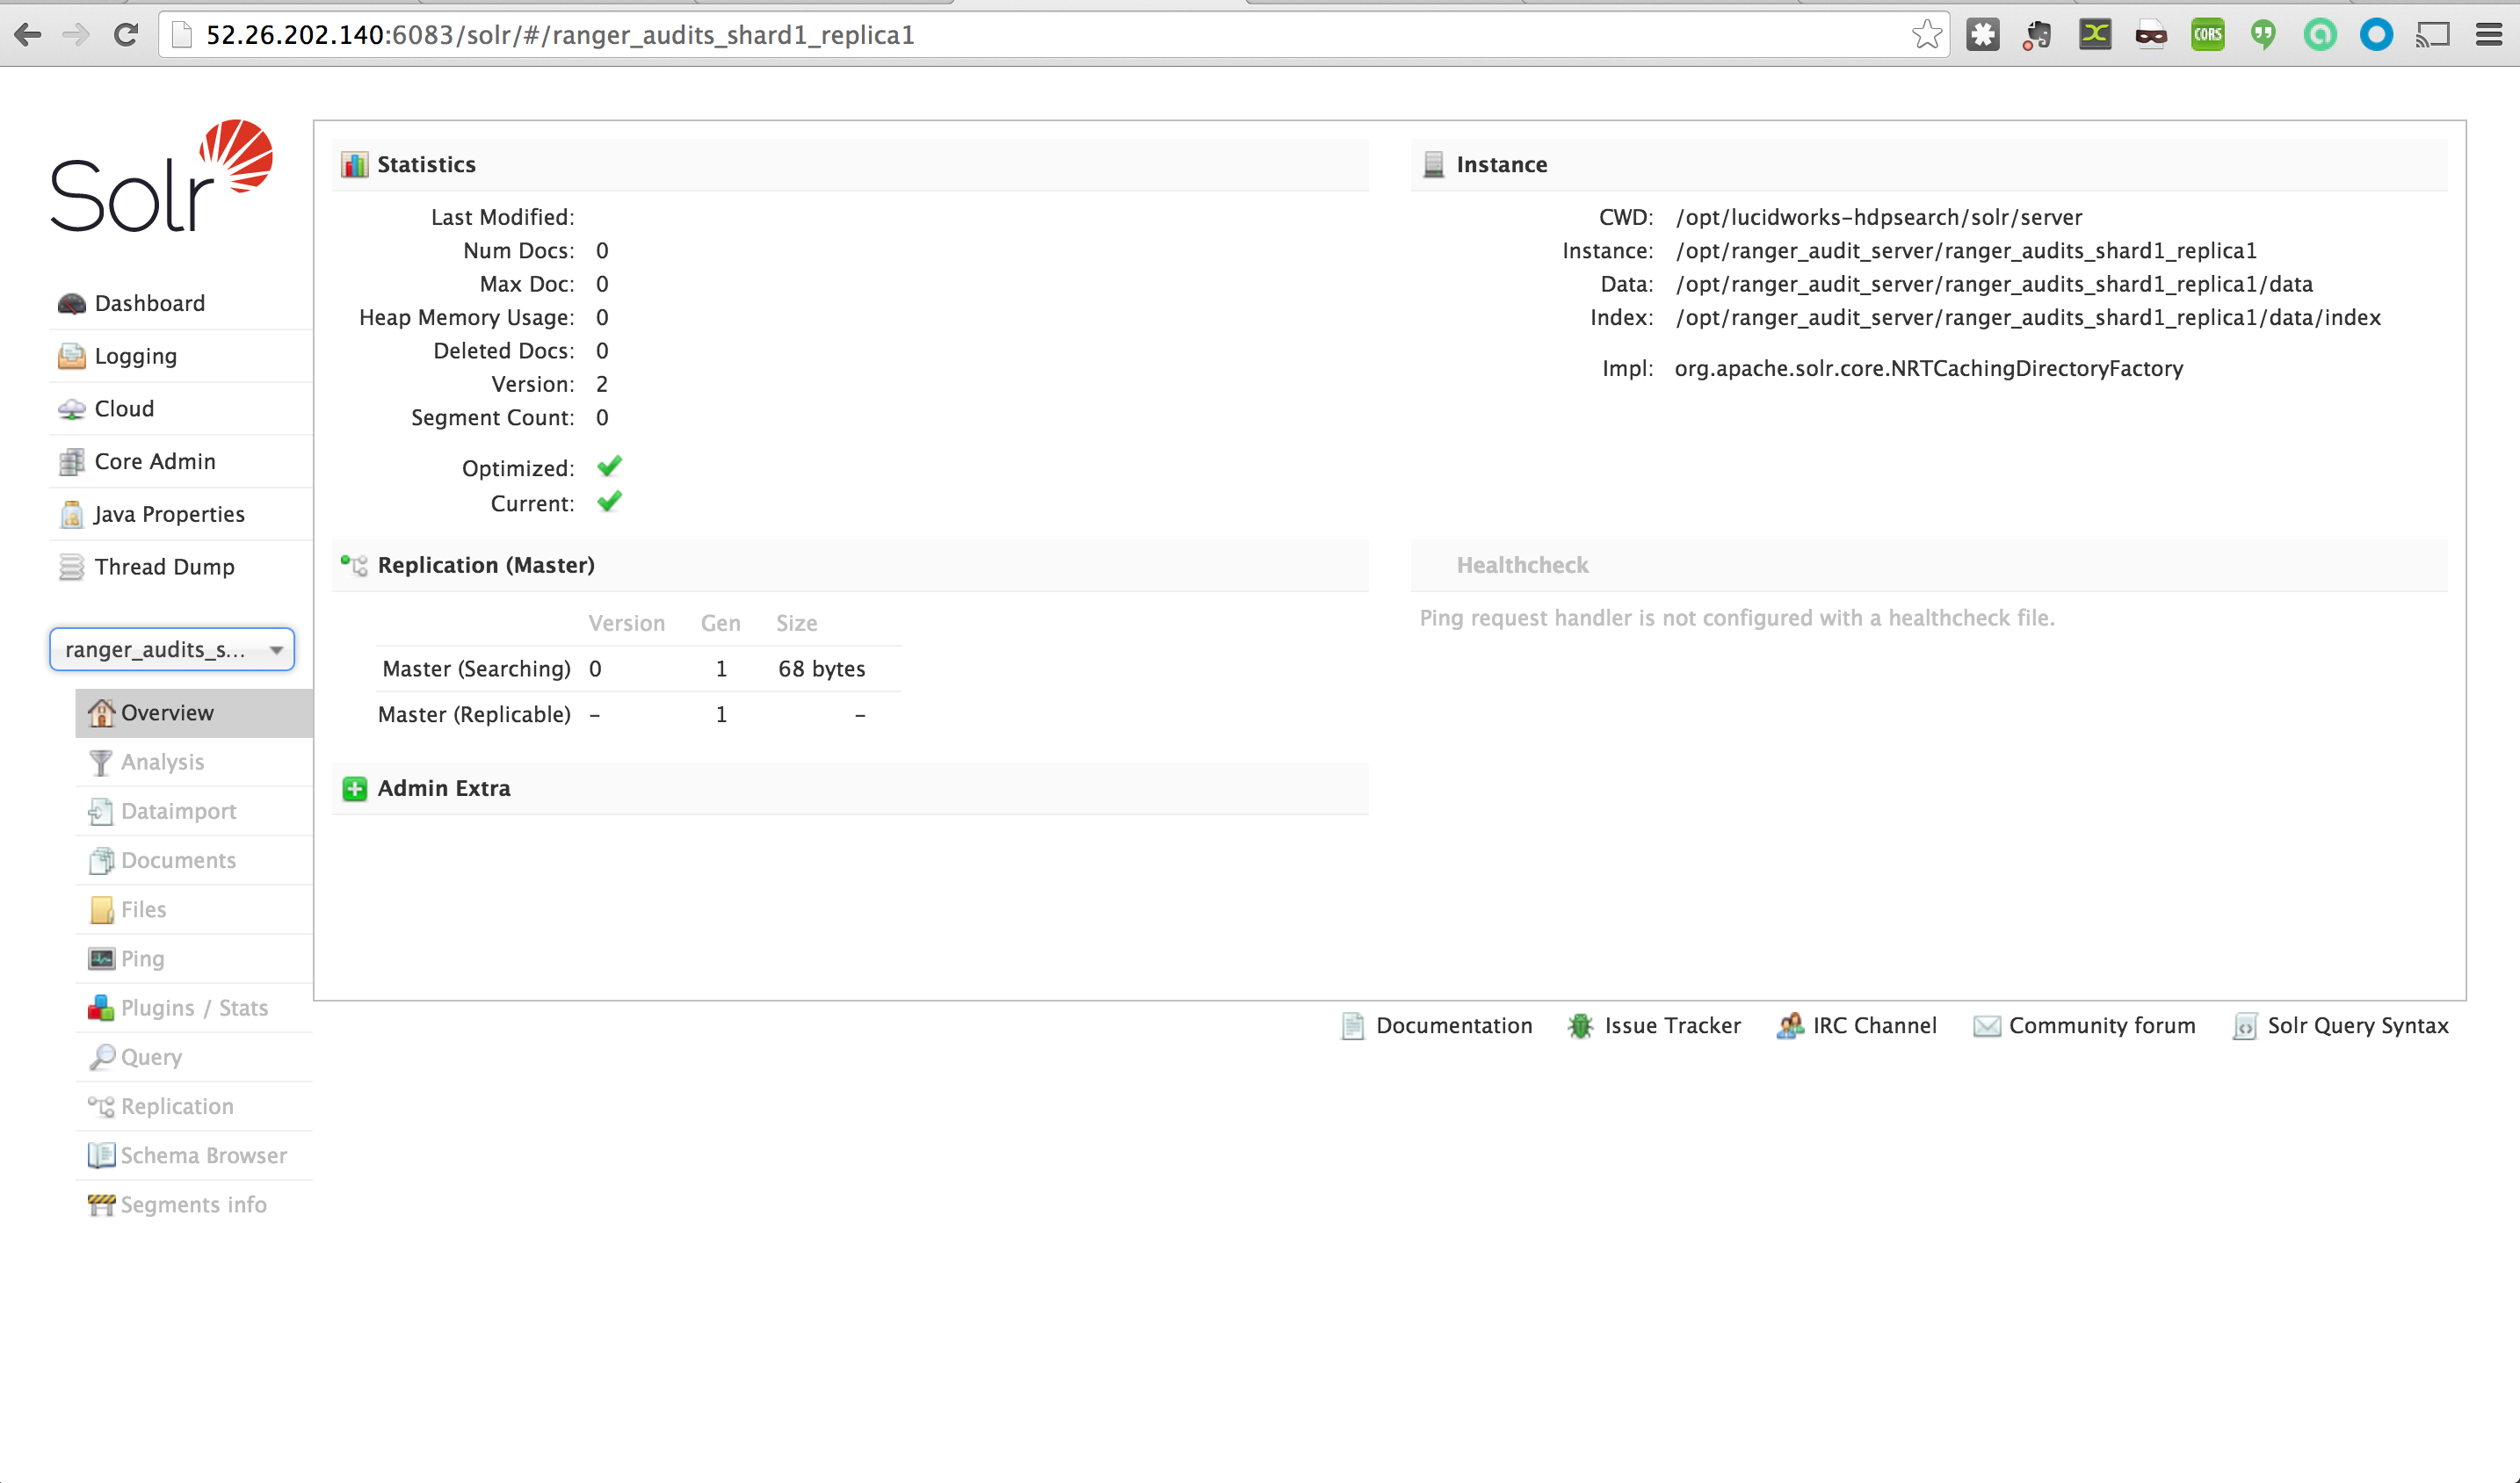
- This is currently empty but will be where Ranger audits will get stored
- access banana dashboard (if installed earlier) at http://SolrLeaderNodeIP:6083/solr/banana/index.html
- This is currently empty but will be where Ranger audits will get visualized

- Access Solr webui for ranger_audits collection at http://SolrLeaderNodeIP:6083/solr/#/ranger_audits_shard1_replica1.
-
Start the Ambari 'Add Service' wizard and select Ranger
-
When prompted for where to install it, choose any node you like
-
On the Ranger Requirements popup windows, you can check the box and continue as we have already completed the pre-requisite steps
-
On the 'Customize Services' page of the wizard there are a number of tabs that need to be configured as below
-
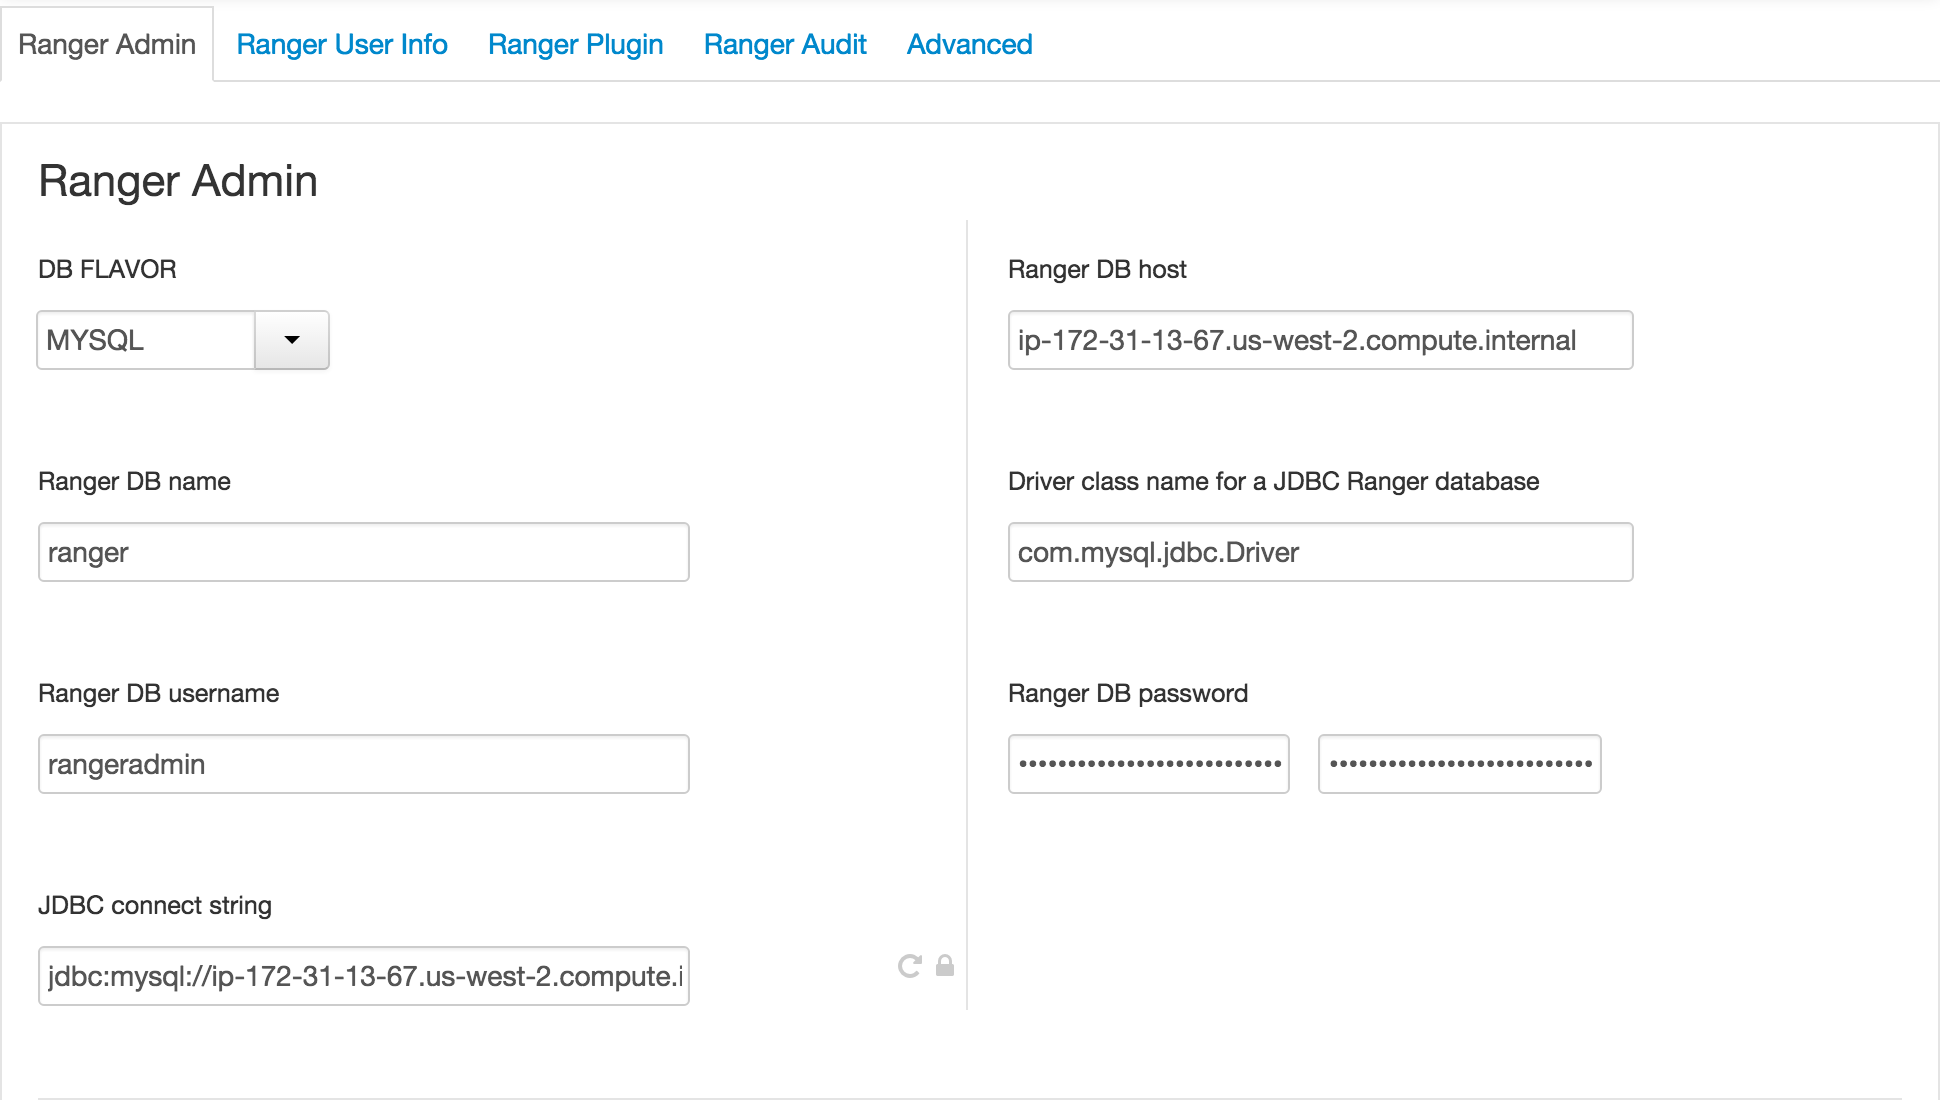
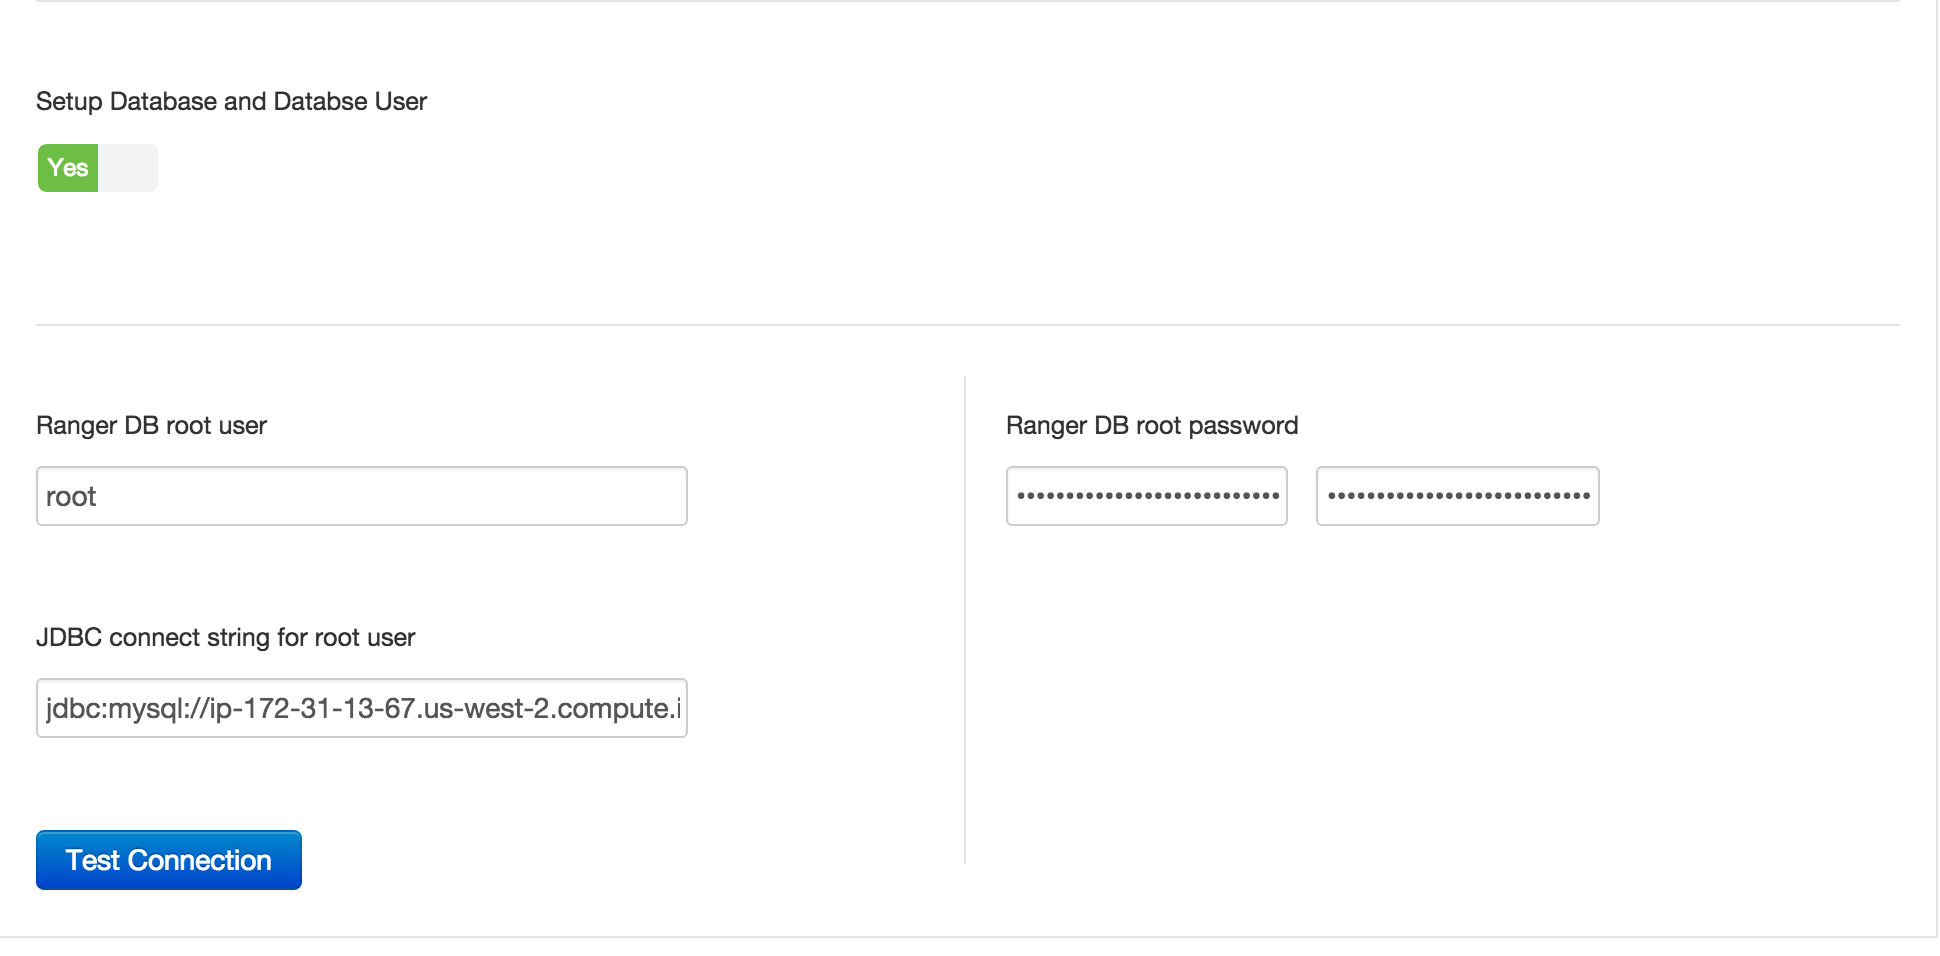
Go through each Ranger config tab, making below changes:
- Ranger Admin tab:
- Ranger DB Host = FQDN of host where Mysql is running (e.g. ip-172-30-0-242.us-west-2.compute.internal)
- Enter passwords: BadPass#1
- Click 'Test Connection' button
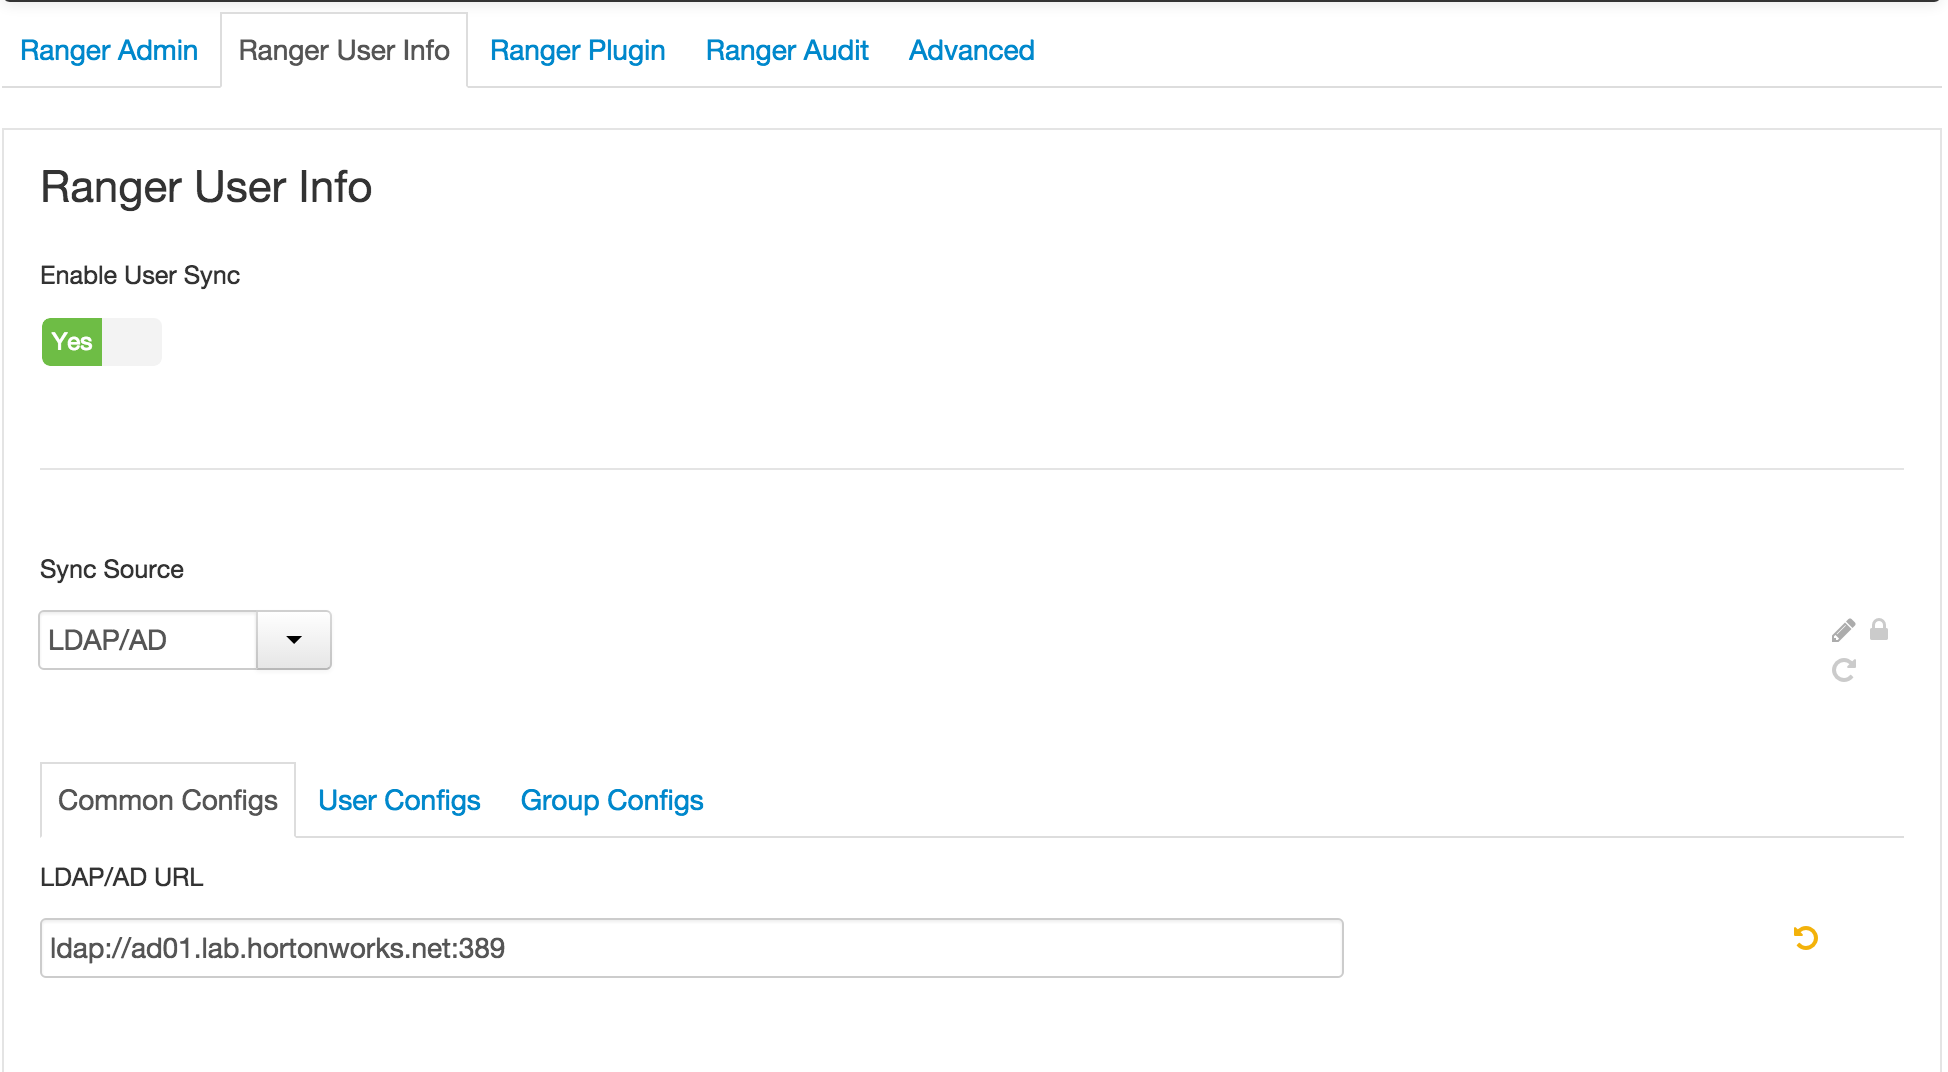
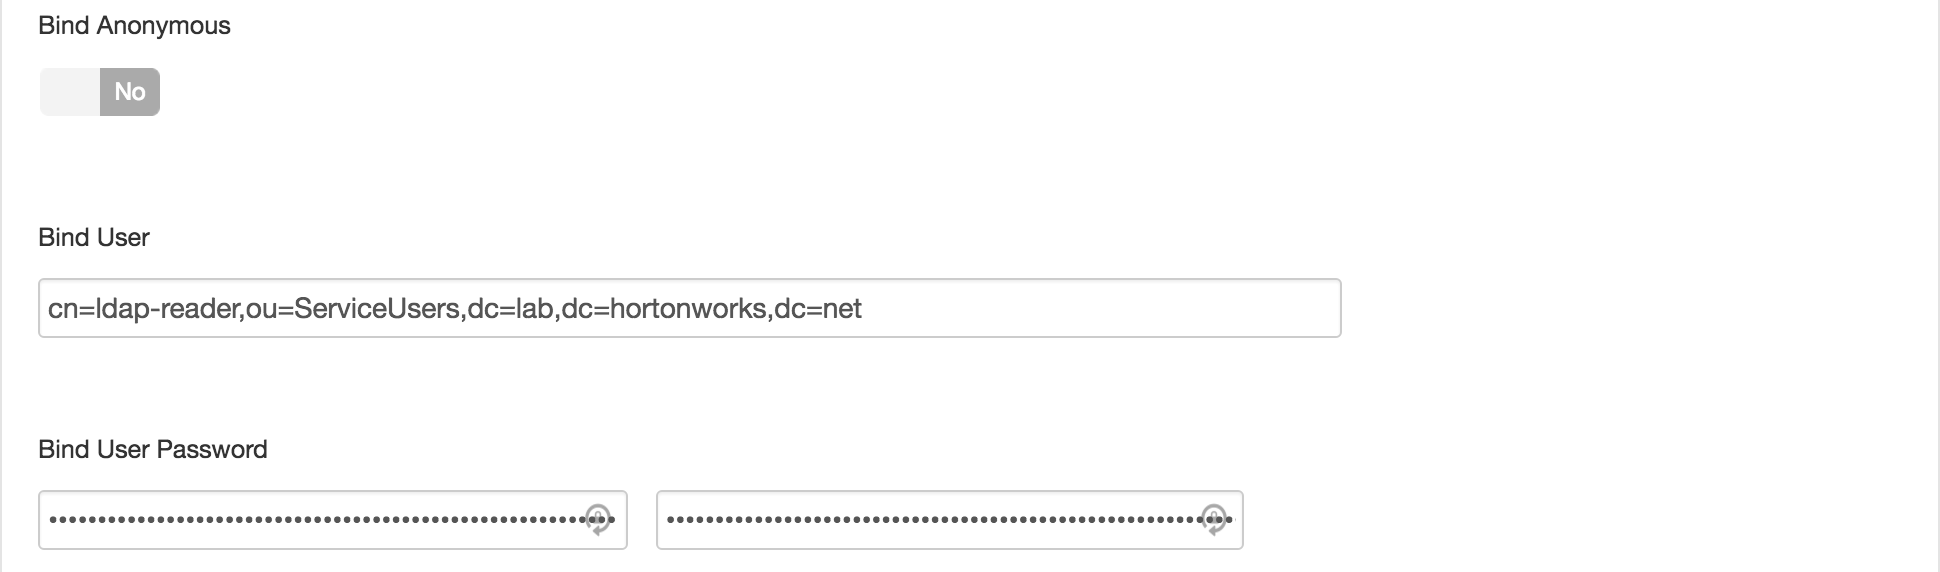
- Ranger User info tab
- 'Sync Source' = LDAP/AD
- Common configs subtab
- Enter password: BadPass#1
- Enter password: BadPass#1
- Ranger User info tab
- User configs subtab
- User Search Base =
ou=CorpUsers,dc=lab,dc=hortonworks,dc=net - User Search Filter =
(objectcategory=person)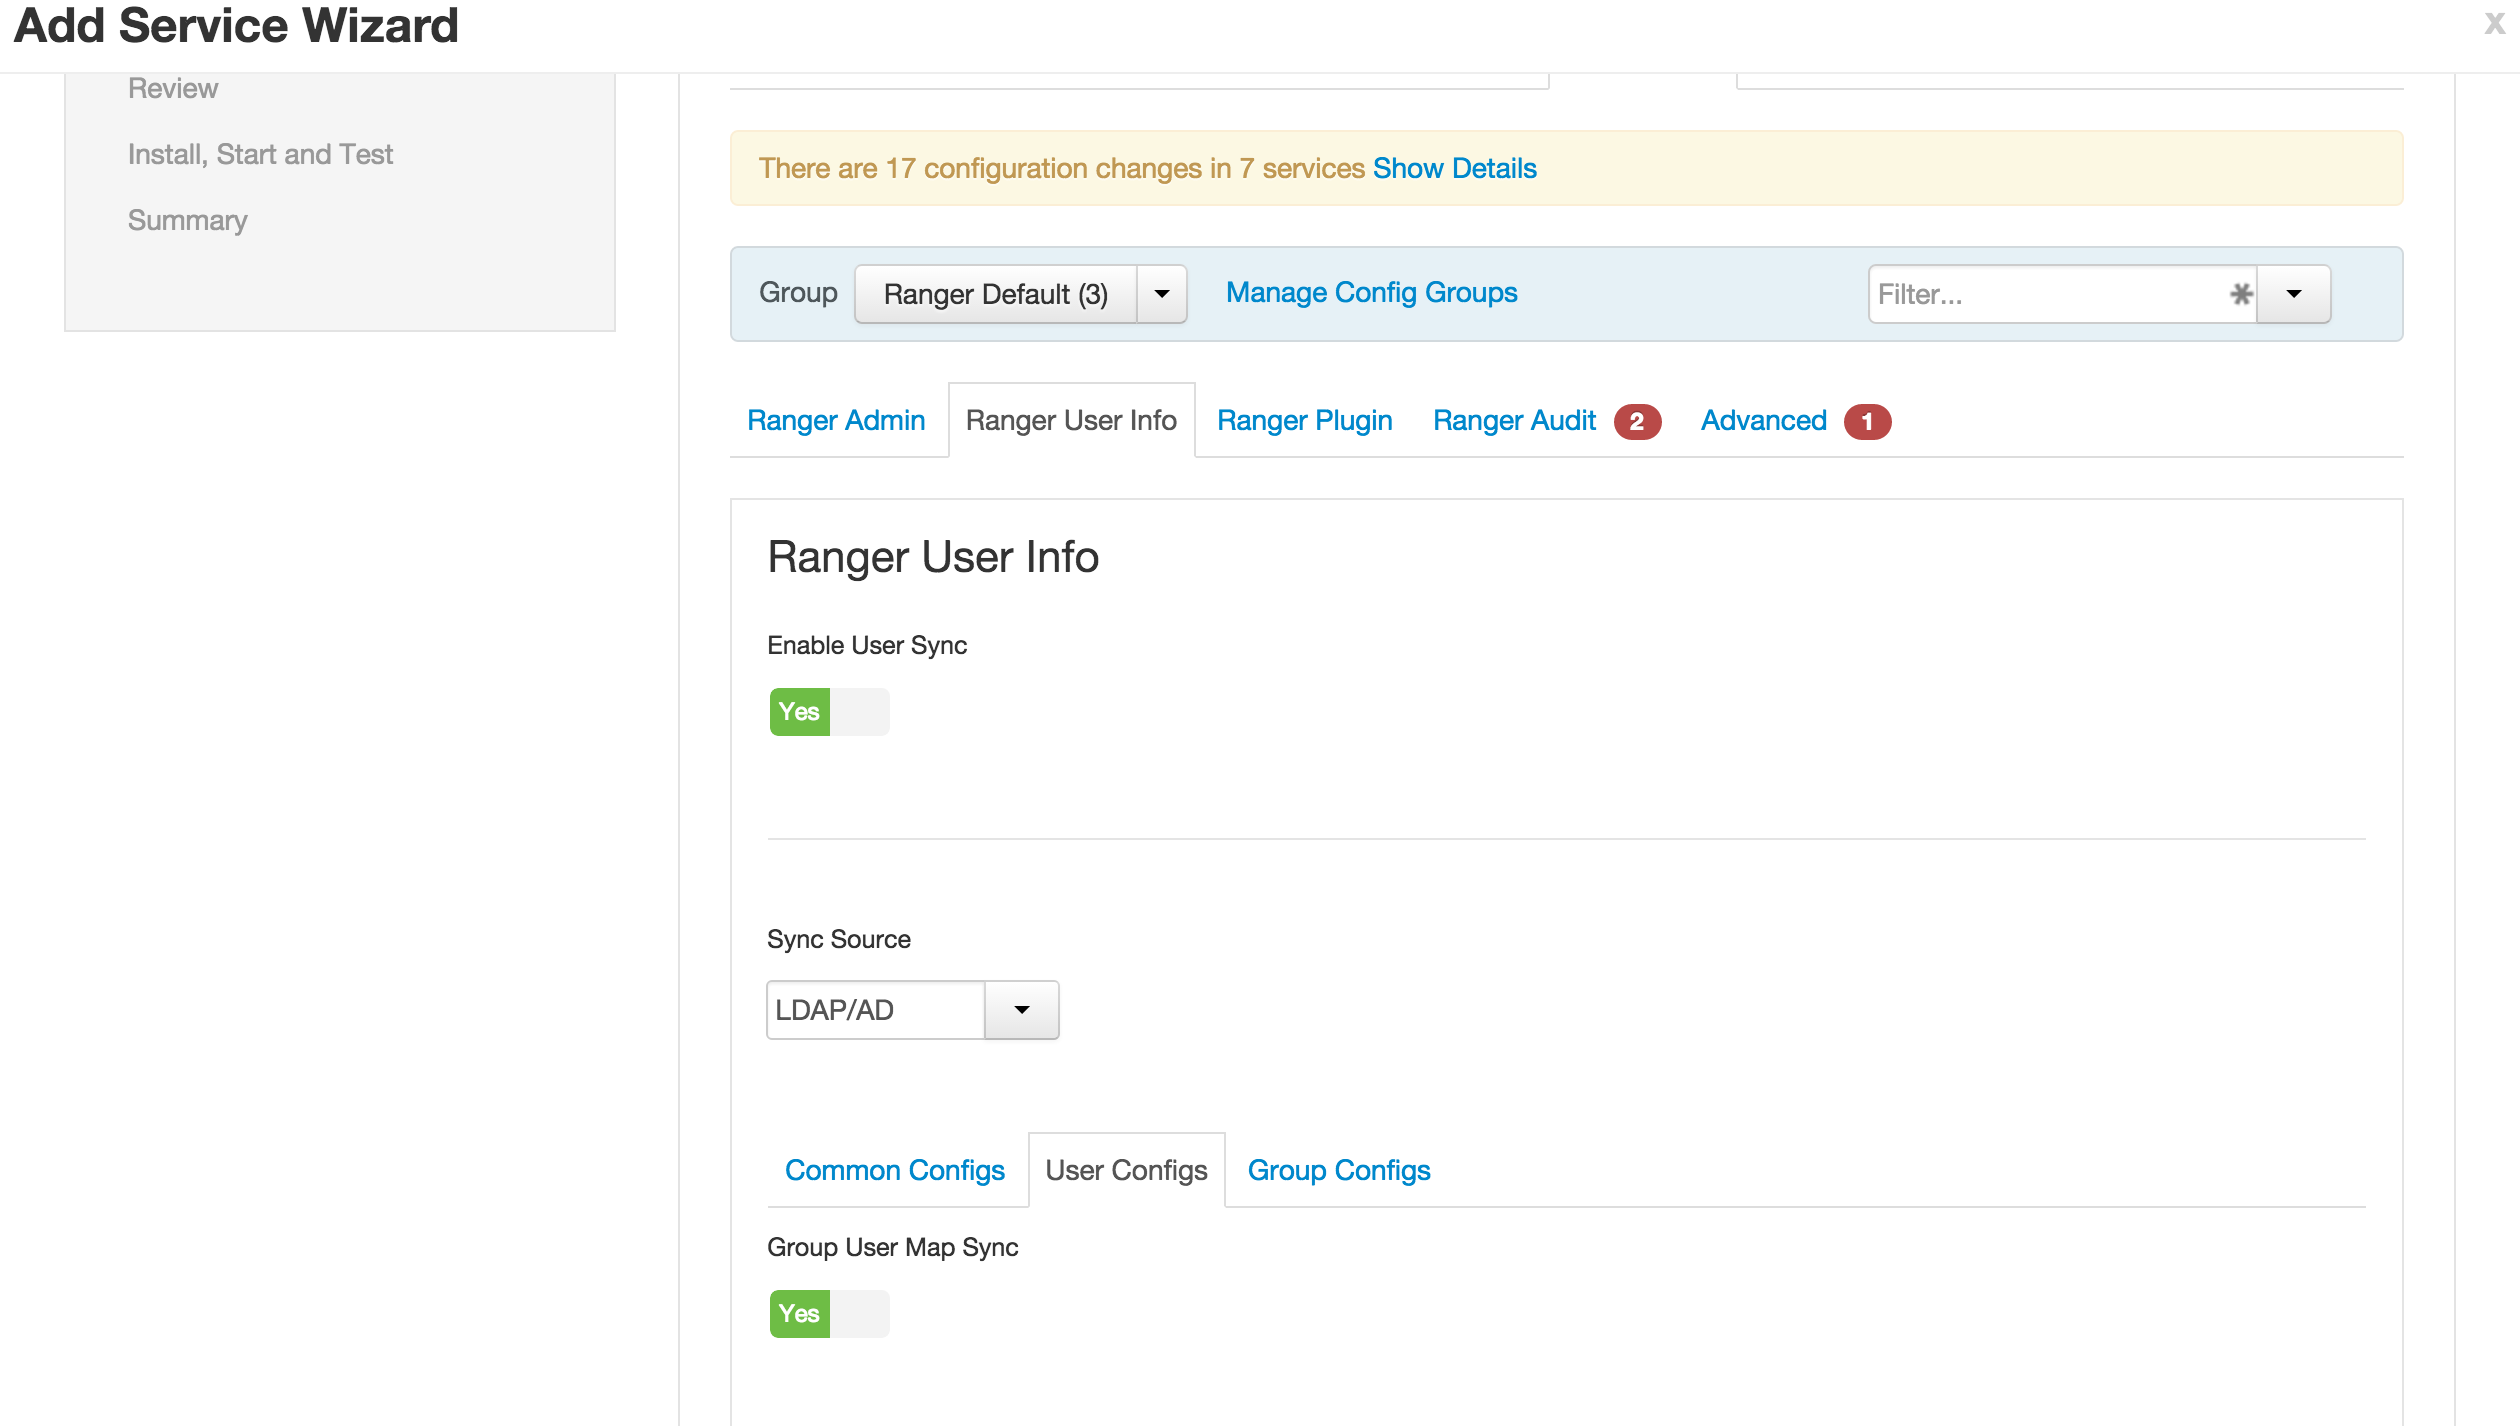

- User Search Base =
- Ranger User info tab
- Group configs subtab
- No changes needed
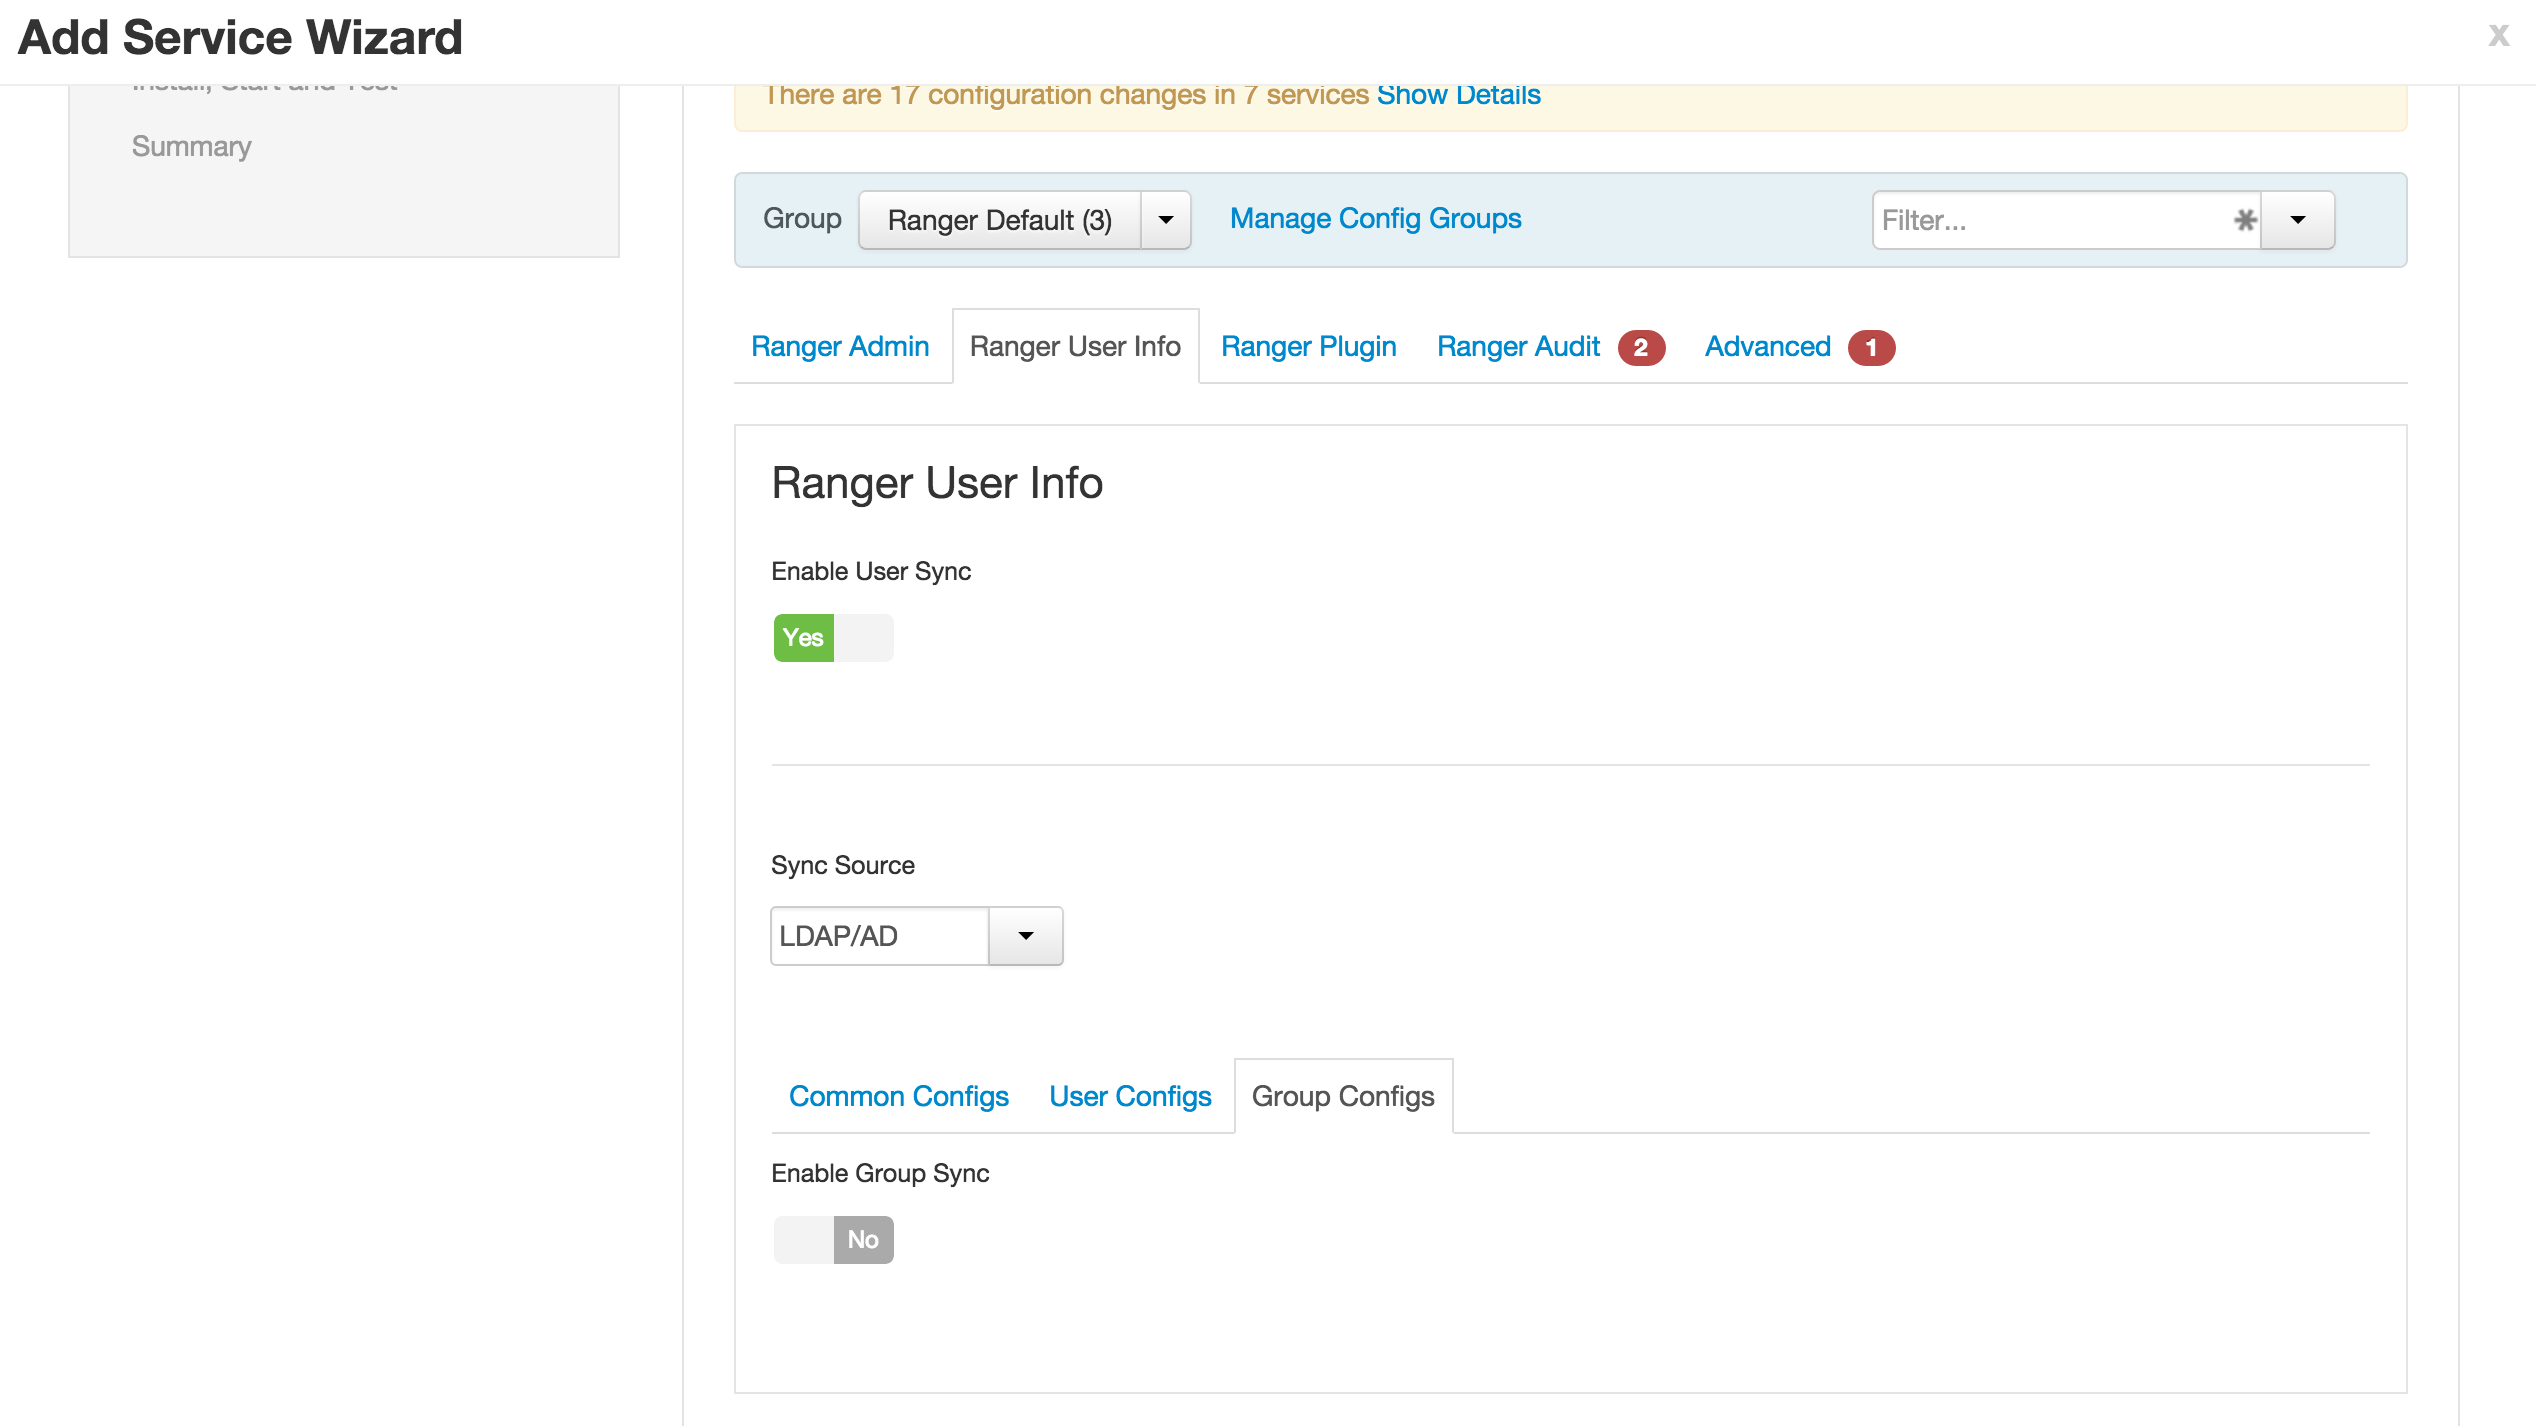
- No changes needed
- Ranger plugins tab
- Enable all plugins

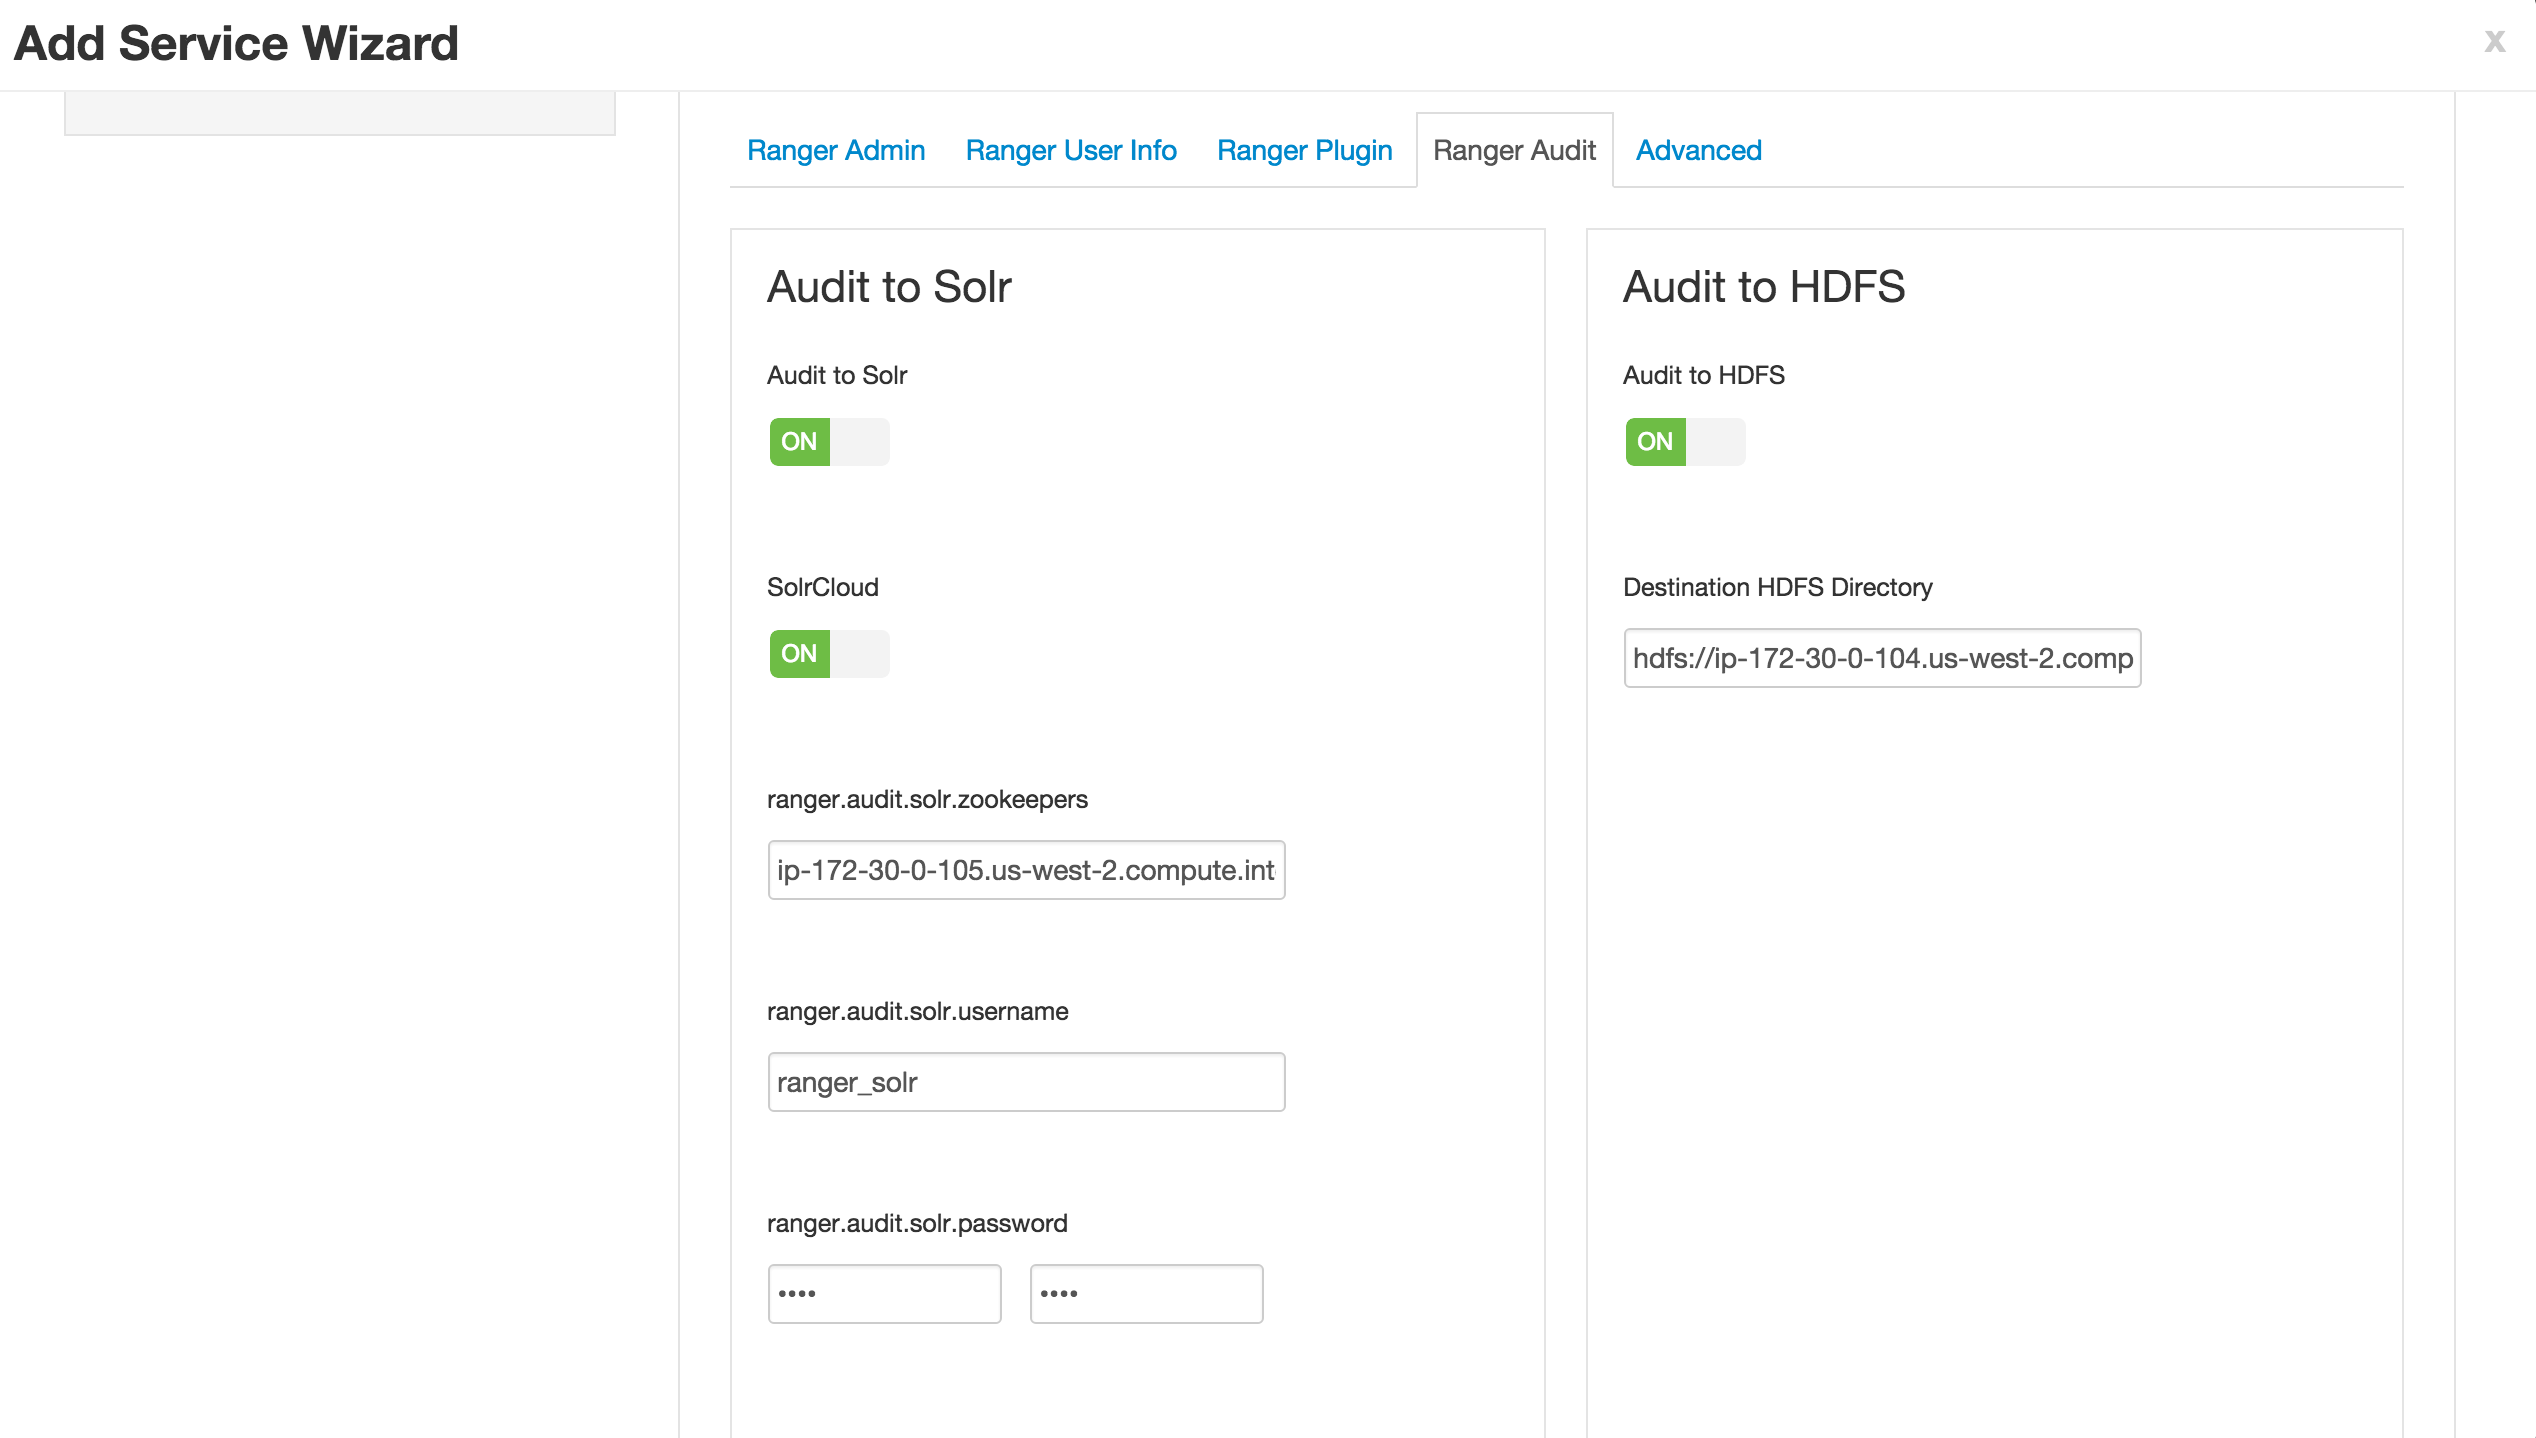
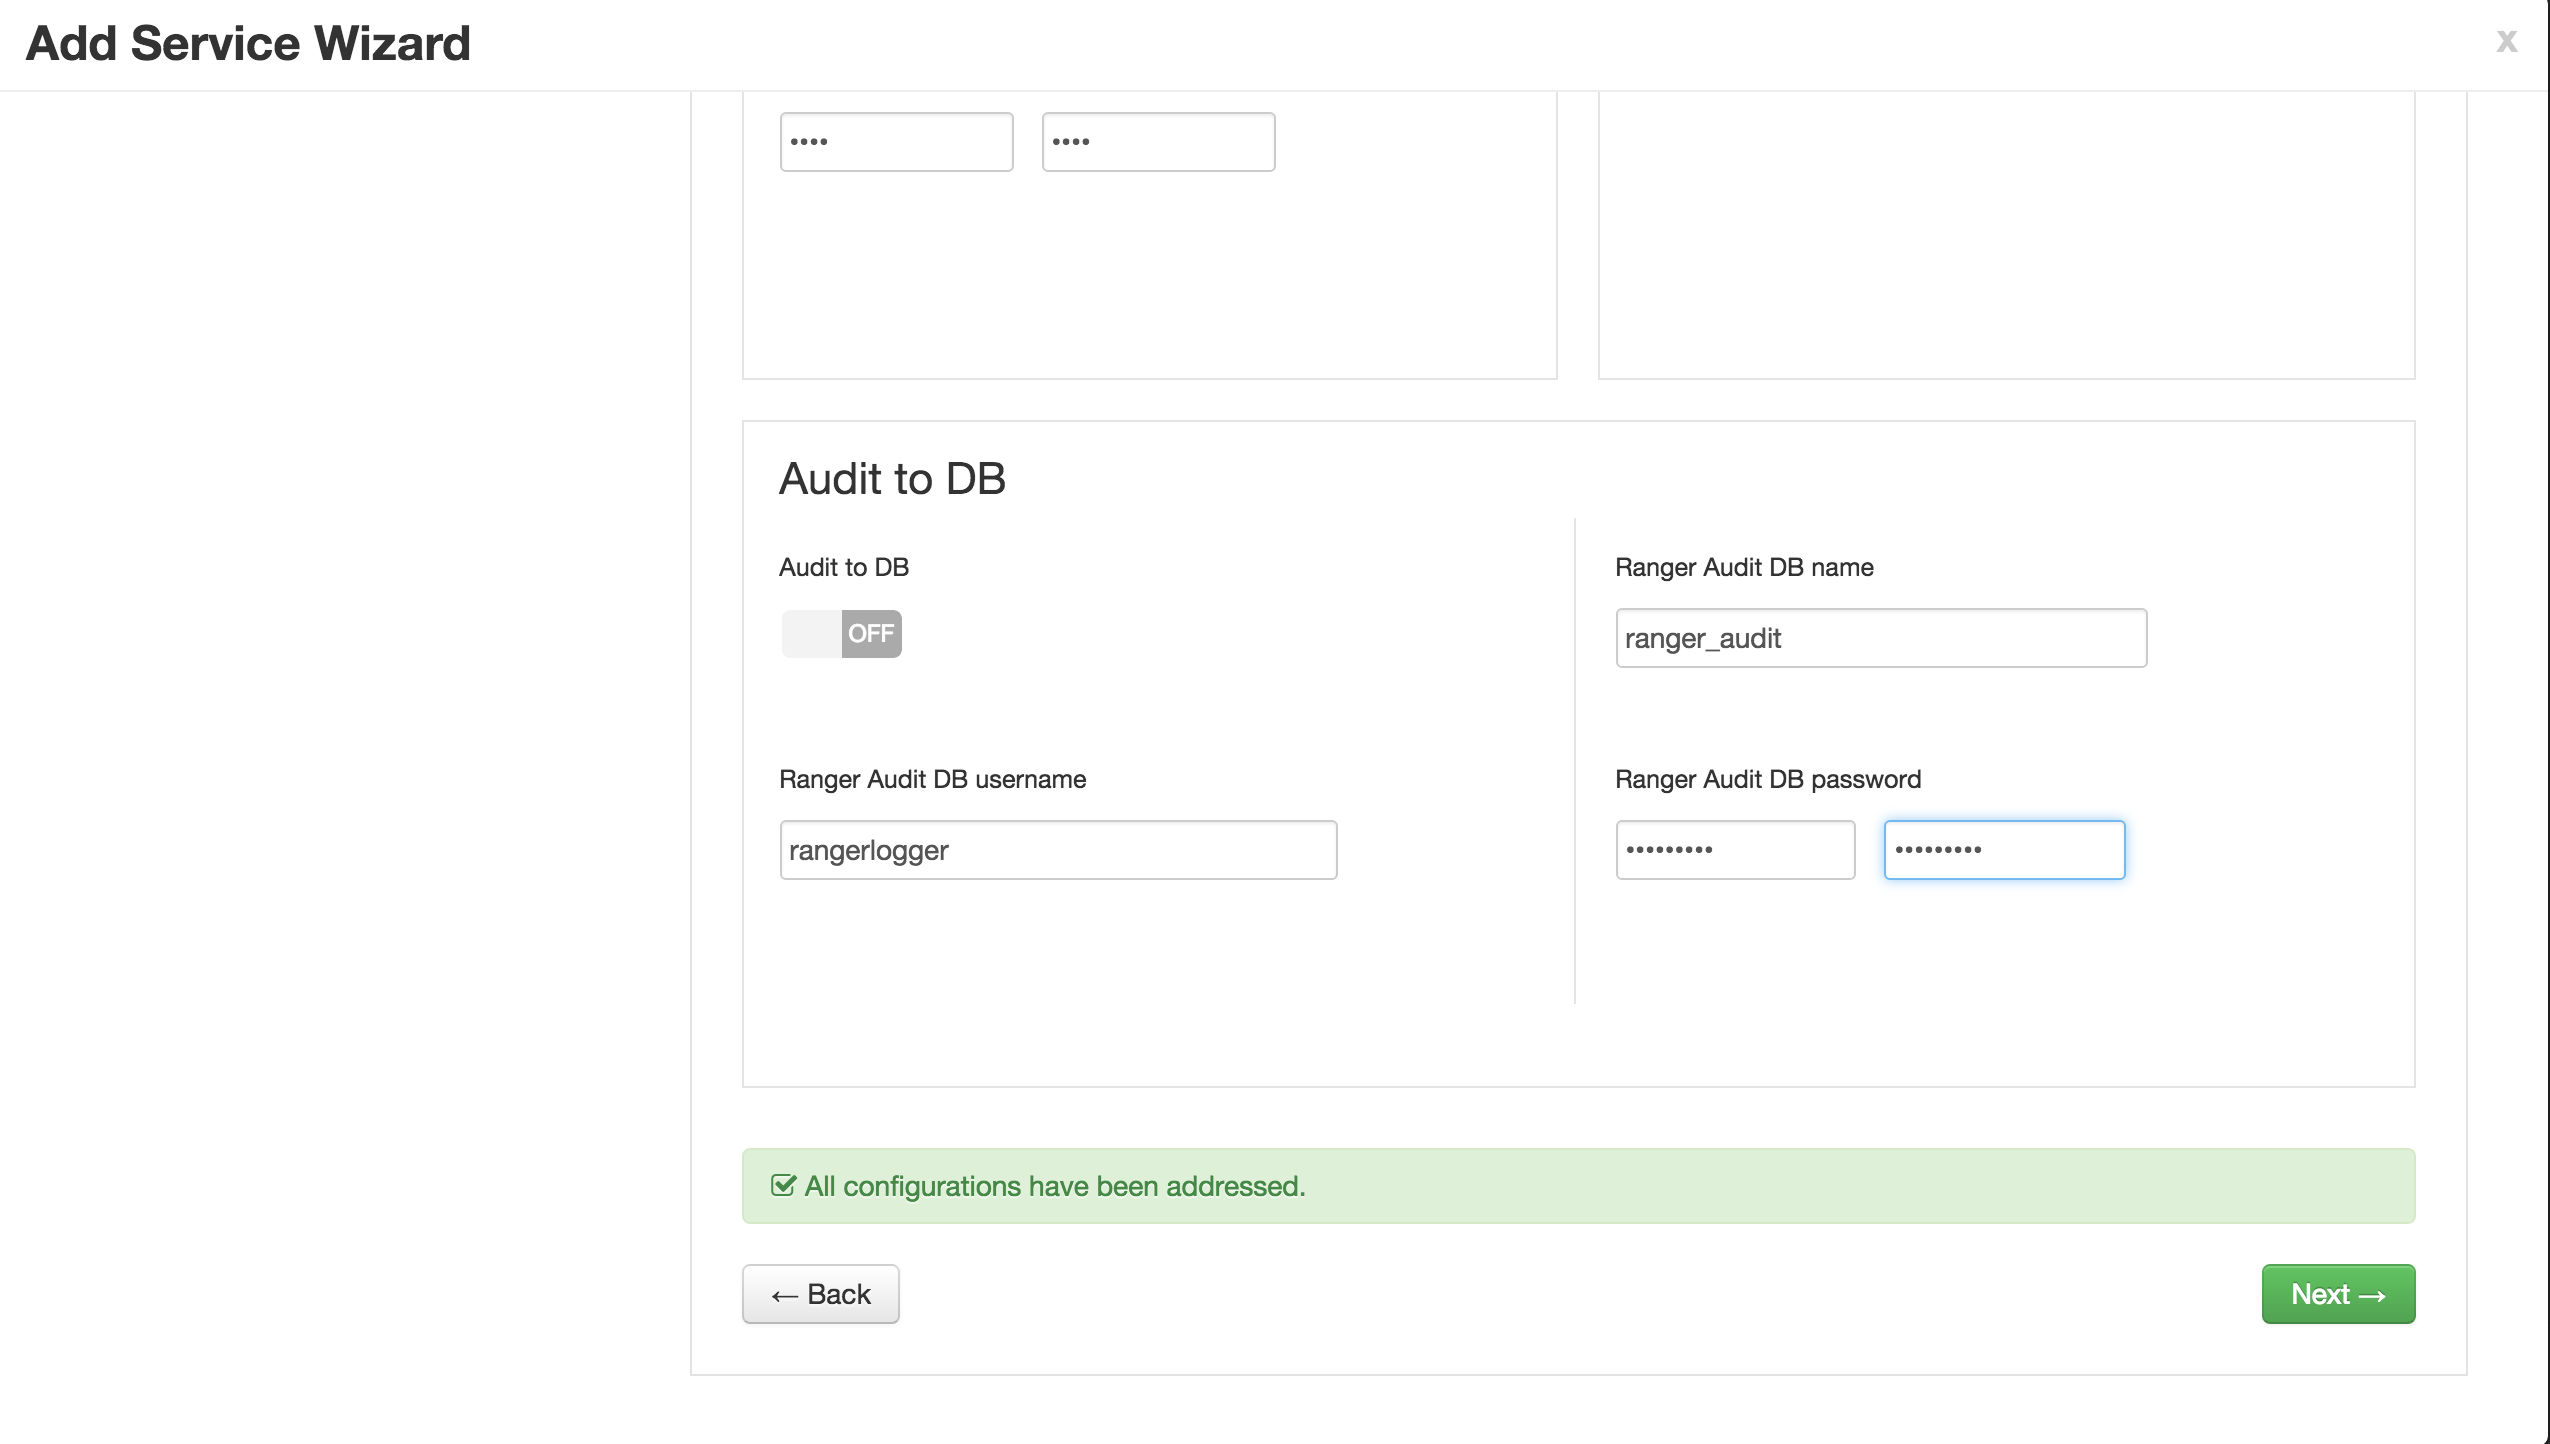
- Ranger Audits tab
- SolrCloud = ON
- enter password: BadPass#1
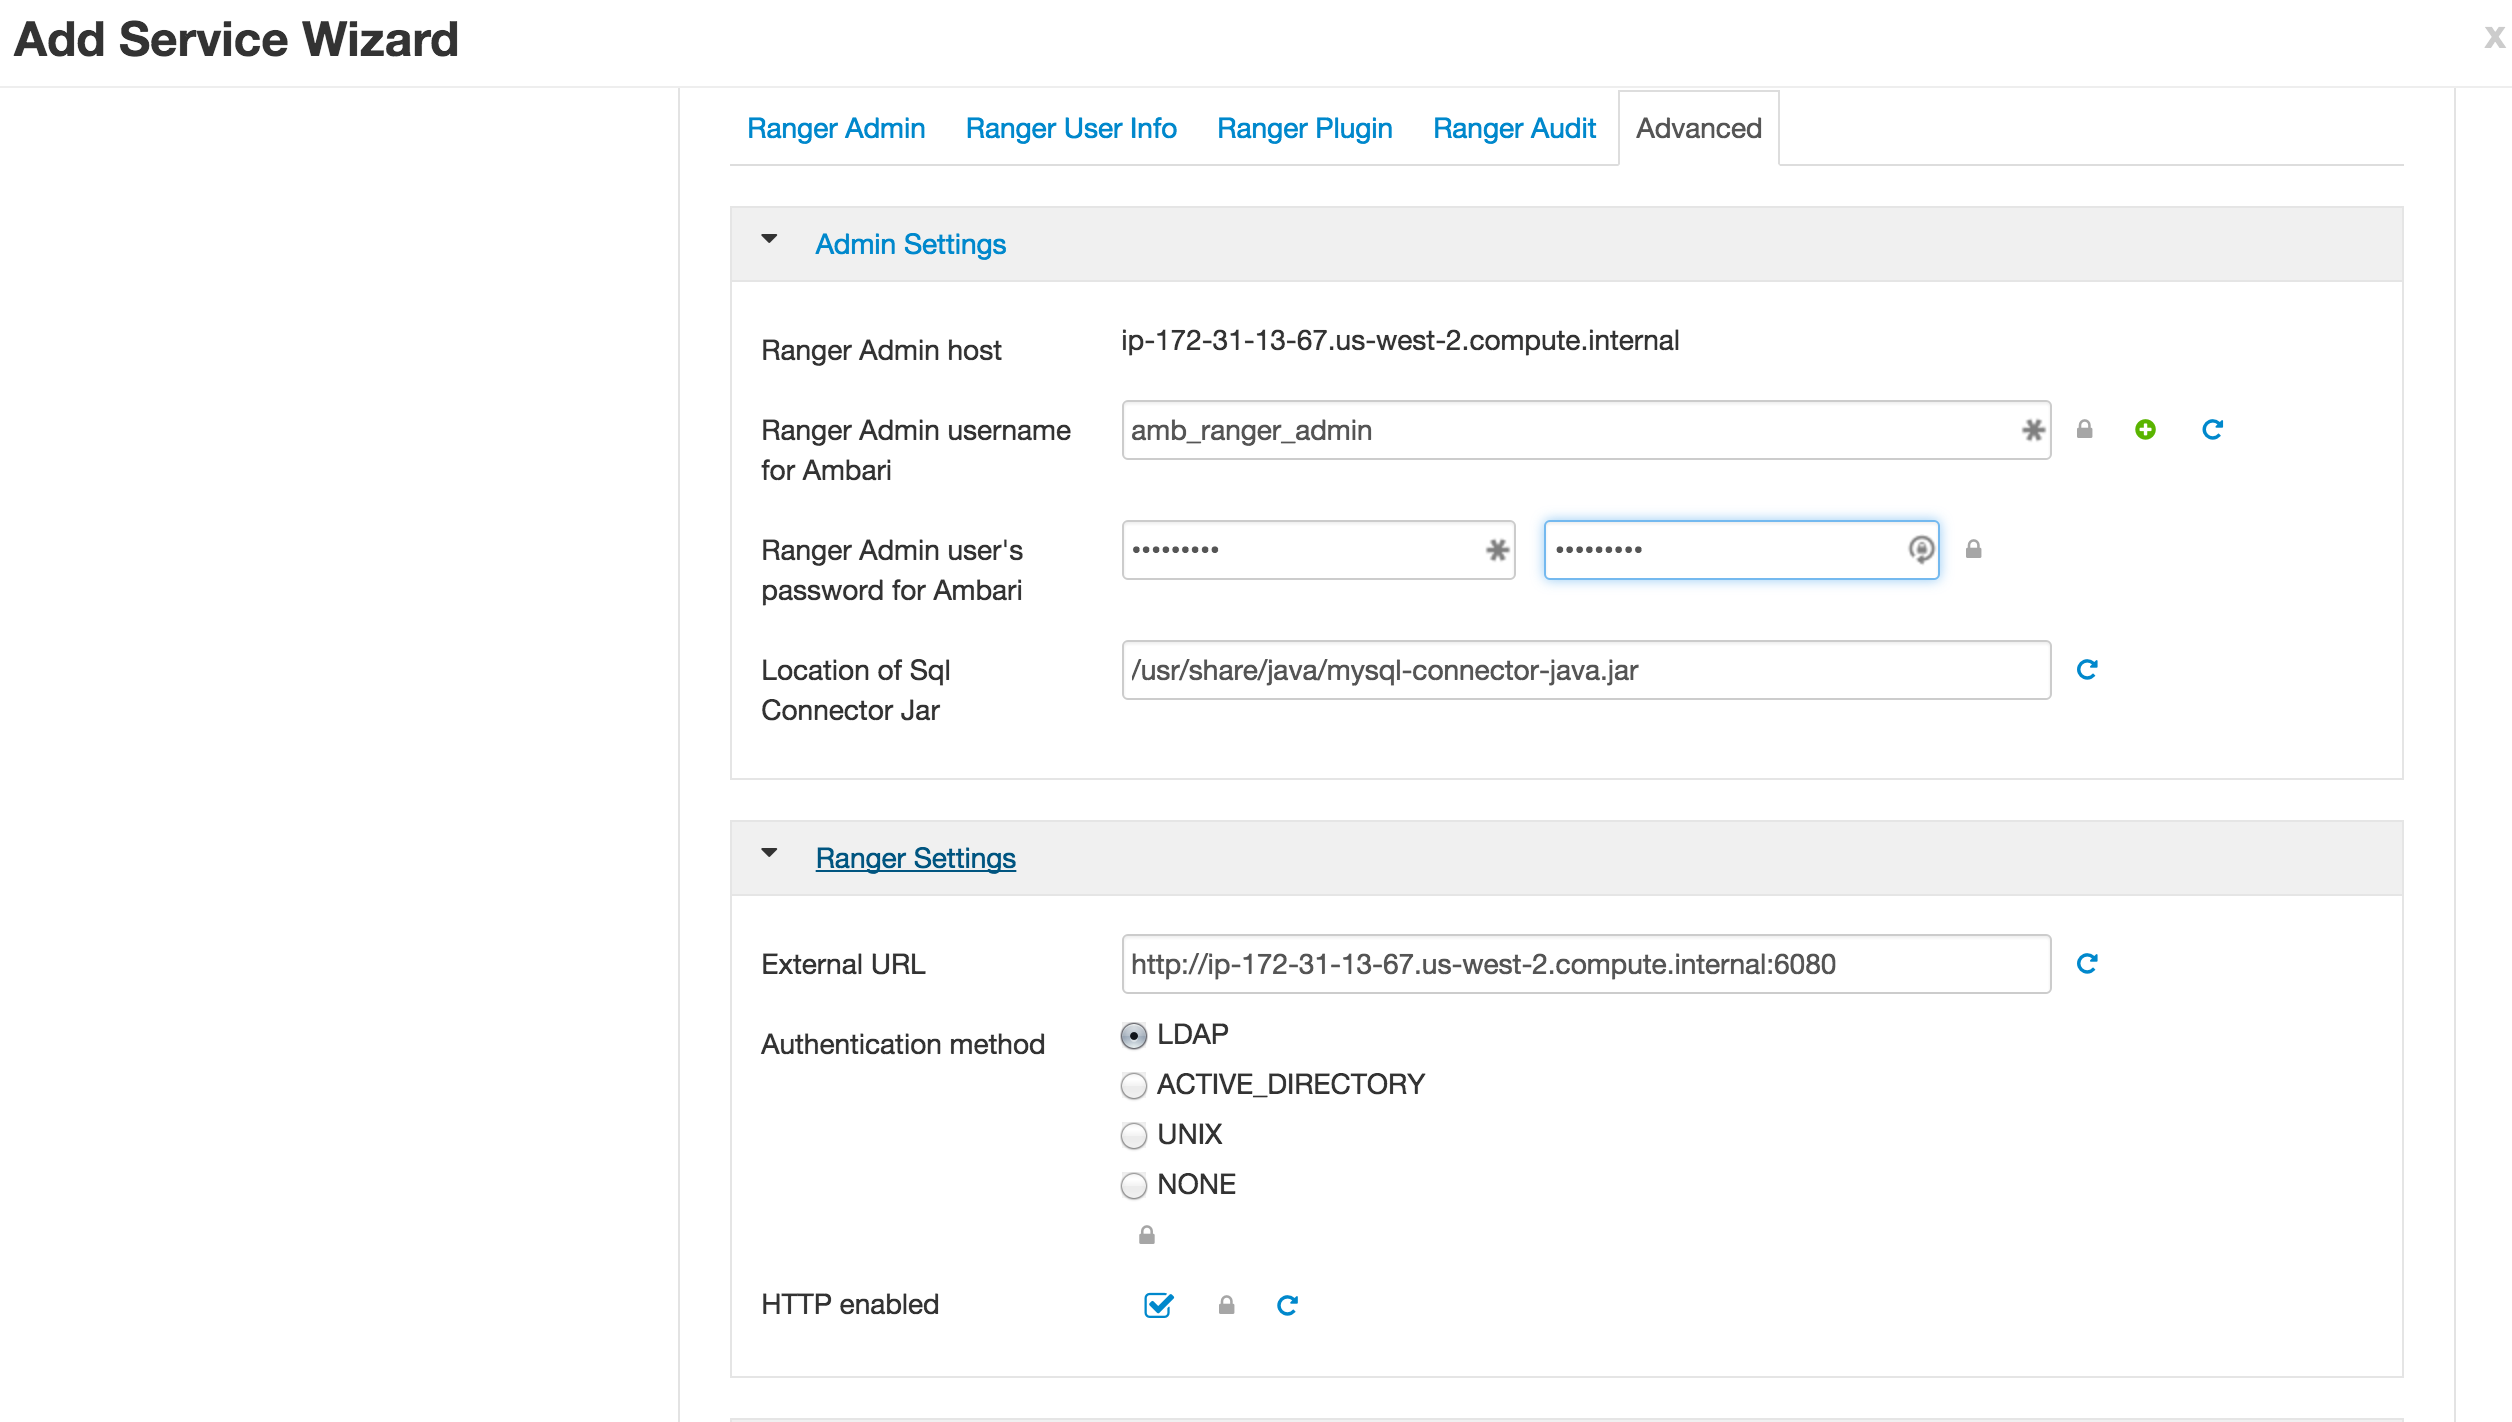
7.Advanced tab
-
No changes needed (skipping configuring Ranger authentication against AD for now)
-
Do NOT click Next just yet. Now configure components so Ranger can use
rangeradmin@LAB.HORTONWORKS.NETprincipal to query HDFS, YARN, Hive, Hbase, Knox. We will do this by clicking the tabs for each of these services and modifying Ranger specific properties.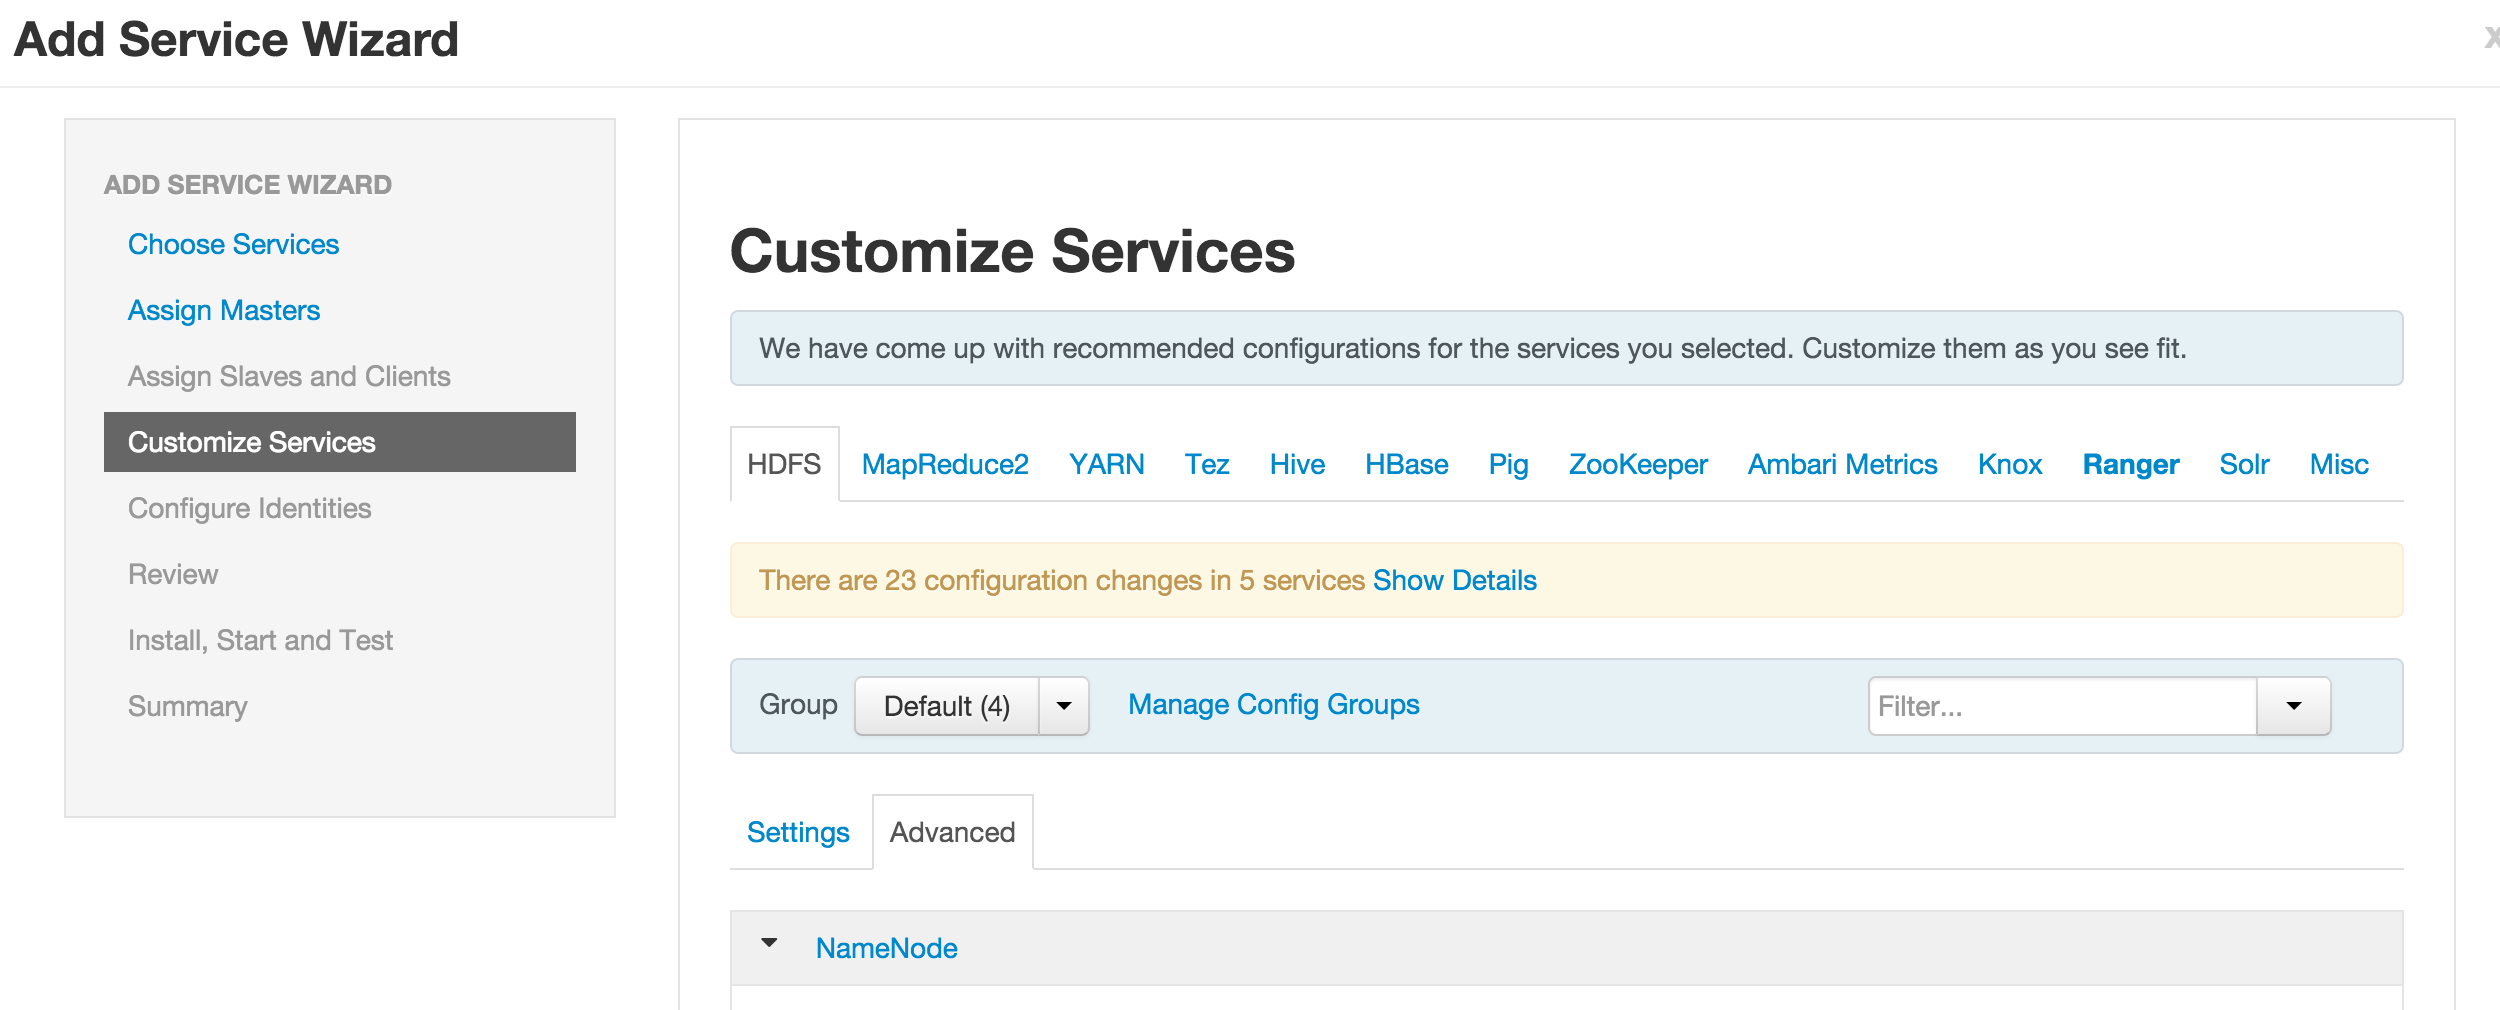
-
HDFS > Advanced > Advanced ranger-hdfs-plugin-properties:
- Ranger repository config user =
rangeradmin@LAB.HORTONWORKS.NET - Ranger repository config password = BadPass#1
- Policy user for HDFS = rangeradmin
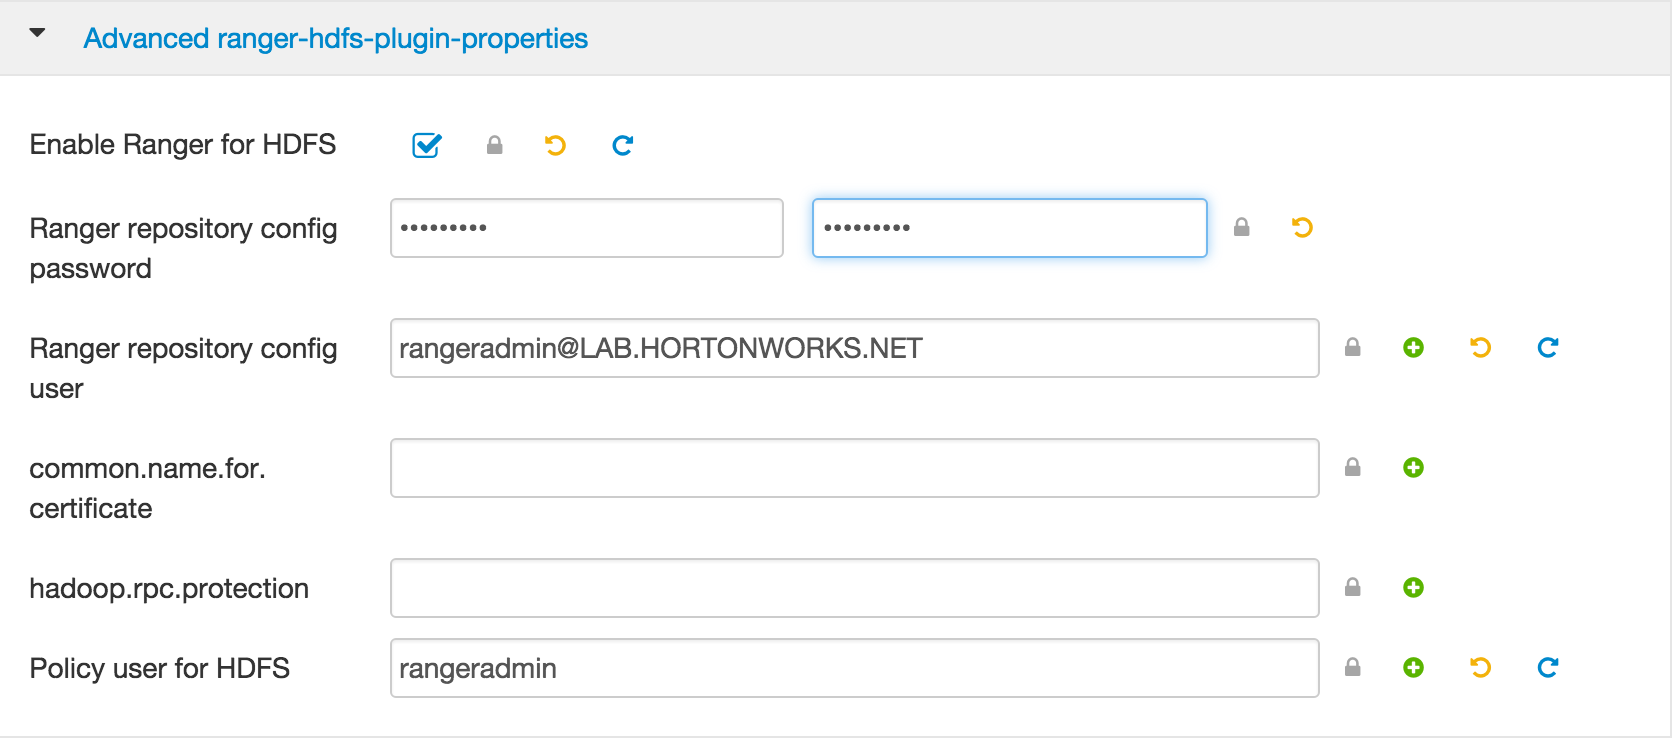
- Ranger repository config user =
-
YARN > Advanced > Advanced ranger-yarn-plugin-properties:
- Ranger repository config user =
rangeradmin@LAB.HORTONWORKS.NET - Ranger repository config password = BadPass#1
- Policy user for YARN = rangeradmin
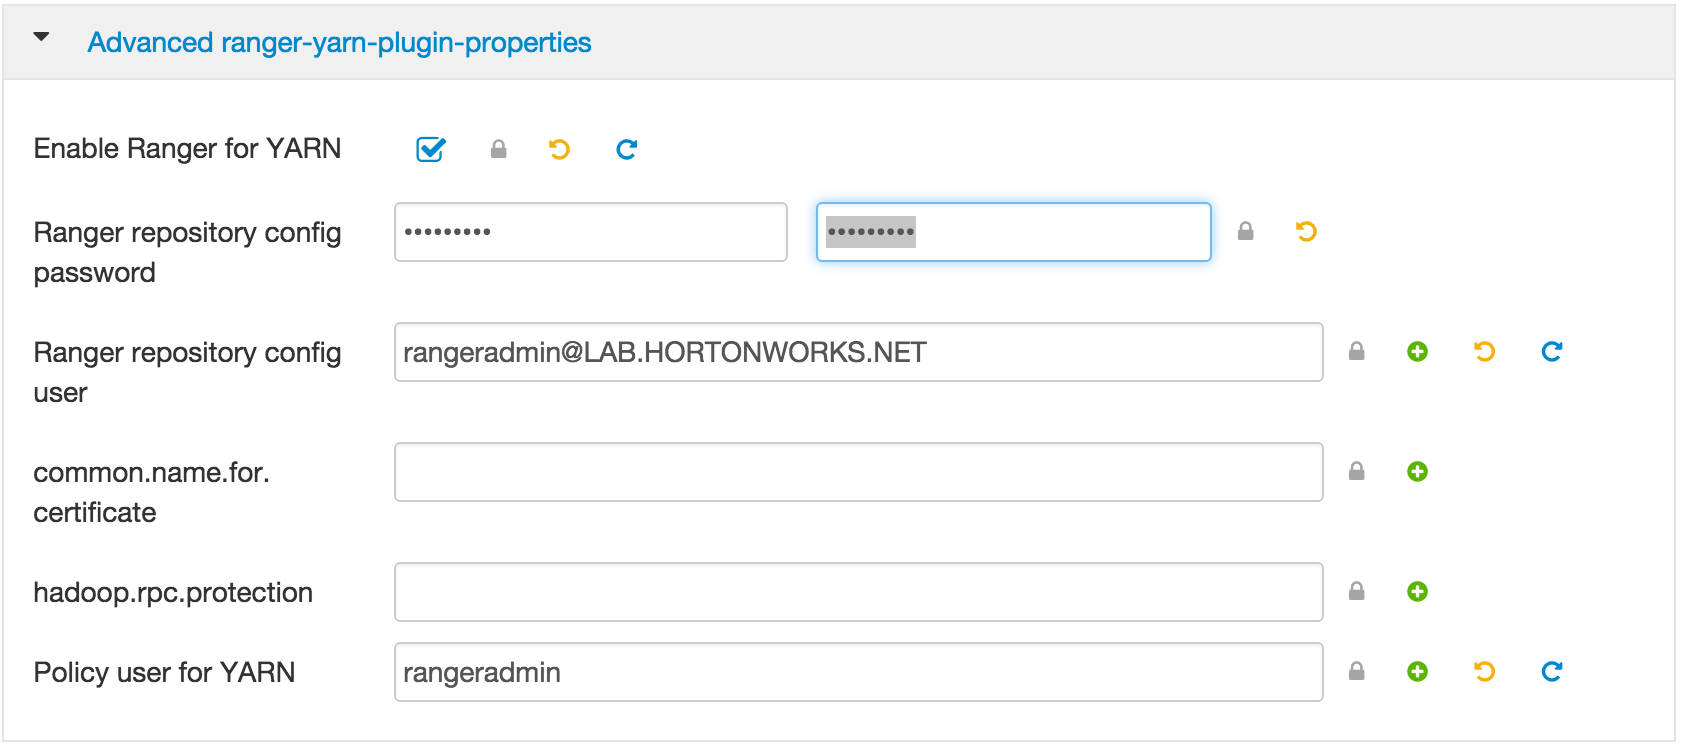
- Ranger repository config user =
-
HIVE > Advanced > Advanced ranger-hive-plugin-properties:
- Ranger repository config user =
rangeradmin@LAB.HORTONWORKS.NET - Ranger repository config password = BadPass#1
- Policy user for HIVE = rangeradmin
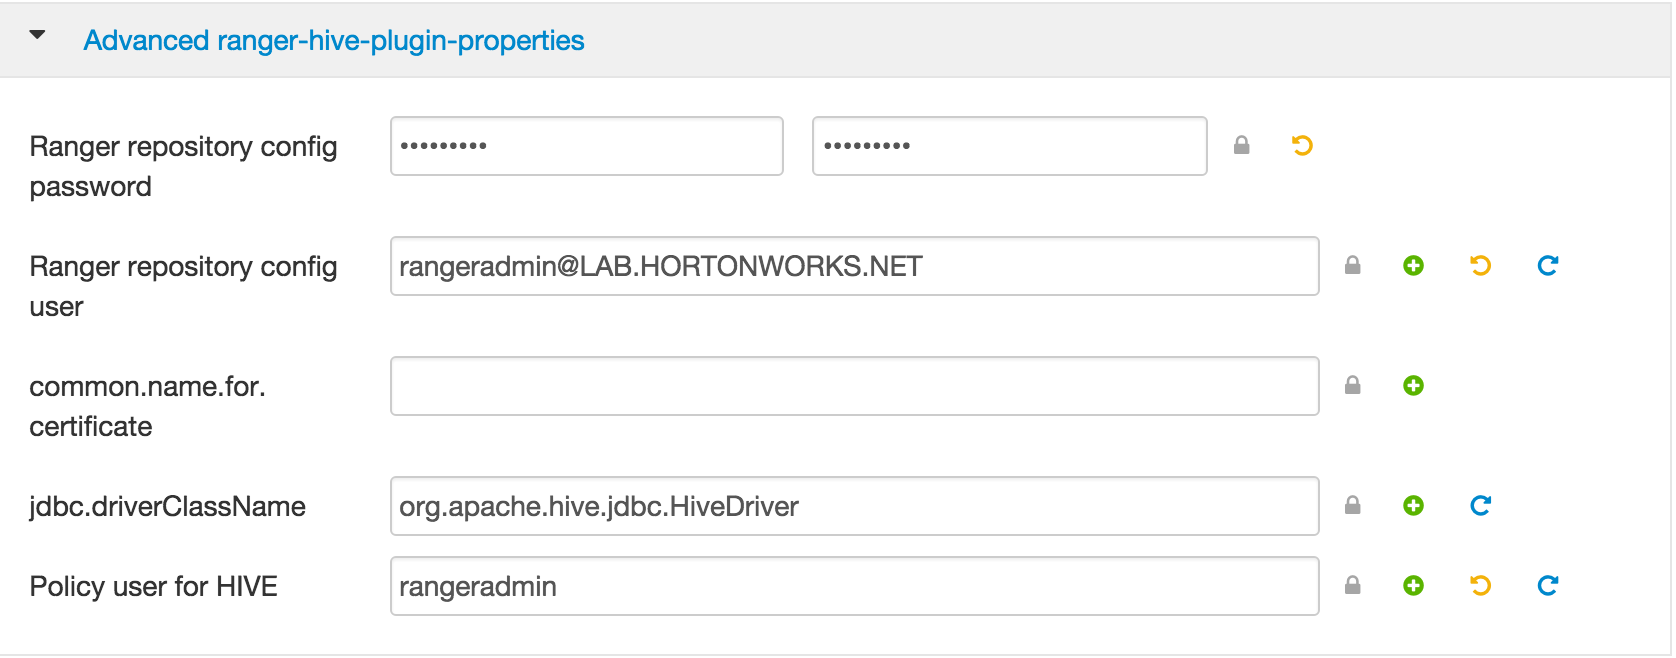
- Ranger repository config user =
-
HBASE > Advanced > Advanced ranger-hbase-plugin-properties:
- Ranger repository config user =
rangeradmin@LAB.HORTONWORKS.NET - Ranger repository config password = BadPass#1
- Policy user for HBASE = rangeradmin
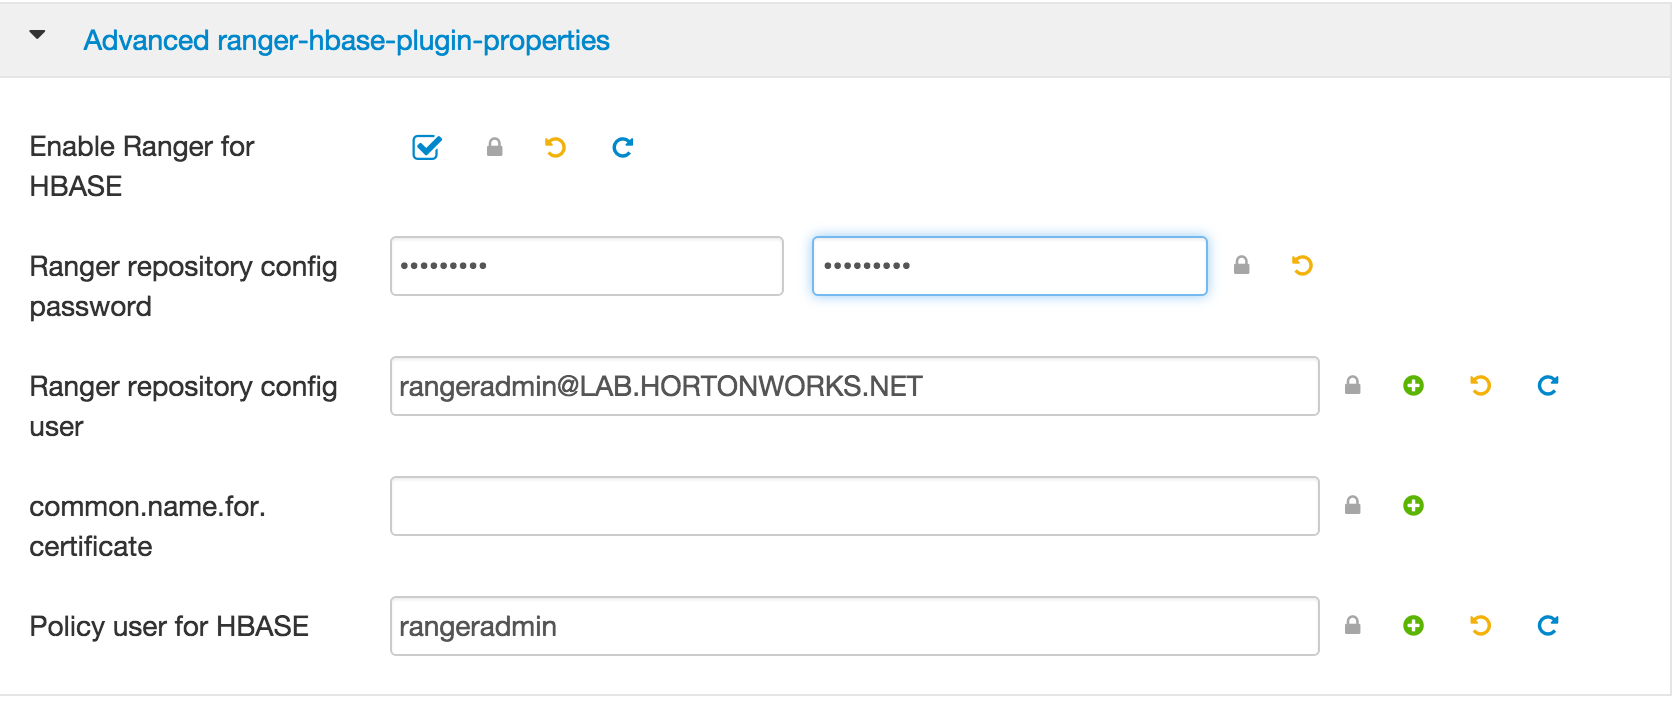
- Ranger repository config user =
-
KNOX > Advanced > Advanced ranger-knox-plugin-properties:
- Ranger repository config user =
rangeradmin@LAB.HORTONWORKS.NET - Ranger repository config password = BadPass#1
- Policy user for KNOX = rangeradmin
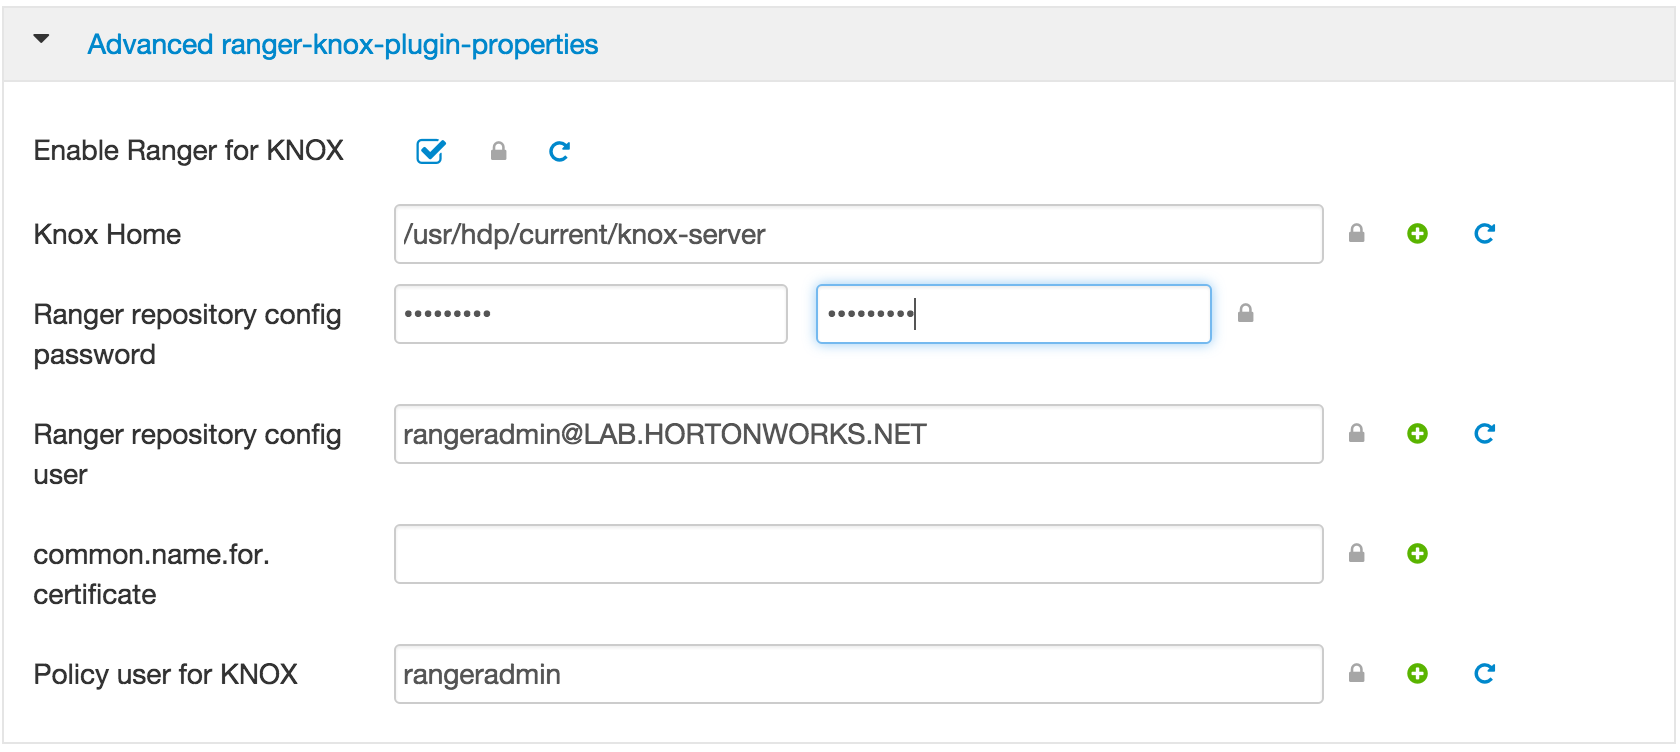
- Ranger repository config user =
-
-
Click Next > Proceed Anyway to proceed
-
On Configure Identities page, you will have to enter your AD admin credentials:
- Admin principal:
hadoopadmin@LAB.HORTONWORKS.NET - Admin password: BadPass#1
- Notice that you can now save the admin credentials. Check this box too
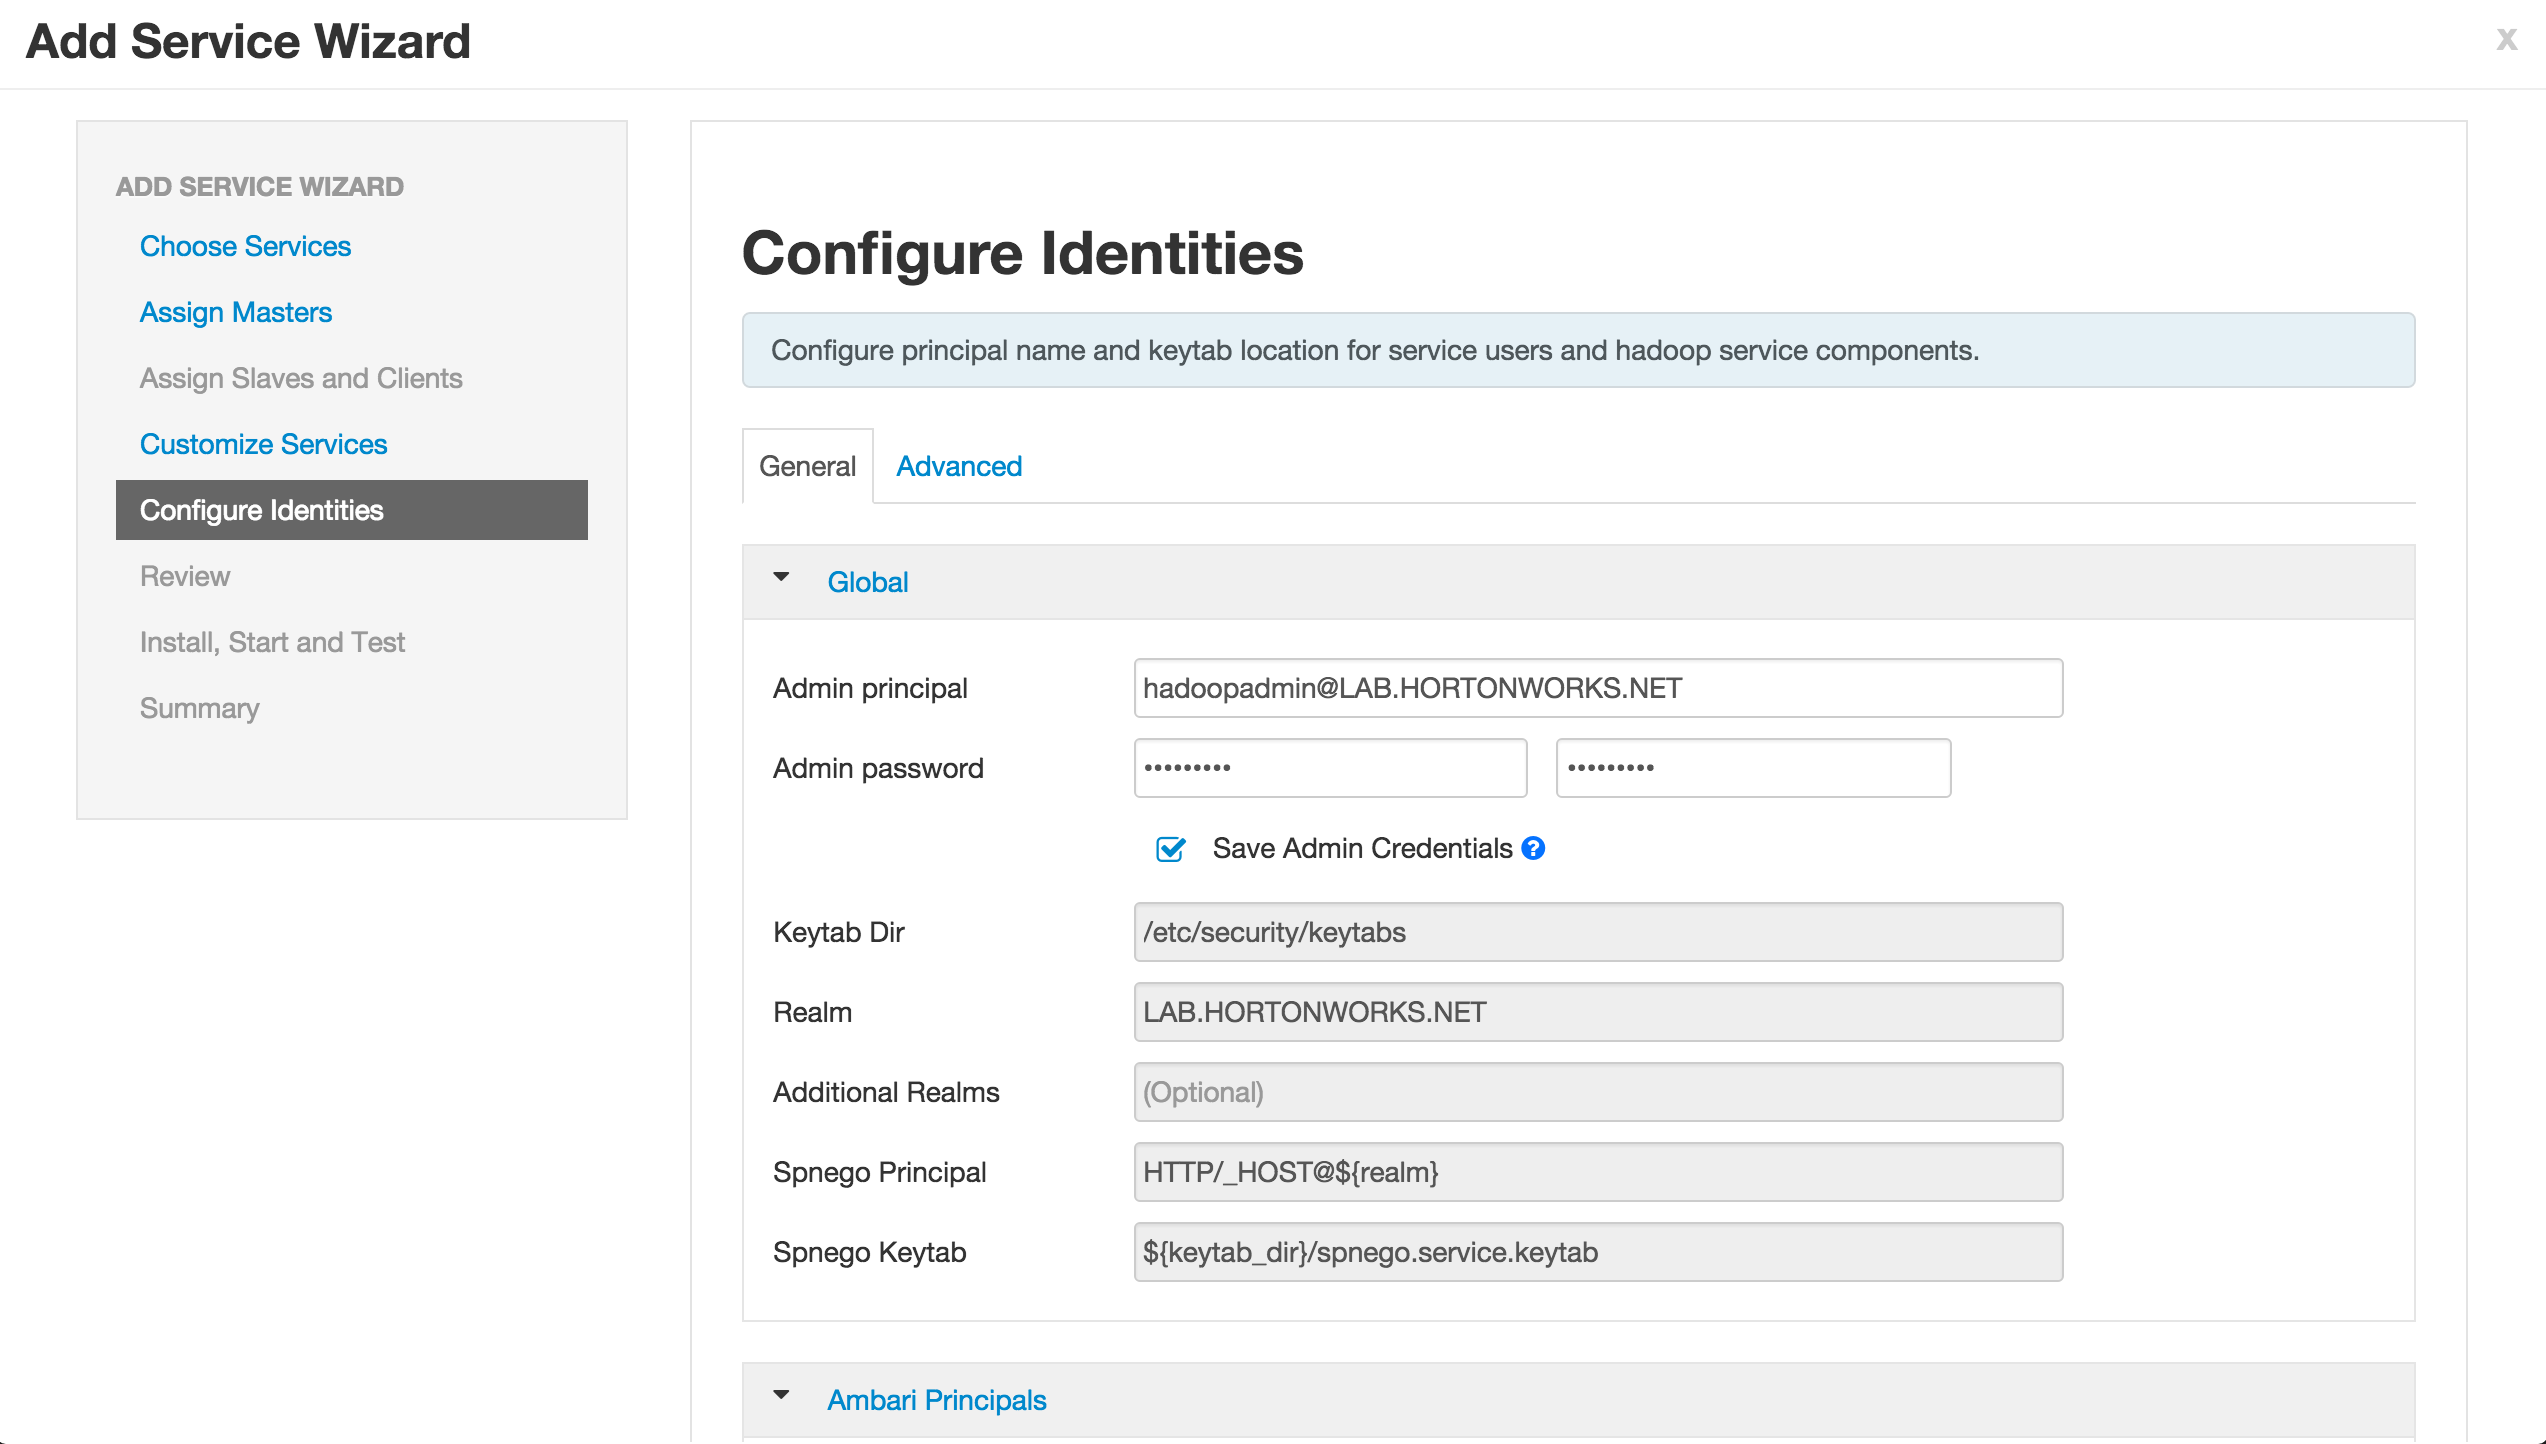
- Admin principal:
-
Click Next > Deploy to install Ranger
-
Once installed, restart components that require restart (e.g. HDFS, YARN, Hive etc)
-
(Optional) In case of failure (usually caused by incorrectly entering the Mysql nodes FQDN in the config above), run below from Ambari node to delete the service so you can try again:
export SERVICE=RANGER
export AMBARI_HOST=localhost
export PASSWORD=BadPass#1

output=`curl -u hadoopadmin:$PASSWORD -k -i -H 'X-Requested-By: ambari'  https://localhost:8444/api/v1/clusters`
CLUSTER=`echo $output | sed -n 's/.*"cluster_name" : "\([^\"]*\)".*/\1/p'`


#attempt to unregister the service
curl -u admin:$PASSWORD -k -i -H 'X-Requested-By: ambari' -X DELETE https://$AMBARI_HOST:8444/api/v1/clusters/$CLUSTER/services/$SERVICE

#in case the unregister service resulted in 500 error, run the below first and then retry the unregister API
#curl -u admin:$PASSWORD -k -i -H 'X-Requested-By: ambari' -X PUT -d '{"RequestInfo": {"context" :"Stop $SERVICE via REST"}, "Body": {"ServiceInfo": {"state": "INSTALLED"}}}' https://$AMBARI_HOST:8444/api/v1/clusters/$CLUSTER/services/$SERVICE

sudo service ambari-server restart

#restart agents on all nodes
sudo service ambari-agent restart
-
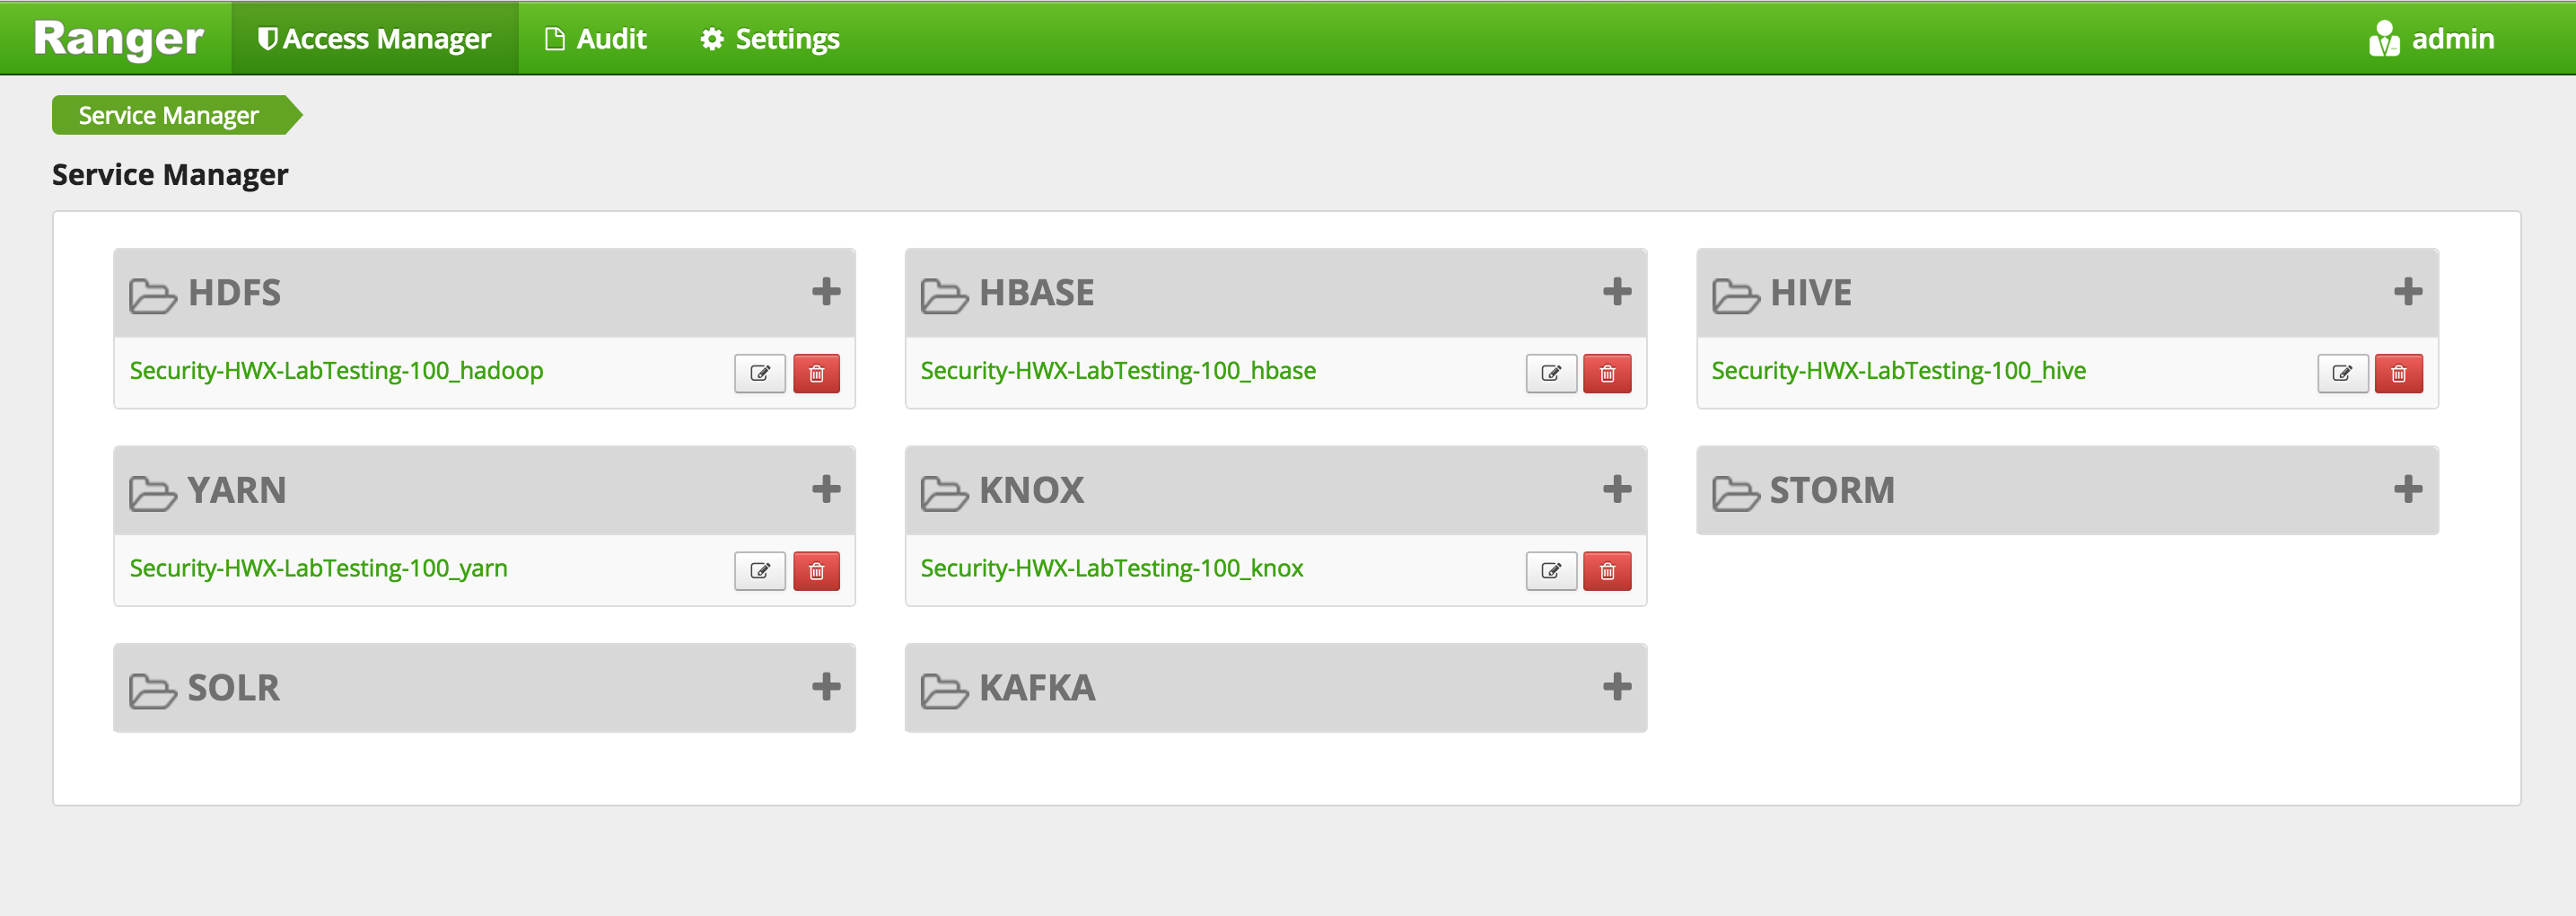
Open Ranger UI at http://RANGERHOST_PUBLIC_IP:6080 using admin/admin
-
Confirm that repos for HDFS, YARN, Hive, HBase, Knox appear under 'Access Manager tab'
-
Confirm that audits appear under 'Audit' > 'Access' tab

- If audits do not show up here, you may need to restart Solr from Ambari
-
Confirm that plugins for HDFS, YARN, Hive etc appear under 'Audit' > 'Plugins' tab
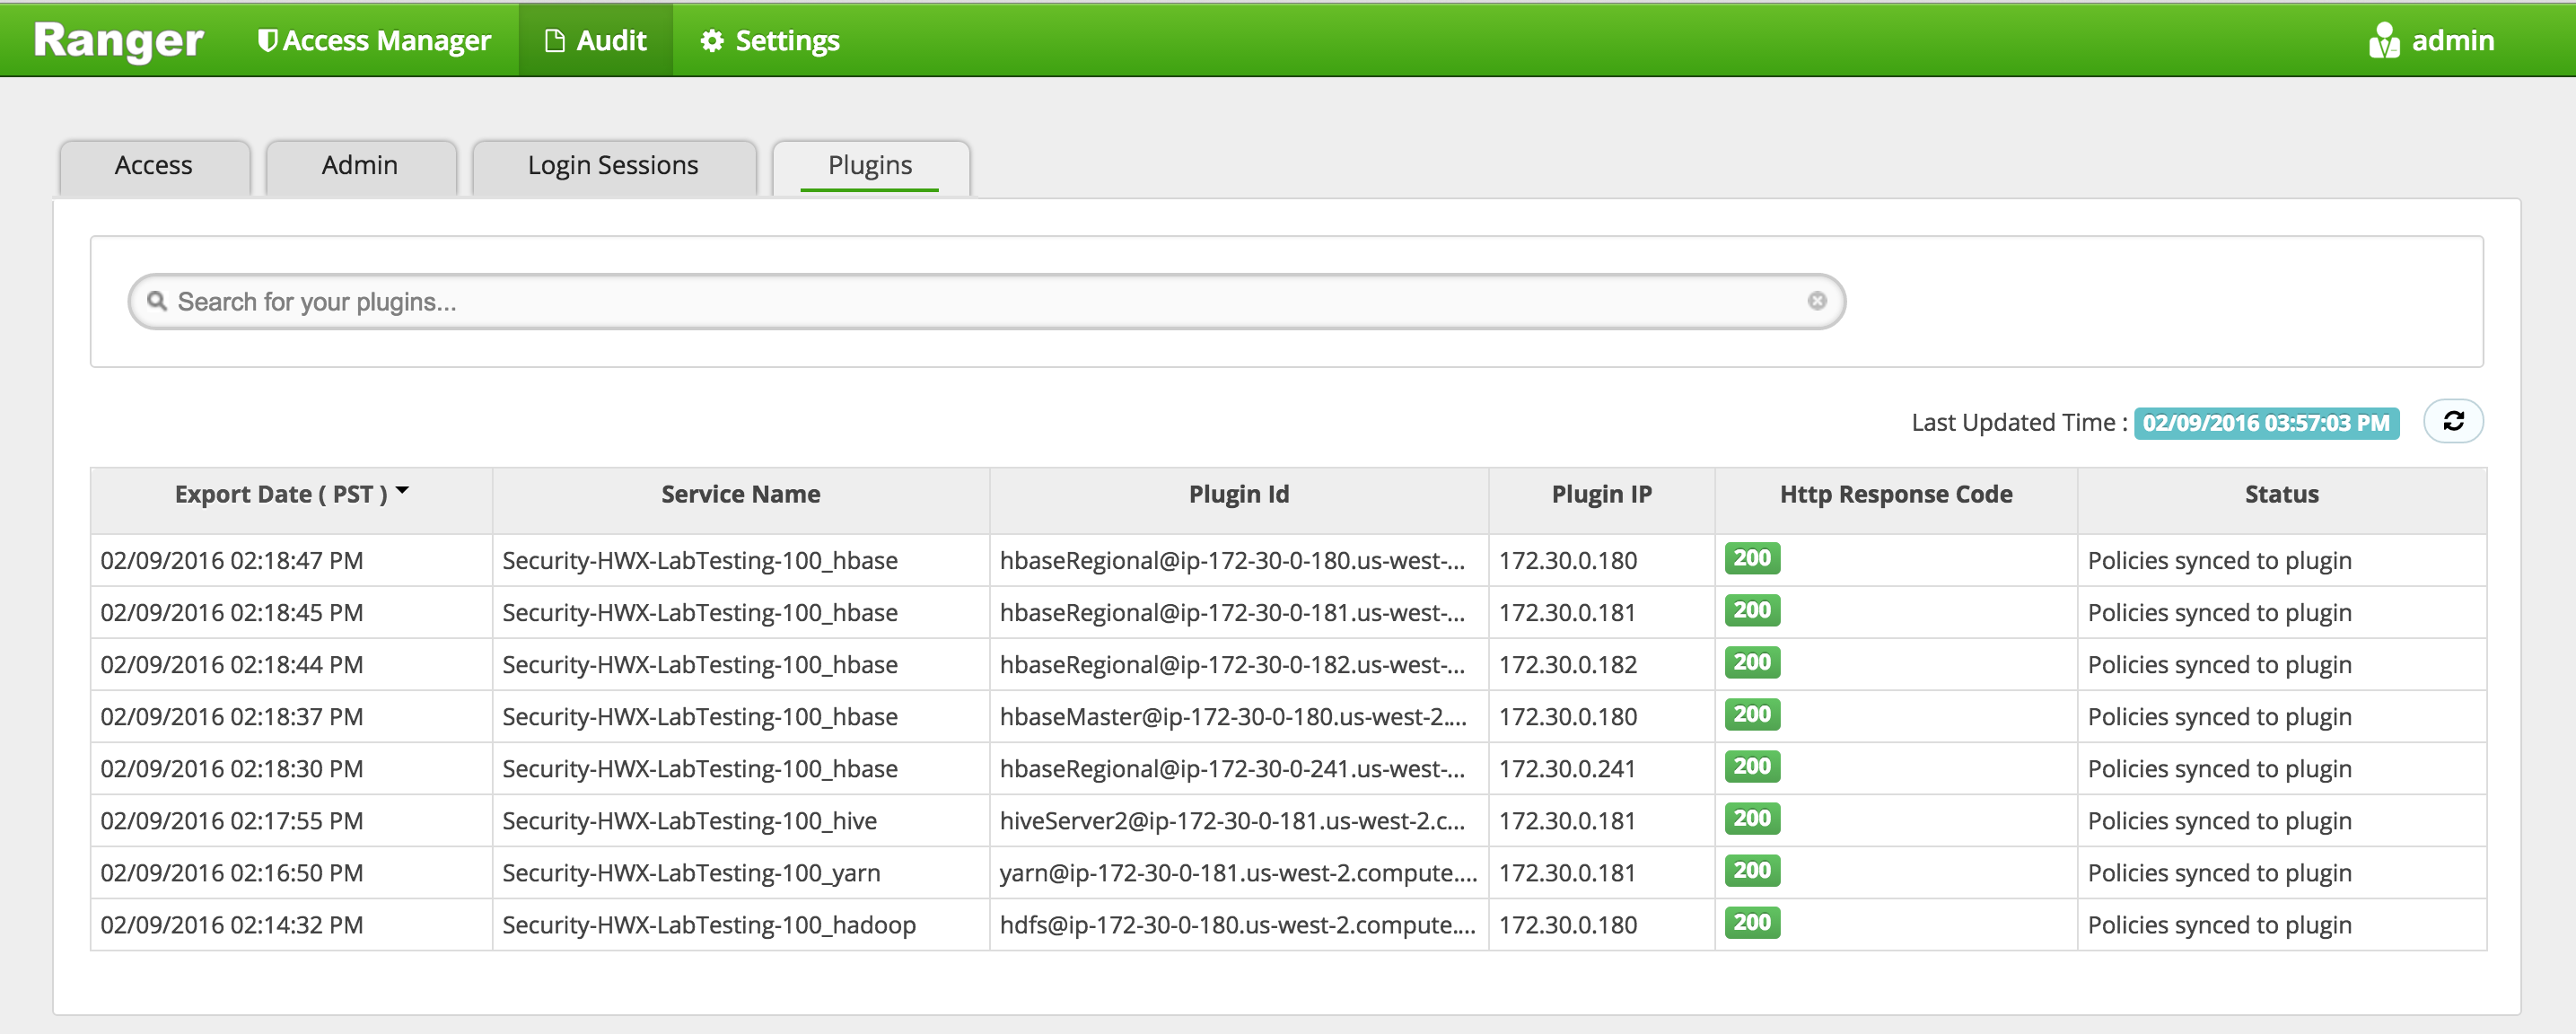
-
Confirm users/group sync from AD into Ranger are working by clicking 'Settings' > 'Users/Groups tab' in Ranger UI and noticing AD users/groups are present

-
Confirm HDFS audits working by querying the audits dir in HDFS:
sudo -u hdfs hdfs dfs -cat /ranger/audit/hdfs/*/*
- Confirm Solr audits working by querying Solr REST API from any solr node
curl "http://localhost:6083/solr/ranger_audits/select?q=*%3A*&df=id&wt=csv"
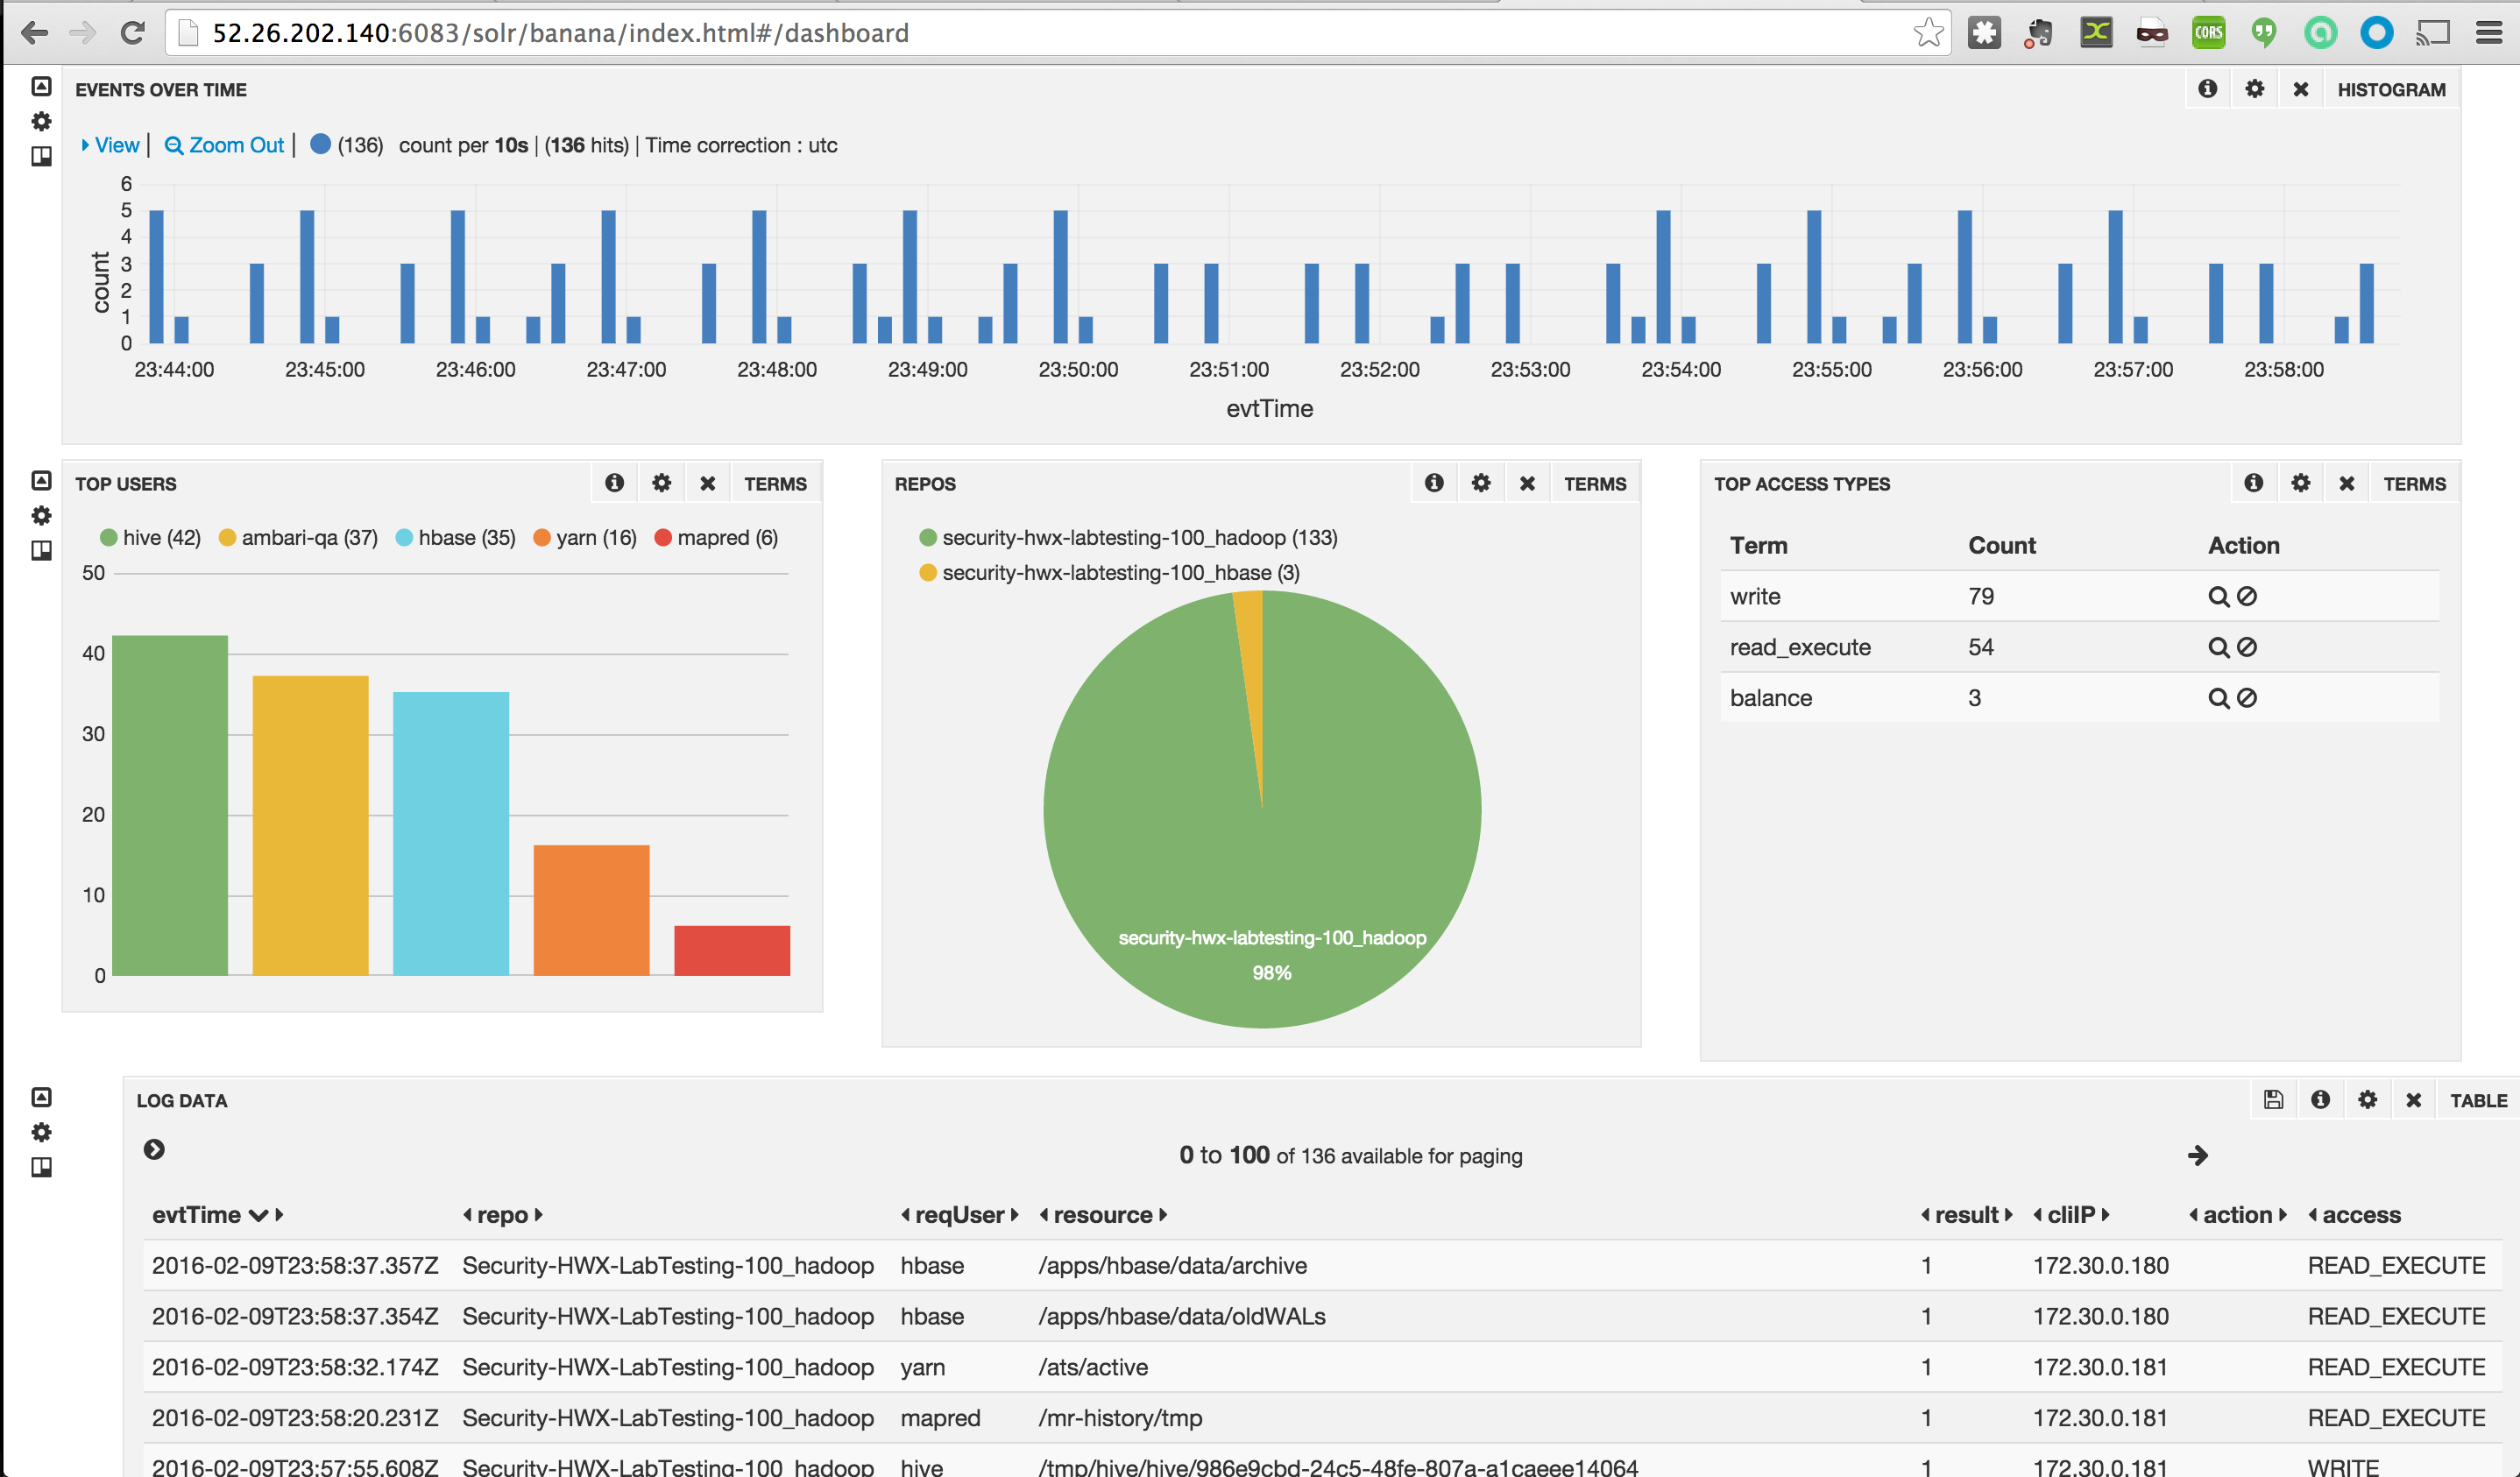
- Confirm Banana dashboard has started to show HDFS audits http://PUBLIC_IP_OF_SOLRLEADER_NODE:6083/solr/banana/index.html#/dashboard
-
Goal: In this lab we will install Ranger KMS via Ambari. Next we will create some encryption keys and use them to create encryption zones (EZs) and copy files into them. Reference: docs
-
In this section we will have to setup proxyusers. This is done to enable impersonation whereby a superuser can submit jobs or access hdfs on behalf of another user (e.g. because superuser has kerberos credentials but user joe doesn’t have any)
- For more details on this, refer to the doc
-
Before starting KMS install, find and note down the below 3 pieces of information. These will be used during KMS install
- Open Ambari > Ranger > Config > Filter for
ranger.audit.solr.zookeepersand note down its value- it will be something like
ip-172-30-0-180.us-west-2.compute.internal:2181,ip-172-30-0-182.us-west-2.compute.internal:2181,ip-172-30-0-181.us-west-2.compute.internal:2181/ranger_audits
- it will be something like
- Find the internal hostname of host running namenode and note it down
- From Ambari > HDFS > click the 'NameNode' hyperlink. The internal hostname should appear in upper left of the page.
- Find the internal hostname of host running Mysql and note it down
- From Ambari > Hive > Mysql > click the 'Mysql Server' hyperlink. The internal hostname should appear in upper left of the page.
- Open Ambari > Ranger > Config > Filter for
-
Open Ambari > start 'Add service' wizard > select 'Ranger KMS'.
-
Pick any node to install on
-
Keep the default configs except for below properties
-
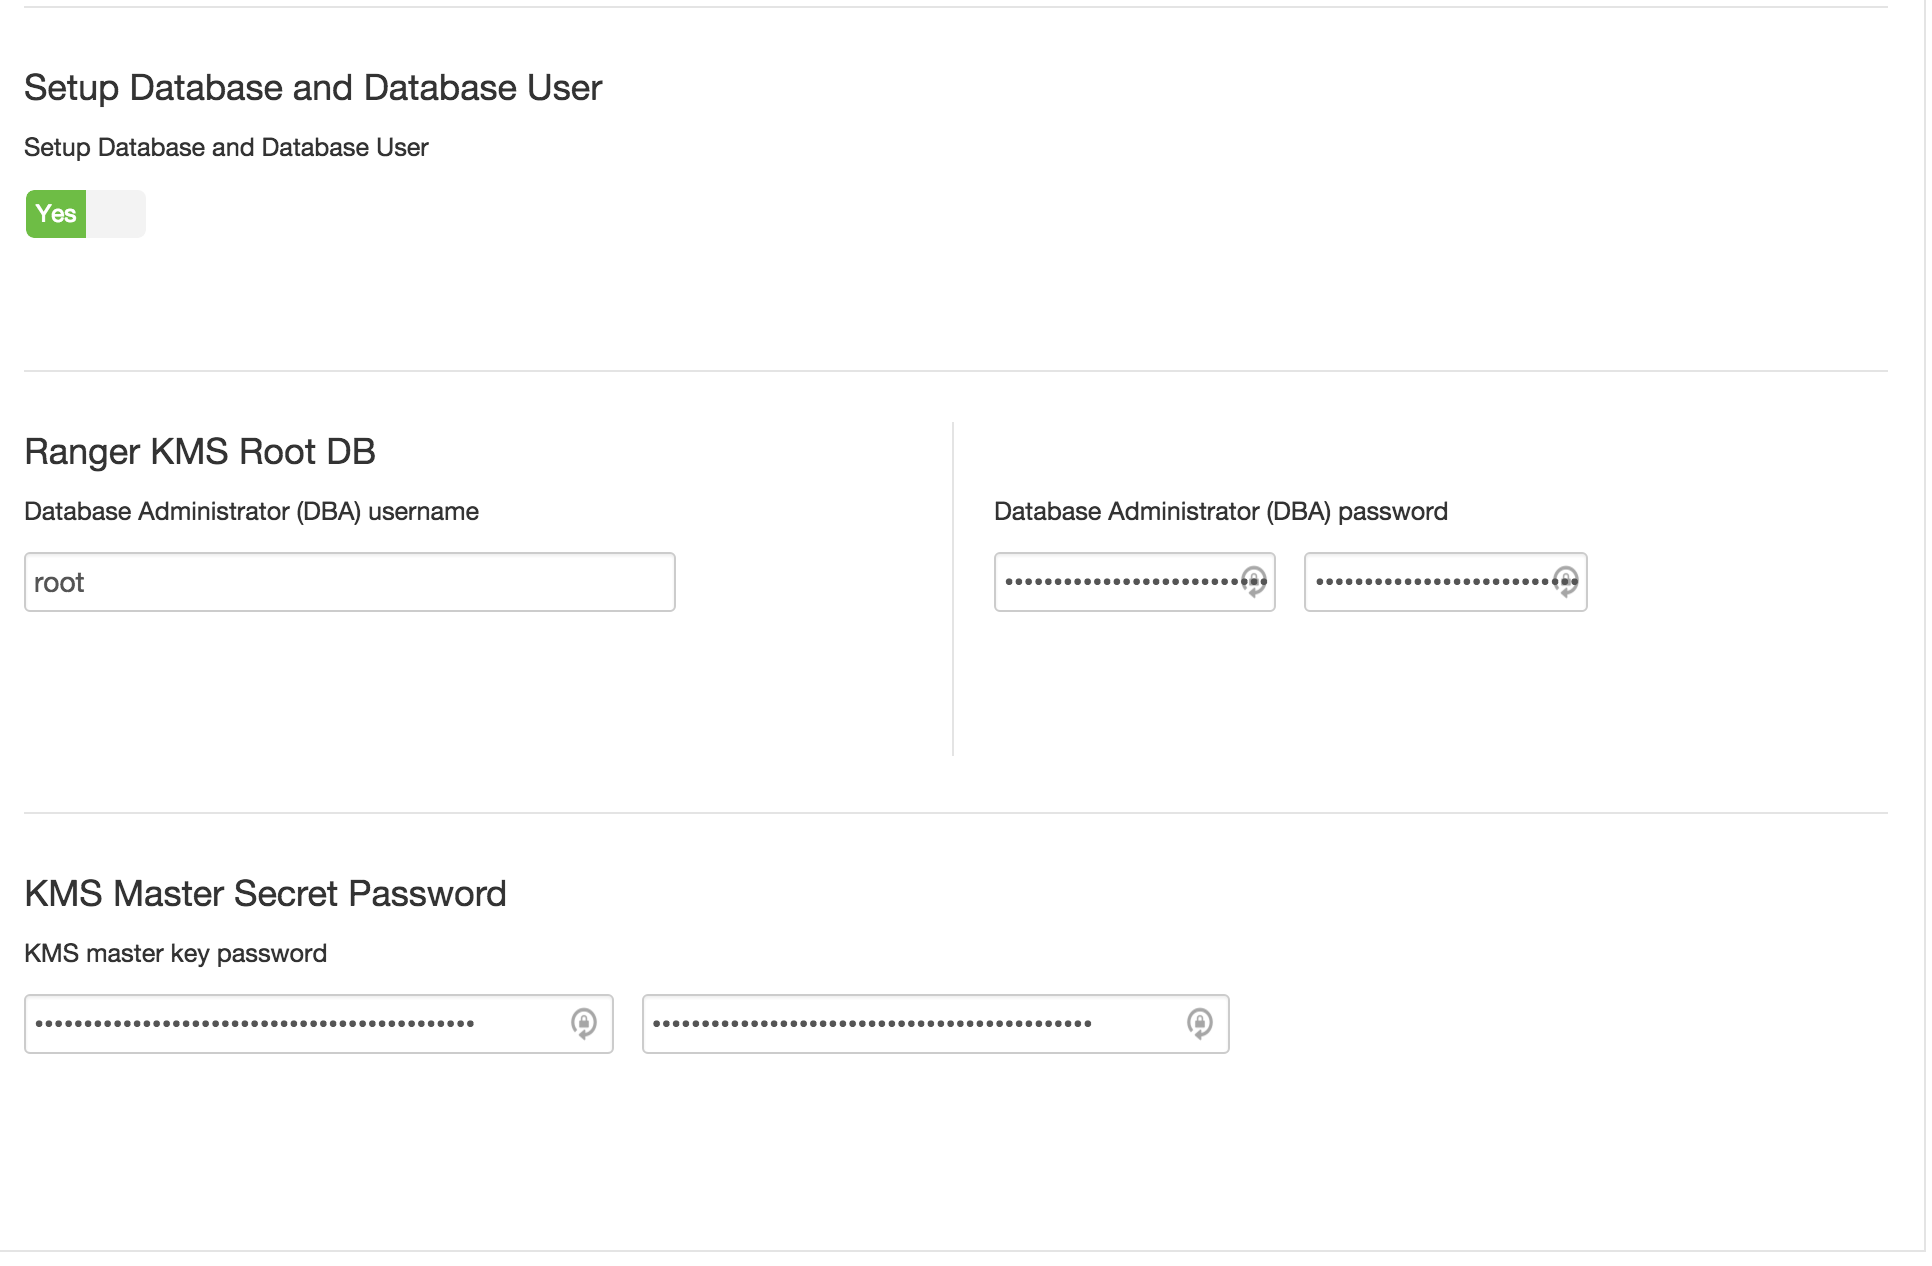
Advanced kms-properties (for Ambari 2.2.0.0 and earlier)
- KMS_MASTER_KEY_PASSWORD = BadPass#1
- REPOSITORY_CONFIG_USERNAME = keyadmin@LAB.HORTONWORKS.NET
- REPOSITORY_CONFIG_PASSWORD = BadPass#1
- db_host = Internal FQDN of MySQL node e.g. ip-172-30-0-181.us-west-2.compute.internal
- db_password = BadPass#1
- db_root_password = BadPass#1
-
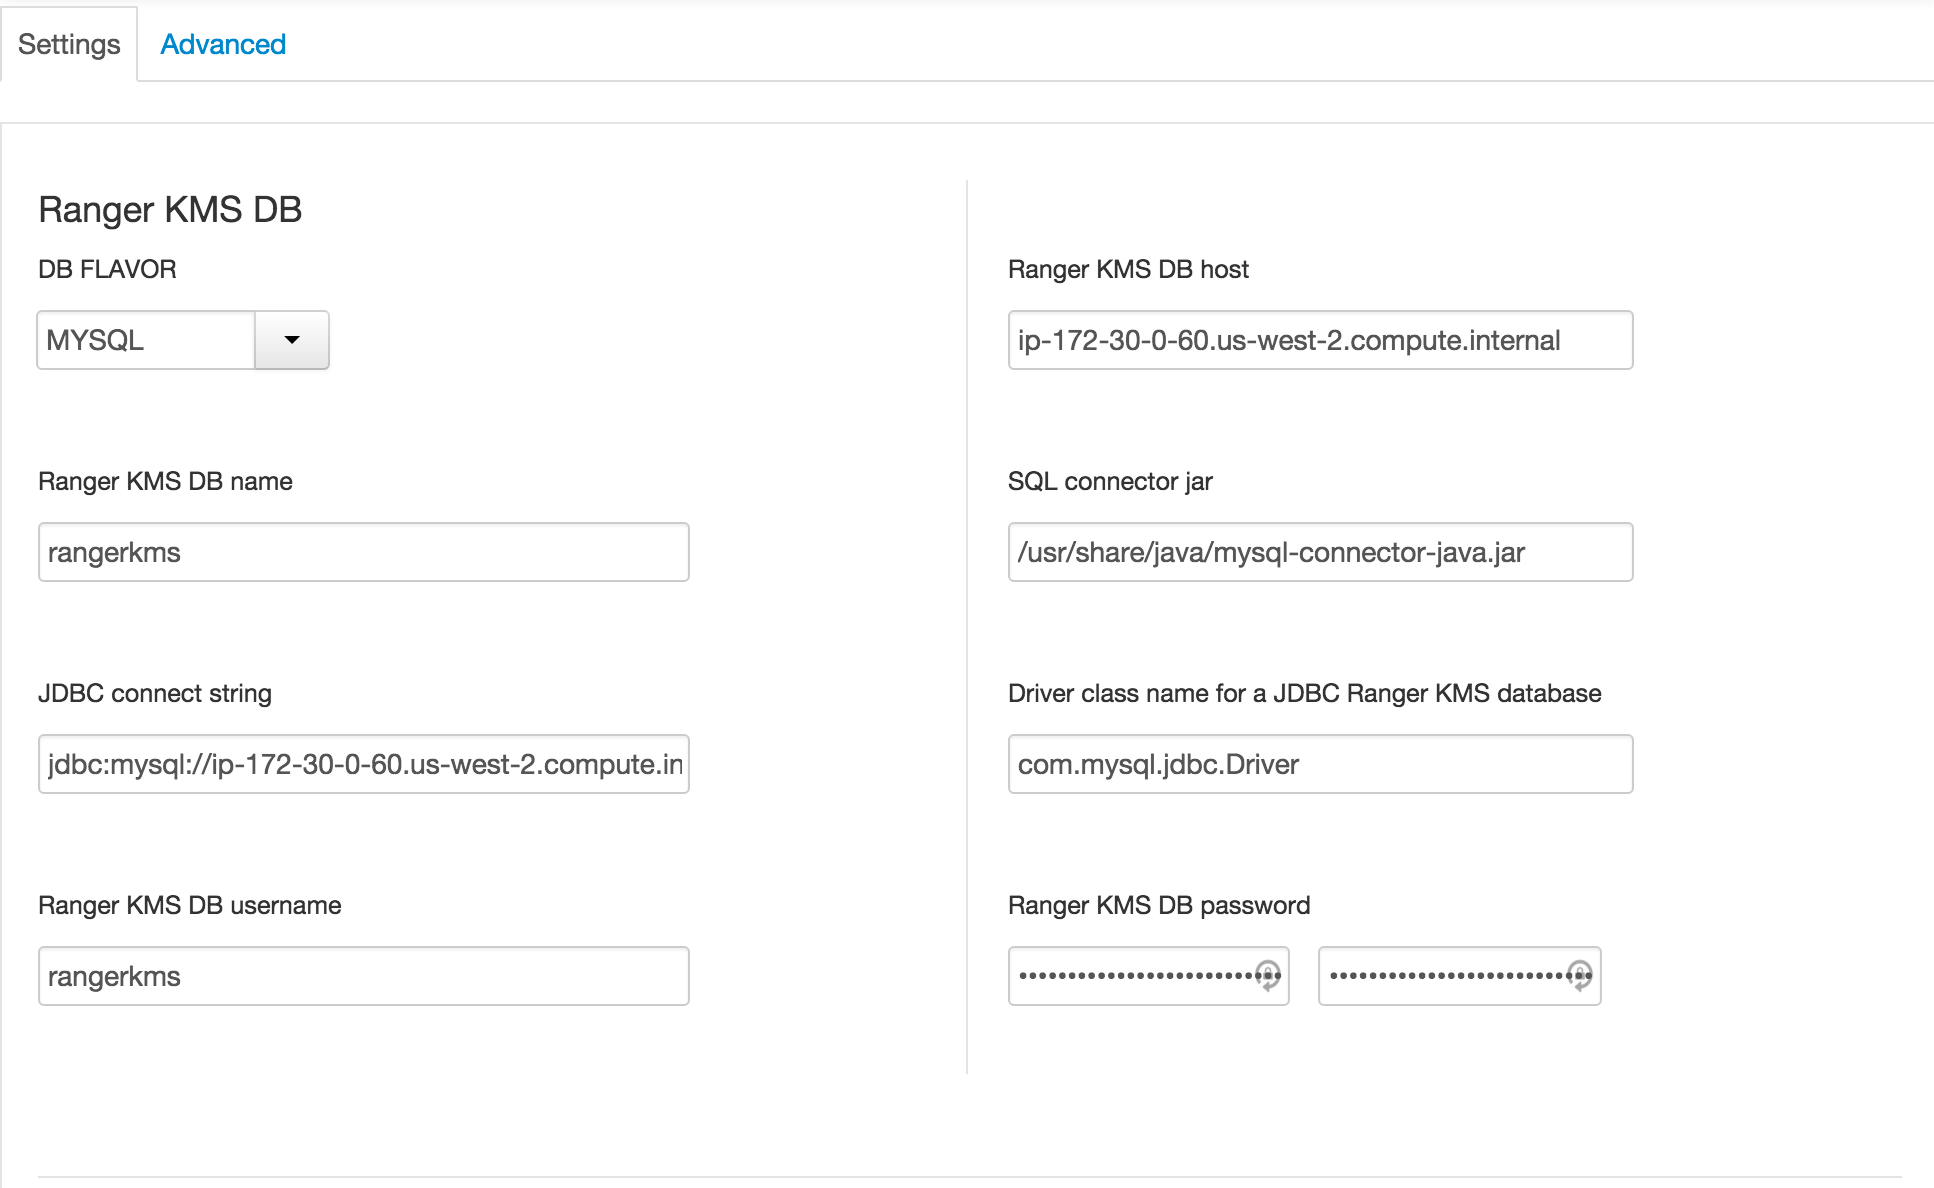
Note that from Ambari 2.2.1.0 onwards, the location of above configs has changed:
-
The DB host and passwords would need to be specified under the new Ambari > Ranger KMS > Settings tab
-
The repository config username/password would still need to be modified under "Advanced kms-properties"

-
the remaining below configurations would be performed the same way (regardless of your Ambari version)
-
-
advanced kms-site:
- hadoop.kms.authentication.type=kerberos
- hadoop.kms.authentication.kerberos.keytab=/etc/security/keytabs/spnego.service.keytab
- hadoop.kms.authentication.kerberos.principal=*
-
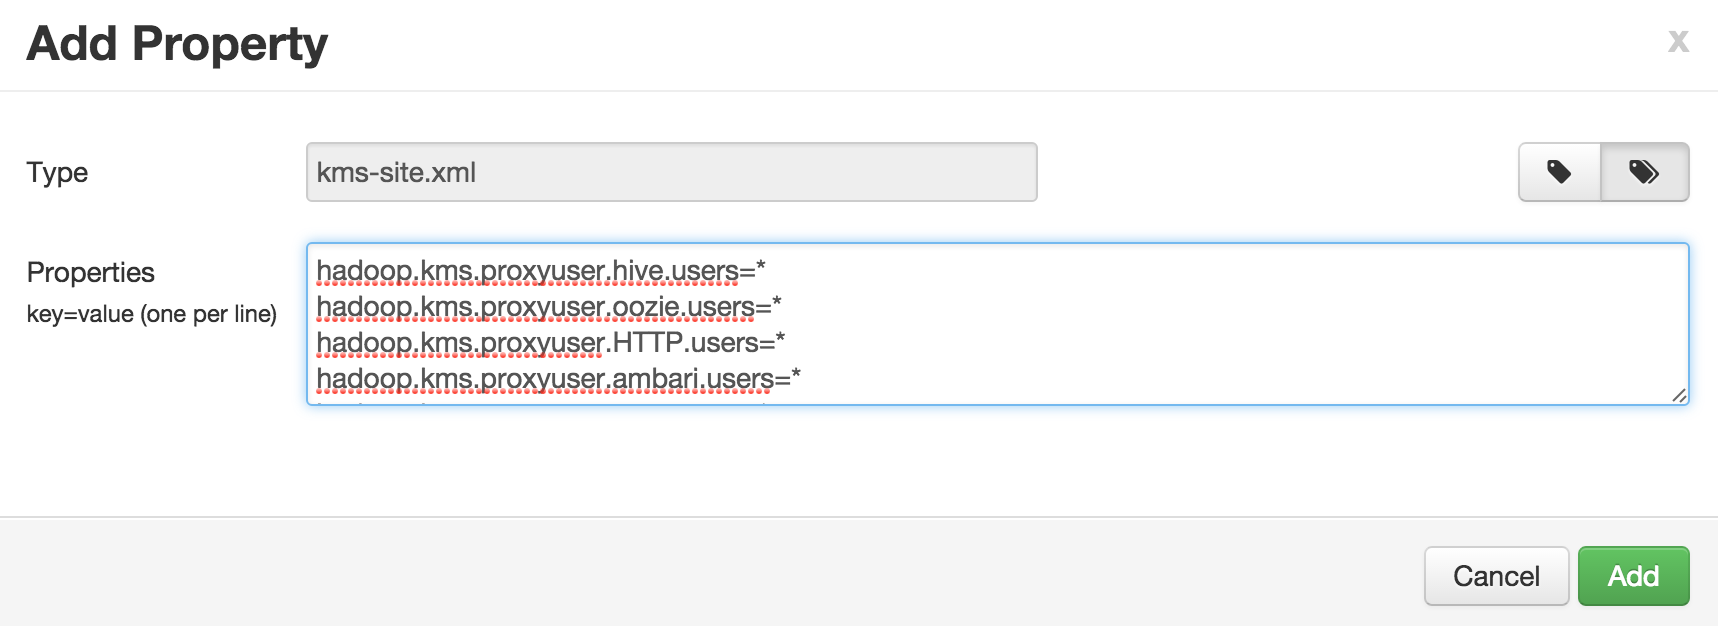
Custom kms-site (to avoid adding one at a time, you can use 'bulk add' mode):
- hadoop.kms.proxyuser.hive.users=*
- hadoop.kms.proxyuser.oozie.users=*
- hadoop.kms.proxyuser.HTTP.users=*
- hadoop.kms.proxyuser.ambari.users=*
- hadoop.kms.proxyuser.yarn.users=*
- hadoop.kms.proxyuser.hive.hosts=*
- hadoop.kms.proxyuser.oozie.hosts=*
- hadoop.kms.proxyuser.HTTP.hosts=*
- hadoop.kms.proxyuser.ambari.hosts=*
- hadoop.kms.proxyuser.yarn.hosts=*
- hadoop.kms.proxyuser.keyadmin.groups=*
- hadoop.kms.proxyuser.keyadmin.hosts=*
- hadoop.kms.proxyuser.keyadmin.users=*
-
Advanced ranger-kms-audit:
- Under xasecure.audit.destination.hdfs.dir, replace NAMENODE_HOSTNAME with FQDN of host where name node is running e.g.
xasecure.audit.destination.hdfs.dir=hdfs://YOUR_NN_INTERNAL_HOSTNAME:8020/ranger/audit
- Under xasecure.audit.destination.solr.zookeepers, copy the value of ranger.audit.solr.zookeepers (this is the value you noted down before starting the KMS install)
xasecure.audit.destination.solr.zookeepers=YOUR_ZK_QUORUM/ranger_audits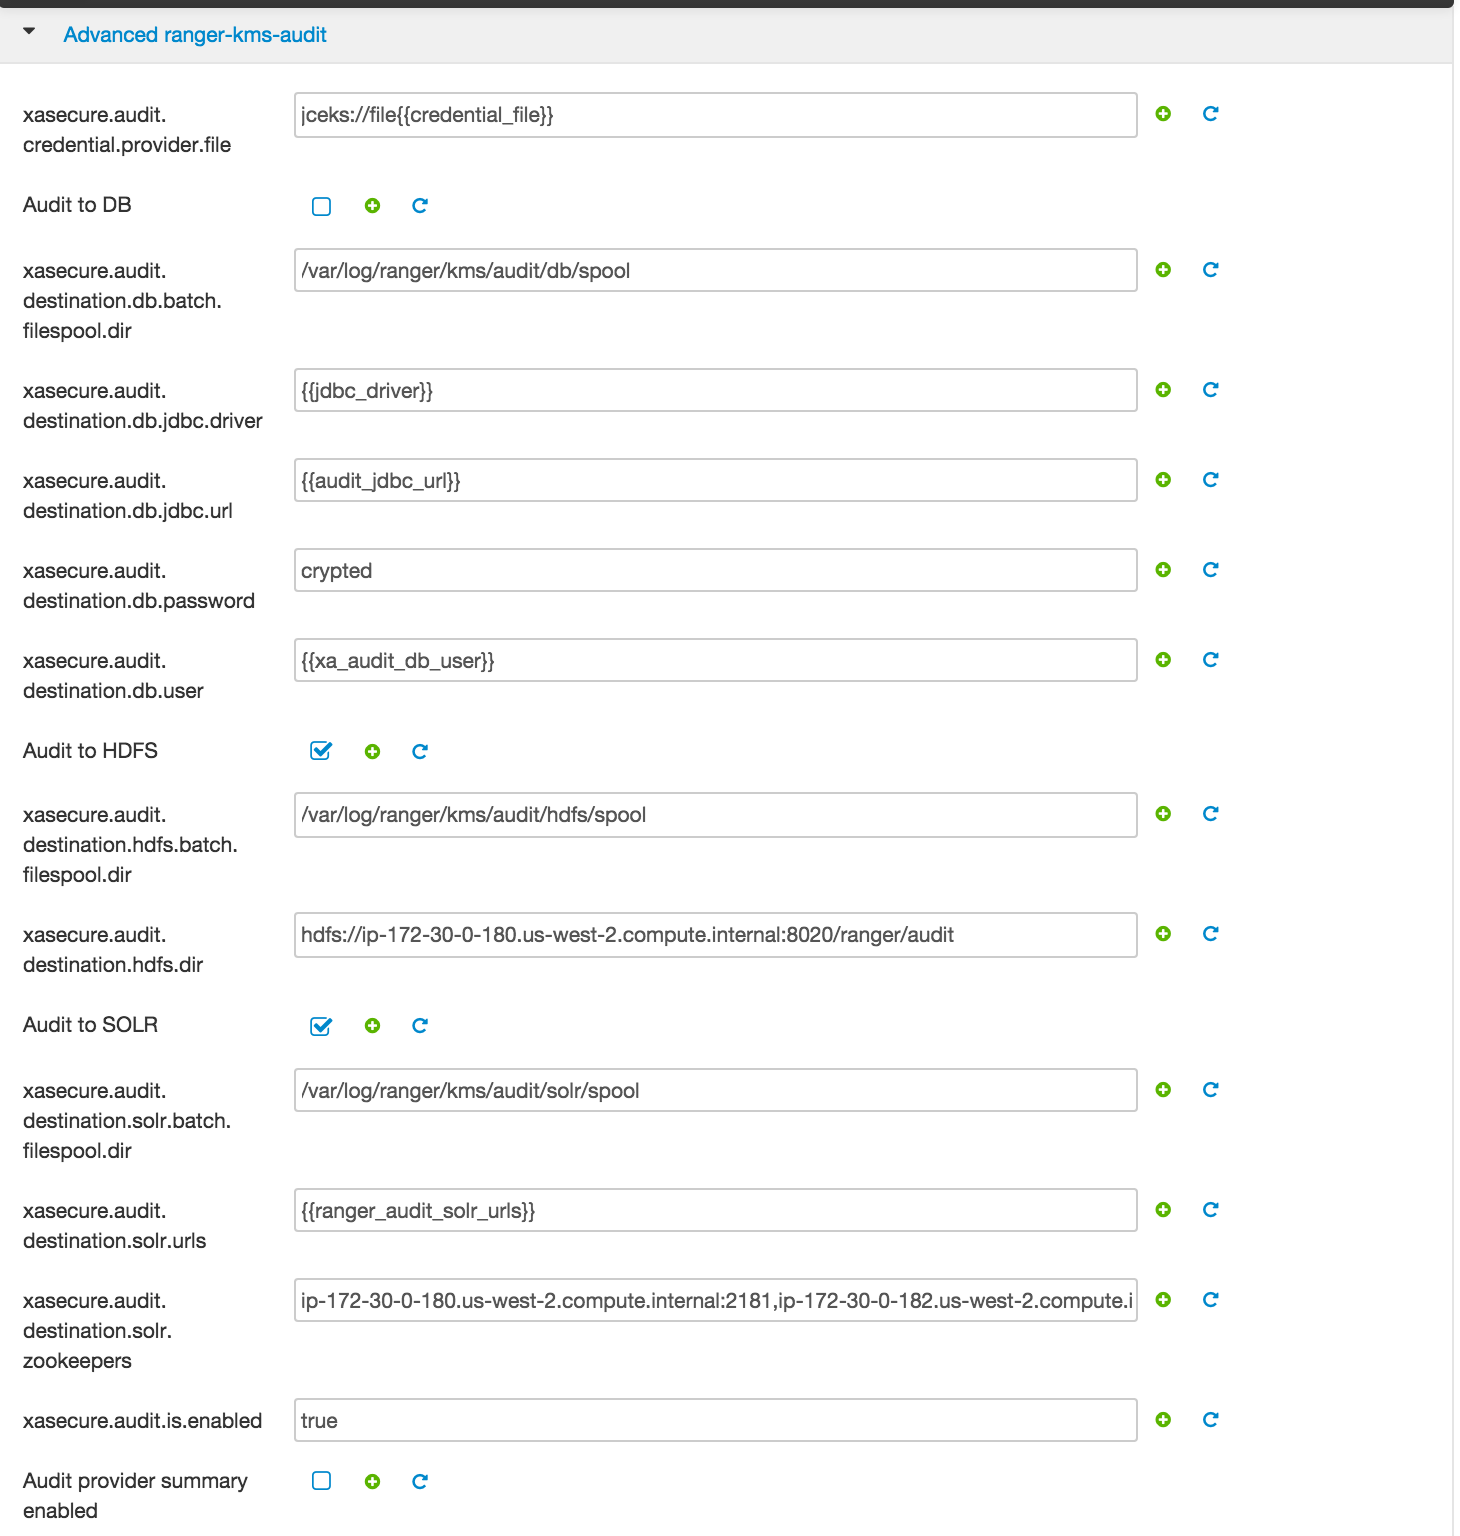
- Under xasecure.audit.destination.hdfs.dir, replace NAMENODE_HOSTNAME with FQDN of host where name node is running e.g.
-
-
Click Next > Proceed Anyway to proceed with the wizard
-
On Configure Identities page, you will have to enter your AD admin credentials:
- Admin principal:
hadoopadmin@LAB.HORTONWORKS.NET - Admin password: BadPass#1
- Check the "Save admin credentials" checkbox
- Admin principal:
-
Click Next > Deploy to install RangerKMS
-
Restart Ranger and RangerKMS via Ambari (hold off on restarting HDFS and other components for now)
-
On RangerKMS node, create symlink to core-site.xml
sudo ln -s /etc/hadoop/conf/core-site.xml /etc/ranger/kms/conf/core-site.xml
-
Confirm these properties got populated to kms://http@(kmshostname):9292/kms
- HDFS > Configs > Advanced core-site:
- hadoop.security.key.provider.path
- HDFS > Configs > Advanced hdfs-site:
- dfs.encryption.key.provider.uri
- HDFS > Configs > Advanced core-site:
-
Set the KMS proxy user
- HDFS > Configs > Custom core-site:
- hadoop.proxyuser.kms.groups=*
- HDFS > Configs > Custom core-site:
-
Restart the services that require it e.g. HDFS, Mapreduce, YARN
-
Restart Ranger and RangerKMS services.
-
(Optional) Add another KMS:
-
Ambari > Ranger KMS > Service Actions > Add Ranger KMS Server > Pick any host
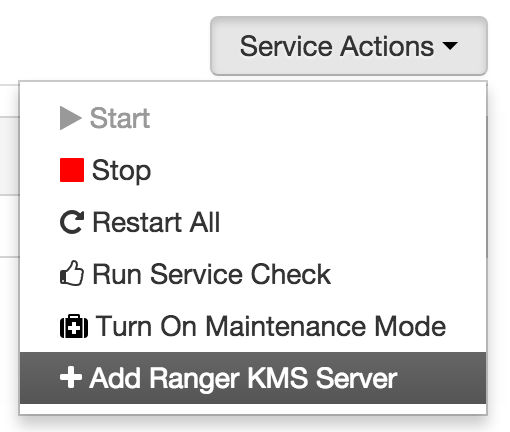
-
After it is installed, you can start it by:
- Ambari > Ranger KMS > Service Actions > Start
-
Once started you will see multiple KMS Servers running in Ambari:
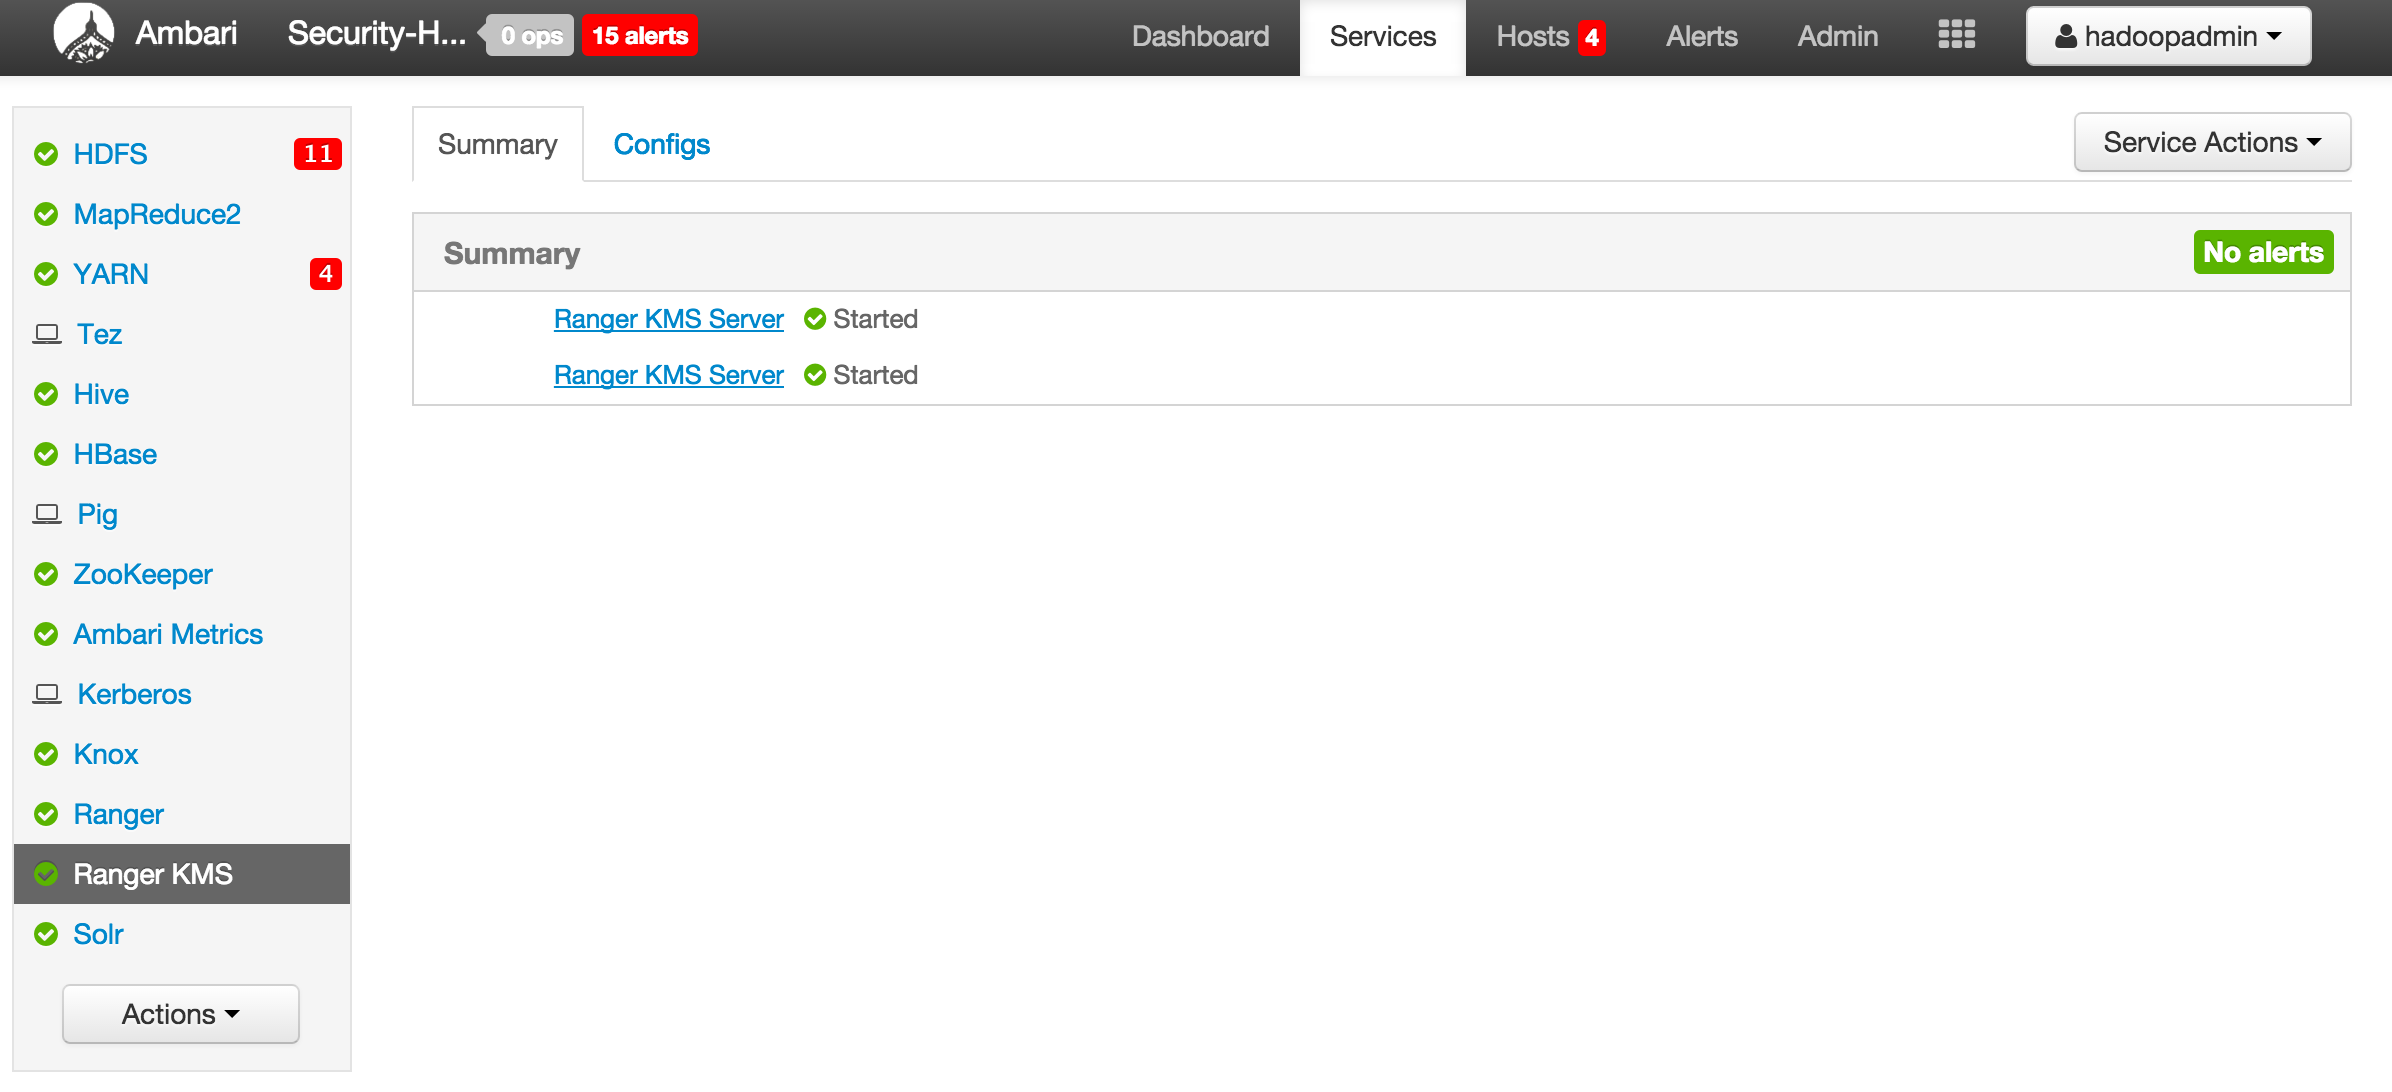
-
-
Before we can start exercising HDFS encryption, we will need to set:
- KMS policies for nn and hive service principals - in order to be able to create and copy files into encryption zones
- policy for HTTP service principal to write to /ranger/audits dir in HDFS - for KMS audits to HDFS to work
-
However, since Ranger does not recognize these users (we only sync'd the business users from AD), we will first need to manually create these users into Ranger (as local Ranger users)
-
Login to Ranger as admin/admin and create few users (nn, HTTP, hive) for Hadoop components we will need to create policies for:
-
create new user nn
- Settings > Users/Groups > Add new user
- username = nn
- password = BadPass#1
- First name = namenode
- Role: User
- Group: hadoop-admins

- Similarly, create a user: HTTP
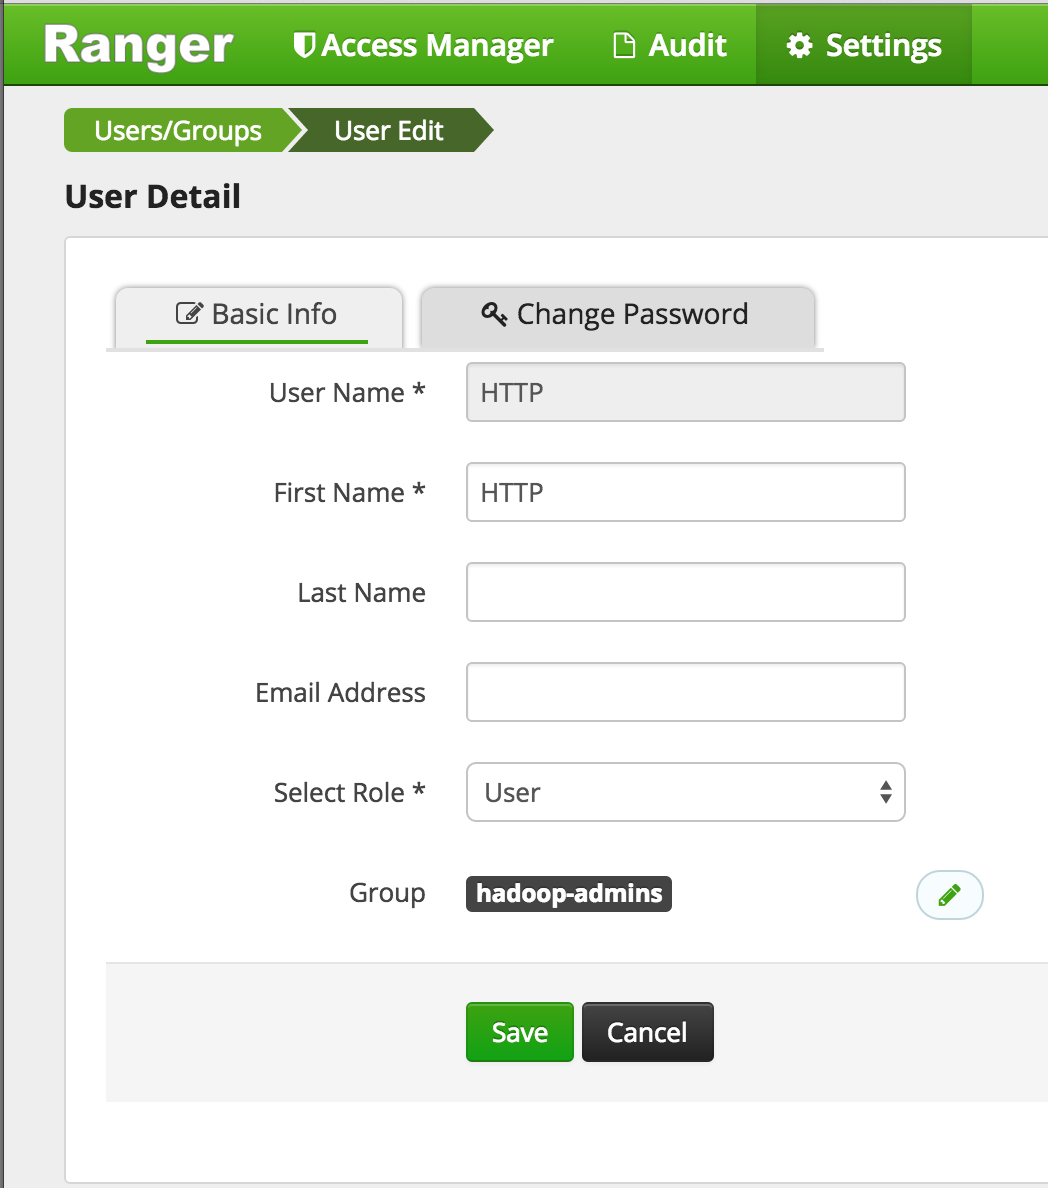
- Similarly, create a user: hive
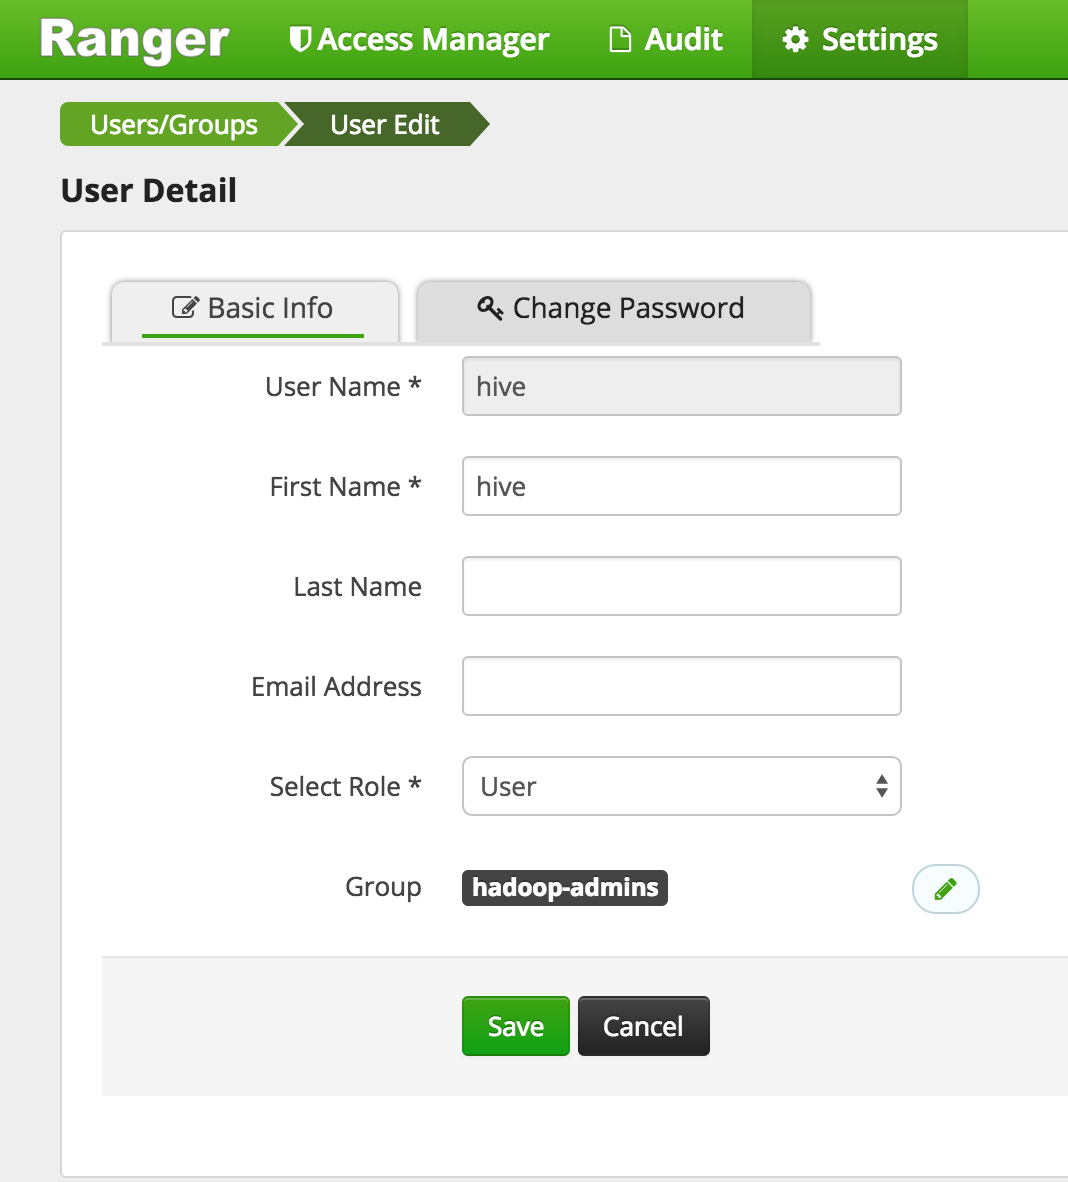
- Settings > Users/Groups > Add new user
-
Now lets add hadoopadmin to 'global policy' for HDFS to allow the user global access on HDFS
- Access Manager > HDFS > (clustername)_hadoop
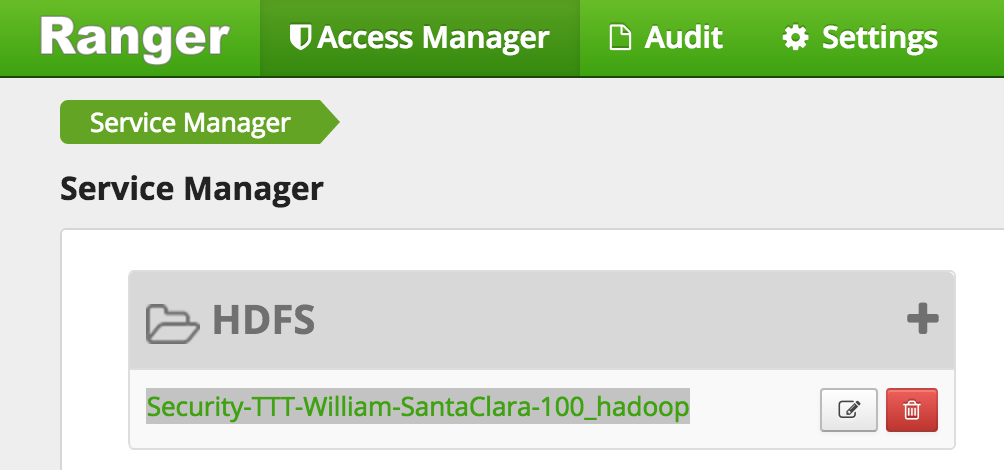
- This will open the list of HDFS policies

- Edit the 'global' policy (the first one) and add hadoopadmin to global HDFS policy and Save
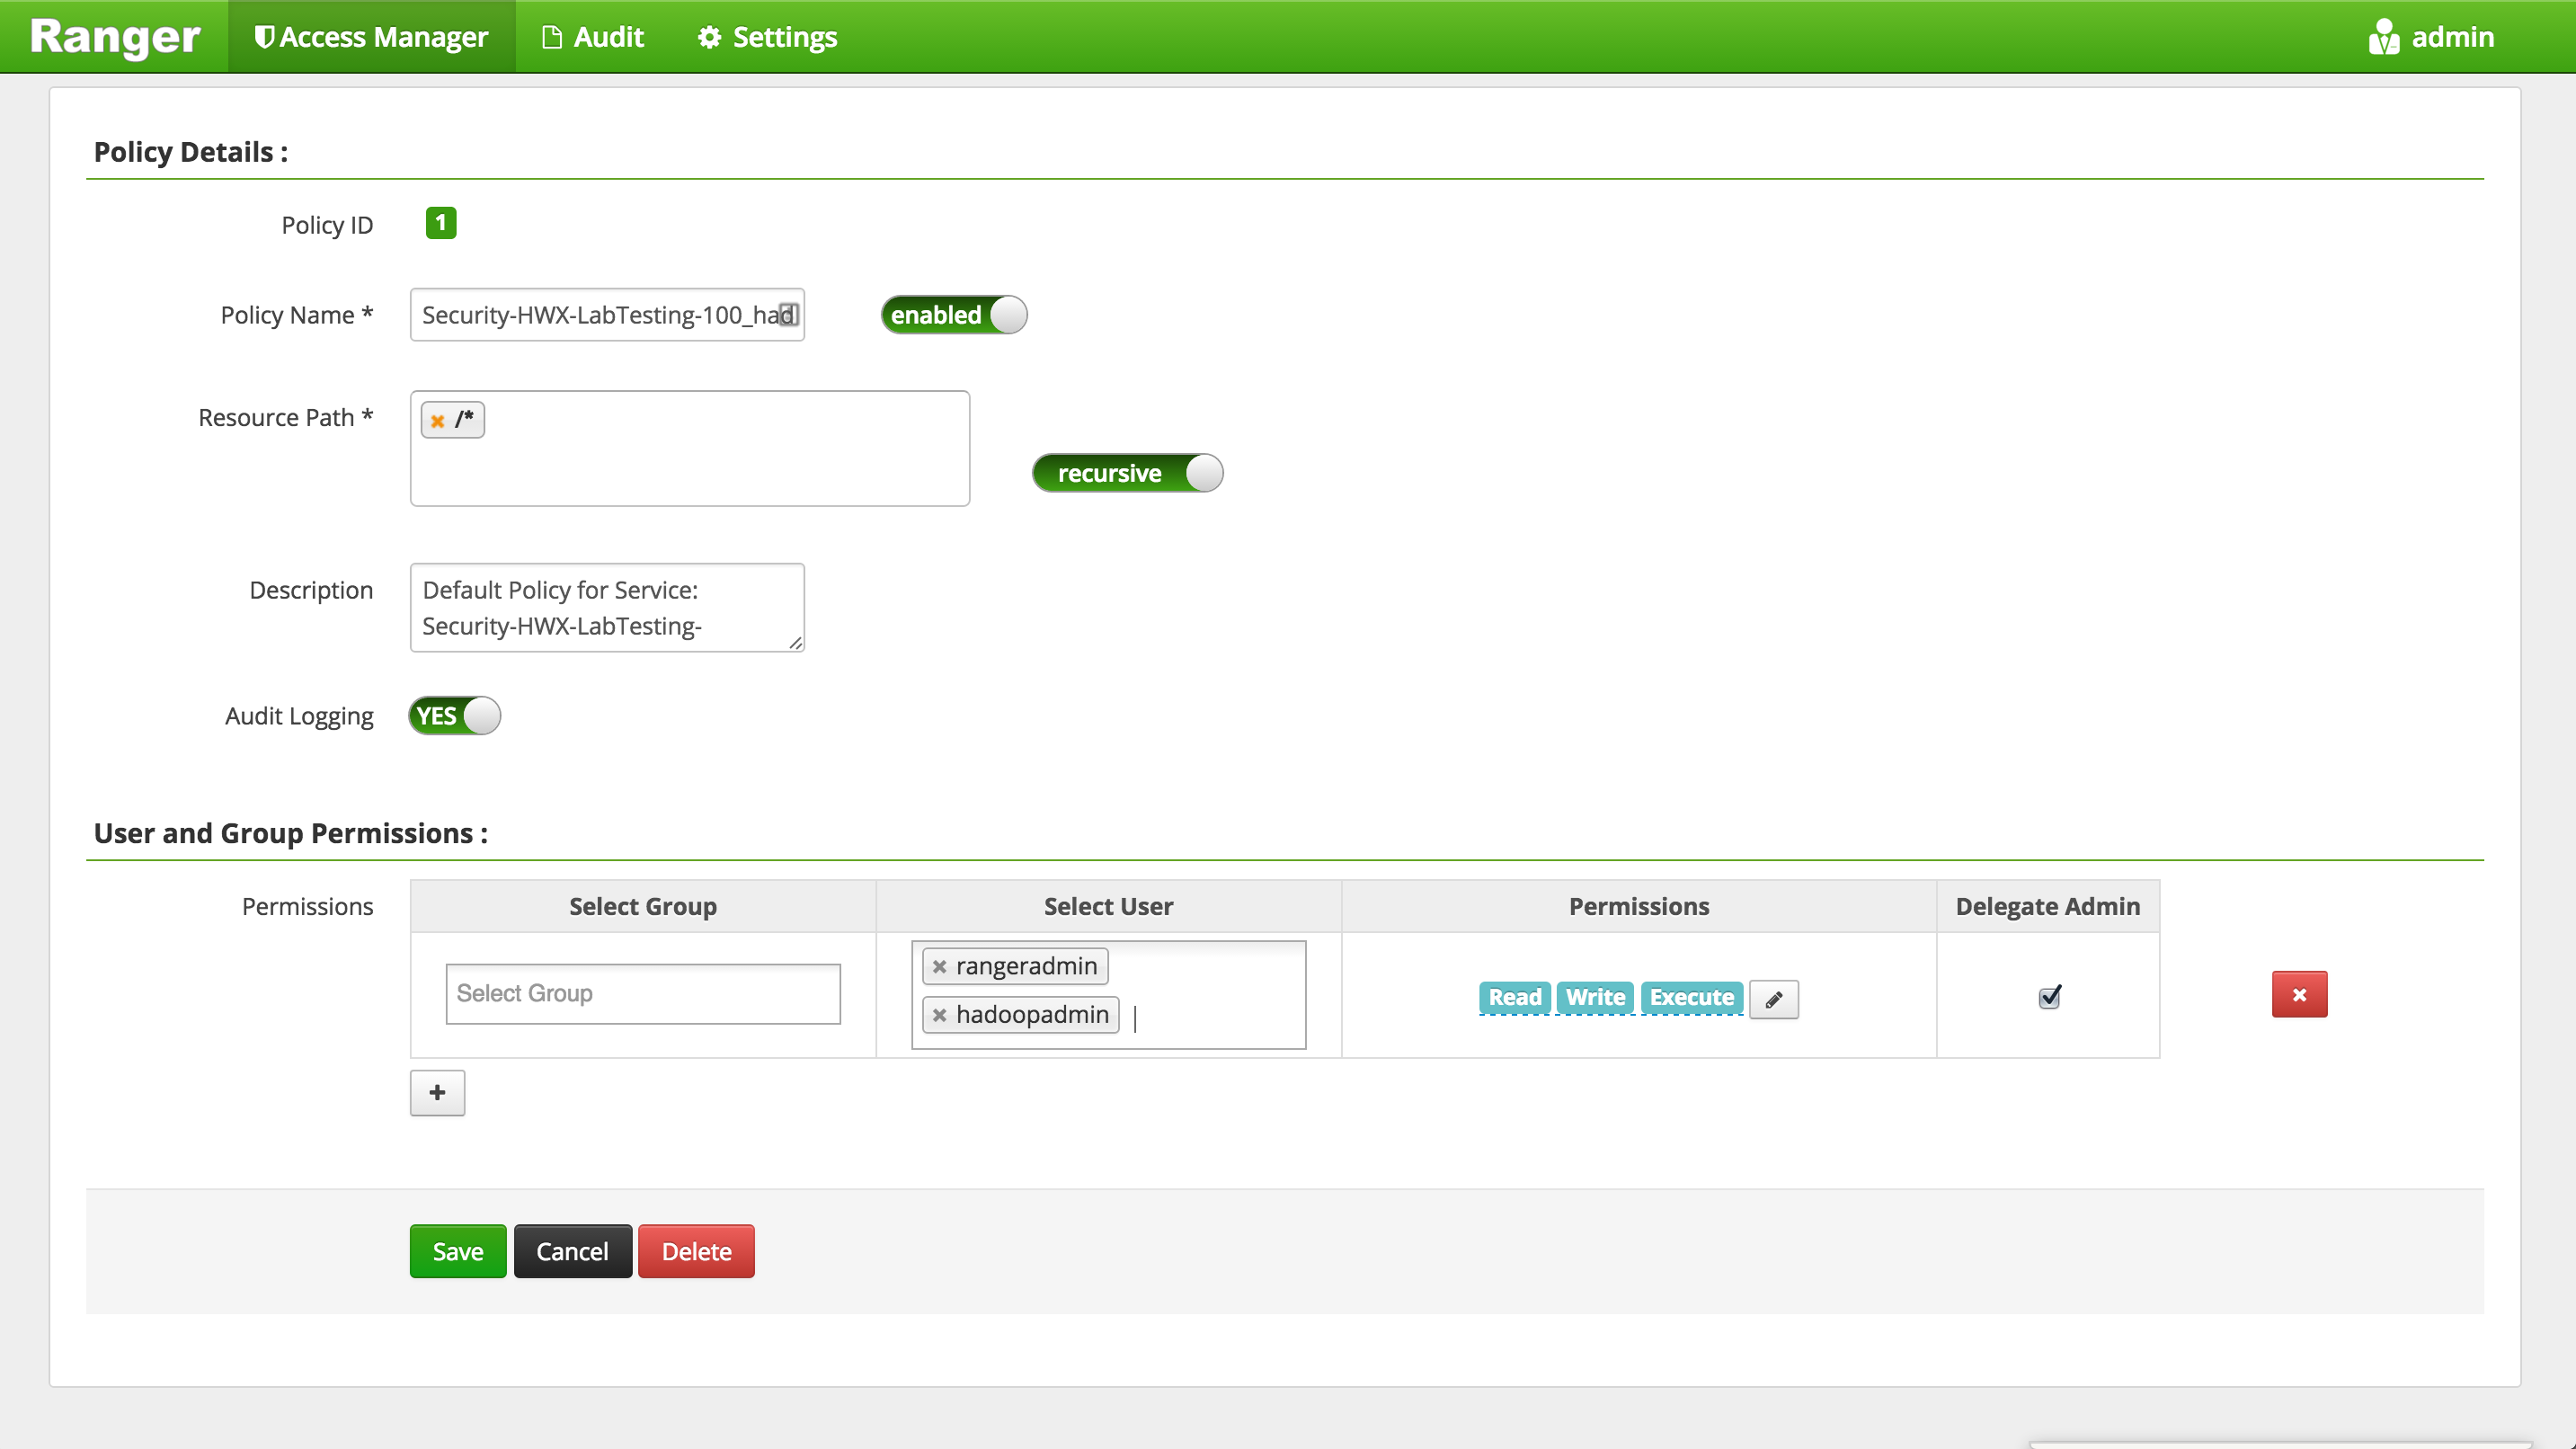
- Access Manager > HDFS > (clustername)_hadoop
-
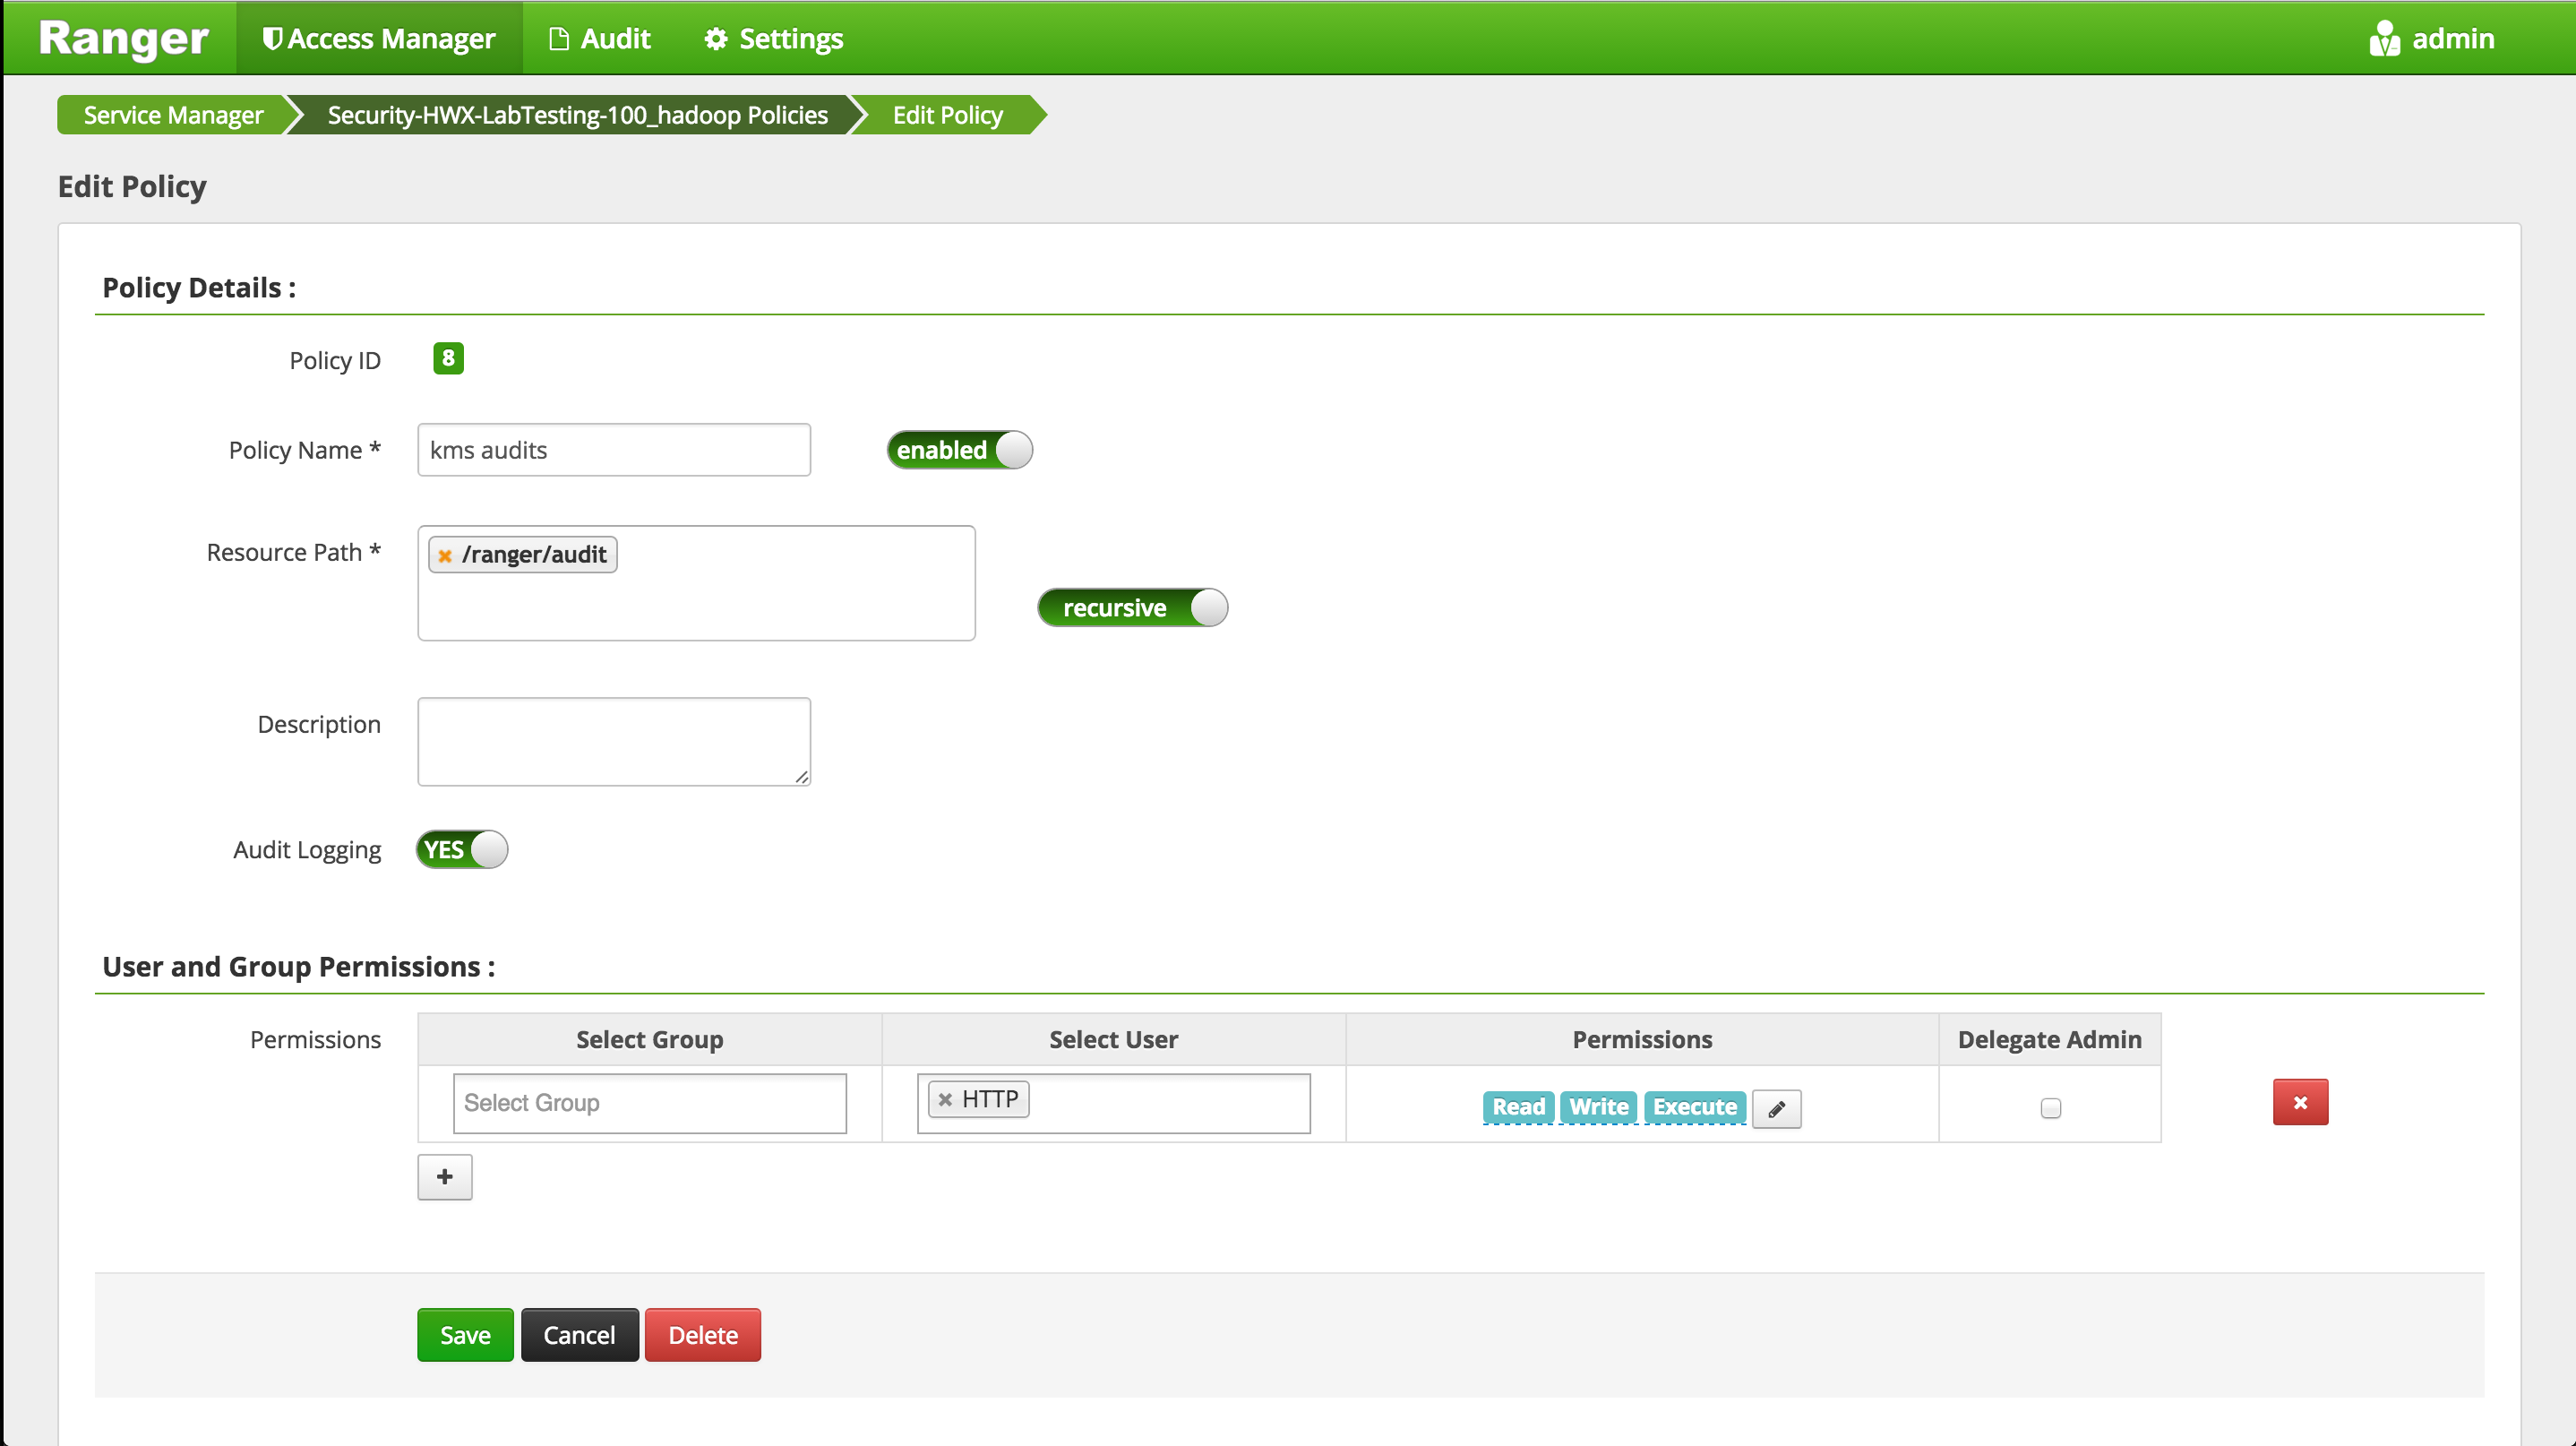
Now "Add a new policy" for HTTP user to write KMS audits to HDFS by clicking "Add new policy" and creating below policy:
- name: kms audits
- resource path: /ranger/audit
- user: HTTP
- Permissions: Read Write Execute
-
You can follow similar steps to add the user hadoopadmin to the Ranger Hive global policies. (Hive has two global policies: one on Hive tables, and one on Hive UDFs)
- Access Manager > HIVE > (clustername)_hive
- This will open the list of HIVE policies
- Edit the 'global' policy (the first one) and add hadoopadmin to global HIVE policy and Save
-
Give keyadmin permission to view Audits screen in Ranger:
- Settings tab > Permissions
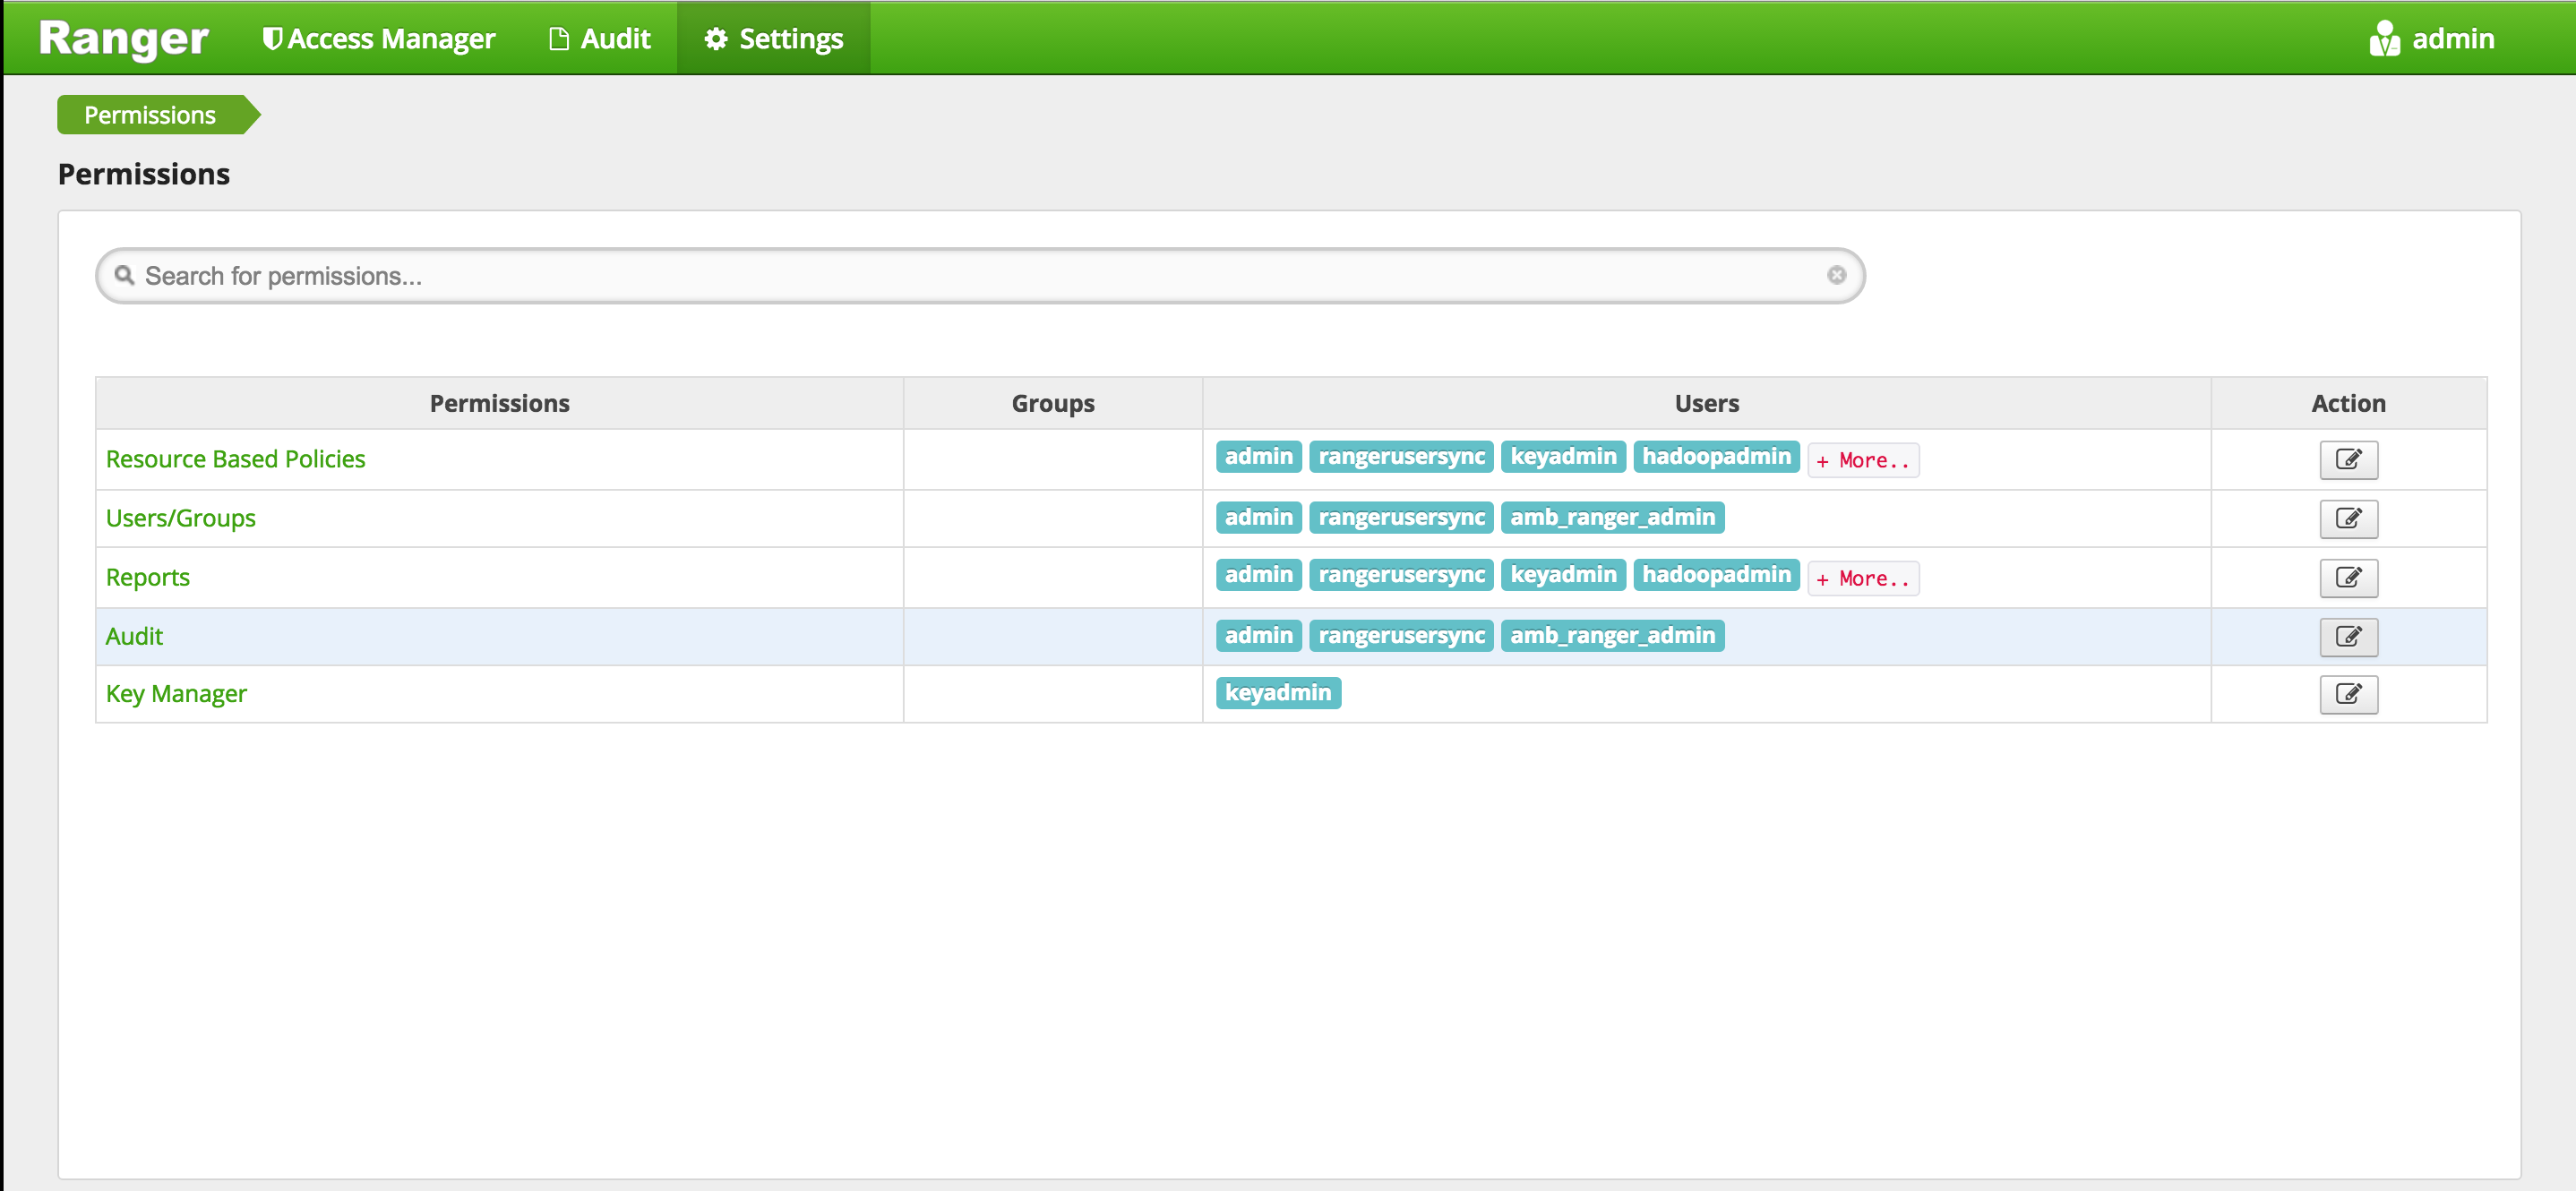
- Click 'Audit' (second row from bottom) to change users who have access to Audit screen
- Under 'Select User', add 'keyadmin' user
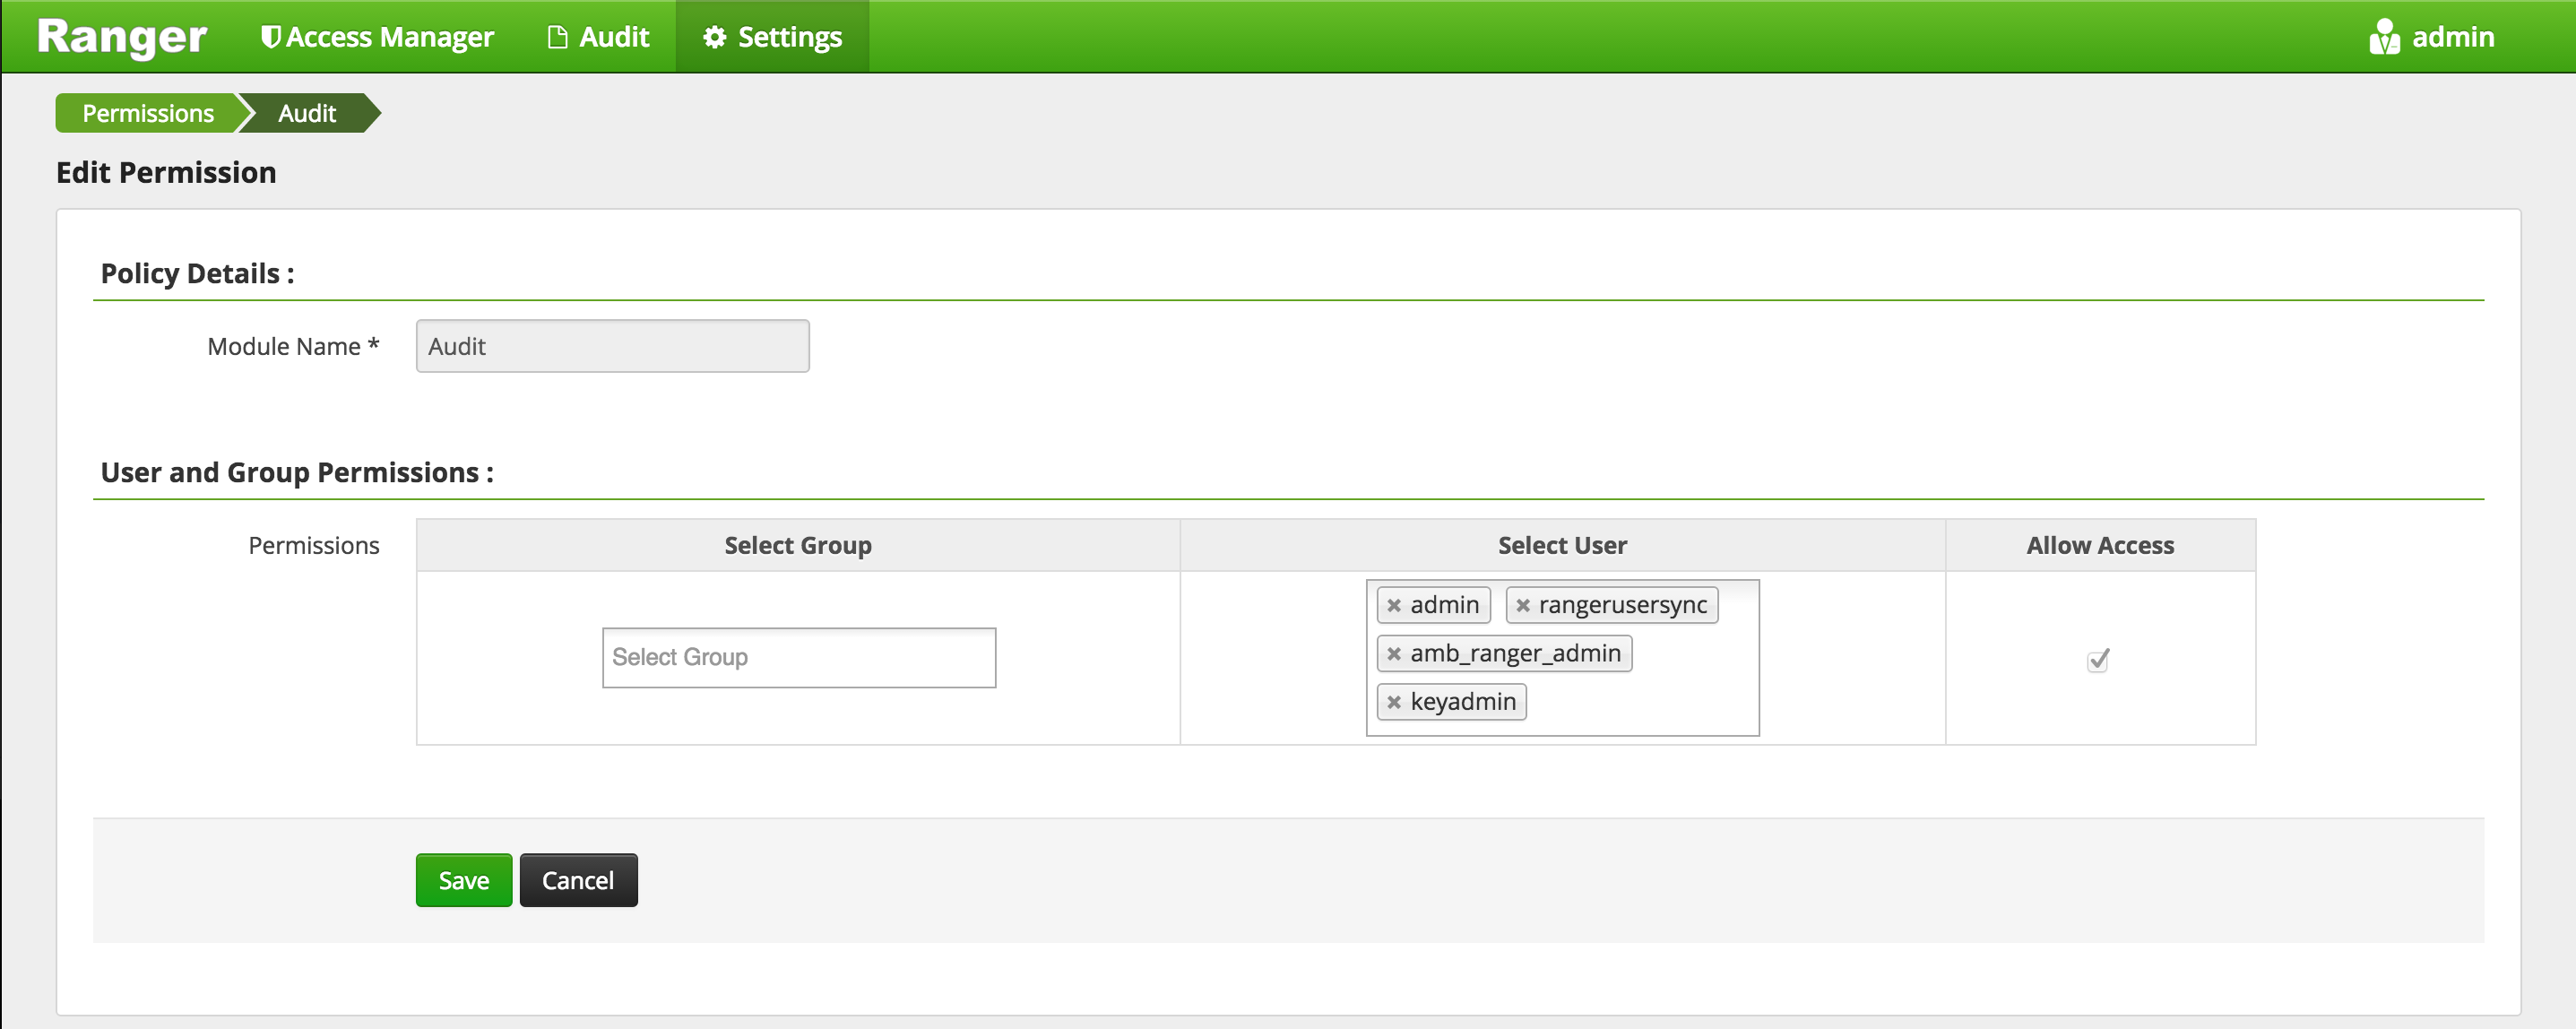
- Save
- Settings tab > Permissions
-
-
Logout of Ranger
- Top right > admin > Logout
-
Login to Ranger as keyadmin/keyadmin
-
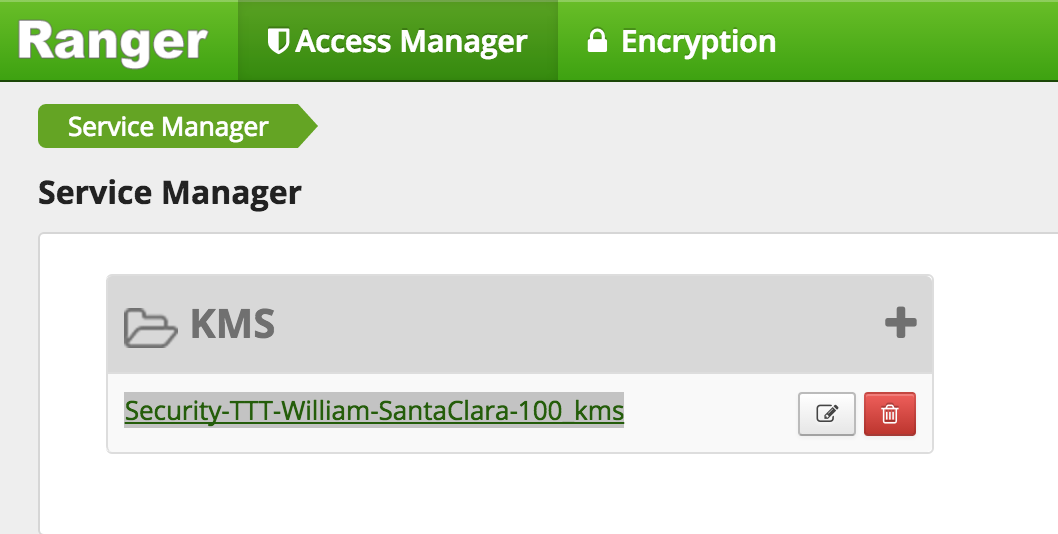
Confirm the KMS repo was setup correctly
- Under Service Manager > KMS > Click the Edit icon (next to the trash icon) to edit the KMS repo
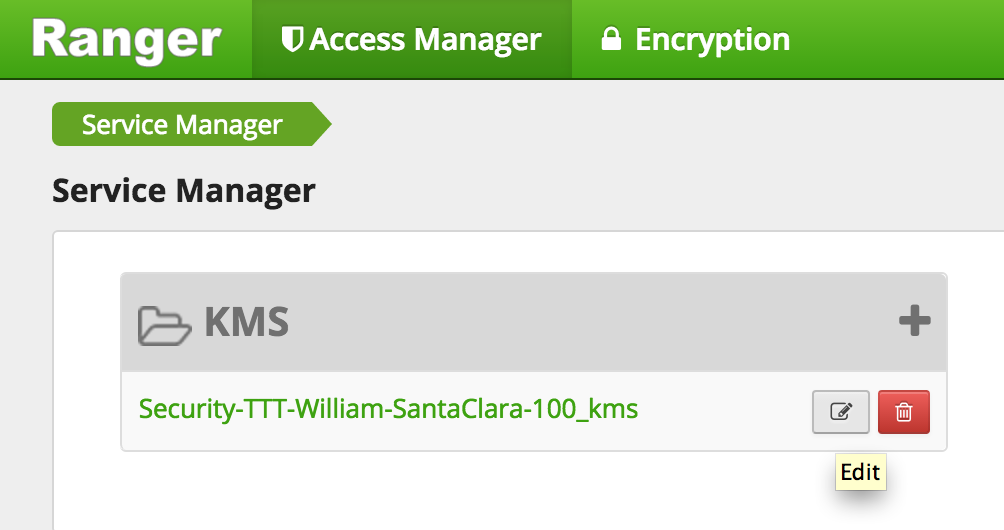
- Click 'Test connection'
- if it fails re-enter below fields and re-try:
- Username: keyadmin@LAB.HORTONWORKS.NET
- Password: BadPass#1
- Once the test passes, click Save
- Under Service Manager > KMS > Click the Edit icon (next to the trash icon) to edit the KMS repo
-
Create a key called testkey - for reference: see doc
- Select Encryption > Key Management
- Select KMS service > pick your kms > Add new Key
- if an error is thrown, go back and test connection as described in previous step
- Create a key called
testkey> Save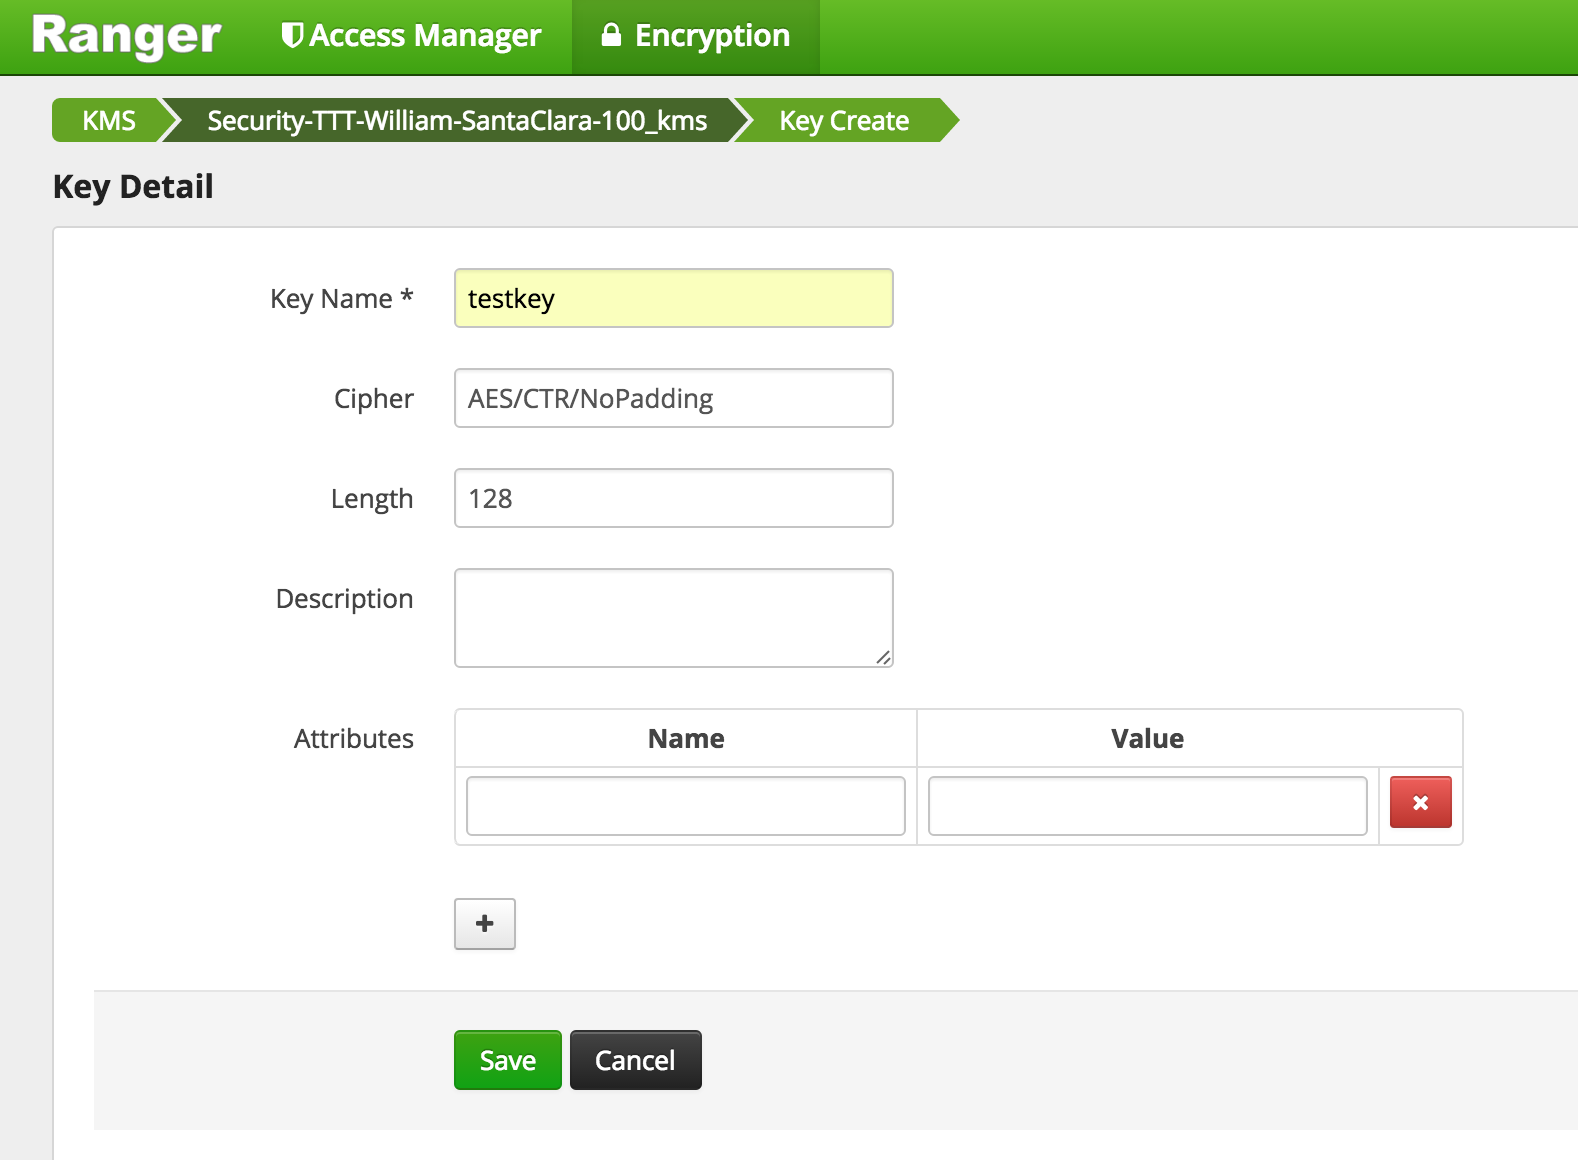
-
Similarly, create another key called
testkey2- Select Encryption > Key Management
- Select KMS service > pick your kms > Add new Key
- Create a key called
testkey2> Save
-
Add user
hadoopadminandnnandhiveto default KMS key policy-
Click Access Manager tab
-
Click Service Manager > KMS > (clustername)_kms link
-
Edit the default policy

-
Under 'Select User', Add
hadoopadmin,nnandhiveusers and click Save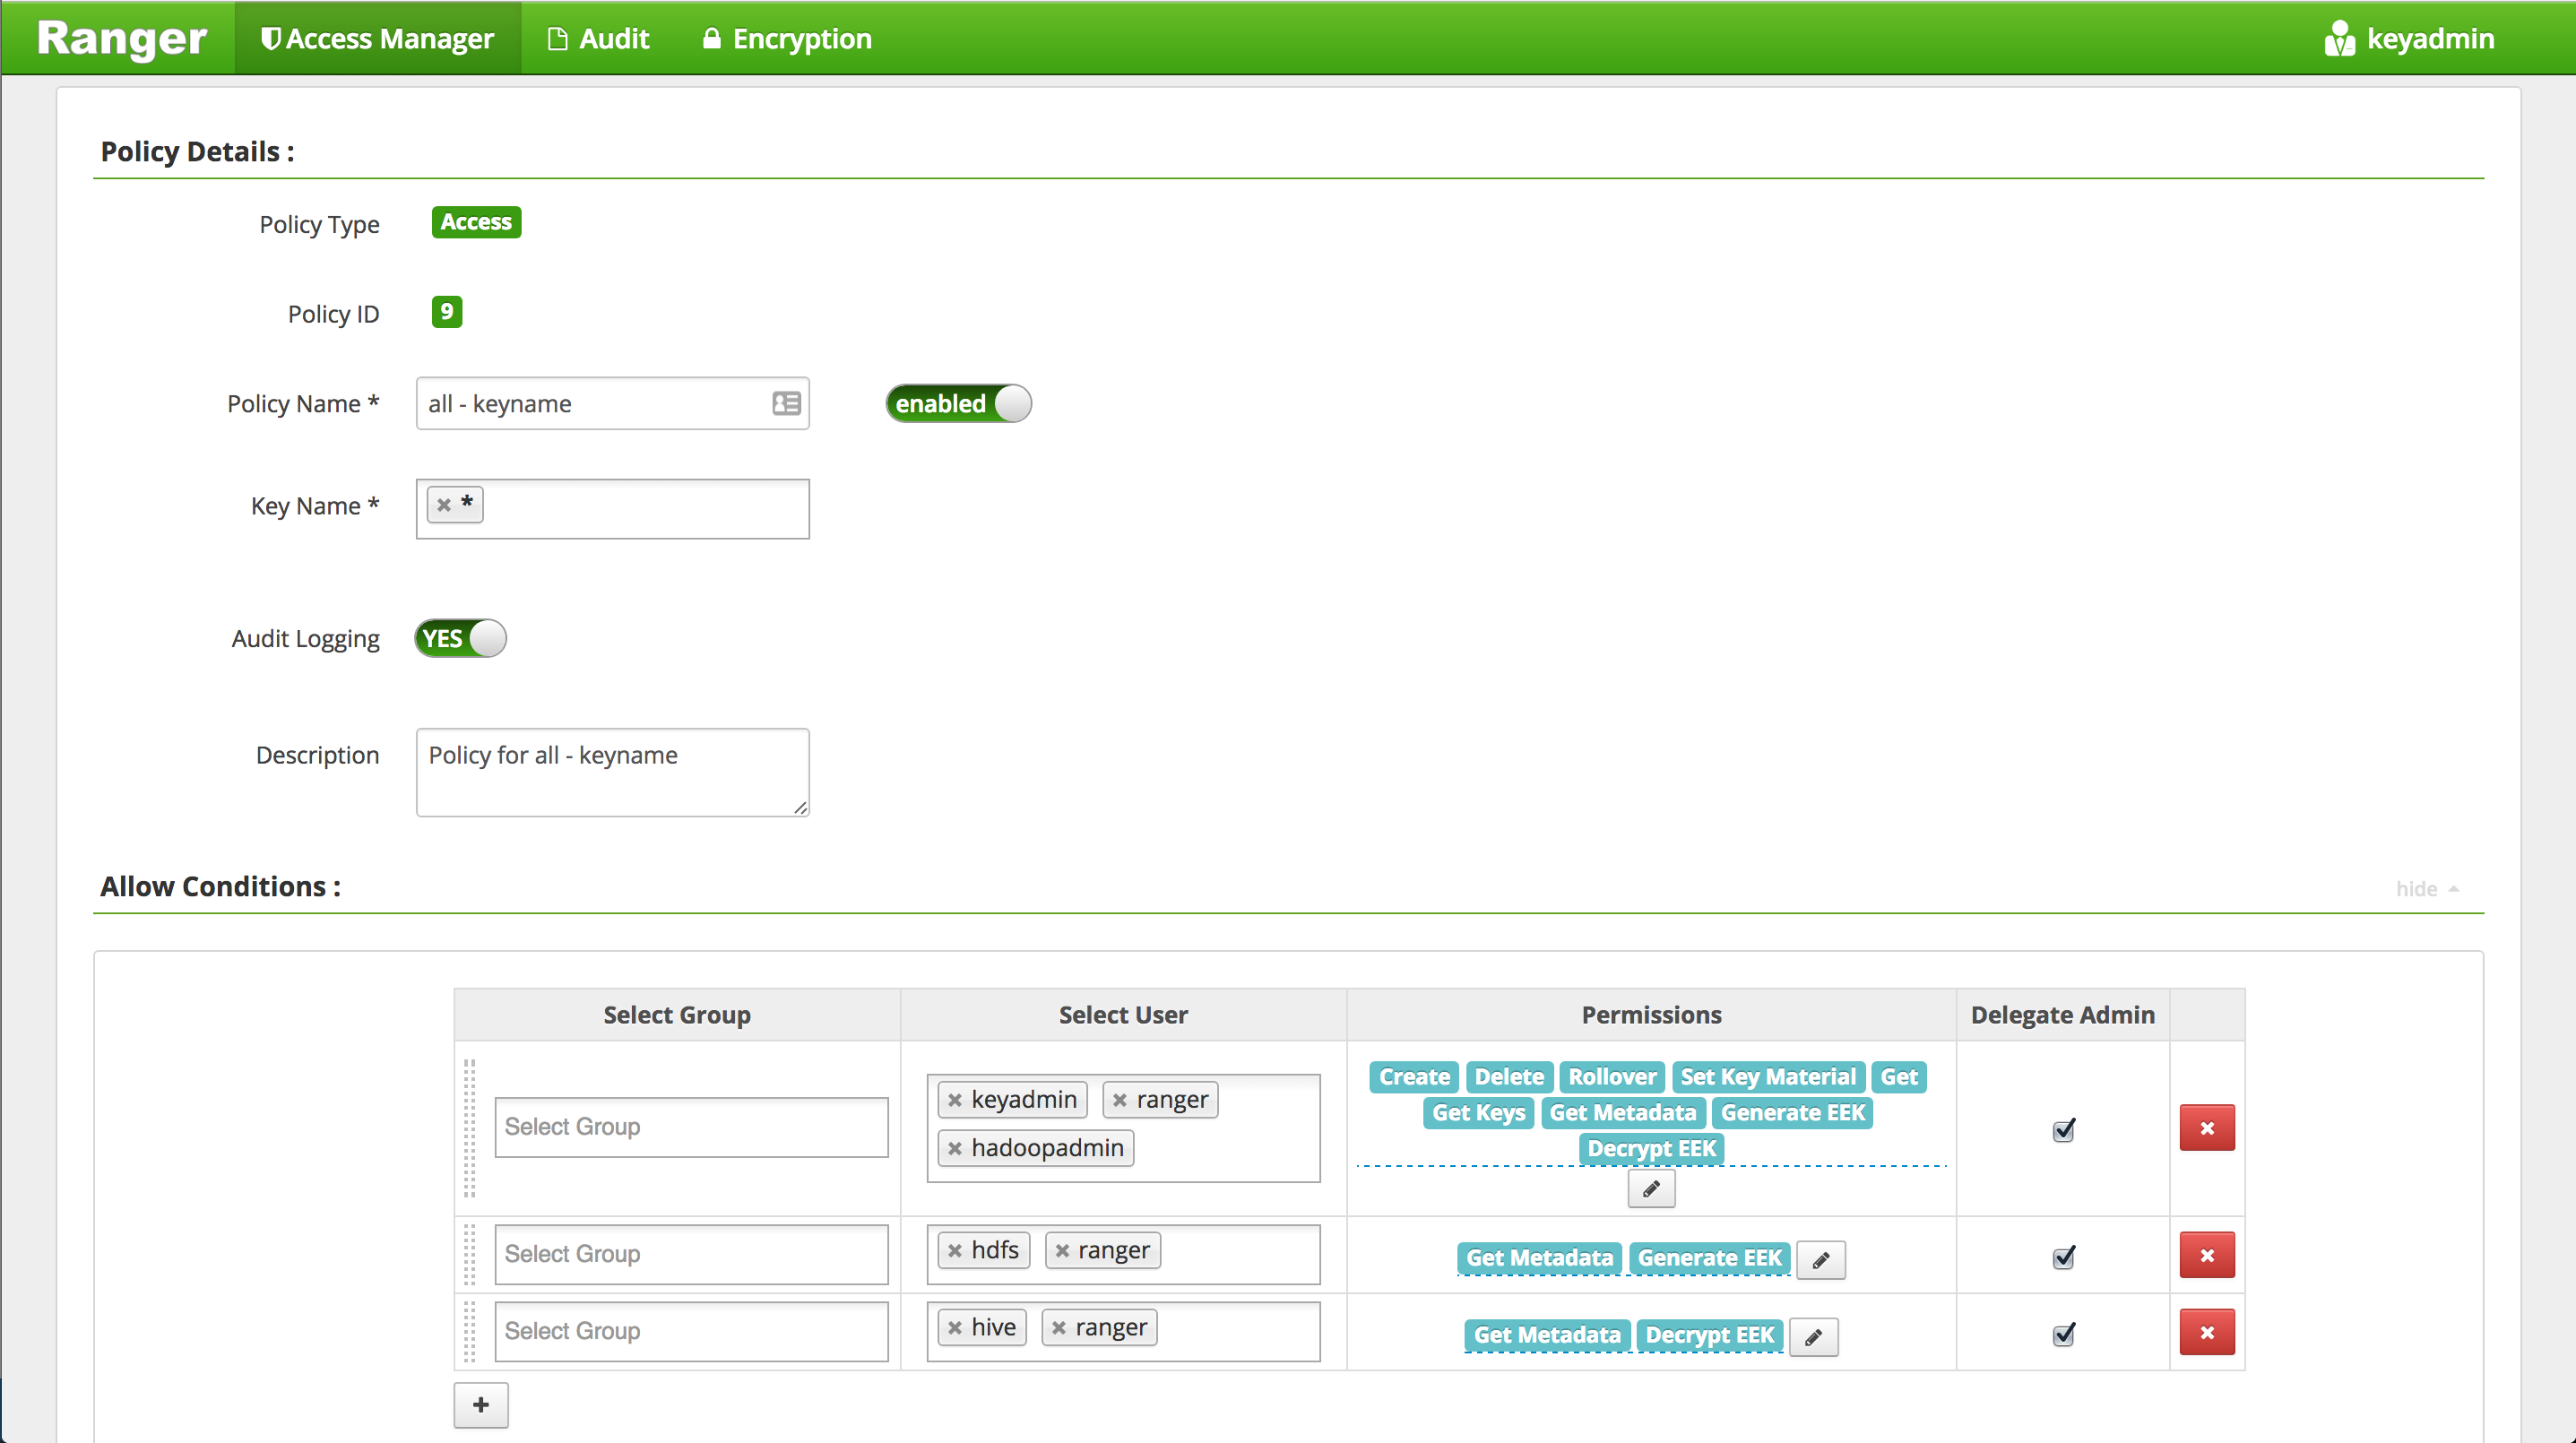
- Note that for simplicity we are giving the hadoop users more permissions than they need. At minimum:
nnuser needsGetMetaDataandGenerateEEKprivilegehiveuser needsGetMetaDataandDecryptEEKprivilege
- Note that for simplicity we are giving the hadoop users more permissions than they need. At minimum:
-
-
Run below to create a zone using the key and perform basic key and encryption zone (EZ) exercises
- Create EZs using keys
- Copy file to EZs
- Delete file from EZ
- View contents for raw file
- Prevent access to raw file
- Copy file across EZs
- move hive warehouse dir to EZ
#run below on Ambari node
export PASSWORD=BadPass#1
#detect name of cluster
output=`curl -u hadoopadmin:$PASSWORD -k -i -H 'X-Requested-By: ambari' https://localhost:8444/api/v1/clusters`
cluster=`echo $output | sed -n 's/.*"cluster_name" : "\([^\"]*\)".*/\1/p'`
echo $cluster
## this should show the name of your cluster
## if not you can manully set this as below
## cluster=Security-HWX-LabTesting-XXXX
#first we will run login 3 different users: hdfs, hadoopadmin, sales1
#kinit as hadoopadmin and sales using BadPass#1
sudo -u hadoopadmin kinit
## enter BadPass#1
sudo -u sales1 kinit
## enter BadPass#1
#then kinit as hdfs using the headless keytab and the principal name
sudo -u hdfs kinit -kt /etc/security/keytabs/hdfs.headless.keytab hdfs-${cluster}
#as hadoopadmin list the keys and their metadata
sudo -u hadoopadmin hadoop key list -metadata
#as hadoopadmin create dirs for EZs
sudo -u hadoopadmin hdfs dfs -mkdir /zone_encr
sudo -u hadoopadmin hdfs dfs -mkdir /zone_encr2
#as hdfs create 2 EZs using the 2 keys
sudo -u hdfs hdfs crypto -createZone -keyName testkey -path /zone_encr
sudo -u hdfs hdfs crypto -createZone -keyName testkey2 -path /zone_encr2
# if you get 'RemoteException' error it means you have not given namenode user permissions on testkey by creating a policy for KMS in Ranger
#check EZs got created
sudo -u hdfs hdfs crypto -listZones
#create test files
sudo -u hadoopadmin echo "My test file1" > /tmp/test1.log
sudo -u hadoopadmin echo "My test file2" > /tmp/test2.log
#copy files to EZs
sudo -u hadoopadmin hdfs dfs -copyFromLocal /tmp/test1.log /zone_encr
sudo -u hadoopadmin hdfs dfs -copyFromLocal /tmp/test2.log /zone_encr
sudo -u hadoopadmin hdfs dfs -copyFromLocal /tmp/test2.log /zone_encr2
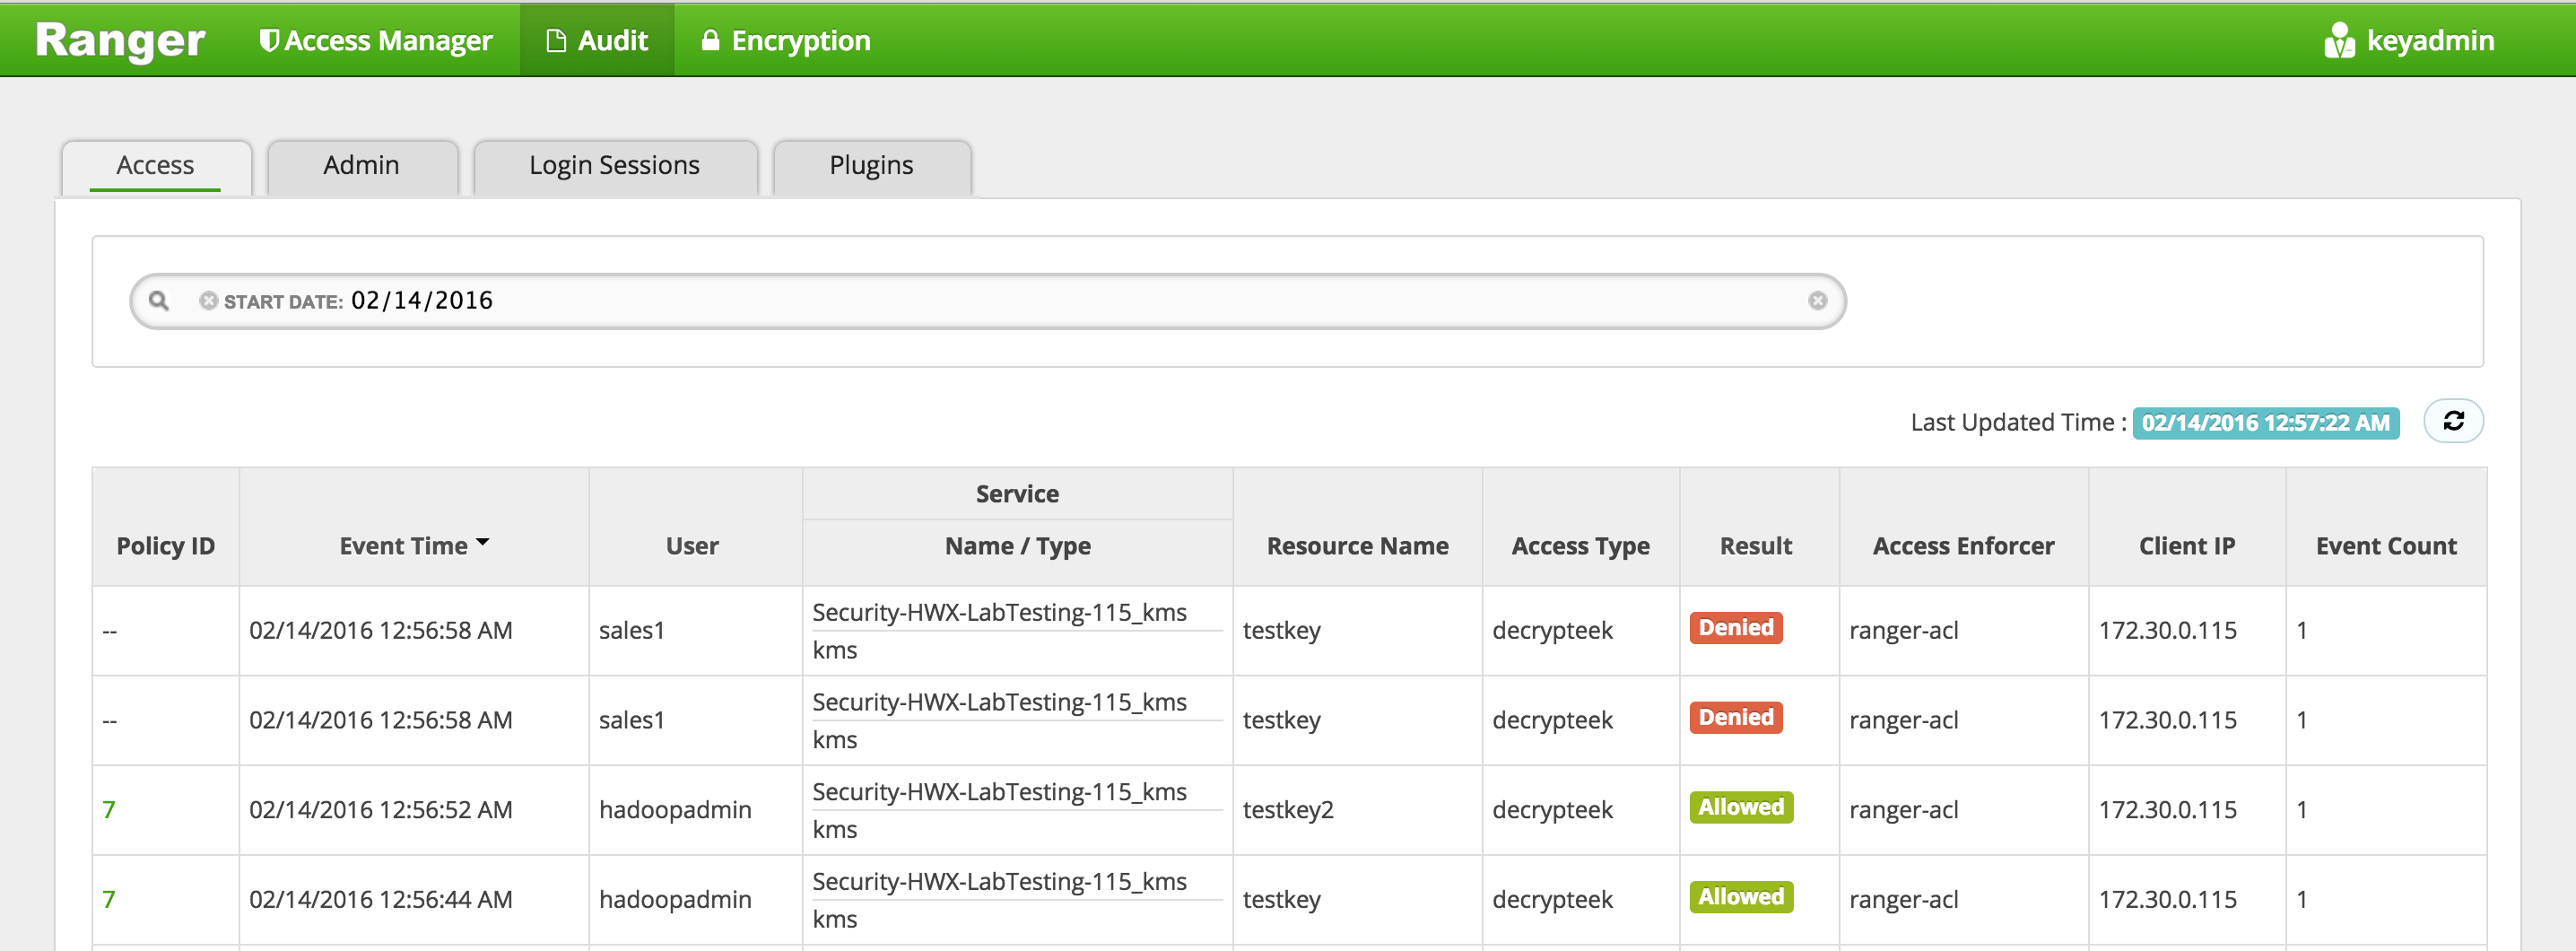
#Notice that hadoopadmin allowed to decrypt EEK but not sales user (since there is no Ranger policy allowing this)
sudo -u hadoopadmin hdfs dfs -cat /zone_encr/test1.log
sudo -u hadoopadmin hdfs dfs -cat /zone_encr2/test2.log
#this should work
sudo -u sales1 hdfs dfs -cat /zone_encr/test1.log
## this should give you below error
## cat: User:sales1 not allowed to do 'DECRYPT_EEK' on 'testkey'
-
Check the Ranger > Audit page and notice that the request from hadoopadmin was allowed but the request from sales1 was denied
-
Now lets test deleting and copying files between EZs - (Reference doc)
#try to remove file from EZ using usual -rm command
sudo -u hadoopadmin hdfs dfs -rm /zone_encr/test2.log
## rm: Failed to move to trash.... /zone_encr/test2.log can't be moved from an encryption zone.

#recall that to delete a file from EZ you need to specify the skipTrash option
sudo -u hadoopadmin hdfs dfs -rm -skipTrash /zone_encr/test2.log

#confirm that test2.log was deleted and that zone_encr only contains test1.log
sudo -u hadoopadmin hdfs dfs -ls  /zone_encr/

#copy a file between EZs using distcp with -skipcrccheck option
sudo -u hadoopadmin hadoop distcp -skipcrccheck -update /zone_encr2/test2.log /zone_encr/
- Lets now look at the contents of the raw file
#View contents of raw file in encrypted zone as hdfs super user. This should show some encrypted characters
sudo -u hdfs hdfs dfs -cat /.reserved/raw/zone_encr/test1.log

#Prevent user hdfs from reading the file by setting security.hdfs.unreadable.by.superuser attribute. Note that this attribute can only be set on files and can never be removed.
sudo -u hdfs hdfs dfs -setfattr -n security.hdfs.unreadable.by.superuser  /.reserved/raw/zone_encr/test1.log

# Now as hdfs super user, try to read the files or the contents of the raw file
sudo -u hdfs hdfs dfs -cat /.reserved/raw/zone_encr/test1.log

## You should get below error
##cat: Access is denied for hdfs since the superuser is not allowed to perform this operation.
- Configure Hive for HDFS Encryption using testkey. Reference
sudo -u hadoopadmin hdfs dfs -mv /apps/hive /apps/hive-old
sudo -u hadoopadmin hdfs dfs -mkdir /apps/hive
sudo -u hdfs hdfs crypto -createZone -keyName testkey -path /apps/hive
sudo -u hadoopadmin hadoop distcp -skipcrccheck -update /apps/hive-old/warehouse /apps/hive/warehouse
-
To configure the Hive scratch directory (hive.exec.scratchdir) so that it resides inside the encryption zone:
- Ambari > Hive > Configs > Advanced
- hive.exec.scratchdir = /apps/hive/tmp
- Restart Hive
- Ambari > Hive > Configs > Advanced
-
Configure Tez for EZ (this is a bug that should be fixed in next release)
- Ambari > Tez > Configs > Custom tez-site
- tez.dag.recovery.enabled = false
- Restart Tez
-
Make sure that the permissions for /apps/hive/tmp are set to 1777
sudo -u hdfs hdfs dfs -chmod -R 1777 /apps/hive/tmp
- Confirm permissions by accessing the scratch dir as sales1
sudo -u sales1 hdfs dfs -ls /apps/hive/tmp
## this should provide listing
- Destroy ticket for sales1
sudo -u sales1 kdestroy
- Logout of Ranger as keyadmin user
In this lab we will see how to interact with Hadoop components (HDFS, Hive, Hbase, Sqoop) running on a kerborized cluster and create Ranger appropriate authorization policies for access.
- We will Configure Ranger policies to:
- Protect /sales HDFS dir - so only sales group has access to it
- Protect sales hive table - so only sales group has access to it
- Protect sales HBase table - so only sales group has access to it
-
Goal: Create a /sales dir in HDFS and ensure only users belonging to sales group (and admins) have access
-
Login to Ranger (using admin/admin) and confirm the HDFS repo was setup correctly in Ranger
- In Ranger > Under Service Manager > HDFS > Click the Edit icon (next to the trash icon) to edit the HDFS repo
- Click 'Test connection'
- if it fails re-enter below fields and re-try:
- Username:
rangeradmin@LAB.HORTONWORKS.NET - Password: BadPass#1
- RPC Protection type: Authentication
- Username:
- Once the test passes, click Save
-
Create /sales dir in HDFS as hadoopadmin
#authenticate
sudo -u hadoopadmin kinit
# enter password: BadPass#1

#create dir and set permissions to 000
sudo -u hadoopadmin hadoop fs -mkdir /sales
sudo -u hadoopadmin hadoop fs -chmod 000 /sales
- Now login as sales1 and attempt to access it before adding any Ranger HDFS policy
sudo su - sales1

hdfs dfs -ls /sales
-
This fails with
GSSException: No valid credentials providedbecause the cluster is kerberized and we have not authenticated yet -
Authenticate as sales1 user and check the ticket
kinit
# enter password: BadPass#1

klist
## Default principal: sales1@LAB.HORTONWORKS.NET
- Now try accessing the dir again as sales1
hdfs dfs -ls /sales
-
This time it fails with authorization error:
Permission denied: user=sales1, access=READ_EXECUTE, inode="/sales":hadoopadmin:hdfs:d---------
-
Login into Ranger UI e.g. at http://RANGER_HOST_PUBLIC_IP:6080/index.html as admin/admin
-
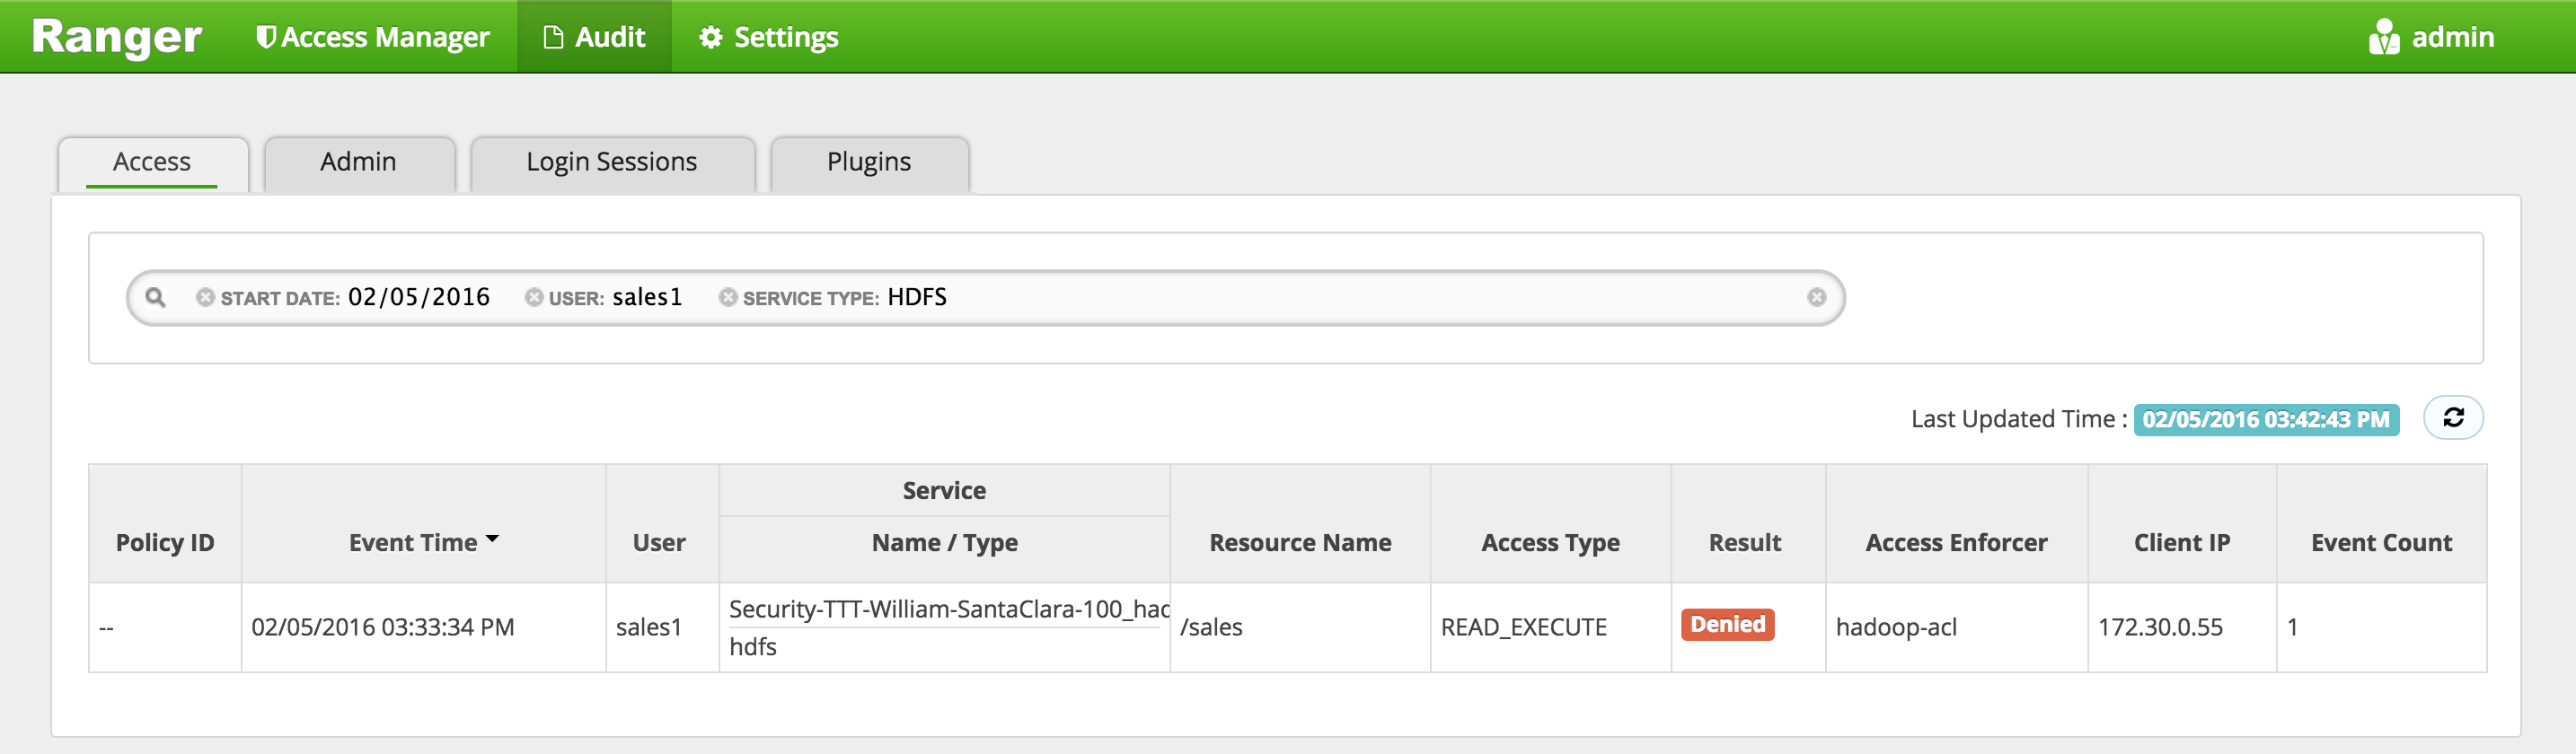
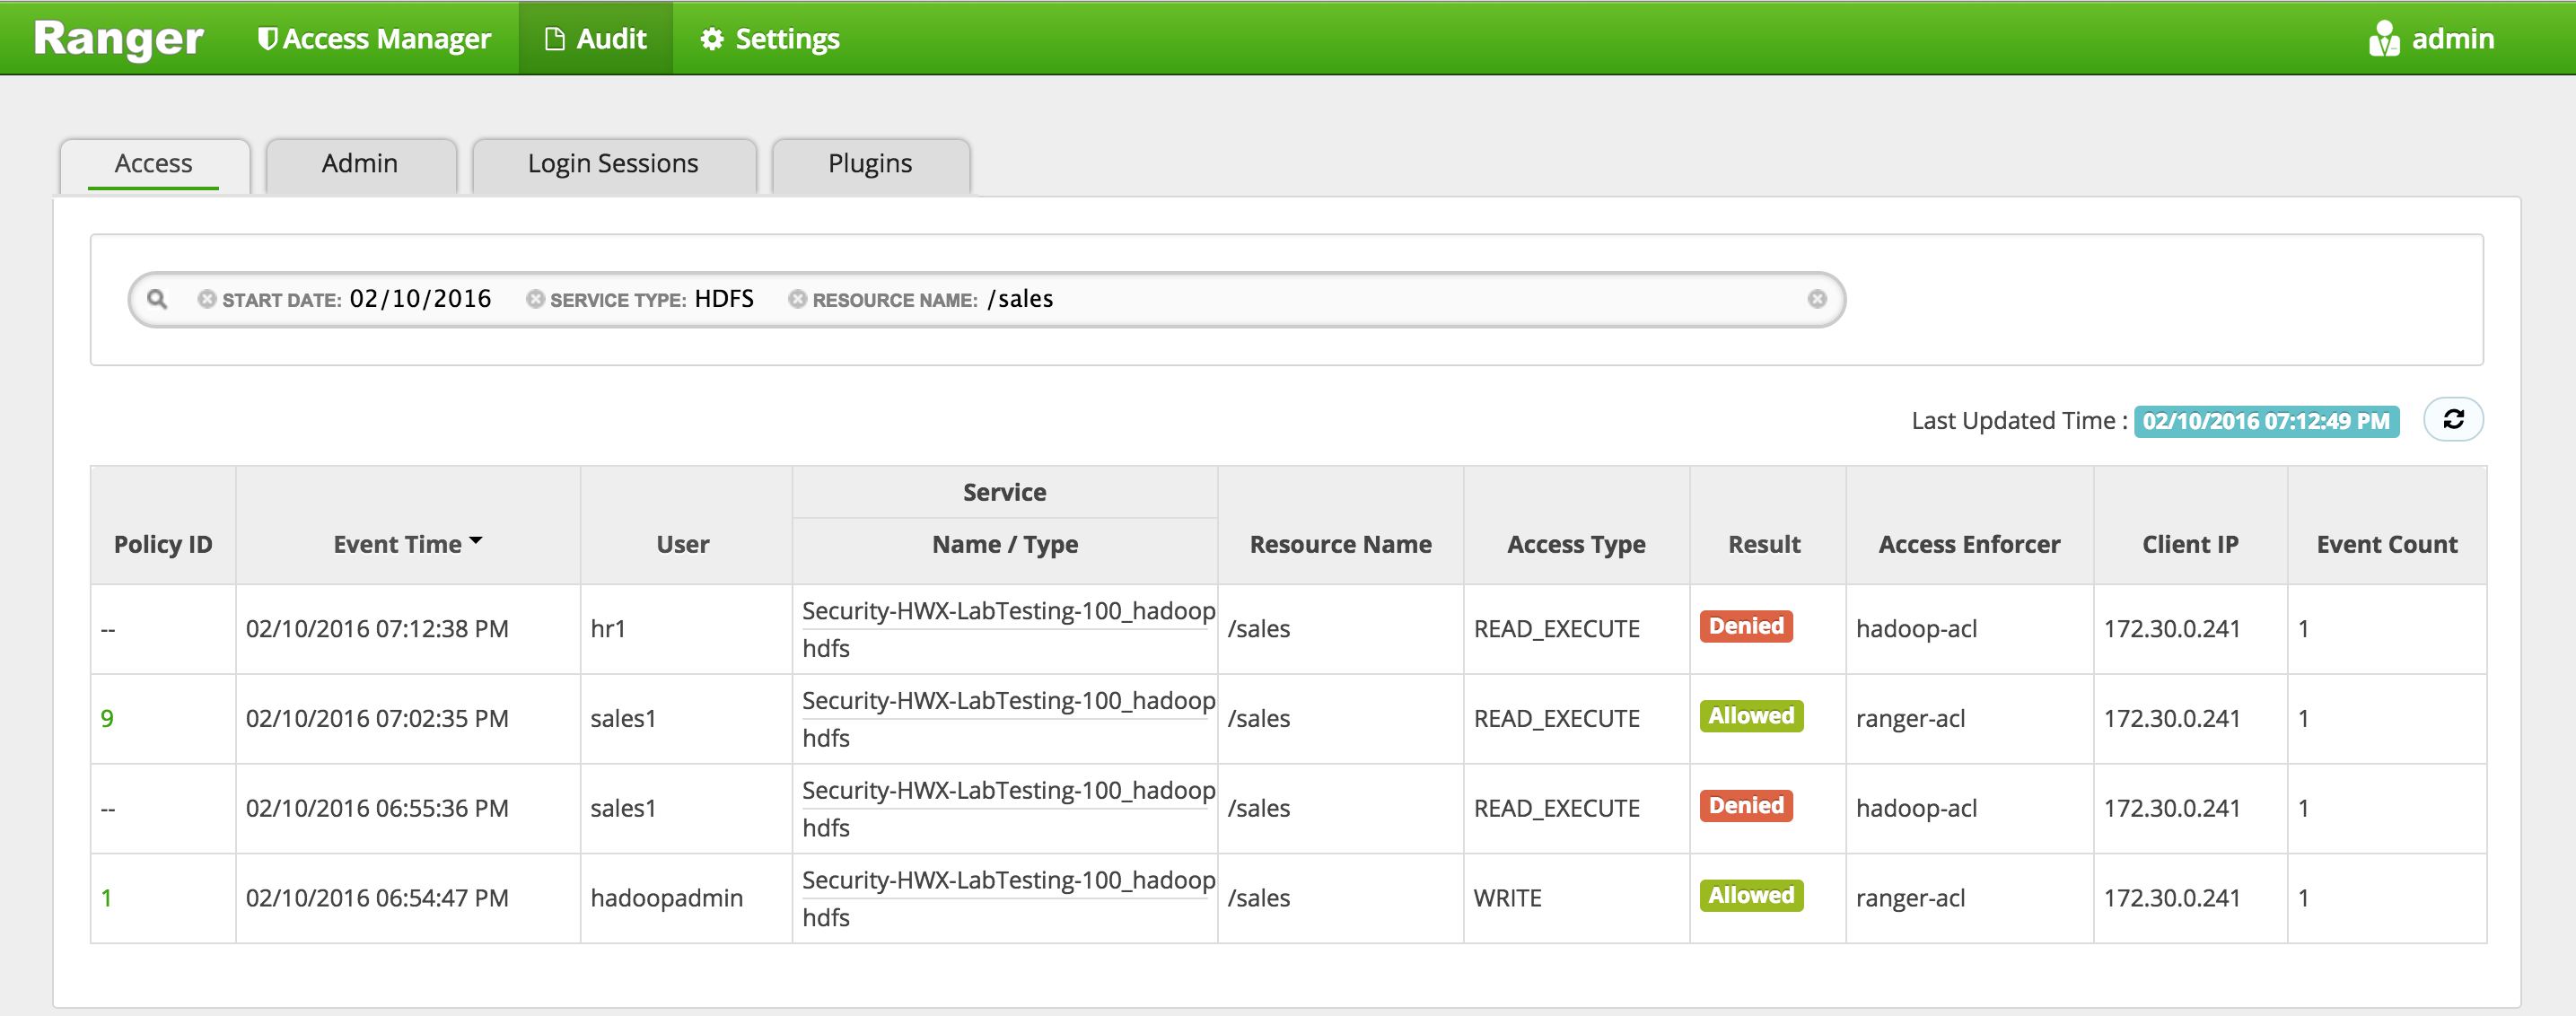
In Ranger, click on 'Audit' to open the Audits page and filter by below.
- Service Type:
HDFS - User:
sales1
- Service Type:
-
Notice that Ranger captured the access attempt and since there is currently no policy to allow the access, it was "Denied"
-
To create an HDFS Policy in Ranger, follow below steps:
- On the 'Access Manager' tab click HDFS > (clustername)_hadoop
- This will open the list of HDFS policies
- Click 'Add New Policy' button to create a new one allowing
salesgroup users access to/salesdir:- Policy Name:
sales dir - Resource Path:
/sales - Group:
sales - Permissions :
Execute Read Write - Add
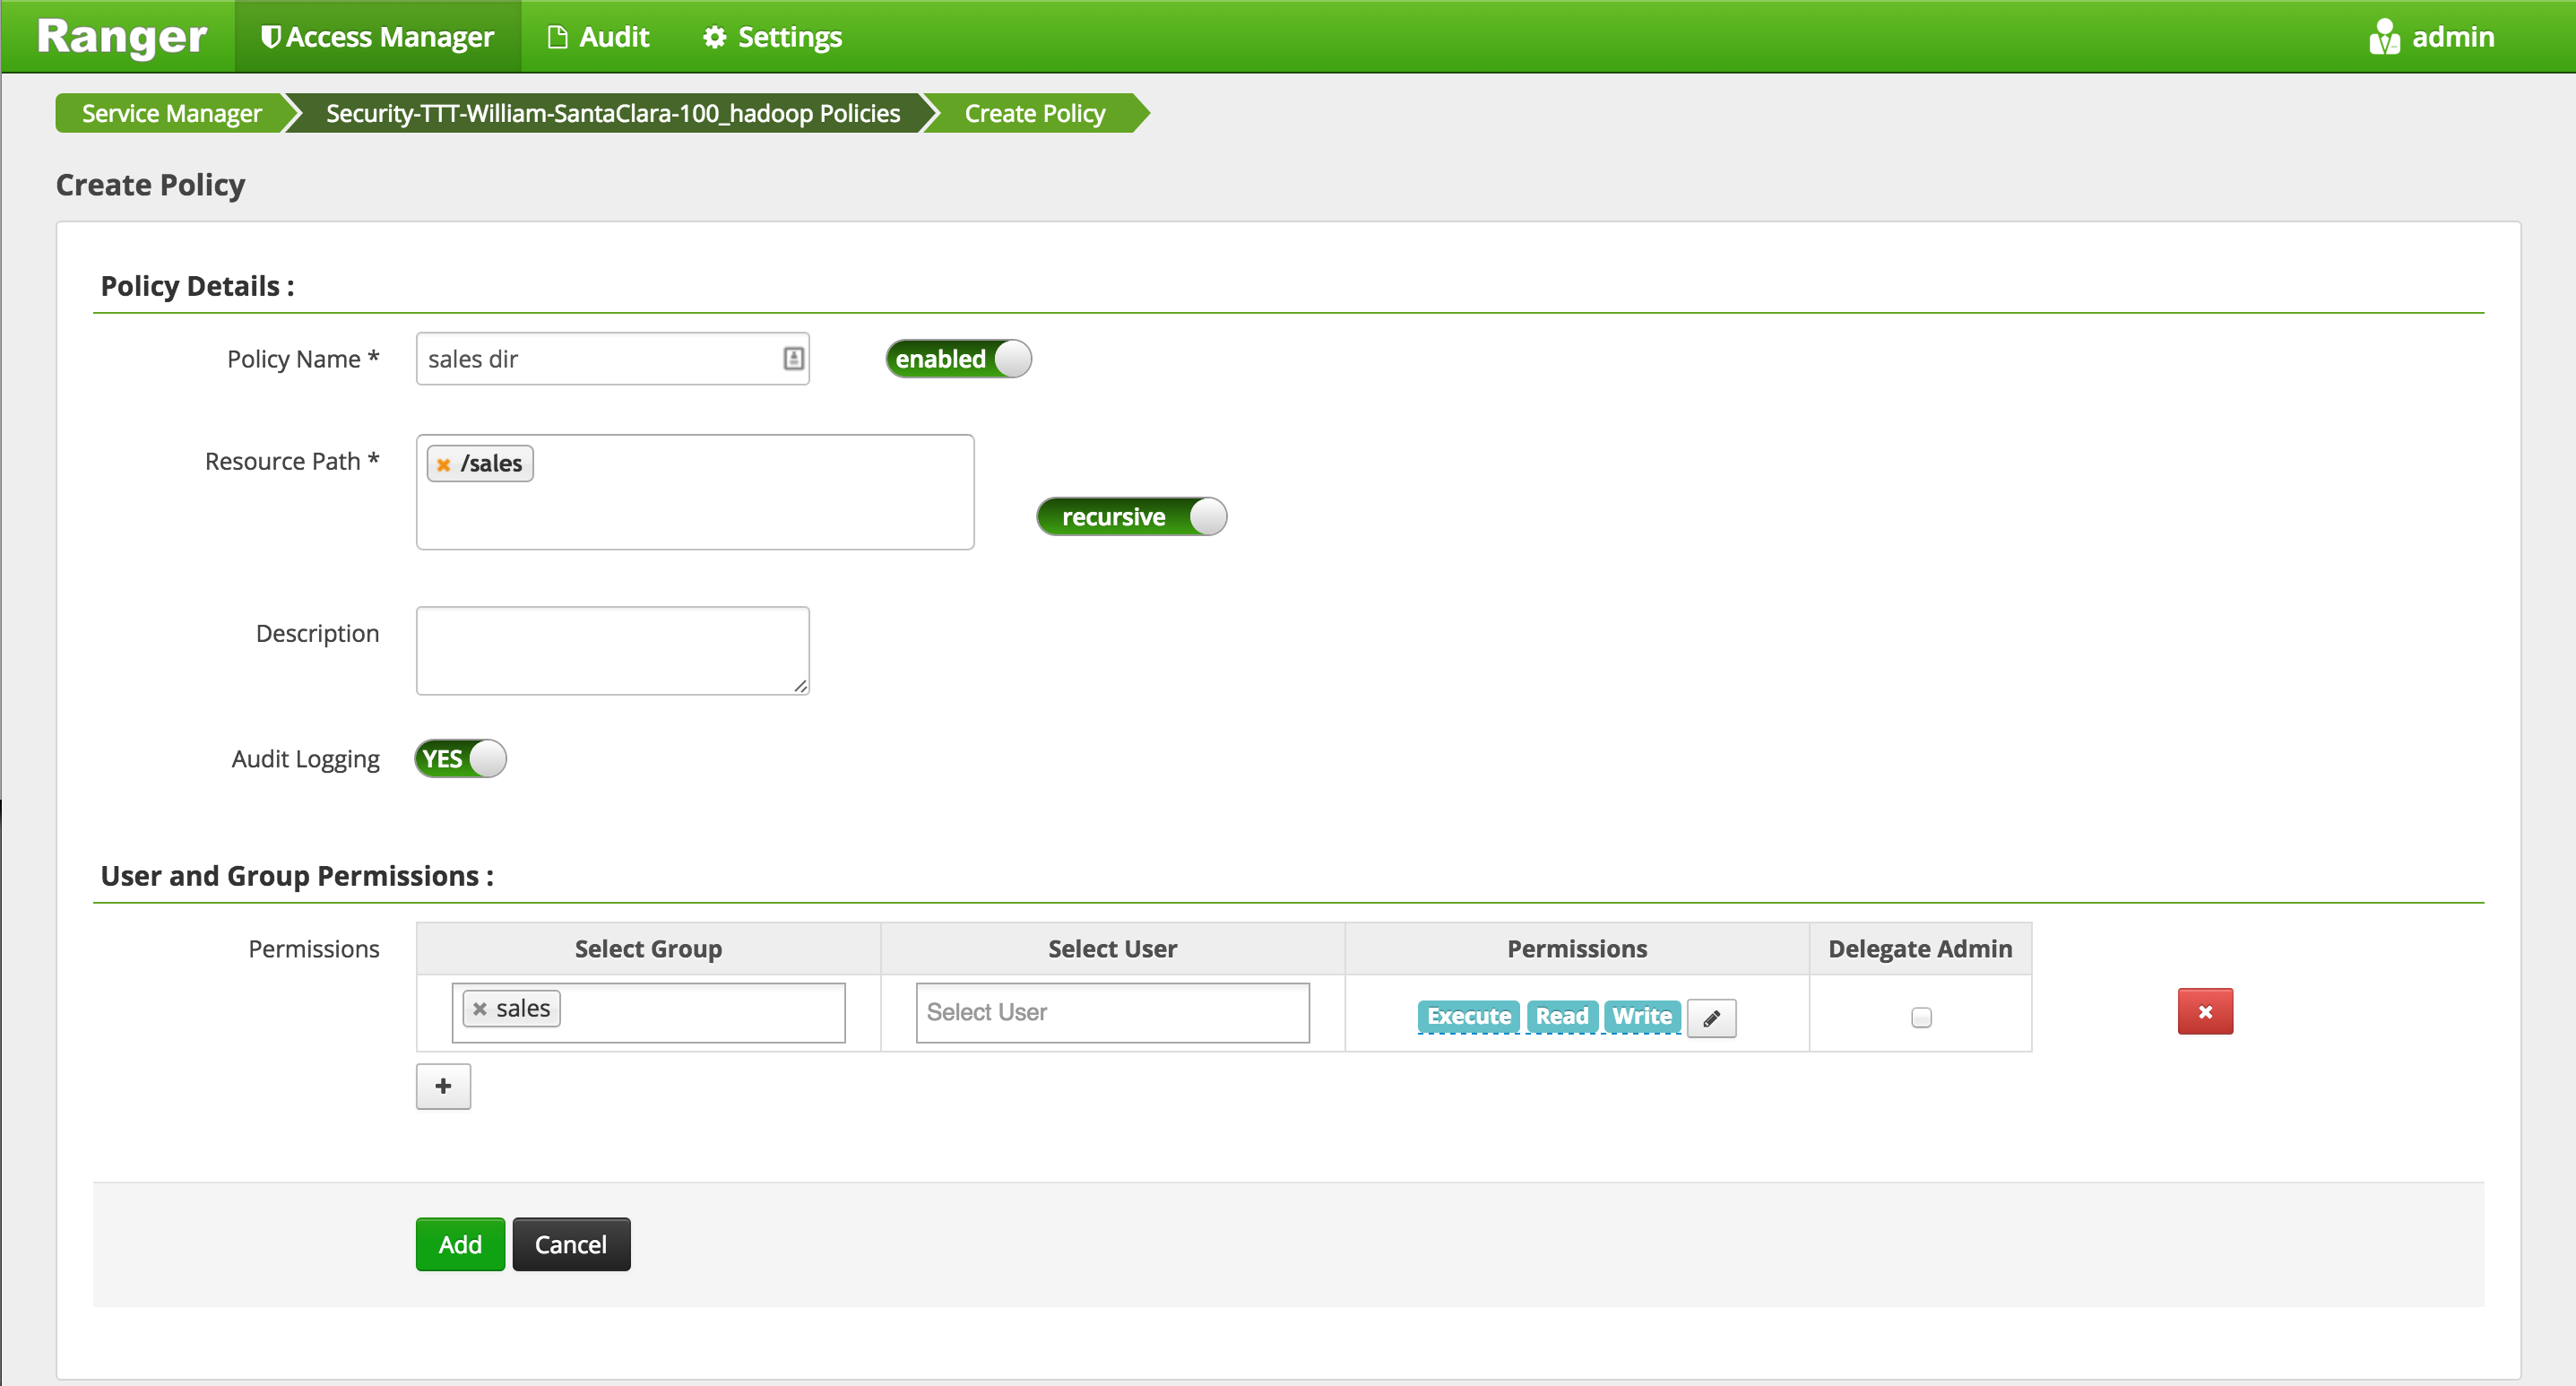
- Policy Name:
- On the 'Access Manager' tab click HDFS > (clustername)_hadoop
-
Wait 30s for policy to take effect
-
Now try accessing the dir again as sales1 and now there is no error seen
hdfs dfs -ls /sales
-
In Ranger, click on 'Audit' to open the Audits page and filter by below:
- Service Type: HDFS
- User: sales1
-
Notice that Ranger captured the access attempt and since this time there is a policy to allow the access, it was
Allowed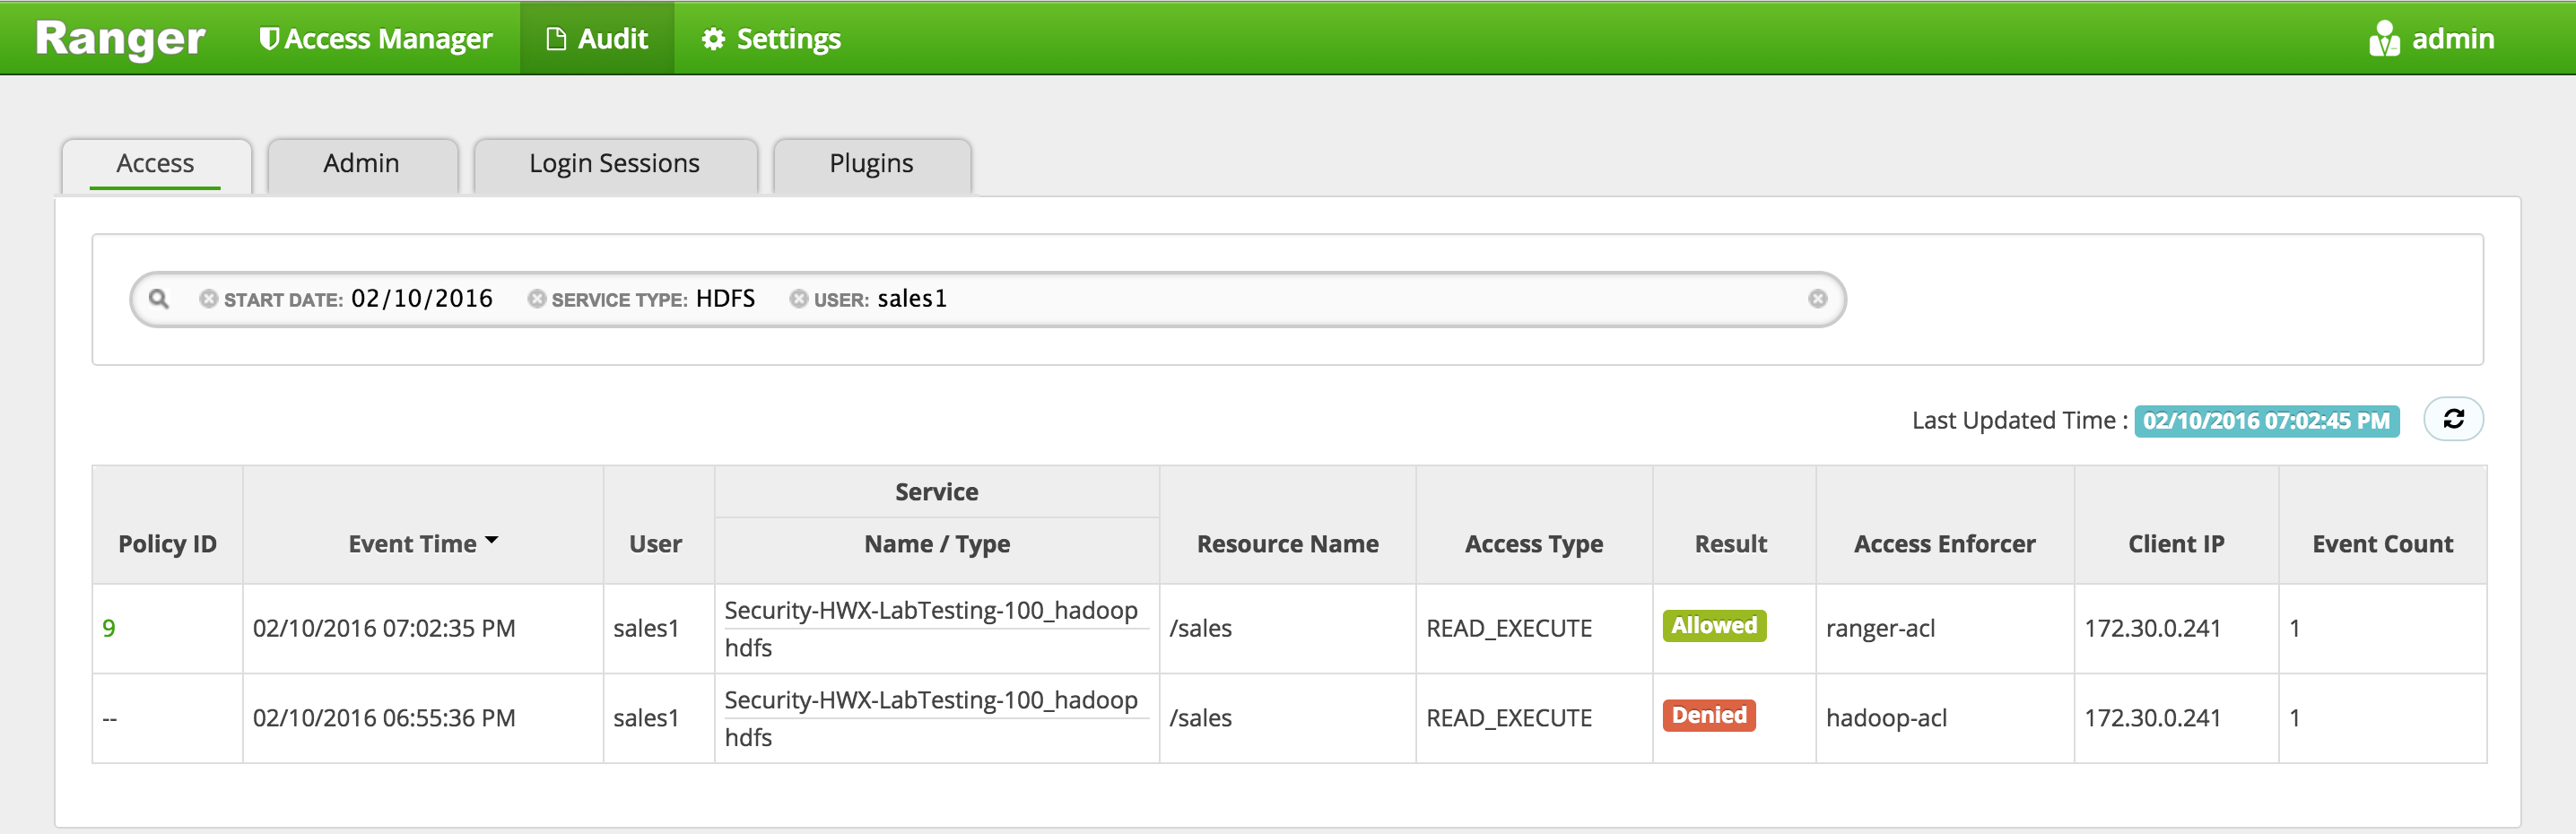
- You can also see the details that were captured for each request:
- Policy that allowed the access
- Time
- Requesting user
- Service type (e.g. hdfs, hive, hbase etc)
- Resource name
- Access type (e.g. read, write, execute)
- Result (e.g. allowed or denied)
- Access enforcer (i.e. whether native acl or ranger acls were used)
- Client IP
- Event count
- You can also see the details that were captured for each request:
-
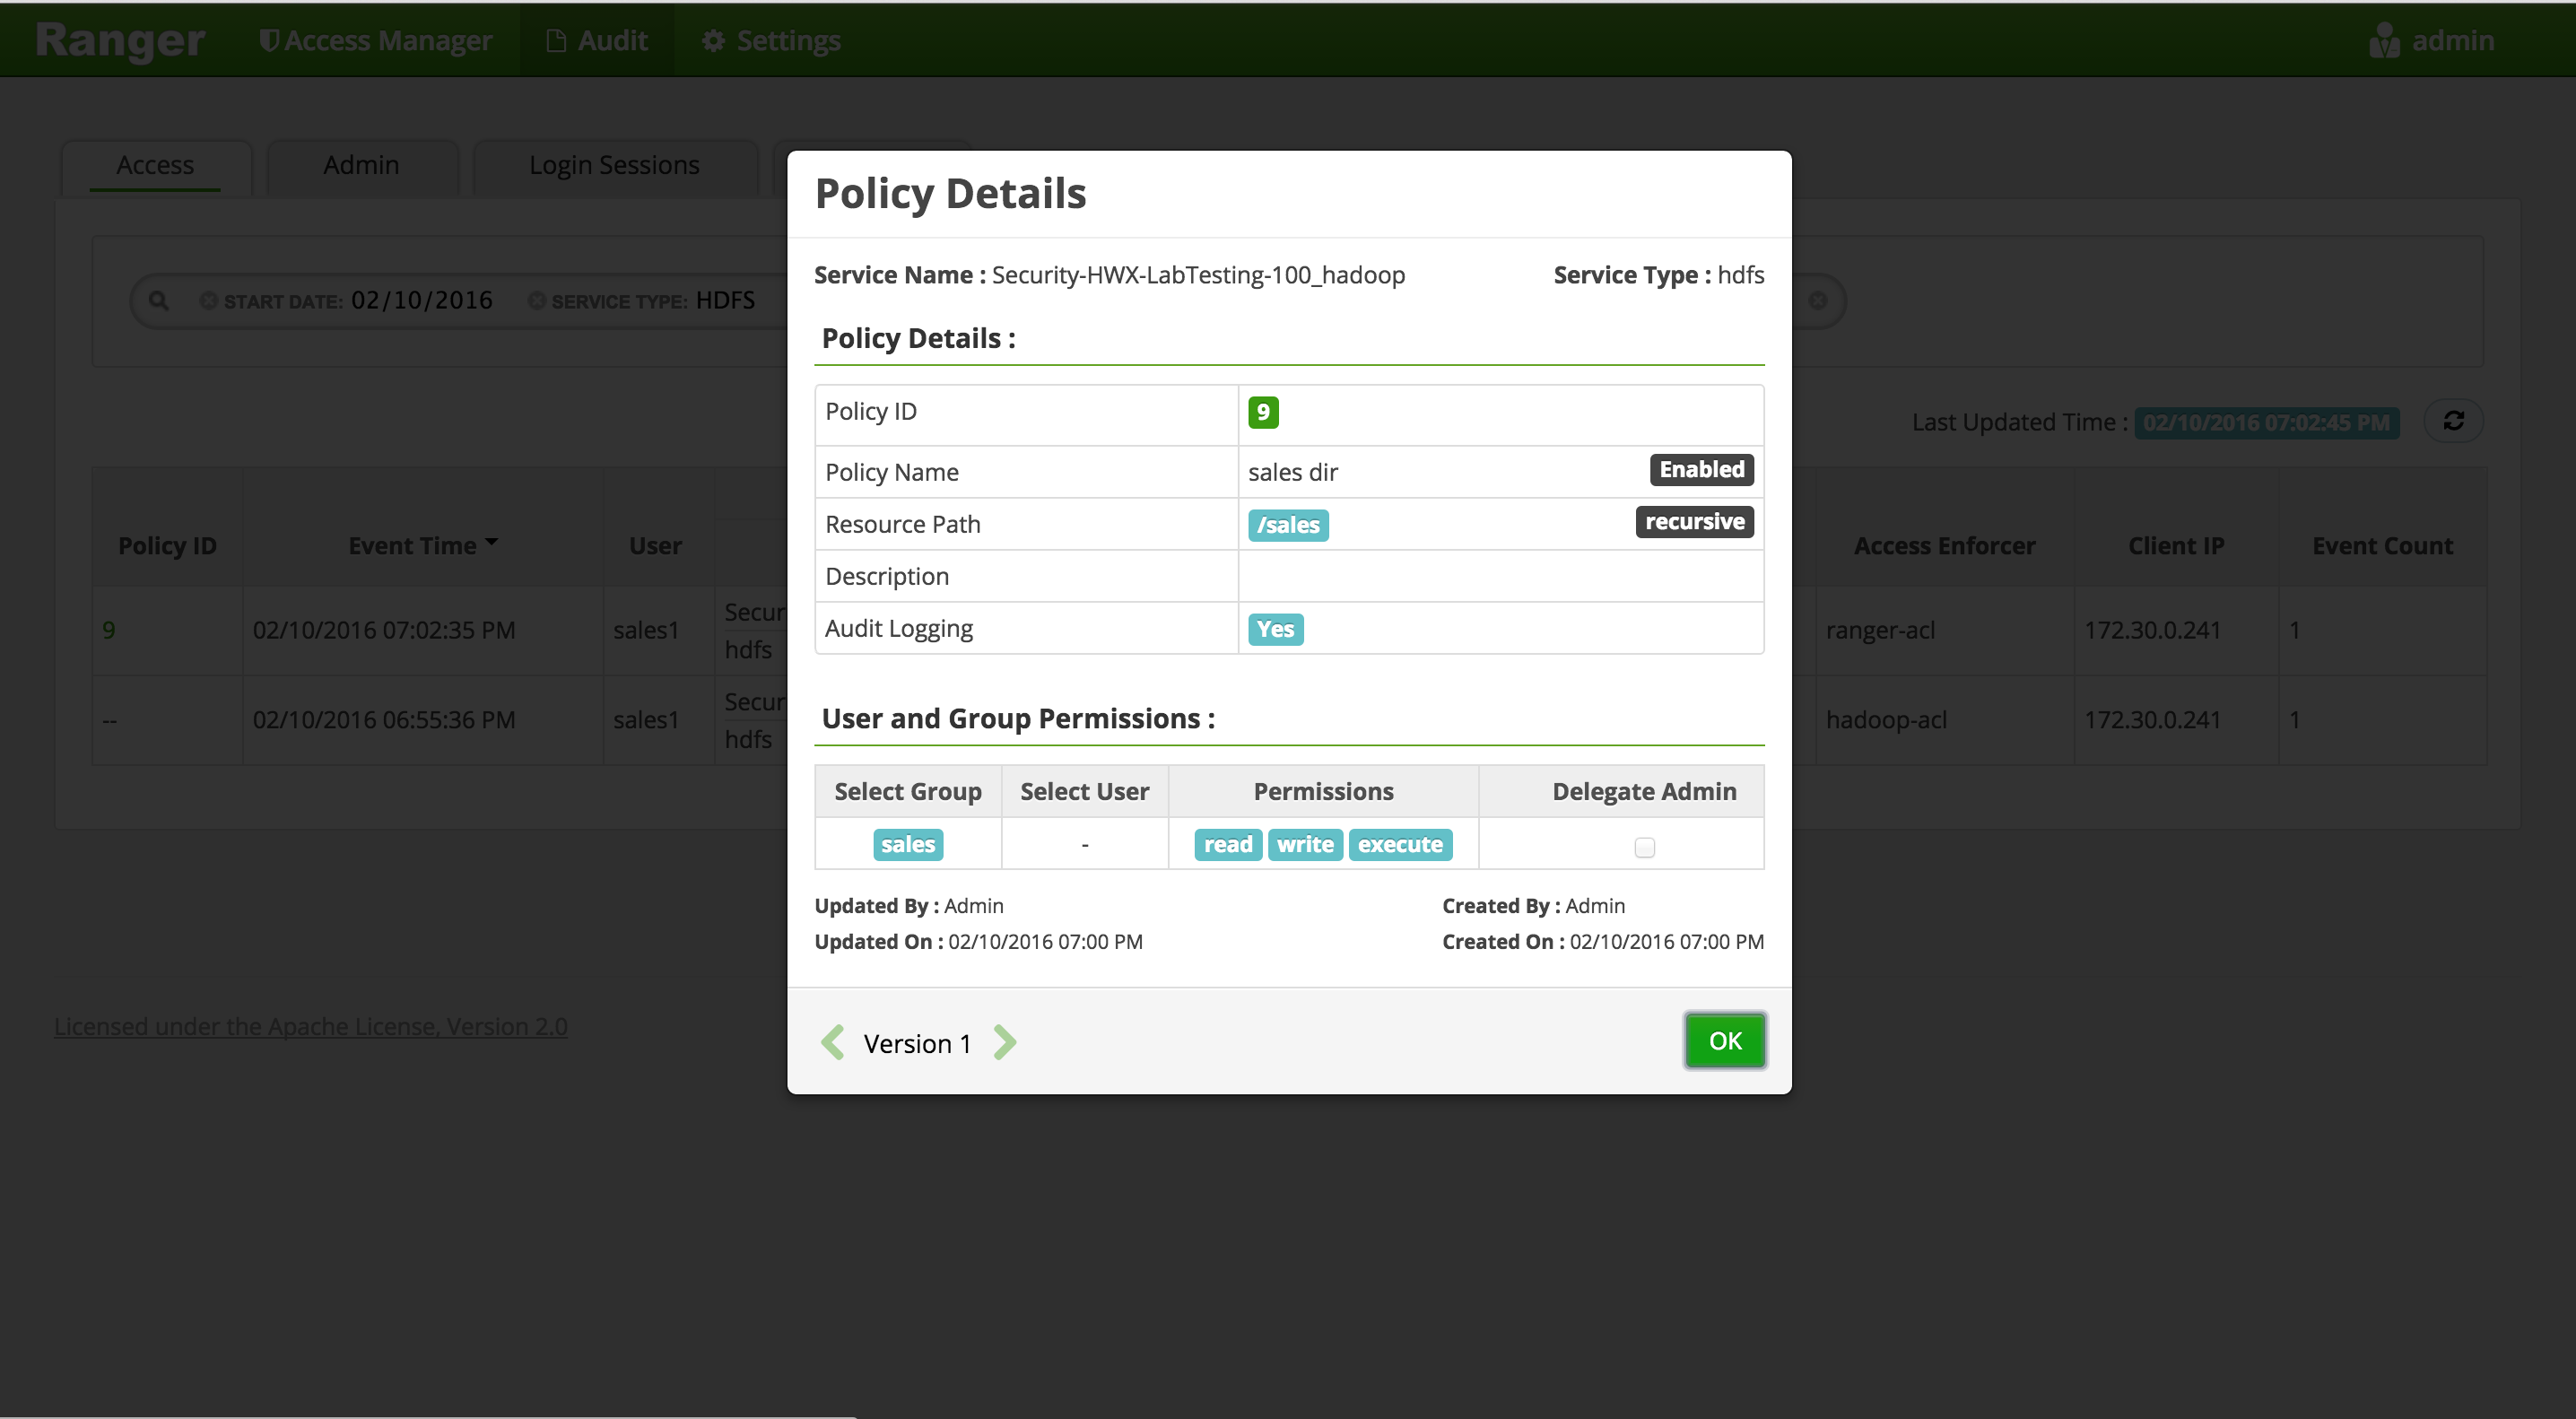
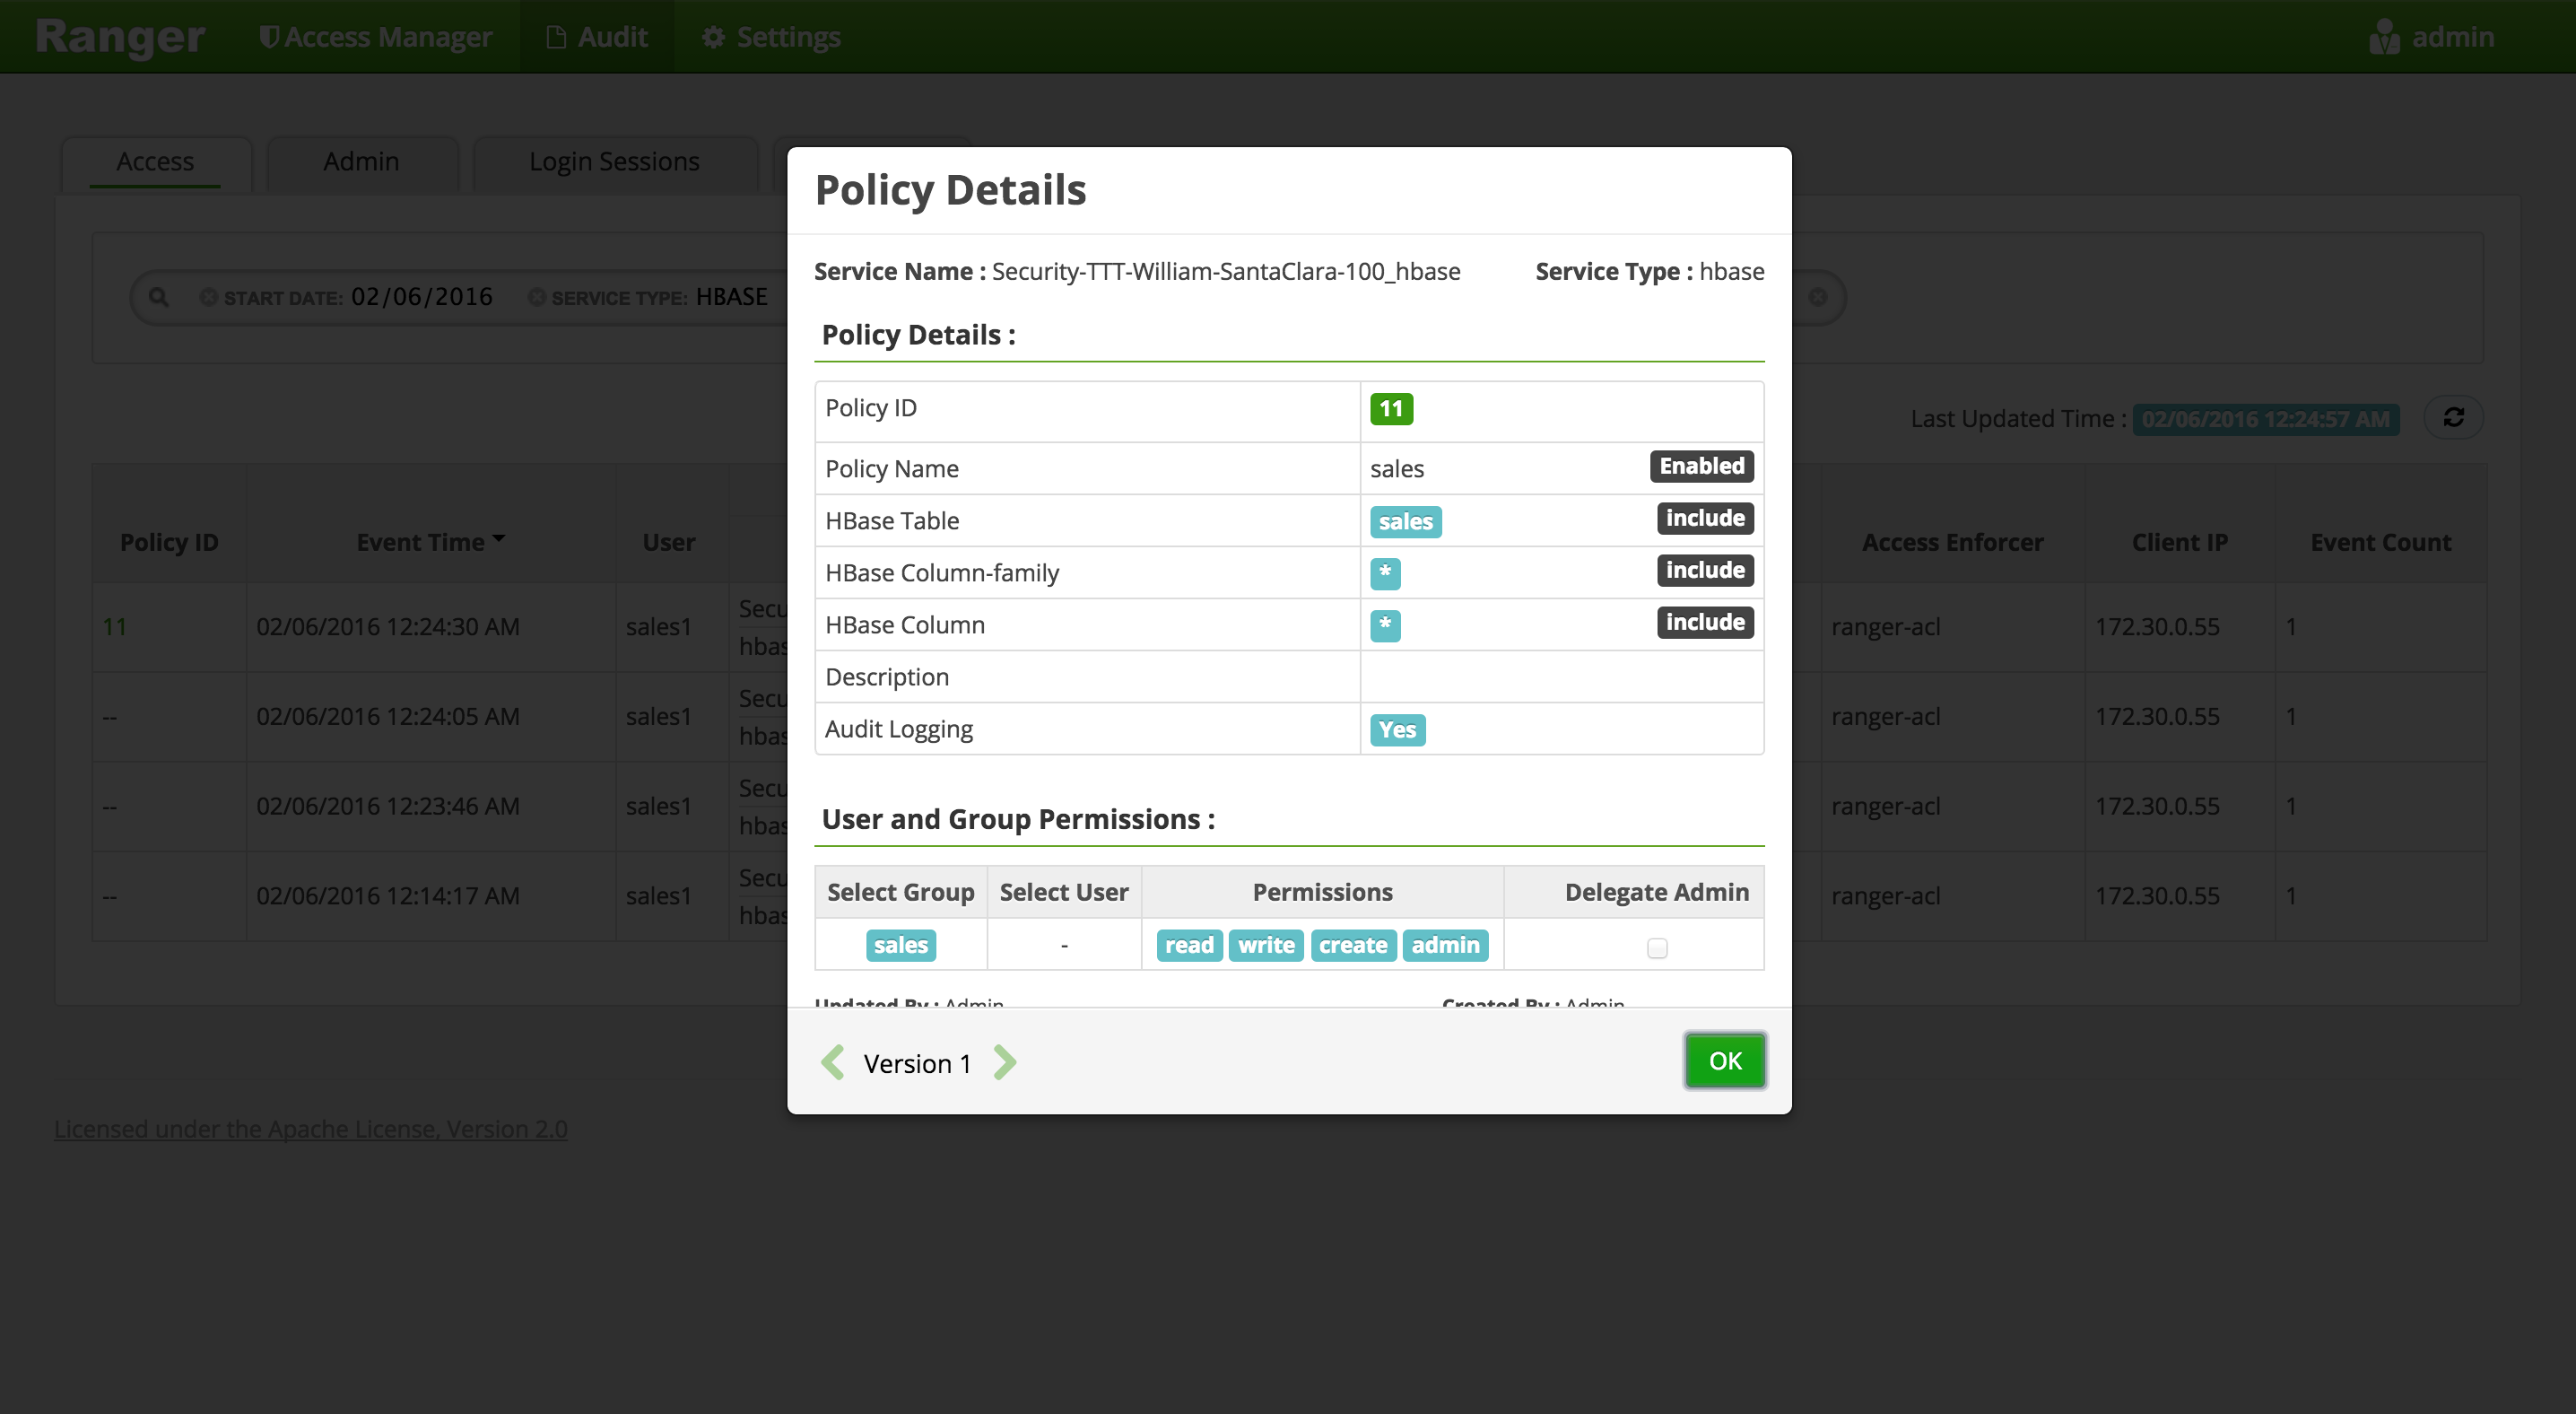
For any allowed requests, notice that you can quickly check the details of the policy that allowed the access by clicking on the policy number in the 'Policy ID' column
-
Now let's check whether non-sales users can access the directory
-
Logout as sales1 and log back in as hr1
kdestroy
#logout as sales1
logout

#login as hr1 and authenticate
sudo su - hr1

kinit
# enter password: BadPass#1

klist
## Default principal: hr1@LAB.HORTONWORKS.NET
- Try to access the same dir as hr1 and notice it fails
hdfs dfs -ls /sales
## ls: Permission denied: user=hr1, access=READ_EXECUTE, inode="/sales":hadoopadmin:hdfs:d---------
-
In Ranger, click on 'Audit' to open the Audits page and this time filter by 'Resource Name'
- Service Type:
HDFS - Resource Name:
/sales
- Service Type:
-
Notice you can see the history/details of all the requests made for /sales directory:
- created by hadoopadmin
- initial request by sales1 user was denied
- subsequent request by sales1 user was allowed (once the policy was created)
- request by hr1 user was denied
-
Logout as hr1
kdestroy
logout
- We have successfully setup an HDFS dir which is only accessible by sales group (and admins)
-
Goal: Setup Hive authorization policies to ensure sales users only have access to code, description columns in default.sample_07
-
Enable Hive on tez by setting below and restarting Hive
- Ambari > Hive > Configs
- Execution Engine = Tez
- Ambari > Hive > Configs
-
Confirm the HIVE repo was setup correctly in Ranger
- In Ranger > Service Manager > HIVE > Click the Edit icon (next to the trash icon) to edit the HIVE repo
- Click 'Test connection'
- if it fails re-enter below fields and re-try:
- Username:
rangeradmin@LAB.HORTONWORKS.NET - Password: BadPass#1
- Username:
- Once the test passes, click Save
-
Now run these steps from node where Hive (or client) is installed
-
Login as sales1 and attempt to connect to default database in Hive via beeline and access sample_07 table
-
Notice that in the JDBC connect string for connecting to an secured Hive while its running in default (ie binary) transport mode :
- port remains 10000
- now a kerberos principal needs to be passed in
-
Login as sales1 without kerberos ticket and try to open beeline connection:
sudo su - sales1
kdestroy
beeline -u "jdbc:hive2://localhost:10000/default;principal=hive/$(hostname -f)@LAB.HORTONWORKS.NET"
-
This fails with
GSS initiate failedbecause the cluster is kerberized and we have not authenticated yet -
To exit beeline:
!q
- Authenticate as sales1 user and check the ticket
kinit
# enter password: BadPass#1

klist
## Default principal: sales1@LAB.HORTONWORKS.NET
- Now try connect to Hive via beeline as sales1
beeline -u "jdbc:hive2://localhost:10000/default;principal=hive/$(hostname -f)@LAB.HORTONWORKS.NET"
- If you get the below error, it is because you did not add hive to the global KMS policy in an earlier step (along with nn, hadoopadmin). Go back and add it in.
org.apache.hadoop.security.authorize.AuthorizationException: User:hive not allowed to do 'GET_METADATA' on 'testkey'
- This time it connects. Now try to run a query
beeline> select code, description from sample_07;
-
Now it fails with authorization error:
HiveAccessControlException Permission denied: user [sales1] does not have [SELECT] privilege on [default/sample_07]
-
Login into Ranger UI e.g. at http://RANGER_HOST_PUBLIC_IP:6080/index.html as admin/admin
-
In Ranger, click on 'Audit' to open the Audits page and filter by below.
- Service Type:
Hive - User:
sales1
- Service Type:
-
Notice that Ranger captured the access attempt and since there is currently no policy to allow the access, it was
Denied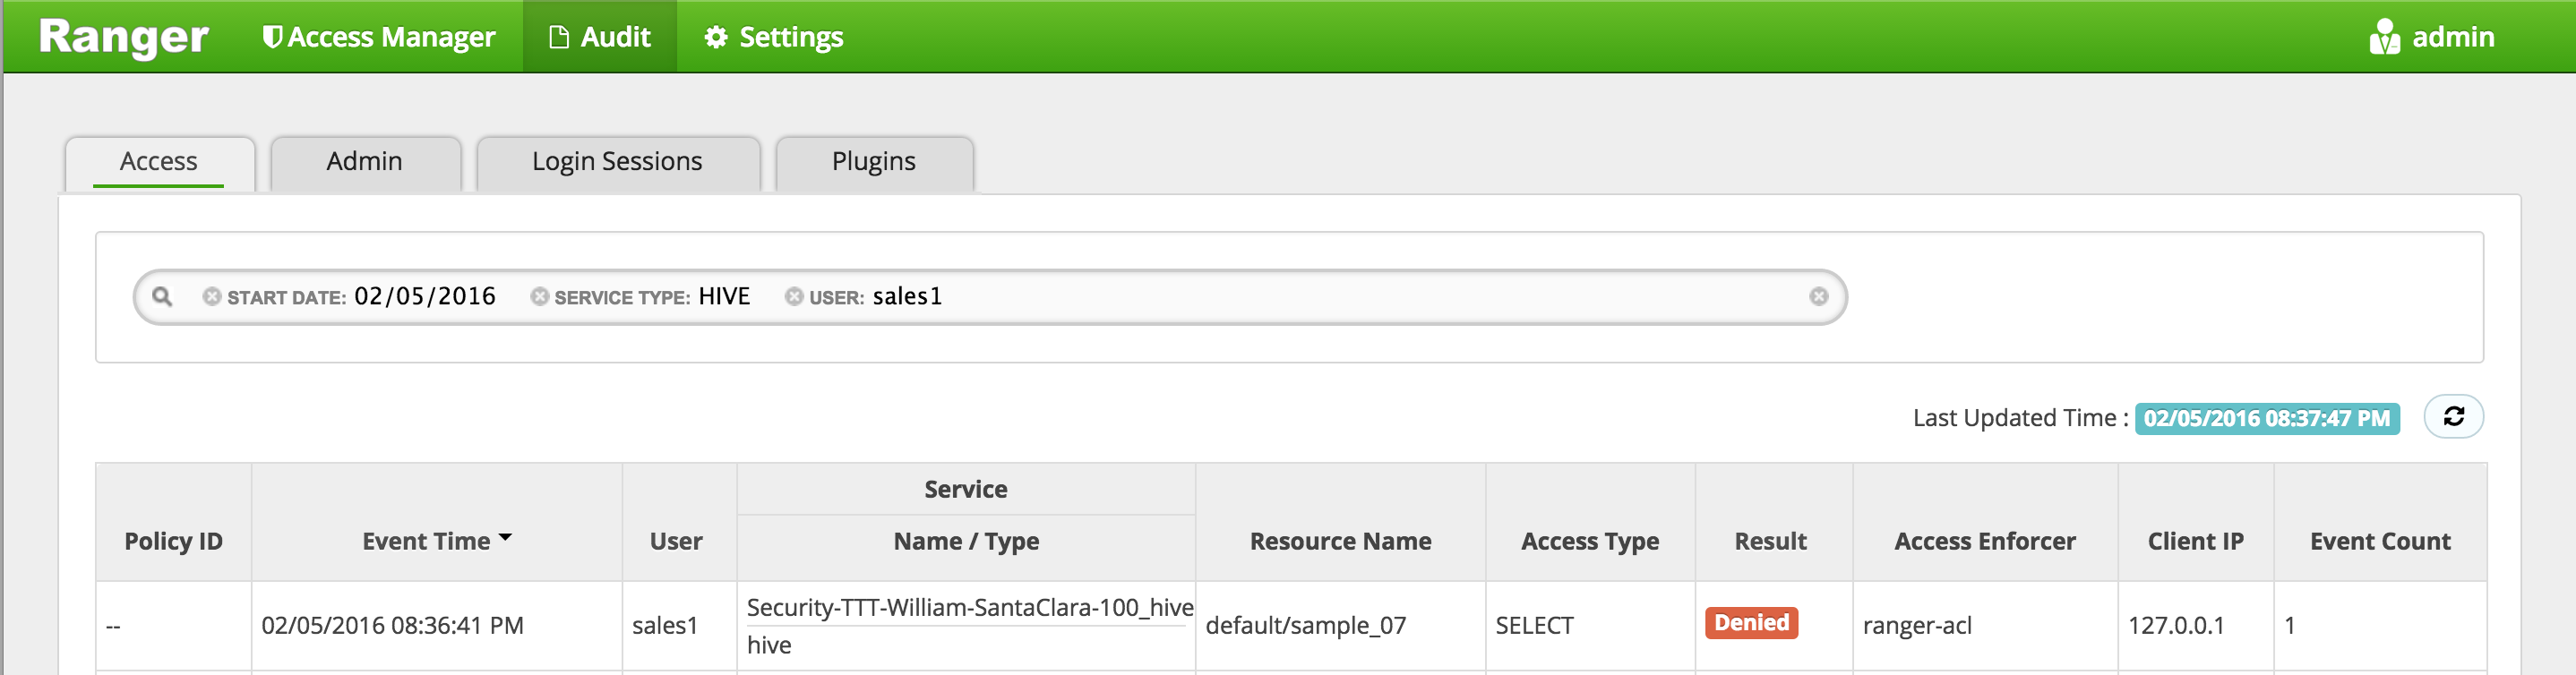
-
To create an HIVE Policy in Ranger, follow below steps:
- On the 'Access Manager' tab click HIVE > (clustername)_hive
- This will open the list of HIVE policies
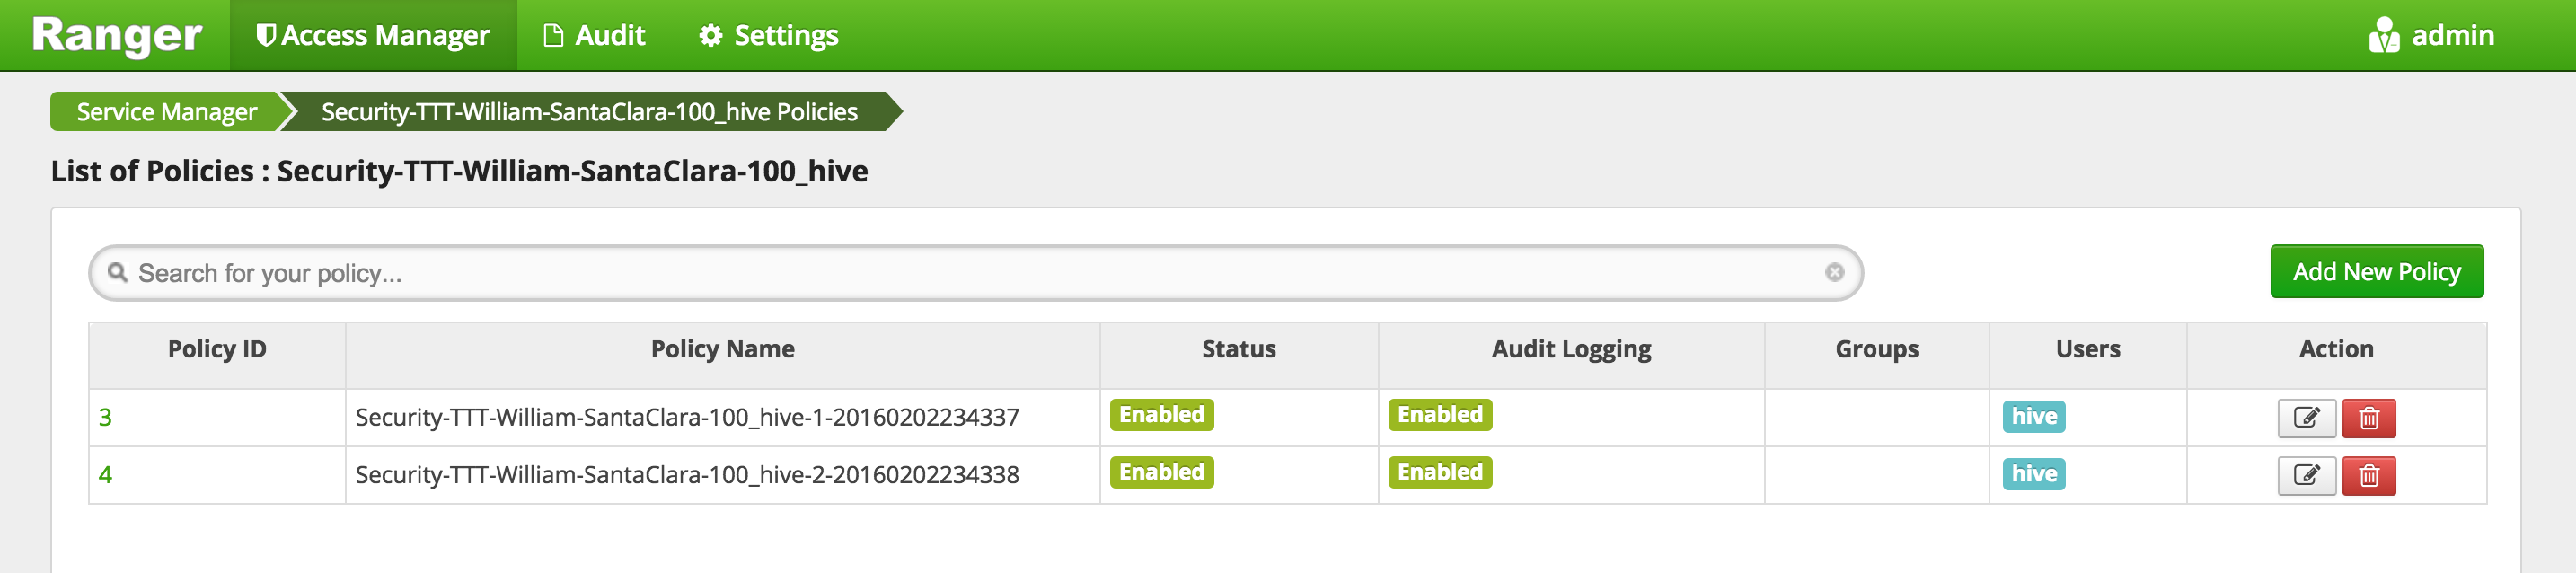
- Click 'Add New Policy' button to create a new one allowing
salesgroup users access tocodeanddescriptioncolumns insample_07dir:- Policy Name:
sample_07 - Hive Database:
default - table:
sample_07 - Hive Column:
codedescription - Group:
sales - Permissions :
select - Add
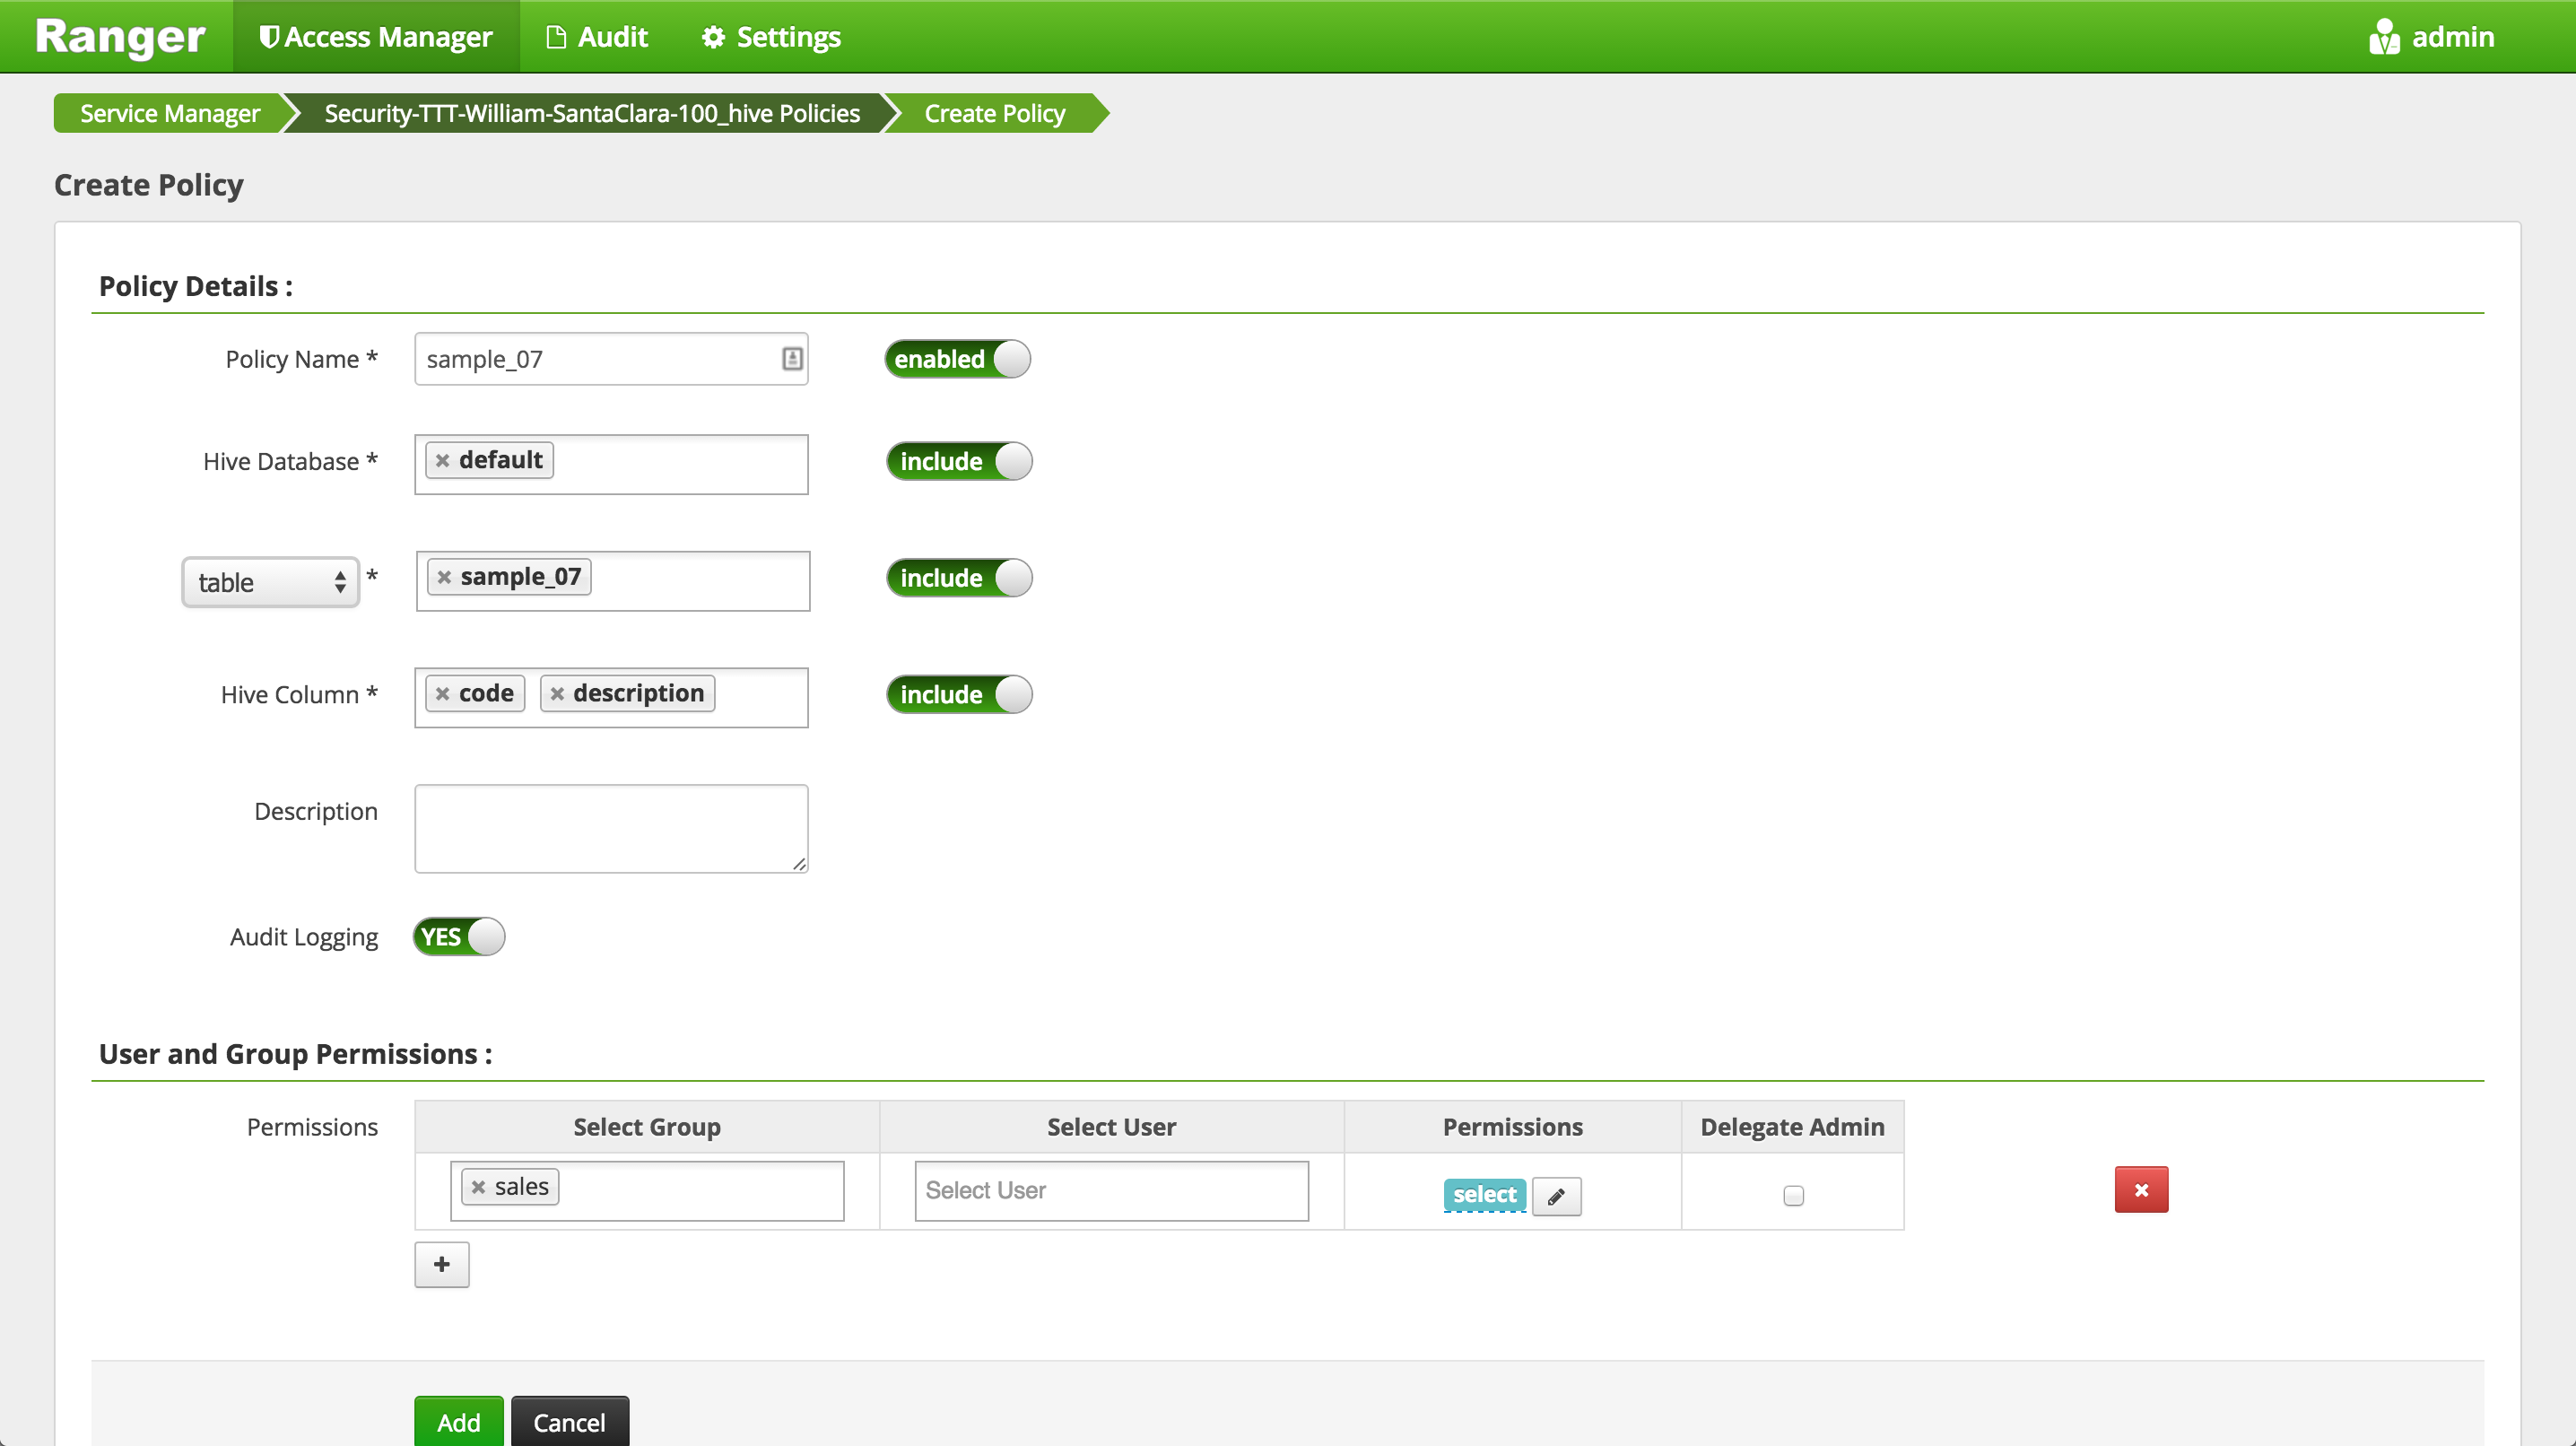
- Policy Name:
- On the 'Access Manager' tab click HIVE > (clustername)_hive
-
Notice that as you typed the name of the DB and table, Ranger was able to look these up and autocomplete them
- This was done using the rangeradmin principal we provided during Ranger install
-
Wait 30s for the new policy to be picked up
-
Now try accessing the columns again and now the query works
beeline> select code, description from sample_07;
-
Note though, that if instead you try to describe the table or query all columns, it will be denied - because we only gave sales users access to two columns in the table
beeline> desc sample_07;beeline> select * from sample_07;
-
In Ranger, click on 'Audit' to open the Audits page and filter by below:
- Service Type: HIVE
- User: sales1
-
Notice that Ranger captured the access attempt and since this time there is a policy to allow the access, it was
Allowed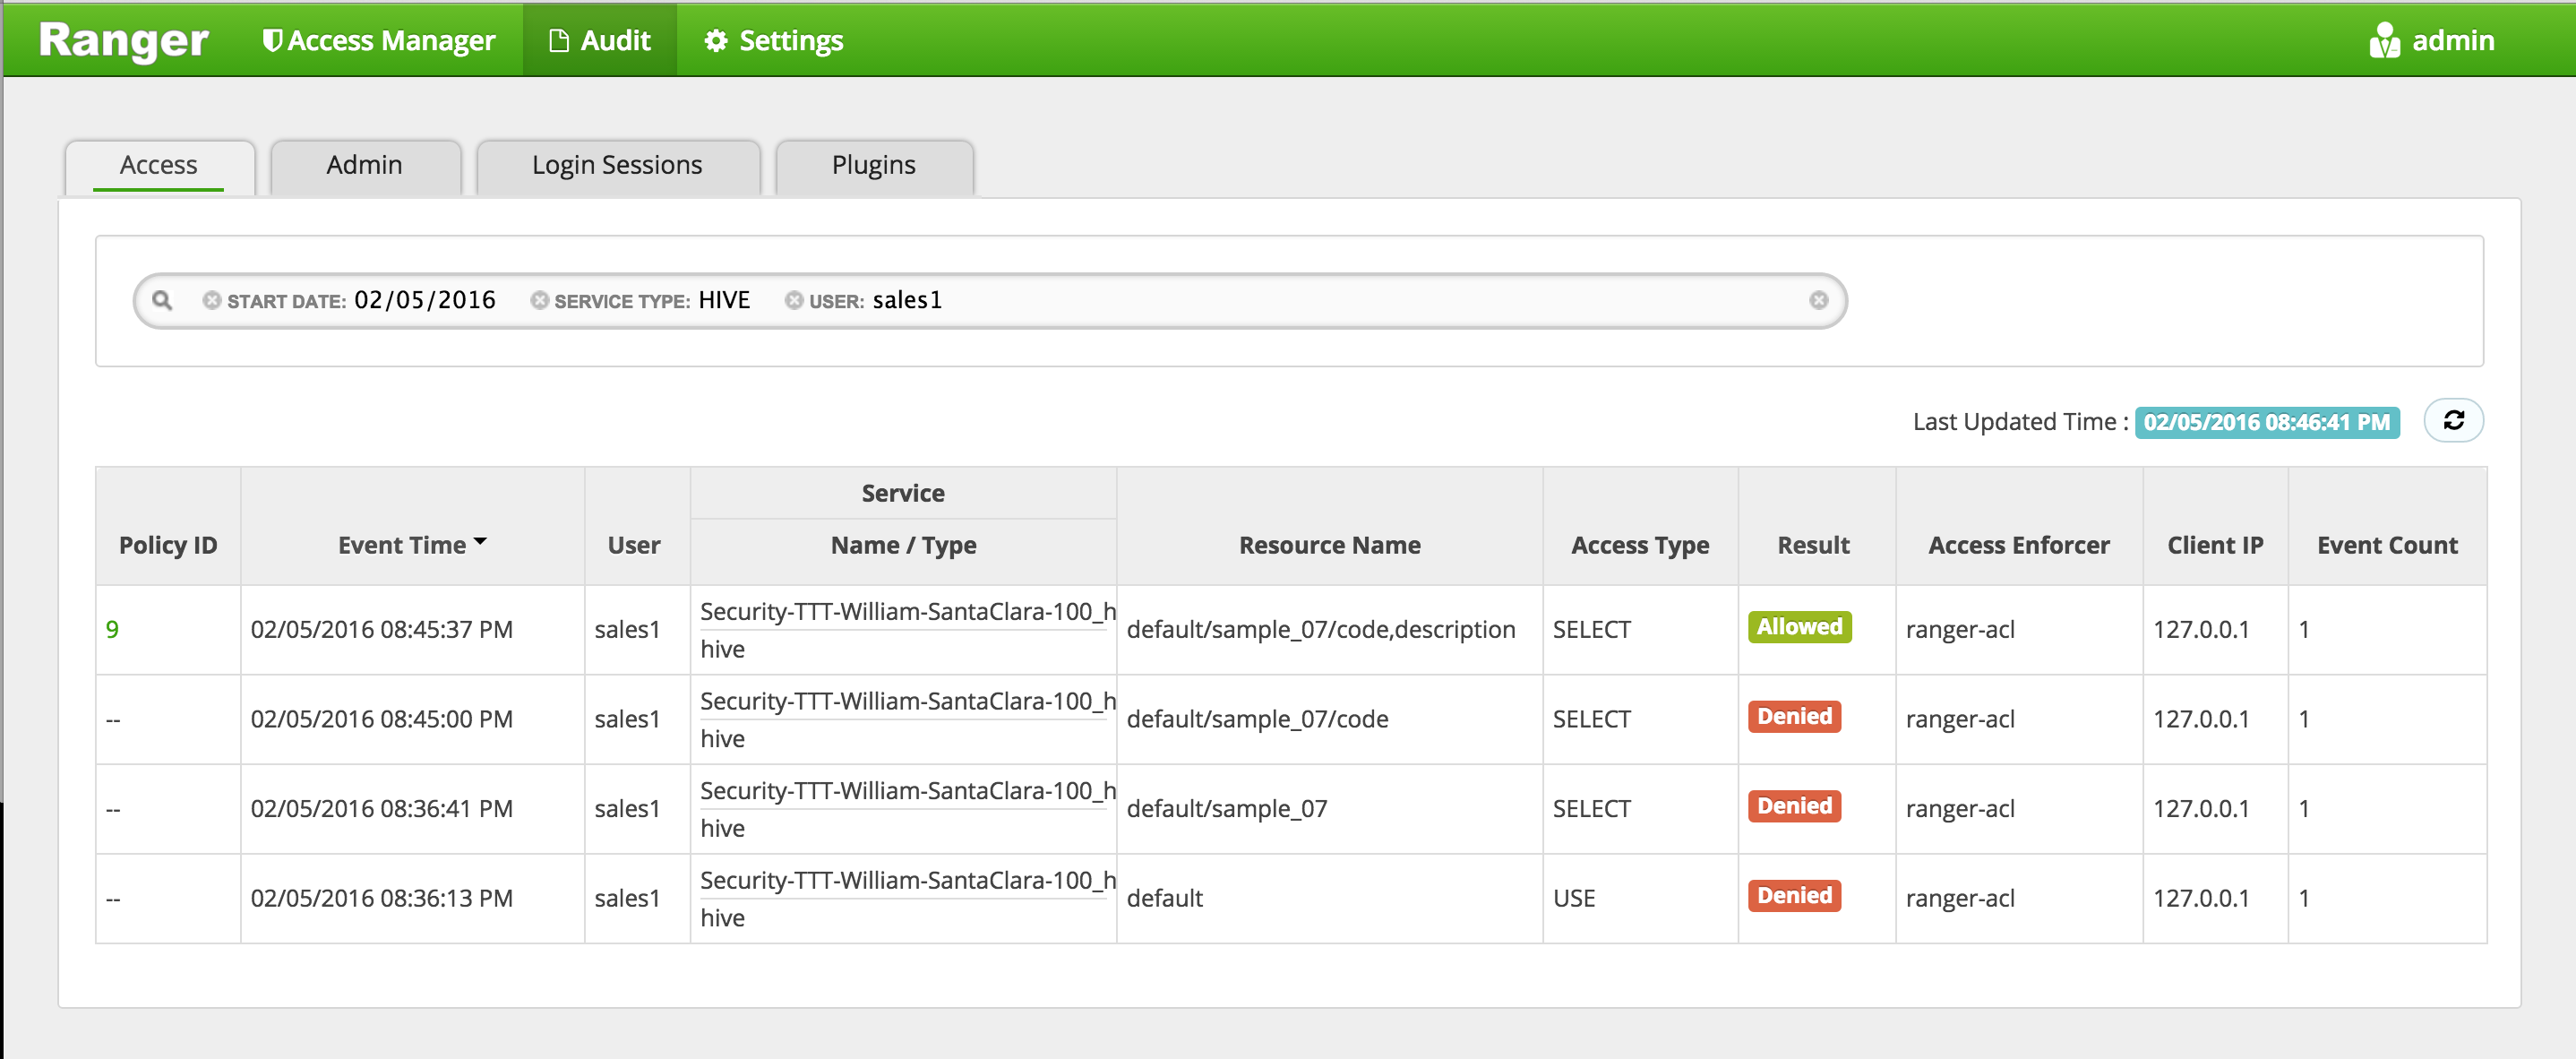
- You can also see the details that were captured for each request:
- Policy that allowed the access
- Time
- Requesting user
- Service type (e.g. hdfs, hive, hbase etc)
- Resource name
- Access type (e.g. read, write, execute)
- Result (e.g. allowed or denied)
- Access enforcer (i.e. whether native acl or ranger acls were used)
- Client IP
- Event count
- You can also see the details that were captured for each request:
-
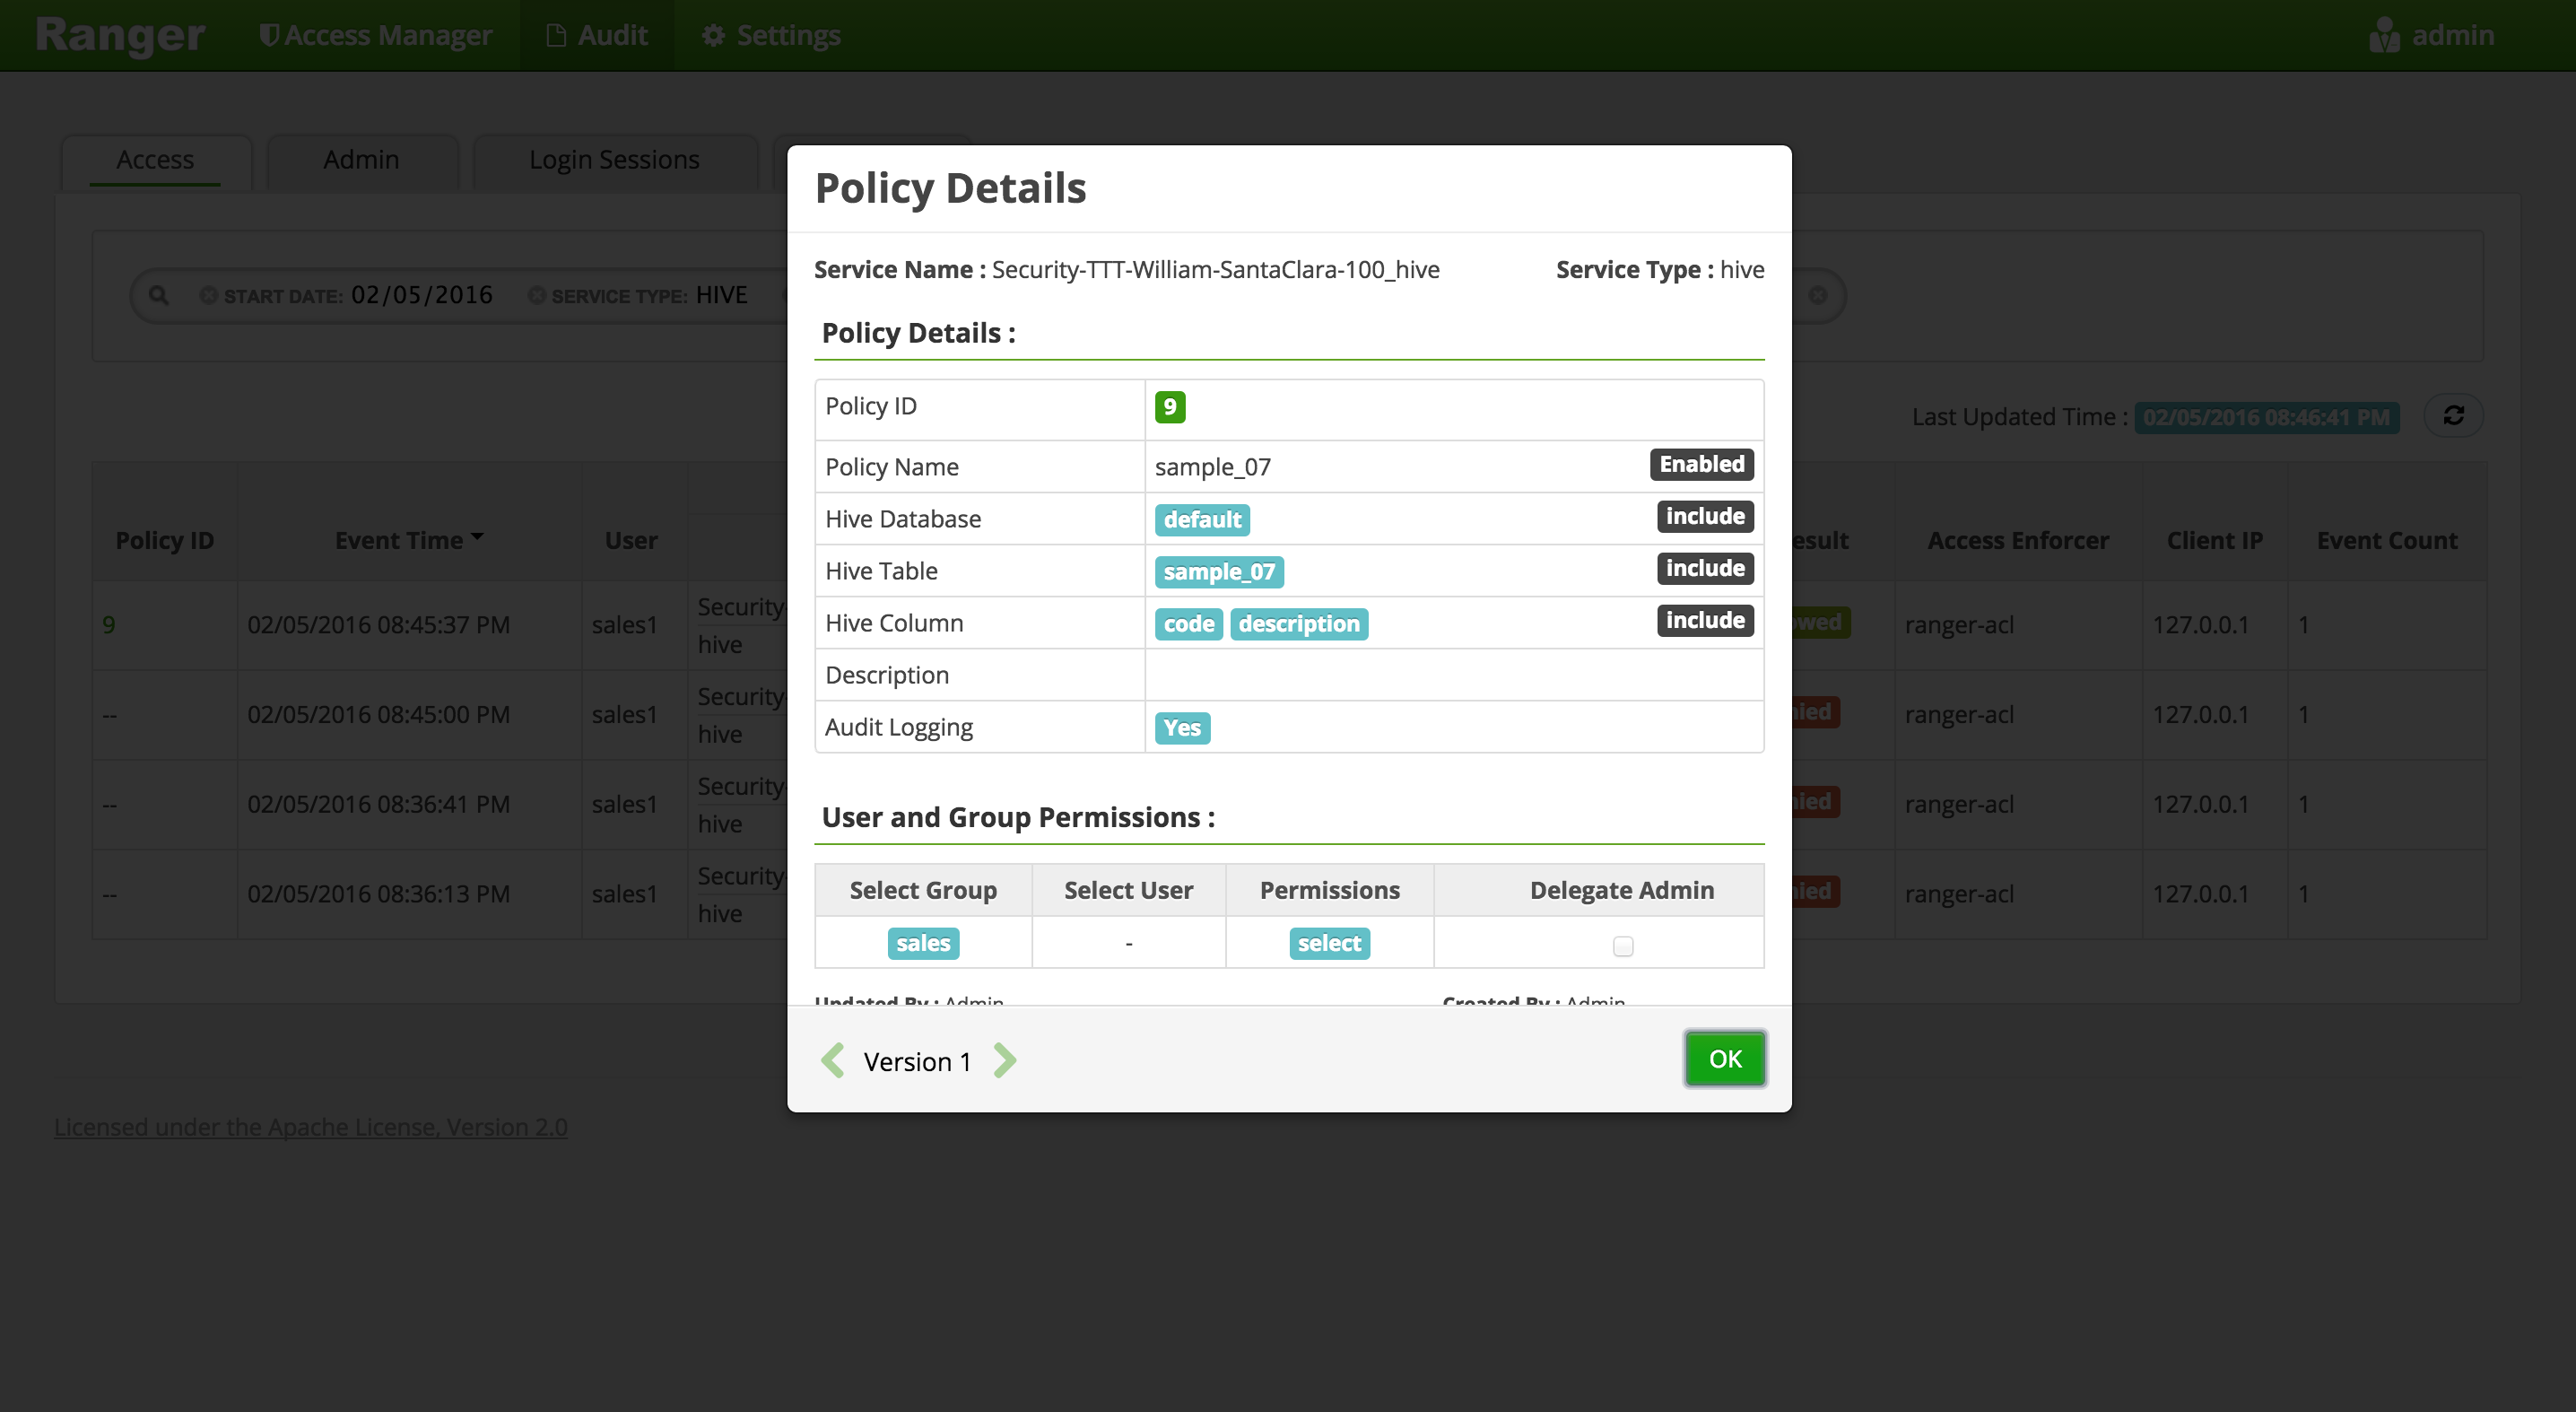
For any allowed requests, notice that you can quickly check the details of the policy that allowed the access by clicking on the policy number in the 'Policy ID' column
-
Exit beeline
!q
-
Now let's check whether non-sales users can access the table
-
Logout as sales1 and log back in as hr1
kdestroy
#logout as sales1
logout

#login as hr1 and authenticate
sudo su - hr1

kinit
# enter password: BadPass#1

klist
## Default principal: hr1@LAB.HORTONWORKS.NET
- Try to access the same table as hr1 and notice it fails
beeline -u "jdbc:hive2://localhost:10000/default;principal=hive/$(hostname -f)@LAB.HORTONWORKS.NET"
beeline> select code, description from sample_07;
-
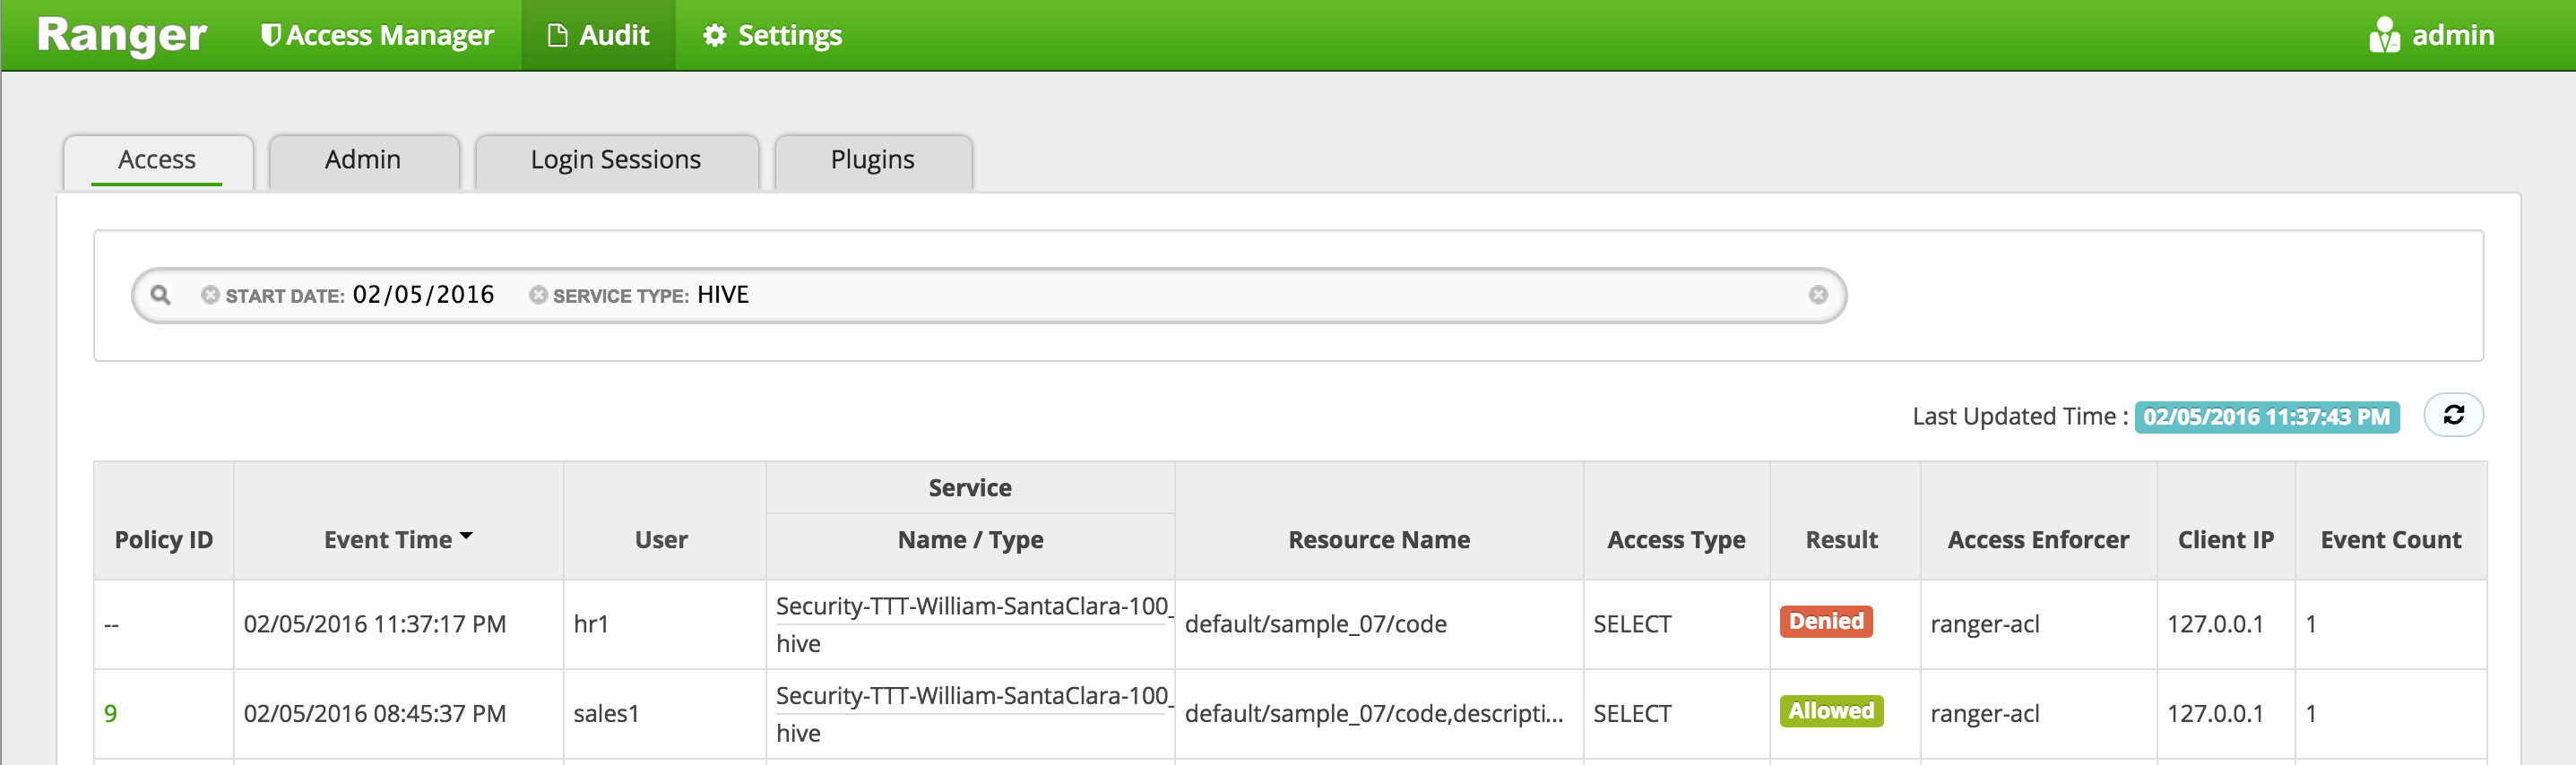
In Ranger, click on 'Audit' to open the Audits page and filter by 'Service Type' = 'Hive'
- Service Type:
HIVE
- Service Type:
-
Here you can see the request by sales1 was allowed but hr1 was denied
- Exit beeline
!q
- Logoff as hr1
logout
- We have setup Hive authorization policies to ensure only sales users have access to code, description columns in default.sample_07
-
Goal: Create a table called 'sales' in HBase and setup authorization policies to ensure only sales users have access to the table
-
Run these steps from any node where Hbase Master or RegionServer services are installed
-
Login as sales1
sudo su - sales1
- Start the hbase shell
hbase shell
- List tables in default database
hbase> list 'default'
-
This fails with
GSSException: No valid credentials providedbecause the cluster is kerberized and we have not authenticated yet -
To exit hbase shell:
exit
- Authenticate as sales1 user and check the ticket
kinit
# enter password: BadPass#1

klist
## Default principal: sales1@LAB.HORTONWORKS.NET
- Now try connect to Hbase shell and list tables as sales1
hbase shell
hbase> list 'default'
- This time it works. Now try to create a table called
saleswith column family calledcf
hbase> create 'sales', 'cf'
-
Now it fails with authorization error:
org.apache.hadoop.hbase.security.AccessDeniedException: Insufficient permissions for user 'sales1@LAB.HORTONWORKS.NET' (action=create)- Note: there will be a lot of output from above. The error will be on the line right after your create command
-
Login into Ranger UI e.g. at http://RANGER_HOST_PUBLIC_IP:6080/index.html as admin/admin
-
In Ranger, click on 'Audit' to open the Audits page and filter by below.
- Service Type:
Hbase - User:
sales1
- Service Type:
-
Notice that Ranger captured the access attempt and since there is currently no policy to allow the access, it was
Denied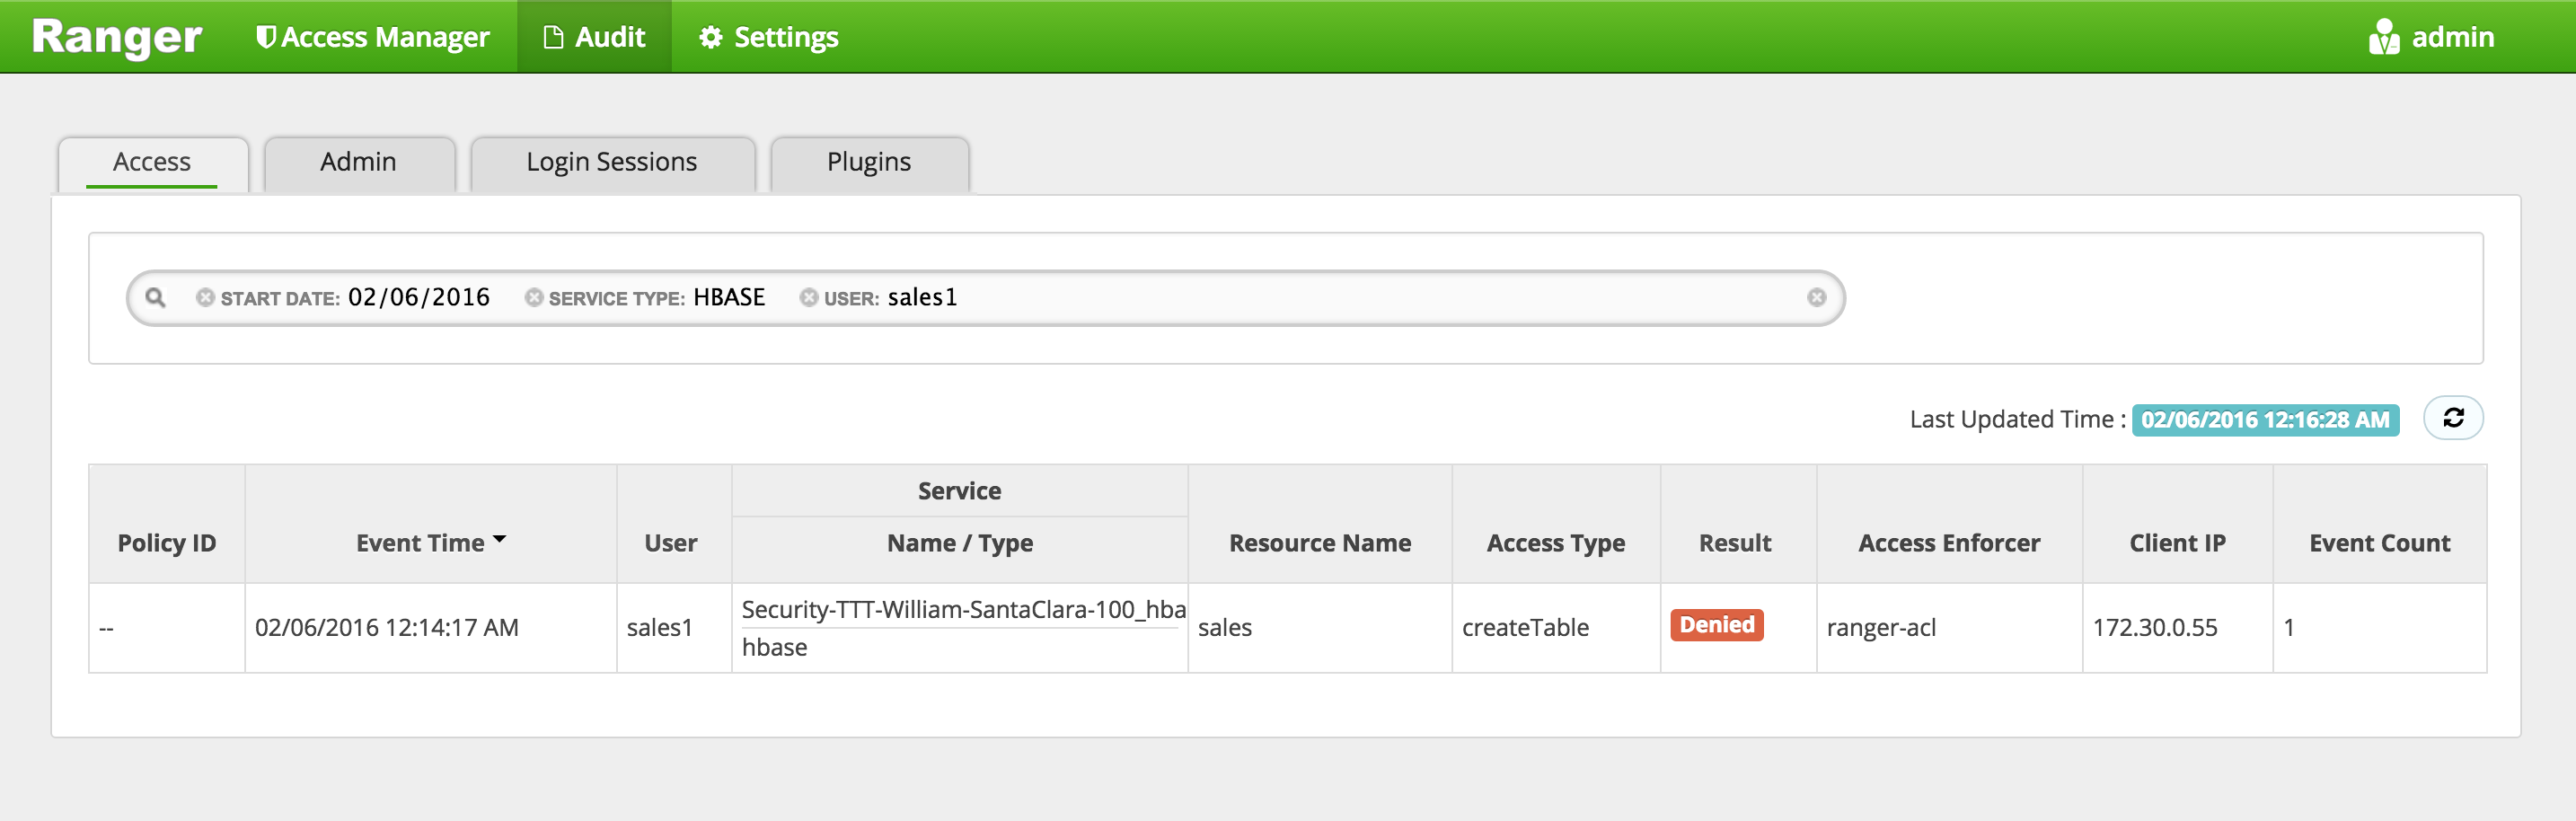
-
To create an HBASE Policy in Ranger, follow below steps:
- On the 'Access Manager' tab click HBASE > (clustername)_hbase
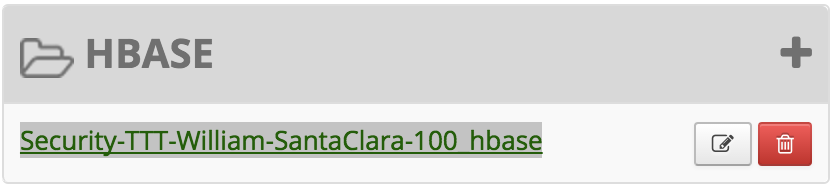
- This will open the list of HBASE policies
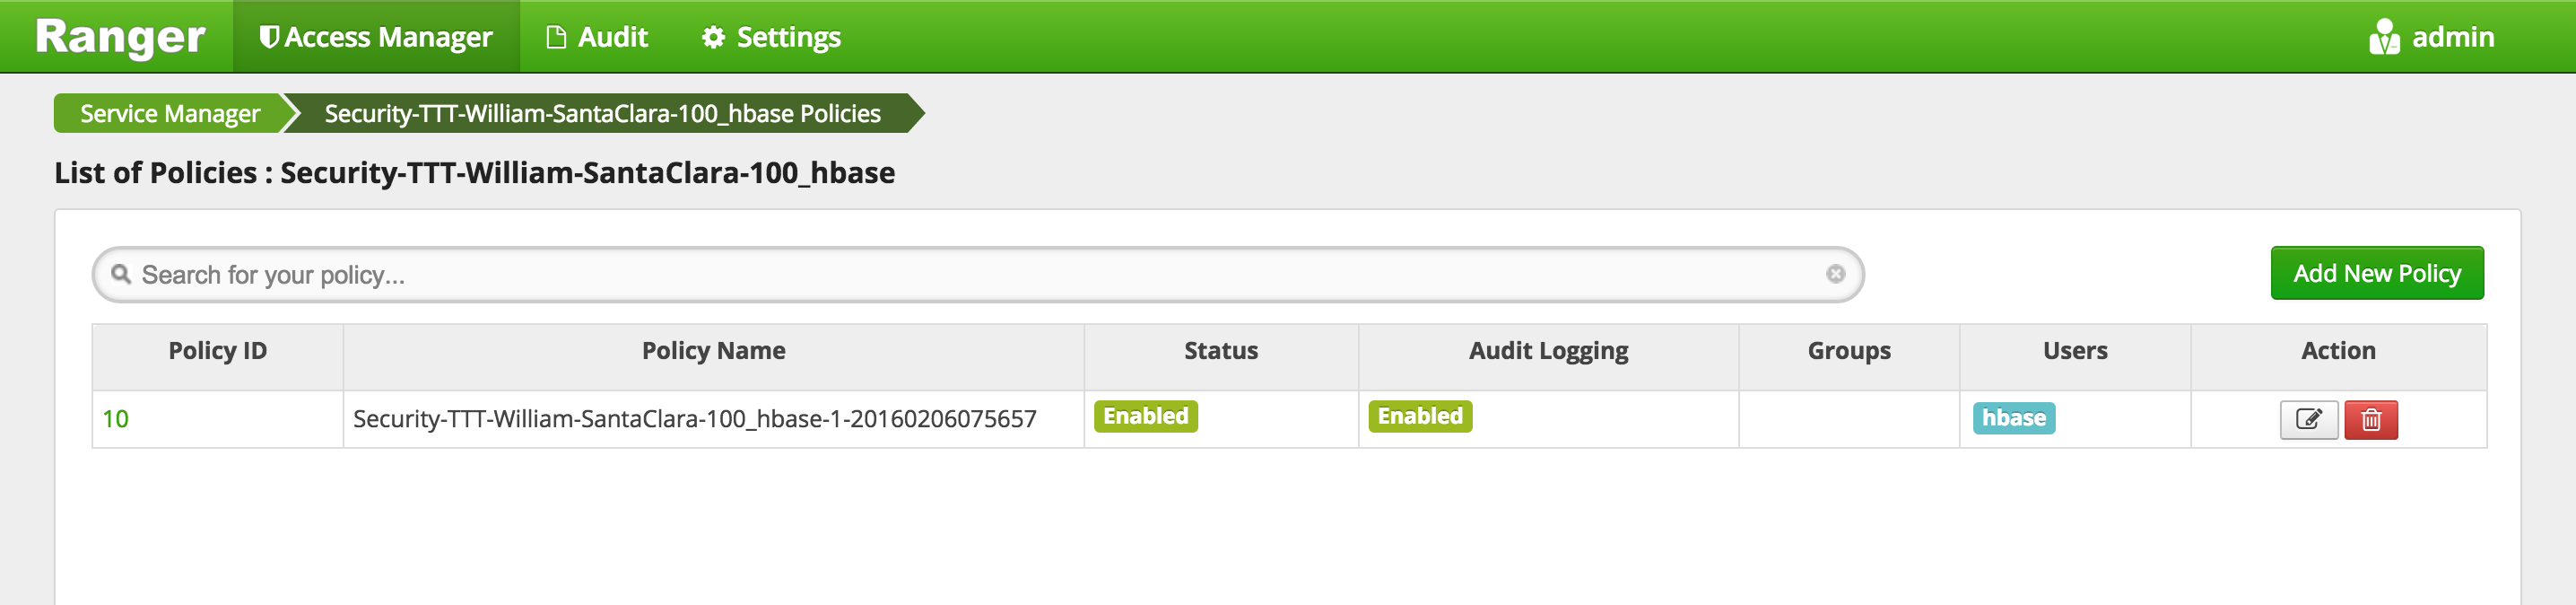
- Click 'Add New Policy' button to create a new one allowing
salesgroup users access tosalestable in HBase:- Policy Name:
sales - Hbase Table:
sales - Hbase Column Family:
* - Hbase Column:
* - Group :
sales - Permissions :
AdminCreateReadWrite - Add
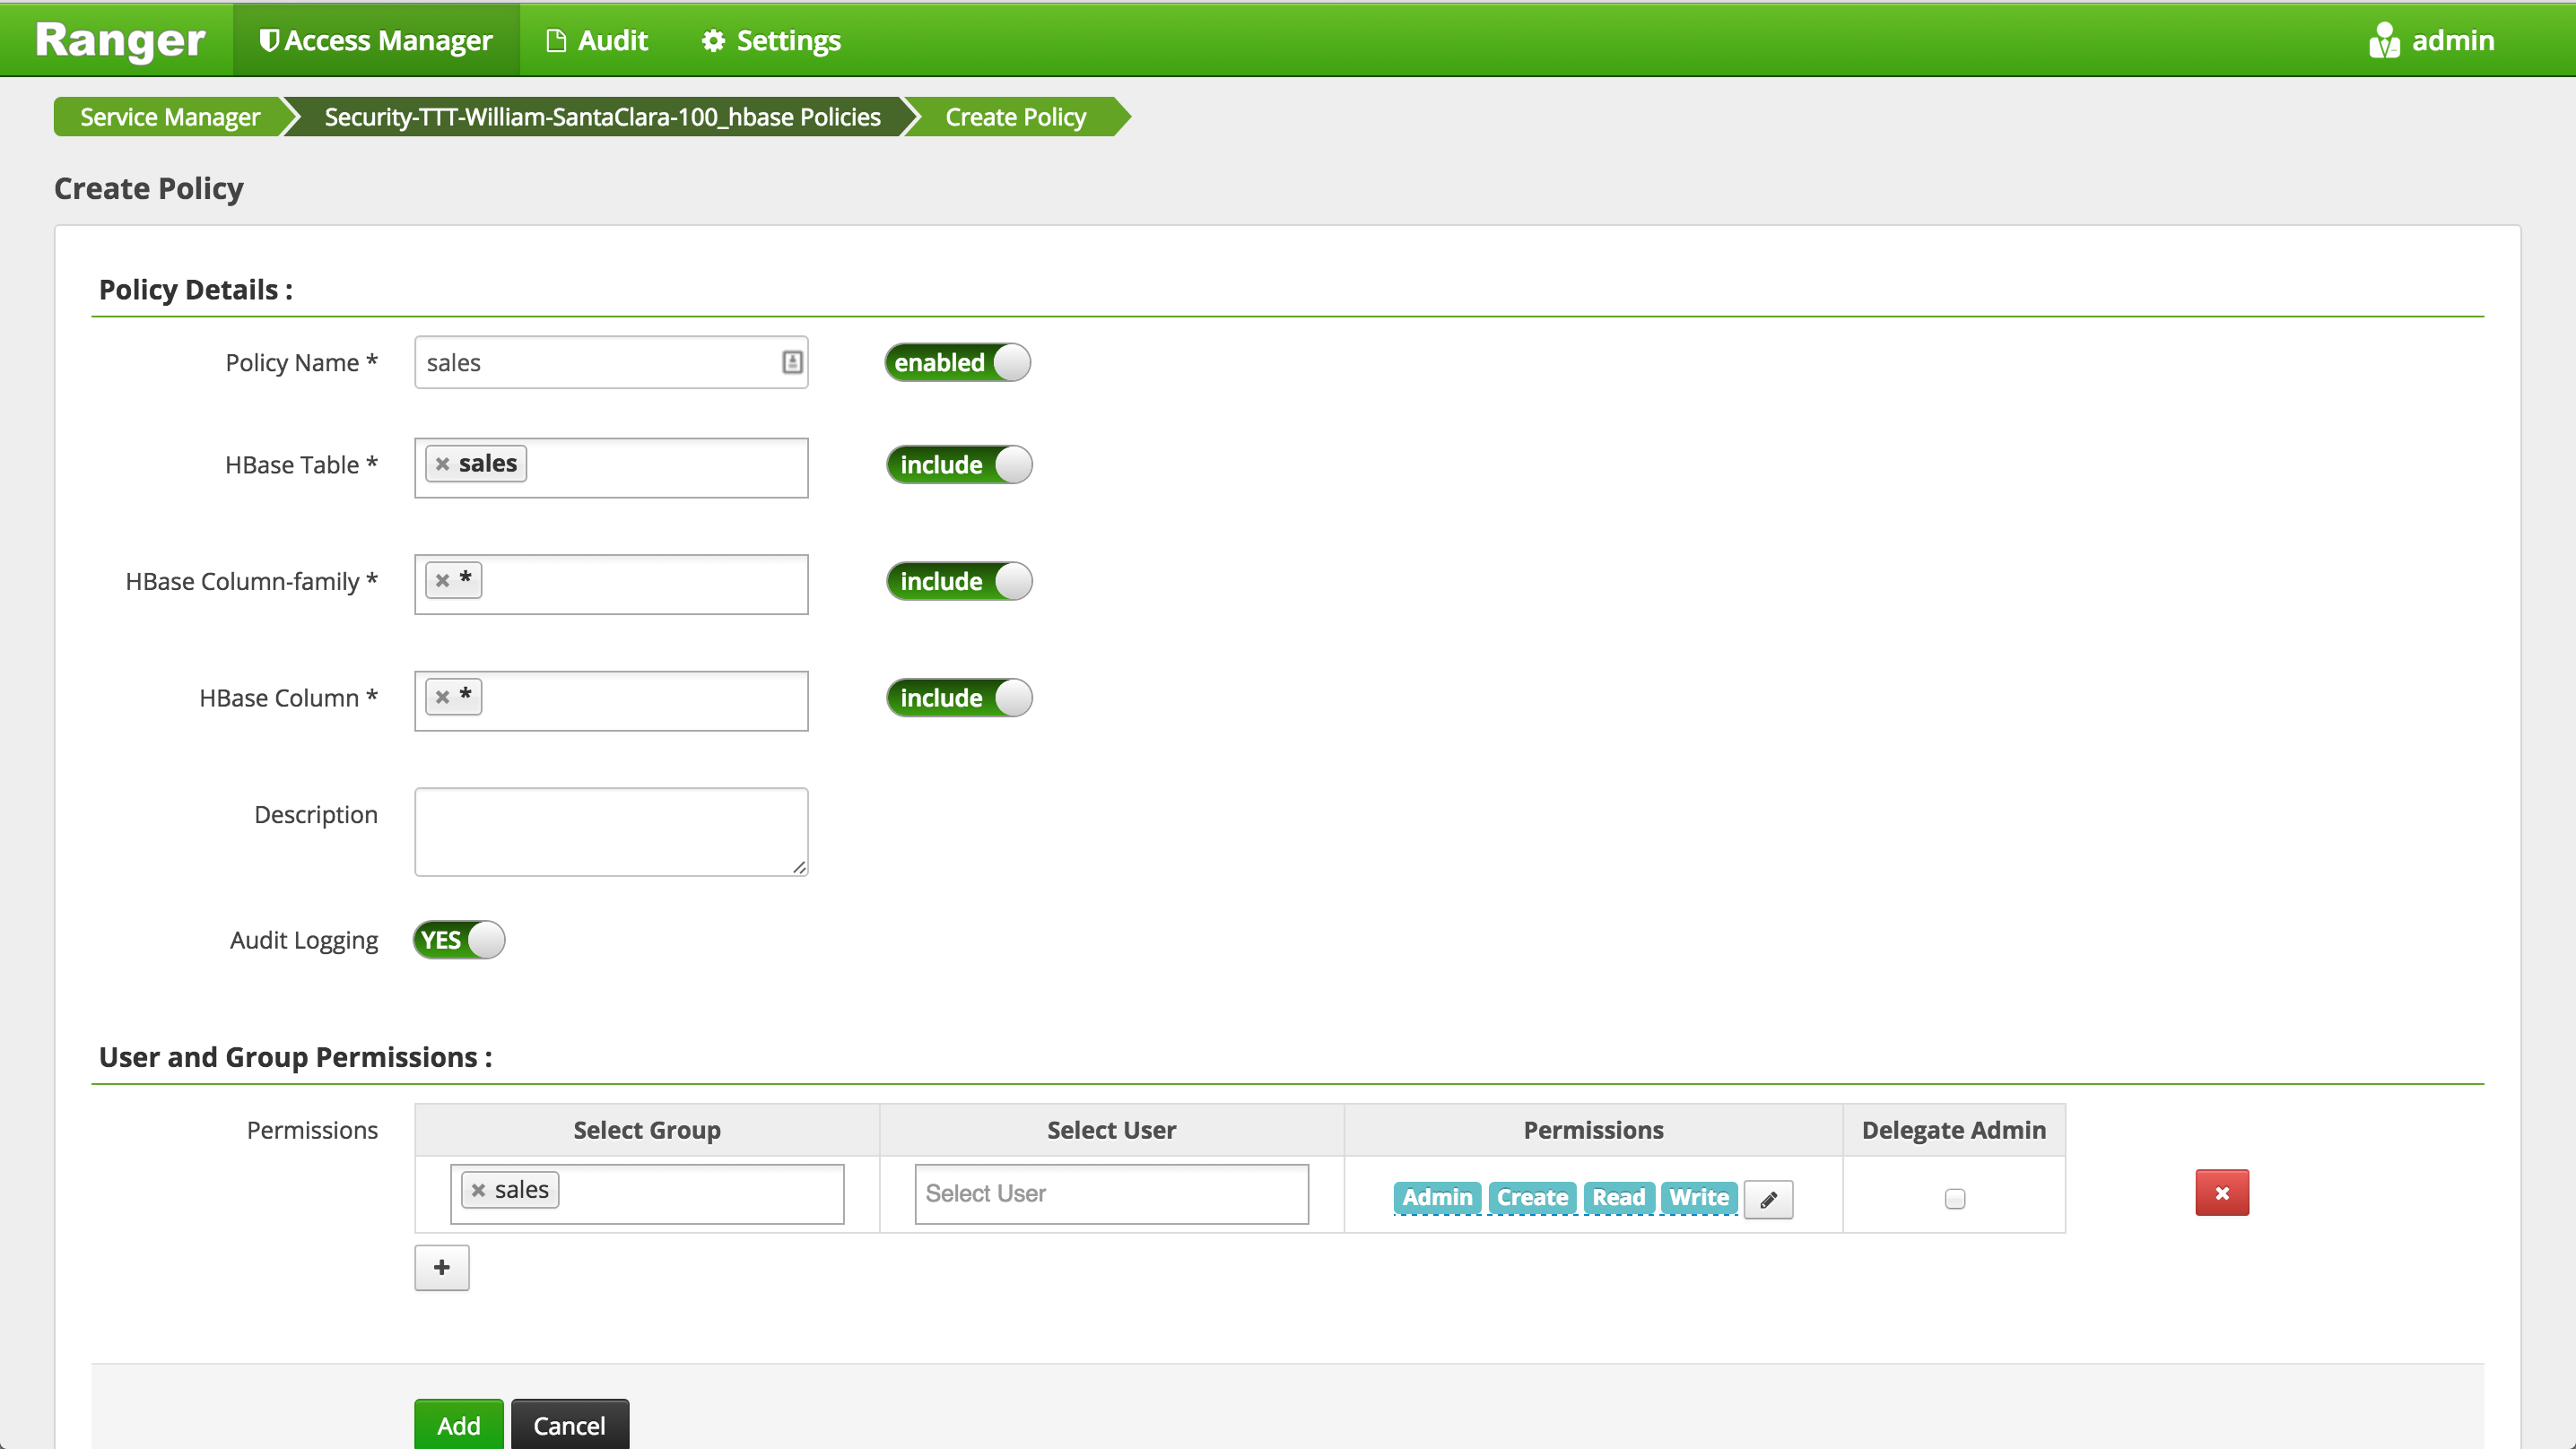
- Policy Name:
- On the 'Access Manager' tab click HBASE > (clustername)_hbase
-
Wait 30s for policy to take effect
-
Now try creating the table and now it works
hbase> create 'sales', 'cf'
-
In Ranger, click on 'Audit' to open the Audits page and filter by below:
- Service Type: HBASE
- User: sales1
-
Notice that Ranger captured the access attempt and since this time there is a policy to allow the access, it was
Allowed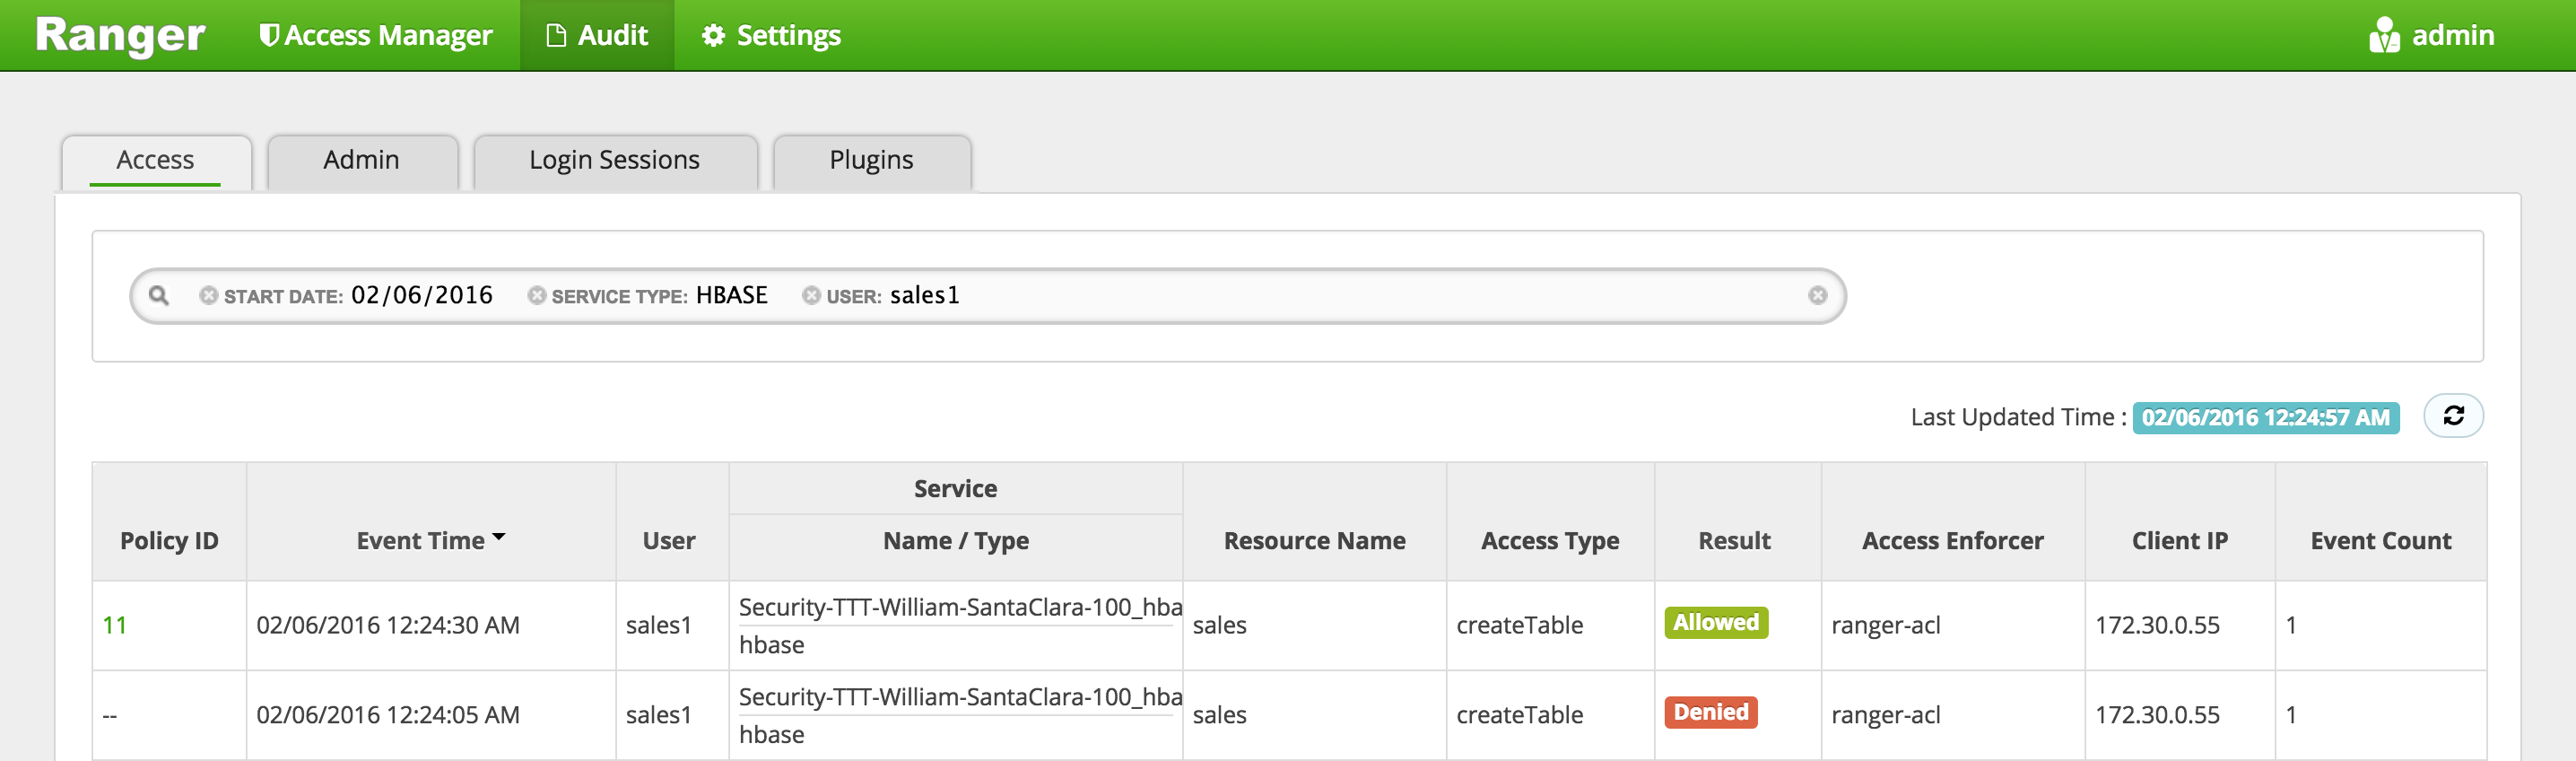
- You can also see the details that were captured for each request:
- Policy that allowed the access
- Time
- Requesting user
- Service type (e.g. hdfs, hive, hbase etc)
- Resource name
- Access type (e.g. read, write, execute)
- Result (e.g. allowed or denied)
- Access enforcer (i.e. whether native acl or ranger acls were used)
- Client IP
- Event count
- You can also see the details that were captured for each request:
-
For any allowed requests, notice that you can quickly check the details of the policy that allowed the access by clicking on the policy number in the 'Policy ID' column
-
Exit hbase shell
hbase> exit
-
Now let's check whether non-sales users can access the table
-
Logout as sales1 and log back in as hr1
kdestroy
#logout as sales1
logout

#login as hr1 and authenticate
sudo su - hr1

kinit
# enter password: BadPass#1

klist
## Default principal: hr1@LAB.HORTONWORKS.NET
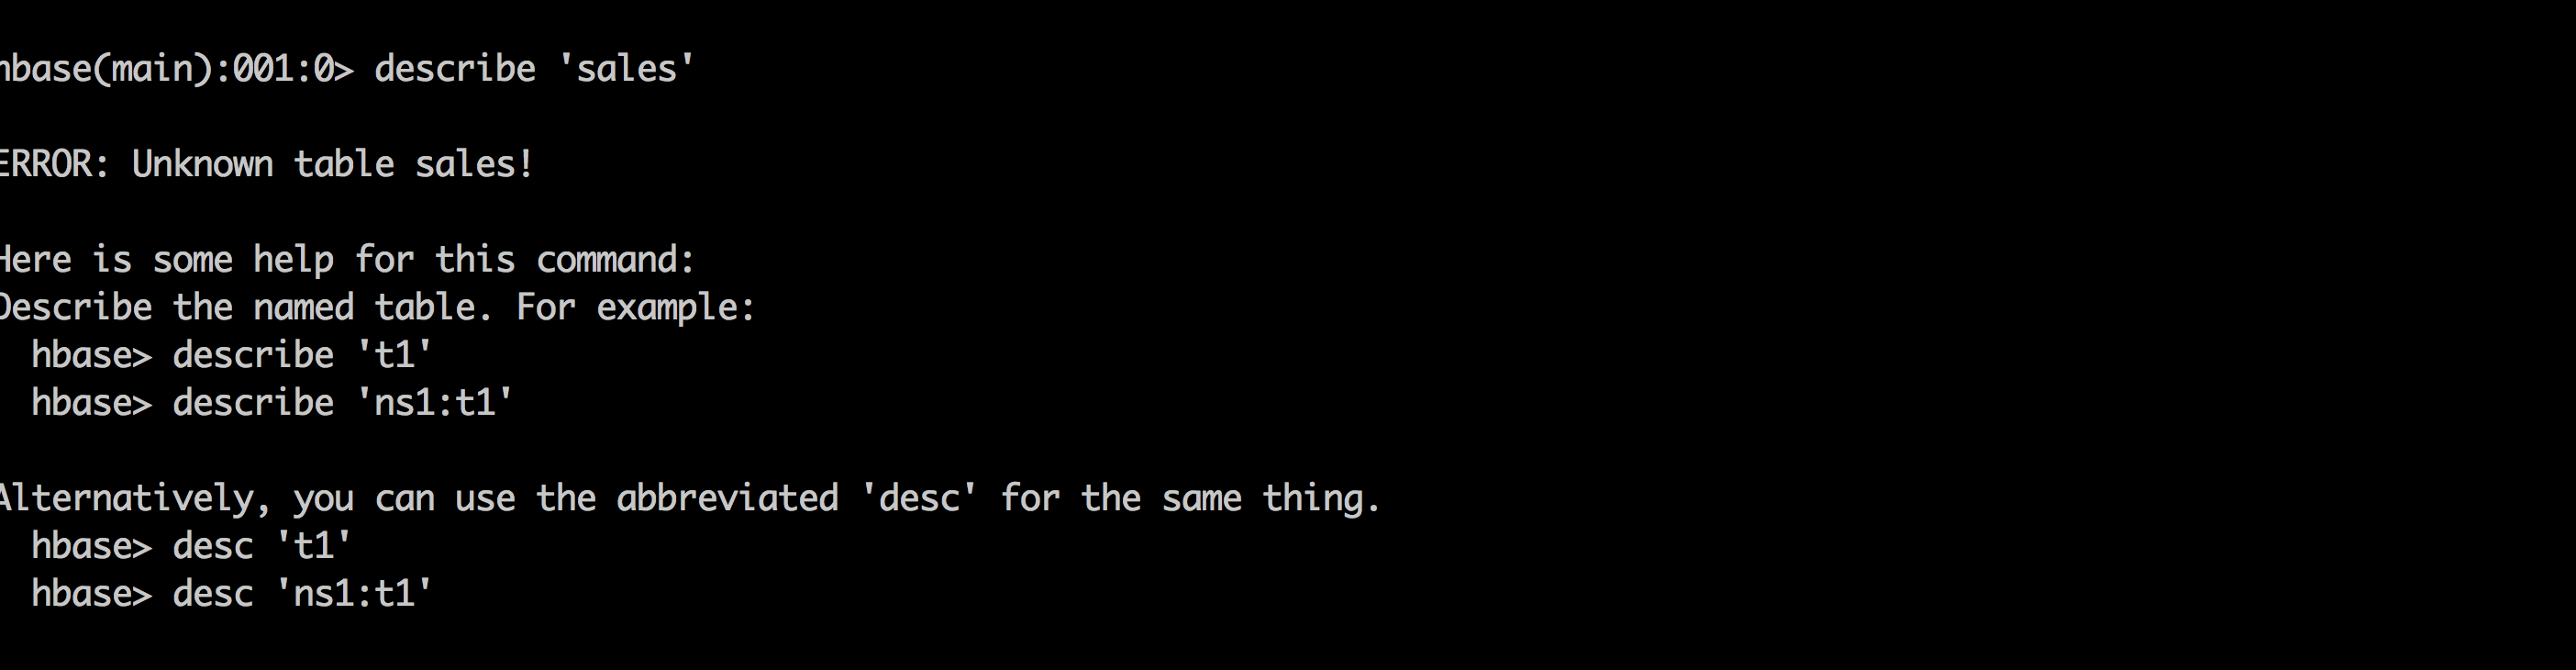
- Try to access the same dir as hr1 and notice this user does not even see the table
hbase shell
hbase> describe 'sales'
hbase> list 'default'
- Try to create a table as hr1 and it fails with
org.apache.hadoop.hbase.security.AccessDeniedException: Insufficient permissions
hbase> create 'sales', 'cf'
-
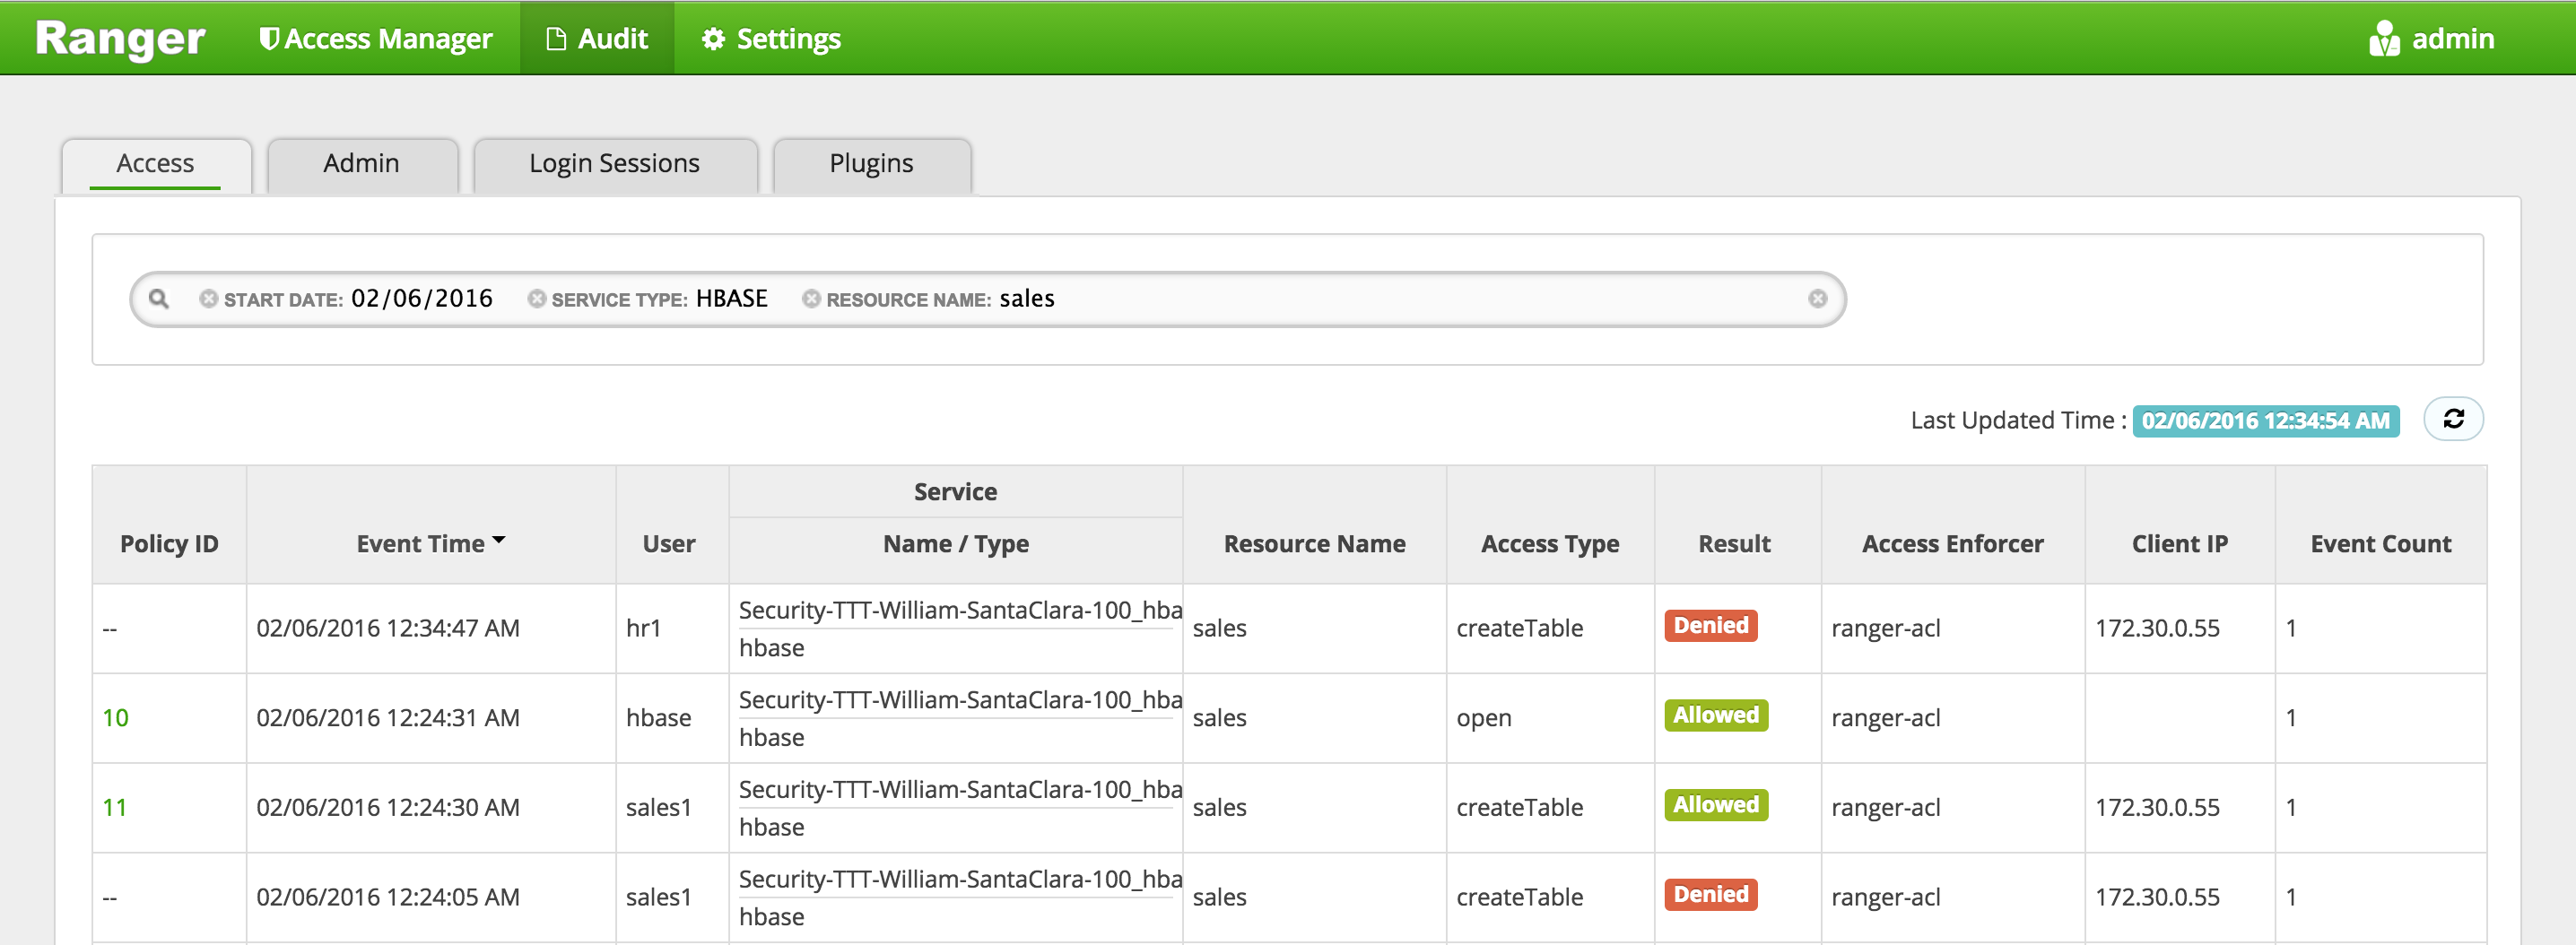
In Ranger, click on 'Audit' to open the Audits page and filter by:
- Service Type:
HBASE - Resource Name:
sales
- Service Type:
-
Here you can see the request by sales1 was allowed but hr1 was denied
- Exit hbase shell
hbase> exit
- Logout as hr1
kdestroy
logout
-
We have successfully created a table called 'sales' in HBase and setup authorization policies to ensure only sales users have access to the table
-
This shows how you can interact with Hadoop components on kerberized cluster and use Ranger to manage authorization policies and audits
-
At this point your Silk/Banana audit dashboard should show audit data from multiple Hadoop components e.g. http://54.68.246.157:6083/solr/banana/index.html#/dashboard
-
If Sqoop is not already installed, install it via Ambari on same node where Mysql/Hive are installed:
- Admin > Stacks and Versions > Sqoop > Add service > select node where Mysql/Hive are installed and accept all defaults and finally click "Proceed Anyway"
- You will be asked to enter admin principal/password:
hadoopadmin@LAB.HORTONWORKS.NET- BadPass#1
-
On the host running Mysql: change user to root and download a sample csv and login to Mysql
sudo su -
wget https://raw.githubusercontent.com/HortonworksUniversity/Security_Labs/master/labdata/PII_data_small.csv
mysql -u root -pBadPass#1
- At the
mysql>prompt run below to:- create a table in Mysql
- give access to sales1
- import the data from csv
- test that table was created
create database people;
use people;
create table persons (people_id INT PRIMARY KEY, sex text, bdate DATE, firstname text, lastname text, addresslineone text, addresslinetwo text, city text, postalcode text, ssn text, id2 text, email text, id3 text);
GRANT ALL PRIVILEGES ON people.* to 'sales1'@'%' IDENTIFIED BY 'BadPass#1';
LOAD DATA LOCAL INFILE '~/PII_data_small.csv' REPLACE INTO TABLE persons FIELDS TERMINATED BY ',' LINES TERMINATED BY '\n';

select people_id, firstname, lastname, city from persons where lastname='SMITH';
exit
- logoff as root
logout
-
Create Ranger policy to allow
salesgroupall permissionsonpersonstable in Hive- Access Manager > Hive > (cluster)_hive > Add new policy
- Create new policy as below and click Add:
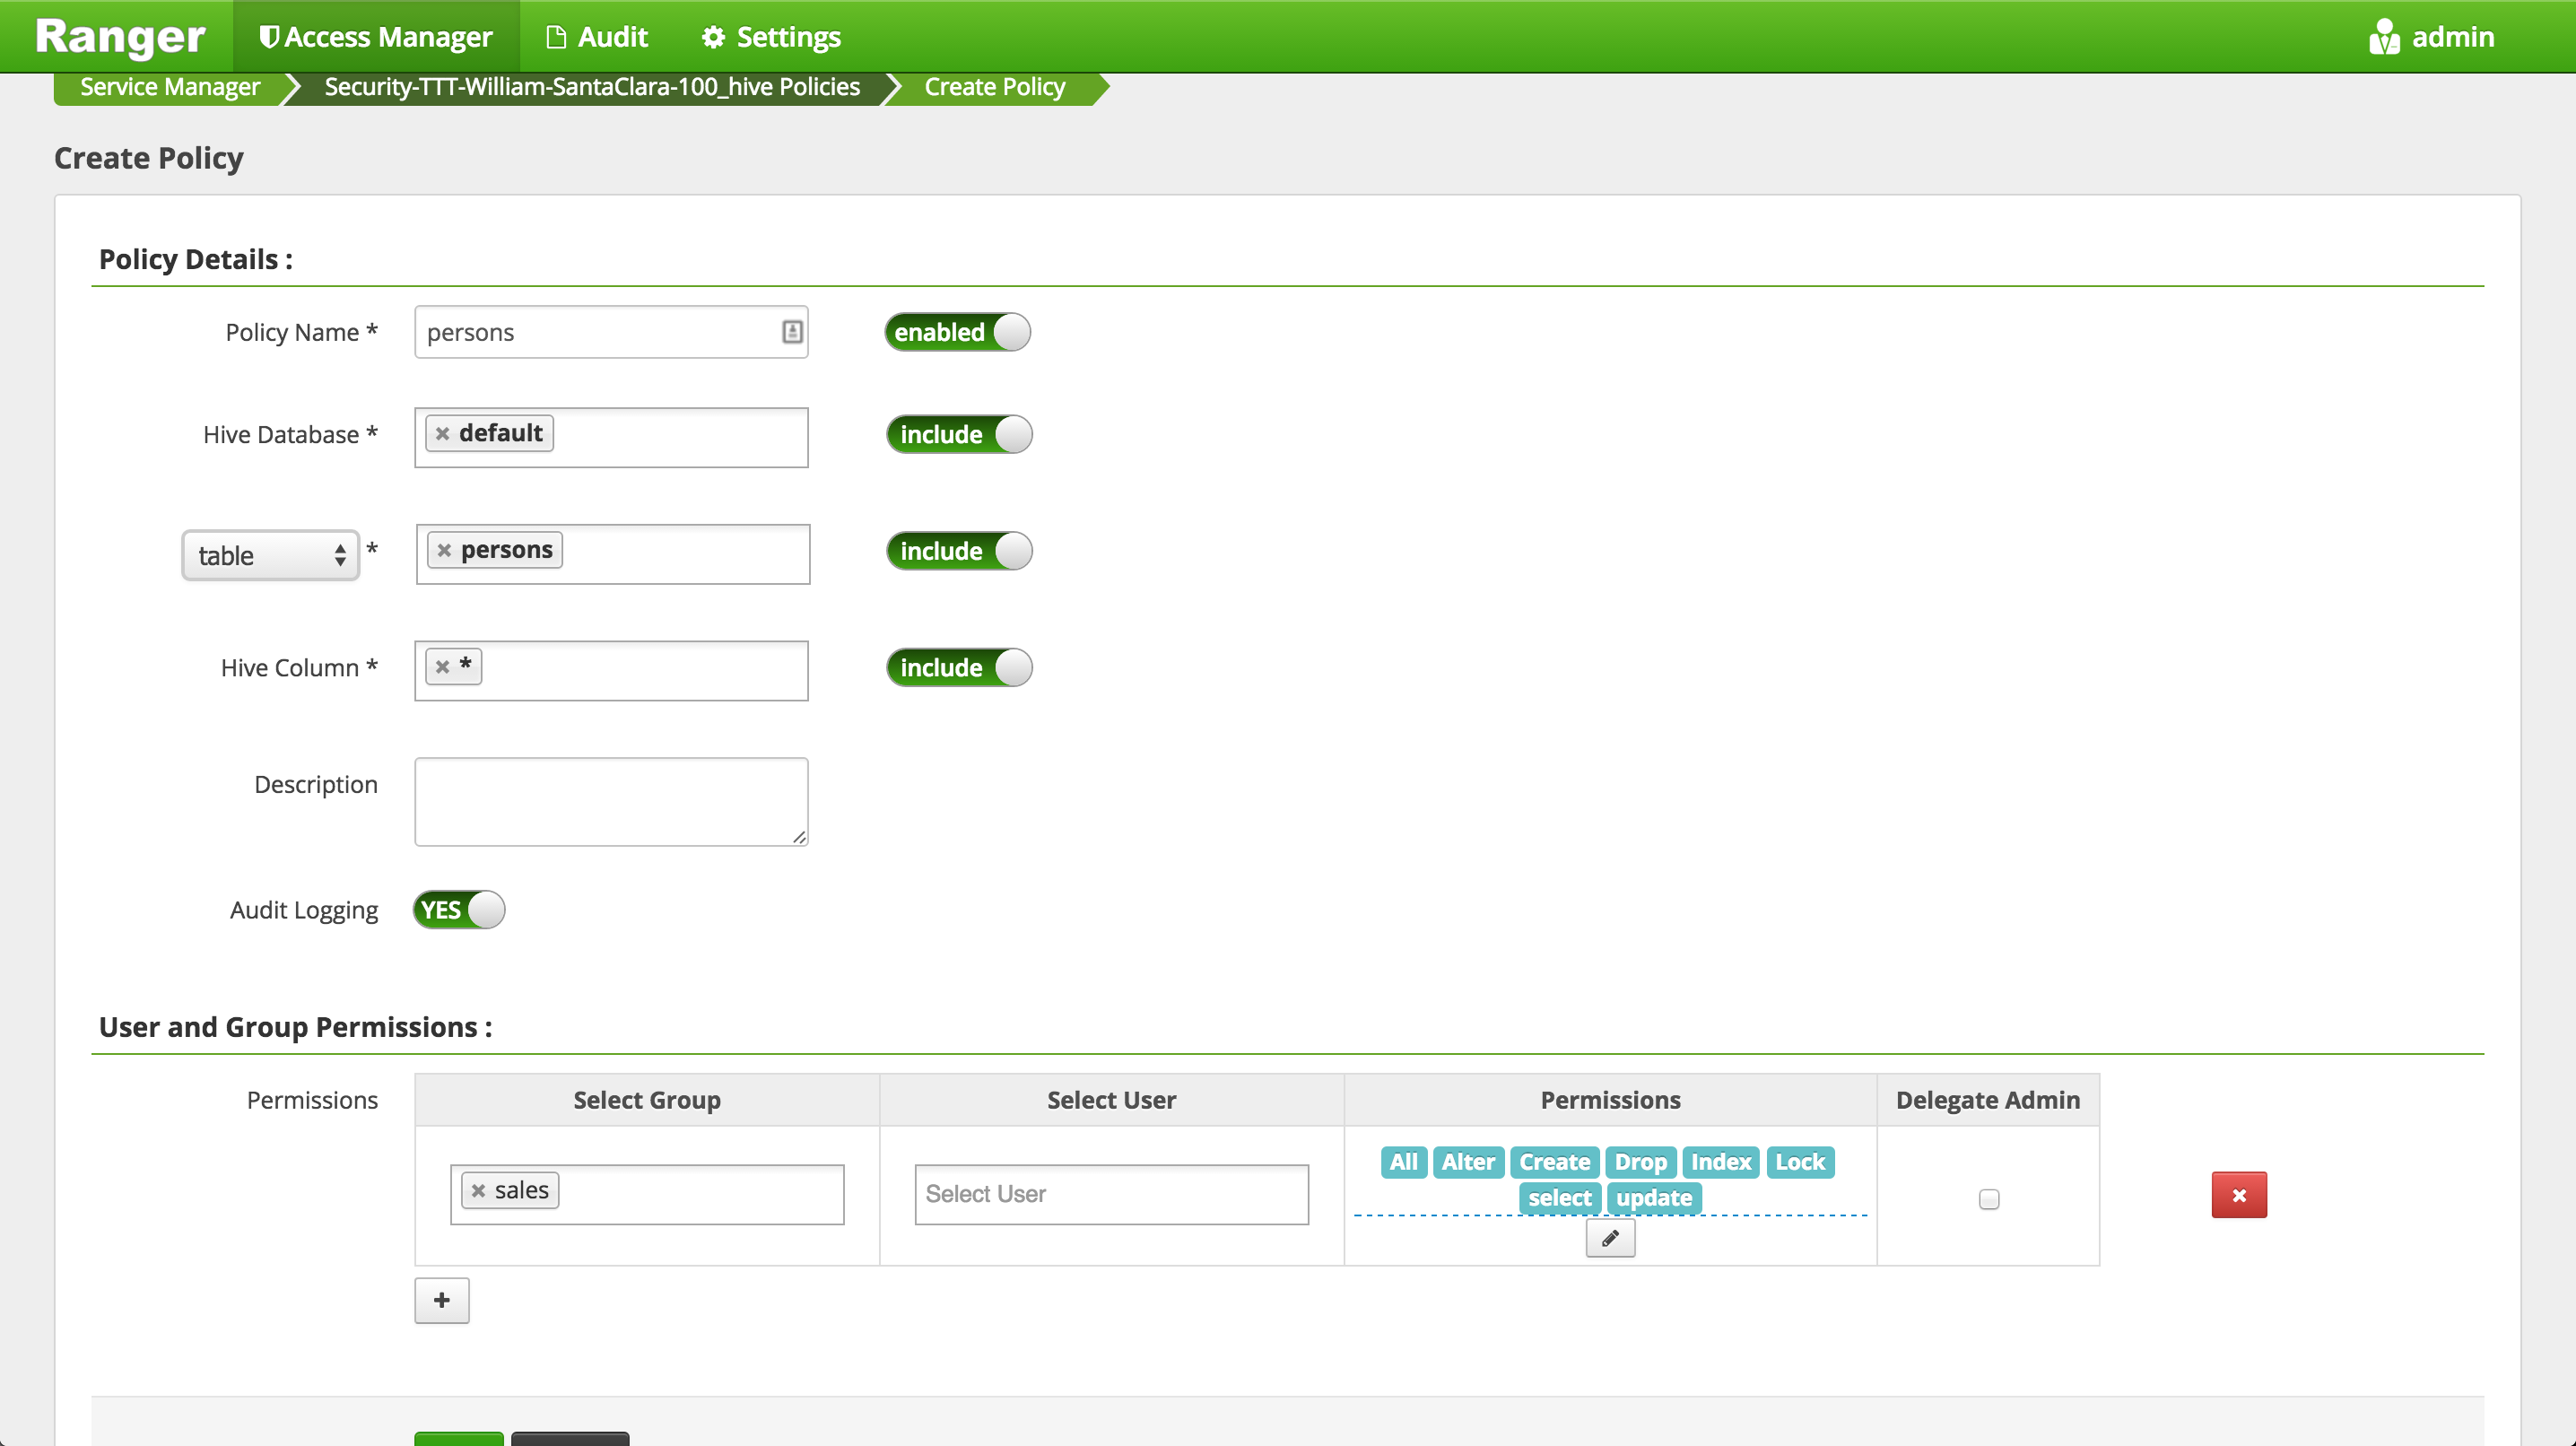
- Log out of Ranger
-
Create Ranger policy to allow
salesgroupGet MetadataGenerateEEKDecryptEEKpermissions ontestkey(i.e. the key used to encrypt Hive warehouse directories)- Login to Ranger http://RANGER_PUBLIC_IP:6080 with keyadmin/keyadmin
- Access Manager > KMS > (cluster)_KMS > Add new policy
- Create new policy as below and click Add:
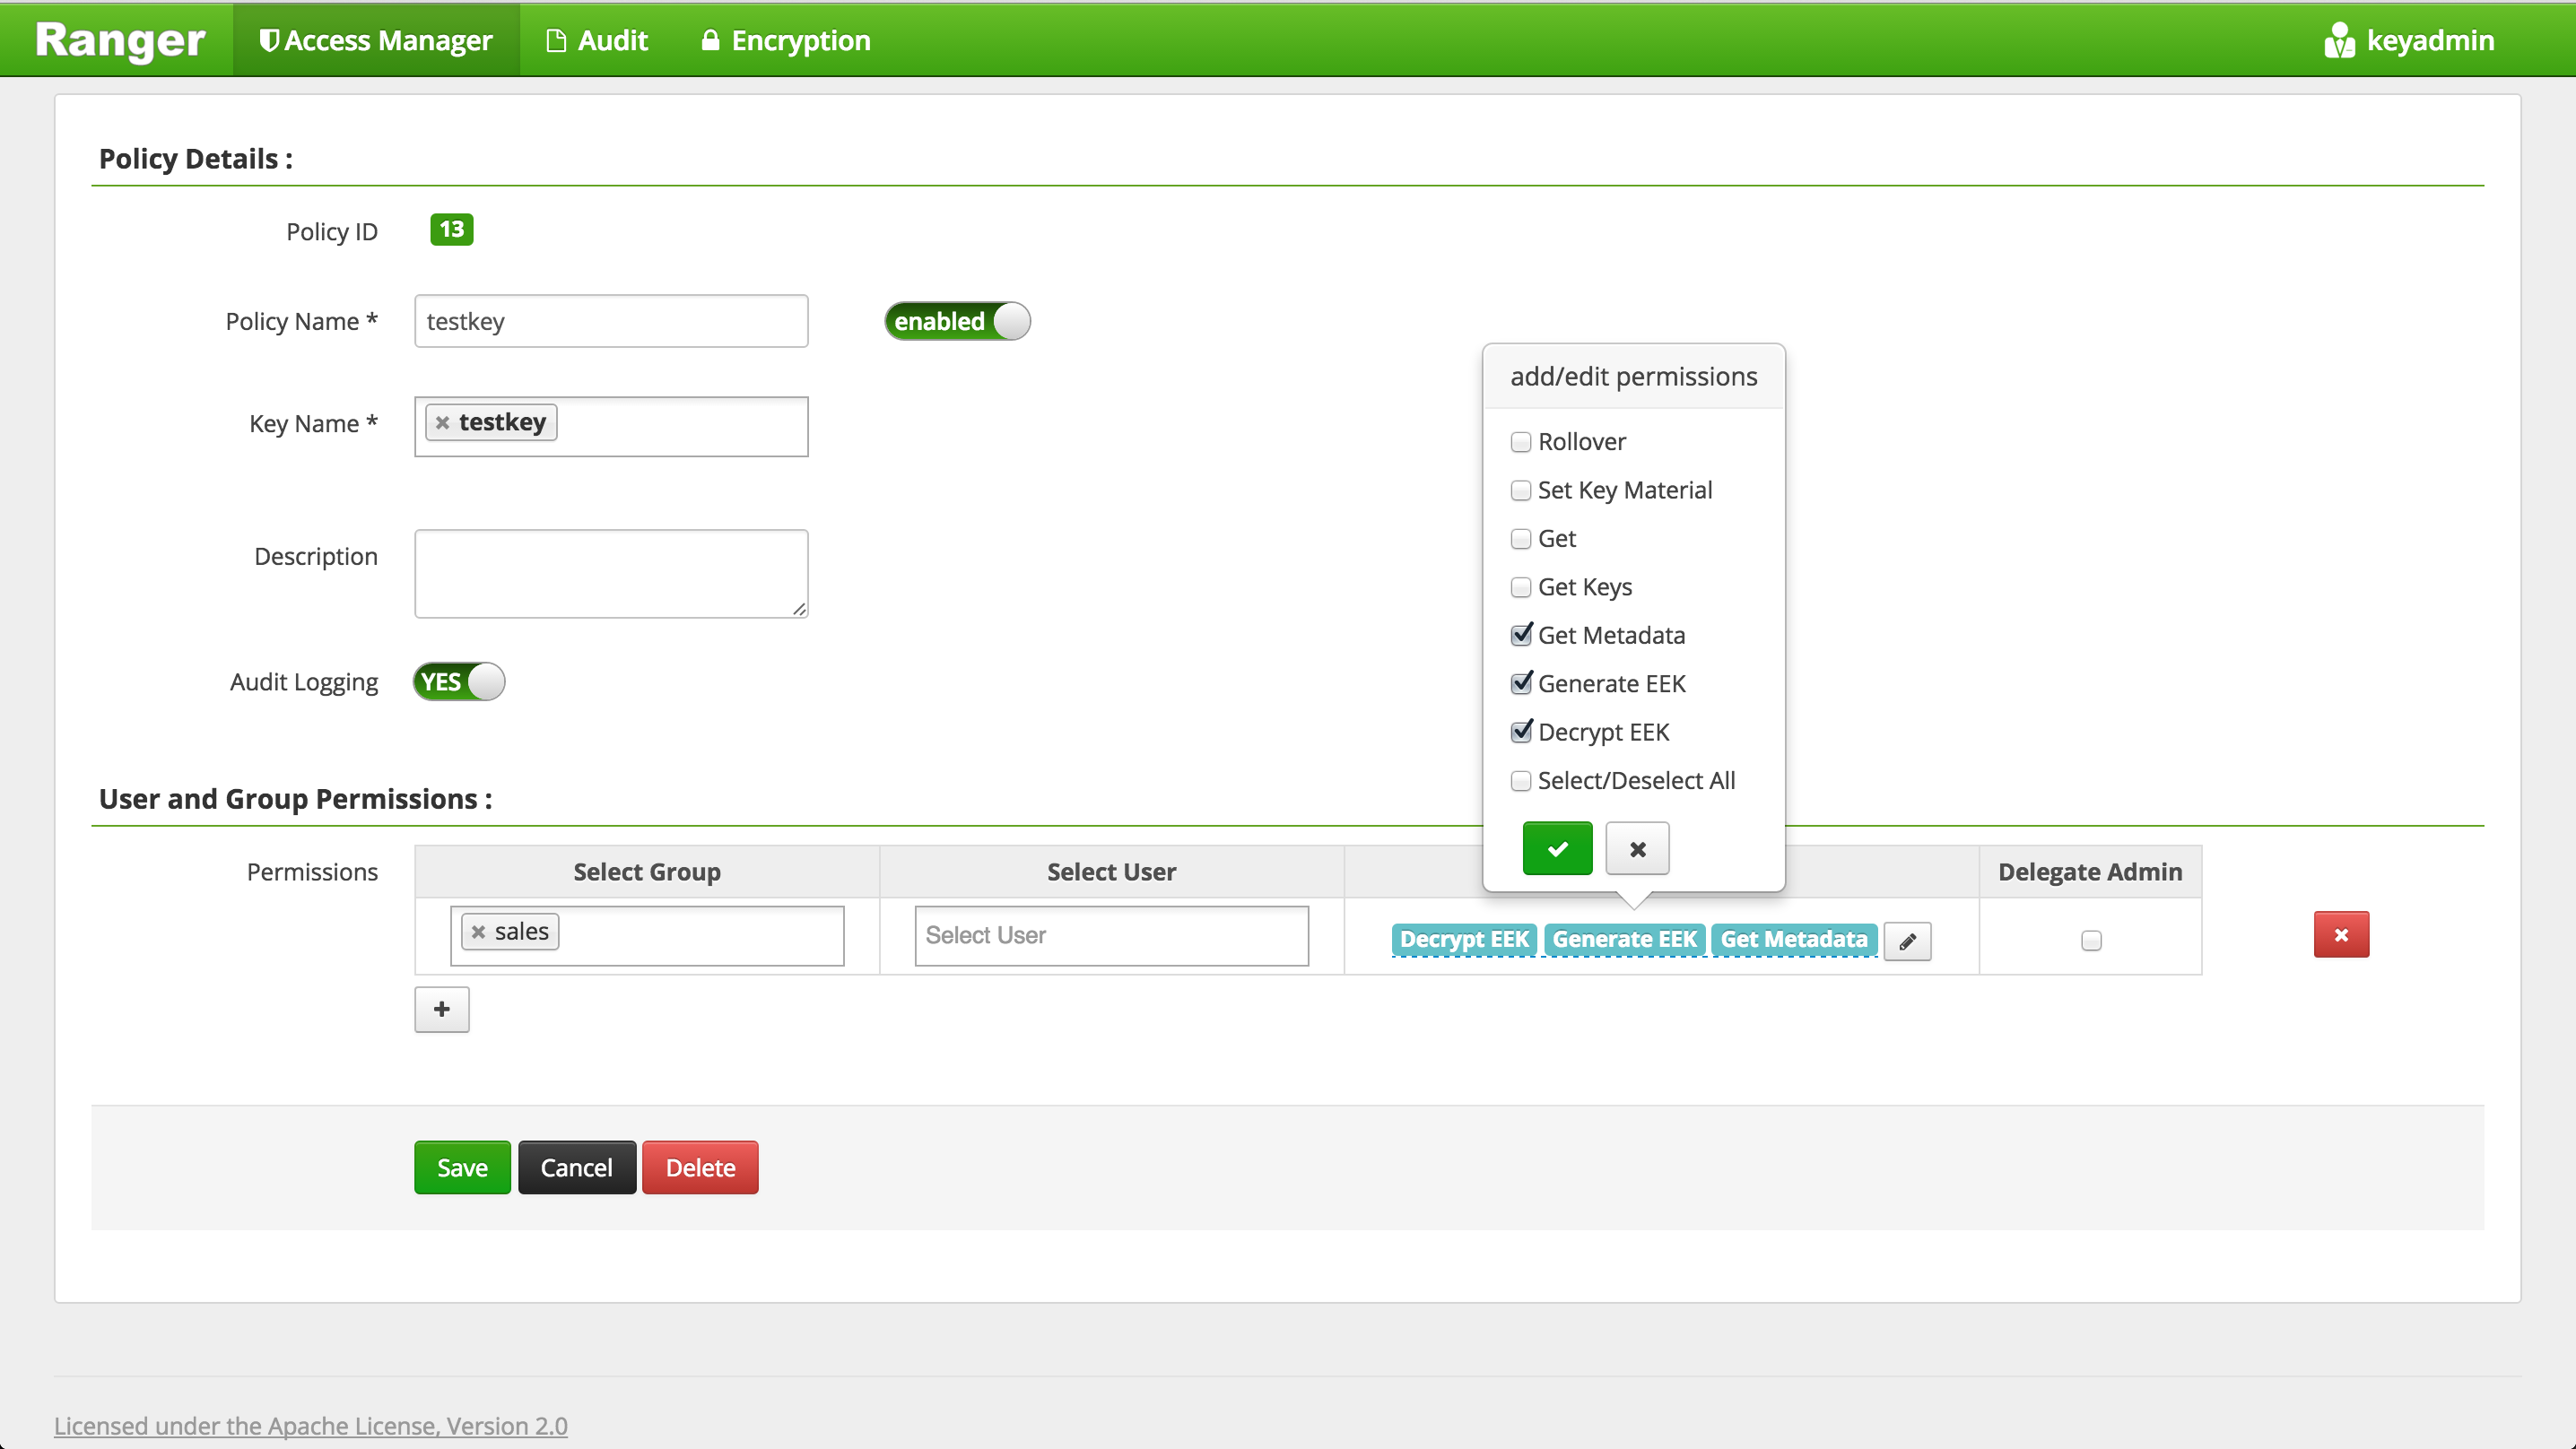
- Log out of Ranger and re-login as admin/admin
-
Login as sales1
sudo su - sales1
- As sales1 user, kinit and run sqoop job to create persons table in Hive (in ORC format) and import data from MySQL. Below are the details of the arguments passed in:
- Table: MySQL table name
- username: Mysql username
- password: Mysql password
- hcatalog-table: Hive table name
- create-hcatalog-table: hive table should be created first
- driver: classname for Mysql driver
- m: number of mappers
kinit
## enter BadPass#1 as password

sqoop import --verbose --connect "jdbc:mysql://$(hostname -f)/people" --table persons --username sales1 --password BadPass#1 --hcatalog-table persons --hcatalog-storage-stanza "stored as orc" -m 1 --create-hcatalog-table  --driver com.mysql.jdbc.Driver
-
This will start a mapreduce job to import the data from Mysql to Hive in ORC format
-
Note: if the mapreduce job fails with below, most likely you have not given sales group all the permissions needed on the EK used to encrypt Hive directories
java.lang.RuntimeException: com.mysql.jdbc.exceptions.jdbc4.CommunicationsException: Communications link failure
- Login to beeline
beeline -u "jdbc:hive2://localhost:10000/default;principal=hive/$(hostname -f)@LAB.HORTONWORKS.NET"
- Query persons table in beeline
beeline> select * from persons;
-
Since the authorization policy is in place, the query should work
-
Ranger audit should show the request was allowed:
- Under Ranger > Audit > query for
- Service type: HIVE
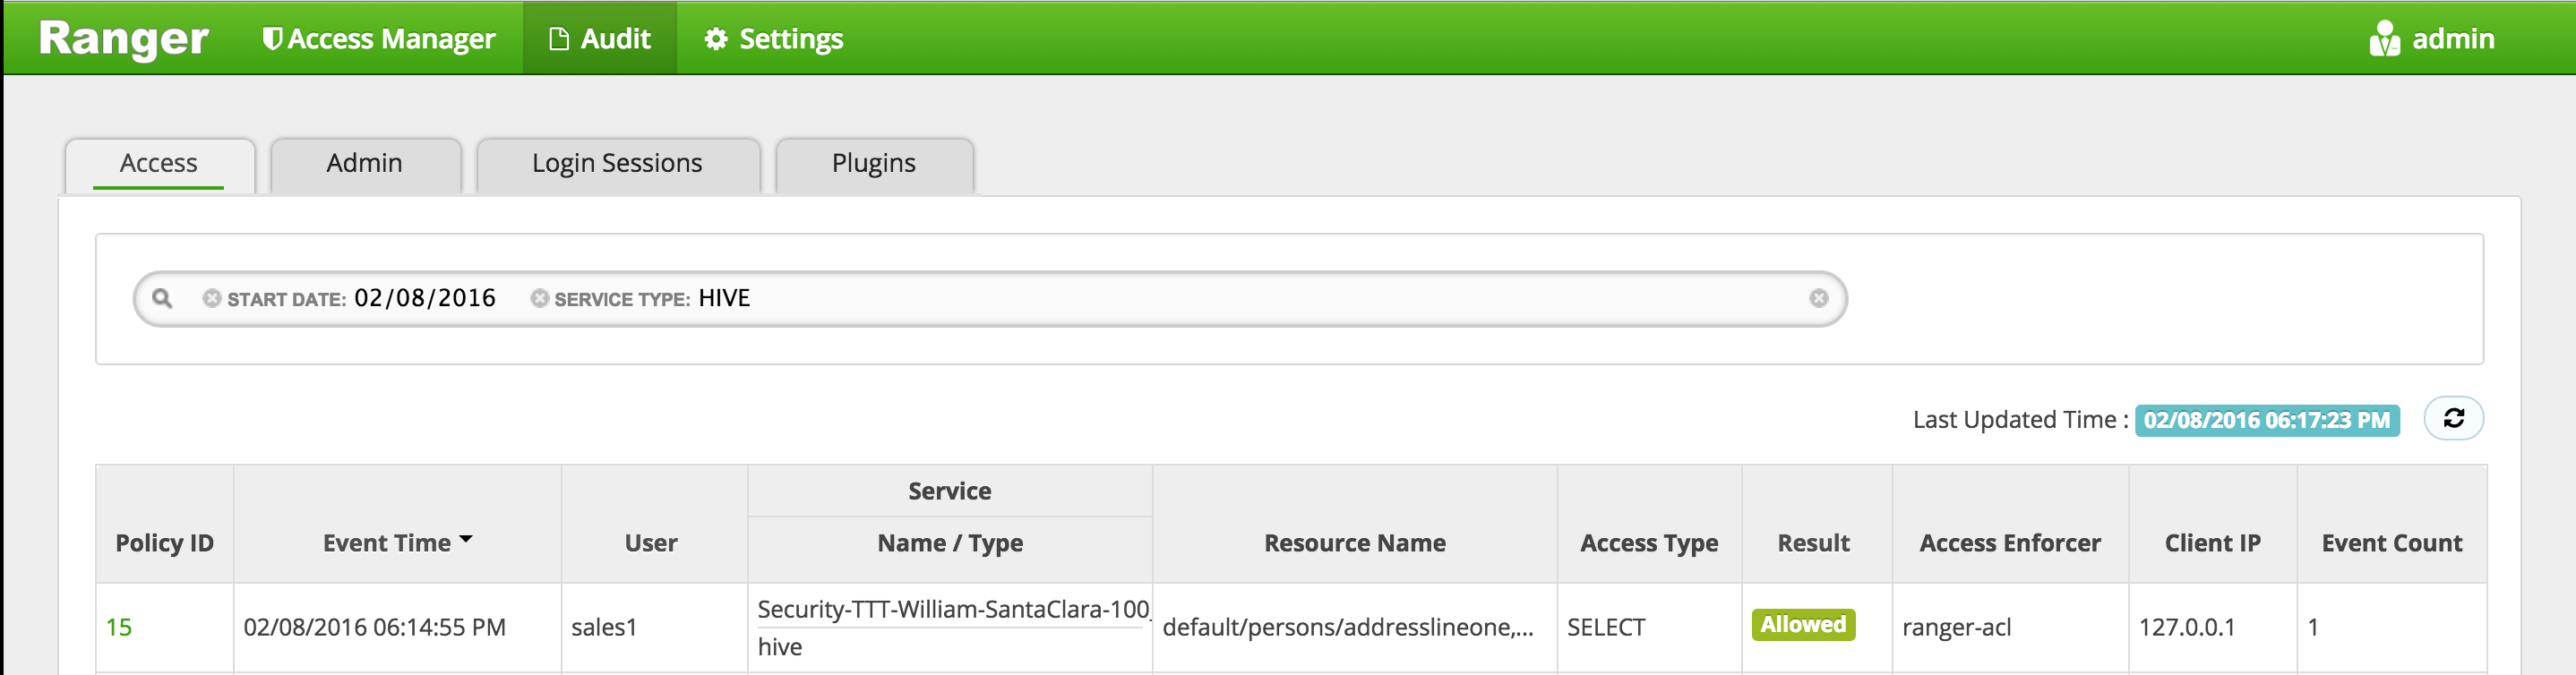
- Service type: HIVE
- Under Ranger > Audit > query for
- From beeline, try to drop the persons table.
beeline> drop table persons;
- You will get error similar to below
message:Unable to drop default.persons because it is in an encryption zone and trash is enabled. Use PURGE option to skip trash.
- To drop a Hive table (when Hive directories are located in EncryptionZone), you need to include
purgeas below:
beeline> drop table persons purge;
- Destroy the ticket and logout as sales1
kdestroy
logout
- This completes the lab. You have now interacted with Hadoop components in secured mode and used Ranger to manage authorization policies and audits
Goal: In this lab we will configure Apache Knox for AD authentication and make WebHDFS, Hive requests over Knox (after setting the appropriate Ranger authorization polices for access)
-
Run these steps on the node where Knox was installed earlier
-
To configure Knox for AD authentication we need to enter AD related properties in topology xml via Ambari
-
The problem is it requires us to enter LDAP bind password, but we do not want it exposed as plain text in the Ambari configs
-
The solution? Create keystore alias for the ldap manager user (which you will later pass in to the topology via the 'systemUsername' property)
- Read password for use in following command (this will prompt you for a password and save it in knoxpass environment variable). Enter BadPass#1:
read -s -p "Password: " knoxpass-
This is a handy way to set an env var without storing the command in your history
-
Create password alias for Knox called knoxLdapSystemPassword
sudo -u knox /usr/hdp/current/knox-server/bin/knoxcli.sh create-alias knoxLdapSystemPassword --cluster default --value ${knoxpass} unset knoxpass -
Now lets configure Knox to use our AD for authentication. Replace below content in Ambari > Knox > Config > Advanced topology.
- How to tell what configs were changed from defaults?
- Default configs remain indented below
- Configurations that were added/modified are not indented
- How to tell what configs were changed from defaults?
        <topology>

            <gateway>

                <provider>
                    <role>authentication</role>
                    <name>ShiroProvider</name>
                    <enabled>true</enabled>
                    <param>
                        <name>sessionTimeout</name>
                        <value>30</value>
                    </param>
                    <param>
                        <name>main.ldapRealm</name>
                        <value>org.apache.hadoop.gateway.shirorealm.KnoxLdapRealm</value>
                    </param>

<!-- changes for AD/user sync -->

<param>
    <name>main.ldapContextFactory</name>
    <value>org.apache.hadoop.gateway.shirorealm.KnoxLdapContextFactory</value>
</param>

<!-- main.ldapRealm.contextFactory needs to be placed before other main.ldapRealm.contextFactory* entries  -->
<param>
    <name>main.ldapRealm.contextFactory</name>
    <value>$ldapContextFactory</value>
</param>

<!-- AD url -->
<param>
    <name>main.ldapRealm.contextFactory.url</name>
    <value>ldap://ad01.lab.hortonworks.net:389</value>
</param>

<!-- system user -->
<param>
    <name>main.ldapRealm.contextFactory.systemUsername</name>
    <value>cn=ldap-reader,ou=ServiceUsers,dc=lab,dc=hortonworks,dc=net</value>
</param>

<!-- pass in the password using the alias created earlier -->
<param>
    <name>main.ldapRealm.contextFactory.systemPassword</name>
    <value>${ALIAS=knoxLdapSystemPassword}</value>
</param>

                    <param>
                        <name>main.ldapRealm.contextFactory.authenticationMechanism</name>
                        <value>simple</value>
                    </param>
                    <param>
                        <name>urls./**</name>
                        <value>authcBasic</value>
                    </param>

<!--  AD groups of users to allow -->
<param>
    <name>main.ldapRealm.searchBase</name>
    <value>ou=CorpUsers,dc=lab,dc=hortonworks,dc=net</value>
</param>
<param>
    <name>main.ldapRealm.userObjectClass</name>
    <value>person</value>
</param>
<param>
    <name>main.ldapRealm.userSearchAttributeName</name>
    <value>sAMAccountName</value>
</param>

<!-- changes needed for group sync-->
<param>
    <name>main.ldapRealm.authorizationEnabled</name>
    <value>true</value>
</param>
<param>
    <name>main.ldapRealm.groupSearchBase</name>
    <value>ou=CorpUsers,dc=lab,dc=hortonworks,dc=net</value>
</param>
<param>
    <name>main.ldapRealm.groupObjectClass</name>
    <value>group</value>
</param>
<param>
    <name>main.ldapRealm.groupIdAttribute</name>
    <value>cn</value>
</param>


                </provider>

                <provider>
                    <role>identity-assertion</role>
                    <name>Default</name>
                    <enabled>true</enabled>
                </provider>

                <provider>
                    <role>authorization</role>
                    <name>XASecurePDPKnox</name>
                    <enabled>true</enabled>
                </provider>

            </gateway>

            <service>
                <role>NAMENODE</role>
                <url>hdfs://{{namenode_host}}:{{namenode_rpc_port}}</url>
            </service>

            <service>
                <role>JOBTRACKER</role>
                <url>rpc://{{rm_host}}:{{jt_rpc_port}}</url>
            </service>

            <service>
                <role>WEBHDFS</role>
                <url>http://{{namenode_host}}:{{namenode_http_port}}/webhdfs</url>
            </service>

            <service>
                <role>WEBHCAT</role>
                <url>http://{{webhcat_server_host}}:{{templeton_port}}/templeton</url>
            </service>

            <service>
                <role>OOZIE</role>
                <url>http://{{oozie_server_host}}:{{oozie_server_port}}/oozie</url>
            </service>

            <service>
                <role>WEBHBASE</role>
                <url>http://{{hbase_master_host}}:{{hbase_master_port}}</url>
            </service>

            <service>
                <role>HIVE</role>
                <url>http://{{hive_server_host}}:{{hive_http_port}}/{{hive_http_path}}</url>
            </service>

            <service>
                <role>RESOURCEMANAGER</role>
                <url>http://{{rm_host}}:{{rm_port}}/ws</url>
            </service>
        </topology>
- Then restart Knox via Ambari
- Tell Hadoop to allow our users to access Knox from any node of the cluster. Modify the below properties under Ambari > HDFS > Config > Custom core-site ('users' group should already part of the groups so just add the rest)
- hadoop.proxyuser.knox.groups=users,hadoop-admins,sales,hr,legal
- hadoop.proxyuser.knox.hosts=*
- (better would be to put a comma separated list of the FQDNs of the hosts)
- Now restart HDFS
- Without this step you will see an error like below when you run the WebHDFS request later on:
org.apache.hadoop.security.authorize.AuthorizationException: User: knox is not allowed to impersonate sales1"
-
Setup a Knox policy for sales group for WEBHDFS by:
-
Login to Ranger > Access Manager > KNOX > click the cluster name link > Add new policy
- Policy name: webhdfs
- Topology name: default
- Service name: WEBHDFS
- Group permissions: sales
- Permission: check Allow
- Add
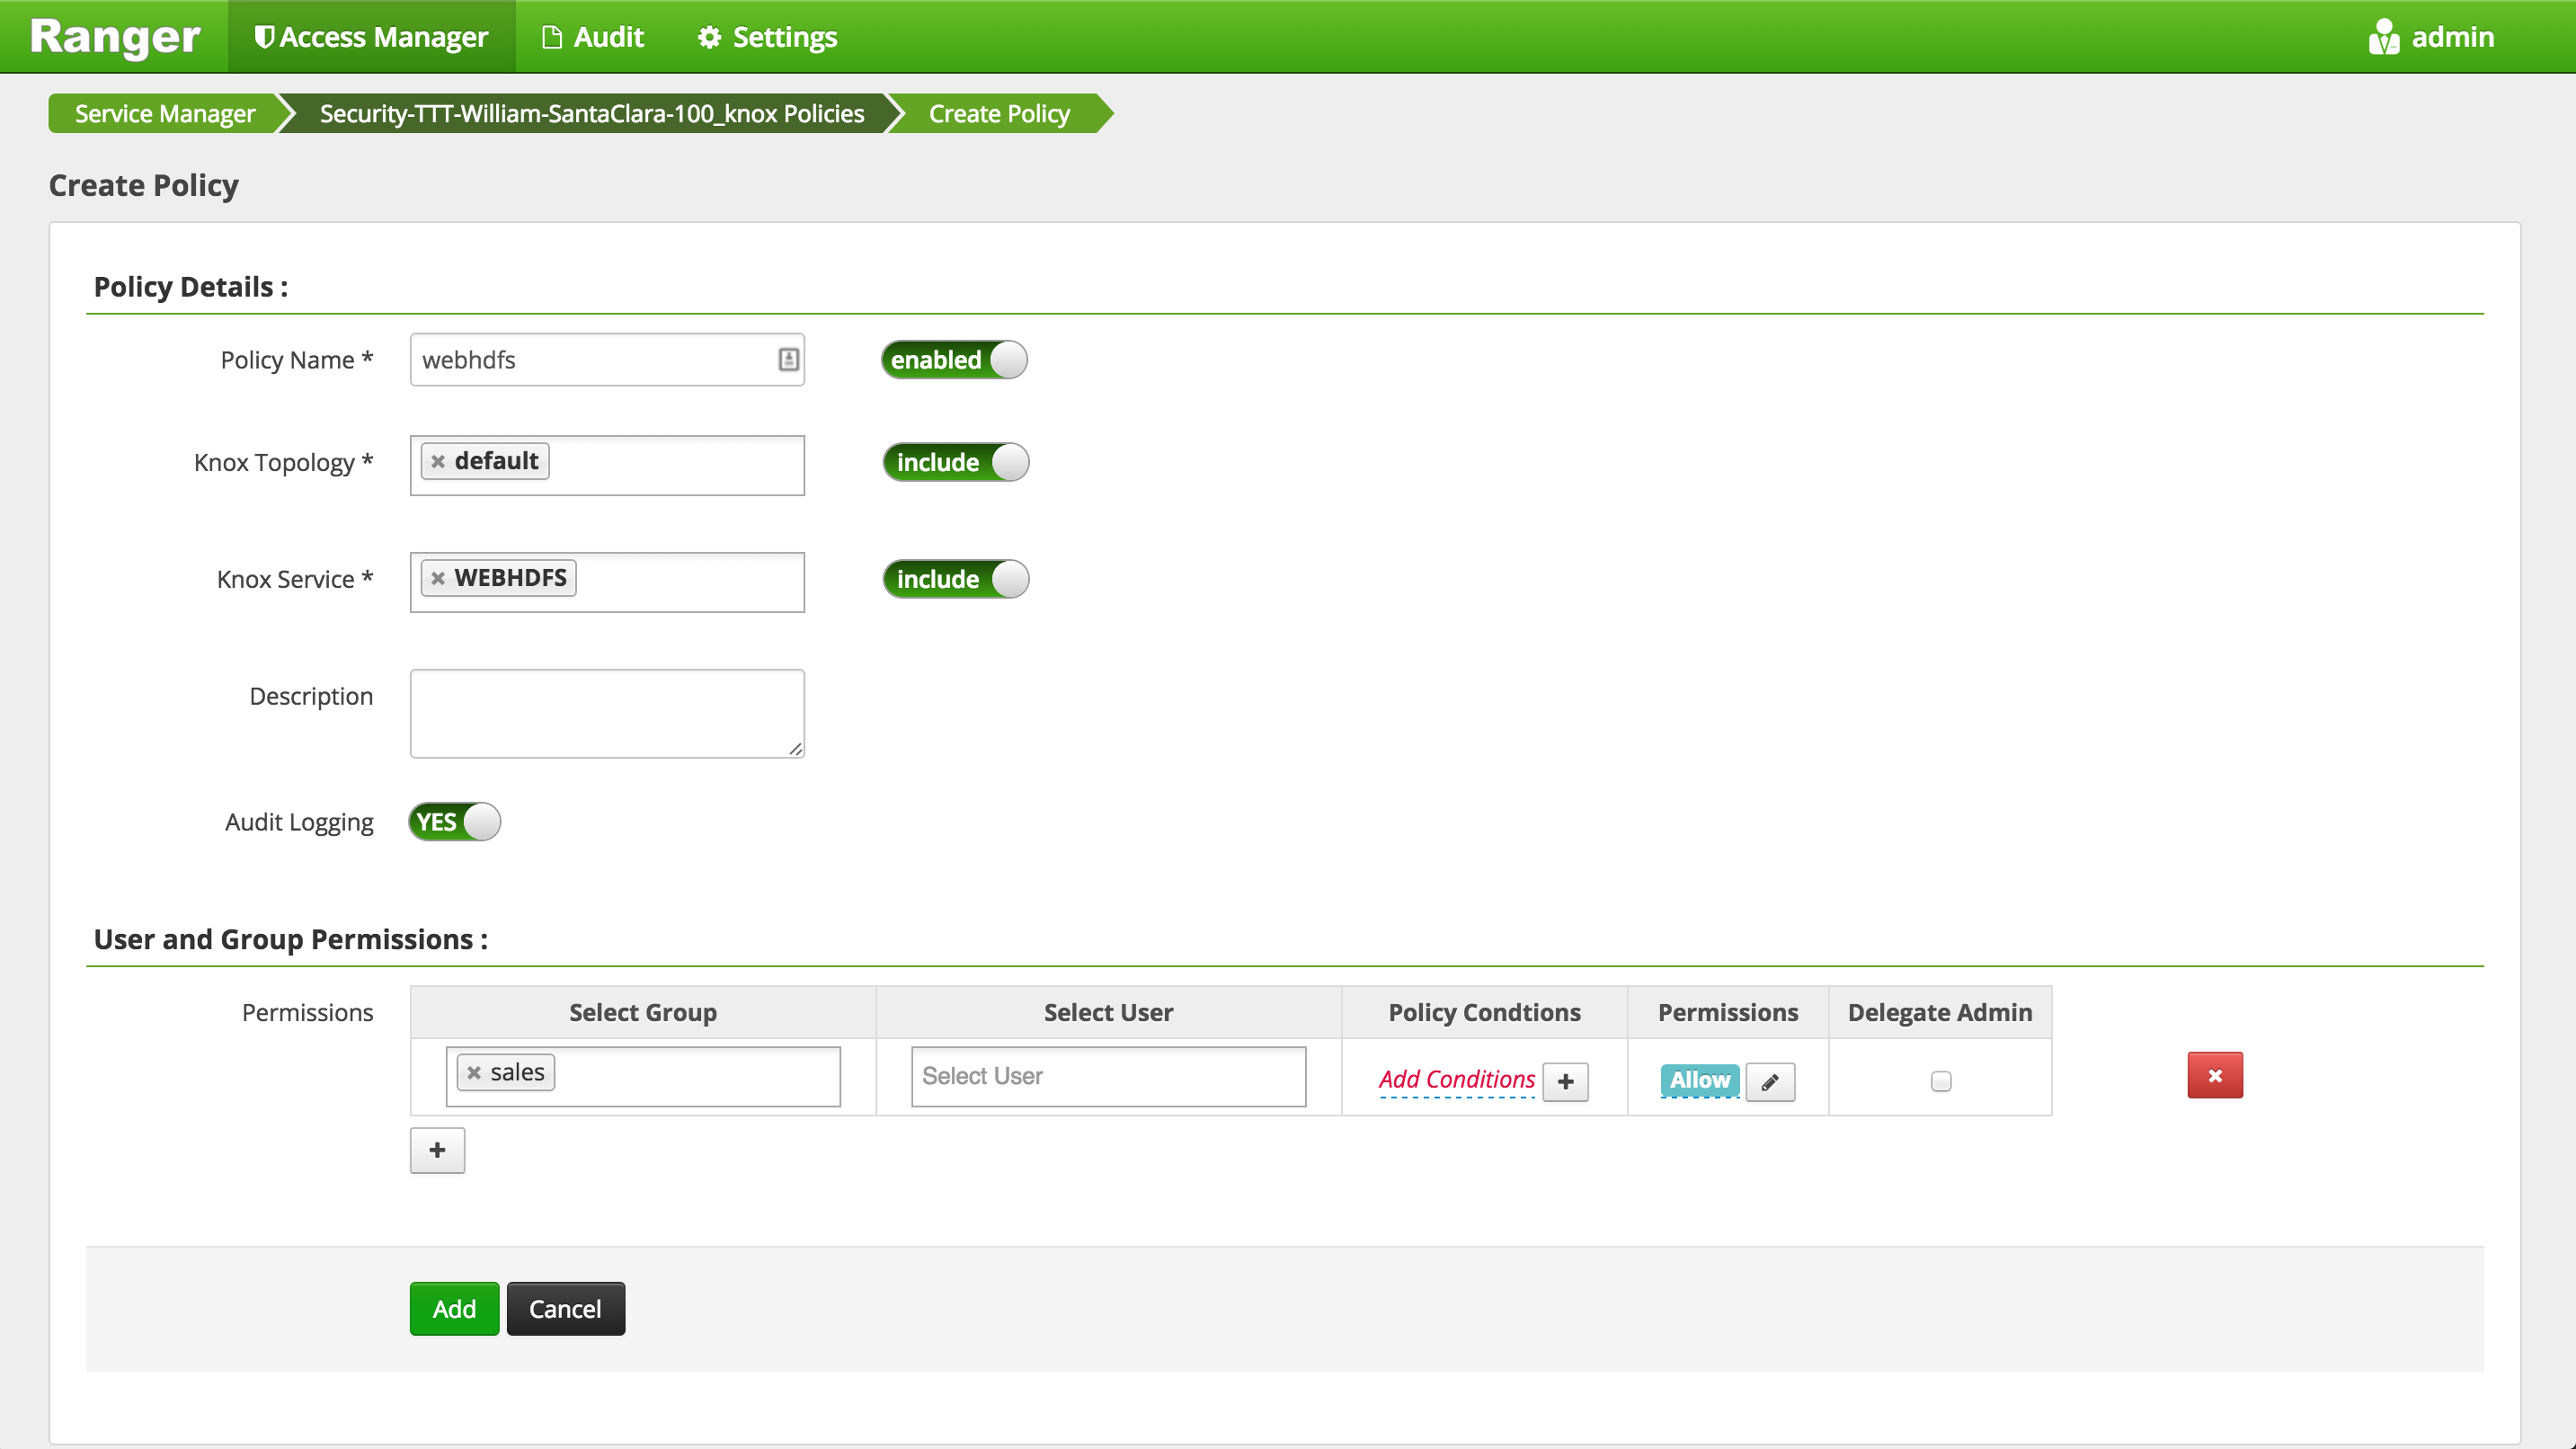
-
Now we can post some requests to WebHDFS over Knox to check its working. We will use curl with following arguments:
- -i (aka –include): used to output HTTP response header information. This will be important when the content of the HTTP Location header is required for subsequent requests.
- -k (aka –insecure) is used to avoid any issues resulting from the use of demonstration SSL certificates.
- -u (aka –user) is used to provide the credentials to be used when the client is challenged by the gateway.
- Note that most of the samples do not use the cookie features of cURL for the sake of simplicity. Therefore we will pass in user credentials with each curl request to authenticate.
-
From the host where Knox is running, send the below curl request to 8443 port where Knox is running to run
lscommand on/dir in HDFS:
curl -ik -u sales1:BadPass#1 https://localhost:8443/gateway/default/webhdfs/v1/?op=LISTSTATUS
-
This should return json object containing list of dirs/files located in root dir and their attributes
-
To avoid passing password on command prompt you can pass in just the username (to avoid having the password captured in the shell history). In this case, you will be prompted for the password
curl -ik -u sales1 https://localhost:8443/gateway/default/webhdfs/v1/?op=LISTSTATUS

## enter BadPass#1
-
For the remaining examples below, for simplicity, we are passing in the password on the command line, but feel free to remove the password and enter it in manually when prompted
-
Try the same request as hr1 and notice it fails with
Error 403 Forbidden:- This is expected since in the policy above, we only allowed sales group to access WebHDFS over Knox
curl -ik -u hr1:BadPass#1 https://localhost:8443/gateway/default/webhdfs/v1/?op=LISTSTATUS
-
Notice that to make the requests over Knox, a kerberos ticket is not needed - the user authenticates by passing in AD/LDAP credentials
-
Check in Ranger Audits to confirm the requests were audited:
- Ranger > Audit > Service type: KNOX

-
Other things to access WebHDFS with Knox
- A. Use cookie to make request without passing in credentials
- When you ran the previous curl request it would have listed HTTP headers as part of output. One of the headers will be 'Set Cookie'
- e.g.
Set-Cookie: JSESSIONID=xxxxxxxxxxxxxxx;Path=/gateway/default;Secure;HttpOnly - You can pass in the value from your setup and make the request without passing in credentials:
- Make sure you copy the JSESSIONID from a request that worked (i.e the one from sales1 not hr1)
curl -ik --cookie "JSESSIONID=xxxxxxxxxxxxxxx;Path=/gateway/default;Secure;HttpOnly" -X GET https://localhost:8443/gateway/default/webhdfs/v1/?op=LISTSTATUS-
B. Open file via WebHDFS
- Sample command to list files under /tmp:
curl -ik -u sales1:BadPass#1 https://localhost:8443/gateway/default/webhdfs/v1/tmp?op=LISTSTATUS- You can run below command to create a test file into /tmp
echo "Test file" > /tmp/testfile.txt sudo -u sales1 kinit ## enter BadPass#1 sudo -u sales1 hdfs dfs -put /tmp/testfile.txt /tmp sudo -u sales1 kdestroy- Open this file via WebHDFS
curl -ik -u sales1:BadPass#1 -X GET https://localhost:8443/gateway/default/webhdfs/v1/tmp/testfile.txt?op=OPEN-
Look at value of Location header. This will contain a long url
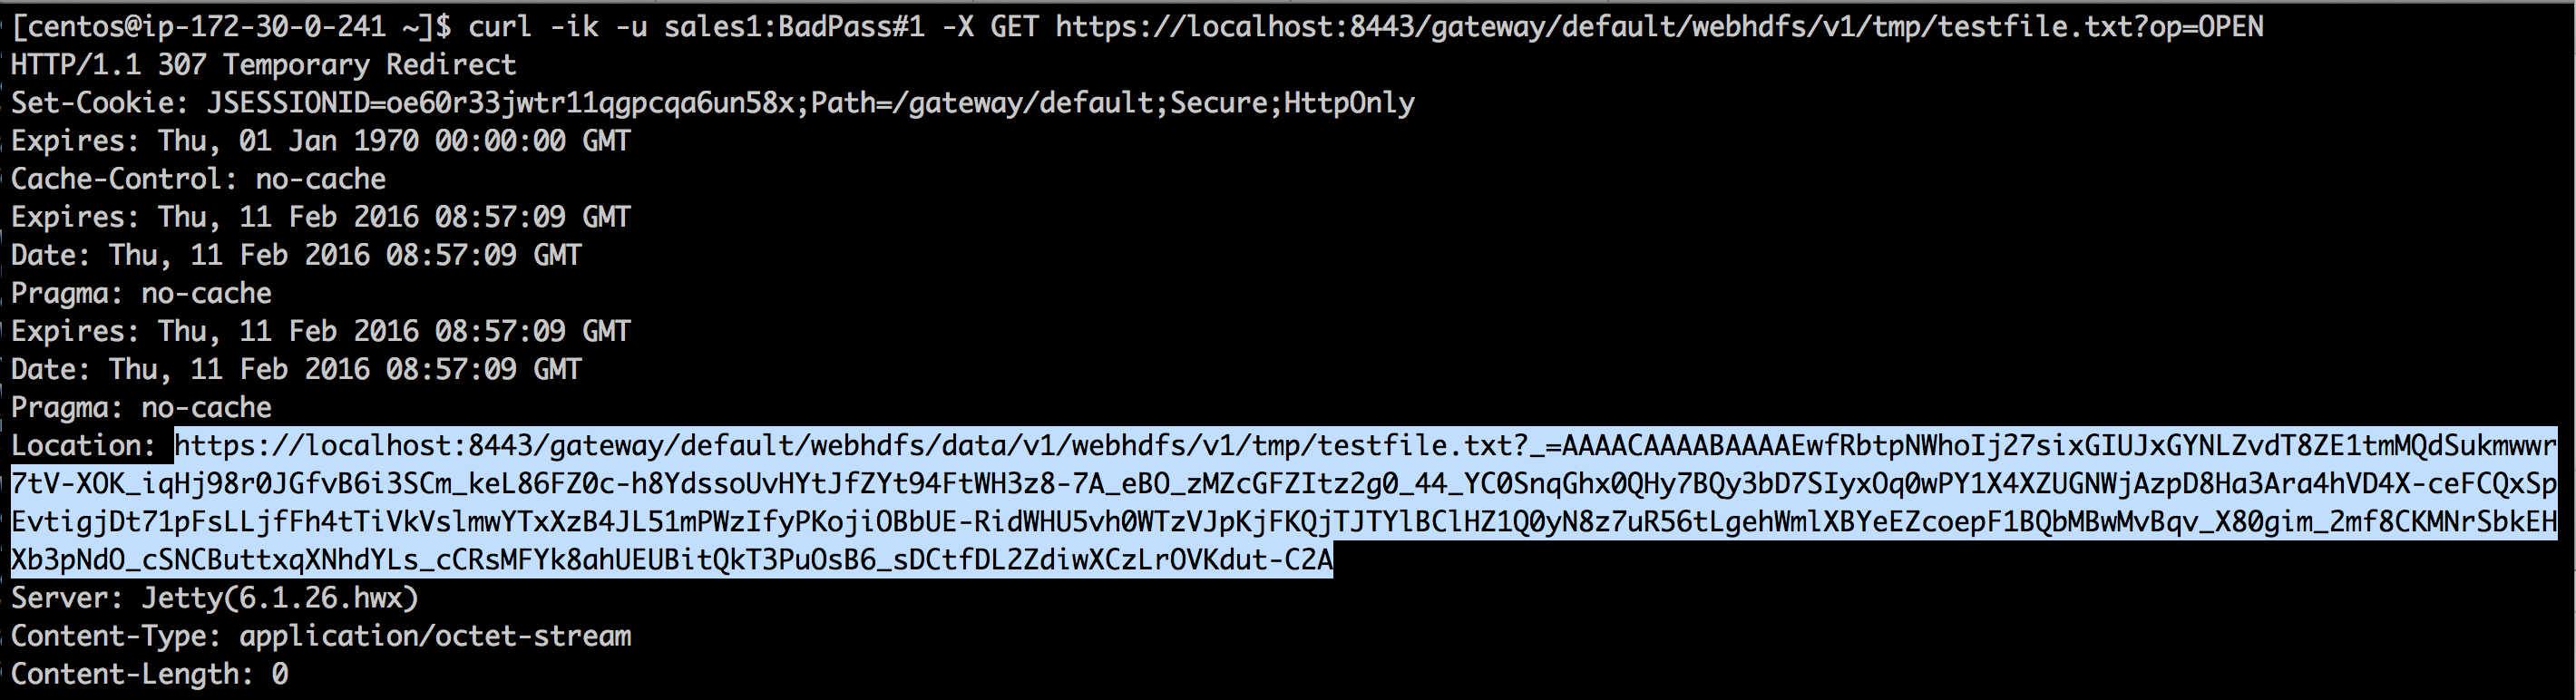
-
Access contents of file /tmp/testfile.txt by passing the value from the above Location header
curl -ik -u sales1:BadPass#1 -X GET '{https://localhost:8443/gateway/default/webhdfs/data/v1/webhdfs/v1/tmp/testfile.txt?_=AAAACAAAABAAAAEwvyZNDLGGNwahMYZKvaHHaxymBy1YEoe4UCQOqLC7o8fg0z6845kTvMQN_uULGUYGoINYhH5qafY_HjozUseNfkxyrEo313-Fwq8ISt6MKEvLqas1VEwC07-ihmK65Uac8wT-Cmj2BDab5b7EZx9QXv29BONUuzStCGzBYCqD_OIgesHLkhAM6VNOlkgpumr6EBTuTnPTt2mYN6YqBSTX6cc6OhX73WWE6atHy-lv7aSCJ2I98z2btp8XLWWHQDmwKWSmEvtQW6Aj-JGInJQzoDAMnU2eNosdcXaiYH856zC16IfEucdb7SA_mqAymZuhm8lUCvL25hd-bd8p6mn1AZlOn92VySGp2TaaVYGwX-6L9by73bC6sIdi9iKPl3Iv13GEQZEKsTm1a96Bh6ilScmrctk3zmY4vBYp2SjHG9JRJvQgr2XzgA}' -
C. Use groovy scripts to access WebHDFS
- Edit the groovy script to set:
- gateway = "https://localhost:8443/gateway/default"
- username = "sales1"
- password = "BadPass#1"
sudo vi /usr/hdp/current/knox-server/samples/ExampleWebHdfsLs.groovy- Run the script
sudo java -jar /usr/hdp/current/knox-server/bin/shell.jar /usr/hdp/current/knox-server/samples/ExampleWebHdfsLs.groovy- Notice output show list of dirs in HDFS
[app-logs, apps, ats, hdp, mapred, mr-history, ranger, tmp, user, zone_encr] - Edit the groovy script to set:
-
D. Access via browser
- Take the same url we have been hitting via curl and replace localhost with public IP of Knox node (remember to use https!) e.g. https://PUBLIC_IP_OF_KNOX_HOST:8443/gateway/default/webhdfs/v1?op=LISTSTATUS
- Open the URL via browser
- Login as sales1/BadPass#1
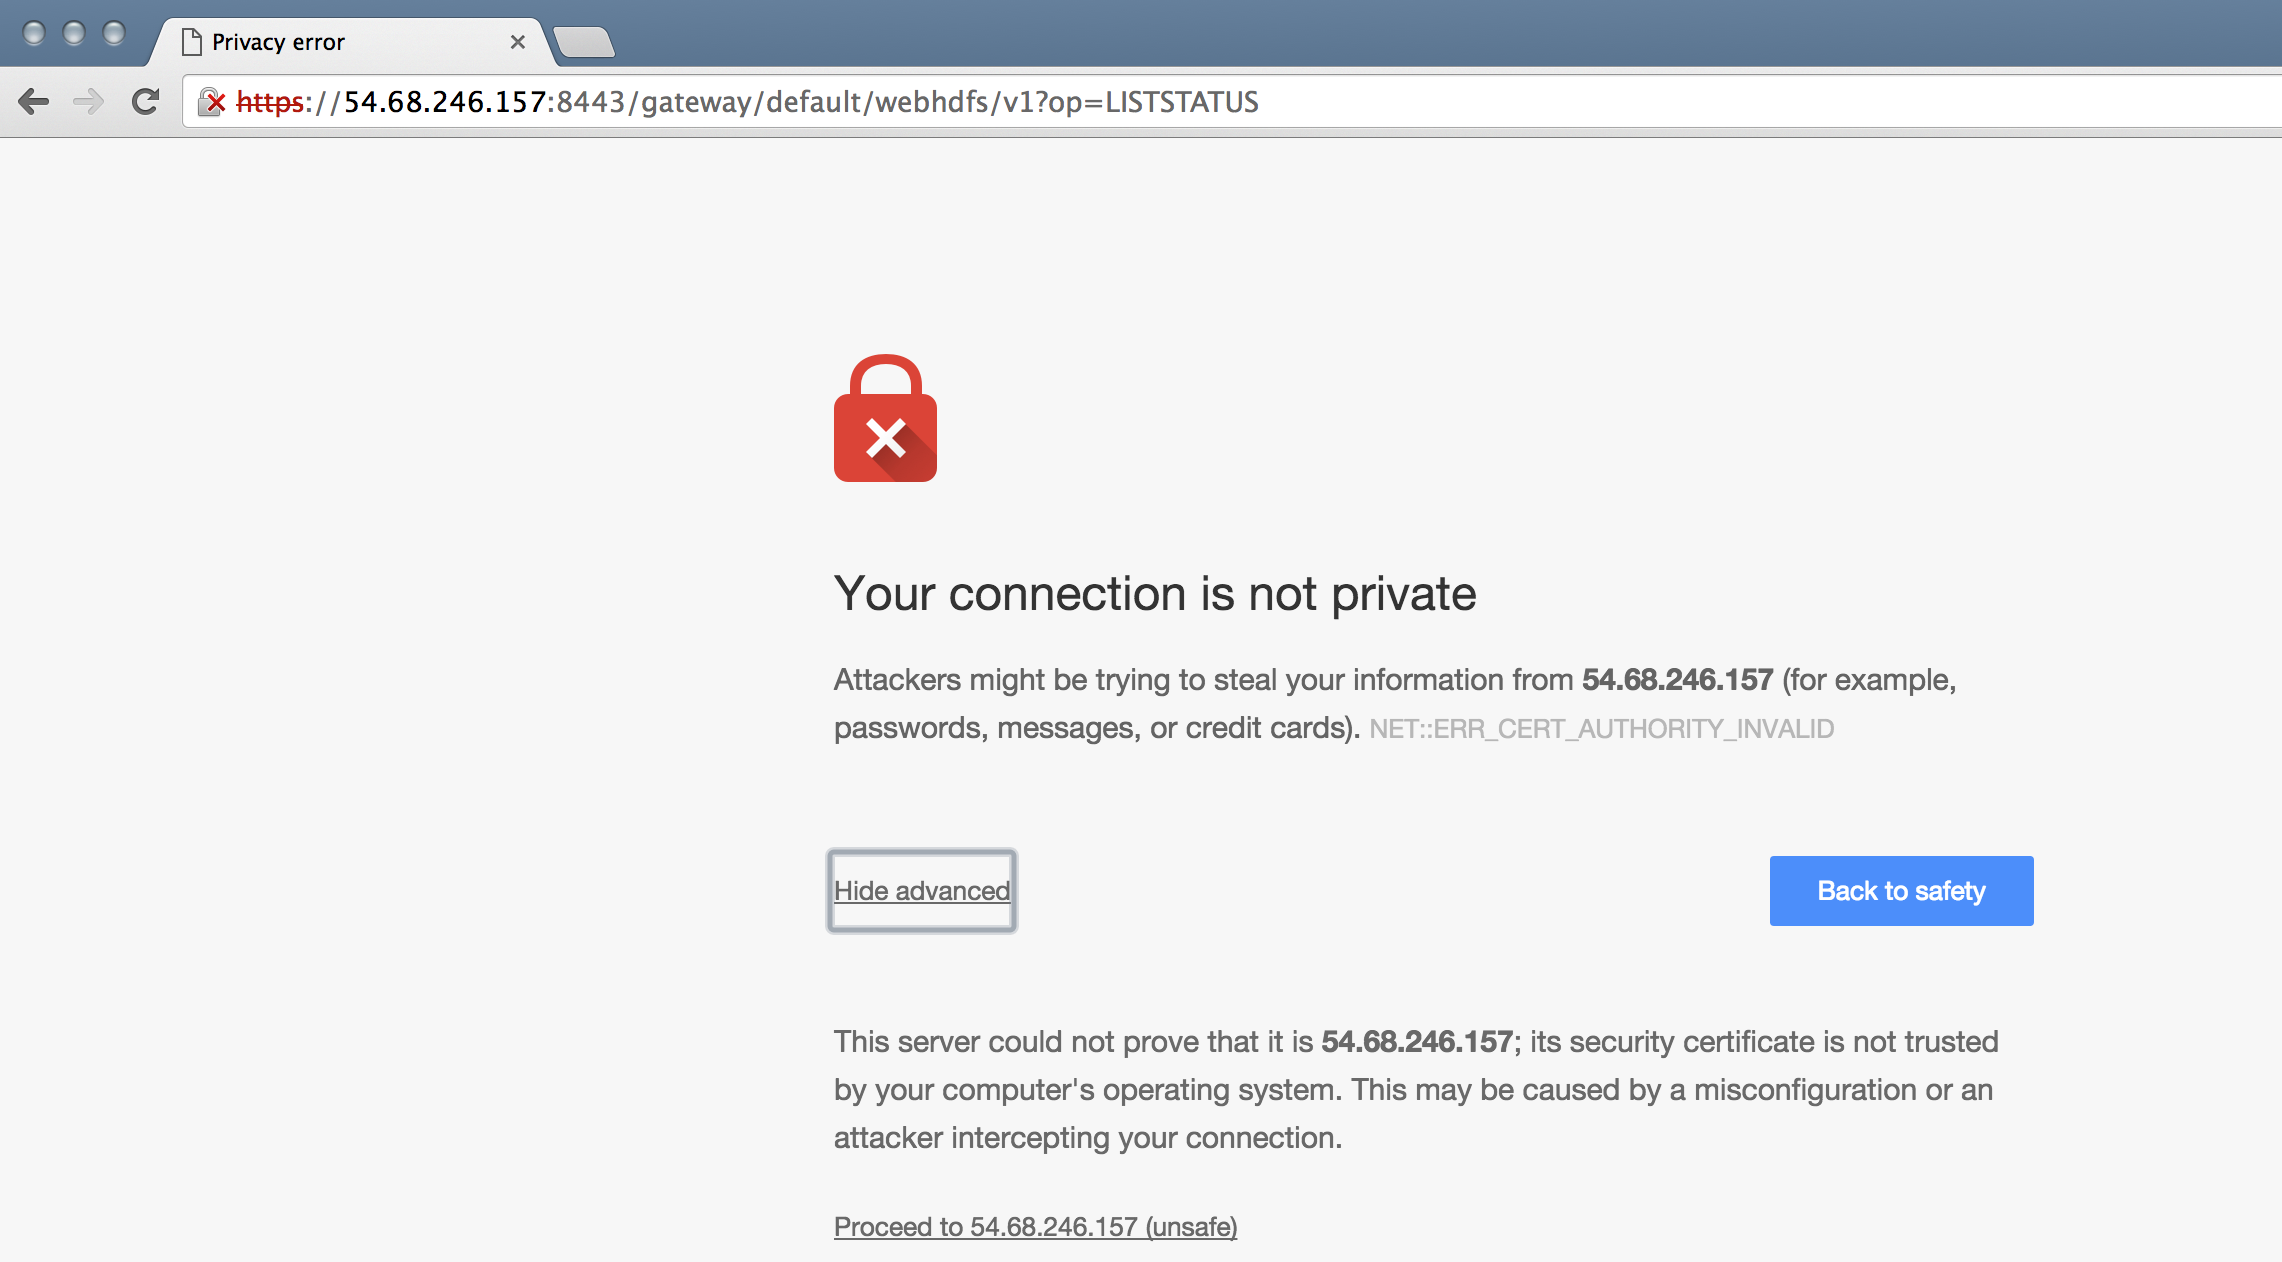
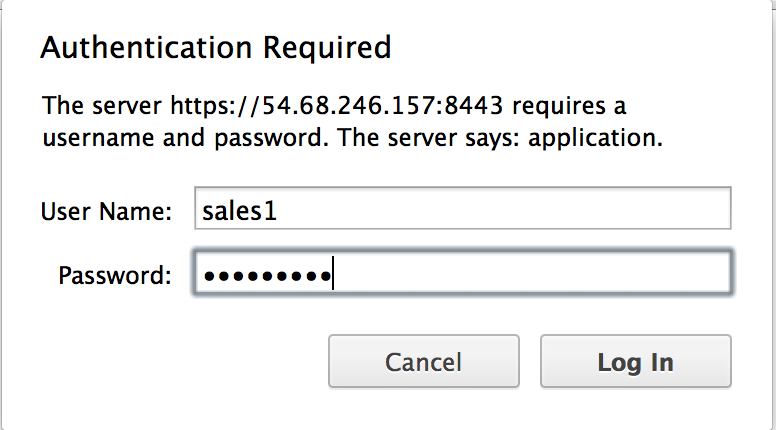
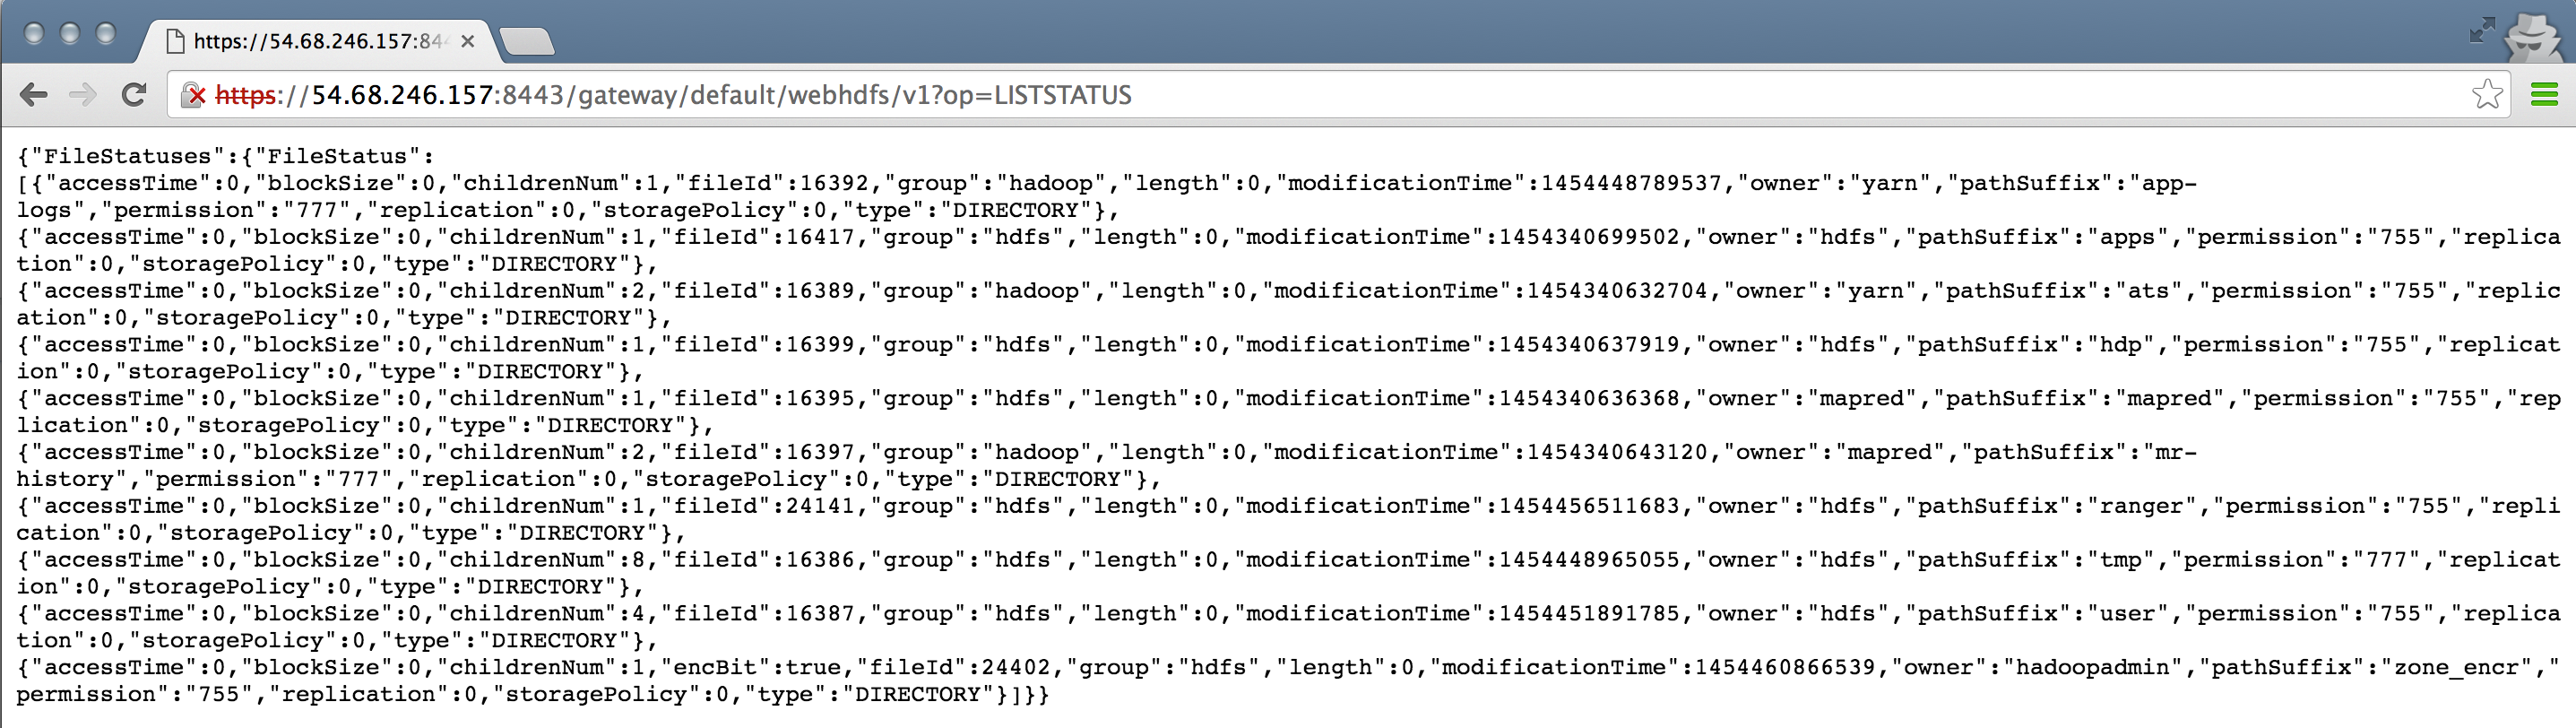
- A. Use cookie to make request without passing in credentials
-
We have shown how you can use Knox to avoid the end user from having to know about internal details of cluster
- whether its kerberized or not
- what the cluster topology is (e.g. what node WebHDFS was running)
- In Ambari, under Hive > Configs > set the below and restart Hive component.
- hive.server2.transport.mode = http
- Give users access to jks file.
- This is only for testing since we are using a self-signed cert.
- This only exposes the truststore, not the keys.
sudo chmod o+x /usr/hdp/current/knox-server /usr/hdp/current/knox-server/data /usr/hdp/current/knox-server/data/security /usr/hdp/current/knox-server/data/security/keystores
sudo chmod o+r /usr/hdp/current/knox-server/data/security/keystores/gateway.jks
-
Setup a Knox policy for sales group for HIVE by:
-
Login to Ranger > Access Manager > KNOX > click the cluster name link > Add new policy
- Policy name: hive
- Topology name: default
- Service name: HIVE
- Group permissions: sales
- Permission: check Allow
- Add
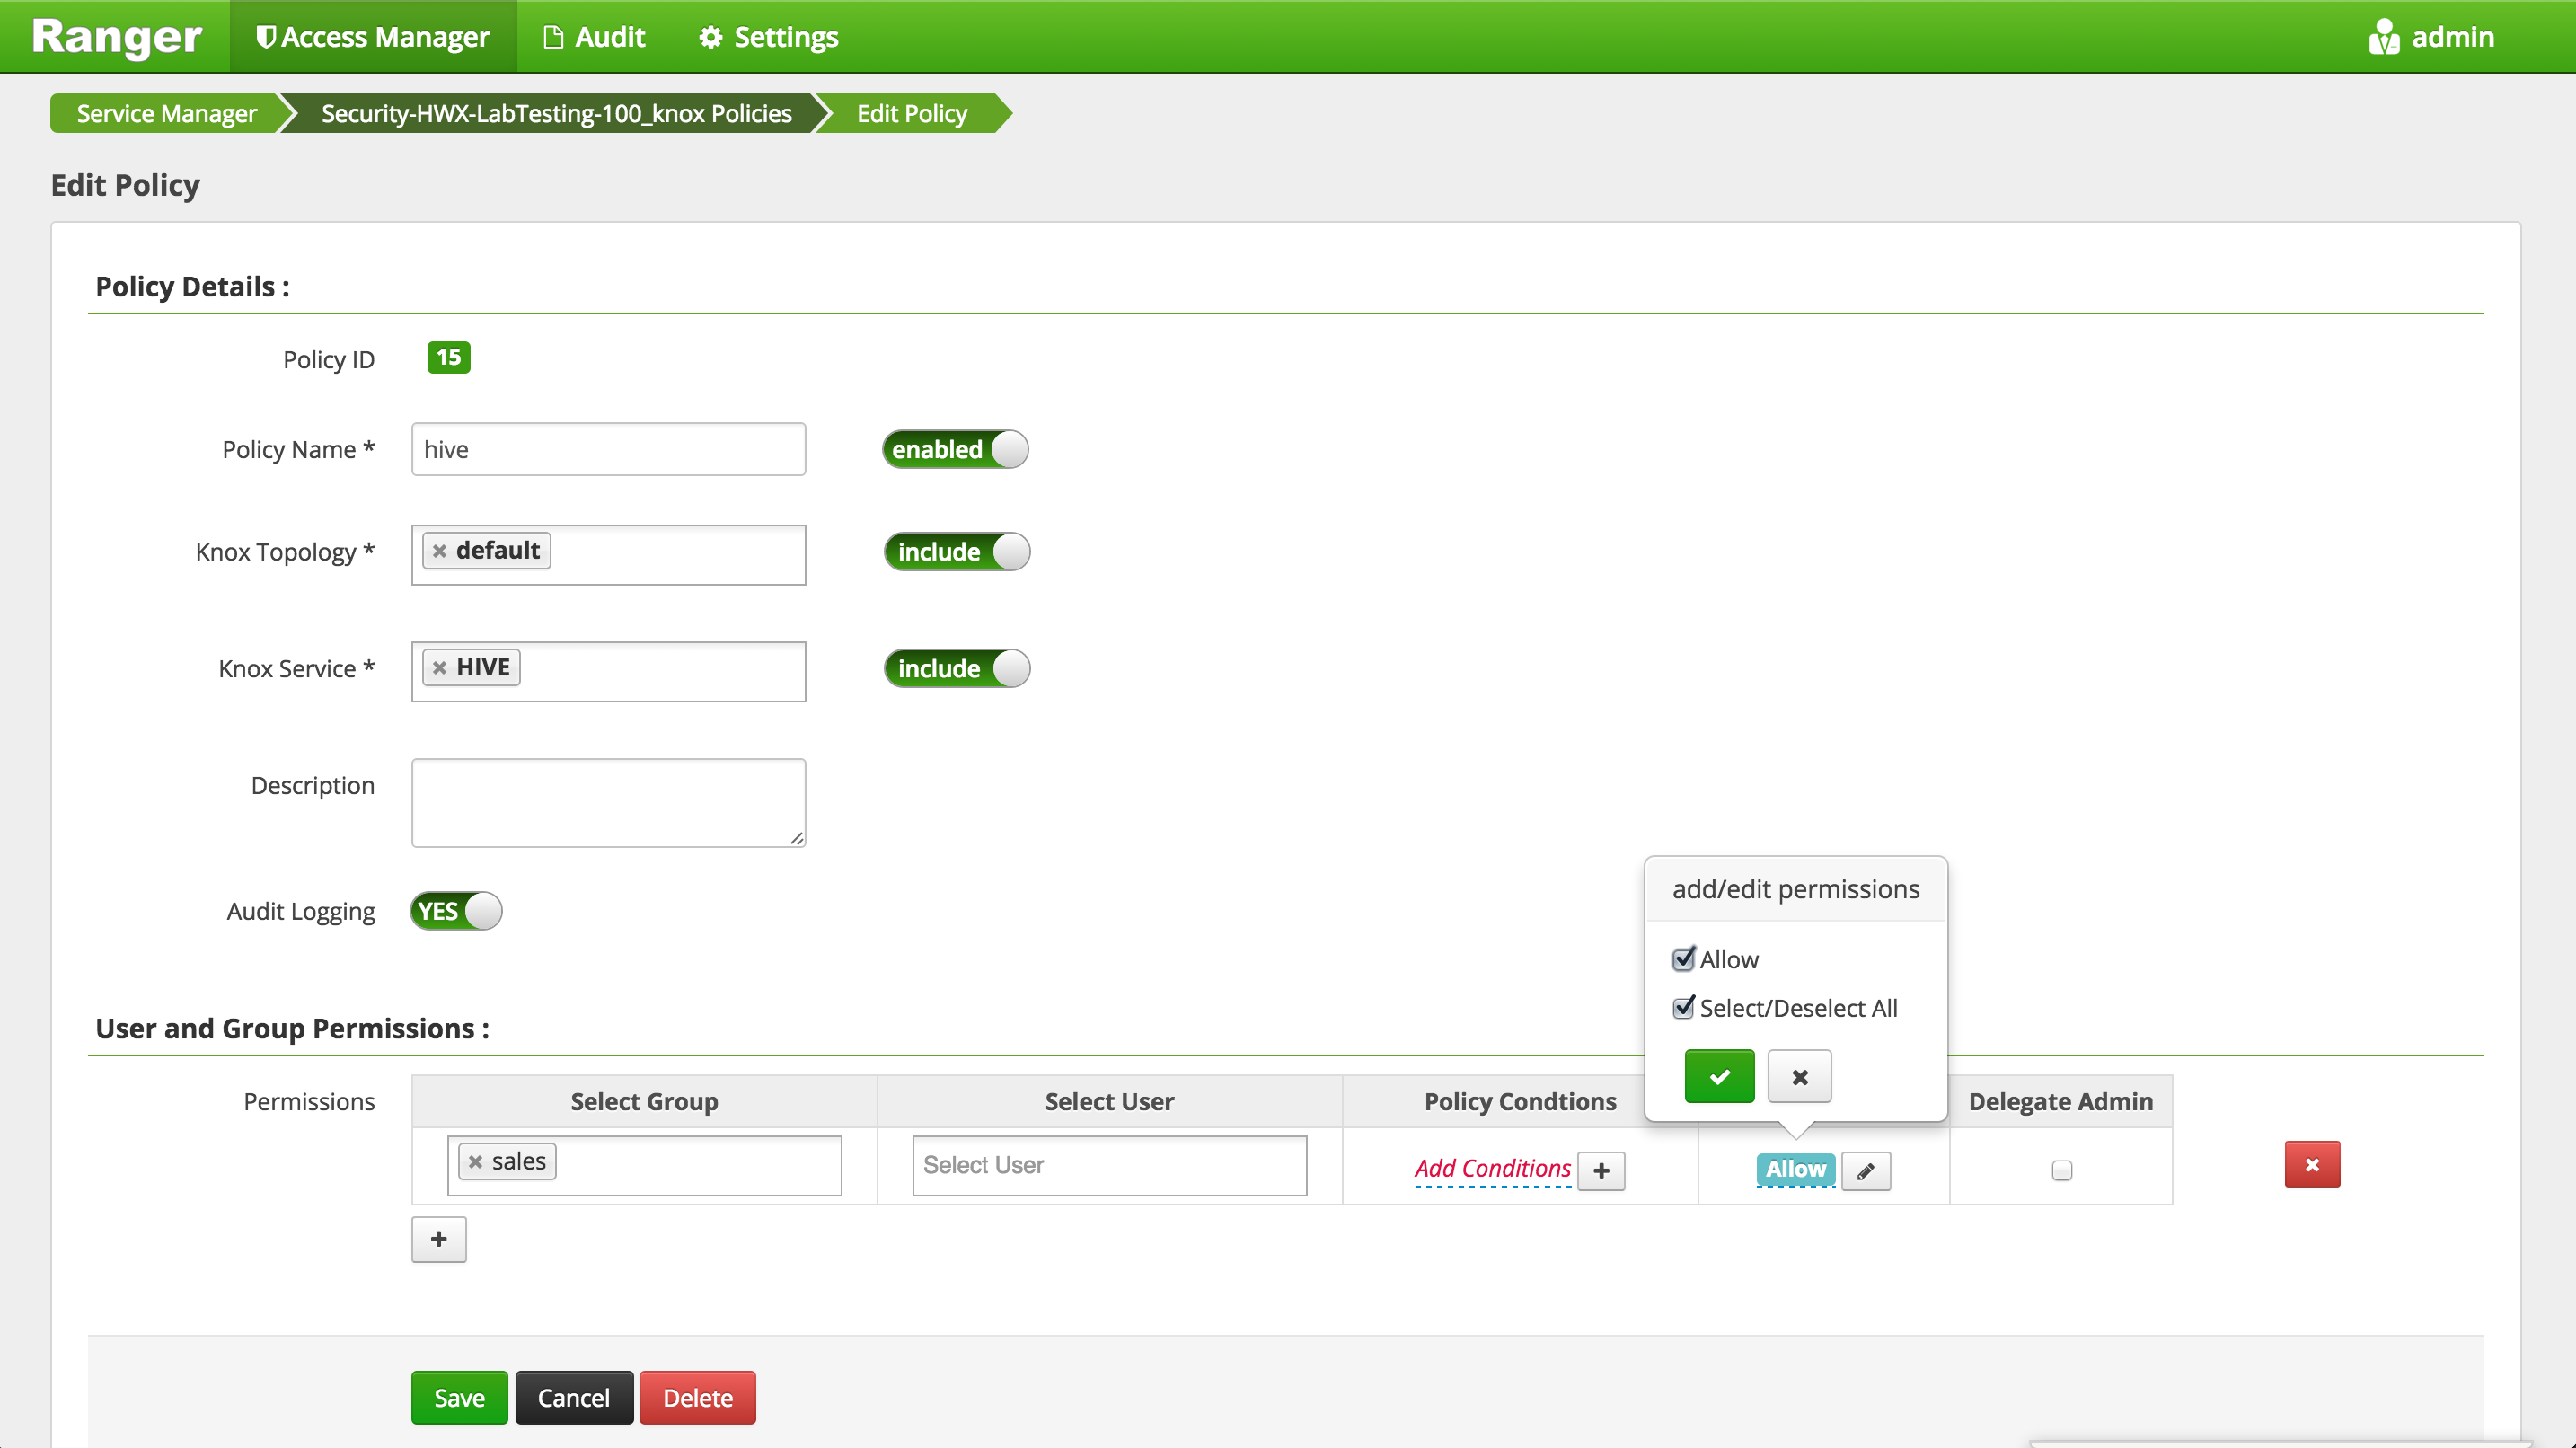
-
By default Knox will use a self-signed (untrusted) certificate. To trust the certificate:
- First on Knox node, create the /tmp/knox.crt certificate
knoxserver=$(hostname -f)
openssl s_client -connect ${knoxserver}:8443 <<<'' | openssl x509 -out /tmp/knox.crt
- On node where beeline will be run from (e.g. Hive node): - copy over the /tmp/knox.crt - easiest option is to just open it in `vi` and copy/paste the contents over: `vi /tmp/knox.crt` - trust the certificate by running the command below
sudo keytool -import -trustcacerts -keystore /etc/pki/java/cacerts -storepass changeit -noprompt -alias knox -file /tmp/knox.crt
```
- Now connect via beeline, making sure to replace KnoxserverInternalHostName first below:
```
beeline -u "jdbc:hive2://KnoxserverInternalHostName:8443/;ssl=true;transportMode=http;httpPath=gateway/default/hive" -n sales1 -p BadPass#1 ```
-
Notice that in the JDBC connect string for connecting to an secured Hive running in http transport mode:
- port changes to Knox's port 8443
- traffic between client and Knox is over HTTPS
- a kerberos principal not longer needs to be passed in
-
Test these users:
- sales1/BadPass#1 should work
- hr1/BadPass#1 should not work
- Will fail with:
Could not create http connection to jdbc:hive2://hostname:8443/;ssl=true;transportMode=http;httpPath=gateway/default/hive. HTTP Response code: 403 (state=08S01,code=0)
-
Check in Ranger Audits to confirm the requests were audited:
- Ranger > Audit > Service type: KNOX
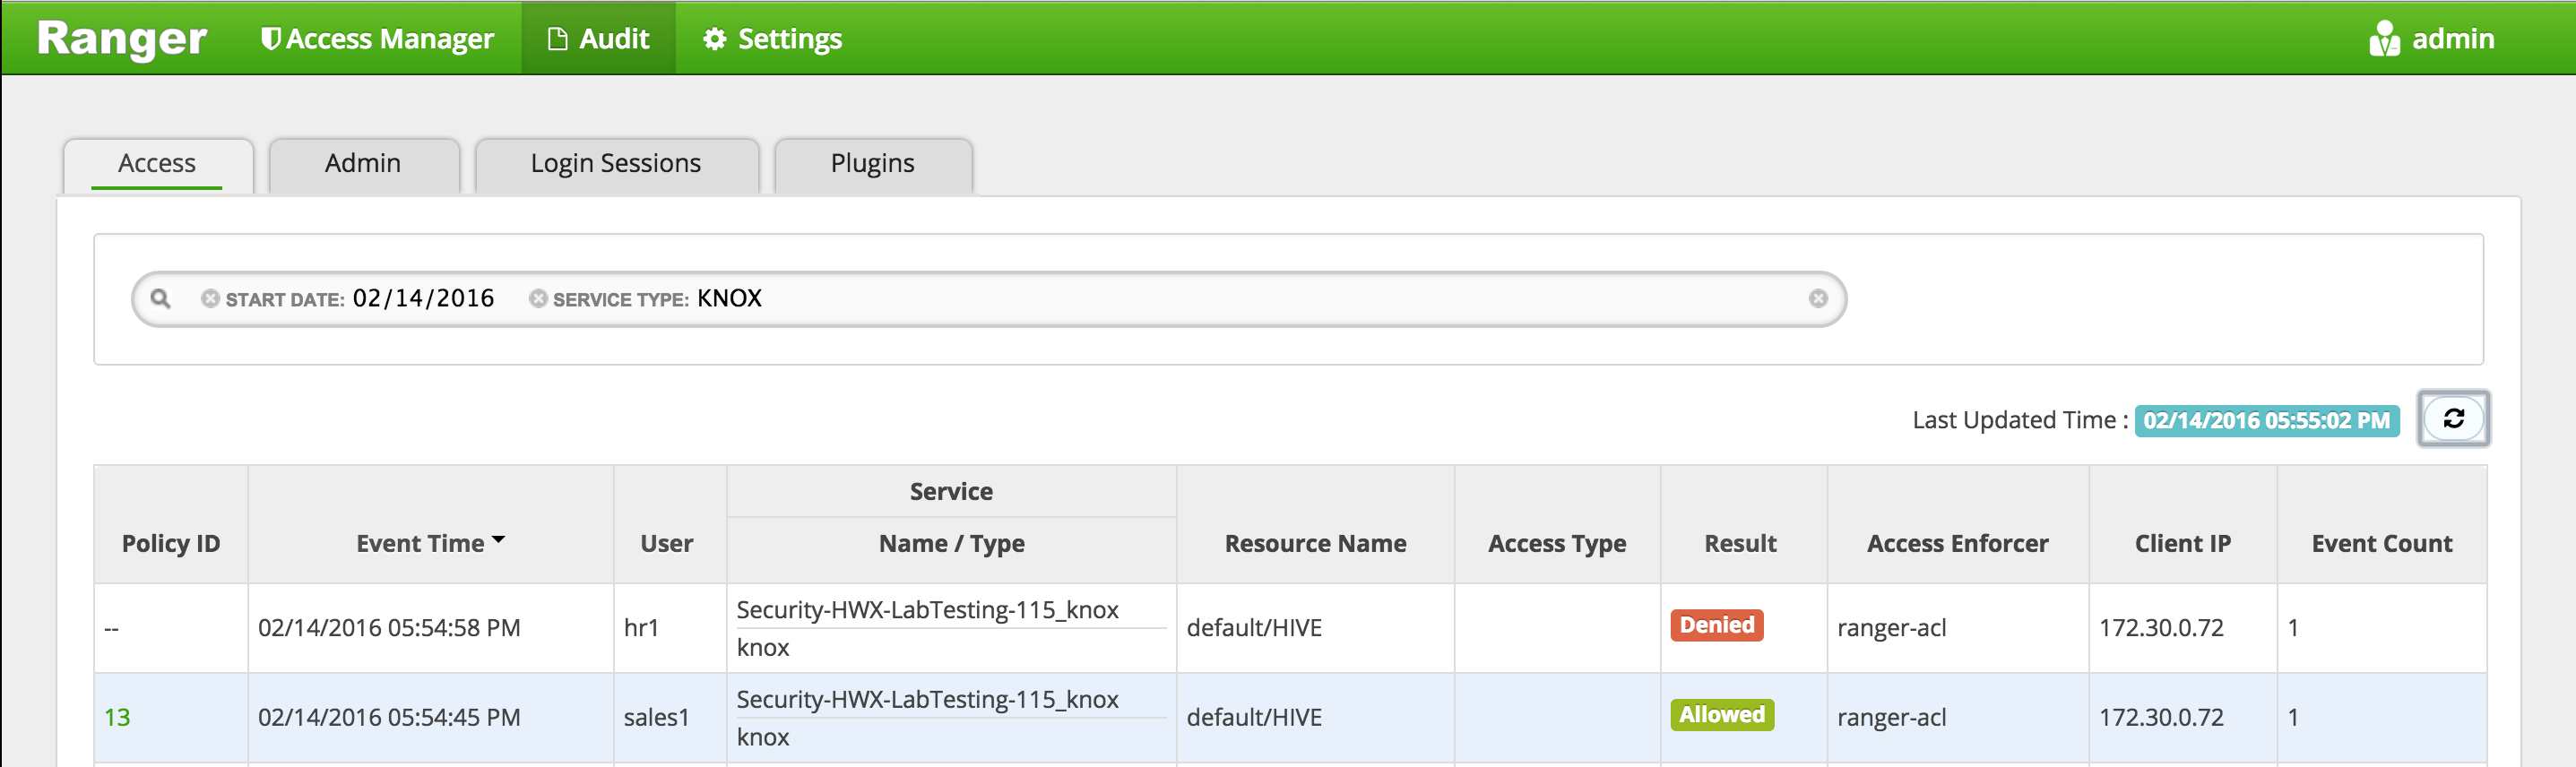
- Ranger > Audit > Service type: KNOX
-
This shows how Knox helps end users access Hive securely over HTTPS using Ranger to set authorization policies and for audits
-
Goal: In this lab we will setup Ambari views on kerborized cluster.
-
Change transport mode back to binary in Hive settings:
- In Ambari, under Hive > Configs > set the below and restart Hive component.
- hive.server2.transport.mode = binary
- In Ambari, under Hive > Configs > set the below and restart Hive component.
-
You may also need to change proxy user settings to be less restrictive
-
Option 1: Manual setup following doc
-
Option 2: Automated setup to install views
sudo su
git clone https://github.com/HortonworksUniversity/ambari-bootstrap
cd ambari-bootstrap/extras/
export ambari_user=hadoopadmin
export ambari_pass=BadPass#1
export ambari_port=8444
export ambari_protocol=https

source ambari_functions.sh
./ambari-views/create-views.sh
-
Restart HDFS and YARN via Ambari
-
Access the views:
- Files view

- Hive view
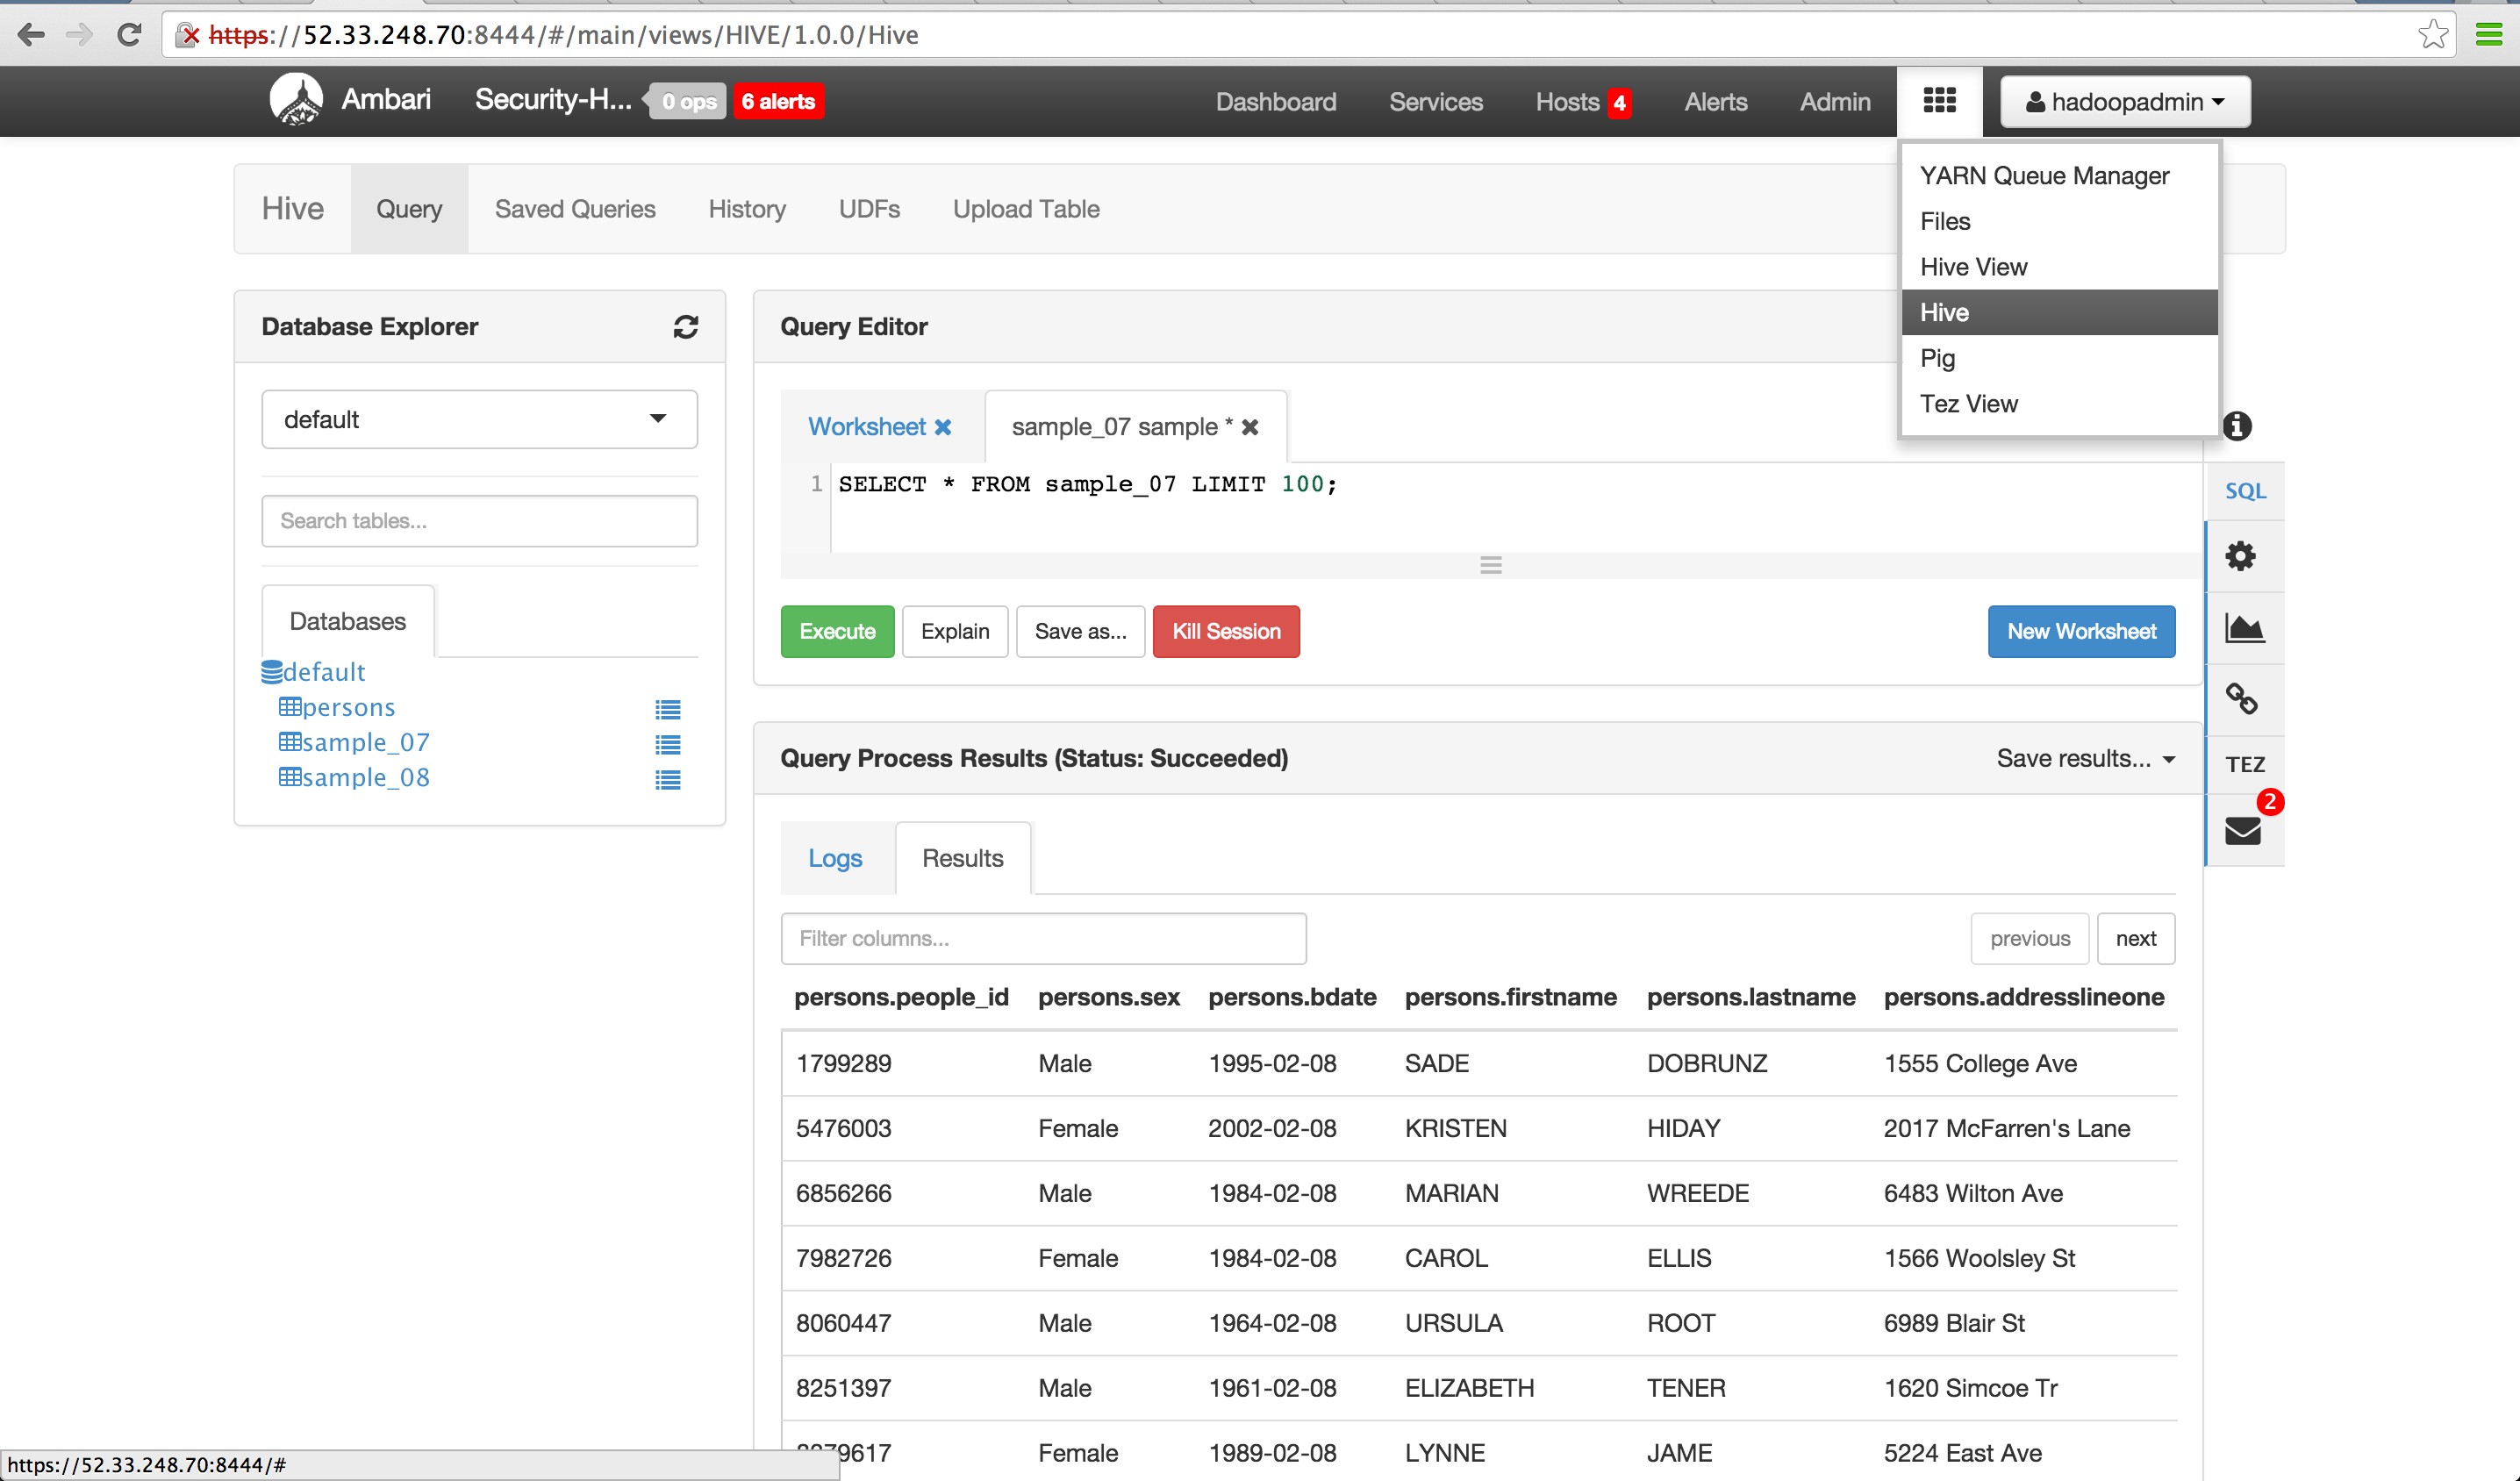
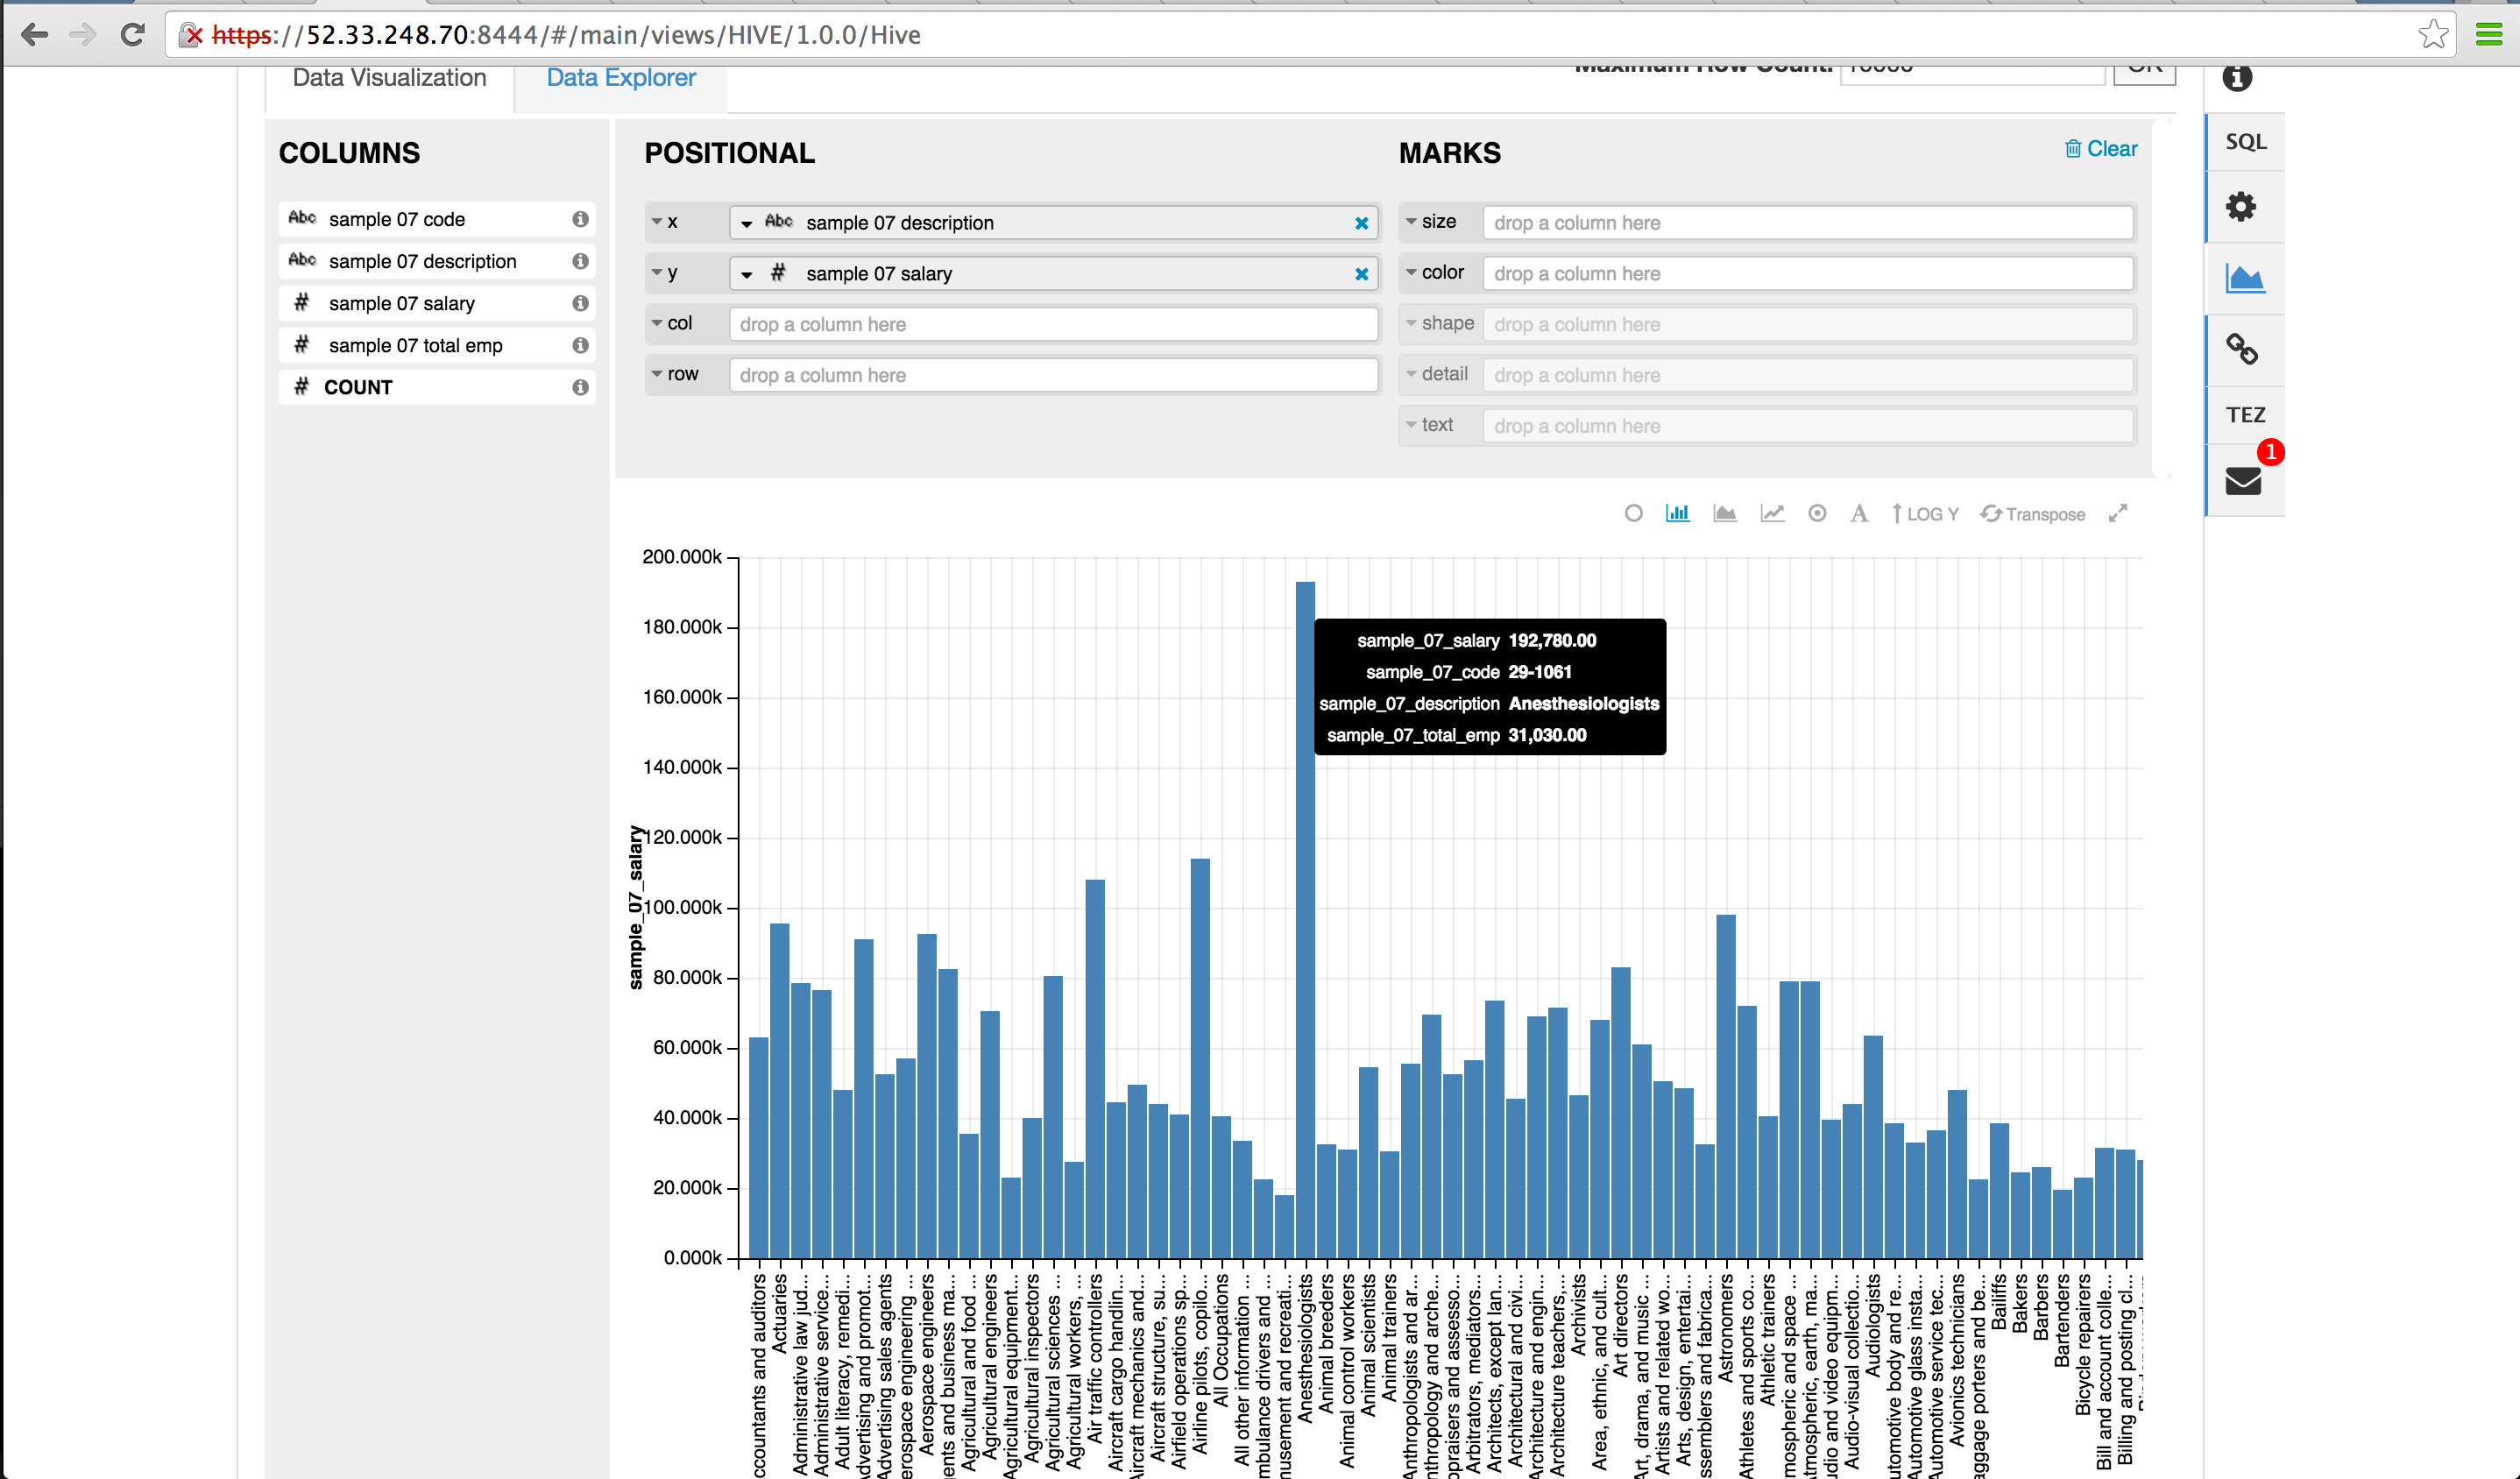
- Pig view
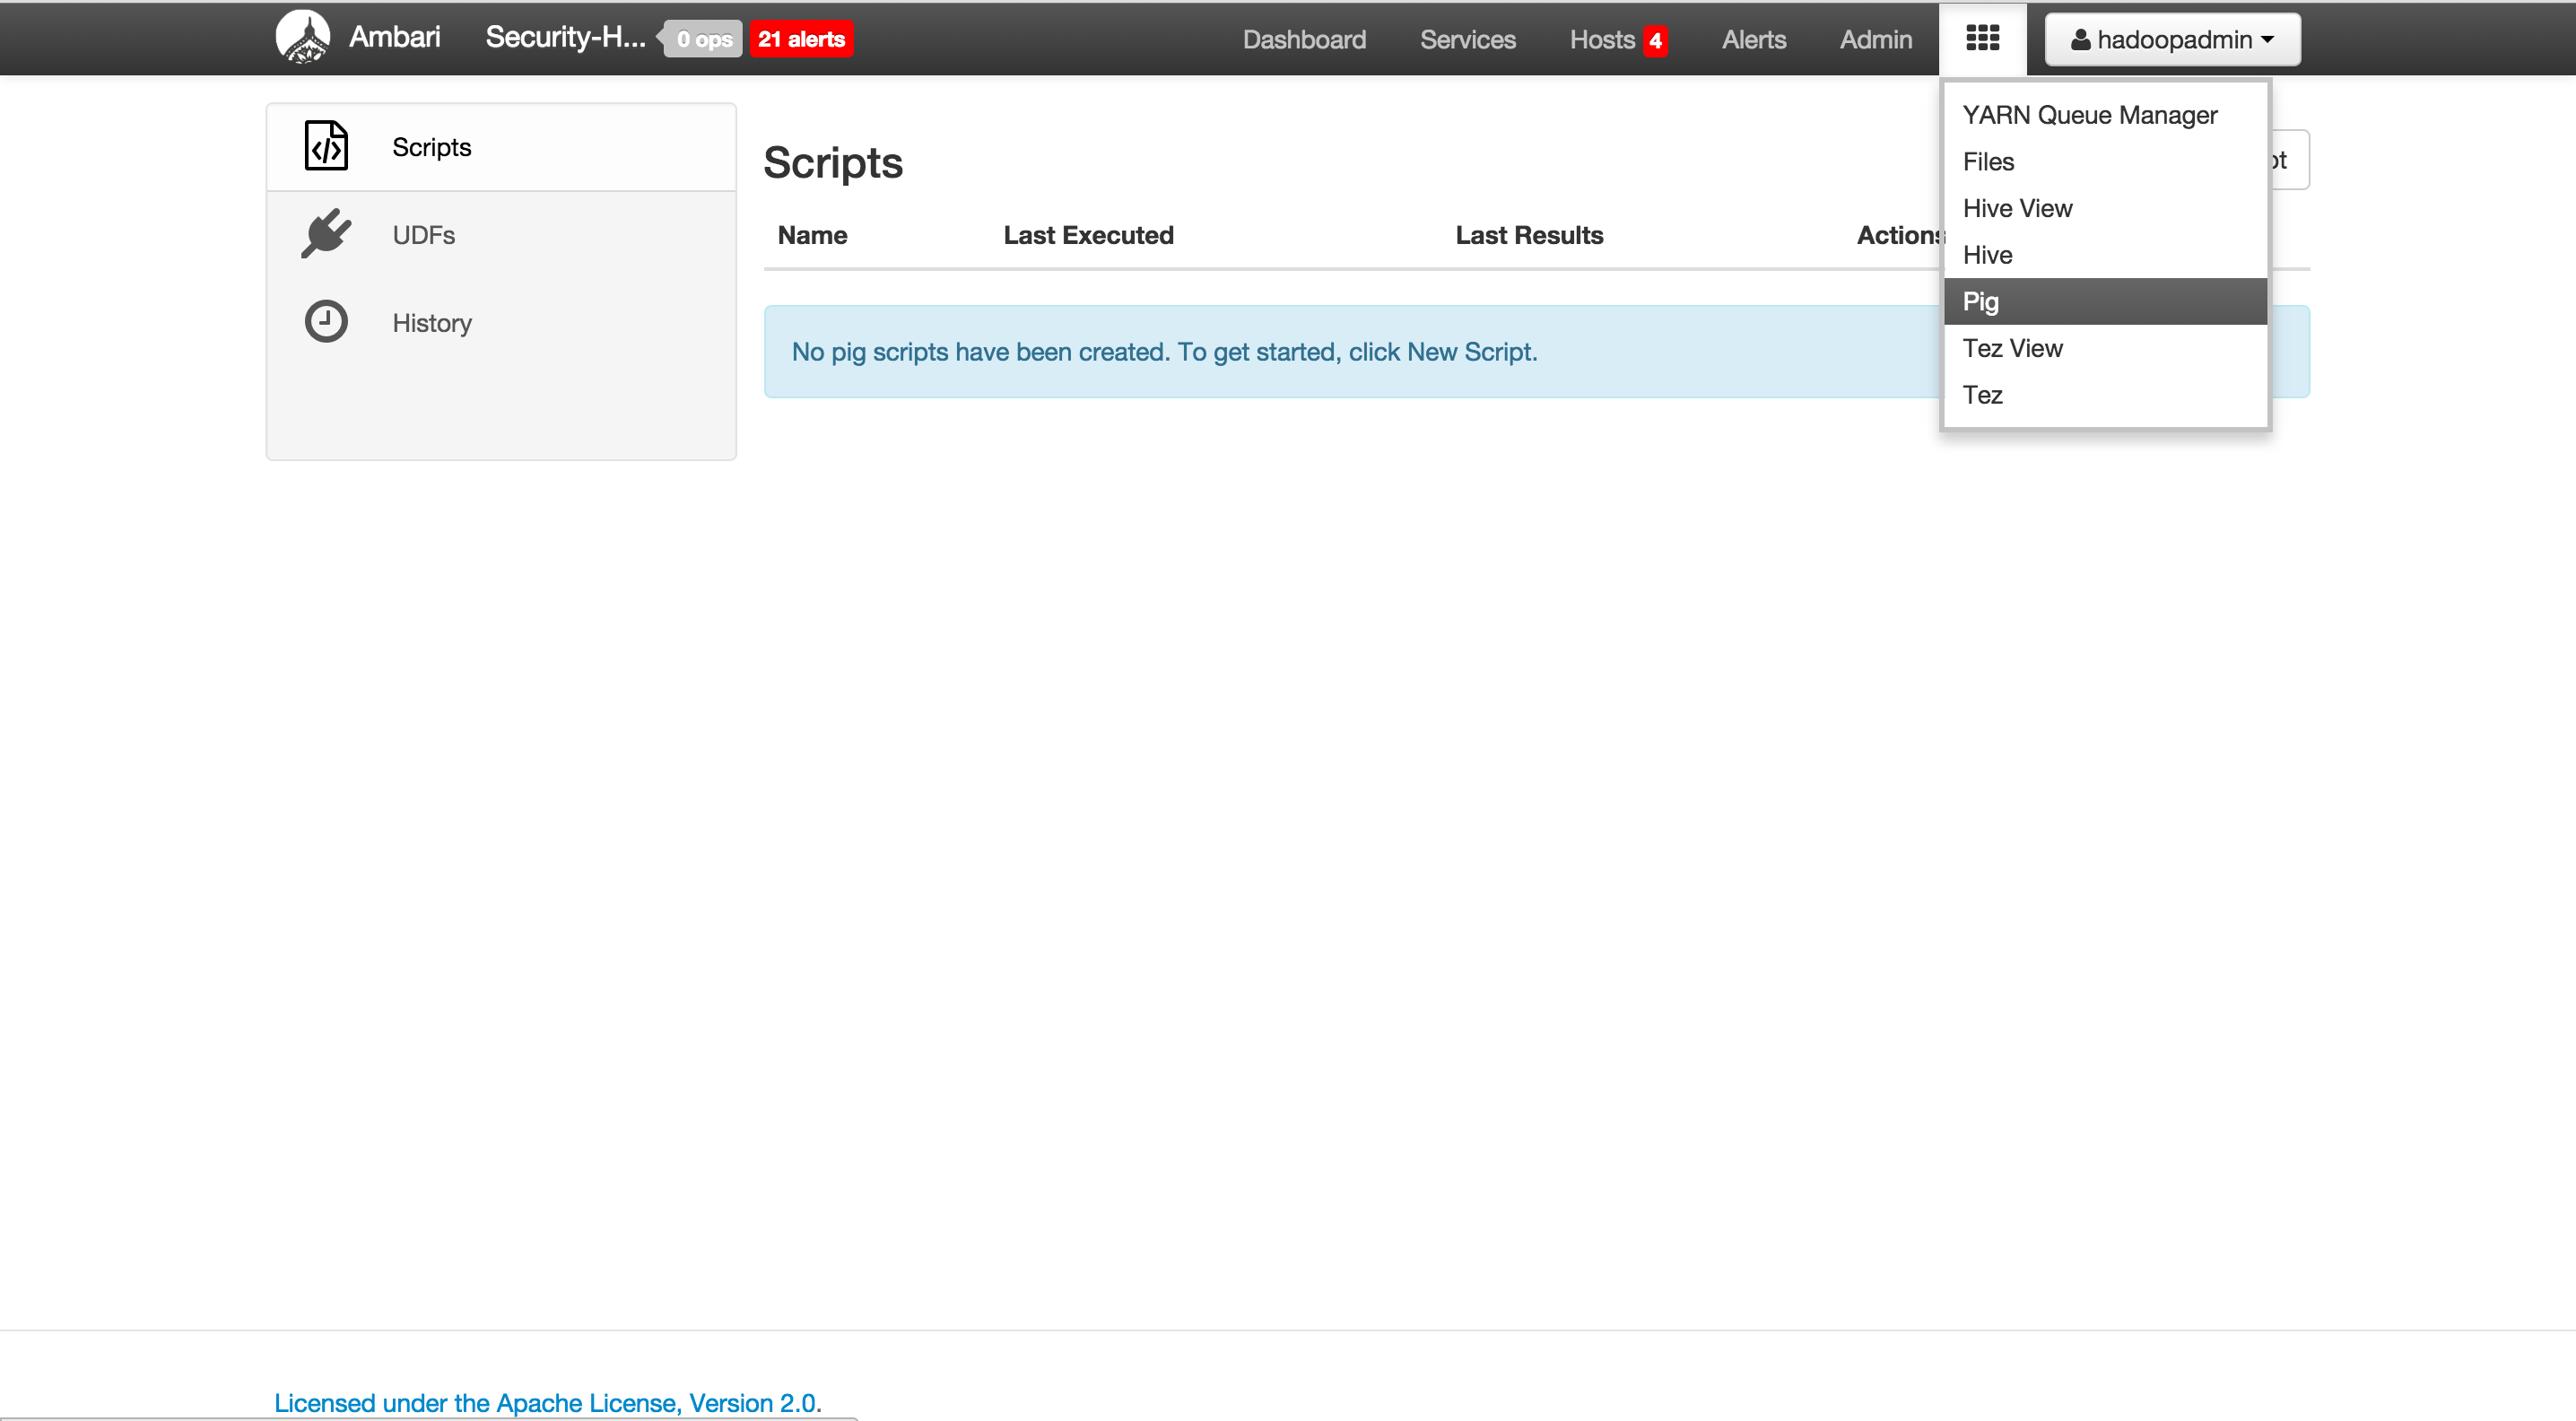
- Tez view
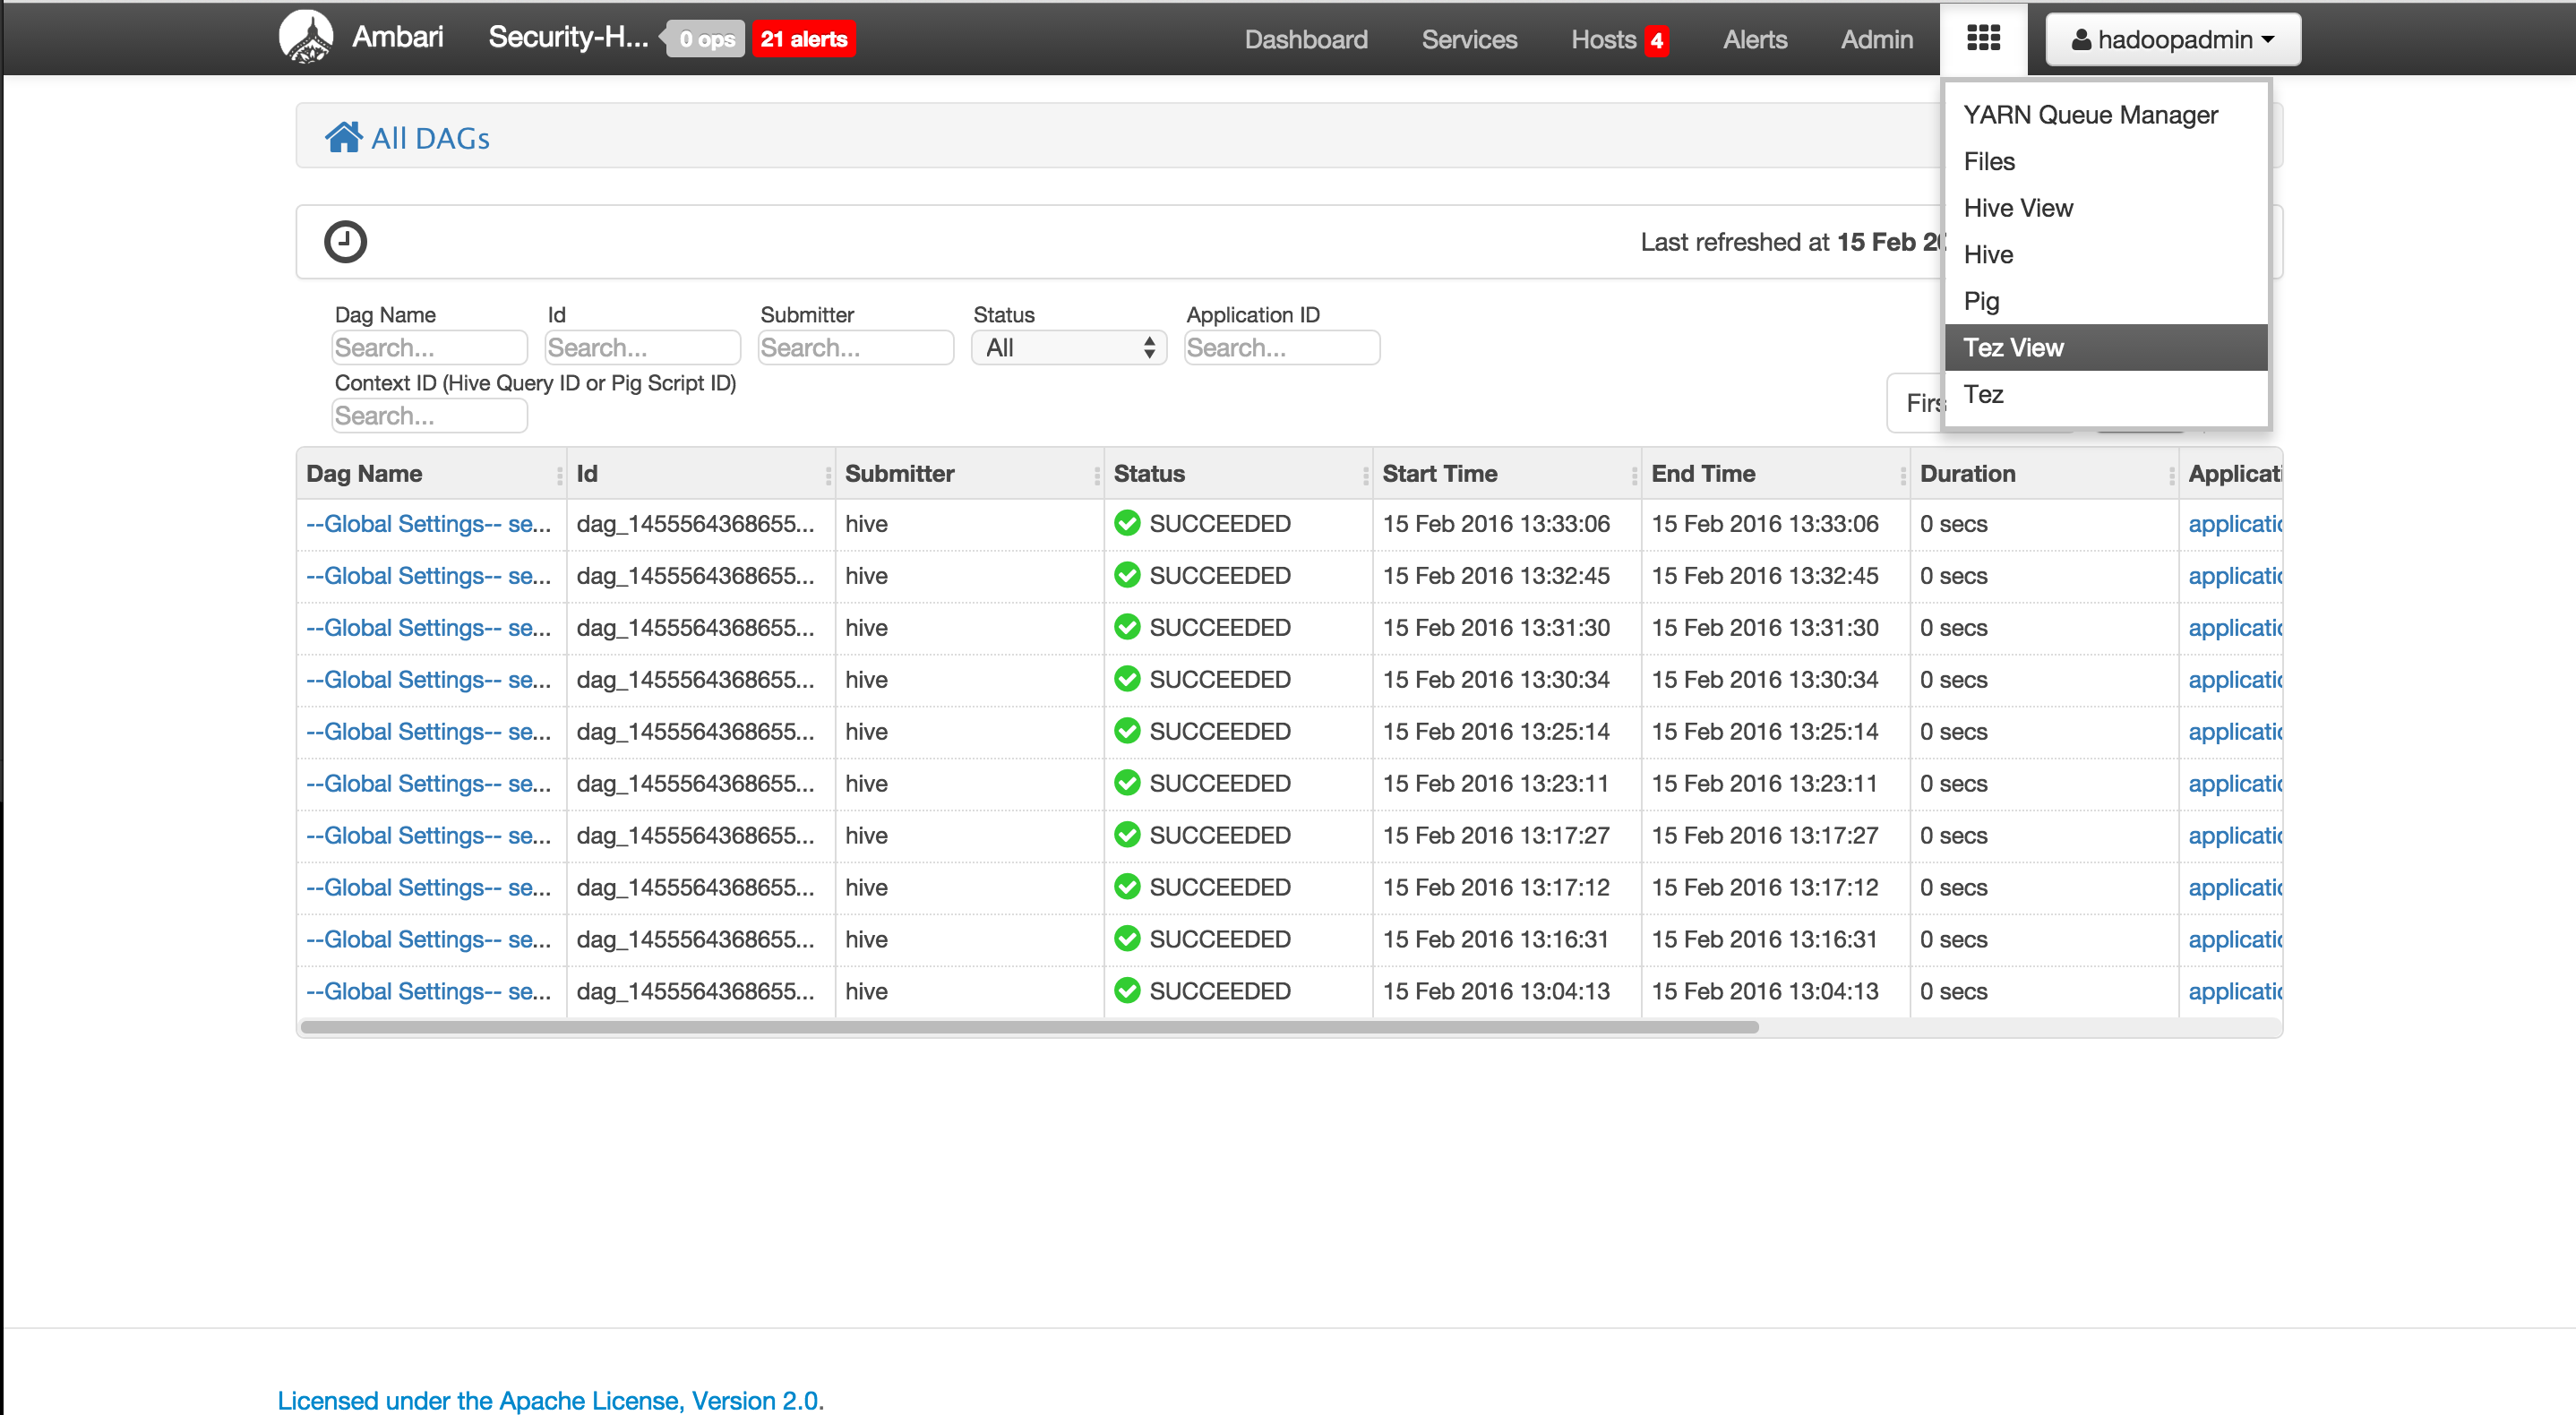

- Files view
-
In Ambari follow steps below:
- On top right of page, click "Manage Ambari"
- under 'Views': Navigate to Hive > Hive > Under 'Permissions' grant sales1 access to Hive view
- similarly you can give sales1 access to Files view
- similarly you can give others users access to various views
- On top right of page, click "Manage Ambari"
-
At this point, you should be able to login to Ambari as sales1 user and navigate to the views
-
Test access as different users (hadoopadmin, sales1, hr1 etc). You can create Ranger policies as needed to grant access to particular groups to particular resources
- Manually install Solr on each node where Zookeeper is running
export JAVA_HOME=/usr/java/default
sudo yum -y install lucidworks-hdpsearch
- Install Ambari service for Solr
VERSION=`hdp-select status hadoop-client | sed 's/hadoop-client - \([0-9]\.[0-9]\).*/\1/'`
sudo git clone https://github.com/HortonworksUniversity/solr-stack.git /var/lib/ambari-server/resources/stacks/HDP/$VERSION/services/SOLR
sudo ambari-server restart
-
Login to Ambari as hadoopadmin and wait for all the services to turn green
-
Install Solr by starting the 'Add service' wizard (using 'Actions' dropdown) and choosing Solr. Pick the defaults in the wizard except:
-
On the screen where you choose where to put Solr, use the + button next to Solr to add Solr to each host that runs a Zookeeper Server
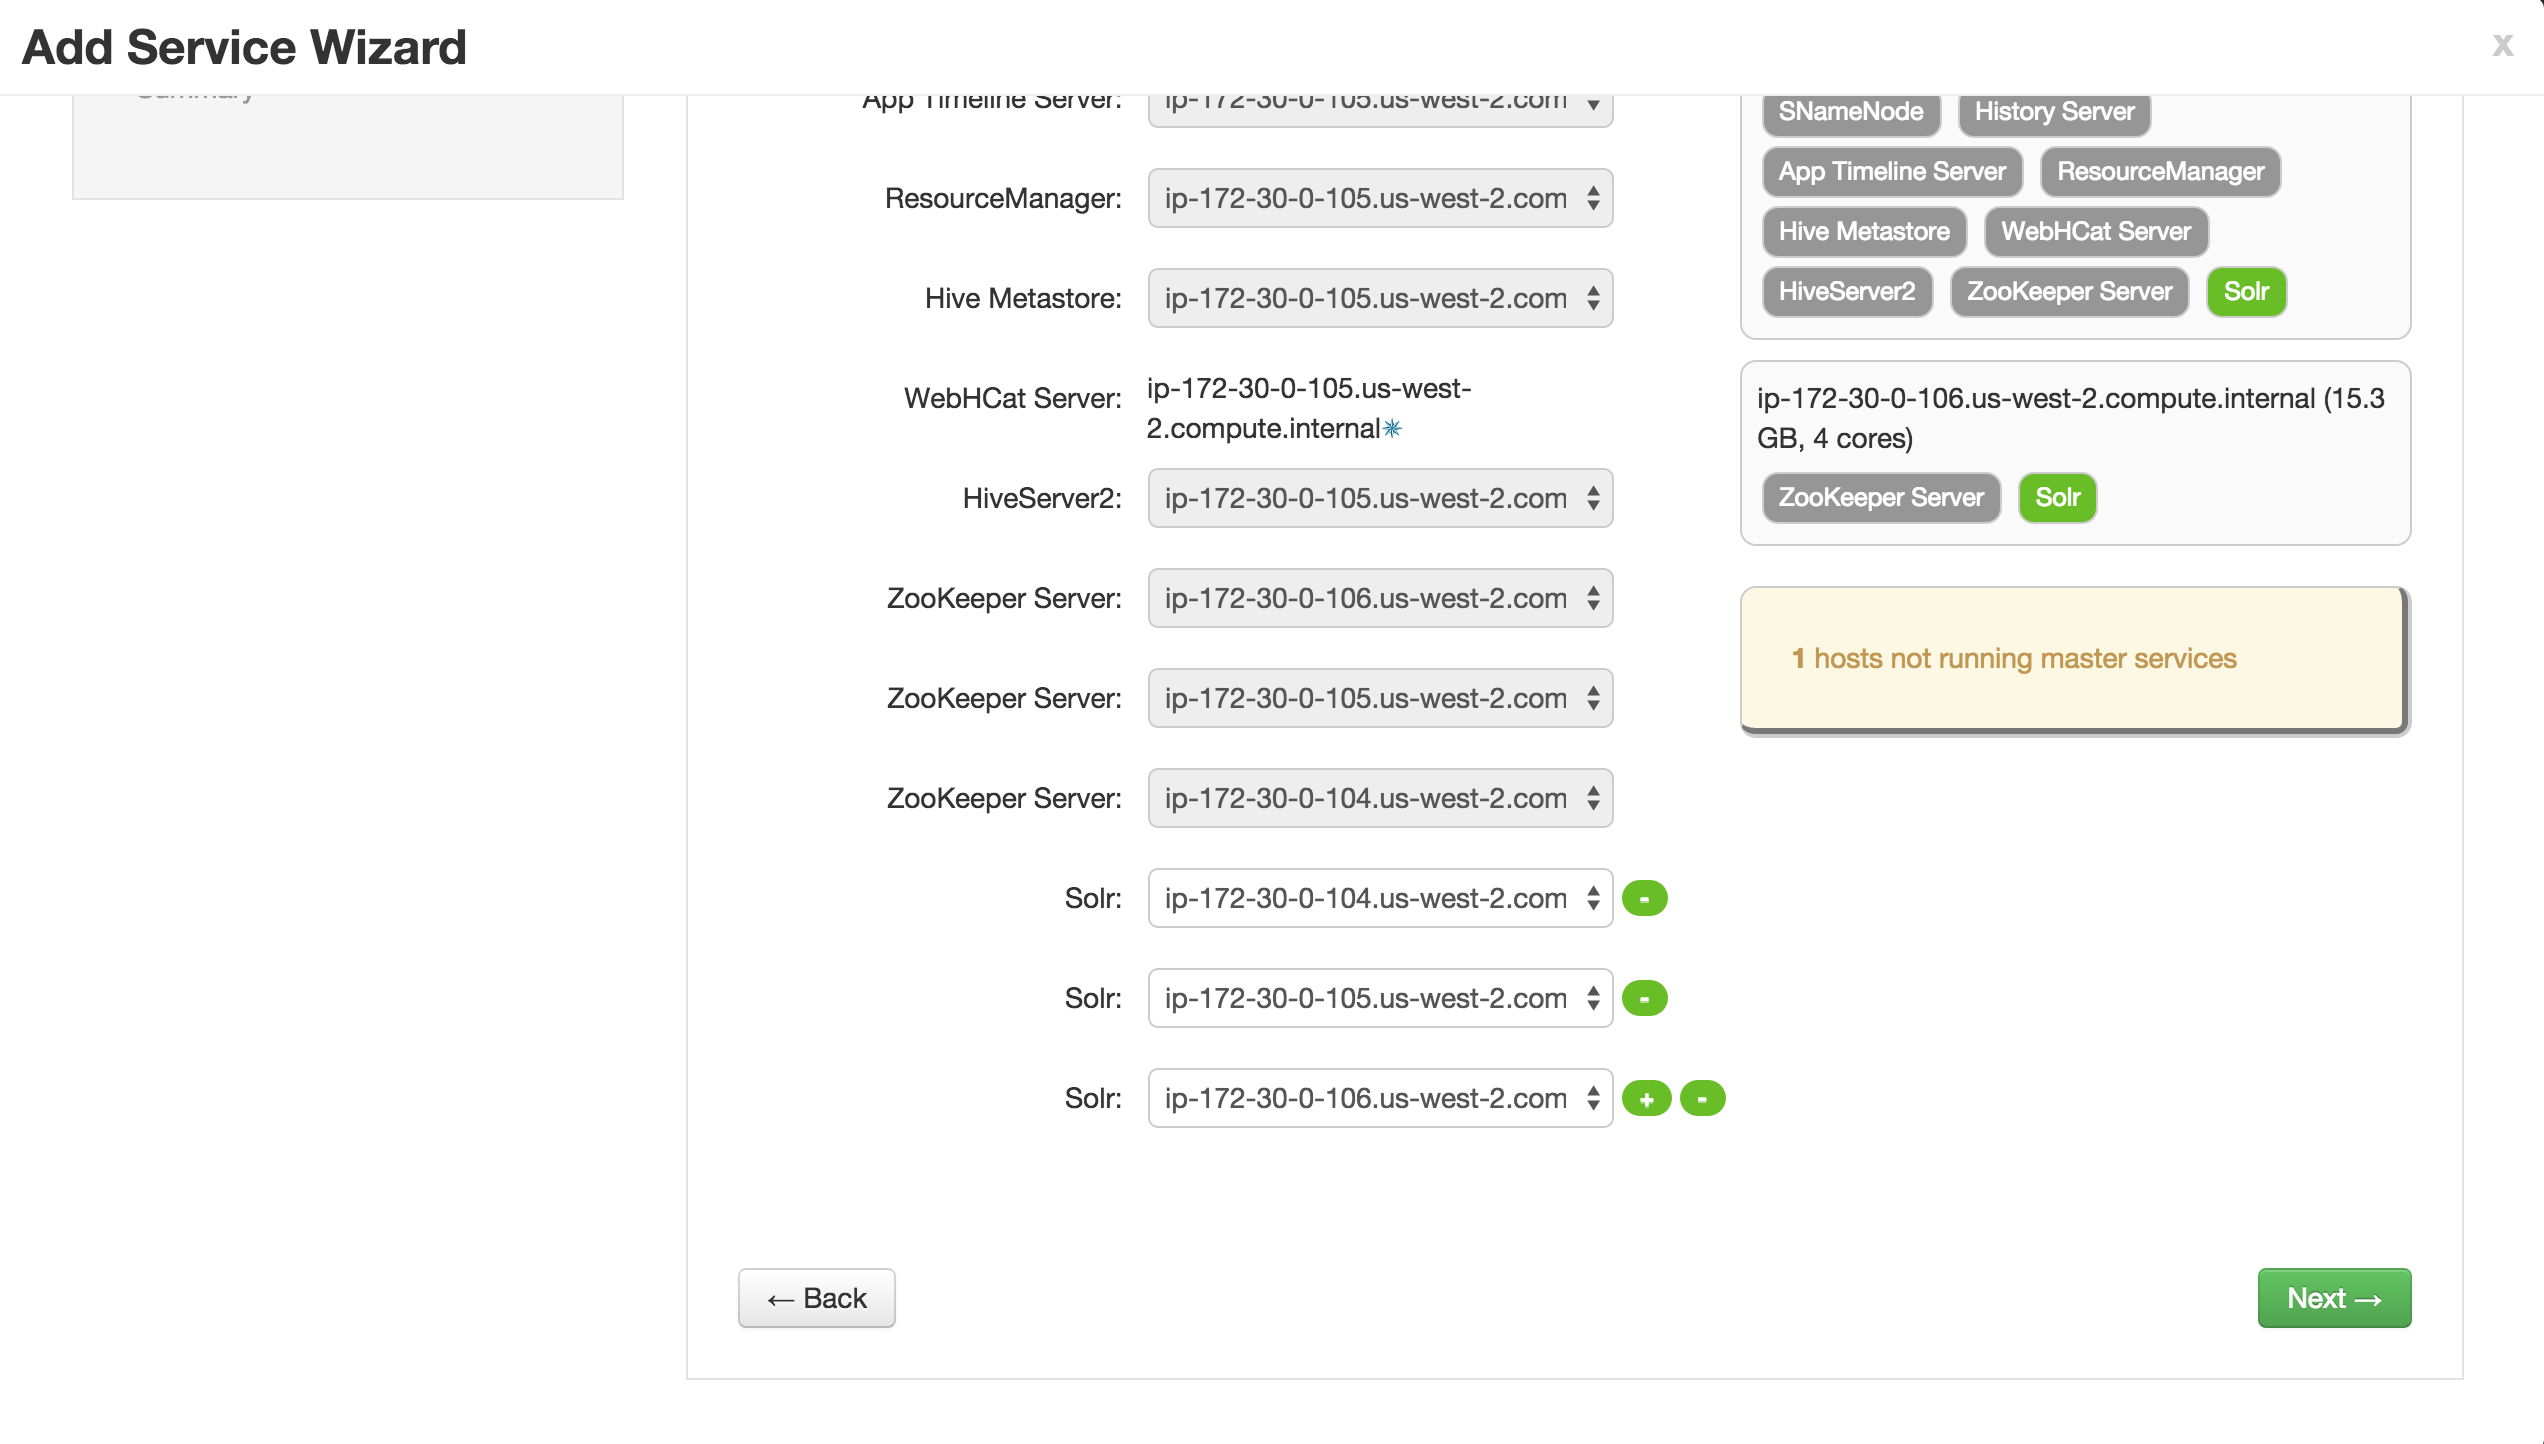
-
On the screen to Customize the Solr service
- under 'Advanced solr-config':
- set
solr.datadirto/opt/ranger_audit_server - set
solr.download.locationtoHDPSEARCH - set
solr.znodeto/ranger_audits
- set
- under 'Advanced solr-env':
- set
solr.portto6083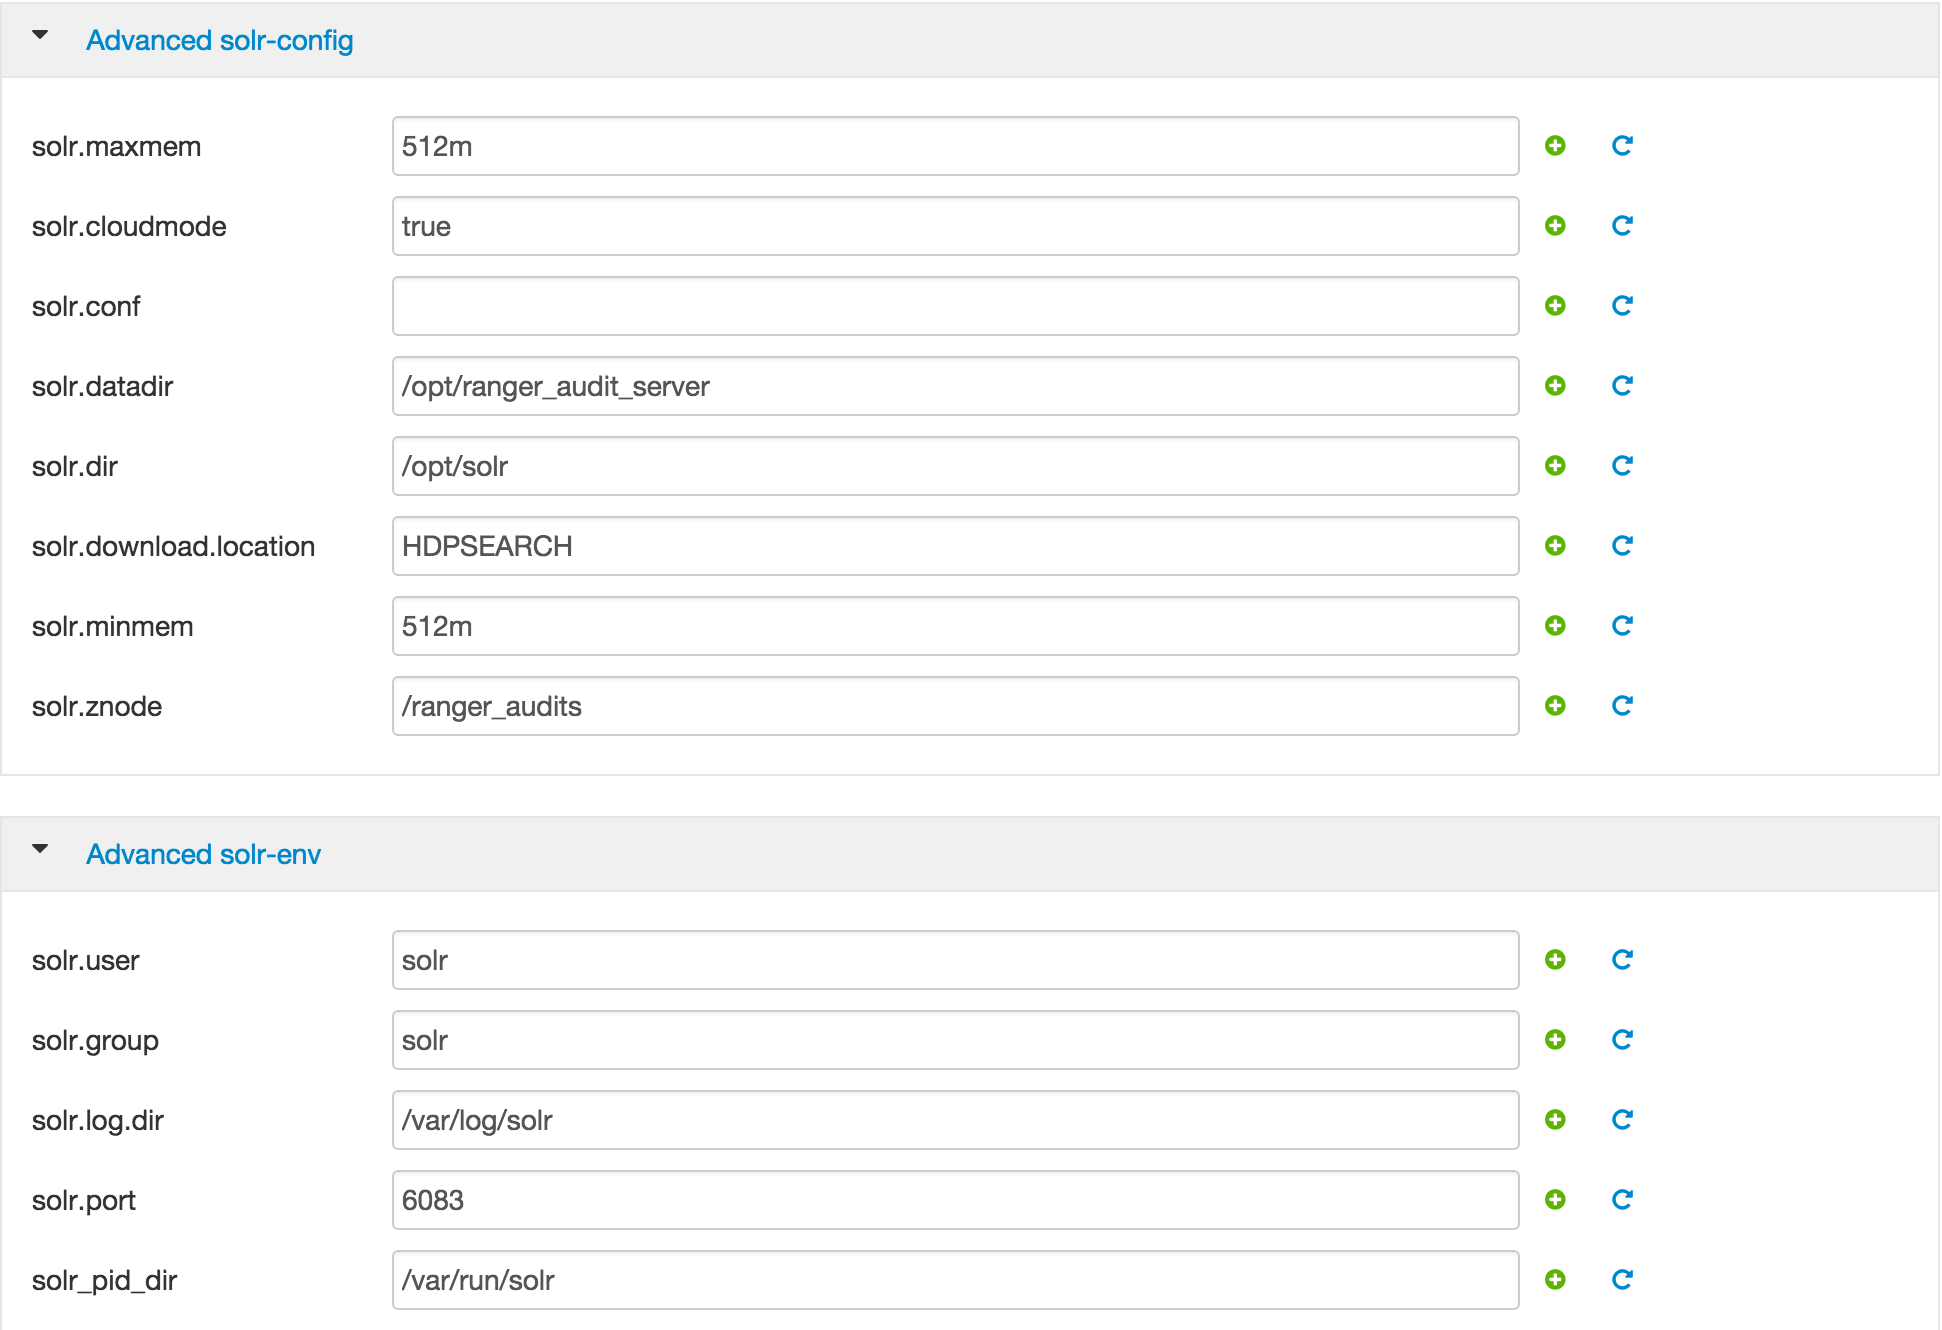
- set
- under 'Advanced solr-config':
-
-
Under Configure Identities page, you will have to enter your AD admin credentials:
- Admin principal:
hadoopadmin@LAB.HORTONWORKS.NET - Admin password: BadPass#1
- Admin principal:
-
Then go through the rest of the install wizard by clicking Next to complete installation of Solr
-
(Optional) In case of failure, run below from Ambari node to delete the service so you can try again:
export SERVICE=SOLR
export AMBARI_HOST=localhost
export PASSWORD=BadPass#1
output=`curl -u hadoopadmin:$PASSWORD -i -H 'X-Requested-By: ambari'  http://localhost:8080/api/v1/clusters`
CLUSTER=`echo $output | sed -n 's/.*"cluster_name" : "\([^\"]*\)".*/\1/p'`

#attempt to unregister the service
curl -u admin:$PASSWORD -i -H 'X-Requested-By: ambari' -X DELETE http://$AMBARI_HOST:8080/api/v1/clusters/$CLUSTER/services/$SERVICE

#in case the unregister service resulted in 500 error, run the below first and then retry the unregister API
#curl -u admin:$PASSWORD -i -H 'X-Requested-By: ambari' -X PUT -d '{"RequestInfo": {"context" :"Stop $SERVICE via REST"}, "Body": {"ServiceInfo": {"state": "INSTALLED"}}}' http://$AMBARI_HOST:8080/api/v1/clusters/$CLUSTER/services/$SERVICE

sudo service ambari-server restart

#restart agents on all nodes
sudo service ambari-agent restart