Want to make a desktop version of your Adobe Experience Manager metadata schemas for your Creative Cloud users? Now you can, with Adobe’s Common Extensibility Platform. CEP is an HTML and NodeJS based extensibility platform that’s both powerful and easy to use. CEP extensions can interact with documents and web services, enabling robust enterprise use cases for creative users. Unlike C++ extensions, CEP extensions are cross-platform and cross-version, making maintenance a breeze. You can also deploy CEP extensions using the CC Packager or command-line tools.
- Lab Overview
- Lesson 1 - Get started with CEP
- Lesson 2 - JSX Startup Script
- Lesson 3 - XMP SDK in JSX
- Lesson 4 - Bridge the gap between CEP & JSX
- Lesson 5 - Display XMP Metadata
- Lesson 6 - CEP Debugging
- CEP Package, Distribute, Install
- Useful Resources
This lab will provide you with an introduction to the structure of a CEP extension. At the conclusion of the lab, you will have a fully functional extension that works in Adobe Bridge. This extension will allow the end user to both read and change specific metadata on an asset, some of which will have been applied by AEM Assets. You will also understand how to code against the XMP libraries that underpin metadata in Creative Cloud desktop applications and AEM.
- Discover resources and examples for working with CEP
- Learn best practices for building CC extensions with CEP
- Build and deploy a custom metadata panel
Working knowledge of:
- Adobe Bridge 2018/2019
- Text Editor (VSCode)
- Google Chrome Browser
- Copy CatData_Summit_Lab in resources/todo_lab to Applications -> Adobe Bridge 2019 -> CEP -> extensions
- Review basic CEP folders structure and required files.
- Complete Manifest.xml
- Modify ExtensionID, HostList and DispatchInfo
We will go over folders structure of a CEP project and the CEP extension manifest.xml.
-
Open ../CatData_Summit_Lab/CSXS/Manifest.xml
-
Give your CEP Extension a unique identifier by modifying
ExtensionBundleId.<ExtensionManifest xmlns:xsi="http://www.w3.org/2001/XMLSchema-instance" ExtensionBundleId="com.adobe.summit19.cepmetadata" ExtensionBundleVersion="1.0" Version="9.0">
-
We must specify a list of available panel(s) by their extension ID in the
ExtensionListsection.<ExtensionList> <Extension Id="com.adobe.summit19.cepmetadata.main" Version="1.0"/> </ExtensionList>
-
Next, we define supported Adobe application and its version for this CEP extension. Each desktop application is a "host," and each has its own code and version targets. For our lab, we enable this extension on Adobe Bridge 2018 and up.
<HostList>
    <Host Name="KBRG" Version="[8.0,99.9]"/>
</HostList>
-
You define the required CEP runtime version for your target host application(s). For example, CEP Runtime version 9.0 can be run on Creative Cloud 2019 desktop apps.
<RequiredRuntimeList>
    <RequiredRuntime Name="CSXS" Version="9.0"/>
</RequiredRuntimeList>
-
Finally, we want to provide the manifest with all the panel's detail that is included within this extension. DispatchInfoList consists of individual panel information such as panel entry point, visibility, UI geometry, and etc. Modify the following:
<MainPath>= Entry Point for HTML<ScriptPath>= Path to JSX to be loaded at panel launch
<Extension Id="com.adobe.summit19.cepmetadata.main">
    <DispatchInfo>
        <Resources>
            <MainPath>./client/index.html</MainPath>
            <ScriptPath>./host/XMP.jsx</ScriptPath>
            <CEFCommandLine></CEFCommandLine>
        </Resources>
        <Lifecycle>
            <AutoVisible>true</AutoVisible>
        </Lifecycle>
        <UI>
            <Type>Embedded</Type>
            <Menu>Summit 2019 CEP Lab</Menu>
            <Geometry>
                <Size>
                    <Height>580</Height>
                    <Width>334</Width>
                </Size>
                <MaxSize>
                    <Height>800</Height>
                    <Width>1200</Width>
                </MaxSize>
                <MinSize>
                    <Height>400</Height>
                    <Width>600</Width>
                </MinSize>
            </Geometry>
        </UI>
    </DispatchInfo>
</Extension>
- Review Bridge_SelectionEvent JSX script.
- Create Event Listener in CEP to receive dispatched event from JSX.
- Enable startup script in Adobe Bridge.
In order to communicate with the Bridge application, we must enable a startup JSX script. This script will notify our CEP panel when the thumbnail selection event is detected within Adobe Bridge.
-
Open Adobe Bridge 2019 -> Preferences -> Startup Scripts
-
Click Reveal My Startup Script
-
Copy "Bridge_SelectionEvent" in ../CatData_Summit_Lab/host/startup to the startup script folder
-
Quit Adobe Bridge
-
Open ../CatData_Summit_Lab/client/js/index.js in text editor
-
Create an event listener to detect dispatched event from JSX. We will use the CSInterface library to add an EventListener with event id "cep.extendscript.event.selectedEvent" when index.html loaded.
- Go to the following line
$(document).ready(() => {...}and add the following code
csInterface.addEventListener("cep.extendscript.event.selectedEvent", (event) => {
    let filename = event.data;
    if (_.isEmpty(filename) === false) {
        currentFilename = filename;
        alert(`file selected: ${currentFilename}`);
    }
});
- Go to the following line
-
Open Adobe Bridge and Launch CEP Extension to test thumbnail selection event.
- Windows -> Extensions -> Summit 2019 CEP Lab
-
Select a thumbnail in Adobe Bridge Content window to verify event selection startup script.


- Complete XMPAdapter Class in XMP.jsx
- Import XMP SDK Library
- Complete XMPAdapter methods
- Complete TODO items in
XMPAdapter.prototype.open - Complete TODO items in
XMPAdapter.prototype.get - Review
getArrayItems = function(namespace, property){...} - Review
getStructObj = function(namespace, property){...} - Complete TODO items in
XMPAdapter.prototype.set - Complete TODO items in
XMPAdapter.prototype.commit - Complete TODO items in
XMPAdapter.prototype.close
- Complete TODO items in
We will explore XMP Toolkit SDK to retrieve and modify XMP MetaData.
-
In Text Editor, open ../host/XMP.jsx
-
We need to load AdobeXMPScript library by instantiating the ExternalObject class.
if(xmpLib == undefined){
    var xmpLib = new ExternalObject("lib:AdobeXMPScript");
}
-
XMPAdapter.prototype.open-
First, we must open the file by instantiating XMPFile object. This class corresponds to the Adobe XMP Toolkit’s File Handler component, which provides convenient I/O access to the main, or document level, XMP for a file. For
getXMP(...)function, we want to open a file for modify access.xmpFile = new XMPFile(filename, XMPConst.UNKNOWN, XMPConst.OPEN_FOR_UPDATE);
-
Once we open a file to retrieve XMP MetaData, we must call
getXMP()method fromXMPFileobject. This method returns anXMPMetaobject.XMPMetaclass provides the ability to create and query metadata properties from an XMP namespace. The class also provides static functions that allow you to create and query namespaces and aliases.xmpMeta = xmpFile.getXMP();
-
-
XMPAdapter.prototype.get-
get(...)method is a sequence of logic that help retrieve the value of a property within XMP. We need to verify if the property exists and identify what type of property it is. If it is an array, it need to retrieve the value of each item in the collection.- We must first call
getProperty(...)method inXMPMetaobject, and this returnXMPPropertyobject.XMPPropertycontains only read-only properties that describe a metadata property. We can identify property type by 'options' property.
var prop = xmpMeta.getProperty(namespace, property);
if(prop !== undefined){
    //Check if property value is an array
    if(prop.options & XMPConst.PROP_IS_ARRAY){
        var items = getArrayItems(namespace, property);
        return items;
    }else{
        return prop.toString();
    }
}
- We must first call
-
-
getArrayItems = function(namespace, property){...}-
If the property is an array, we have to do the following:
- Using
countArrayItems(...)method inXMPMetaobject, we can determine the number of items in the collection and loop through it. - To retrieve an array item, we must call
getArrayItem(...)and pass namespace, property, and index. Note: index of an array starts at 1, not 0. - For an array item that is a structure (STRUCT) type, we must handle it differently by calling
getStructObj(...)function.
var cnt = xmpMeta.countArrayItems(namespace, property);
var objArr = [];
if (cnt > 0){
    for(var i=1;i <= cnt;i++){
        arrItem = xmpMeta.getArrayItem(namespace, property, i);
        if (arrItem && arrItem.options & XMPConst.PROP_IS_STRUCT){
            var obj = getStructObj(namespace, property + "[" + i + "]")
            objArr.push(obj);
        }else{
            objArr.push(arrItem.toString());
        }
    }
    return objArr;
}
- Using
-
-
getStructObj = function(namespace, property){...}-
If the property within an array is a structure, then we must construct an object.
- Using
iterator(...)method inXMPMetaobject, we can iterate through the nested object of the given property within a namespace. - Calling
next()method to retrieve the next item in an iterator. This returnsXMPPropertyobject.
var obj = {},
    iter = xmpMeta.iterator(XMPConst.JUST_CHILDREN,namespace,property),
    item = iter.next();
while(item){
    if (item.value){
        var propertyName = (item.path).match(/(\w+)$/g)[0]
        if(item.options & XMPConst.PROP_IS_ARRAY){
            obj[propertyName] = getArrayItems(namespace, propertyName);
        }else{
            obj[propertyName] = item.value;
        }
    }
    item = iter.next()
}
return obj;
- Using
-
-
XMPAdapter.prototype.setset(...)method is a sequence of logic that help set a value of a XMP property. If you have a custom namespace or a namespace that not registered in the file XMP Metadata, a namespace must be registered before continuing.
XMPMeta.registerNamespace(namespace, prefix);
- If a value is an Array, we must either delete the current property or append a value to it. For the simplicity, we overwrite the existing array property with a new array.
- To overwrite, we delete the existing property using
deleteProperty()method inXMPMetaobject. - Next, we create an empty property with a type of Array using
setProperty(...)method. - Finally, we loop through the value and utilize
appendArrayItem(...)method to append each item to the array.
- To overwrite, we delete the existing property using
if(Object.prototype.toString.call(value) === '[object Array]'){
    if(xmpMeta.doesPropertyExist(namespace, property)){
        xmpMeta.deleteProperty(namespace, property);
    }
    //Create Empty Property with Array Type
    xmpMeta.setProperty(namespace, property, null, XMPConst.PROP_IS_ARRAY);
    //Append Array Items to the Property
    for(var i = 0;i<value.length;i++){
        xmpMeta.appendArrayItem(namespace, property, value[i]);
    }
}else{...}
- If a value is a string then we can pass a value to
setProperty(...)method.
xmpMeta.setProperty(namespace, property, value);
-
XMPAdapter.prototype.commit- Since we know how to write XMP, we must commit the change that we made. To commit the change, we must call
putXMP(...)from XMPFile object and pass modified xmpMeta back in.
if(xmpFile && xmpMeta){
    //commit the change, save back XMPMeta.
    xmpFile.putXMP(xmpMeta);
}
- Note:
putXMP(...)does not write the modified metadata back into the file. We must close the opened XMPFile to finalize the change.
- Since we know how to write XMP, we must commit the change that we made. To commit the change, we must call
-
XMPAdapter.prototype.close- Close an opened file by calling
closeFile()from XMPFile object.
if(xmpFile){
    //close
    xmpFile.closeFile();
    xmpFile = undefined;
    xmpMeta = undefined;
}
- Close an opened file by calling
- Create functions in JSX for get/set XMP from CEP
- Call JSX get/set XMP functions from CEP
- Review code on how to display retrieved XMP Metadata from JSX.
We will look at how to get/set XMP metadata from our custom XMPAdapter to CEP.
-
Open ../host/XMP.jsx
-
In the previous lab, we created
XMPAdapterclass to simplify the way we retrieve XMP data. In this step, we will need a way for CEP to be able to retrieve XMP metadata.- First, we need to pass an object from CEP to
XMPCEPHelper.getXMP(...)function.- The object for the parameter should contain the current filename, namespace URL, and property name
- Next, we create new
XMPAdapterobject, open the file, and retrieve property value within the specified property in a namespace. - If there is a value, we need to return
JSON.stringifyof the result.
XMPCEPHelper.getXMP = function (args) {
    var filename = args.filename,
        namespace = args.namespace,
        property = args.property;
    var xmp = new XMPAdapter();
    xmp.open(filename);
    var result = xmp.get(namespace, property);
    xmp.close();
    if (result !== undefined) {
        return JSON.stringify(result);
    }
}
- First, we need to pass an object from CEP to
-
We do a similar method for setting XMP data from CEP.
- To set XMP, we require additional information such as a prefix and a value.
- Create new XMPAdapter object, open the current file and call
setmethod.
XMPCEPHelper.setXMP = function (args) {
    var filename = args.filename,
        namespace = args.namespace,
        prefix = args.prefix,
        property = args.property,
        value = args.value;

    var xmp = new XMPAdapter();
    xmp.open(filename);
    xmp.set(namespace, prefix, property, value);
    xmp.commit();
    xmp.close();
}
-
Lets call
XMPCEPHelper.getXMP(...)in JSX from CEP.- By invoking
getXMPfromJSX(...)function, we need to pass an object that contains the following keys- filename
- namespace
- property
- Next, we serialize this object for JSX by
JSON.stringifytheparamObj. - Using our helper function
JSXHelper.runEvalScript(...), we will evaluateXMPCEPHelper.getXMP(paramObj)in JSX
function getXMPfromJSX(paramObj) {
    paramObj = JSON.stringify(paramObj);
    return JSXHelper.runEvalScript(`XMPCEPHelper.getXMP(${paramObj})`);
}
- By invoking
-
Lets call
XMPCEPHelper.setXMP(...)in JSX from CEP.- By invoking
setXMPfromJSX(...)function, we need to pass an object that contains the following keys- filename
- namespace
- prefix
- property
- value
- Next, we serialize this object for JSX by
JSON.stringifytheparamObj. - use helper function
JSXHelper.runEvalScript(...)to evaluateXMPCEPHelper.setXMP(paramObj)in JSX
function setXMPfromJSX(paramObj) {
    paramObj = JSON.stringify(paramObj);
    return JSXHelper.runEvalScript(`XMPCEPHelper.setXMP(${paramObj})`);
}
- By invoking
- Review Metadata Display
We will review how to display the XMP Metadata to the panel.
-
Open ../client/index.jsx
-
In lesson 2, we added event handling to listen for a selection event by JSX startup script. When the CEP extension received the dispatched event, it will need to retrieve and populate XMP data to our UI by calling
populateXMPFields()function.csInterface.addEventListener("cep.extendscript.event.selectedEvent", (event) => { let filename = event.data; if (_.isEmpty(filename) === false) { currentFilename = filename; populateXMPFields(); } });
-
In
populateXMPFields()function, We will begin populating the editable fields (Name, Cat Breed, Age, and Gender).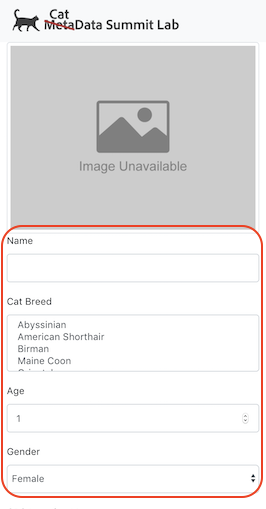
- First, we created a list that map the form elements to XMP property.
const uiFields = [{
        "fieldID": "cat_name",
        "namespace": "http://cat.adobe.com",
        "prefix": "cat",
        "property": "name"
    },
    {
        "fieldID": "cat_breed",
        "namespace": "http://cat.adobe.com",
        "prefix": "cat",
        "property": "breed"
    },
    {
        "fieldID": "cat_age",
        "namespace": "http://cat.adobe.com",
        "prefix": "cat",
        "property": "age"
    },
    {
        "fieldID": "cat_gender",
        "namespace": "http://cat.adobe.com",
        "prefix": "cat",
        "property": "gender"
    }
];
- Next, To save ourself from writing repetitive code, we will simply iterate through each of the items in the list. We are going to call
getXMPfromJSX(...)and pass the corresponding XMP namespace and the property name.
for (let field of uiFields) {
    let params = {
        filename: currentFilename,
        namespace: field.namespace,
        property: field.property
    }
    getXMPfromJSX(params).then(result => {
        if (_.isEmpty(result) === false) {
            $(`#${field.fieldID}`).val(JSON.parse(result));
        } else {
            $(`#${field.fieldID}`).val("");
        }
    })
}
-
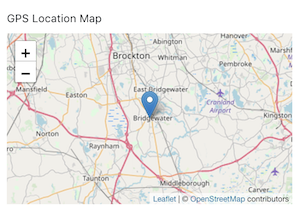
For our extension, we wanted to populate geotagging information by pulling GPS data from the EXIF namespace to a map.
-
EXIF stored GPS coordinate in Degrees Decimal Minutes (DDM) format and we need to convert it to Decimal Degrees (DD)format by calling our
MapHelper.convertDDMtoDD(...)function (See ./client/js/utils.js). -
Once we have the correct format for the coordinate, we can use Leaflet library to draw the map and pin.
// Get Latitude and Longitude from EXIF GPS Data
let gpsLat = getXMPfromJSX({
    filename: currentFilename,
    namespace: "http://ns.adobe.com/exif/1.0/",
    property: "GPSLatitude"
});

let gpsLong = getXMPfromJSX({
    filename: currentFilename,
    namespace: "http://ns.adobe.com/exif/1.0/",
    property: "GPSLongitude"
});

Promise.all([gpsLat,gpsLong]).then(results => {
    if (!_.isEmpty(results) && results.length == 2) {
        let ddLat = MapHelper.convertDDMtoDD(JSON.parse(results[0])),
            ddLong = MapHelper.convertDDMtoDD(JSON.parse(results[1]));
        console.log(`Lat: ${ddLat} | Long: ${ddLong}`);
        MapHelper.setLeafletMap('mapid', ddLat, ddLong, true);
    }
});
-
-
Lastly, we will be displaying top 10 DAM PredictedTag generated by AEM.
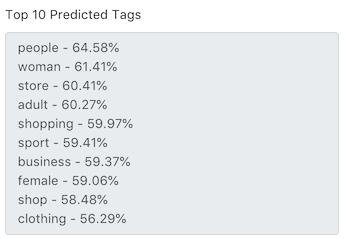
//get predictedTags from DAM namespace
getXMPfromJSX({
    filename: currentFilename,
    namespace: "http://www.day.com/dam/1.0",
    property: "predictedTags"
}).then(result => {
    if (_.isEmpty(result) === false) {
        //get the first 10 predicted tags
        let tags = JSON.parse(result).slice(0, 10)
        for (let tag of tags) {
            $("#predictedTags").val($("#predictedTags").val() + `${tag.predictedTagName} - ${(tag.predictedTagConfidence * 100).toFixed(2)}%\n`);
        }
    } else {
        $("#predictedTags").val("");
    }
});
-
Since we made a couple of fields editable, we want the end user to press Save to call the
save()function.- Similar to retrieve Name, Cat Breed, Age and Gender fields in step 3, we will call
setXMPfromJSX(...)and pass it the corresponding XMP namespace, property name, prefix and field value.
function save() {
    if (!_.isEmpty(currentFilename)) {
        for (let field of uiFields) {
            let value = $(`#${field.fieldID}`).val();
            if (_.isEmpty(value) === false) {
                let params = {
                    filename: currentFilename,
                    namespace: field.namespace,
                    prefix: field.prefix,
                    property: field.property,
                    value: value
                }
                setXMPfromJSX(params);
            }
        }
    }
}
- Similar to retrieve Name, Cat Breed, Age and Gender fields in step 3, we will call


- Enable Debug mode and Allow unsigned extension
- Create .debug file
- Using Google Chrome Browser - Developer Tools to debug CEP.
We will go through the process of debugging CEP extension with Google Chrome Developer Tool.
-
By default, debug mode and allowing unsigned extension is disabled. To enable we must do the following.
-
- Open Terminal and input the following command:
defaults write com.adobe.CSXS.9 PlayerDebugMode 1 - Reboot your machine.
- Open Terminal and input the following command:
-
- Open Registry Edit and Navigate to the following location
HKEY_CURRENT_USER/Software/Adobe/CSXS.9 - If you do not see CSXS.9 folder, you can create a new one.
- Add the following String type key
PlayerDebugModewith a value of1
- Open Registry Edit and Navigate to the following location
-
-
Create a new file called
.debugin the root of CEP extension- Extension Id must match the extension Id that we input in Lesson 1.3.
- If the extension have multiple panel then you must specify each of the extension id here
- HostList is a list of supported application for your panel. Each Host Name have a corresponding port that will be use for debugging.
<?xml version="1.0" encoding="UTF-8"?>
<ExtensionList>
    <Extension Id="com.adobe.summit19.cepmetadata.main">
        <HostList>
            <Host Name="PHXS" Port="8000"/>
            <Host Name="IDSN" Port="8001"/>
            <Host Name="AICY" Port="8002"/>
            <Host Name="ILST" Port="8003"/>
            <Host Name="PPRO" Port="8004"/>
            <Host Name="PRLD" Port="8005"/>
            <Host Name="FLPR" Port="8006"/>
            <Host Name="AUDT" Port="8007"/>
            <Host Name="KBRG" Port="8008"/>
        </HostList>
    </Extension>
</ExtensionList>
- Extension Id must match the extension Id that we input in Lesson 1.3.
-
To debug, we need to launch the Adobe Bridge 2019 and our CEP panel then with Google Chrome browser navigate to the following URL:
http://localhost:8008
-
To add a debug breakpoint use
debuggerkeyword and place it within your javascript to tell the debugger where to stop. This will allow you to step through the code.

Getting Started with CEP Extensions
CEP Package, Distribute, Install
Using ES6 promises to write async “evalScript()” calls