This guide is meant to help people interested in making a drone using a Pixhawk as the flight controller with an onboard computer of your choice using Dronekit or ROS. This guide shows you how to use Dronekit using a Raspberry Pi and ROS with a Jetson Nano. However, they can both be done the same way with some changes. There are specific components that are needed to complete this project.
- 1️⃣ Getting Started
- 2️⃣ The Onboard Computer
Everything on the Parts List is required for this project. Please read carefully what is needed. This is also assuming you have the necessary tools of a soldering iron, snips, and other essential tools needed for electronics.
Here is a playlist of videos showing you how to build your drone. This will also go over how to flash the Firmware to the pixhawk. I will go more in-depth regarding the Firmware in the next area. You can choose either Ardupilot or PX4. However, I recommend PX4 Firmware.
Make sure your motors are in the correct configuration. You do this by making sure the motor wires are connected to the correct wires of the ESC. Below is a diagram of the direction of the motors and ESC configuration.
I recommend you put on the propellers at the end. Not until you are ready to fly.


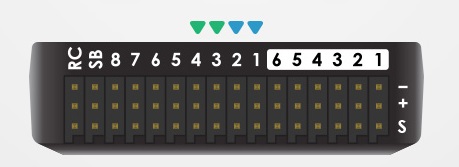
Plug the ESC pins into back of the Pixhawk. (order should be from top-> -, s, +) Make sure they are in the correct order or your drone will fly incorrectly.
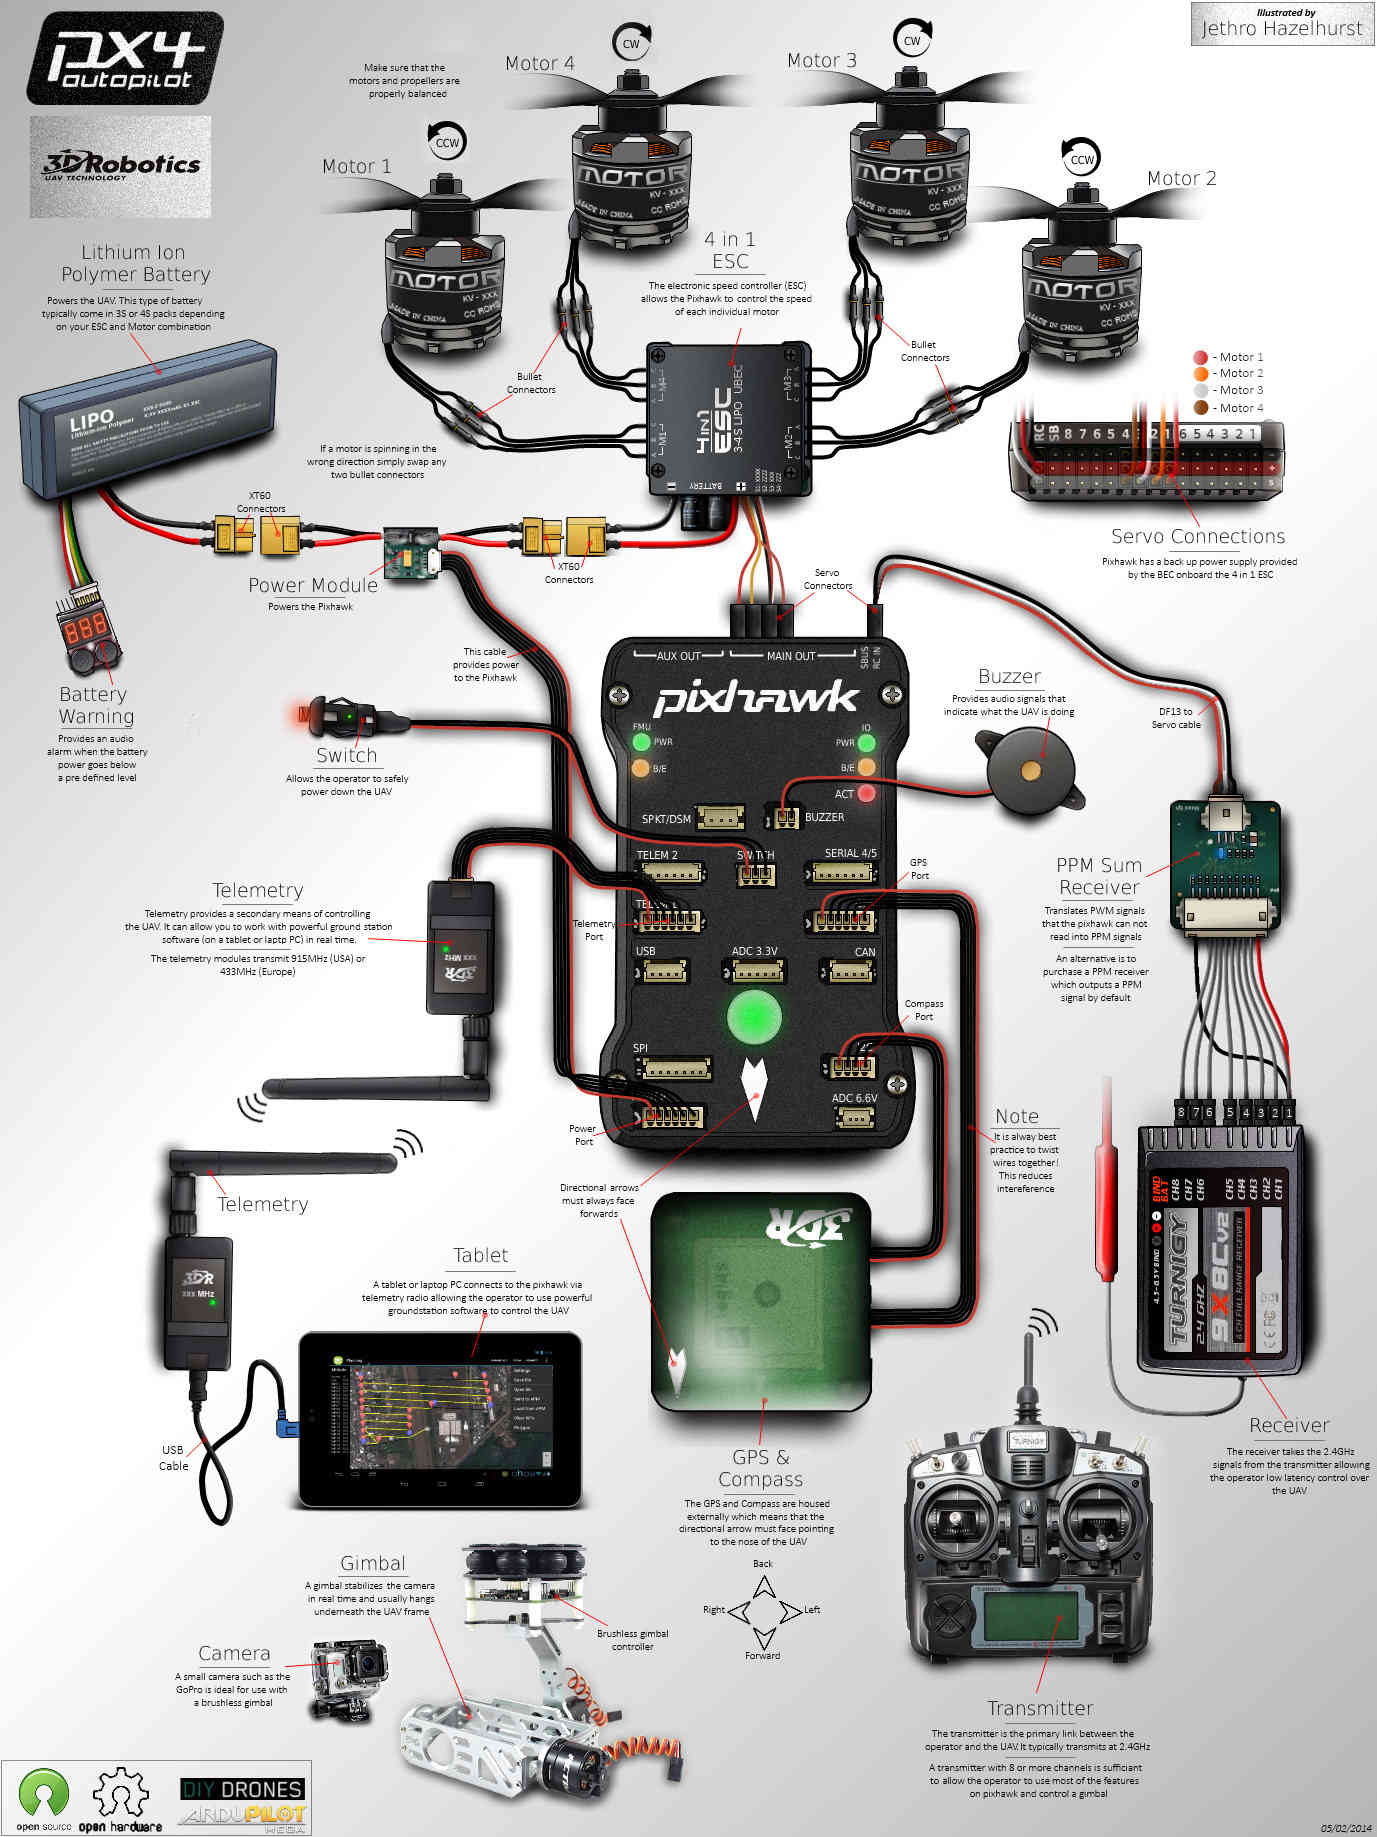
Plug in the rest of the modules you've puchased into their respected slots as showed in this image:
We are using QGroundControl, it works great and makes it easy to set parameters. Follow this video on how to install the PX4 Firmware. If you would like to use the Ardupilot firmware, click on Ardupilot in the QGroundControl options. If you have issues with the latest px4 Firmware, you can look at earlier versions here, we are currently using v1.10.1.

There are two companion computers we recommend using the Jetson Nano or the Raspberry Pi. The Jetson Nano is a pricier embedded system compared to the Raspberry Pi. However, it makes an excellent system for object detection/avoidance. Make sure you have all the necessary parts to power and put an OS on these computers. You will need a device to put the OS on the micro sd card. Something like this -> Micro SD Card USB Reader. This makes it easy to image.
nKuylen has made a platform in the back of the drone for the Raspberry pi or Jetson Nano. We recommend printing this or developing your own.
We will be using ROS with the Jetson Nano. If you are unfamiliar with ROS, I recommend you learn it first through the documentation as this part will assume you know how to operate the catkin workspace. For more information on the Jetson nano, please follow this site. It would be best to use Balena Etcher for an easy imaging process. A helpful video I found is here. Use the image given for the Jetson Nano here. Once you have successfully imaged your Jetson Nano put the sd card into the Nano.
We are using ROS Melodic as the Jetson Nano is using their NVIDIA® Jetson Nano™ Developer Kit deriving from Ubuntu 18.04. This ROS install is taken from here
Setting your sources.list
sudo sh -c 'echo "deb http://packages.ros.org/ros/ubuntu $(lsb_release -sc) main" > /etc/apt/sources.list.d/ros-latest.list'Keys Setup:
sudo apt-key adv --keyserver 'hkp://keyserver.ubuntu.com:80' --recv-key C1CF6E31E6BADE8868B172B4F42ED6FBAB17C654Install:
sudo apt update
sudo apt install ros-melodic-desktop-full
Environment Setup:
echo "source /opt/ros/melodic/setup.bash" >> ~/.bashrc
source ~/.bashrc
(Optional) Dependencies for Building Packages:
sudo apt install python-rosdep python-rosinstall python-rosinstall-generator python-wstool build-essentialInstall rosdep:
sudo apt install python-rosdepInitialize rosdep:
sudo rosdep init
rosdep update--NEED TO WORK ON THIS--
MAVROS is the MAVLink extendable communication node for ROS with proxy for Ground Control Station.
Install MAVROS:
sudo apt-get install ros-melodic-mavros ros-melodic-mavros-extras
Install Geographic datasets:
wget https://raw.githubusercontent.com/mavlink/mavros/master/mavros/scripts/install_geographiclib_datasets.sh
chmod a+x install_geographiclib_datasets.sh
sudo ./install_geographiclib_datasets.shThe configuration for the Pixhawk and Jetson Nano is straightforward. Use a micro USB to USB cable. Connect the micro USB side into the Pixhawk's serial port and the USB into the Jetson nano.
After plugging the cord into the Pixhawk and Nano, you can run this command to see if everything is correct:
roslaunch mavros px4.launchIf there is a permissions issue with the serial port, make sure your user is in the 'dialout' group. You can do this by using this command (replace the 'enter username' with your username):
sudo usermod -a -G dialout enter usernameCongrats! You have successfully connected your Nano to your Pixhawk. If you are having trouble, this video may help you.
Start by Installing the Raspberry Pi OS using Raspberry Pi Imager here. Image the Pi with the recommended OS. You can use this video to help you image the Pi.
In order for the Pi to communicate with the Pixhawk, we need to connect four cables. They are 5V, GND, TX, and RX. You will need to create the connector yourself. I purchased this kit to make my own. I then soldered the connectors from the pixhawk to 4 female jumper wires.
Here is the configuration of the pins

On your Raspberry Pi, enter:
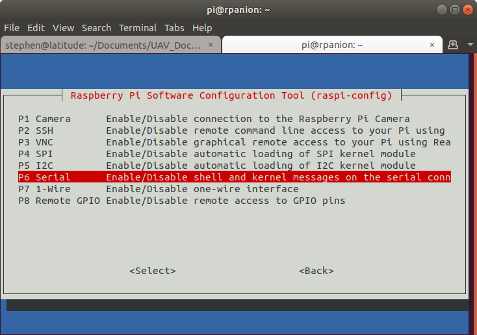
sudo raspi-configAnd in the utility, select “Interfacing Options”:

RasPiConfiguration Utility
And then “Serial”:
When prompted, select no to “Would you like a login shell to be accessible over serial?”.
When prompted, select yes to “Would you like the serial port hardware to be enabled?”.
Reboot the Raspberry Pi when you are done.
The Raspberry Pi’s serial port will now be usable on /dev/serial0.
Once you have configured your Pi, you now have to change a few parameters on your pixhawk in QGroundControl or another ground control software. To set up the default companion computer message stream on TELEM 2, set the following parameters:
MAV_1_CONFIG = TELEM 2 (MAV_1_CONFIG is often used to map the TELEM 2 port)
MAV_1_MODE = Onboard
SER_TEL2_BAUD = 921600 (921600 or higher recommended for applications like log streaming or FastRTPS)
After you have changed those parameters, restart the Pixhawk. If not done already, connect the Raspberry Pi to the Pixhawk. You will need to install MAVProxy dependencies. You can find the MAVProxy install here -> MAVProxy INSTALL GUIDE. I will show below how to install these dependencies for Python 2 since that is what the Pi has on default.
For Python 2 on Debian based systems (including Ubuntu, WSL, Raspian):
sudo apt-get install python-dev python-opencv python-wxgtk4.0 python-pip python-matplotlib python-lxml python-pygame
pip install PyYAML mavproxy --user
echo "export PATH=$PATH:$HOME/.local/bin" >> ~/.bashrc
If you get a “permission denied” error message when connecting to serial devices, the user permissions may need to be changed:
sudo usermod -a -G dialout <username>Make sure you update:
pip install mavproxy --user --upgradeOnce finished installing everything, make sure to reboot the Pi.
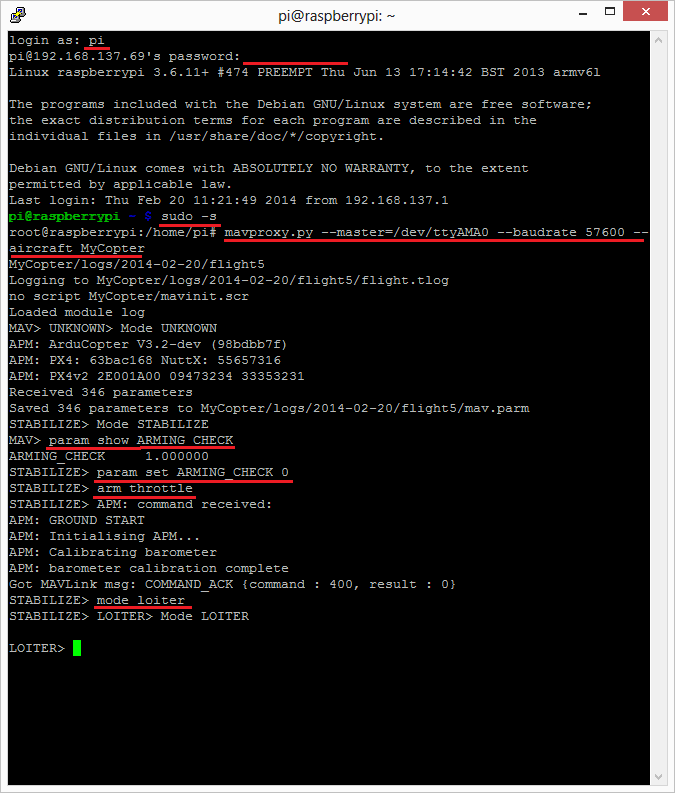
Next, run this command in the terminal to test the serial connection between the Pi and Pixhawk. If you are only getting the MAV> sign, make sure your parameters are correct for baud rate and correct telemetry port. It could also be your gpio pins are incorrect or not fully pushed on the RPI.
Enter this command to test:
mavproxy.py --master=/dev/serial0 --baudrate 921600 --aircraft MyCopterYou should see something like this:
You can also arm and test the throttle by typing :
MAKE SURE YOUR PROPS ARE OFF BEFORE!
arm throttleThen check to see if the pi can communicate with a computer using QGroundControl (Your Computer's IP running QGC)
mavproxy.py --master=/dev/serial0 --baudrate 921600 --out <Computer IP>:14550 --aircraft MyCopter If simulating the drone using Dronekit to test scripts is something you're interested in following along. Otherwise, proceed to the Dronekit Installation on the Pi. We are using Ubuntu 18.04, but any other Ubuntu version should work.
Clone the PX4 source code:
git clone https://github.com/PX4/PX4-Autopilot.git --recursiveEnter the directory:
cd PX4-Autopilot/Install:
bash ./Tools/setup/ubuntu.shCheck to see if you can run the Simulation on your Linux machine.
Enter the directory:
cd PX4-Autopilot/Choose from either Gazebo or jMAVSim:
make px4_sitl_default jmavsimOR
make px4_sitl gazeboIn your Linux terminal, clone the Dronekit repository using:
git clone https://github.com/dronekit/dronekit-python.gitEnter the directory:
cd ./dronekit-pythonThen build and install:
sudo python setup.py build
sudo python setup.py install
While the Simulation is running in the background, you can use an IDE of your choice (We are using Pycharm). In the IDE, go to the directory and use the interpreter from the dronekit repository. Then run this code below that uses the Dronekit library.
Dronekit Mission Simulation Example
Notice the code uses the IP - '127.0.0.1:14540' as this is the simulation's IP. Run the code and see it take off!
In your Raspberry Pi's terminal, enter these commands:
Update Pi
sudo apt-get update
sudo apt-get upgrade
Install Dronekit, and Dependencies
sudo apt-get install python-pip python-dev
sudo pip install pyserial
sudo pip install dronekit
sudo pip install MAVProxy
Create a folder where you can put your dronekit scripts. Take the code from Dronekit Mission Real Example. Notice the connection string is different from the IP we had before in the Simulation. We also had to specify the baud rate in the vehicle initialization on line 40 for our pixhawk and Pi to communicate. Now that we have the code set up, lets run the program!
Run Command:
ATTENTION! THIS PROGRAM ARMS THE DRONE AND EXECUTES THE PATH
python DronekitMissionRealEx.py --connect /dev/serial0You now have a drone running with Dronekit! For more information on Dronekit, visit their documentation page here.