Authored by: Abiral Pokharel, Eelisha Pathak, Nidwija Bhatta
This repository consists of Recognition of handwritten equations into their individual characters that is acheived using Convolutional Neural Network (CNN)
- Python 3.6
- Pytorch 1.2+
- OpenCV
- Scikit-learn
- livelossplot
- matplotlib
Handwritten Equation Recognizer was made written in Jupyter Notebook using Python 3.6. Pytorch was used for building the cnn model and to run the final software in your PC you can run the final_implementation.ipynb inside the running build folder. To train the model from scratch keep each characters into their own folder and keep all the folder in a folder named "extracted_images" inside the training folder and run the data_management.ipynb and then her_training.ipynb The model saved will be named her_model
- Data Collection and Processing
- Model Training and Loss Calculations
- Final Implementation
- Description of Working of the system
a. Libraries used
b. Model Description
c. Data Preprocessing, Training and Implementation Phase - Results
- Limitations
- References
The initial data was collected from kaggle and due to data mismatch and redundant data some data were pruned and extracted data from MNIST database was added and collected into the training database. The point wise algorithm used in Data Processing is given below:
- Import necessary Libraries and API (For this project, numpy, os, cv2, random, and matplotlib was imported)
- Create a Label for each folder where the data is present. For our project there are 30 folders each with 24 unique characters used in our recognition system. Each folder consists of only the characters data which is denoted by the folder’s name. Hence for ‘-‘ image, the folder it is contained in is named ‘-‘. Store the labels in a variable with an identifier number (index).
- Merge the image with the identifier using numpy and shuffle the data.
- Now split the dataset into “HerX.npy” with all the image data and “HerY.npy” with all the labels for training.
- Finally, make a separate numpy file “Labels_her.npy” with link to each identifier and image label. Example: For “1” our identifier is 5 so we link “1” with 5 so whenever 5 is predicted from the model, it is actually “1”. We do this for all 55 characters.
- Import Necessary Libraries and API (For our project, Pytorch, and its neural network libraries, sklearn data splitter, dataloader for batch processing, and CUDA library).
- Define the Model using Pytorch class and initiate the model into “net”.
- Load the two .npy files with images and labels and normalize the image data by shrinking its data between 0 and 1.
- Split the loaded data into training data and testing data. (33% of total data is testing data, the rest is training data)
- Create Tensor variables for each of the four variables as obtained from 4 for Pytorch CNN input.
- Split the data into batches of 300 (our project) without shuffling for faster and efficient training.
- Define the Learning rate and total epochs for training. (For our project Learning rate = 0.001 and total Epochs are = 1000
- Define the optimizer and loss calculation function for our backpropagation for training. (We used Cross Entropy Loss and Adam Optimizer).
- Compute the total training steps required and initialize correct and total data parsed to 0.
- Start the training loop for total epochs.
- For every I, (images, labels) in count and combine train_X_data_tensor and train_Y_data_tensor.
- Feed every image to model “net” and store the obtained outputs to “outputs”.
- Compute the loss from variable defined in 8 and store it in “loss”.
- Equalize all gradients in the model to zero.
- Carry out Backward Propagation and compute sensitivity.
- Update the weights of the Model “net”.
- Check if predicted data is equal to the actual label of the data and if it is add 1 to correct.
- Increase total by 1.
- Display all loss and accuracy after every 100 batches of images have been processed.
- Go to 11 until all the images are processed else go to 21.
- Go to 10 until all epochs are completed else go to 22.
- Initialize the model “net” to evaluation mode.
- Erase all the gradients from the model.
- Redefine correct and total and equate both to 0.
- For every I, (images, labels) in count and combine test_X_data_tensor and test_Y_data_tensor.
- Feed every image to model “net” and store the obtained outputs to “outputs”.
- Check if predicted data is equal to the actual label of the data and if it is, add 1 to correct.
- Increase total by 1.
- Go to 25 until all the images are processed else go to 30.
- Display the test accuracy of the model.
- Save the model to “her_model”.
The Implementation Phase consists of Image Preprocessing, Segmentation, Prediction and Re-Assembly process which are mentioned below:
- Import Necessary Libraries and APIs. (For this phase, cv2, numpy, skimage.filters, pytorch and os libraries were used.)
- Define the Model using Pytorch class.
- Initiate the model into “net”.
- Load the saved model.
- Get the input image from the user.
- Resize the Image into appropriate resolution (400 x 224) and convert it into grayscale.
- Remove Noise from the image and increase contrast of only the handwritten characters.
- Remove the background using kernel.
- Find Contours in the image using mean and standard deviation.
- Using the data from 9 compute the positions of the characters and the number of characters.
- Define the rectangle to enclose the different characters in the preprocessed image.
- Split the different rectangles with separated characters.
- Increase the padding of the individual separate images.
- Feed the image into the model “net” to compute the output.
- Sort the outputs according to the position of the rectangle.
- Display these output values to the user.
The working of Handwritten Equation Recognizer as mentioned above is split into two parts: Training Phase and Implementation Phase. Hence this section describes each of the phases’ processes and working in detail.
For this phase we used Pytorch as the main library for deep learning convolution neural network creation. PyTorch is software, specifically a machine learning library for the programming language Python, based on the Torch library, used for applications such as deep learning and natural language processing. It is primarily developed by Facebook's artificial-intelligence research group, and Uber's Pyro probabilistic programming language software is built on it. It is free and open-source software released under one of the BSD licenses. We also created tensors to be able to sue CUDA for accelerated machine learning such that training phase can be complete very fast and efficiently. Tensors, while from mathematics, are different in programming, where they can be treated simply as multidimensional array data structures (arrays). Tensors in PyTorch are like NumPy arrays, with the addition being that Tensors can also be used on a GPU that supports CUDA. PyTorch supports various types of Tensors. We also used OpenCV to preprocess the images which is described in the next section. OpenCV (Open source computer vision) is a library of programming functions mainly aimed at real-time computer vision. Originally developed by Intel, it was later supported by Willow Garage then Itseez (which was later acquired by Intel). The library is cross-platform and free for use under the open-source BSD license. OpenCV supports the deep learning frameworks TensorFlow, Torch/PyTorch and Caffe. Finally, tkinter was used for creating the Graphical User Interface for the implementation phase of Handwritten Equation Recognizer. Tkinter is a Python binding to the Tk GUI toolkit. It is the standard Python interface to the Tk GUI toolkit and is Python's de facto standard GUI. Tkinter is included with standard Linux, Microsoft Windows and Mac OS X installs of Python.The name Tkinter comes from Tk interface. Tkinter was written by Fredrik Lundh. Tkinter is free software released under a Python license. As with most other modern Tk bindings, Tkinter is implemented as a Python wrapper around a complete Tcl interpreter embedded in the Python interpreter. Tkinter calls are translated into Tcl commands which are fed to this embedded interpreter, thus making it possible to mix Python and Tcl in a single application. Python 2.7 and Python 3.1 incorporate the "themed Tk" ("ttk") functionality of Tk 8.5. This allows Tk widgets to be easily themed to look like the native desktop environment in which the application is running, thereby addressing a long-standing criticism of Tk (and hence of Tkinter). There are several popular GUI library alternatives available, such as wxPython, PyQt (PySide), Pygame, Pyglet, and PyGTK. However due to time constraints and limitations of training, tkinter was used because of its easy learning curve and simple to use interface and python bindings.
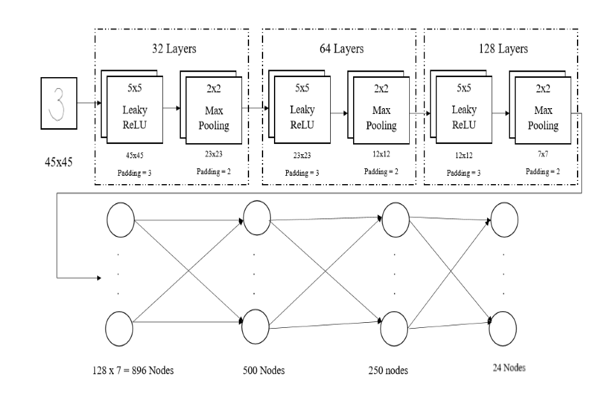
The Convolution Neural Network model of Handwritten Equation Recognizer consists of 7 total layers. Each of the seven layers are detailed below: First Layer is the Input Layer which consists of nodes of 45x45 inputs. This is the actual number of pixels in the image that is being input into the model. Each of this pixel have individual values of floating point constants ranging from 0 to 1. The next layer is the first of the Convolution layer with 32 layers that are split to distinguish features from the input image. The layer consists of 5x5 Filter layer with Leaky ReLU as activation function with padding 3 and a 2x2 Max Pooling layer with stride 2. The output from this layer is fed into the second layer. The second layer is another of the Convolution layers with 64 layers for feature extraction with similar 5x5 filter with padding 3 and 3x3 max pooling layer with Leaky ReLU as activation function and stride = 2. This output is then fed into another 3rd convolution layer. The third convolution layer consists of 128 layers splits with 5x5 convolution filter with Leaky ReLU with padding = 3 and 3x3 Max Pooling layer with stride = 2. Finally, the output of this layer is sent to the drop-out function. Drop-out function is a function used using Convolution Neural Network training to avoid the overfitting situation that arises when there is large number of nodes for less data which when not dropped-out can make the model remember each and every data reducing the overall effectiveness of the prediction accuracy of the model. Before the drop-out function, the output is also reshaped or rather Flattened for easy processing of data for the next layer. The output of the drop-out function is then fed into the first of the fully connected layer but the fourth layer with 128 x 7 = 896 nodes which are then connected to the fifth layer and sixth layer with 500 and 250 nodes respectively. Finally, the sixth layer is connected to the final seventh and output layer with 24 outputs which predicts the character in the input image. This process is same for both training and implementation phase.
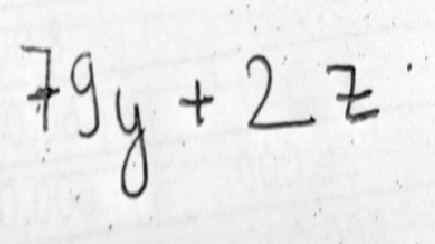
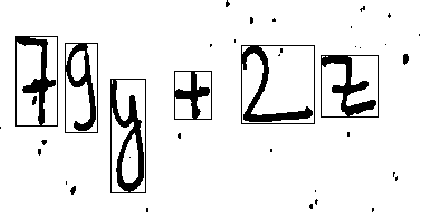
Firstly, using numpy and OpenCV we used the dataset images we collected from online sources to generate two numpy files which were then used to train the model. The data we collected had lot of same images, so we used python’s os library extension to delete same images from the dataset. This resulted us having roughly 60000 images of equations characters which were classified into 24 different labels. All these labels were separated into their respective files for identifier linkage as mentioned in the algorithm section. We also randomized the data so that the model training would be even more effective and have higher accuracy. Next was the training phase, which as described above used PyTorch and numpy to access the create data and use it to train the convolution neural network model we generated in the data preprocessing phase. After the training was completed, the implementation phase was initiated. The implementation phase consists of implementation of the model in application which was generated using tkinter. This is the front end of Handwritten Equation Recognizer. The back end consisted of mostly the previous Pytorch Model. The difference here is that this phase involves use of OpenCv’s Segmentation and Preprocessing libraries to implement segmentation as detailed in the algorithm section. The segmentation process can be better defined using the figure below:

Finally, the individual segments are sent to the model for prediction and the obtained result is the displayed using the Graphical user interface of the program created using the tkinter library.
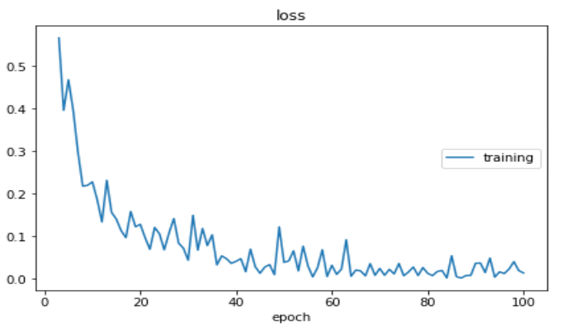
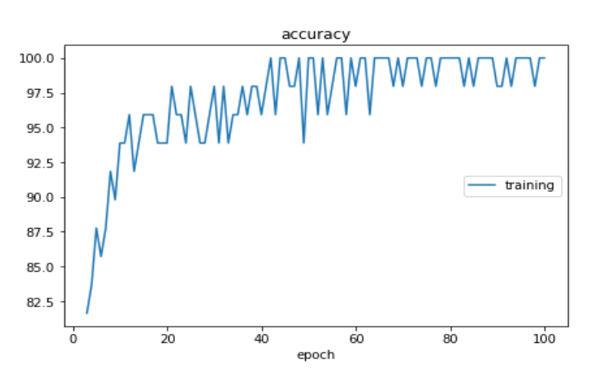
- The accuracy of Training was found to be 95.88%.
- The accuracy of Testing was found to be 97.14%.
As we see in the outputs of HER, the segmentation process segments the “=” sign into two separate “-“ which is the limitation of OpenCV. This could have been solved using area constraint but due to time limitations and lack of adequate programmers this couldn’t be implemented in the final project. Again, the output doesn’t match the input image of the model. Out of the 7 characters in our image, only 4 are identified correctly. The main reason for this result is inconsistent data in our dataset. There are some characters with large number of images while some with only 10. This has caused the model to lean towards predicting the data it encountered more during training. This is the reason for predicting the part of “=” as A and k rather than two “- “s. Finally, the other reason which predicted “2” as “z” and “+” as “4” is due to machine error which can be solved by using effective preprocessing which couldn’t be implemented due to time constraints. Additionally, the other project limitations of this projects are:
- The subscripts and superscripts cannot be currently be recognized.
- Not all mathematical equations characters can be recognized.
The Future Works which can be carried out to perfect the project are:
- Better preprocessing implementation can be achieved.
- Better data can be collected using case study and various other data elicitation techniques.
- The model can be further trained for other characters used in mathematics.
- The model can be extended to calculate the values of equations and display the desired output with solution.
- Gupta, Prachi, Neelam Pal, Lavanya Agrawal. Recognition of Handwritten Mathematical Equations. IMS Engineering College. India. 2017.
- Mohapatra, Hitesh. Handwritten Character Recognition (HCR) using Neural Network. Veer Surendra Sai University of Technology. India. 2009.
- Lu, Catherine, Karanveer Mohan, Recognition of Online Handwritten Mathematical Expression Using Convolution Neural Networks. Stanford University.