In this case we are just using some js code as example. You can apply the following setup to any JS code base.
- To use different packages we need to setup the package manager -
npmin this folder:npm init -y
- Add a
.gitignorefile to leave thenode_modulesout of your commits:Save theecho "node_modules" > .gitignore
.gitignorefile with the code editor to apply the changes.
- Add
eslintas a development dependency by running:npm install eslint --save-dev
- Add a
lintscript to thepackage.jsonfile that will lint the code:"scripts": { ..., "lint": "eslint . --fix" },
-
Run the Command Line Initialization script of
eslint:npm run lint -- --init
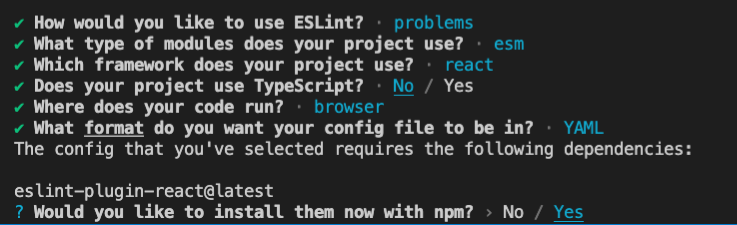
Follow the dialog in the terminal to complete the linter setup. A linter file and all the dependencies will be added depending on your preferences. This are the options chosen in this blueprint:

-
Run the linter:
npm run lint
You should get at least two linter errors that look like this:
 Don't worry about them now, we will fix them later.

-
Install the
elintextension for your code editor:
- Install husky -- easily setup of Git Hooks:
npm install husky --save-dev
- Add a
preparescript to thepackage.jsonfile that will setuphusky:"scripts": { ..., "prepare": "husky install" },
- Run the prepare script to setup
husky:npm run prepare
- Add a hook to run the linter on every commit:
npx husky add .husky/pre-commit "npm run lint"
- Add and commit you code and check the linter runs automatically:
The commit should fail as the linter does not passed. Congratulations! You setup code quality with a standard linter style on each commit!
git add .
git commit -m "feat: added linter on commit"
- Make sure you push and commit your code
- Feel free to take the exercise further and experiment yourself with the setup