To run these tutorials, you must have the following installed:
- On Windows ensure that the drive that this repo is cloned onto is a "Shared Drive" with Docker Desktop
- On Windows we recommend running all commands from GitBash
- Nodejs or Yarn
Change directory to the artifacts folder:
cd quorum-test-network (default folder location)
To start services and the network:
./run.sh starts all the docker containers
To stop services :
./stop.sh stops the entire network, and you can resume where it left off with ./resume.sh
./remove.sh will first stop and then remove all containers and images
All our documentation can be found on the Besu documentation site.
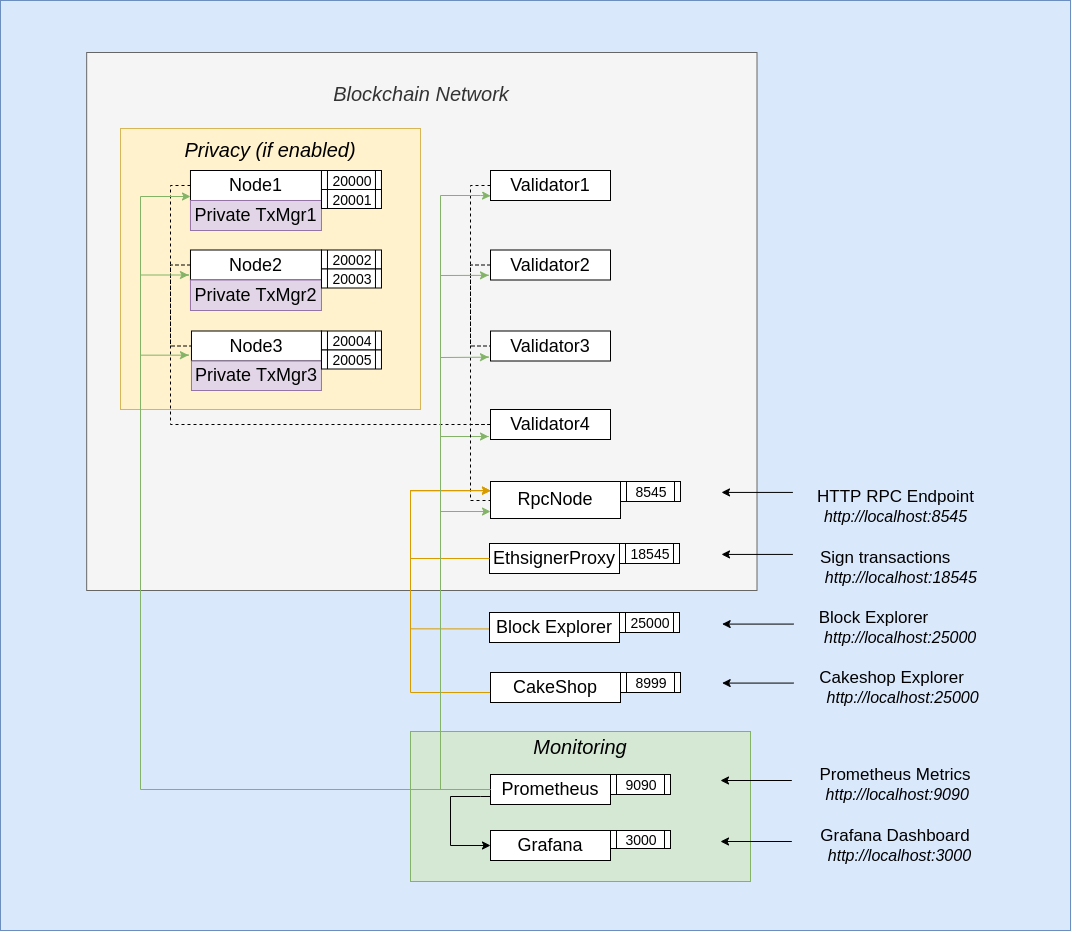
Each quickstart setup is comprised of 4 validators, one RPC node and some monitoring tools like:
- Alethio Lite Explorer to explore blockchain data at the block, transaction, and account level
- Metrics monitoring via Prometheus and Grafana to give you insights into how the chain is progressing (only with Besu based Quorum)
- Optional logs monitoring to give you real time logs of the nodes. This feature is enabled with a
-eflag when starting the sample network
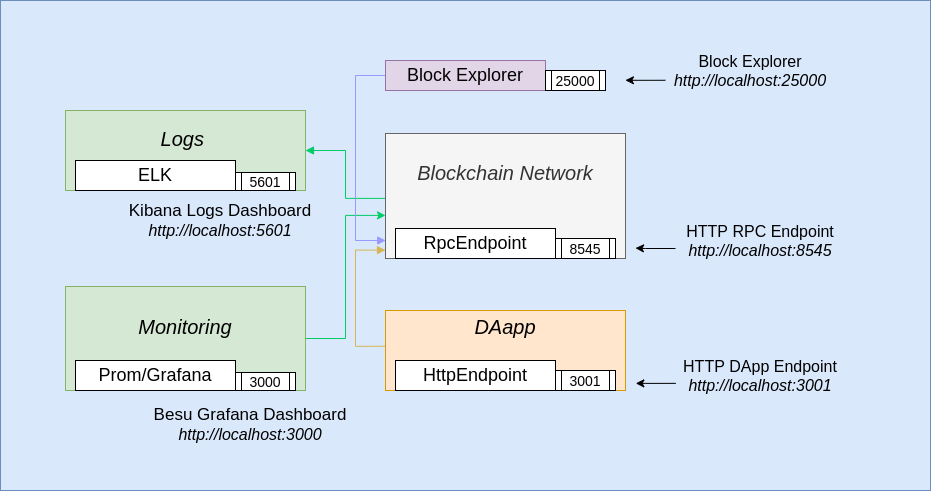
The overall architecture diagrams to visually show components of the blockchain networks is shown below.
Consensus Algorithm: The Besu based Quorum variant uses the IBFT2 consensus mechanism.
Private TX Manager: Both blockchain clients use Tessera
This is the simplest of the networks available and will spin up a blockchain network comprising 4 validators, 1 RPC
node which has an EthSinger proxy container linked to it so you can optionally sign transactions. To view the progress
of the network, the Alethio block explorer can be used and is available on http://localhost:25000.
Hyperledger Besu based Quorum also deploys monitoring solutions.
You can choose to make metrics monitoring via Prometheus available on http://localhost:9090,
paired with Grafana with custom dashboards available on http://localhost:3000.
You can also use Splunk to see all logs, traces and metrics available at http://localhost:8000 (with the credentials admin/quickstart).
Essentially you get everything in the architecture diagram above, bar the yellow privacy block
Use cases:
- you are learning about how Ethereum works
- you are looking to create a Mainnet or Ropsten node but want to see how it works on a smaller scale
- you are a DApp Developer looking for a robust, simple network to use as an experimental testing ground for POCs.
This network is slightly more advanced than the former and you get everything from the POA network above and a few Ethereum clients each paired with Tessera for its Private Transaction Mananger.
As before, to view the progress of the network, the Alethio block explorer can be used and is available on http://localhost:25000.
Hyperledger Besu based Quorum also deploys monitoring solutions.
You can choose to make metrics monitoring via Prometheus available on http://localhost:9090,
paired with Grafana with custom dashboards available on http://localhost:3000.
You can also use Splunk to see all logs, traces and metrics available at http://localhost:8000 (with the credentials admin/quickstart).
Essentially you get everything in the architecture diagram above.
Use cases:
- you are learning about how Ethereum works
- you are a user looking to execute private transactions at least one other party
- you are looking to create a private Ethereum network with private transactions between two or more parties.
Once the network is up and running you can make public transactions on the chain and interact with the smart contract at its deployed address,
and you can also make private transaction between members and verify that other nodes do not see it.
Under the smart_contracts folder there is a SimpleStorage contract which we use for both as an example.
For the public transaction:
cd smart_contracts
npm install
node scripts/public_tx.js
which creates an account and then deploys the contract with the account's address. It also initializes the default constructor
with a value (47). Once done, it will call the get function on the contract to check the value at the address, and
you should see it return the value. Then it will call the set function on the contract and update the value (123)
and then verify the address to make sure its been updated.
node scripts/public_tx.js
{
  address: '0x36781cB22798149d47c55A228f186F583fA9F64b',
  privateKey: '0x6ee9f728b2e4c092243427215ecd12e53b9c0e388388dc899b1438c487c02b61',
  signTransaction: [Function: signTransaction],
  sign: [Function: sign],
  encrypt: [Function: encrypt]
}
Creating transaction...
Signing transaction...
Sending transaction...
tx transactionHash: 0xaf86a44b2a477fbc4a7c9f71eace0753ac1ffc4c446aa779dbb8682bf765e8b9
tx contractAddress: 0xE12f1232aE87862f919efb7Df27DC819F0240F07
Contract deployed at address: 0xE12f1232aE87862f919efb7Df27DC819F0240F07
Use the smart contracts 'get' function to read the contract's constructor initialized value ..
Obtained value at deployed contract is: 47
Use the smart contracts 'set' function to update that value to 123 ..
Verify the updated value that was set ..
Obtained value at deployed contract is: 123
For the private transaction:
cd smart_contracts
npm install
node scripts/private_tx.js
which deploys the contract and sends an arbitrary value (47) from Member1 to Member3. Once done, it queries all three members (tessera)
to check the value at an address, and you should observe that only Member1 & Member3 have this information as they were involved in the transaction
and that Member2 responds with a 0x to indicate it is unaware of the transaction.
node scripts/private_tx.js
Creating contract...
Getting contractAddress from txHash:  0xc1b57f6a7773fe887afb141a09a573d19cb0fdbb15e0f2b9ed0dfead6f5b5dbf
Waiting for transaction to be mined ...
Address of transaction: 0x8220ca987f7bb7f99815d0ef64e1d8a072a2c167
Use the smart contracts 'get' function to read the contract's constructor initialized value ..
Waiting for transaction to be mined ...
Member1 value from deployed contract is: 0x000000000000000000000000000000000000000000000000000000000000002f
Use the smart contracts 'set' function to update that value to 123 .. - from member1 to member3
Transaction hash: 0x387c6627fe87e235b0f2bbbe1b2003a11b54afc737dca8da4990d3de3197ac5f
Waiting for transaction to be mined ...
Verify the private transaction is private by reading the value from all three members ..
Waiting for transaction to be mined ...
Member1 value from deployed contract is: 0x000000000000000000000000000000000000000000000000000000000000007b
Waiting for transaction to be mined ...
Member2 value from deployed contract is: 0x
Waiting for transaction to be mined ...
Member3 value from deployed contract is: 0x000000000000000000000000000000000000000000000000000000000000007b
Further documentation for this example and a video tutorial is also available.
There is an additional erc20 token example that you can also test with: executing node example/erc20.js deploys a HumanStandardToken contract and transfers 1 token to Node2.
This can be verified from the data field of the logs which is 1.
As an example we've included the Truffle Pet-Shop Dapp in the dapps folder and here is a video tutorial you
can follow of deployment to the network and using it. Please import the private key 0xc87509a1c067bbde78beb793e6fa76530b6382a4c0241e5e4a9ec0a0f44dc0d3 to
Metmask before proceeding to build and run the DApp with run-dapp.sh. Behind the scenes, this has used a smart contract that is compiled and then
deployed (via a migration) to our test network. The source code for the smart contract and the DApp can be found in the folder dapps/pet-shop
| This is a test account only and the private and public keys are publicly visible. Using test accounts on Ethereum mainnet and production networks can lead to loss of funds and identity fraud. In this documentation, we only provide test accounts for ease of testing and learning purposes; never use them for other purposes. Always secure your Ethereum mainnet and any production account properly. See for instance MyCrypto "Protecting Yourself and Your Funds" guide. |
As seen in the architecture overview diagram you can extend the network with monitoring, logging, smart contracts, DApps and so on
- Once you have a network up and running from above, install metamask as an extension in your browser
- Once you have setup your own private account, select 'My Accounts' by clicking on the avatar pic and then 'Import Account' and enter the private key
0xc87509a1c067bbde78beb793e6fa76530b6382a4c0241e5e4a9ec0a0f44dc0d3 - Build the DApp container and deploy by
cd dapps/pet-shop
./run_dapp.sh
When that completes open a new tab in your browser and go to http://localhost:3001 which opens the Truffle pet-shop box app
and you can adopt a pet from there. NOTE: Once you have adopted a pet, you can also go to the block explorer http://localhost:25000
and search for the transaction where you can see its details recorded. Metamask will also have a record of any transactions.

