| Author | Zhang Hongda |
|---|---|
| 2210010444@qq.com | |
| Institute | Harbin Institute of Technology |
A graphical user interface designed for trajectory programming by demonstration for UR5 robot.
- ROS kinetic
- Qt 5.9.1
- Install the pcl_tracker package and finish the preparation steps.
- Follow the installation guidance in universal_robot package.
- Add a new group_state named "forward".
roscd ur5_moveit_config/config
sudo gedit ur5.srdf
append the following contents to the file.
<group_state name="forward" group="manipulator">
    <joint name="elbow_joint" value="1.5707" />
    <joint name="shoulder_lift_joint" value="-1.5707" />
    <joint name="shoulder_pan_joint" value="0" />
    <joint name="wrist_1_joint" value="-1.5707" />
    <joint name="wrist_2_joint" value="-1.5707" />
    <joint name="wrist_3_joint" value="0" />
</group_state>
- Modify the xacro file of UR5 robot. Append a fix link "pen" to "tool0" link.
roscd ur_description/urdf/
sudo gedit ur5.urdf.xacro
append the following contents at the end of the file:
<xacro:property name="pen_length" value="0.125" />
<link name="${prefix}pen"/>
<joint name="${prefix}tool0_fixed_joint-pen_fixed_link" type="fixed">
    <origin xyz="0 0 ${pen_length}" rpy="0 0 0"/>
    <parent link="${prefix}tool0"/>
    <child link="${prefix}pen"/>
</joint>
NOTE: Modify the value of "pen_length" parameter according to actual condition.
- Install the ur_modern_driver package if you are using a UR version 3.0 and above, and make sure the robot is well connected.
- The implementation of the system requires a Kinectv2 sensor (Kinectv1 is fine but you may need to modify some of the files in the src folder).
- The camera should be well calibrated and fixed on a shelf above the working platform (see also iai_kinect2/kinect2_calibtation).
- The extrinsic parameters of the camera in the frame of UR's base link shoud be published through tf messages. (see also tf_base2camera and transform_publisher).
Step 1: clone the repository into your own workspace
cd ${PATH_TO YOUR_WORKSPACE_FOLDER}/src
git clone https://github.com/Zhang-Hongda/move_ur5_qt
Step 2: building
catkin_make
Step 3: activate the workspace
source ${PATH_TO YOUR_WORKSPACE_FOLDER}/devel/setup.bash
To start the program, first run:
roslaunch pcl_tracker demo.launch
NOTE: Modify the launch file if you don't want to use the transform_publisher package to publish the extrinsic parameters.
Then run:
roslaunch move_ur5_qt move_ur5_qt.launch
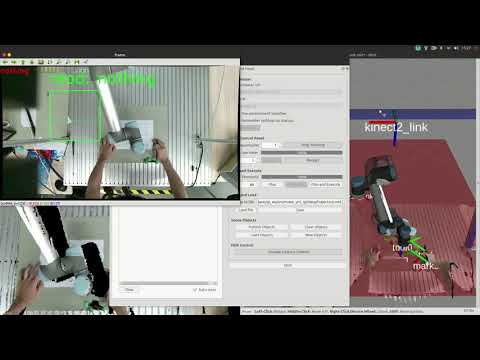
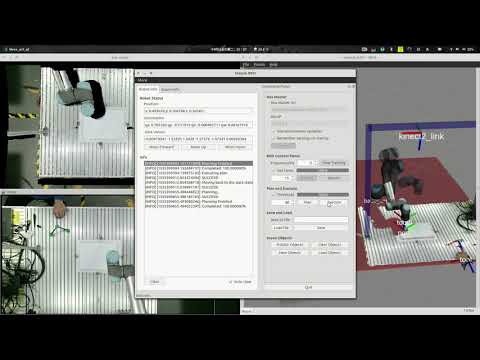
The interface should look like this:


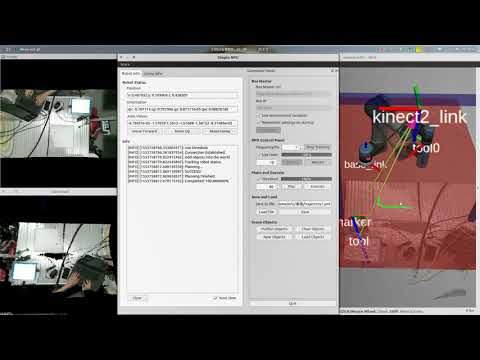
- The "Robot Info" tag displays information about the status of the robot and information concerning motion planning and execution
- The "Scene Info" tag displays information about the pose of the marker in robot's frame and information concerning trajectory demonstration.
- The command panel on the right allows users to control the trajectory programming process.
- The "Ros Master" panel
- Users can specify the url and ip for connecting the ros master.
- Check "Use environment variables" if you want to use the environmental configuration of your computer (recommended).
- Check "Remember settings on stratup" to allows the system to load the current configuration during startup next time.
- The "RPD Control Panel"
- To strat the tracking process, check the "Start Tracking" button.
- The frequency of capturing the tf messages of the marker can be modified in the spinbox (default value is 1 Hz).
- To record the trajectory of the moving marker, click on "Record" button and move the marker along the desired trajectory.
- Pause the recording process by clicking on "Stop" button.
- Click "Finish" to indicate the termination of the trajectory demonstration process.
- Check "Use timer" to allows the system to terminate the recording process automatically after countdown. The time of the countdown can be modified in the spinbox.
- The "Plan and Execute" panel
- After finishing the step of trajectory demonstration, users can plan and execute the recorded trajectory by clicking "Plan" and "Execute".
- The motion planning and execution are implemented through moveIT.
- Check "Threshold" to set a threshold for the completion rate of the motion planning (default value is 80%).
- The "Save and Load" panel
- Users can save the recorded trajectory in a .xml file.

- Users can load the trajectory file by clicking on the "Load file" button.

- Modify the path in "Save to file" to specify the path for saving trajectory files.
- If the path in "Save to file" is empty, a dialog will show up to help you find a path for saving files.

- Users can save the recorded trajectory in a .xml file.
- The "Scene Objects" panel
- This panel allows users to add and delete collison objects in moveIT planning space.
- By default, the system adds a table and a shelf in the space, but you may need to modify the models according to your own situation (a tutorial can be found at Planning Scene ROS API).
- The "New Objects" and "Load Objects" functions are currently in developing, which will allow users to draw 3D collision objects and place the objects in the planning space.
- To avoid collision, you can also use octomap.
- The "Ros Master" panel


- A quick guidance of the developed system.
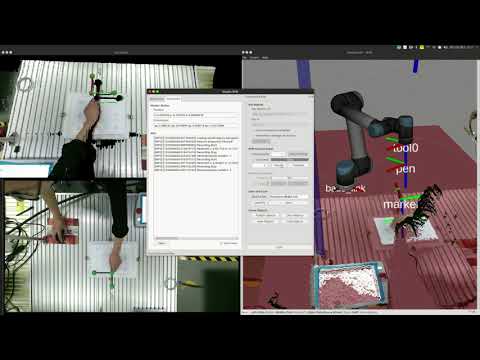
- Trajectory programming by specifying five waypoints.
- Trajectory programming with a continuous curve.
- A hand gesture recognition system has been developed.
- Gesture commands

- GUI


To start the program, run:
roslaunch move_ur5_qt T-RPD.launch
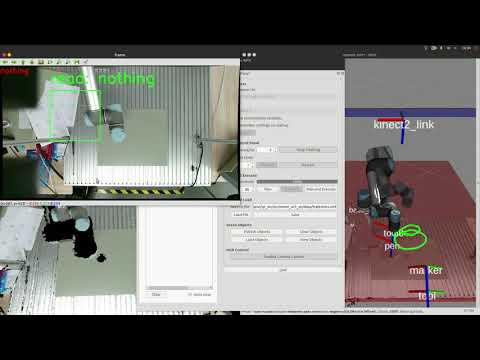
- Simply click on "Enable Gesture Control" button to enable gesture control.
- Now you can control the state of the system by performing gestures under the camera within the green box.
- The hand is segmented by applying an HSV filter. Users can double click on the image to specify a specific color.
- Gestures are recognized and published by an ROS node.
- The node publishes gesture information through topic "gestures".
- Trajectory programming system with hand gesture recognition.
- Programming a 3D trajectory with the system.