- First of all, we need to install GNS3 on our machine. You can download it from here.
- After installing GNS3, we need to install Docker. You can download it from here.
-
A first image with a system of our choice (in my case, I used alpine:3.14)
-
A second image with a system of our choice with some tools installed
| Zebra or quagga | A network routing software that will provide implementation of differents protocols (BGP), (OSPF), (RIP)... |
| BGPD | A BGP Daemon (bgp is a TCP protocol using the best way algorighm, it have some advantages for big networks because it will automaticaly take the best way to transmit the datas) |
| OSPFD | A OSPF Daemon (ospf is an IP protocol, used most of time for little networks ) . |
| IS-IS route engine service | IS-IS is a link-state IGP that uses the shortest-path-first (SPF) algorithm to determine routes |
| BusyBox or an equivalent | BusyBox is a multi-call binary that combines many common Unix utilities into a single executable. |
Note: You can find a document explaining difference between BGP and OSPF here
- First dockerfile containing BusyBox
FROM alpine:3.14

RUN apk add vim - Second dockerfile containing Zebra, BGPD, OSPFD, IS-IS route engine service
FROM alpine:3.14

RUN apk --no-cache add quagga tini && \
    rm -rf /var/cache/apk/* && \
    touch /etc/quagga/zebra.conf && \
    touch /etc/quagga/vtysh.conf && \
    touch /etc/quagga/ospfd.conf && \
    touch /etc/quagga/bgpd.conf && \
    touch /etc/quagga/isisd.conf

COPY entrypoint.sh /

RUN chmod +x /entrypoint.sh && chmod 777 -R /etc/quagga

ENTRYPOINT ["/sbin/tini", "--"]

CMD [ "/entrypoint.sh" ]- The entrypoint.sh will just run all the daemons
#!/bin/sh

ospfd -d && isisd -d && bgpd -d && zebra -d

/usr/sbin/watchquagga ospfd bgpd isisd zebraFirst of all, we need to create the same network topology on GNS3 as the one in the subject

- We need to configurate the routers with the following commands in order to set up the VXLAN
# R1
    vtysh # router CLI
    conf t # enter configuration mode
    ip forwarding # enable ip forwarding
    int eth1 # select the interface
    no sh # enable interface
    ip address 32.1.1.254/24 # set the ip address
    int eth0 # select the interface
    no sh # enable interface
    ip address 30.1.1.254/24 # set the ip address
    do write # apply the configuration
    exit # exit the configuration mode
    exit # exit the vtysh mode

    # eth0 will be the interface for the VXLAN

# R1 -> Unicast Routing
ip link add vxlan10 type vxlan id 10 remote 30.1.1.253 dstport 4789 dev eth0 #  distant ip address where the packet will be sent in port 4789
ip link set vxlan10 up
ip addr add 32.1.1.254/24 dev vxlan10

# R2
    vtysh # router CLI
    conf t # enter configuration mode
    ip forwarding # enable ip forwarding
    int eth1 # select the interface
    no sh # enable interface
    ip address 32.1.1.253/24 # set the ip address
    int eth0 # select the interface
    no sh # enable interface
    ip address 30.1.1.253/24 # set the ip address
    do write # apply the configuration
    exit # exit the configuration mode
    exit # exit the vtysh mode

    # eth0 will be the interface for the VXLAN

# R2 -> Unicast Routing
ip link add vxlan10 type vxlan id 10 remote 30.1.1.254 dstport 4789 dev eth0 # distant ip address where the packet will be sent in port 4789
ip link set vxlan10 up
ip addr add 32.1.1.253/24 dev vxlan10- Then, we need to create a bridge in order to connect the link vxlan10 to the eth1 interface to have the same traffic
# R1
ip link add name br0 type bridge
ip link set br0 up
ip link set vxlan10 master br0
ip link set eth1 master br0

# R2

ip link add name br0 type bridge
ip link set br0 up
ip link set vxlan10 master br0
ip link set eth1 master br0- Now, we need to configure the hosts
# H1
ip addr add 32.1.1.1/24 dev eth1
route add default gw 32.1.1.254

# H2
ip addr add 32.1.1.2/24 dev eth1
route add default gw 32.1.1.253- Now, we can ping the hosts
# From H1
ping 32.1.1.2

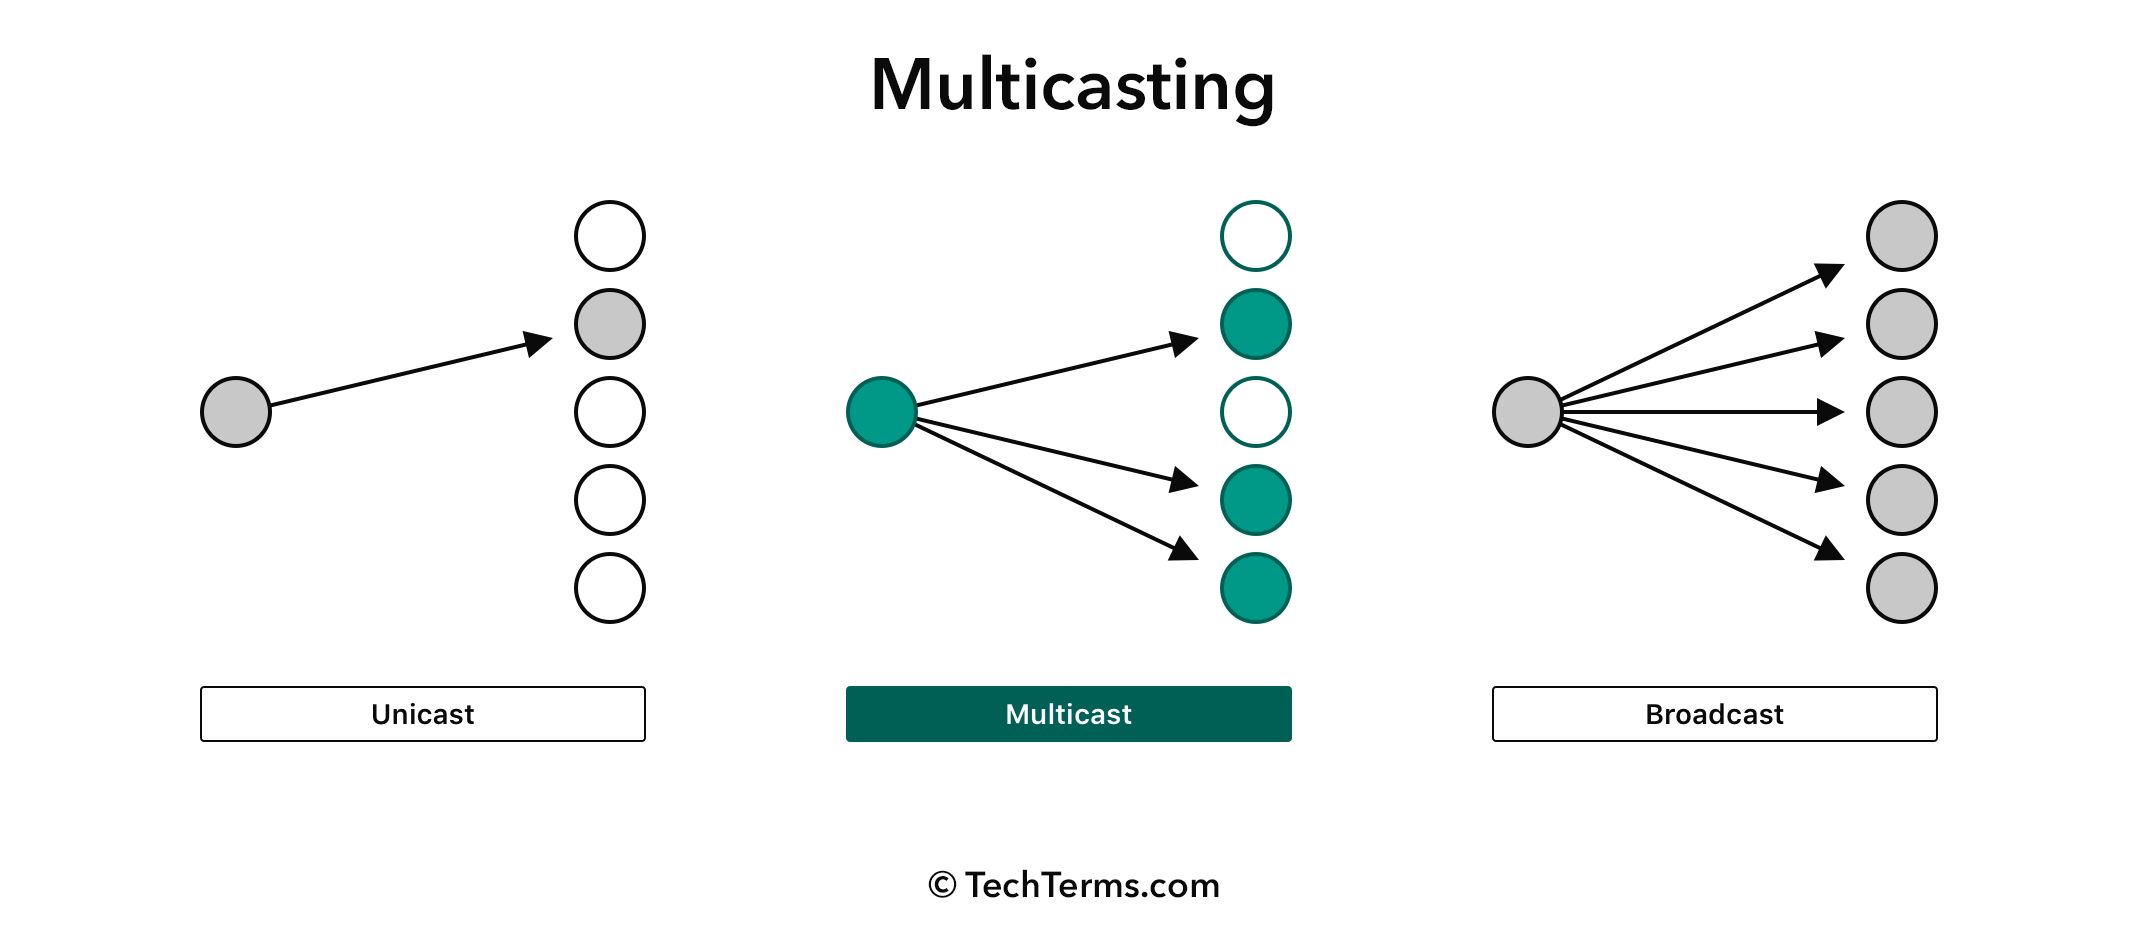
First of all, we need to understand what is the multicast routing
-
The unicast routing is used to send a packet to a specific destination. The packet will be sent to the destination IP address. The unicast routing is used for the majority of the network traffic.
-
The multicast routing is used to send a packet to a group of destination. The packet will be sent to the multicast IP address. The multicast routing is used for the network traffic that needs to be sent to a group of destination.
-
The broadcast routing is used to send a packet to all the destination. The packet will be sent to the broadcast IP address. The broadcast routing is used for the network traffic that needs to be sent to all the destination.
# R1
ip link delete vxlan10 # delete the unicast vxlan
ip link add vxlan10 type vxlan id 10 dstport 4789 group 239.1.1.1 dev eth0 ttl auto # 239.1.1.1 will communicate with 30.1.1.254 in the port 4789 with auto ttl for the packets
ip link set up dev vxlan10
ip addr add 32.1.1.254/24 dev vxlan10

# R2
ip link delete vxlan10 # delete the unicast vxlan
ip link add vxlan10 type vxlan id 10 dstport 4789 group 239.1.1.1 dev eth0 ttl auto # 239.1.1.1 will communicate with 30.1.1.253 in the port 4789 with auto ttl for the packets
ip link set up dev vxlan10
ip addr add 32.1.1.253/24 dev vxlan10First of all, we need to create the same network topology on GNS3 as the one in the subject

Before starting, we need to understand all the different notions and what is BGP
Border Gateway Protocol (BGP) is the postal service of the Internet. It will choose the fastest efficient route to deliver the different packages to the client using an internal AS routing protocol
The Internet is a network of networks, and autonomous systems are the big networks that make up the Internet. More specifically, an autonomous system (AS) is a large network or group of networks that has a unified routing policy. Every computer or device that connects to the Internet is connected to an AS.
lo is the loopback interface. This is a special network interface that the system uses to communicate with itself.
A reflector is a BGP router that will reflect the BGP messages to the other BGP routers
The VXLAN Tunnel End Point (VTEP) is the VXLAN encapsulation point and is connected to a traffic source which may be a stand-alone server or virtual machine
Open Shortest Path First (OSPF) is a route protocol that will find the fastest path to transfer datas
EVPN (Ethernet VPN) is a technology for carrying layer 2 Ethernet traffic in a VPN using WAN protocols (Wide area network)
BGP EVPN is a protocol to resolve efficiently those two different aspects without using multicast or learning the source address
A BGP EVPN network is a network that uses BGP to exchange the MAC address table between the different routers. The MAC address table is used to know where to send the packet to the destination.

-
Now, we need to configure all the different routers
-
In a first time, we need to setup the VXLAN, same as the part 2
#R2

ip link add vxlan10 type vxlan id 10 dstport 4789 # create the vxlan interface
ip link set vxlan10 up # enable the vxlan

ip link add name br0 type bridge # create the bridge
ip link set br0 up
ip link set vxlan10 master br0
ip link set eth1 master br0

#R3

ip link add vxlan10 type vxlan id 10 dstport 4789 # create the vxlan interface
ip link set vxlan10 up # enable the vxlan

ip link add name br0 type bridge # create the bridge
ip link set br0 up
ip link set vxlan10 master br0
ip link set eth1 master br0

#R4

ip link add vxlan10 type vxlan id 10 dstport 4789 # create the vxlan interface
ip link set vxlan10 up # enable the vxlan

ip link add name br0 type bridge # create the bridge
ip link set br0 up
ip link set vxlan10 master br0
ip link set eth1 master br0
-
After that, we will attribute ip address 10.1.1.2/30 to the eth1 interface and we will attribute to our loopback interface the ip address 1.1.1.1/32 and we will enable the BGP protocol on the route 1.1.1.1 as neighbor and finally, we will activate the EVPN on the router
# R2 ip conf
vtysh # router CLI
enable
conf t # configuration mode
hostname routeur_nabentay_2 # set the hostname
no ipv6 forwarding # disable ipv6
int eth1 # interface eth1
no sh # disable the shutdown
ip address 10.1.1.2/30 # set the ip address to the interface eth1
ip ospf area 0 # set the ospf area to 0

int eth0 # interface eth0
no sh # disable the shutdown
ip address 20.1.1.254/24 # set the ip address to the interface eth0
ip ospf area 0 # set the ospf area to 0

int lo # interface lo
ip address 1.1.1.2/32 # set the ip address to the interface lo
ip ospf area 0 # set the ospf area to 0

router bgp 1
neighbor 1.1.1.1 remote-as 1 # set the neighbor
neighbor 1.1.1.1 update-source lo # set the update source

address-family l2vpn evpn # activate the EVPN
neighbor 1.1.1.1 activate # activate the neighbor
advertise-all-vni
exit-address-family

router ospf
do write
# R3 ip conf
vtysh
enable
conf t
hostname routeur_nabentay_3
no ipv6 forwarding
int eth2
no sh
ip address 10.1.1.6/30
ip ospf area 0

int eth0
no sh
ip address 20.1.1.253/24
ip ospf area 0

int lo
ip address 1.1.1.3/32
ip ospf area 0

router bgp 1
neighbor 1.1.1.1 remote-as 1
neighbor 1.1.1.1 update-source lo

address-family l2vpn evpn
neighbor 1.1.1.1 activate
advertise-all-vni
exit-address-family

router ospf
do write
# R4 ip conf
vtysh
enable
conf t
hostname routeur_nabentay_4
no ipv6 forwarding
int eth3
no sh
ip address 10.1.1.10/30
ip ospf area 0

int eth0
no sh
ip address 20.1.1.252/24
ip ospf area 0

int lo
ip address 1.1.1.4/32
ip ospf area 0

router bgp 1
neighbor 1.1.1.1 remote-as 1
neighbor 1.1.1.1 update-source lo

address-family l2vpn evpn
neighbor 1.1.1.1 activate
advertise-all-vni
exit-address-family

router ospf
do write
-
Now, we will configure the reflector
# R1
vtysh
enable
conf t
hostname routeur_nabentay_1
no ip forwarding
no ipv6 forwarding
int eth1
no sh
ip address 10.1.1.1/30

int eth2
ip address 10.1.1.5/30

int eth3
ip address 10.1.1.9/30

int lo
ip address 1.1.1.1/32

router bgp 1
neighbor ibgp peer-group
neighbor ibgp remote-as 1
neighbor ibgp update-source lo
bgp listen range 1.1.1.0/29 peer-group ibgp

address-family l2vpn evpn
neighbor ibgp activate
neighbor ibgp route-reflector-client
exit-address-family

router ospf
network 0.0.0.0/0 area 0

line vty
do write
-
do sh ip route # Return route used by router

do sh bgp summary # Return a summary about bgp like neighboor, used routes...
do sh bgp l2vpn evpn # Return bgp evpn type route that exist