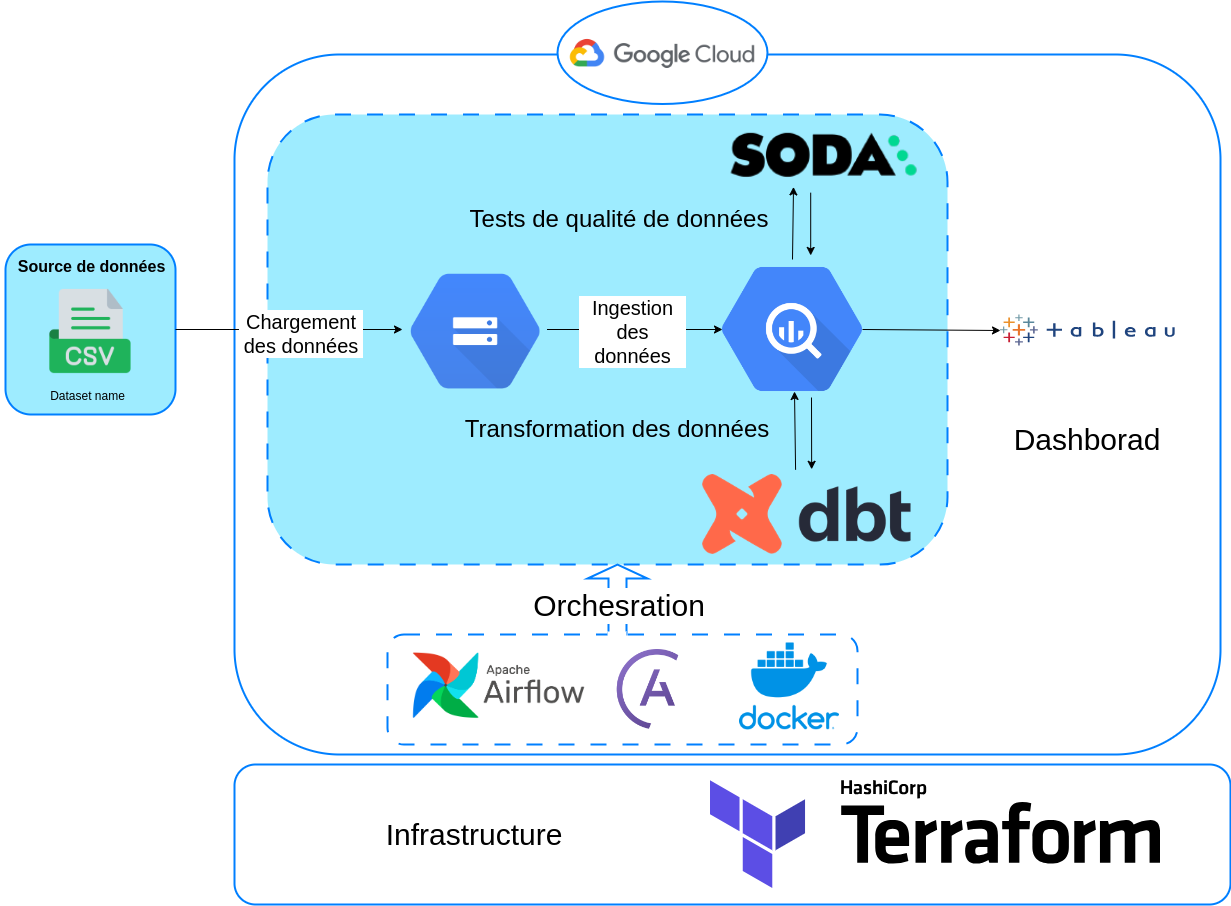
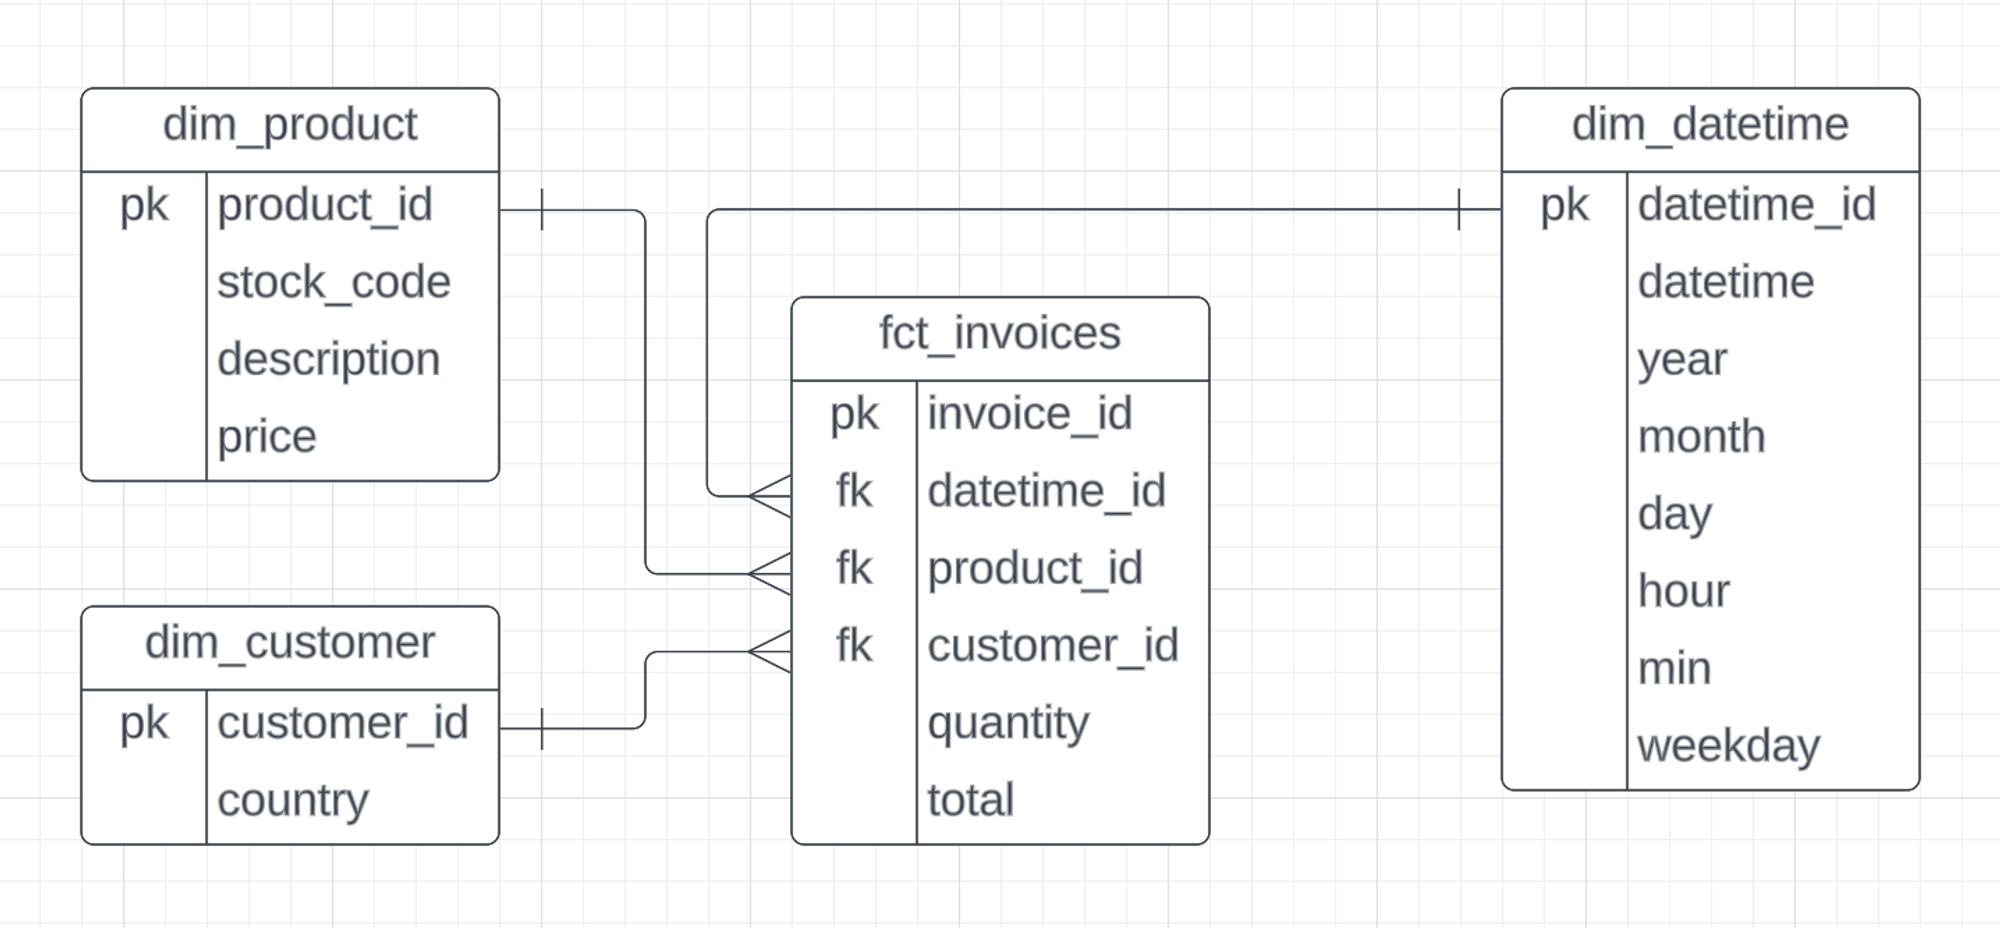
A data engineering project in which we'll be creating an ETL data pipeline to extract, analyze and visualize information from the data of an online retail company.
For the ML model, this is a website developed with Dash and Python, under the name FashionMe, where you can consult the list of the most popular, most expensive and least expensive products. It also incorporates an additional database containing images associated with the products.
Data on online retail transactions.
| Column | Description |
|---|---|
| InvoiceNo | Invoice number. Nominal, a 6-digit integral number uniquely assigned to each transaction. If this code starts with the letter 'c', it indicates a cancellation. |
| StockCode | Product (item) code. Nominal, a 5-digit integral number uniquely assigned to each distinct product. |
| Description | Product (item) name. Nominal. |
| Quantity | The quantities of each product (item) per transaction. Numeric. |
| InvoiceDate | Invoice Date and time. Numeric, the day and time when each transaction was generated. |
| UnitPrice | Unit price. Numeric, Product price per unit in sterling. |
| CustomerID | Customer number. Nominal, a 5-digit integral number uniquely assigned to each customer. |
| Country | Country name. Nominal, the name of the country where each customer resides. |
- Configure google cloud infrastructure using Terraform.
- Configure the local Airflow environment with Astro CLI.
- Create a data pipeline using Airflow.
- Upload CSV files to Google Cloud Storage.
- Manage data in BigQuery.
- Implement data quality checks in the pipeline using - Soda.
- Integrate dbt and cosmos to run data models with Airflow.
- Create a dashboard using Tableau.
- Train ML model with BigQueryML.
- Infrastructure: Terraform
- Google Cloud Platform (GCP)
- Data Lake : Cloud Storage
- Data Warehouse : BigQuery
- Astro SDK for Airflow setup
- Workflow orchestration: Apache Airflow
- Transforming data: dbt & cosmos
- Data quality checks: Soda
- Containerization: Docker
- Data Visualization: Tableau
- Machine Learning: BigQueryML
First, clone the repository using http:
git clone https://github.com/Youcef-Abdelliche/trend-sales-detection.git
or ssh:
git clone git@github.com:Youcef-Abdelliche/trend-sales-detection.git
- Create your GCP free trial.
- Set up new project and write down your Project ID.
- Configure service account to get access to this project and download auth-key (.json). Please check the service account has all the permissions below:
- Viewer
- Storage Admin
- Storage Object Admin
- BigQuery Admin
- Download auth-key json file and replace it with service-account.json file in the path:
include/gcp/service-account.json
-
Download SDK for local setup.
-
Enable the following options under the APIs and services section:
- Identity and Access Management (IAM) API
- IAM service account credentials API
We used Terraform to build and manage GCP infrastructure. Terraform configuration files are located in the separate folder. There are 2 configuration files:
- variables.tf - contains variables to make your configuration more dynamic and flexible;
- main.tf - is a key configuration file consisting of several sections.
Now we used the steps below to generate resources inside the GCP:
- Move to the terraform folder using bash command
cd - Run
terraform initcommand to initialize the configuration. - Use
terraform planto match previews local changes against a remote state. - Apply changes to the cloud with
terraform applycommand.
- Start Airflow on your local machine by running:
astro dev start
This command will start 4 Docker containers on your machine, each for a different Airflow component:
- Webserver: The Airflow component responsible for rendering the Airflow UI
- Scheduler: The Airflow component responsible for monitoring and triggering tasks
- Triggerer: The Airflow component responsible for triggering deferred tasks
- Postgres: Airflow's Metadata Database
Run 'docker ps' to verify that all 4 Docker containers were created.
docker ps
- Access the Airflow UI for your local Airflow project. To do so, go to
http://localhost:8080/
and log in with those crededntials: Username: 'admin' Password: 'admin'
- Configure your Google Cloud Platform credentials.
- Create and configure the necessary connections in Airflow: In the Airflow UI:
- Airflow → Admin → Connections
- id: gcp
- type: Google Cloud
- Keypath Path:
/usr/local/airflow/include/gcp/service_account.json
- Test the connection (Click on 'Test' button) → Save (Click on 'Save' button)
- Customize the Airflow DAGs to suit your specific requirements.
- Run the pipeline and monitor its execution.
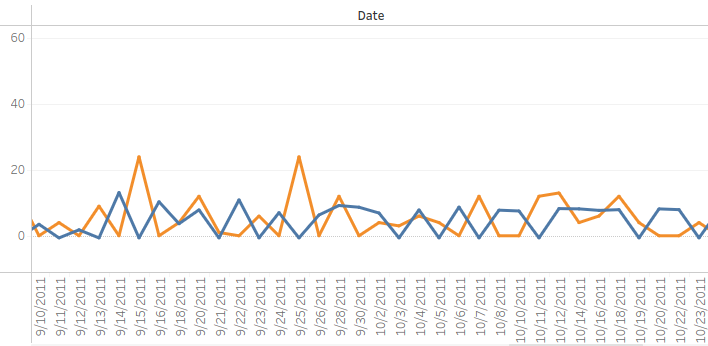
we used BigQuery ML to create an ARIMA model for sales prediction for each product. the SQL query used to create the Model and forecast the values is in the model creation.sql file
finally, we visualized the predicted values in tableau to compare theme with the actual values


