| Cortical - outer | Cortical - inner | Subcortical |
|---|---|---|
 |
 |
 |
*Animation created using BrainPainter, by Garbarino and Lorenzi, IPMI, 2019 *
Sep 2019: BrainPainter can now be run straight from the browser: https://brainpainter.csail.mit.edu/
-
Sept 2019: Our paper describing BrainPainter has been invited for an oral presentation at the MICCAI 2019 MBIA workshop in Shenzhen, China.
-
Aug 2019: In addition to the DK atlas, we now support two more atlases: Destrieux and Trouville. We also support inflated and white-matter surfaces.
csv file with biomarkers (i.e. numbers) for each brain region, in a user-defined range (0-3 here): 0 - white, 1 - orange, 2 - light red 3 - dark red (colours can be changed)
| Biomarker data | hippocampus [0-3] | inferior temporal [0-3] | superior parietal [0-3] | ... |
|---|---|---|---|---|
| Image 1 | 0.6 | 2.3 | 1.3 | .. |
| Image 2 | 1.2 | 0.0 | 3.0 | .. |
| Image 3 | 2.4 | 0.1 | 1.6 | .. |
cortical + subcortical drawings for each table row -- each region is coloured according to the numbers above:
| Cortical - outer | Cortical - inner | Subcortical |
|---|---|---|
 |
 |
 |
Author: Razvan V. Marinescu - razvan@csail.mit.edu
BrainPainter is a software for colouring brain images using any used-defined input. For each brain region it takes values from a 0-1 (or 0-max), and colours the brain regions according to these numbers. Numbers could represent biomarkers or absolutely anything.
The software is easily customisable -- one can change the colour palette, the type of brain surface, image resolution, etc ... More details below. It also requires no installation, as it is already pre-installed in a docker container.
If you find the software useful, I would appreciate if you could cite it at the end of the figure caption, along these lines: "Fig 1. ... Drawings generated using BrainPainter [ref].".
References:

@article{marinescu2019brain,
  title={BrainPainter: A software for the visualisation of brain structures, biomarkers and associated pathological processes},
  author={Marinescu, Razvan and Eshaghi, Arman and Alexander, Daniel and Golland, Polina},
  journal={arXiv preprint arXiv:1905.08627},
  year={2019}
}
License: CC-BY 3.0
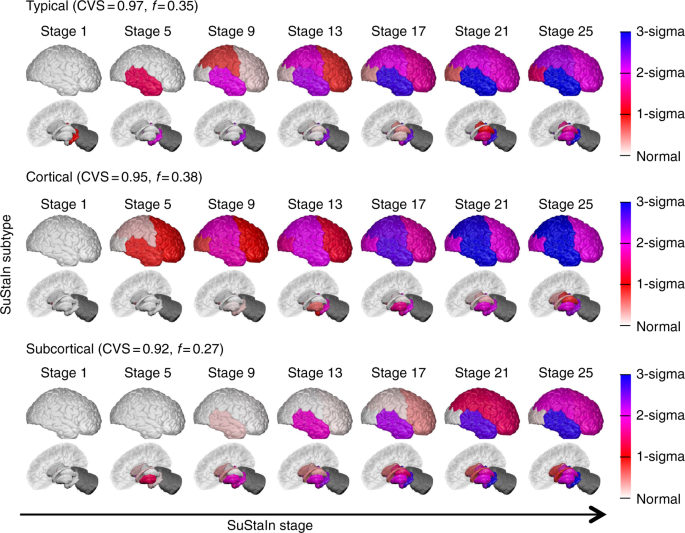
*Brains used by Young et al, Nature Comms., 2018 *

Subcortical regions used by Wijeratne et al, Ann. Clin. Neurol., 2018
In order to remove the need to install blender and it's dependencies, I made a container which has blender and this software already pre-installed and ready to run.
-
Install Docker for your current operating system. For MacOS use this link: https://docs.docker.com/v17.12/docker-for-mac/install/#download-docker-for-mac
Make sure you run the docker deamon after installing. To check if it installer properly, run:
sudo docker infoIf prompted to make an account with dockerhub, skip as you don't need one.
-
Download the docker image with the bundled blender and brain coloring software using:
sudo docker run -it mrazvan22/brain-coloringThe image size may be large (~1GB), so use a good connection. Note that after the download, it will automatically connect to the container. If it connected successfully, you should see the shell as follows:
root@e3b175e886db:/# -
Go to the directory and pull the latest changes, if any:
cd /home/brain-coloring/git pull origin master(update to latest changes, if any) -
Generate the brain images using the make command (also see Makefile):
make
If successful, you should see the images in folder output/DK_output/ being updated. For configuring a new experiment, see section "Running the Software" below.
Note that this is harder due to the need of installing packages in the python version bundled with blender.
-
Install blender 2.79 from https://www.blender.org/download/releases/2-79/
-
Pull the git repository:
git clone https://github.com/mrazvan22/brain-coloring -
Go to the directory and run the make command
cd brain-coloring/makeIf successful, you should see blender loading the structures and updating the images in output/DK_output.
-
If running on MacOS, blender might not be added to your path. In this case, run (change the path/to/blender to your installation location):
sudo /Applications/Blender/blender.app/Contents/MacOS/blender --background --python blendCreateSnapshot.py -
If python libraries are missing, install them using:
pip3 install scipypip3 install numpyIf the same error is obtained even after installing, it's probably because the packages are installed in the default system-wide python instead of the local python. See this answer for how to fix this:
https://blender.stackexchange.com/questions/5287/using-3rd-party-python-modules
Note: do not install the bpy package, as it comes automatically with the blender-bundled python
-
Create a new DK_myexperiment.csv file with pathology numbers according to the format in input/DK_template.csv (or any of the other templates there). Each row will generate a pair of cortical/subcortical images.
-
If using docker, copy your DK_myexperiment.csv to the docker container:
sudo docker cp DK_myexperiment.csv 9f52258c25f6:/home/brain-coloring/inputHere, replace 9f52258c25f6 with your container-ID, which you can find by running
docker pson host:CONTAINER ID IMAGE COMMAND 9f52258c25f6 mrazvan22/brain-coloring "/bin/bash" -
change configuration file config.py:
- input file: set to your new input file, input/DK_myexperiment.csv
- input folder: set to your new output folder, e.g. output/DK_myexperiment
- brain type: pial, inflated or white (white-matter)
- image type: cortical-outer, cortical-inner or subcortical
- RGB colours to show pathology
- the mapping between your atlas and the 3D brain regions that will be coloured (we use the DK atlas)
- image resolution, etc ...
-
re-generate images using the Makefile command
make -
If using docker, copy the image out of the docker container to the home directory ~/ :
sudo docker cp <yourContainerID>:/home/brain-coloring/output/DK_output/Image_1_cortical-outer.png ~/