![]()
![]()

Qolsys Gateway (qolsysgw) is an AppDaemon
automation that serves as a gateway between a Qolsys IQ Panel
(2, 2+ or 4)
and Home Assistant. Qolsys Gateway works by establishing a connection
to your Qolsys Panel and uses the MQTT integration of Home Assistant.
It takes advantages of the MQTT discovery
feature (automatically enabled when you setup the integration) to declare the
device, alarm control panels (for each partition) and different sensors, and
keep them up to date with the information coming from the panel, while
providing you with the means to arm, disarm or trigger your alarm directly
from Home Assistant, manually or through automations.
- How It Works
- Requirements
- Installation
- Configuration
- Other documentation
- Acknowledgements and thanks
Qolsys Gateway is an async application and has a few parallel workflows:
-
The communication with the Qolsys Panel
-
Qolsys Gateway connects to your Qolsys Panel using the configured information (hostname, token, port), thanks to a Control4 interface
-
As soon as the connection is established, Qolsys Gateway requests from the panel the information on the current state of the panel, its partitions and sensors
-
Qolsys Gateway listens for messages from the panel, and calls a callback method everytime a message can be parsed to an executable action; the callback will push that message in an MQTT thread (that step is not mandatory but doing that loop allows to debug the application from Home Assistant by sending events directly in MQTT)
-
Every 4 minutes, a keep-alive message is sent to the connection, in order to avoid the panel from disconnecting Qolsys Gateway
-
-
The communications with MQTT
-
Qolsys Gateway listens to an
eventtopic, when a message is received, we update the state of the panel according to the event (it can be updating the sensors, the partitions or the panel itself). Messages in that topic are the messages that come from the Qolsys Panel, and that we intepret as change to the state of the panel. In general, with the update, we will trigger a few MQTT messages to be sent to update the status of the element at the source of the event in Home Assistant. -
Qolsys Gateway also listens to a
controltopic, when a message is received, we communicate the action to perform to the Qolsys Panel. Messages in that topic are coming from Home Assistant as reactions to service calls on thealarm_control_panelentities, or of manually configured actions. They can be used to arm or disarm the system, or even to trigger the alarm on the device.
-
-
A Qolsys IQ Panel 2 or 2+ (software version 2.5.3 or greater), or 4 (software version 4.1 or greater), for which you have the dealer code (defaults to
2222). In some cases, the installer code (defaults to1111) might be sufficient, but in my experience, it was not, as the required menus were not visible. -
Understanding that this automation is not part of the core of Home Assistant and is thus not officially supported by Home Assistant. By using it, you agree that neither Home Assistant nor myself are responsible for any issues with your Home Assistant configuration, loss of data, or whatever could be caused by using Qolsys Gateway. Setting up Qolsys Gateway requires enabling the Control4 protocol on your Qolsys Panel, which may open to security issues and someone taking over control of your alarm system, so please be aware of what you are doing, and only do it if you are ready to take those risks.
Installing Qolsys Gateway requires the following steps.
You can get to the Home Assistant documentation for installation page in order to setup Home Assistant for your needs.
You will require a working MQTT broker alongside your Home Assistant
installation. Home Assistant provides documentation on how to install
and configure an MQTT broker.
If you wish to use MQTT through a docker deployment, you can use the
eclipse-mosquitto docker image.
If you can, setup a username and password to secure your broker even more.
Qolsys Gateway is an AppDaemon automation, which means it depends on a working and running version of AppDaemon, connected to your Home Assistant. You can find all the resources necessary in AppDaemon's documentation about how to install AppDaemon and how to configure it with the HASS plugin for communicating with Home Assistant, and with the MQTT plugin for communicating with your MQTT broker.
If you wish to use AppDaemon through a docker deployment, you can use the
acockburn/appdaemon docker image.
See an example of appdaemon.yaml
appdaemon:
  time_zone: "America/New_York" # Adapt this to your actual timezone

  # All three of those might be already filled for you, or you set the
  # values here, or use the secrets.yaml file to setup the values
  latitude: !secret latitude
  longitude: !secret longitude
  elevation: !secret elevation

  plugins:
    # If using the add-on in Home Assistant, that plugin will already be
    # enabled; when using the docker container, you will have to add it here
    HASS:
      type: hass
      ha_url: "http://homeassistant:8123"
      token: !secret ha_token # The token you get from home assistant

    # And we need to add the MQTT plugin
    MQTT:
      type: mqtt
      namespace: mqtt # We will need that same value in the apps.yaml configuration
      client_host: mosquitto # The IP address or hostname of the MQTT broker
      client_port: 1883 # The port of the MQTT broker, generally 1883

      # Only if you have setup an authenticated connection, otherwise skip those:
      client_user: appdaemon # The username
client_password: !secret mqtt_password # The passwordHACS is the Home Assistant Community Store and allows for community integrations and automations to be updated cleanly and easily from the Home Assistant web user interface. If it is simple to install Qolsys Gateway without HACS, keeping up to date requires manual steps that HACS will handle for you: you will be notified of updates, and they can be installed by a click on a button.
If you want to use HACS, you will have to follow their documentation on how to install HACS.
Installing Qolsys Gateway is pretty simple once all the applications above are setup. You can either follow the path using HACS (a bit more steps initially, easier on the longer run) or use the manual setup approach.
To install Qolsys Gateway with HACS, you will need to make sure that you enabled AppDaemon automations in HACS, as these are not enabled by default:
- Click on
Configurationon the left menu bar in Home Assistant Web UI - Select
Devices & Services - Select
Integrations - Find
HACSand click onConfigure - In the window that opens, make sure that
Enable AppDaemon apps discovery & trackingis checked, or check it and clickSubmit - If you just enabled this (or just installed HACS), you might have to wait a few minutes as all repositories are being fetched; you might hit a GitHub rate limit, which might then require you to wait a few hours for HACS to be fully configured. In this case, you won't be able to proceed to the next steps until HACS is ready.
Now, to install Qolsys Gateway with HACS, follow these steps:
- Click on
HACSon the left menu bar in Home Assistant Web UI - Click on
Automationsin the right panel - Click on
Explore & download repositoriesin the bottom right corner - Search for
qolsysgw, and click onQolsys Gatewayin the list that appears - In the bottom right corner of the panel that appears, click on
Download this repository with HACS - A confirmation panel will appear, click on
Download, and wait for HACS to proceed with the download - Qolsys Gateway is now installed, and HACS will inform you when updates are available
Installing Qolsys Gateway manually can be summarized by putting the content of the
apps/ directory of this repository (the qolsysgw/ directory) into the apps/
directory of your AppDaemon installation.
For instance, if your Home Assistant configuration directory is in /hass/config/,
you most likely have AppDaemon setup in /hass/config/appdaemon/, and you can thus
put qolsysgw/ into /hass/config/appdaemon/apps/.
The MQTT integration of Home Assistant needs to be configured with your MQTT broker in order for Qolsys Gateway to work. If you haven't setup the MQTT integration yet, you can do so with the following steps:
- Click on
Configurationon the left menu bar in Home Assistant Web UI - Select
Devices & Services - Select
Integrations - Click on
Add Integrationin the bottom right corner - Search for
MQTT, and click on the MQTT integration - Fill in the information as configured for your MQTT broker (hostname, port, and username and password if setting things up with an authenticated connection)
- Click on
Submit, Home Assistant will try and connect to the MQTT broker, and the integration will be setup upon success.
If you already have the Control4 token for your Qolsys IQ Panel, you can skip that step. If you do not understand what that sentence is about, you definitely need to go through that step.
Qolsys Gateway communicates with your Qolsys Panel using a protocol that exists for communications with Control4 automation. That protocol is not enabled on your Qolsys Panel by default, so we will need to enable it and note the token that will be provided to us.
To enable the feature and get your secure token, you will need to:
-
Connect your Qolsys Panel to your WiFi network (if not already done)
- Swipe down from the top menu bar and select
Settings. - Touch
Advanced Settingsand use either the installer code or the dealer code (you might have access with the main user code, too). - Touch
Wi-Fi. - Check the
Enable Wi-Fibox if not already active. - Available networks will appear in a list.
- Touch the desired network and use the keyboard to type the password (if required).
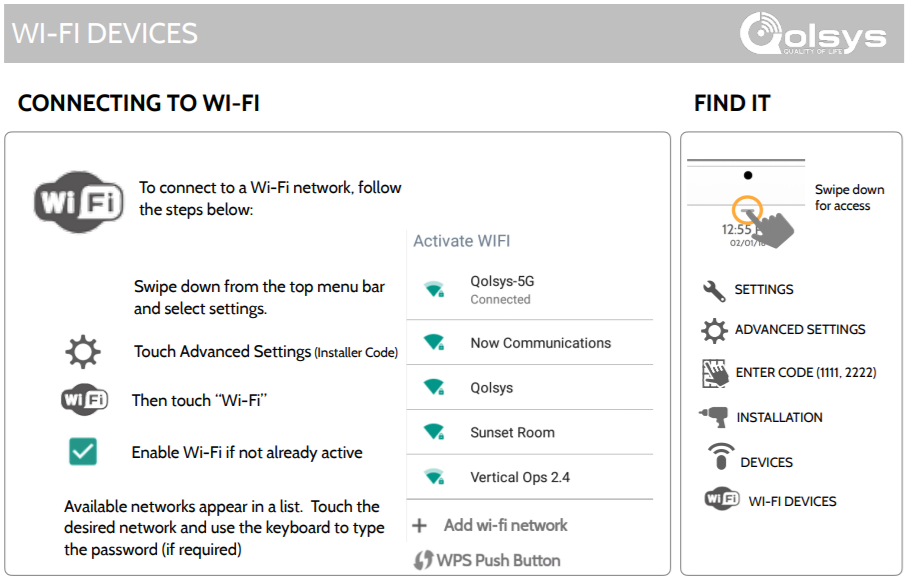
- Swipe down from the top menu bar and select
-
Enable 3rd party connections
- Swipe down from the top menu bar and select
Settings. - Touch
Advanced Settingsand use the dealer code (you might have access with the installer code, too). - Touch
Installation. - Touch
Devices. - Touch
Wi-Fi Devices. - Touch
3rd Party Connections. - Check the
Control4box to enable 3rd Party Connections. - The panel will reboot in order to apply the change.
- Come back to the same menu once the reboot is done.
- Touch
Reveal secure tokenand note the token that the panel is providing you, we will need it to configure Qolsys Gateway. - If you ever leak that token, come back to this menu and touch
Regenerate secure tokenin order to make sure that nobody can get access to control your alarm system.
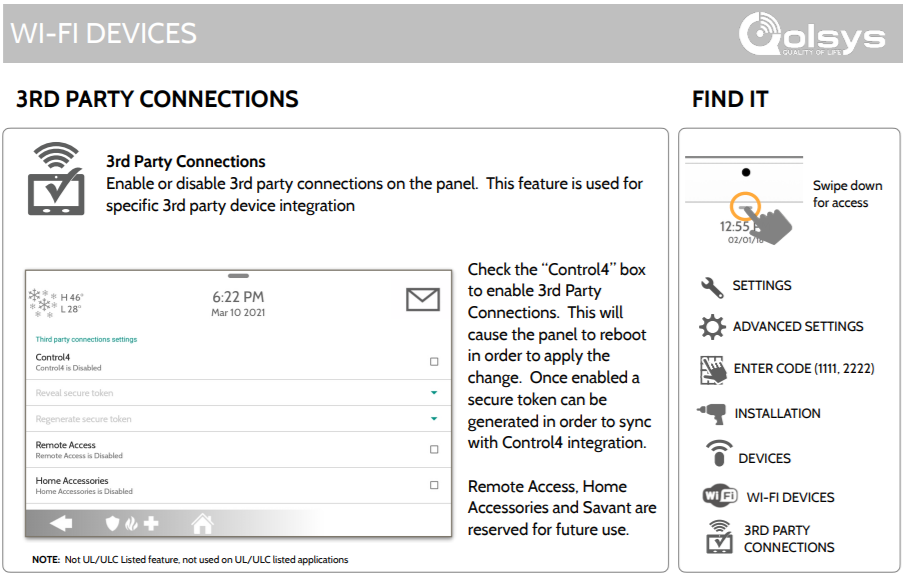
- Swipe down from the top menu bar and select


Qolsys Gateway needs to be configured in the apps.yaml file of AppDaemon.
If your Home Assistant configuration directory is in /hass/config/, and
AppDaemon in /hass/config/appdaemon/, you will find this file in
/hass/config/appdaemon/apps/apps.yaml (next to the qolsysgw/ directory
we moved here previously).
The minimum configuration to use Qolsys Gateway is the following:
qolsys_panel:
  module: gateway
  class: QolsysGateway
  panel_host: <qolsys_panel_host_or_ip>
  panel_token: <qolsys_secure_token>
With:
- qolsys_panel: the name of the application for AppDaemon. You can run
multiple instances of Qolsys Gateway, each with a different Qolsys Panel,
if you ever need so. See the configuration options below, specifically
panel_unique_id, to be able to configure multiple devices. - module: the main module from which QolsysGateway will be loaded.
This parameter is mandatory and cannot be changed as it references
the
qolsysgw/gateway.pyfile. - class: the name of the class that will be loaded by AppDaemon for
that automation. This parameter is mandatory and cannot be changed as
it references the
QolsysGatewayclass in theqolsysgw/gateway.pyfile. - panel_host: the hostname or IP address of your Qolsys Panel, as connected to your network. That hostname or IP address must, of course, be accessible from the server running AppDaemon.
- panel_token: the secure token we got from enabling Control4 on the Qolsys Panel.
-
panel_port: the port to use to connect to your Qolsys Panel with the Control4 protocol. This is not really configurable on the panel itself, but available as an option if needed (for instance, for NAT needs). Defaults to
12345.qolsys_panel: # ... panel_port: 4242 # use the port 4242 # ...
-
panel_mac: the mac address of your Qolsys Panel. This is something you can find from your router, and might allow you to link the device created in Home Assistant by Qolsys Gateway to other entries related to your Panel. Not used by default, and Qolsys Gateway will try to resolve the mac address using ARP - which does not work when using appdaemon in docker, except if using the host network mode -, or ignore it entirely if not possible.
qolsys_panel:
  # ...
  panel_mac: aa:bb:cc:dd:11:22
  # ...
-
panel_user_code: the code to send to your Qolsys Panel to disarm your system (and arm when in secure arm mode). This needs to be a valid user code added to your Qolsys Panel. It is recommended to use a distinct user code if setup, so you have the ability to roll it as needed. If unset (or
null), you will not be able to disarm your alarm system without providing a code in Home Assistant. Defaults tonull.qolsys_panel: # ... panel_user_code: 1234 # there is a code '1234' allowing me to disarm my Qolsys Panel # ...
-
arm_away_exit_delay: the delay to set when arming away through Qolsys Gateway. Setting the value to
0will instantly arm the alarm system. Setting tonullwill let the panel use its default value. Setting to any other positive value will set that delay. This will not change the default behavior of the panel when handled manually, simply what will happen when arming away from Home Assistant through Qolsys Gateway. Note that if "Auto Stay" is enabled (may be the default in some cases), an exit delay is configured, and no door is opened or closed during the delay, the panel will be set to "Arm Stay" instead. Defaults tonull.qolsys_panel: # ... arm_away_exit_delay: 0 # arming instantly when triggered from Home Assistant, since related to automations # ...
-
arm_stay_exit_delay: the delay to set when arming stay through Qolsys Gateway. Setting the value to
0will instantly arm the alarm system. Setting tonullwill let the panel use its default value. Setting to any other positive value will set that delay. This will not change the default behavior of the panel when handled manually, simply what will happen when arming stay from Home Assistant through Qolsys Gateway. Defaults tonull.qolsys_panel: # ... arm_stay_exit_delay: 10 # arming in 10 seconds when triggered from Home Assistant # ...
-
arm_away_bypass: whether or not to bypass sensors that are "open" when arming away through Qolsys Gateway. Bypassed sensors are then ignored until the next time the panel will be armed (this means that closing and reopening those sensors after arming with the bypass will not trigger an alarm). Setting the value to
truewill always bypass open sensors when arming away, while setting it tofalsewill always disable the bypass. If you have a default behavior for this defined in your panel, this parameter will override it. Leaving the parameter unset will leave the panel decide what to do. Defaults tonull.qolsys_panel: # ... arm_away_bypass: true # will bypass the open sensors if any # ...
-
arm_stay_bypass: whether or not to bypass sensors that are "open" when arming stay through Qolsys Gateway. Bypassed sensors are then ignored until the next time the panel will be armed (this means that closing and reopening those sensors after arming with the bypass will not trigger an alarm). Setting the value to
truewill always bypass open sensors when arming stay, while setting it tofalsewill always disable the bypass. If you have a default behavior for this defined in your panel, this parameter will override it. Leaving the parameter unset will leave the panel decide what to do. Defaults tonull.qolsys_panel: # ... arm_stay_bypass: false # will NOT bypass the open sensors if any # ...
-
arm_type_custom_bypass: the type of arming to use when using
ARM_CUSTOM_BYPASSfrom Home Assistant. This arming type will automatically enable bypassing the open sensors. Setting the value toarm_awaywill lead to the panel being armed in away mode with bypass enabled whenARM_CUSTOM_BYPASSis used. Setting the value toarm_staywill lead to the panel being armed in stay mode. Defaults toarm_away.qolsys_panel: # ... arm_type_custom_bypass: arm_stay # to arm the panel in stay mode when using the custom bypass arming type # ...
-
panel_unique_id: the unique ID of the device that will be created for the panel in Home Assistant. All the partitions and sensors unique IDs will be based on that unique ID to, in order to separate cleanly the potential multiple panels you would setup with Qolsys Gateway. Defaults to
qolsys_panel.qolsys_panel: # ... panel_unique_id: meerkat # there cannot be another device with 'meerkat' as ID, it can help if you want to use Qolsys Gateway for two+ panels # ...
-
panel_device_name: the name of the device as it will appear in Home Assistant. Because Qolsys Gateway provides a unique ID for all its elements, you will be able to change the name in the user interface of Home Assistant. Even though, this is the name that Qolsys Gateway will advertise for your panel. Defaults to
Qolsys Panel.qolsys_panel: # ... panel_device_name: Steve # hey, Steve! # ...
-
ha_check_user_code: whether or not the check of the user code should be done in the Home Assistant user interface. If set to
false, the code will never be checked in home assistant even if required for arming, disarming or triggering the alarm, and will always be sent to Qolsys Gateway for checking. If set totrueand the code is required for one of the actions, if will be checked by the Home Assistant user interface, and never sent through the network to Qolsys Gateway (a session token is shared to Home Assistant by Qolsys Gateway to make sure it is receiving control messages from the right instance). Note that in case of issues of checking a code in Qolsys Gateway, things will simply fail silently. Requirespanel_user_codeto be set, will silently revert tofalseotherwise. Defaults totrue.qolsys_panel: # ... ha_check_user_code: false # we want Qolsys Gateway to receive the code and perform the check # ...
-
ha_user_code: if you want to use a different disarm code in Home Assistant than the actual disarm code that Qolsys Gateway will use with the panel, you can define it here. You can use numeric codes (will show a numeric pad in Home Assistant's user interface) or any characters (will show a text box). If
ha_check_user_codeis set totrue, then the verification of that code will be done in Home Assistant directly. If set tofalse, Qolsys Gateway will use that code to compare against what Home Assistant will send in the control topic. Requirespanel_user_codeto be set, will raise an error otherwise. Defaults tonull.qolsys_panel: # ... ha_user_code: $up3r$ecre7!! # this will be the code expected from the user # ...
-
code_arm_required: whether or not we require to type-in the code to arm the alarm system. Requires
panel_user_codeto be set, will raise an error otherwise as the Qolsys Panel does not require any code to arm the alarm system, and Qolsys Gateway cannot do that check without a configured code. Defaults tofalse.qolsys_panel: # ... code_arm_required: true # ...
-
code_disarm_required: whether or not we require to type-in the code to arm the alarm system. Will silently be forced to
trueifpanel_user_codeis not set, as Qolsys Gateway will not be able to disarm the alarm system without a code. Defaults tofalse.qolsys_panel: # ... code_disarm_required: true # ...
-
code_trigger_required: whether or not we require to type-in the code to trigger the alarm system. Requires
panel_user_codeto be set, will raise an error otherwise as the Qolsys Panel does not require any code to trigger the alarm system, and Qolsys Gateway cannot do that check without a configured code. Defaults tofalse.qolsys_panel: # ... code_trigger_required: true # ...
-
default_trigger_command: the trigger command to use among the valid control commands that Qolsys Gateway support. Defaults to
TRIGGER.qolsys_panel: # ... default_trigger_command: TRIGGER_FIRE # if we want to trigger the fire alarm by default # ...
-
default_sensor_device_class: the sensor device class to use by default if a Qolsys sensor type is not directly mapped to a device class in Qolsys Gateway, but is still part of the identified sensors. Defaults to
safety.qolsys_panel: # ... default_sensor_device_class: null # if we do not want to get a sensor if the device class is not directly mapped # ...
-
enable_static_sensors_by_default: whether or not sensors that will not be updated by the panel (e.g. Bluetooth) should be enabled by default in Home Assistant. Even if setting this to
false, you will have the ability to enable them on a sensor-by-sensor basis in Home Assistant. If setting it totrue, you will also be able to disable them on a sensor-by-sensor basis in Home Assistant. Defaults tofalse.qolsys_panel: # ... enable_static_sensors_by_default: true # ...
-
mqtt_namespace: the MQTT namespace to use to read and send messages in MQTT. This should be the same as configured in
appdaemon.yaml, so if you did not usemqtt, you will need to use that option for Qolsys Gateway to work properly. Defaults tomqtt.qolsys_panel: # ... mqtt_namespace: mqtt-homeassistant # if we used that namespace in appdaemon.yaml # ...
-
mqtt_retain: whether or not we should set the retain flag on availability and states messages of the partitions and sensors. This is interesting as if Home Assistant starts listening to MQTT right after we sent our status messages and we do not use
retain, then Home Assistant will not know the state. However, usingretainmeans that we need to handle the cases where AppDaemon is killed, this means that for this option to be considered, we need thebirth_topicandwill_topicof AppDaemon to be the same, so we can consider AppDaemon's availability as an information of the availability of our partitions and sensors. Defaults totrue.qolsys_panel: # ... mqtt_retain: false # if we do not want to use MQTT retain # ...
-
discovery_topic: The topic base that Home Assistant listens to for MQTT discovery. This needs to be the same as the
discovery_prefixconfigured for the MQTT module in the Home Assistant configuration, which ishomeassistantby default. Defaults tohomeassistant.qolsys_panel: # ... discovery_topic: hass-discovery # if the discovery_prefix was changed to hass-discovery in Home Assistant # ...
-
control_topic: the topic to use to receive control commands from Home Assistant. If using
{panel_unique_id}as part of the value, it will be converted to the value as defined by thepanel_unique_idparameter, allowing to automatically handle multiple instances of Qolsys Gateway for multiple panels, since you will have to define different unique IDs for each. Defaults to{discovery_topic}/alarm_control_panel/{panel_unique_id}/set.qolsys_panel: # ... control_topic: panel_{panel_unique_id}/control # ...
-
event_topic: the topic to use to write (and also read) the Qolsys Panel events. If using
{panel_unique_id}as part of the value, it will be converted to the value as defined by thepanel_unique_idparameter, allowing to automatically handle multiple instances of Qolsys Gateway for multiple panels, since you will have to define different unique IDs for each. Defaults toqolsys/{panel_unique_id}/event.qolsys_panel: # ... event_topic: panel_{panel_unique_id}/event # ...
-
user_control_token: a fixed control token that can be used as an alternative to the session token for control commands sent to Qolsys Gateway, if you want to trigger control commands that are not supported by an Home Assistant service. When set to
null, this is simply disabled (only the session token will be considered valid). Defaults tonull.qolsys_panel: # ... user_control_token: My$ecr3tT0k3n! # ...
The initial findings that made this project possible are discussed in the community forum of Home Assistant, where the Control4 interface was initially mentioned, as well as a number of the events and actions that could be used once the connection initiated with the Qolsys Panel.
The ad-qolsys project by @roopesh, which I
used before deciding to rewrite the automation from scratch with different
features and a different way to handle events and actions. This project is not
using a line of code of ad-qolsys, but was initially inspired
by it.