An UP board Ubuntu real-time patched kernel (4.4.86).
Here's a compiled image for UP Board. Copy and paste following in your terminal:
wget -c "https://github.com/QiayuanLiao/Ubuntu-RT-UP-Board/releases/download/UP-board-4.4.86-rt99/UP-board-4.4.86-rt99.tar.xz" && tar -xvzf UP-board-4.4.86-rt99.tar.xzYou are all set now! For the next step:
- If you need help to replace the kernel or install Ubuntu, please follow the link and read on.
- To test this kernel please refer to Configuration and Test
- Also if you want to build from source, here is the tutorial.
- Finally, here's a step by step tutorial to build from generic kernel
- The UP board patches is modify from this repo to work with kernel version 4.4.86
- Supported Buses:
- GPIO
- UART
- SPI
- I2C
- LEDs
- Unsupported:
- HDMI Audio
- PWM(frequency error)
-
Copy the Debian packages to UP board
-
Remove all the generic installed kernel
sudo apt-get autoremove --purge 'linux-.*generic' -
Go to the file of debian packages and install the kernel:
sudo dpkg -i linux-*.deb -
Reboot
sudo reboot -
Verify that the kernel is indeed installed by typing
uname -vyou should get
#1 SMP PREEMPT RT xxxxxxxx
-
Download Ubuntu 16.04.6 ISO from the Ubuntu download page (works with desktop and server edition)
http://releases.ubuntu.com/16.04/ubuntu-16.04.6-desktop-amd64.iso http://releases.ubuntu.com/16.04/ubuntu-16.04.6-server-amd64.iso
-
Burn the downloaded image on a USB stick. We suggest to use etcher for doing that. You can download it from:
-
Insert the USB thumb drive in a empty USB port and proceed with a normal Ubuntu installation.
-
Get the source:
git clone git@github.com:QiayuanLiao/Ubuntu-RT-UP-Board.git cd Ubuntu-RT-UP-Board -
Config the kernel:
cp .config kernel
cd kernel
make menuconfig
selet save and exit
-
Make the kernel
make -j`nproc` && make -j`nproc` bindeb-pkThen you will get:
linux-firmware-image-4.4.86-rt99_4.4.86-rt99-1_amd64.deb
linux-headers-4.4.86-rt99_4.4.86-rt99-1_amd64.deb
linux-image-4.4.86-rt99_4.4.86-rt99-1_amd64.deb
linux-libc-dev_4.4.86-rt99-1_amd64.deb
-
Get kernel from:
https://git.kernel.org/pub/scm/linux/kernel/git/stable/linux.git/snapshot/linux-4.4.86.tar.gzand decompress.
-
Get RT_PREEMPT patch from:
https://mirrors.edge.kernel.org/pub/linux/kernel/projects/rt/4.4/older/patches-4.4.86-rt99.tar.xz
-
Get UP board patches from release
-
Copy
patches-4.4.86-rt99.tar.xztolinux-4.4.86, then patch:unxz -cd patches-4.4.86-rt99.tar.xz | patch -p1 -
Copy
UP-borad-patches.tar.xztolinux-4.4.86, then patch:unxz -cd UP-borad-patches.tar.xz | patch -p1 -
Config and make
-
Check if there are two SPI device
ls /dev/spidev*you should get:
/dev/spidev2.0 /dev/spidev2.1 -
Enable the HAT functionality from userspace
sudo add-apt-repository ppa:ubilinux/up sudo apt install upboard-extras sudo usermod -a -G gpio ${USER} sudo usermod -a -G leds ${USER} sudo usermod -a -G spi ${USER} sudo usermod -a -G i2c ${USER} sudo usermod -a -G dialout ${USER} sudo reboot -
Go to the
/testfile run the./blink.shcd test sh ./blink.shthen the green led of UP board will blink
-
For HAT test, check
-
Install requirement
sudo apt install rt-tests stress gnuplot -
Go to the
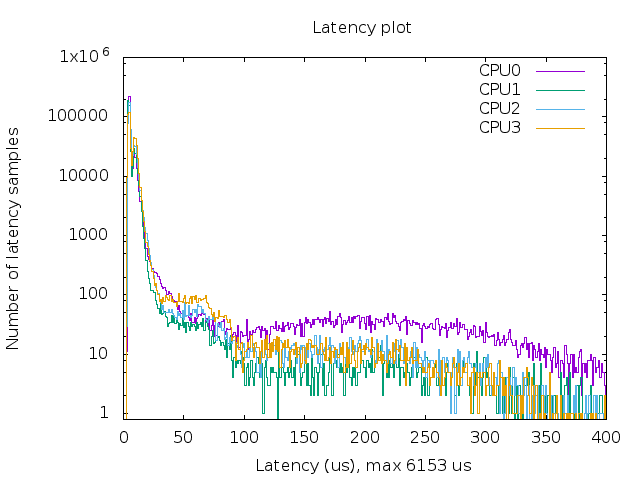
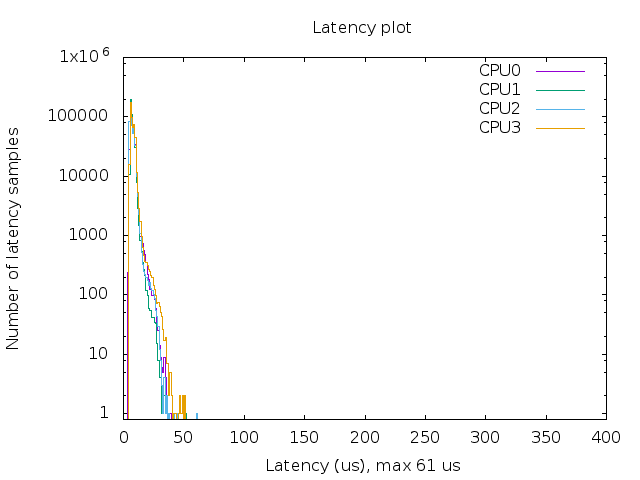
/testfile and Run the RT testcd test sudo sh ./rt-test.shThe latency plot look like this:
-
Analysis:
- More sample on the left means lower latency in general
- More clustered samples indicate less flutter
- The max latency should not deviate far from mean value (typically under 100us)


@dicarlo236 helped a lot through out patching work.