WebEngage Unity iOS plugin for Unity iOS apps. This unitypackage is only for iOS and would not work on any other platform.
-
Download the WebEngageUnityiOS.unitypackage.
-
Import the downloaded unitypackage into your Unity project through
Assets>Import Package>Custom Package....
-
Download latest XCFramework for WebEngage
-
Unzip zip file to get XCFramework file
-
Copy Unzipped
XCFrameworkinside your project folder -
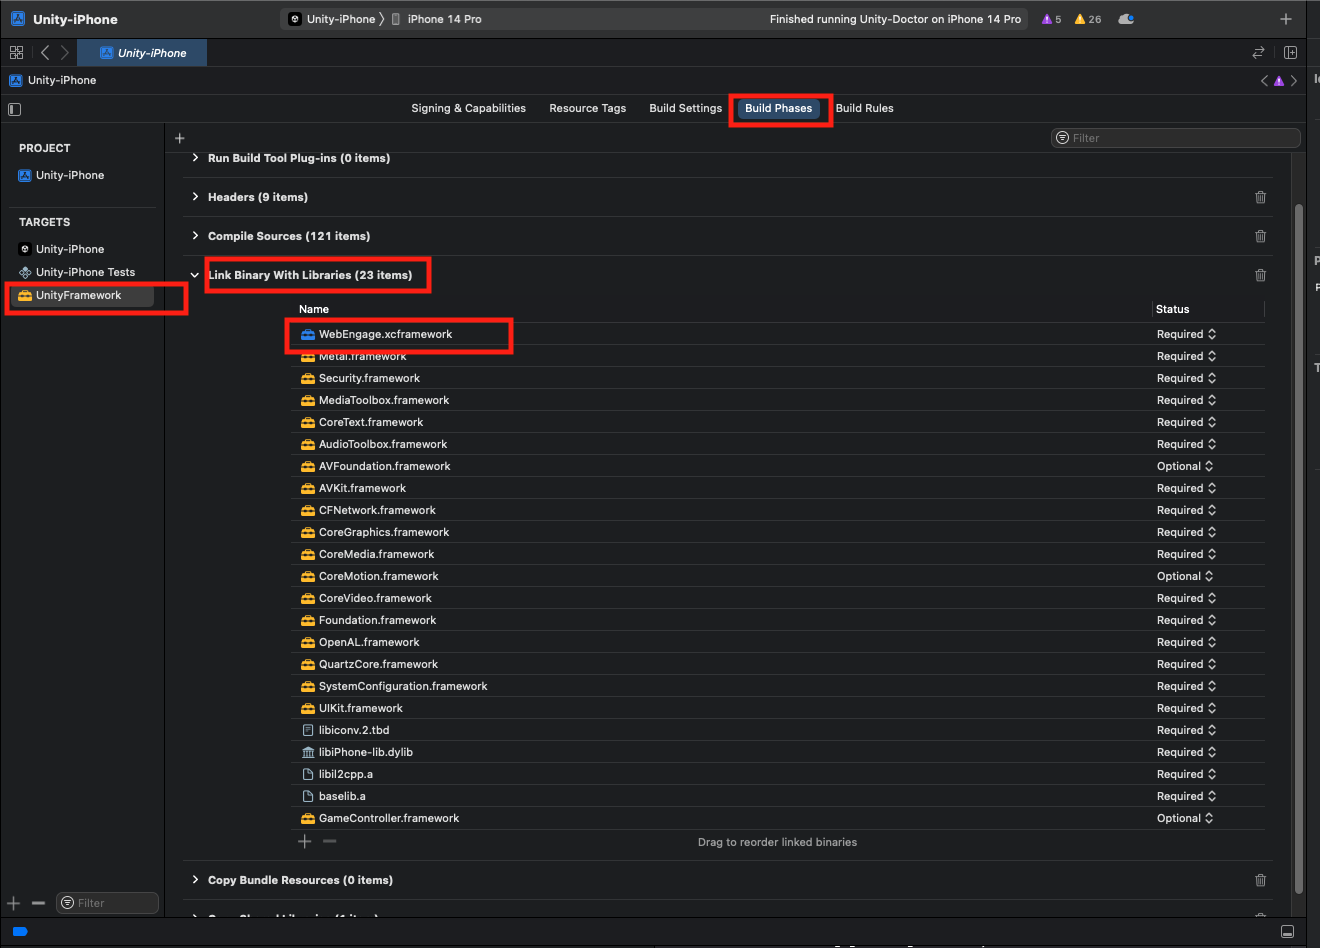
Open Unity iOS Project in XCode
-
In Xcode, go to your
Targets, underUnityFrameworkTarget, selectBuild Phases -
Add XCFramework under
Link Binary With Libraries, You can drag and dropXCFrameworkor add thourgh + option under it
- Add the following values in
/Assets/Editor/WebEngagePostProcessBuild.csfile.
...

public class WebEngagePostProcessBuild
{
   [PostProcessBuild]
   public static void EditXcodePlist(BuildTarget buildTarget, string pathToBuiltProject)
   {
       if (buildTarget == BuildTarget.iOS)
       {
       	// Add your WebEngage license code
       	string WEBENGAGE_LICENSE_CODE = "YOUR-WEBENGAGE-LICENSE-CODE";

       	// Set debug log level
           string logLevel = "VERBOSE";
       	...
       }
   }
}
Note: Replace YOUR-WEBENGAGE-LICENSE-CODE with your own WebEngage license code.
- Initialize the WebEngage SDK in your
AppDelegate.mclass.
#import <WebEngage/WebEngage.h>
...

-(BOOL)application:(UIApplication*) application didFinishLaunchingWithOptions:(NSDictionary*) options
{
    [[WebEngage sharedInstance] application:application didFinishLaunchingWithOptions:options];

    ...
}
If you are not already implementing AppDelegate.m in your Unity app, then create a new file at /Assets/Plugins/iOS/OverrideAppDelegate.m and copy the below contents in it.
#import "UnityAppController.h"
#import <WebEngage/WebEngage.h>


@interface OverrideAppDelegate : UnityAppController
@end


IMPL_APP_CONTROLLER_SUBCLASS(OverrideAppDelegate)

@implementation OverrideAppDelegate

-(BOOL)application:(UIApplication*) application didFinishLaunchingWithOptions:(NSDictionary*) options
{
    [[WebEngage sharedInstance] application:application didFinishLaunchingWithOptions:options];

    return [super application:application didFinishLaunchingWithOptions:options];
}

@end
- Login and Logout
using WebEngageBridge;
...

public class YourScript : MonoBehaviour
{
    ...

    // User login
    WebEngage.Login("userId");

    // User logout
    WebEngage.Logout();
}- Set system user attributes as shown below.
using WebEngageBridge;
...

public class YourScript : MonoBehaviour
{
    // Set user first name
    WebEngage.SetFirstName("John");

    // Set user last name
    WebEngage.SetLastName("Doe");

    // Set user email
    WebEngage.SetEmail("john.doe@email.com");

    // Set user hashed email
    WebEngage.SetHashedEmail("144e0424883546e07dcd727057fd3b62");

    // Set user phone number
    WebEngage.SetPhoneNumber("+551155256325");

    // Set user hashed phone number
    WebEngage.SetHashedPhoneNumber("e0ec043b3f9e198ec09041687e4d4e8d");

    // Set user gender, allowed values are ['male', 'female', 'other']
    WebEngage.SetGender("male");

    // Set user birth-date, supported format: 'yyyy-mm-dd'
    WebEngage.SetBirthDate("1994-04-29");

    // Set user company
    WebEngage.SetCompany("Google");

    // Set opt-in status, channels: ['push', 'in_app', 'email', 'sms']
    WebEngage.SetOptIn("push", true);

    // Set user location
    double latitude = 19.0822;
    double longitude = 72.8417;
    WebEngage.SetLocation(latitude, longitude);
}- Set custom user attributes as shown below.
using WebEngageBridge;
    ...
    // Set custom user attributes
    WebEngage.SetUserAttribute("age", 25);
    WebEngage.SetUserAttribute("premium", true);

    // Set multiple custom user attributes
    Dictionary<string, object> customAttributes = new Dictionary<string, object>();
    customAttributes.Add("Twitter Email", "john.twitter@mail.com");
    customAttributes.Add("Subscribed", true);
WebEngage.SetUserAttributes(customAttributes);- Delete custom user attributes as shown below.
using WebEngageBridge;
    ...

WebEngage.DeleteUserAttribute("age");Track custom events as shown below.
using WebEngageBridge;
    ...

    // Track simple event
    WebEngage.TrackEvent("Product - Page Viewed");

    // Track event with attributes
    Dictionary<string, object> orderPlacedAttributes = new Dictionary<string, object>();
    orderPlacedAttributes.Add("Amount", 808.48);
    orderPlacedAttributes.Add("Product 1 SKU Code", "UHUH799");
    orderPlacedAttributes.Add("Product 1 Name", "Armani Jeans");
    orderPlacedAttributes.Add("Product 1 Price", 300.49);
    orderPlacedAttributes.Add("Product 1 Size", "L");
    orderPlacedAttributes.Add("Product 2 SKU Code", "FBHG746");
    orderPlacedAttributes.Add("Product 2 Name", "Hugo Boss Jacket");
    orderPlacedAttributes.Add("Product 2 Price", 507.99);
    orderPlacedAttributes.Add("Product 2 Size", "L");
    orderPlacedAttributes.Add("Delivery Date", System.DateTime.ParseExact("2017-10-21 09:27:37.100", "yyyy-MM-dd HH:mm:ss.fff", null));
    orderPlacedAttributes.Add("Delivery City", "San Francisco");
    orderPlacedAttributes.Add("Delivery ZIP", "94121");
    orderPlacedAttributes.Add("Coupon Applied", "BOGO17");
    WebEngage.TrackEvent("Order Placed", orderPlacedAttributes);

    // Track complex event
    Dictionary<string, object> product1 = new Dictionary<string, object>();
    product1.Add("SKU Code", "UHUH799");
    product1.Add("Product Name", "Armani Jeans");
    product1.Add("Price", 300.49);

    Dictionary<string, object> detailsProduct1 = new Dictionary<string, object>();
    detailsProduct1.Add("Size", "L");
    product1.Add("Details", detailsProduct1);

    Dictionary<string, object> product2 = new Dictionary<string, object>();
    product2.Add("SKU Code", "FBHG746");
    product2.Add("Product Name", "Hugo Boss Jacket");
    product2.Add("Price", 507.99);

    Dictionary<string, object> detailsProduct2 = new Dictionary<string, object>();
    detailsProduct2.Add("Size", "L");
    product2.Add("Details", detailsProduct2);

    Dictionary<string, object> deliveryAddress = new Dictionary<string, object>();
    deliveryAddress.Add("City", "San Francisco");
    deliveryAddress.Add("ZIP", "94121");

    Dictionary<string, object> orderPlacedAttributes = new Dictionary<string, object>();
    List<object> products = new List<object>();
    products.Add(product1);
    products.Add(product2);

    List<string> coupons = new List<string>();
    coupons.Add("BOGO17");

    orderPlacedAttributes.Add("Products", products);
    orderPlacedAttributes.Add("Delivery Address", deliveryAddress);
    orderPlacedAttributes.Add("Coupons Applied", coupons);

WebEngage.TrackEvent("Order Placed", orderPlacedAttributes);-
Build your iOS app through Unity Editor and open Unity-iPhone.xcodeproj in your Xcode IDE.
-
Select your main app target (Unity-iPhone), under Capabilities enable Push Notifications.
-
Also under Capabilities enable Background Modes and check Remote notifications.
-
Download the WebEngageNotificationService.unitypackage.
-
Import the downloaded unitypackage into your Unity project through
Assets>Import Package>Custom Package.... -
Build your iOS app through Unity Editor and open Unity-iPhone.xcodeproj in your Xcode IDE.
-
Verify that NotificationService extension is added and linked to your main app target.
-
Download the WebEngageNotificationContent.unitypackage.
-
Import the downloaded unitypackage into your Unity project through
Assets>Import Package>Custom Package.... -
Build your iOS app through Unity Editor and open Unity-iPhone.xcodeproj in your Xcode IDE.
-
Verify that NotificationContent extension is added and linked to your main app target.
1. If you are facing integration or build issues with rich-push notification unity plugins, then try adding the extensions and pods manually.
-
Remove the WebEngageNotificationService.unitypackage and WebEngageNotificationContent.unitypackage plugins (if added).
-
Build your iOS app through Unity Editor and open Unity-iPhone.xcodeproj in your Xcode IDE.
-
Follow the instructions at WebEngage documentation.
No additional steps are required for in-app notifications.
using WebEngageBridge;
    ...
	// Set screen name
    WebEngage.ScreenNavigated("Purchase Screen");

    // Update current screen data
    Dictionary<string, object> currentData = new Dictionary<string, object>();
    currentData.Add("productId", "~hs7674");
    currentData.Add("price", 1200);
    WebEngage.SetScreenData(currentData);

    // Set screen name with data
    Dictionary<string, object> data = new Dictionary<string, object>();
    data.Add("productId", "~hs7674");
    data.Add("price", 1200);
    WebEngage.ScreenNavigated("Purchase Screen", data);