- Node.js 16.0+ - Installation
- VSCode
- git - Installation (optional, only if you want to publish your project on the web later on)
In the command line (tip - I use Hyper and I love it):
If you want to use git then you can go to the Github project and fork the project. Then you can clone your own repository:
git clone git@github.com:yourGithubUsername/workshop-holiday-map.git
If you don't want to use git then you can download the repository on the github website. Here is a description of how to do that. Unzip the folder.
Go to the newly created folder and install the dependency libraries:
cd workshop-holiday-map
npm install
To start a local server with the project:
npm run dev
Then open your browser at http://localhost:3000/
Take a look at the structure of index.html. The story map has:
- the intro page of the story. You can add the title of the story and a description with an intro image. You can change the styling in general.scss.
- the content with different sections for each part of the story. The id of the section is important, we will link it with the geodata. The content can be text, video or images.
- at the end of the content there is a map panel. This has a fixed location at the bottom of the screen and scrolling through text is synchronized with what is being shown in the map.
- the closing page of the story (text and image)
At this part start drafting the structure of your story and replace the content in my template. Add a title, add content for the different sections and what you want to display on the map.
To create the map you'll need a free ArcGIS Developer account. Once you created it and confirmed your email address go to the main page and click "Upgrade to developer account". If you go to API keys you should see a default key:
Copy the Default API Key and paste it in the esriConfig.apiKey: see on Github.
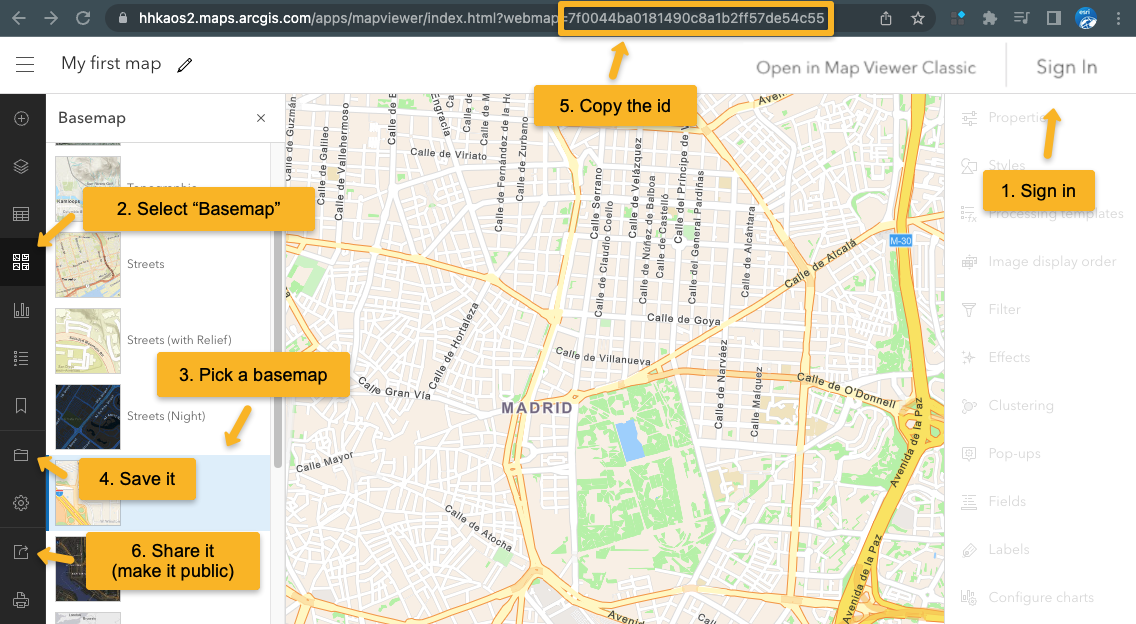
Now you can create a web map:
- Go to the ArcGIS Map Viewer and login with the account you created.
- Activate the "Basemap" selection tool.
- Choose a basemap.
- Save the web map.
- Copy the ID.
- Share it (Choose: "Everyone (public)").
- Load it in the application using your ID.
Note: It's out of the scope of this workshop, but if you'd like to create a custom vector tile basemap, you can do it with the Vector Tile Style Editor.
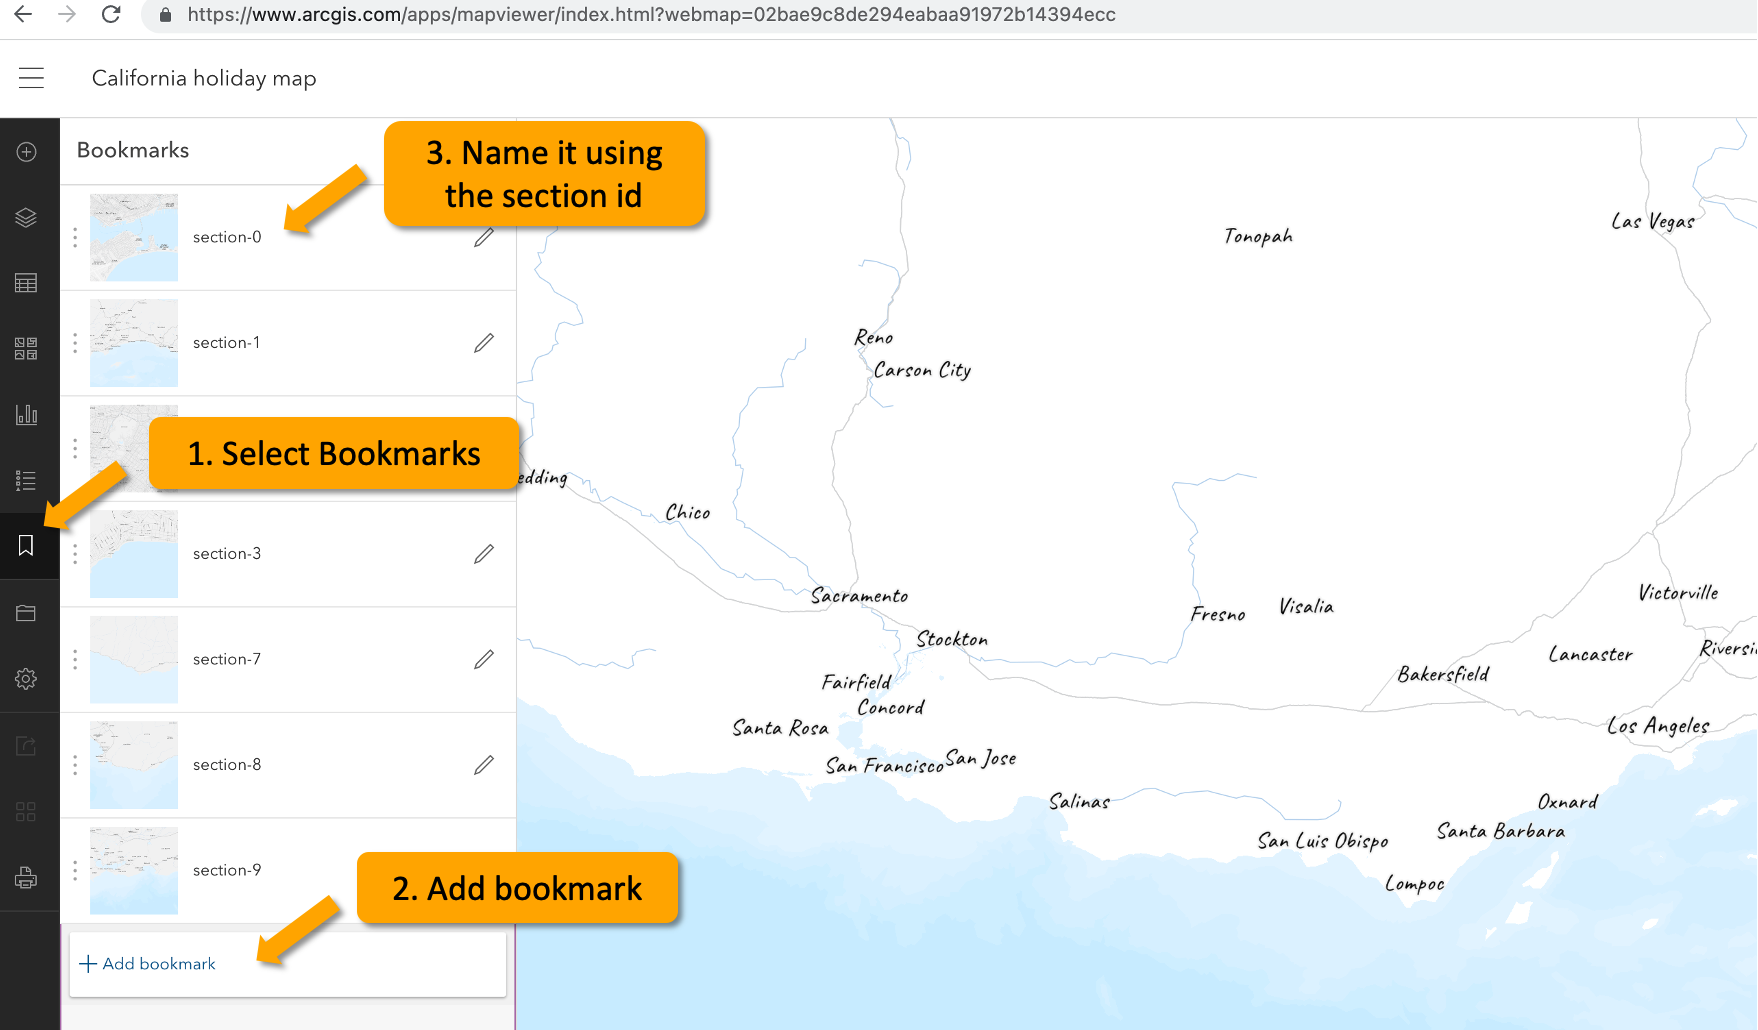
For a certain section of the storymap, you'll want to zoom to a location. We can store these locations by using bookmarks. In ArcGIS Map Viewer open the map you previously created and:
- Go to Bookmarks.
- Zoom and scroll on the map to go to the viewpoint you want to have in your section. Click to Add a new bookmark.
- Name that bookmark using the section id.
- Save the map
When the application loads, when the user scrolls or when the window is resized we calculate which section is currently visible. The id of the current visible section is used to either animate a path from tracks.geojson (with the same id), to go to a map viewpoint or to filter the points in points.geojson.
I used geojson.io to create the point and line data for this project. I animated the line data based on the scroll progress of a certain section and I filter the points based on the section they're supposed to be displayed in.
For example, the point that should be displayed in "section-0" will have a property id with the key section-0. The same for the tracks that will be animated. A polyline that should be animated in "section-1" will have a property id witht the key section-1. Have a look at the data.
Maybe you want to rephrase that sentence? or change the style of the basemap? or swap this image for another one where you look much better 😉 This is where we do all these final changes.
The one where we go public - deploying project to GitHub Pages (optional) 🌐
Once you are happy with your map you can create a production build and deploy it to GitHub Pages.
npm run build
The dist folder then contains all the files for the web app which can either be copied to a web server or pushed to the gh-pages branch to be served at https://arnofiva.github.io/arcgis-core-template.
In order to use the gh-pages approach, see the following instructions. Make sure you remove an existing dist folder if it has been created from a previous build.
Follow these steps to create an orphan gh-pages branch (meaning it does not share any history with main):
mac: rm -rf dist // windows: rmdir dist
git checkout --orphan gh-pages
git rm -rf .
git commit --allow-empty -m "Init empty branch"
git push origin gh-pages
Return to main branch:
git checkout main
The following will create a dist folder (fails if it already exists) and make it point to the root of the gh-pages branch:
git worktree add dist gh-pages
Once the previous steps have been completed, you can repeat the following every time you want to deploy a new version of your local code:
npm run build
cd dist/
mac: touch .nojekyll // windows: echo.> .nojekyll
git add .
git commit -am 'Deploy'
git push origin gh-pages
cd ../
Note: we need to add the .nojekyll file in the dist folder because Jekyll doesn't copy files that start with underscore to the final site and like this we bypass it. See more explanation here.


