Not just the fastest google drive copy tools compared with other tools
I wrote only part of it I modified specific instructions or look here and here吧
-
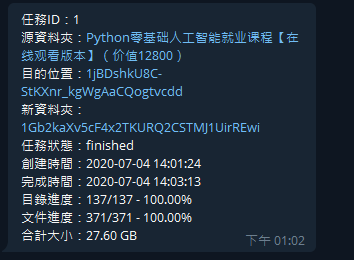
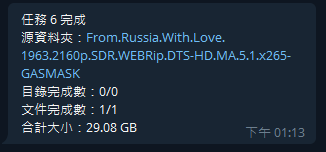
When executing the /task command, the percentage of completion will be returned
-
When pasting a sharing link, add more common options that are available without having to enter the dst ID each time

Here, the default three copy destinations are the same, all config.js of which are in DEFAULT_TARGET
The modification is in config.js, COPY_TARGET2 COPY_TARGET2 and the corresponding dstID on the assignment is OK

-
When copying is complete, a pop-up notification will show the file size

Here is the service and configuration I use (free configuration): always-free gcp Compute Engine + zerossl + free domain hosting. Note that my configuration does not use cloudflare
One-click installation script (thanks to the script maker @vitaminx)
- I have slightly modified the installation script here, which is different from the original version from fork
- Do not use cloudflare to parse
- ssl is additionally configured in the nginx service (the certificate placement path will be explained later)
- For specific installation conditions and restrictions, please refer to the project of the original author of the script
- Here are the commands that can be used by pasting
- One-click deployment script for gdutils project (including "Query Dump" and "TG Robot")
bash -c "$(curl -fsSL https://raw.githubusercontent.com/waga43/gd-utils-ettm/master/gdutilsinstall.sh)"- "Dump query part" of one-click deployment script of gdutils project
bash -c "$(curl -fsSL https://raw.githubusercontent.com/waga43/gd-utils-ettm/master/gdutilscsinstall.sh)"- The "TG robot part" of the one-click deployment script of the gdutils project
bash -c "$(curl -fsSL https://raw.githubusercontent.com/waga43/gd-utils-ettm/master/gdutilsbotinstall.sh)" - Four parameters need to be entered during the installation process:
- Robot TOKEN: This can be obtained by registering with "@BotFather" in Telegram
- Telegram user ID: You can get it by sending a message to the robot @userinfobot in Telegram
- Google team drive ID: it is the default address of the file you are dumping, and the script is mandatory to write the Google team drive ID
- Domain name: the domain name you resolved to VPS on cloudflare (format: abc.34513.com)
- For script installation problems, please send information to TG: onekings or vitaminor@gmail.com
- For system usage problems (such as unable to transfer, restarting the robot, etc.), please contact the project author @vegg
- The test can be used to install the system perfectly:
- Centos 7/8
- debian 9/10
- ubuntu 16.04/18.04/19.10/20.04
- Enable a host, both VPS and private server (If the private server is not configured for hard dialing, you must go to the router to set the port correspondence)
- Confirm fixed ip, or use ddns service
- Use domain hosting service to resolve to dynamic domain name, or add A record to assign to fixed IP
- Use the fixed domain name set by domain hosting to apply for SSL certificate
- Put the certificate in the corresponding paths /etc/ssl/certificate.crt and /etc/ssl/private.key
- After the setting is completed, confirm that the host's port is open
- Execute the installation script, it will automatically start the service with nginx, especially set the jump from http to https
This tool currently supports the following features:
- Statistics of arbitrary (you have relevant permissions, the same below, no longer repeat) directory file information, and supports export in various forms (html, table, json).
Support interrupt recovery, and the statistics of the catalog (including all of its descendants catalog) information will be recorded (gdurl.sqlite) Please enter a command line under this project in the local directory database files ./count -h they use help.
-
Copy all files in any directory to the directory you specify, and also support interrupt recovery. Support filtering based on file size, you can enter
./copy -hviewed using Help -
Deduplicate any directory, delete files with the same md5 value in the same directory (only one is kept), and delete empty directories.
Enter in the command line ./dedupe -h to see the use of help
-
After completing the relevant configuration in config.js, you can deploy this project on the server (which can normally access Google services), providing http api file statistics interface
-
Support telegram bot, after the configuration is completed, the above functions can be operated by bot
This tool requires nodejs installation. For client installation, please visit https://nodejs.org/zh-cn/download/ . For server installation, please refer to https://nodejs.org/zh-cn/download/. For server installation, please refer to https://github.com/nodesource/distributions/blob/master/README.md#debinstall
It is recommended to choose the v12 version of the node to prevent errors in the following installation dependencies.
If your network environment cannot access Google services normally, you need to configure some on the command line first: (skip this section if you can access it normally)
http_proxy="YOUR_PROXY_URL" && https_proxy=$http_proxy && HTTP_PROXY=$http_proxy && HTTPS_PROXY=$http_proxy
Please YOUR_PROXY_URLreplace with your own proxy address
- Command line execution
git clone https://github.com/waga43/gd-utils-ettm && cd gd-utils-ettmClone and switch to this project folder - Perform
npm install --unsafe-perm=true --allow-rootinstallation dependent, partially dependent may need to download proxy environment, we need to step on the configuration
If an error occurs during installation, please switch the nodejs version to v12 and try again. If there Error: not found: make is such a message in the error message, it means that your command line environment is missing the make command, you can refer to here or directly google search Make Command Not Found
If the error message there better-sqlite3, execute npm config set unsafe-perm=true and rm -rf node_module delete rely directory, and finally perform at npm i the installation try.
After the installation is completed, there will be an additional node_modules directory under the project folder. Please do not delete it, and then proceed to the next configuration.
It is strongly recommended to use service account (later known as SA), the method See Obtaining https://gsuitems.com/index.php/archives/13/
get back to json file SA, please copy it to sa the directory
After the configured SA, if you do not need to file personal pad for operations, you can skip [Personal Account Configuration] This section, and the time to execute the command, remember to bring -S parameter tells the program to use the SA operation is granted.
- Command line
rclone config fileto find the profile path rclone - Open the configuration file
rclone.conf, findclient_id,client_secretandrefresh_tokenthese three variables, which are filled under this projectconfig.js, you need to pay attention to these three values must be wrapped in a pair of quotes, and the quotes at the end of the comma, which is required JavaScript-compliant object syntax
If you have not configured rclone, you can search for rclone google drive and complete the relevant configuration.
If in your rclone.conf there are no client_id and client_secret it shows that you can use the default configuration of rclone, with the rclone own client_id, although even rclone themselves do not recommend doing so,because we share its interface calls limit during peak usage period may trigger limit.
Get your own client_id. You can refer to these two articles: Cloudbox/wiki/Google-Drive-API-Client-ID-and-Client-Secret and https://p3terx.com/archives/goindex-google-drive-directory-index.html#toc_2
After obtaining the client_id and client_secret, execute it again rclone config to create a new remote. During the configuration process, you must fill in your newly acquired clinet_id and client_secret , you can rclone.conf see the newly acquired in refresh_token it. Note that the previous refrest_token cannot be used because it corresponds to the client_id that comes with rclone
After the parameters are configured, execute on the command line node check.js. If the command returns the data of the root directory of your Google hard disk, it means that the configuration is successful and you can start using the tool.
If you want to use the telegram bot function, further configuration is required.
First, https://core.telegram.org/bots#6-botfather get token bot according to the instruction, and then fill in config.js tg_token variable.
Then get your telegram username, the name of the username is not displayed, but the string of characters tg individual behind the website, for example, my personal web site is tg https://t.me/viegg, the user name is viegg, the purpose of obtaining the user name in the code is to configure white list To allow only specific users to call the robot. Fill the username config.json the configuration like this: tg_whitelist: ['viegg'], on behalf of myself only allowed to use the robots.
If you want to share the use rights of the robot to other users, you only need to change it to this: tg_whitelist: ['viegg', 'Others username']
In the config.jsfile, there are several other parameters:
// How many milliseconds of a single request does not respond after timeout (base value, if it times out continuously, next time it will be adjusted to twice the previous time)
const TIMEOUT_BASE = 7000

// The maximum timeout setting, such as a certain request, the first 7s timeout, the second 14s, the third 28s, the fourth 56s, the fifth time is not 112s but 60s, the same is true for subsequent
const TIMEOUT_MAX = 60000

const LOG_DELAY = 5000 // Log output interval in milliseconds
const PAGE_SIZE = 1000 // Each network request reads the number of files in the directory, the larger the value, the more likely it will time out

const RETRY_LIMIT = 7 //If a request fails, the maximum number of retries allowed
const PARALLEL_LIMIT = 20 // The number of parallel network requests can be adjusted according to the network environment

const DEFAULT_TARGET = '' // Required, copy the default destination ID, if you do not specify the target, it will be copied here, it is recommended to fill in the team disk ID, pay attention to use English quotation marks
Readers can adjust according to their respective circumstances
The principle of the program is to call the official interface of google drive to,recursively obtain the information of all files and subfolders in the target folder. Roughly speaking, how many folders are in a directory requires at least so many requests to complete the statistics .
It is not known whether Google will limit the frequency of the interface, or whether it will affect the security of the Google account itself.
Don't abuse it at your own risk