UC Davis Senior Design Project 2020:
Secure and Private Social Media App
Client
Justin Jia
Team Hobbyte
Abigail Lee, Nathan Hoffman,
Viswaas Prabunathan, John Paulus Francia
As many contemporary social media platforms use our user data to curate advertisements and give access to third parties, the demand for private social media arises Sanctuary Chat is a cross platform social media app featuring two-factor authentication and end-to-end encryption, thereby providing users with optimal security and privacy.
This is a senior design project, specifically for the class ECS193 A/B at UC Davis. Justin Jia, a former student and mentor for the senior design class at UC Davis, was our client who mentored us as we built this application.
- Overview of the Product
- Installation or Distribution
- Project Structure
- App Functionality
- Troubleshooting
- Frequently Asked Questions
- Known Issues and Edge Cases
- Contact Information
- Glossary
Sanctuary Chat offers two-factor authentication (by default) as an additional security layer. After entering a user's credentials to login, Sanctuary Chat sends an SMS text containing an OTP (one time password) to the phone number associated with that profile. This ensures that a user can be logged-in from only one device.
Chat messages are deleted from Sanctuary Chat's database once the messages are sent to the respective recipients' devices. If a user loses chat history or conversations with a recipient, a backup of the conversation history can be provided by other recipients in the same chat room.
Additionally, conversations are encrypted in transit into ciphertext before they're stored in Dynamo DB. Personal conversations are end to end encrypted using the Diffie-Hellman key exchange. Group conversations are encrypted symmetrically.
Sanctuary Chat is transparent with storing user's data and collects miniminal user information during SignUp. The personally identifiable information collected from users include email and phone number, both of which are crucial for password recovery and two-factor authentication respectively.
Software:
- React Native - UI/UX
- Expo - CLI for building, testing
- AWS AppSync - Communication
- AWS DynamoDB - Message queue
- AWS Cognito - Two-Factor Authentication
- TweetNaCL.js - Encryption library

npm installto install node modulesnpm install -g expo-clito install expo cli
- Please note: when the
terminalis mentioned, it is allways reffering to the root directory of the App. - Go to https://docs.amplify.aws/start/getting-started/installation/q/integration/react-nativen and follow the steps to create an AWS account.
- Open your terminal and type
npm install -g @aws-amplify/clito install the Amplify CLI.
- Type
amplify configureinto the terminal. - A web browser will open to the AWS login page. Login to the AWS console and then retern to the terminal and press enter.
- Next select your region. Note that not all regions support SMS messaging. So select the region closest to you that does support SMS. Here is a list of regions that support SMS.
- You can then choose an IAM username - it is not important what you choose, but remember it as you will want to use it later.
- Press enter. A web page will open. You will configure the user settings here. To do this:
- Press
Next: Permissions - Press
Next: Tags - Press
Next: Review - Press
Create User - You will then be taken to a confirmation page that displays your
Access key IDandSecret access key. These will never be displayed again so download the CSV containing them so you can access them again later.
- Press
- Return to your terminal and press
enter. - Enter Access key ID and then Secret access key.
- Give your profile a name, and then you're done configuring your Amplify CLI!
- Go to the terminal and type
amplify init - Next you will be asked a series of questions. The default answers will be fine, just be sure that you choose
javaScriptforChoose the type of app that you're buildingandreact-nativeforWhat javascript framework are you using. - When asked
Do you want to use an AWS profile?selectYes. Then select the profile that you just created. That's it, time for the next step!
-
Go to the terminal and type
amplify add auth. -
Answer the following the following questions as follows:
- Do you want to use the default authentication and security configuration?
Manual configuration - Select the authentication/authorization services that you want to use:
User Sign-Up & Sign-In only (Best used with a cloud API only) - Please provide a friendly name for your resource that will be used to label this category in the project:
Anything will do - Please provide a name for your user pool:
Anything will do - How do you want users to be able to sign in?
Username - Do you want to add User Pool Groups?
No - Do you want to add an admin queries API?
No - Multifactor authentication (MFA) user login options:
ON (Required for all logins, can not be enabled later) - For user login, select the MFA types:
SMS Text Message - Please specify an SMS authentication message:
Anything will do - Email based user registration/forgot password:
Enabled (Requires per-user email entry at registration) - Please specify an email verification subject:
Anything will do - Please specify an email verification message:
Anything will do - Do you want to override the default password policy for this User Pool?
No - What attributes are required for signing up?
select email and phone number - Specify the app's refresh token expiration period (in days):
default (or anything else) - Do you want to specify the user attributes this app can read and write?
No - Do you want to use an OAuth flow?
No - Do you want to configure Lambda Triggers for Cognito?
No
- Do you want to use the default authentication and security configuration?
-
Now you're done! In the terminal, type
amplify statusto check thatAUTHwas successfully added to the App. Typeamplify pushto push these changes to the cloud. -
You should now be able to login to your AWS console, type Cognito into the
find servicesearch bar, select Cognito, then selectManage user pools, and then select the user pool that you just created. If you don't see the userpool that you just created here, go to your terminal and typeamplify auth console. This will open the user pool that you just created in a web browser. -
At this point you should be able to run the app by typing
npm startinto the terminal, and create a user through the signup page. However, you will not yet be able to verify the user or login because you have not yet enabled AWS to send SMS codes.
-
Navigate to the user pool that you just create on the AWS console. Under
General settingsselectMFA and verification, then do the following:- Under
How will a user be able to recover their account?selectEmail only. - Under
Which attributes do you want to verify?selectphone number - Now select
save changes - Now you must request a spending limit increase to enable SMS messages to be sent. (Note: I am not totally sure if this part is necessary. Maybe try to start the App and create an account before you do this.)
- From the services dropdown menu select
support. - Then choose
create case. - Fillout and submit the request.
Under Limit type select
SMS Text Messaging
- From the services dropdown menu select
- Under
- Open your terminal.
- Type
npm startto start running the App - Open the app on your phone using the expo app or open it in an emulator. Create an account and login!
- Go to your userpool and make sure that you can see this new user there.
- In the terminal type
amplify add api - Answer the subsequent questions as follows:
- Please select from one of the below mentioned services:
GraphQL - Provide API name:
Anything here - Choose the default authorization type for the API:
API key - Enter a description for the API key:
Anything here - After how many days from now the API key should expire (1-365):
any valid number (you will have to recreate the api key in the aws console anter this expires.) - Do you want to configure advanced settings for the GraphQL API?
No, I am done - Do you have an annotated GraphQL schema?
No - Do you want a guided schema creation?
Yes - What best describes your project:
Single object with fields (e.g., “Todo” with ID, name, description) - Do you want to edit the schema now?
Yes- This will open a file in your text editor. Past the following schema in the file and save.
type Message @model {
    id: ID!
    to: String!
    from: String!
    payload: String!
}
- This will open a file in your text editor. Past the following schema in the file and save.
- Return to the terminal and press
enter - Type
amplify pushto make these changes present in the cloud.
- Please select from one of the below mentioned services:
- Go to your AWS console and search for
AWS AppSync. SelectAWS AppSyncand then select the API that you just created. - Once you have selected your AppSync API, select
schema - Once on the schema page, scroll down the
schemawindow and pasteInto the Subscription type. After you do this shere should be a chunk of code that looks like this:onCreateMessageByRecipient(to: String!): Message @aws_subscribe(mutations: ["createMessage"])type Subscription { onCreateMessageByRecipient(to: String!): Message @aws_subscribe(mutations: ["createMessage"]) onCreateMessage: Message @aws_subscribe(mutations: ["createMessage"]) onUpdateMessage: Message @aws_subscribe(mutations: ["updateMessage"]) onDeleteMessage: Message @aws_subscribe(mutations: ["deleteMessage"]) } - Then save the schema.
- Now export the schema: both .json and .graphql files. Save the files somewhere.
- Replace
Hobbyte/src/graphql/schema.jsonwith the.jsonfile - Replace
Hobbyte/amplify/#current-cloud-backend/api/hobbyte/build/schema.graphqlwith the.graphqlfile - Go to
Hobbyte/src/graphql/subscriptions.graphqland add the following code to the top of the file:export const OnCreateMessageByRecipient = /* GraphQL */ ` subscription OnCreateMessageByRecipient($to: String!) { onCreateMessageByRecipient(to: $to) { Id to from payload } }`;
To send test queries, mutations, and subscriptions from AWS AppSync to AWS DynamoDB, see the Troubleshooting section about "Testing locally using AWS query Tab". There is also more documentation in this tutorial "Run Queries and Mutations": .
That’s it! You have successfully added and configured the AWS services for Sanctuary Chat! I hope that you enjoy the code!
TweetNaCl is the world's first auditable high-security cryptographic library. For encrypting text, we use the slightly modified files from TweetNaCl.js that work with react native expo specifically.
npm i tweet-nacl-react-native-expo
Or download source code
All API functions accept and return bytes as Uint8 Arrays. If you need to encode or decode strings, use functions from here.
nacl.box.keyPair()
Generates a new random key pair for box and returns it as an object with publicKey and privateKey members:
{
   mypublicKey: ...,  // 32 bit Uint8Array
   myprivateKey: ...   // 32 bit Uint8Array
}
nacl.box.before(theirPublicKey, mySecretKey)
Using the Diffie Hellman key exchange, box.before() creates the shared key with a fetched public key and local private key.
nacl.box(message, nonce, theirPublicKey, mySecretKey)
Encrypts and authenticates messages using recipient's public key, sender's private key, and the uniquely generated nonce.
Returns an encrypted and authenticated message in the Uint8Array format, which is nacl.box.overheadLength longer than the original message.
nacl.box.open(box, nonce, theirPublicKey, mySecretKey)
Authenticates and decrypts the given box with sender's public key, recipient's private key, and the given nonce.
Returns the original message, or null if authentication fails.
nacl.secretbox(message, nonce, key)
Encrypts and authenticates messages using the key and the nonce. The nonce must be unique for each distinct message for this key.
Returns an encrypted and authenticated message, which is nacl.secretbox.overheadLength longer than the original message.
nacl.secretbox.open(box, nonce, key)
Authenticates and decrypts the given secret box using the key and the nonce.
Returns the original message, or null if authentication fails.
Sign up requires the user to provide:
- Username
- Password - must be longer than 8 characters
- Phone Number
- Consent to Terms and Conditions
The goal of Sanctuary is to have minimal user information on record. This information is stored on AWS Cognito which has customizable multi-factor authentication steps. In Sanctuary, the following two-factor authentication policies were set up to maintain optimal security for the user:
- Sign up - After submitting the above account information, they must verify their account by entering a temporary passcode that they receive via text message to complete the signup process.
(Note: If the user tries to login with an account that has not been verified by entering the one time passcode, they will be redirected to the page where they can complete the account verification process, instead of being logged in.)
- Login - User must enter username and password as well as a temporary code texted to their verified phone number.
- Changing email - A temporary code is sent to the user's new email to verify it.
- Changing phone number - A temporary code is sent to the new phone to verify it.
- Changing password - A temporary code is sent to the verified phone number.
A user can recover their account if they lose or forget their password. They do this by selecting the I forgot my password button on the login page. They are then redirected to a page where they can enter their user address. If they entered a valid username, and the email associated with that username has been verified, then a one-time-passcode will be sent to their email and the user will be directed to a page where they can enter a new password and the one-time-passcode to create a new password. If this is successful the user will then be able to login with this new password.
A user can only recover their password if they have verified their email. So, if the user enters an invalid username, or a username with an email address that has not been verified, the user will be directed to a screen where they will be informed that they can not recover their password with the information that they provided.
Sanctuary uses AsyncStorage to store files on devices. Five pieces of information are stored as the following key-value pairs:
- "User" - User token for sign in
- "keys" - the User's private key used for encryption
- "rooms" - List of all rooms with basic info.
- roomId - message history for each room based on the rooms' ids
- roomId+"settings" - settings for each room based on the rooms' ids
The room list screen provides navigation to each chat room, creation of new chat rooms, and navigation to user settings. Room summaries are stored under the "rooms" key in async storage and displayed as a flatlist. Each item contains the room id, room name, and an unread message count.
Room creation requires a list of members (not including yourself) as a comma separated list and optionally a custom name for the chat room. The default room name will be "Chat!" if no other name is entered.
Our chat interface utilizes Gifted Chat by FaridSafi. It's behavior and layout is similar to Apple's iMessage. It allows the user to enter a message in a discrete text box at the bottom of the screen and then send it. The sender's messages appear on the right and other member's messages appear on the left with a corresponding avatar and username.
User's can scroll up to see previous messages.
Avatars of the user's initials from the username are displayed as a randomly colored and generated avatar. Avatar source and credits.
On the Rooms list screen, the user will see an unread number count next to the room which updates when an incoming message arrives in that room.
Extra room customization in Chat is handled in Room Settings.
- change text or bubble color for chat messages
- change room name
- add/remove member from room
To maintain user privacy, the AWS Dynamo database was used as a message queue and channel.
- Message storage - Messages are only temporarily stored on the database if the other user is offline.
- Message retrieval - When recipient is online or comes online, messages are retrieved and stored on the user's local storage then deleted from the database.
- Outstanding messages - Any messages that are not read or retrieved are only allowed to stay on the database for a week and then they are deleted.
- Encryption Key Storage - Public encryption keys are stored indefinitely on the database and are updated every time the user signs into their account.
Public keys are stored and maintained in this message queue so that they're accessible by any user who would like to start a conversation.
AWS AppSync API was used to create this message queue communication. AppSync uses GraphQL schemas to route data from the user's account to the AWS Dynamo database. In this project, GraphQL queries and mutations were used to create, delete, and query messages as well as public encryption keys from the database. User information, content, and settings are encapsulated in GraphQL requests which are JSON objects.

The room settings page provides customizable room names and text or bubble colors. It also allows for the adding/removing of members and sending of the full message history (like a forced backup) to other users. Setting changes and backups are a different message type so that they are handled appropriately.
To ensure messages are protected from MITM (Man in the Middle) attacks, we utilize TweetNaCl for encrypting conversations.
Conversations between two are end to end encrypted with TweetNaCl's box method. With a box, each of the two participants create a distant key pair, consisting of a private and public key.
The participants share their public keys with each other (via AWS). Using the Diffie Hellman key exchange, the public keys (of the other participants) are combined with the local private key to sign and encrypt data.
-
Encryption -The sender signs the outgoing message with their local private key and encrypts with the recipients public key. Additionally, every message is encrypted along with a nonce. The nonce jumbles the initial text with random characters before encrypting it to ciphertext. This is crucial since the encrypted ciphertext shouldn't be identical in length to the unencrypted text.
-
Decryption -The recipient verifies the signature with the sender’s public key and decrypts the message with their local private key. The nonce, which is sent alongside the encrypted message, is used to omit the randomly added characters during encryption and view the original message.
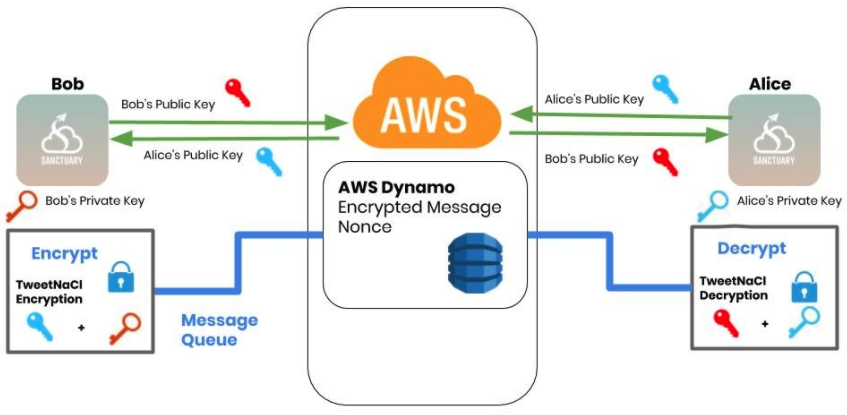

Group messages are encrypted symmetrically, using TweetNaCl's secretbox method, and are only visible to the participants of the group.
Symmetric encryption is when a single secret key is generated for every message along with a nonce which jumbles the message accordingly. The secret key and nonce is sent with the encrypted message to be used by recipients to decrypt.

Trouble Signing Up on Sanctuary Chat
-
Ensure the phone number is in the following format +18885551234 exactly with the '+' and no spaces or characters between the numbers.
-
Email must be a valid format following these guidelines: "mysite@ourearth.com my.ownsite@ourearth.org mysite@you.me.net " (Source: https://www.w3resource.com/javascript/form/email-validation.php)
-
Password must be 8 characters long in our code. We did not make it a requirement to have special characters, capital letters, or numbers.
Sanctuary App Crashing - Testflight build
- Reinstall app to clear cache and try creating a new account again.
Debugging on Expo
If the app crashes, some ways to troubleshoot:
- Expo App crashes on start up
- The app's cache and local storage needs to be deleted. Uninstall Expo app and reinstall. If garbage data is retrieved from AWS, it can damage local storage for when one tries to open the app in the future.
- Check Console Log and Expo log for warnings and stack trace
If the app is not loading,
- Expo takes roughly 2-5 minutes to first build Javascript bundle and then load app on the first try depending on Wifi connection and device being used. We found that on UCDavis campus, the app took closer to 4-5 minutes to load on the first try and we found it easier to run the app on cellular or hot spot. Debugging over our home Wifi was much faster.
- Use 'Tunnel' or 'LAN' to run the app on the phone.
Expo App not receiving incoming messages
- Stop Expo process running on computer and reload the entire app.
- A successful received message should display the following logs:
New Message: {
  "onCreateMessageByRecipient": {
    "id": "cc3dfe4b-030d-4771-b1db-b89db49d855e",
    "to": "abby",
    "from": "AWS",
    "payload": "{\"nonce\":\"bqVdVZg7cu/kXNl15OTdhIIo2+1Z7frq\",\"key\":\"\",\"payloadEncrypted\":\"ARA6ZA5fs2FrrfMIXnoDU3ZiRkL383DyNossvrlT1JOXcTCfrbp1TZAUD9rDyfZMCMbbhv5ZhrM8vUob3i/dC3wnFibTvWEmqXD6DqrvnYcV+ssFHMMGZbR5c+s0yzYFdCG3/evskZlXOOMWQo1ZY6EF4hUt+yuoMfXGeSCByxwgW7W8MbOdZkxd2C3XD9iHAIIcfTcaJ1bfgCC21EYkQCda7aEIs2lcBHYm1A2n22X7kEn73Ccwf3Jkvs6ONMx4sGxm7YcD5I+ofHBZAyvi/jRxothdpHxR+QEtPB4Pu1WnRyr57UedVmWiKz6crmNHZzibQA==\",\"box\":true}"
  }
}
- Check the sender's console logs to ensure the message has been sent successfully. A successful message sent should display the following logs:
AWS Success - Create Message
Object {
  "data": Object {
    "createMessage": Object {
      "from": "abby",
      "id": "5fbce67e-6600-4557-bece-48a341de9344",
      "payload": "{\"nonce\":\"bqVdVZg7cu/kXNl15OTdhIIo2+1Z7frq\",\"key\":\"\",\"payloadEncrypted\":\"ARA6ZA5fs2FrrfMIXnoDU3ZiRkL383DyNossvrlT1JOXcTCfrbp1TZAUD9rDyfZMCMbbhv5ZhrM8vUob3i/dC3wnFibTvWEmqXD6DqrvnYcV+ssFHMMGZbR5c+s0yzYFdCG3/evskZlXOOMWQo1ZY6EF4hUt+yuoMfXGeSCByxwgW7W8MbOdZkxd2C3XD9iHAIIcfTcaJ1bfgCC21EYkQCda7aEIs2lcBHYm1A2n22X7kEn73Ccwf3Jkvs6ONMx4sGxm7YcD5I+ofHBZAyvi/jRxothdpHxR+QEtPB4Pu1WnRyr57UedVmWiKz6crmNHZzibQA==\",\"box\":true}",      "to": "viswaas",
    },
  },
}
This log is triggered when the subscription set up is notified of any additions to the database concerning the user.
Expo App not sending messages
If the app is not sending messages, check for 'AWS Success - Create Message' log. If it is not displayed,
- resend message
- delete room and create a new one
- Check if correct username was entered
- Reload app
- Check Wifi connection
- Check for Expo logs and warnings
- Reinstall Expo
AWS Dynamo Warning: - GraphQLError: Request failed with status code 401
When sending messages, if the following error appears:
Possible Unhandled Promise Rejection (id: 5):
Object {
  "data": Object {},
  "errors": Array [
    [GraphQLError: Request failed with status code 401],
  ],
}
The API key needs to be updated. To do this, it navigates to the AWS AppSync Settings tab. Copy the "Primary auth mode - API KEY" listed and paste it in the 'aws-exports.js' file in the Sanctuary Chat project.
The following tutorial step 4 - GraphQL API Operations details the placement of API keys and how they are required for any mutation, query, or subscription requests to the AWS Dynamo database. When creating the API at the beginning, the APIkey's lifetime can be set so it doesn't expire every 7 days per default.
Stopped Receiving SMS codes The AWS spending budget needs to be increased if the SMS text codes for authentication have stopped working. The following tutorial outlines the process.
Testing locally using AWS Query Tab The AWS AppSync Queries tab can be used to send text messages to the app. It is recommended that the programmer first send a test message from app to database, then copy the payload into the query. Then swap the usernames in the 'to' and 'from' fields. An example of mutation:
// Used for creating text message, changing room settings, removing or adding members
mutation CreateMessage {
      createMessage(
        input:{
        to: "user1",
          from: "AWS",
            payload:"INSERT PAYLOAD STRING HERE"
        }
      ) {
              	id
                to
    	        from
               payload
      }
    }


// Used to check for public key for a certain user
query checkForPublicKey{
  listMessages(filter:{
    to:{eq:"key"},
    from:{eq:"user"},
  }){
    items {
      to
      from
      id
      payload

    }
  }
}
Payload format - also available in /src/payload.js:
{
    actionType: int
    roomId: int
    roomName: String
    roomMembers: [String]
    sender: String
    created: Date
    joiningMember: String
    leavingMember: String
    textContent: String
    newRoomName: String
}
Q. What if I lost my phone?
If you have the same phone number, the account can be recovered since on sign in, a verification code will be sent to the phone number on file.
If the phone number is changed, you must be logged in (requiring verification from the original phone number) to change the phone number.
Other member(s) in the chat room can send a backup copy of the room's chat history by going to the room's Settings page and pressing the "Send Backup" button at the bottom of the screen.
Logging into account does not recover all previous conversations otherwise and usernames of other members are not remembered.
Q. How do I create a group chat?
To create a group chat, add the usernames separated by commas in the Recipients field of the Create Chat Room screen. ex.
user1, user2, user3
You can also add or remove members from the group in settings
Q. How do I leave a chat room?
We wanted to allow users to remove chat history without being removed from the room. To remove yourself from the room, delete yourself from the members list in that room's settings
Q. How do I delete rooms or room members?
Swipe on the room or member you wish to remove and tap delete.
Q. How do I recover my account if I lose my password?
See Password Recovery
- End-to-End Encryption (in group conversations)
- Since the Diffie-Hellman key exchange algorithm works only between a pair of keys (private and public), the only feasible way to implement the algorithm for group conversations would be to create shared keys per sender and recipient in the group, store shared keys, and then encrypt the same message separately. We did not have time to implement this and were not sure if this was scalable.
- Decrypting using old key (in personal conversations)
- We discovered that there is an edge case in the following scenario where a user would not be able to decrypt messages sent while they were offline:
- ex. Bob sends some messages to Alice while she is offline. He then signs out and then back in. Whenever a user signs in, their pubic key is updated. Therefore, when Alice opens the app to retrieve the offline messages, she also needs to retrieve Bob's public key to decrypt. However, the messages have been encrypted with Bob's old public key and now cannot be decrypted.
- A possible solution proposed by the team was to store the shared key and only update it after it has retrieved a message. However this does not work if there are multiple offline messages.
- Backups use sender's perspective
- Currently, receiving backups will not convert to the receiver's perspective. All messages are still labeled with names.
- App - The app is in reference to the Sanctuary app.
- User - The user is a person who has created an account in our app and uses it to message others.
- App creator - This includes all developers of Hobbyte Team and any other programmer who chooses to use and build the Sanctuary App.
- Two-factor Authentication - Two factor authentication is a security measure which requires the user to enter a piece of information they know and provide input from something they have. For example, a password would be something they know and a phone verification code sent to them would be something they have.
- End-to-End Encryption - This is a security measure which encrypts a message that is sent from one user to another and cannot be intercepted by a man in the middle (MITM).
- TweetNaCl - An open source library providing decoding, key pair generation, encryption and decryption functions for two different encryption techniques 'box' and 'secretbox'.
- Diffie–Hellman key exchange - Conceived by Ralph Merkle, this is a method of securely exchanging cryptographic keys over a public channel.This key exchange method allows two parties that have no prior knowledge of each other to jointly establish a shared secret key over an insecure channel. Used by TweetNaCl's box to exchange public keys.
- Nonce - a random or pseudo-random number generated for every message to obtain a hash ciphertext. Nonce ensures the encrypted ciphertext and initial unencrypted text don't remain equal in length.
- Amazon Web Service (aka: AWS) - This is a backend service which provides several microservices such as multi-factor authentication, user pools, and serverless pipelines for a certain price depending on data transactions and usage. This is a third party API.
- AWS Cognito - This service allows the app creator to create groups of users, known as user pools, which have access to certain features or databases. This service also allows app creators to customize the handling of multi-factor authentication, user authentication, password recovery, and sign in setup.
- AWS Amplify - This is the development platform on Amazon Web Service that allows the app creator to set up the React Native App with an AWS database and services. This provides the framework and development tools necessary for cross platform development for backends.
- AWS AppSync - This service handles GraphQL requests and communication between the app and AWS databases.
- AWS Databases - Amazon Web Service provides a number of databases to work with. When building the Sanctuary App, we chose to use DynamoDB tables for creating our message queue and room tables.
- Secure and Private Social Media App Requirements v2.pdf