This is a template script for running a task in the fMRI scanner. It is designed to be modular, lightweight and easy to adapt to your needs. Your main tool is fMRI_task.m, which is designed to play one run of experimental task at a time.
The structure & most of the ideas for this repo come from work by @costantinoai and @laura. It was adapted by @TimManiquet.
Repository structure
.
.
├── README.md
├── data
│   └── sub-01
│       └── ...
├── fMRI_task.m
├── src
│   ├── list_of_stimuli.tsv
│   ├── parameters.txt
│   ├── readme_files
│   └── stimuli
│       └── your images here ...
└── utils
    ├── adjustFixationDuration.m
    ├── configScreenCol.m
    ├── convertVisualUnits.m
    ├── createLogFile.m
    ├── dateTimeStr.m
    ├── detectKeyboard.m
    ├── determineButtonMapping.m
    ├── displayFixation.m
    ├── displayInstructions.m
    ├── displayTrial.m
    ├── initializePTB.m
    ├── loadImages.m
    ├── logEvent.m
    ├── logKeyPress.m
    ├── macInitializePTB.m
    ├── macLogKeyPress.m
    ├── makeTrialList.m
    ├── parseParameterFile.m
    ├── resizeStim.m
    ├── saveAndClose.m
    └── setupScreen.m
Make sure the following exist in your root directory:
- A
utilsfolder containing utility functions. - A
srcfolder containing all your stimuli insrc/stimuli. - A
parameters.txtfile in thesrcdirectory, containing your experimental parameters. - A
list_of_stimuli.tsvfile in thesrcdirectory, containing a list of your trial stimuli & other relevant variables.
Before starting your experiment, make sure you set the two flags fmriMode and debugMode. These will determine a number of things:
debugModewill make your experiment run in a window instead of full screen, and will prevent data from being saved. Switching it off will make the cursor dissapear for the time of the experiment, have it run in full screen, and save all result and log data.fmriModewill have the fMRI screen properties, response & trigger buttons, and response instruction values used. Switching it off will turn these parameters to their PC values.
The macMode is an extra flag you can set on if you're running your experiment on Mac. Do note that Psychtoolbox is not optimised for Mac systems, and surely isn't maintained anymore on macOS in newest versions. Use this flag to develop and/or debug your task on your local machine if you have to and are using a Mac. Here are the things that will change if you set that flag on:
- Keyboard detection: the task will begin by running the
detectKeyboardfunction, which will ask you to give some key presses in the command window. This will allow MatLab to detect which keyboard you're using and return a keyboardID. - Psychtoolbox initialisation: the initialisation of Psychtoolbox will be done using this keyboardID to create the keyboard queue and record key presses.
- key presses will then be recorded using a different function that uses keyboardID as an argument to know where to look for input.
Most of your experiment parameters will be read externally from the parameters.txt file. When you conceive your own task, use this document as a checklist for the elements you need to set. Here is a detailled description of all the parameters you will find in parameters.txt and what they do.
| Parameter name | Default value | Description |
|---|---|---|
stimDur |
1 |
Stimulus presentation time (in seconds). |
fixDur |
1 |
Duration of each post-stimulus fixation (in seconds). |
prePost |
10 |
Duration of the pre- and post-run fixation periods (in seconds). |
taskName |
'my-exp' | Name of your experiment, useful to identify it in output files. |
resize |
true |
Resize flag, determines whether your stimuli get resized or not. |
resizeMode |
'visualUnits' | If the resize flag is true, determines how to resize the images. Two possible values: visualUnits and pixelSize (see Trial list). |
outWidth |
8 |
If the resize flag is true, the width of your resized stimuli (in pixels or degrees of visual angle, depending on your resizeMode. Either one of outWidth or outHeight has to exist if the resize flag is true. |
outHeight |
8 |
If the resize flag is true, the height of your resized stimuli. |
numRuns |
2 |
Total number of runs in the experiment. |
stimListFile |
'list_of_stimuli.tsv' | Name of the file that contains a partial or full list of the experiment trials (see Trial list). |
numRepetitions |
2 |
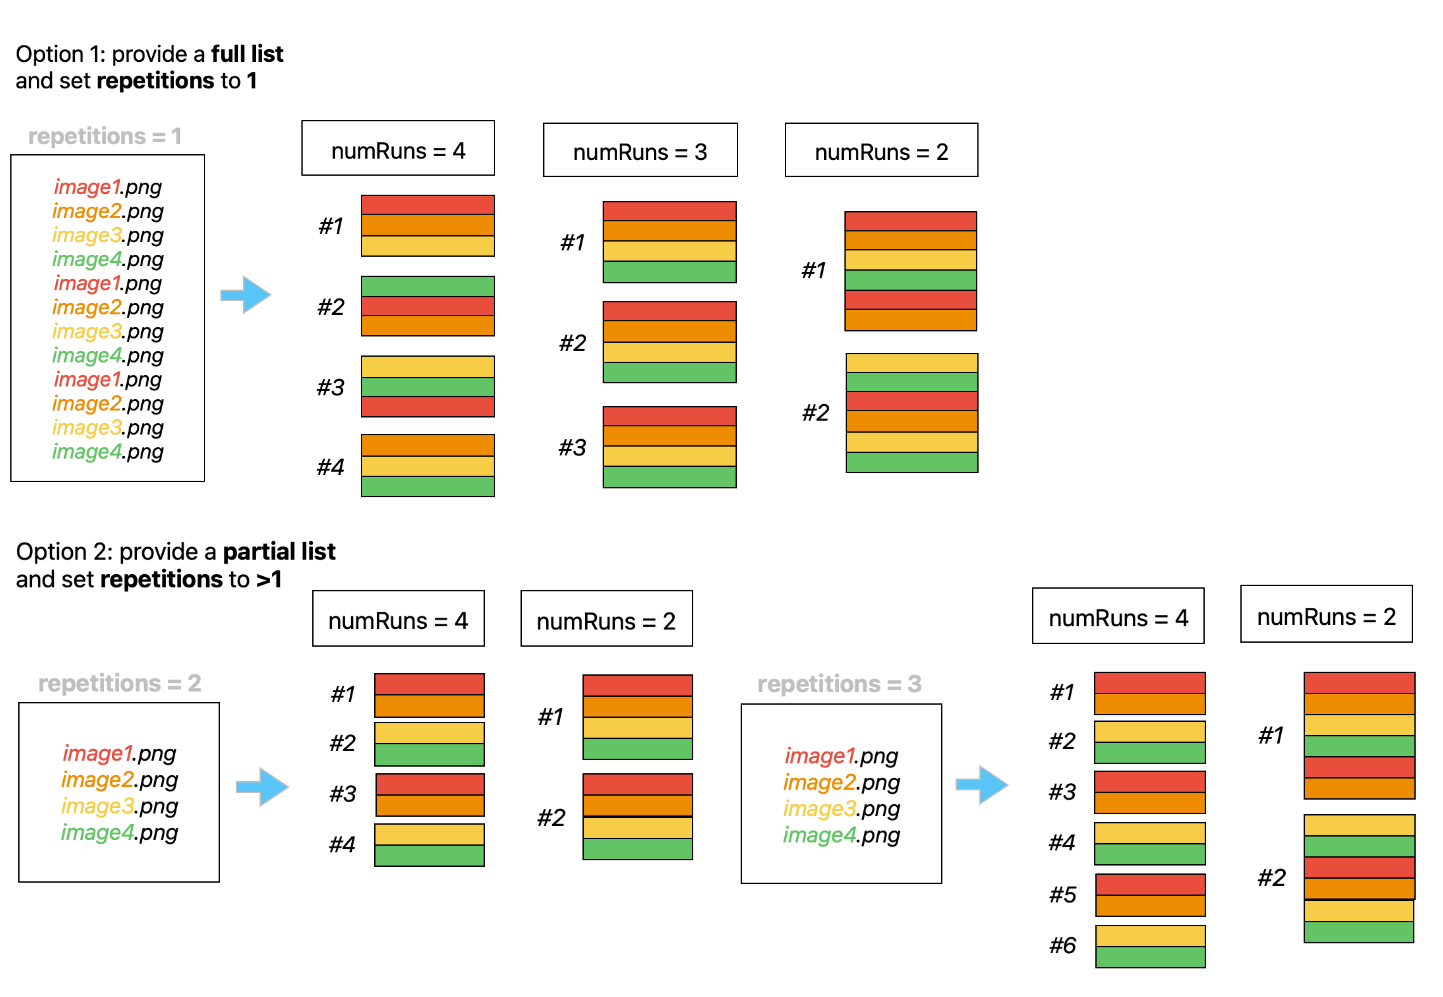
How many times to repeat the trials listed in the stimListFile. Set to 1 if it contains a full trial list (see How to write your list of stimuli). |
stimRandomization |
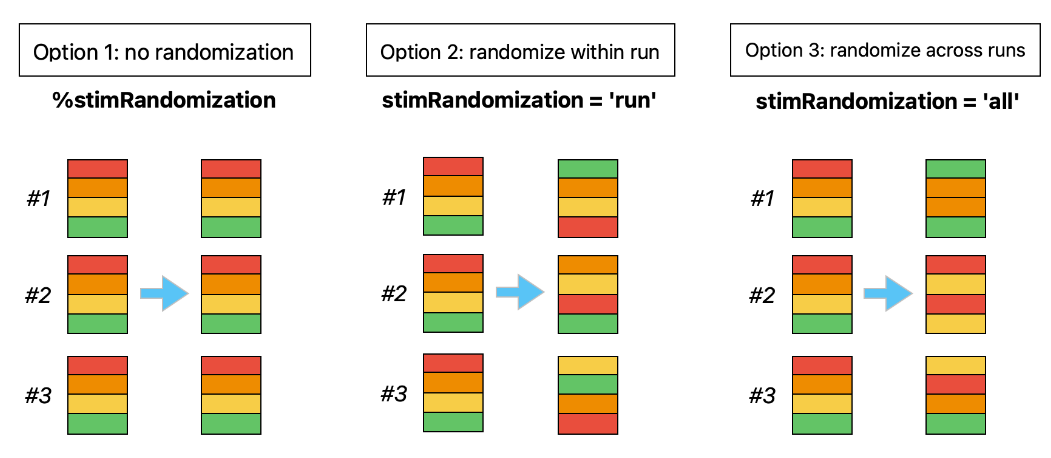
'run' | How to randomize the stimuli in your trial list. Comment out if you don't need any randomisation. Other possible values are 'run' and 'all' (see Trial randomization). |
fixSize |
.6 |
Size of your fixation element (in degrees of visual angle). |
fixType |
'round' | Type of fixation element you wish to use (see displayFixation.m). Possible values include 'round' and 'cross'. |
textSize |
30 |
Size of your text on screen. |
textFont |
'Helvetica' | Font of your text on screen. |
instructionsText1, instructionsText2, ... |
'On each trial..' | Line-by-line elements of instruction to give at the beginning of each run. |
triggerWaitText |
'Experiment loading ...' | Message to display while the script waits for a trigger to begin the task. |
scrDistMRI |
630 |
Distance to the screen in the MRI scanner (in mm). |
scrWidthMRI |
340 |
Width of the screen in the MRI scanner (in mm). |
scrDistPC |
520 |
Estimated distance to the PC screen in debug mode (in mm). |
scrWidthPC |
510 |
Estimated width of the PC screen in debug mode (in mm). |
respKeyMRI1, respKeyMRI2 |
51, 52 |
Key codes of the response buttons at the scanner (2-button right & red response box). |
triggerKeyMRI |
53 |
Key code of the MRI trigger. |
respInstMRI1, respInstMRI2 |
'left/green', 'right/red' | Names to display for each key in the instructions at the scanner. |
respKeyPC1, respKeyPC2 |
'q', 'w' | Keyboard response keys in debug mode (will also be used in the instructions). |
triggerKeyPC |
'a' | Mock trigger keyboard key to use in debug mode. |
escapeKey |
'ESCAPE' | Keyboard key to use to abort the experiment. |
The trials of your task will be executed based on the parameters and list of stimuli file that you input. Upon execution, a list of trials is created that contains all the information about the trials to be played in the experiment.
Write your list of stimuli in a file called list_of_stimuli.tsv, to be placed in the src folder. This file should contain at least one column with header name stimuli. All other columns are optional, will be read as extra information and stored in the list of trials output file (see below for an example, with two extra variables animacy and setting).
stimuli     animacy     setting
image1.png  animate     outside
image2.png  inanimate   inside
image3.png  inanimate   outside
image4.png  animate     outside
image5.png  animate     inside
Your list of trials will be built from the list of stimuli provided in the stimuli column of your list_of_stimuli.tsv file. Here is how the script will proceed:
- Based on the length of your stimuli column and the number of repetitions (
numRepetitions), a total number of trials is calculated (stimuli list length * number of repetitions). The list of stimuli is duplicated to match this length. - Based on the number of runs, each entry in the list of stimuli gets assigned a run number, considering evenly long runs and starting from 1.
There are two possible ways of writing this list:
- Provide a full stimuli list, with one line for each trial of the whole experiment, and set the number of repetitions to 1. This is the way to go if you want to control exactly the whole sequence of action.
- Provide a partial stimuli list, with one line for each trial of one/several run(s) of the experiment, but not for the whole experiment. In this case, set the number of repetitions to >1. This is the way to go if you are repeating the same set of stimuli several times across the experiment.
The resulting trial list gets enhanced of several extra variables (trial number, etc.) and is then saved as trial-list-sub#.tsv. On any given run, the file either already exists and is read, or gets created if it doesn't exist yet.
You might wish to monitor the accuracy of your participants online, to have an idea of how the task is going or to give feedback. This can be achieved by playing with extra variables in your list_of_stimuli.tsv file. These variables will automatically be indexed in your trial list and can hence be accessed during/right after trial presentation. The script contains a section showing how to use such variables for accuracy monitoring (see the %% monitoring accuracy section, l.290).
You can ask the script to randomize your trials by playing with the stimRandomization parameter.
- Comment out the
stimRandomizationparameter in your parameters file if you don't need any randomization from your list of stimuli. - Set the
stimRandomizationparameter to 'run' to randomize your trials within each run. - Set the
stimRandomizationparameter to 'all' to randomize your trials across all runs.
You can introduce fixation events in your task by replacing image file names in your list of stimuli by the word fixation. The script will read those differently and show a fixation instead of showing a stimulus for these trials.
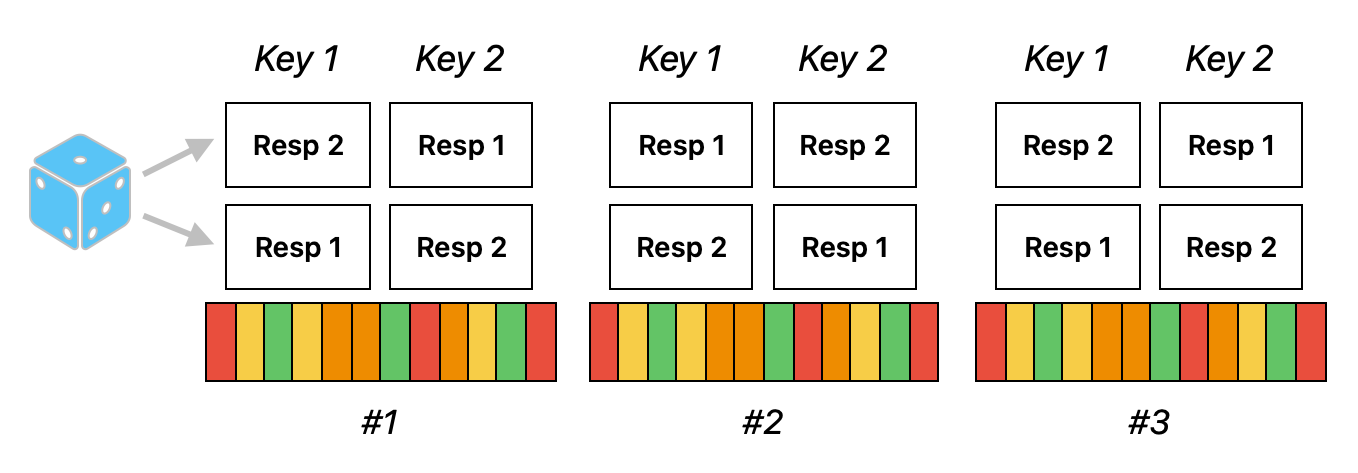
This task template takes two response buttons, which can be determined using the respKey parameters. A random assignment is made for the first run. The order of buttons is then switched across runs. Make sure the repsonse instructions you write in the respInst parameters match the order of the response button parameters. These will be used to render correct instructions at the beginning of each run.
The instructions you write line by line in the parameters will be pasted together in a single paragraph. Add as many instruction lines as you need (instructionsText4, instructionsText5, ...). Make sure to have two place holders in your instructions, denoted with parentheses (). These will be replaced by the response instructions you gave, and alternated in between runs.
Upon completion and given the debugMode flag is off, your data folder should look like this:
.
├── sub-01
│   ├── YYYY-MM-DD-hh-mm_sub01_run01_my-exp_log.tsv
│   ├── YYYY-MM-DD-hh-mm_sub01_run01_my-exp.mat
│   ├── YYYY-MM-DD-hh-mm_sub01_run02_my-exp_log.tsv
│   ├── YYYY-MM-DD-hh-mm_sub01_run02_my-exp.mat
│   ├── ... other runs here
│   └── sub-01_trial-list.tsv
└── sub-02
    └── ...
In this output are the following files:
- log files are created for each run (i.e. each time you run the script). They contain information about every event in the script, including screen flips, key presses, errors, etc. They are meant to keep track of everything. By default, they are named time tag-subject number-run number-experiment name-log**.tsv**.
.matfiles are created for each run and contain every variable created by MatLab during the run, including theparamsandinstructures,runTrialslist, etc. By default, they are named time tag-subject number-run number-experiment name**.mat**.- trial list files are created once per participant (at the beginning of the first run). They contain a full list of the trials to run across the experiment, divided into runs. Any additional variable that you added to your list of stimuli will appear in that table as well (see How to write your list of stimuli). Participant responses, as well as stimulus ideal and actual onset times, will also be written in that document. These latter bits of information can also be found in the .mat files, and are just double written here for practicality.
This section lists the most often encountered bugs and their solution.
| Problem | Resolution |
|---|---|
| Screen Setup | If you get an error from the screen setup section, it might be a problem with the system frame rate and the frame rate detected by PTB. Perhaps you are using an external monitor? If so, try disconnecting the external monitor, or set SkipSyncTests to 1 (ATTENTION: DON`T DO THIS IF YOU ARE RUNNING THE REAL EXPERIMENT! ONLY FOR DEBUG PURPOSES). |
| Trigger Wait | There is a known bug currently (as of the 21st of March 2024) where the MRI scanner sends two triggers before beginning. As a result, two keys presses are logged in the trigger wait section, with the start of each run actually taking place after the second trigger. |
| Keyboard silent | Did your script crash, and now you cannot write anything in Matlab anymore? Maybe your keyboard is still silent. You need to enable input listening again by running ListenChar(0). Find a way to run that segment, for instance by finding it in saveAndClose, highlighting and evaluating it. |


