


This is a python script which generates layouts of keycaps and glyphs for (automatic) import into Blender! Gone will be the days of manually placing caps into the correct locations and spending hours fixing alignment problems of glyphs on individual keys—simply specify the layout you want using the JSON output of KLE to have the computer guide the caps into the mathematically-correct locations.
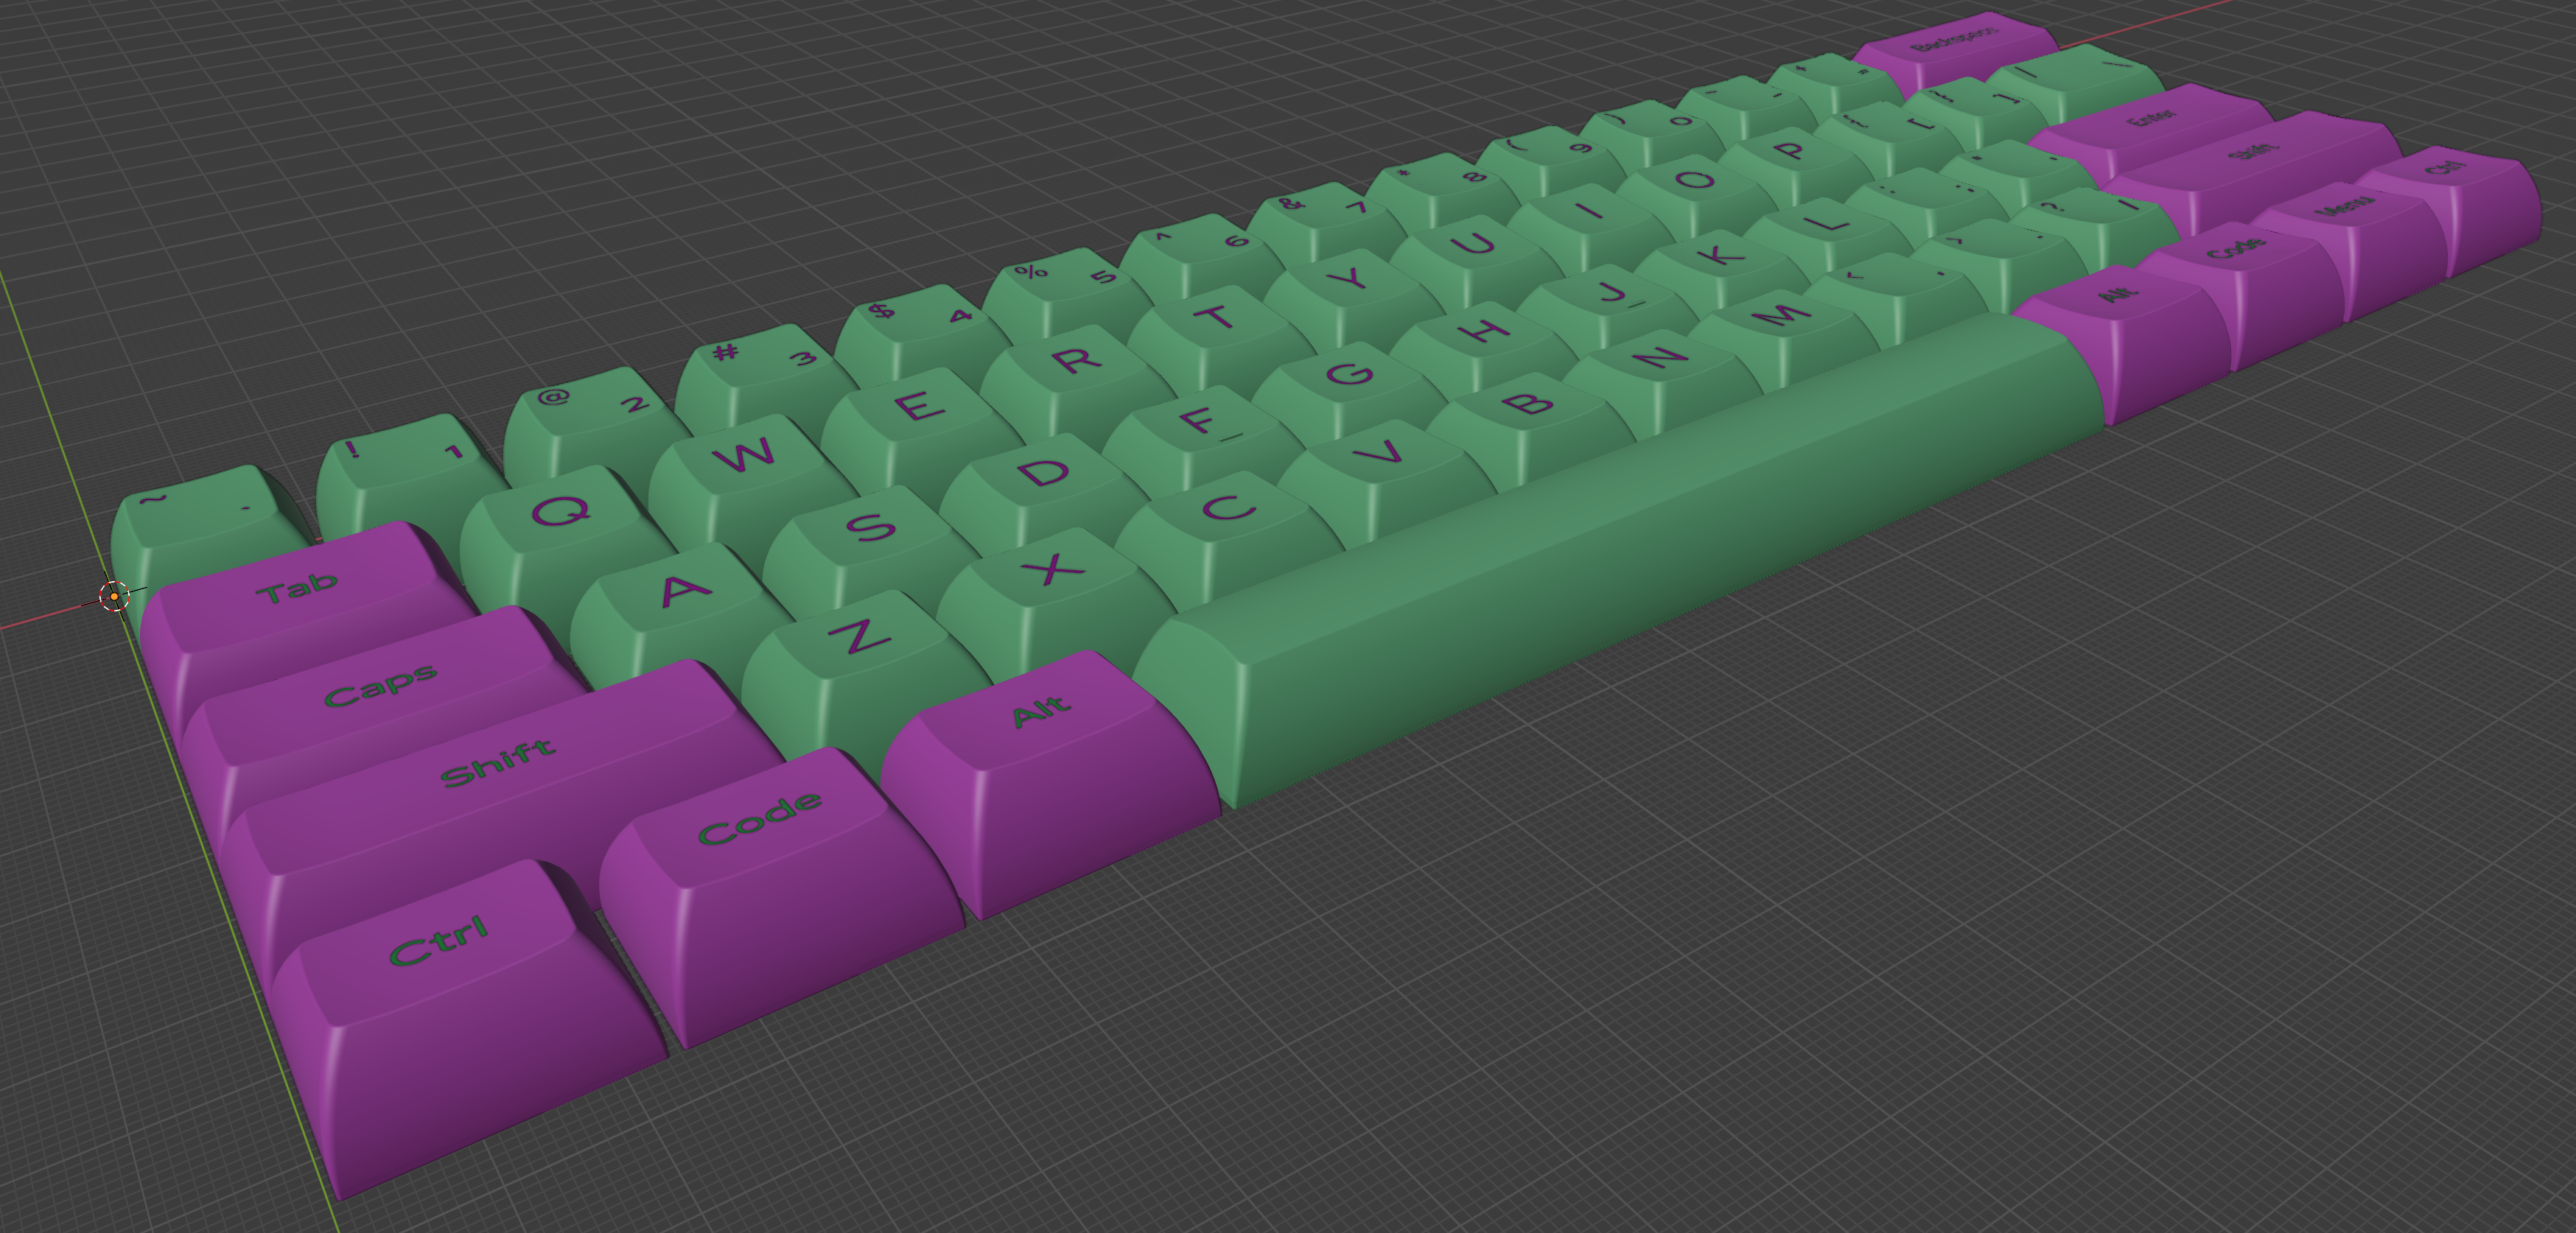
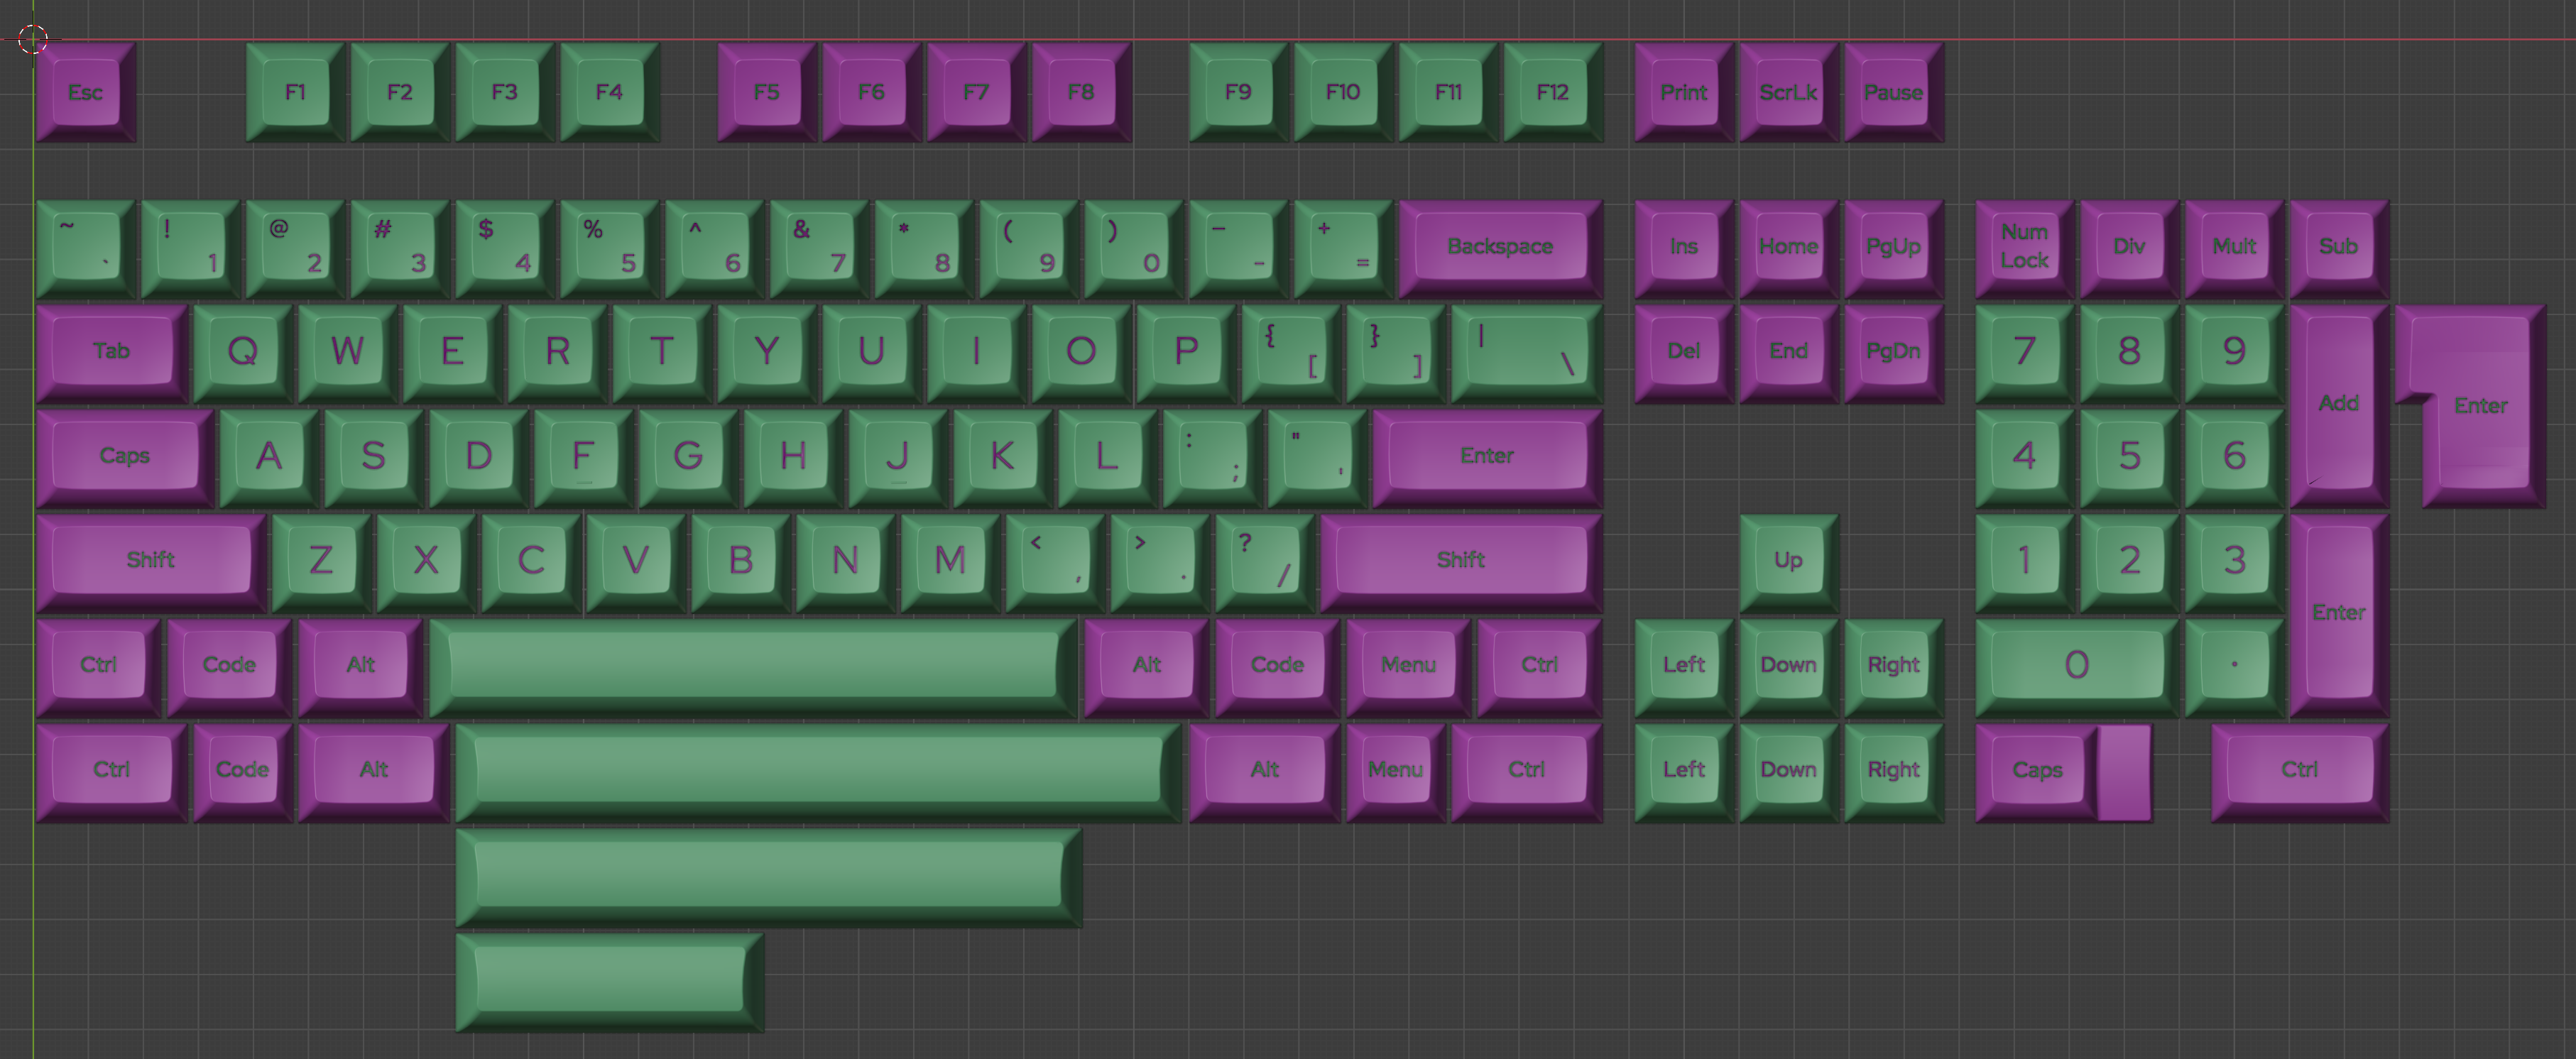
This script can be used to create a single source of truth for glyph alignment on caps and—as an added bonus—colourway-config, so later changes and fixes can be more easily propagated.
Please note that for the steps below, default configuration files are provided (and obtained through the zip on the releases page), so the annoying in-the-dark stage of getting the thing working for the first time should be largely avoided. Configuration can optionally be saved and read from a file.
The python API of adjustkeys also allows a coder to be notified of the objects it creates, thereby allowing it to form part of a larger keyboard-render build-system, should the user be that-way inclined.
- Why Bother?
- Usage
- Custom Setup
- Pitfalls
- Building from Source
- Contributing
- Gripes
- Author and Acknowledgements
Alignment is important. Whereas good alignment can lend your set a kind of refined perfection, bad alignment can unnecessarily draw the eye and distract from the rest of your hard work. The only problem is that to perfect alignment requires a non-negligable amount of effort to be spent on each key—it’s not as simple as just putting the glyph in the centre by how the computer sees it:
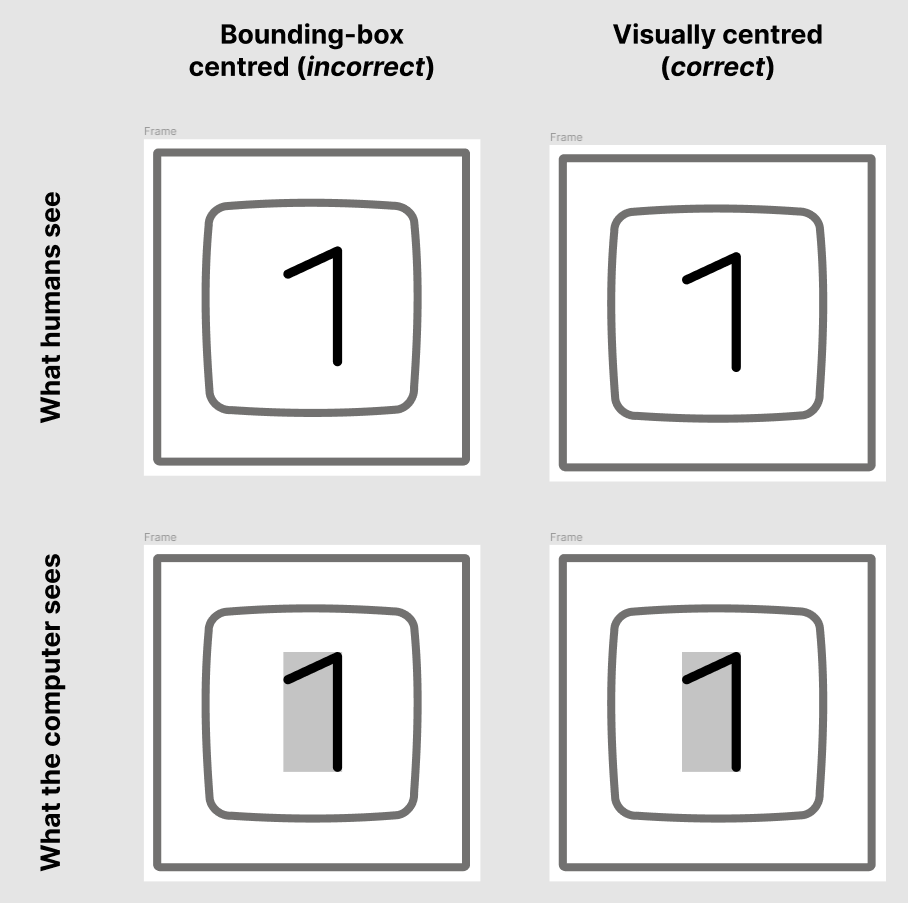
Without an in-depth study into emulation of the human eye, the best way to align glyphs is to use your own, but to do this for each time a glyph and keycap appears in every layout/kit would be extremely time-consuming, especially if one were to find something later which would require fixing very early-on in the process.
Therefore, adjustkeys exists—to help banish the duplication of tedious alignment work from the task of preparing renders for ICs and GBs, allowing its’ users to focus on the more fun bits of rendering, like watching your set come to life.
You’ll need a working installation of Blender (v2.82+ or v2.90+ work) and a little familiarity with the yaml syntax (although this can be picked up as it’s designed to be relatively human-friendly).
There’s two ways of interacting with adjustkeys, either through the Blender extension or through Python, both are explained here.
Important: currently, you need to be able to view the console output for certain features of adjustkeys, which can be done as follows depending on your operating system.
- Windows:
- Open blender as usual
- Go to Window > Toggle System Console
- Linux:
- Open up a terminal
- Enter
blender
- MacOS:
- Read and do Blender’s very quick guide on how to get
blenderinto your path if step 2 doesn’t work. - Enter
blenderat the terminal
- Read and do Blender’s very quick guide on how to get
Regardless of how you choose to use adjustkeys, you’ll need a text editor to edit the configuration files.
Notepad or Blender’s editor work okay, but they don’t have syntax highlighting (which makes things much easier).
If you’re new around text-editors, I’d recommend VSCodium, a minimalistic editor which is just Microsoft’s excellent VSCode compiled from the source and hence without the snooping nonsense present in the canonical closed-source binary.
You’ll need a working installation of Blender.
- Go to the releases page and download
adjust-keys-blender-addon.zip - Install ImageMagick by following this quick guide
- Install the addon by going to Edit > Preferences > Add-ons > Install, and install the zip you just downloaded and activate the plugin (tick the tick-box)
- (Optional) If it doesn’t already appear, you may need to search the preferences window for
Adjustkeys.
- (Optional) If it doesn’t already appear, you may need to search the preferences window for
- Go to Properties > Scene Properties > Adjustkeys to see the menu
- Press place caps and glyphs
- Wait a moment, et voilà!
See the custom setup section for how to change the stock settings into your own keycap set.
If you want to use adjustkeys through another python script for the purpose of automating something a script:
- Install ImageMagick by following this quick guide
- Go to the releases page, download
adjust-keys.zipand unzip it so that theadjustkeys-binbinary somewhere you won’t accidentally delete it- If you want to automate the process (e.g. through
git submodule), runningmake -C /path/to/adjust-keys/ develwill make a binary and necessary data files
- If you want to automate the process (e.g. through
- Copy the path where
adjustkeysnow is (I have mine in/home/kcza/Documents/keys/adjustkeys-bin) - In your existing Python script add the following lines, appropriately substituting the path from the previous step:
from sys import path
path.append('/path/to/adjustkeys-bin')
from adjustkeys.adjustkeys import main as adjustkeys- Now, you can call
adjustkeysas necessary from your script. The function takes input of either an (arbitrarily-nested) list of strings corresponding to command-line arguments, or a dictionary corresponding to the yaml arguments. Both are equally expressive but dictionaries are the more standard way of passing data of the two. The function returns a dictionary containing the names of the objects created during that run, and the number of warnings triggered.
A complete python example is below.
from sys import path
path.append('/path/to/adjustkeys-bin')
from adjustkeys.adjustkeys import main as adjustkeys

adjustkeys_args:dict = {
		'glyph_dir': 'my-super-cool-glyphs/',
		'layout_row_profiles_file': 'examples/layout_row_profiles-60.yml',
		'layout_file': './my-interesting-layout.json'
	}
inf:dict = adjustkeys(adjustkeys_args)
Assuming that the my-super-cool-glyphs folder is full of (super cool) glyphs, that the adjustkeys.zip has been extracted into the same folder as the script above (hence examples/ is next to it) and that my-interesting-layout.json exists and contains a valid KLE layout.
You should be able to uninstall through the usual Blender UI, that is, Edit > Preferences > Add-ons > Adjustkeys > Remove, but in some cases this may not work some python binary files can get marked as read-only during the installation process, and Blender’s delete function doesn’t force-delete to override this condition. As a result, if the ‘remove’ button doesn’t work you may need to do the following:
- Close Blender
- Go to the directory where extensions are installed, for a standard setup, this will probably be of the form:
- Windows:
C:\\Users\\<username>\\AppData\\Roaming\\Blender Foundation\\Blender\\2.XX\\scripts\\addons\\ - macOS:
/Users/<username>/Library/Application Support/Blender/2.XX/scripts/addons/ - Linux:
~/.config/blender/2.XX/scripts/addons/
- Windows:
- Delete the
adjust_keys_blender_addonfolder
There are no configuration files or python dependencies located outside of this folder, so after step 3, your Blender installation will be completely free of any adjustkeys related material.
It’s a fair assumption that the user will not be contented with just re-making the examples all day—they should probably want to do something cool themselves.
There are a few important files which are combined to make the layout you see before you; it’s important that the user has some notion of what each does and what they should look like as otherwise adjustkeys won’t be able to work.
There’s not too much to each, but some understanding should help avoid errors.
They’ll be explained in this section, but as an overview, adjustkeys takes:
- A directory containing
.objfiles each containing an individual keycap - A directory containing the glyphs to be placed, each in a separate
.svgfile - A
yaml(or equivalentlyjson) file containing the layout exported from KLE - A
yamlfile which specifies the location of the centre of a key in a particular profile - A
yamlfile which specifies a mapping from key names to glyph names
This is probably the easy bit—just head on over to KLE, configure a layout (a grid-like one like a standard 104 key ANSI layout will do, angling isn’t explicitly supported just yet) then click the Download > Download JSON. It’s important to note that KLE interactive editor doesn’t use JSON, it’s just JSON-like, so simply copy-pasting might not work.
Here’s the first few lines of a valid file as an example:
[
  [
    "Esc",
    {
      "x": 1
    },
    "F1",
    "F2",
    "F3",
"F4",To change keycap profiles, you need a few things.
(Please note that in the profiles/kat/ folder everything is supplied for KAT-profiles keycaps.
If a profile you want isn’t in the repo, you’ll need two things:
- A folder containing one
objfile for each keycap width and row combination, named asrow-width.obj, e.g. the modelR5-1_0u.objwould be used for a 100%-layout escape key. Note how the radix/decimal point in1.0is replaced with an underscore.- If a homing bump is present, the
-homingsuffix is added, for exampleR2-1.0u-homing.obj - Special keys have special names:
iso-enter.obj,num-plus.obj,num-enter.obj,stepped-caps.obj - The only vertices present in each of these files belong to the keycap model it holds, and the bottom of the cap is parallel to the x-y plane.
- If a uniform profile (e.g. KAM/DSA) is used, all keycap models should be considered to have profile
R2(as this is the defaultadjustkeysuses).
- If a homing bump is present, the
- A
yamlfile containing information on the location of the centre of a keycap as a fraction of a unit from the top left of the space it occupies (i.e. including margins)
Then to point adjustkeys to these through the relevant for keycap models and centres file.
To change the glyphs/images on top of the keycaps, you’ll firstly need a folder full of svgs (each containing exactly one image to be applied) and a mapping from the names of the keys in your layout to the name of the file (without the svg extension) which you wish to apply to that key.
An example folder of glyphs is seen in glyphs/red-hat-display/ which contains an svg for each legend in some keycap set design which uses the Red Hat Display font.
(As an aside, I chose Red Hat Display as an example font specifically for the reason that I haven’t seen it on a keycap set before—given the freedom of dye-sublimation, I believe that designers should be able to respect the desires of the others, but, when the occasion permits, to surprise them.)
You’ll need to tell adjustkeys where in your layout you want each legend to be placed.
For this you need a mapping such as that in examples/ansi-example-map.yml, where some of the lines are below:
'@-2': 2-at
'A': a
'Alt': alt
'B': b
'Backspace': backspace
'C': c
'Caps Lock': caps-lock
'Ctrl': ctrl
'D': d
'Delete': delete
'E': e
'End': end
Each line is like an instruction which tells adjustkeys that keycap named to the left of the colon is to have the svg named to the right of the colon applied to it.
The keycap names are derived from the KLE input JSON; taken as either the text of the key or, if there is more than one symbol on it, the name of each from the top with new-lines \n replaced by dashes (such as @-2 above).
The glyph names are just the final part of the svg path without the extension—for an svg in C:/Users/kcza/Downloads/some-glyph.svg can be referred to simply as some-glyph (assuming adjustkeys has been told to look for glyphs in C:/Users/kcza/Downloads/ in the first place).
The lines don’t need to be alphabetical order; they are here just for cleanliness.
If you want, you can keep a guide to represent the keycap in the svg which you can have automatically removed when adjustment is performed (this is designed to help with the trial-and-error process of getting things the right size).
If a curve in your svg has the id cap-guide (by default, although the id to exclude can be different), then it will be automatically discarded when combining the svg data.
For the most logical results, ensure that the value provided to the ‘unit-length’ option is the same as the height and width of a 1u-size input svg.
(By default the unit length is 292, which is the same as the height of every svg in glyphs/red-hat-display.)
There are two ways of colouring keycaps and glyphs: either from raw KLE input or from a colour map file. The first way is always active and is just a matter of adjusting RGB colours through the website; the second way can be deactivated but is on by default.
A colour map file is a list of objects, each of which possibly specifies a keycap colour and/or a glyph style, the name to give the corresponding material in Blender, and a condition which must be true for it to be applied to each given key.
The file is scanned from top to bottom, so if there are two places a keycap can be matched from, then only one nearest the top of the file will be used.
The cap-style and glyph-style fields can either be a 6-digit hex colour or a section of CSS code which is applied directly to the svg data.
Note that svg-styling for caps is only available when uv-mapping is used to apply glyphs to keys as the shrink-wrapping is only capable of using single block colours.
Here’s an example of the example colour-map file in the repo:
- name: green
  cap-style: '32a852'
  glyph-style: 'fill:#ad1aad;'
  cond:
    key-name:
    - .-.+
    - '[^+/*-]'
    - ''
    - F[1-49][0-2]?
    not-all:
      key-name:
      - ↑
      - →
      - ↓
      - ←
      key-pos: y > 5.5
- name: purple
  cap-style: 'ad1aad'
  glyph-style: '32a852'
  cond: true
Note firstly the indentation and how it discerns the list of objects (each containing a name, cap-style, glyph-style and cond field) from the contents of the condition (cond) stored inside of each.
Secondly, note the quote marks—these are used to force the yaml parser to consider what’s inside them as a string of letters as otherwise, the hex code 001100 would be considered a number and have the preceding zeros stripped away (leaving 1100, which isn’t good).
The condition key (cond) is true if all of its contained conditions are true, where a condition is any of the following.
Some mental gymnastics is required.
Note that as yaml dictionaries are used, condition names must be unique.
To avoid problems adjustkeys only checks that the first part matches, hence the conditions all: ..., all2: ... and all-asdf: ... are all treated identically.
This is either true or false.
It is useful to have the last rule of a colour-map file with condition true as a catch-all so that no keys lack styling information.
It is possible to make the colour of the key depend on its position in a given layout.
For this, a mathematical condition may be specified.
Note that as per the KLE standard, the value of x increases to the right, and the value of y downwards.
Conditions are constructed as follows, closely following Python+C syntax.
- Numbers and the variables
xandyare valid expressions - The negation of an expression is also an expression
- A pair of expressions can be compared by any of the following binary operations.
^^power*, multiplication/, division, e.g.3 / 2 = 1.5//, integer division, e.g.3 // 2 = 1%, modulo, remainder of integer division, e.g.3 % 2 = 1+, addition-, subtraction
- A pair of expressions may be compared to form a condition
<less-than<=, less-than-or-equal>, greater-than>=, greater-than-or-equal=, equal==, equal!=, not equal
- A pair of conditions may be used in logical operations; this is also a condition:
!logical negation (trueiff its input isfalse)&logical conjunction (trueiff both inputs aretrue)|logical disjunction (trueiff either input istrue)^exclusive or (trueiff either but not both inputs istrue)=>logical implication (trueiff either the left is false, or both are true)<=>logical equivalence (trueiff both inputs have the same value)
If a conditional operator is omitted, a value of true is returned if and only if the numerical value resolved is not equal to zero.
Note that as only binary operations are considered (exactly two inputs), multiple comparisons can have unexpected results, such as the following.
0.3 < 0.1 < 0.2
= (0.3 < 0.1) < 0.2
= False < 0.2
= 0 < 0.2
= True
Use the & operator instead: a < b < c should be expanded to a < b & b < c.
It is possible for the legend text of a key to be used to constrain colour-application.
The contents of the key-name field is either a string, or a list of strings, each of which represents a regular expression.
If the keycap legend matches any of the regular expressions specified, then the condition is true.
Any new-line characters present in the keycap legend are replaced by dashes, for example !\n1 becomes !-1.
It’s not essential to know regular expressions, but a few basics such as those outlined below can make things a little more streamlined. The cheatsheet and playground on regexr may be helpful.
Consider the example regular expression .*.
This comprises of ., which means match any one character, and * which means repeat zero or more of the regular expression to its left.
Hence .* just means that anything, including the empty string, is matched.
Similarly, the regex [0-9] specifies a character class which means match any one of the characters specified inside it.
Here a range from 0 to 9 is specified, hence this will match any single digit.
In the example colour-map, this concept is used in conjunction with the ? operator which matches either zero or one_ of the regular expression to its left.
This was used in the expression F[1-49][0-2]?, which when applied to a 100% keyboard will match keys F1 to F4 and F9 to F12.
It is possible to apply the same rule differently depending on the last part of the path to the layout file to which it is applied.
This is done using regular expressions in the same way as the key-name condition.
If this is required, some diligent naming if input files may be useful.
For example, orthogonal layouts might have the word ortho as a part of their name, which would be matched by .*ortho.*.
For example if a layout file /home/kcza/Documents/some-layout.yml is used, regular expression will be applied to just the some-layout part.
This is the same as the layout-file-name condition except that the entire path (i.e. including parent directories) is considered.
For platform-independence, all directory separators are replaced with forward-slashes so no DOS-style backslashes in paths can break things.
Takes a set of conditions as specified in this readme.
Returns true iff every single one of its sub-conditions are true.
Takes a set of conditions as specified in this readme.
Returns true iff at least one of its sub-conditions are true.
Takes a set of conditions as specified in this readme.
Negation of the all condition, returns true iff at least one of its sub-conditions is false.
Takes a set of conditions as specified in this readme.
Negation of the any condition, returns true iff none of its sub-conditions is true.
This takes either two or three sub-conditions: an if clause, a then clause and an optional else clause.
- If everything in the
ifclause istrue, then the implication returnstrueiff all conditions in thethenclause aretrue - Otherwise (something in the
ifclause isfalse) and so the implication returnstrueiff either there is noelseclause or all conditions in theelseclause aretrue.
This is useful for making conditions which are only checked in response to certain conditions. For example, the following will colour everything left of a line at 45° red in a layout with ‘ortho’ in the name, but otherwise will colour red anything left of a vertical line.
- name: red
  cap-colour: 'ff0000'
  glyph-style: 'ff0000'
  cond:
    implication:
      if:
        layout-file-name: .*ortho.*
      then:
        key-pos: x + y <= 8
      else:
key-pos: y <= 5Although adjustkeys is designed to be reasonably lenient, there are a few places an unsuspecting user can be caught out, so here’s a few things to keep in mind.
If you’re finding that some keys are missing, it may be because adjustkeys is looking for keycap models of widths and heights which do not exist.
Make sure that the KLE layout file is referencing the right profile (in JSON this is the p key).
Currently, adjustkeys combines colour information from a KLE input and through a colour-map but as KLE does not have an explicit ‘default’ colouring mode which would indicate when to fall-back on the colour-map, there is no perfect way of deciding when to do so. The heuristic used by adjustkeys is as follows:
- If a colour-map is enabled then:
- If the keycap being parsed has a glyph colour of
#000000, this is taken as an indication to fall back on the user’s colour-map rules - Otherwise the given glyph colour is specified as the intended colour
- If the keycap being parsed has a cap colour of
#cccccc, this is taken as an indication to fall back on the user’s colour-map rules - Otherwise the given cap colour is specified as the intended colour
- If the keycap being parsed has a glyph colour of
- Otherwise, KLE colours are taken as an exact specification of the user’s desired colourway
Therefore, if the user wishes to use a colour of #cccccc for caps, or #000000 for glyphs in their design, it may be better to tell adjustkeys not to use the colour-map file through the appropriate option.
The library adjustkeys uses for svg to png conversion, ImageMagick, has configurable usage limits to prevent a user’s system from being overwhelmed.
Unfortunately, for large uv images, this can sometimes be too low by default.
To fix this, find your system’s ImageMagick policy.xml file and increase the maximum width, height and area to something massive such as 100EiB.
You may need to uncomment the relevant lines (by removing the <!-- and --> surrounding the line).
Some strange results may be seen when using some of the fancier unicode characters (such as ← and →) in character classes ([...]).
This is because they have a longer internal representation than the common Latin characters and the regular expression matcher only checks one Latin character-length at a when checking character classes.
Avoid this by moving these characters into their own regular expressions if possible or rewriting things to avoid this situation.
For example, in the example colour map file, a list of arrows is given instead of the single regular expression [^↑→↓←].
This section is only useful for contributors; if you want to use the script, looking at the releases page and the usage section should suffice.
Assuming git is installed, then in a suitable directory, run the following from the command-line.
For an easier experience, install cython3 first—it’s used here as a static checker and can find some bugs without needing to explicitly run all code-paths.
It’s optional, if you don’t want to install it, just pass the NO_CYTHON=y option on the make line.
git clone https://github.com/TheSignPainter98/adjust-keys
cd adjust-keys
make
Non-essential parts of the process which require programs which might not easily be found on all platforms can be removed from the build process by defining the appropriate NO_x variable.
See Makefile for more information.
Contributions are welcome! Please see the contribution note, abide by the code of conduct and the note following:
- To add glyphs for a font x, please place the related
svgs inglyphs/x/, relative to the project root (thexshould be lower-case) - To add keycap models and metadata for a profile y,
- Place the related
objfiles inprofiles/y/relative to the project root (theyshould be lower-case and spaces should be replaced by dashes)
- If the profile is non-uniform and the row closest to the average user’s wrists is not
R1, enter a mapping in theprofile-row-mapfield of theprofiles/y/keycap_data.yml.in, where the left are standardised names as below and the right are the names used by the new cap models. Otherwise, leave the fieldnull- Users of
adjustkeysshould assume that profileR1is that of the row closest to the average user’s wrists - The profile number of any other row is either the same or one greater than the previous row as distance away from the user increases.
- Users of
- (The annoying one) measure the location of the centre of the face of the keycap model and the uppermost and leftmost extremes of the keycap model and enter the values into
profiles/y/centres.csv
- Place the related
- When adding code, please use include type-annotations—they make it much easier to interface with the Python code written before!
Above all, please abide by the licenses of the relevant works! For example, the license for Gotham, a common type family in KAT and KAM sets, would prohibit it’s inclusion in this repo. In particular, some licenses state that the format of the contained glyphs may not be changed. For example, at the time of writing, the licence for Comic Sans MS would prohibit its use through adjustkeys... although one might argue this is a good thing as there are plenty of better families which do what Comic Sans tries to but better.
The licensing section section below should be updated to acknowledge the original source of the material.
I wrote this in Python for two reasons:
- There exists a large, well-documented Python API for Blender
So that anyone learning to program could have an example of some reasonably complicated code and some reasonably clean methods to deal with challengesPython is a popular but bad programming language.
Some languages like C are beautifully simple, others like Haskell are beautifully complex, but alas Python is neither. It’s type system (“duck typing”), it’s lack of native support for type annotations is bad, its import system caching when it can’t find packages is bad and that imported modules are allowed to have side-effects is bad. Although Python isn’t the only language to suffer these ailments, it’s the only one I’ve seen which lies at the intersection of all these problems and is also popular.
This code was written by Ed Jones (Discord @kcza#4691).
Acknowledgement for using adjustkeys is welcome but not mandatory :P
Thanks to Swishy for user-testing in the early stages and for suggesting that adjustkeys would benefit from being a Blender extension and that it needed uv-mapping.
All files written by contributors to this project are covered under the GNU Lesser General Public License v3.0, with the following exceptions. Please note that the licenses listed below were correct to the best of my knowledge at the time of writing; check the sources for the most up-to-date versions of their respective licenses.
- KAT keycap models present in the repo were derived from a model kindly provided by zFrontier which was found on the Keycap Designers’ Discord
If there are any artifacts not present in the originals, please blame AutoCAD’s
objconversion - Cherry keycap models present were derived from step files kindly provided by hineybush and are available via GitHub
- The typeface used in svgs the
glyphs/red-hat-display/folder is Red Hat Display which uses the Open Font License - The typeface used in svgs the
glyphs/open-cherry/folder is Open Cherry by dakotafelder available under the license specified on GitHub and missing glyphs are substituted with Quicksand (OFL) - The arrow symbols used in svgs in the
glyphs/open-cherry/folder are ‘GMK Icons’ found on the Keycap Designers’ Discord - The keycap representation used in
glyphs/red-hat-displayandglyphs/open-cherryis derived from a 2D model by Alex Lin of zFrontier, which was also found on the Keycap Designers’ Discord - The layout
examples/layout.ymlis derived from the ANSI 104 layout example on KLE - All contents of the
examples/folder are licensed under CC0 1.0 Universal (CC0 1.0) and hence are dedicated to the public domain
Please ensure that credit is given where it is due.