
🔸 Web-Application Name : API-Panda-Backend
🐼 API-Panda takes an Isomorphic approach and runs the front-end isolated from the back-end in it's own container. The configuration, architecture, and deployment cycle for the front-end of the application has no depdendencies on the backend. The back-end is deployed as a standlone API which can be utilzied by any application using the provided routes. This is ideal for scaling and fits the scenario in an Enterprise where a team comprises of different front-end and back-end developers.
📌 API-Panda Front-end Repo : https://github.com/Technologeek/react-assignment .
📌 API-Panda Back-end Repo : https://github.com/Technologeek/api-panda-backend .
📌 API-Panda Postman Collection : https://www.getpostman.com/collections/c9c83a1f6f459ca967ff .
❗️ Note : The documentation for each part will be located in their respective ReadMe files in the root directory of the repos.
🐼 API-Panda is an in-browser alternative to to a API management library like Postman. API-Panda is lightweight, fast & supports GET & POST requests at the moment. This is ideal for developers who quickly like to see the request/response format of the backend API endpoints to plan out their front-end architecture. Under the hood, API-Panda makes an actual API call for the given end-points along with their content-type specifications and displays the response in a pretty format. It is similar to making an API call from a promise based liblary like axios but instead of using browser's network cell to analyise the response, you use API-Panda to view the data returned by the network. After siging up, users can save their URL's in collections and access them later with one click.
🐼 API-Panda back-end offers a comprehensive API which goes beyond the scope of main application to implement new features if needed. The provided back-end is secure, tested, verified, and written to scale in terms of the application architecture & design philosophy.
One difference between a smart programmer and a professional programmer is that the professional understands that clarity is king. Professionals use their powers for good and write code that others can understand. — Robert C. Martin
API-Panda back-end takes an approach where the architecture design is shaped in a way that is abides by the principles of SOLID. Even though JavaScript is not an Object-Oriented programming language, by seperating the application logic from the views or models can give us a much cleaner code. API-Panda utilises such practices to ensure the written code is understandable , readable, changeable, extendable, and maintainable. To assure Seperation Of Concerns, each function, each class, each module exposes a single-minded attitude that remains entirely undistracted, and unpolluted, by the surrounding details.
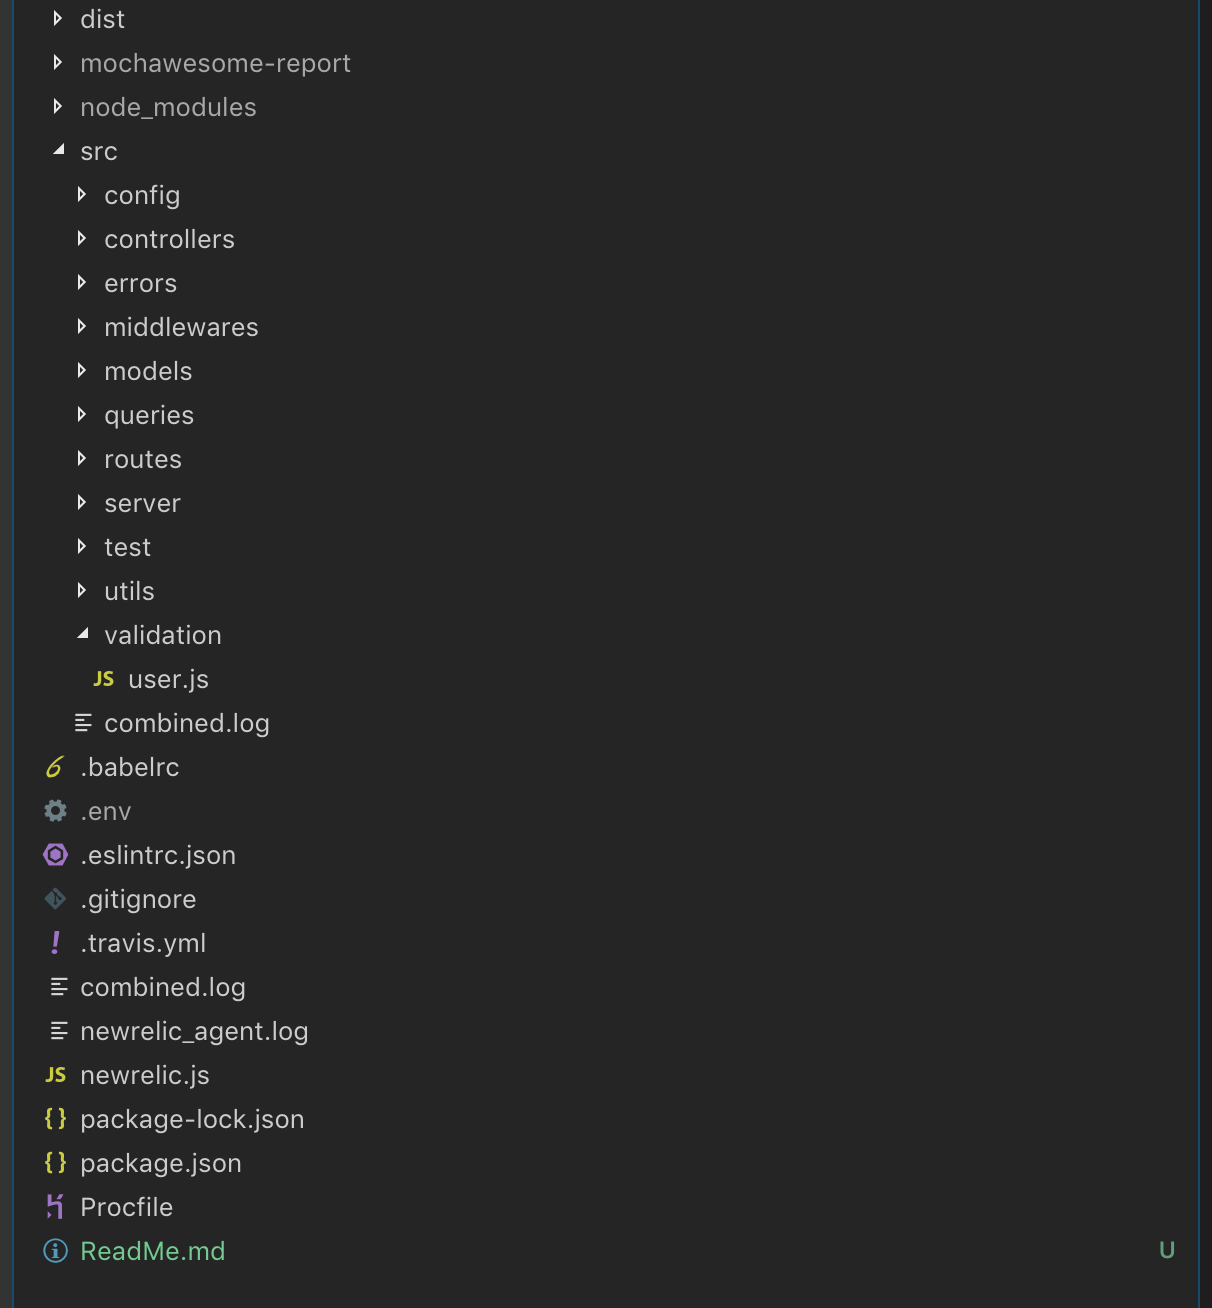
It's important to understand the approaches taken to design the architecture. Let's have a look at the directory structure first.
-
🔘 Decomposition : Every module is intended to perform only a specific task. For further decomposition, the modules are categorized into sub-directories. There is technically no "View" layer but the models & controllers are primary modules that utilize different methods.
-
🔘 Single Point of Action : In an express application, a single point of action ensures we have a dedicated middleware that performs an action on receiving the request/response.
Below is the brief description of every module in the directory.
-
🔘 Root of the project contains general configurations like babel, eslint, prettier, Travis and other files that will be utilized by the application on a global level.
➕ EsLint : Uses the famous airbnb plugin for the industry level linting policies.
➕ Babel : Configured to use the latest ES6 features and transform runtimes while creating the production build.
-
🔘 Config : DataBase config goes here. This module is responsible for connecting to the Test/Production database depending on the variable received from the .env.
-
🔘 Controllers : The driver programs for business logic taking into account the other utility methods.
-
🔘 Errors : Returns a ValidationError. Further can be expanded to handle other errors in the application.
-
🔘 MiddleWares : Express middleware functions responsible for taking an action on the request/response received. Further classified as
➕ coreMiddleWares.js : All global middlewares will go here.
➕ errorHandler.js : Error handling middleware for the entire application. Will be responsible for throwing a specific error on the request received. Ideally, every error will be forwarded here by the next() callback.
➕ logger.js : Logger for the application using winston module.
➕ passport.js : Authentication middleware.
➕ promiseResolver.js : MiddleWare for resolving promises as the application is highly asynchronous.
➕ responseSender.js : General middleware for sending appropriate responses.
➕ Validation.js : This middleware currently handles only Validation for login/sign-up but the idea is to used a centralized middleware of handle all validations.
-
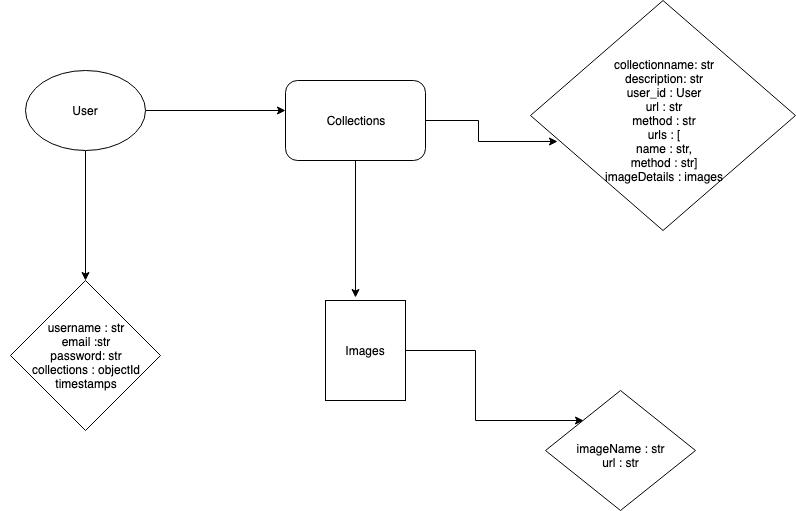
🔘 Models : Mongo Models/Schema of the application.
-
🔘 Queries : Provides a sort of Abstraction layer between the modles and the controllers. This also defines the general mongoose queries that can be resued throughout the application.
-
🔘 : Routes : Contains routes classified by the route-type and an index route. The primary motive while designing the route was to keep the routes clean and seperate all the business/application logic from the routes. For instance, a route with authentication will look like:
router.get(
  "/username/:username",
  passport.authenticate("jwt", { session: false }),
  promiseResolver(userController.getUserInformation),
  responseSender
)
-
🔘 : Server : Defines the entry point of the application.
-
🔘 : Test : Holds Testing strategies for the application seperated by the test type. (more in the testing section)
-
🔘 : Utils : Contains the Utility functions.
-
🔘 : Validation : Contains the custom validation utilities.
-
🔘 Misc
➕ combined.log : Logger file shows log messages.
➕ new_relic_agent.log : Shows logs from new_relic analytics system.
➕ Procfile : Heroku config.
➕ mochaawesome-report : Test/Coverage reports.
➕coverage : Coverage reports generated from NYC.
- 💊 Create a collection with an URL which will be persisted to a database.
- 💊 One-Click access to previous collections.
- 💊 One-Click make-request to previous API's.
- 💊 Search function to filter the existing collections.
- 💊 Perform instant GET/POST requests without creating a collection.
- 💊 View a request's Response/Error data in a pretty format.
- 💊 One click access for adding, updating & deleting collections.
- 💊 Auto-generation of a profile image based on the user's initials.
- 💊 Appropriate display of loaders, errors and strict validation when necessary.
- 💊 Intuitive User-Interface design.
- 💊 Bonus : System generated random quotes to keep developers motivated.
| End-Point | Request-Type | Request-Body | Response |
|---|---|---|---|
| /api/auth/signup | POST |
{username,email,password} | {userId,email,token,success,status} |
| /api/auth/login | POST |
{email,password} | {userId,email,token,success,status} |
| /api/users/:userId | GET |
NA | {collections,id,username,email,created,updated,success,status} |
| /api/users/email/:email | GET |
NA | {collections,id,username,email,created,updated,success,status} |
| /api/users/username/:username | GET |
NA | {collections,id,username,email,created,updated,success,status} |
| /api/users/:userid/collections | POST |
{collectionname, method,url/description,userid,urls,imagedetails} | {collectionname, method,url/description,userid,urls,imagedetails,success,status} |
| /api/users/:userid/collections | GET |
NA | {collectionname, method,url/description,userid,urls,imagedetails,success,status} |
| /api/users/:userid/collections/recent-collection | GET |
NA | {recent 10 collections user} |
| /api/users/:userid/collections/search/:searchText | GET |
NA | { found collection} |
| /api/collections/recent-collection | GET |
NA | {recent 10 collections all users } |
| /api/collections/:collectionId | GET |
{} | {found collection} |
| /api/collections/:collectionId | PUT |
{collection data to update} | {updated collection data,success,status,message} |
| /api/collections/:collectionId | DELETE |
{} | {hash,signature,deletecount,success,status} |
| /api/quote | GET |
NA | {quote,id,author,success} |
| /api/health | GET |
NA | {ok} |
This application is packaged for development & deployment builds with proper environment configurations. To use the application end-points, the live version should be used - https://api-panda-backend-server.herokuapp.com as it comes pre-configured with a mongoDb instance that is deployed to a Cloud.
To run the project locally,
-
Git clone this repository
git clone https://github.com/Technologeek/api-panda-backend.gitCd into api-panda-backend -
Ensure you've Node/Npm/Yarn installed to download the dependencies. The project uses following versions.
- Node : v8.12.0
- NPM : 6.4.1
- Yarn : 1.9.4
-
It is recommended to use Yarn for downloading all the dependencies. But in it's absence, NPM would do the job. Perform the following commands from inside the project folder (directory where package.json is located)
yarn installornpm install -
Once the dependencies are downloaded, you can run the development project server by
npm start. This should run the application on port 3000. -
The environment variables file needs to be created manually (.env) and the data for the same will be sent to via slack. You can copy,paste that data and re-run the application to get the enviroment varibales working.
-
You need to configure the mongoDb url-string to point towards your local running instance or use the default that is the one deployed to the cloud.
-
Other commands are listed below
npm run start- Starts the development server (uses nodemon).npm run build- Generates the Production build of the application in the dist folder.npm run serve- Serves the Production build of the application.npm run test- Initiates a test runner to run all the tests in parallel.npm run generateTestReport- Generates a test report in mochaawesome-report folder.npm run coverage- Generates test coverage report in the terminal. -
If the above steps executed accurately, you'll have a server running locally as expected. Post-Man collection (linked above) can be used to test the API.
A .env file needs to be created in the root directory of the project with the following configurations.
PORT = 3000
JWT_ENCRYPTION_KEY = YourEncryptionKey
JWT_EXPIRATION_TIME = 10000
DB_URL = your_db_server_url_goes-here-
🔘 : API-Panda backend uses JWT based authentication along with passport for verification. Once the token is generated, the subsequent requests expect the same to be passed in the request header as a bearer token.
-
🔘 : The token then is verified before processing the request.
-
🔘 : Every route in the application is protected except api/user/signup, /api/user/login, /api/quote, /api/health
-
🔘 : 'test' folder contains the test for all the components in the project. It will conduct two type of test- Integration Test, Unit Test, and end-to-end testing for one of the flows. The test are run through mocha and assertion are made through chai
-
🔘 : Integration Test Integration Test is placed in e2e folder. Integration test run through chai-http package. It also provides us the capability of spawning new Server at the destined port and then running all the test. The test includes -
Registering New User
Login User with the above credentials
Make a collection
Read a collection
Update a collection
Delete collection
All the corner cases in which the api should return an error are also covered. The major case of unauthorized user and the validation tests are also covered in this tests. We have also use mockgoose which mimics the mongo db server and keeps the data in memory. The main advantage for using mockgoose is that every time test runs we get new set of database to run the test into.
- 🔘 : Unit Test All other folder includes the unit test for the respective modules. We have used sinon for making spies, stubbing and mocking function so that we can run the test in isolation. The main focus of the test is to mock each and every function so that the test scope can be narrowed.
Simarly, models, schemas are also tested.
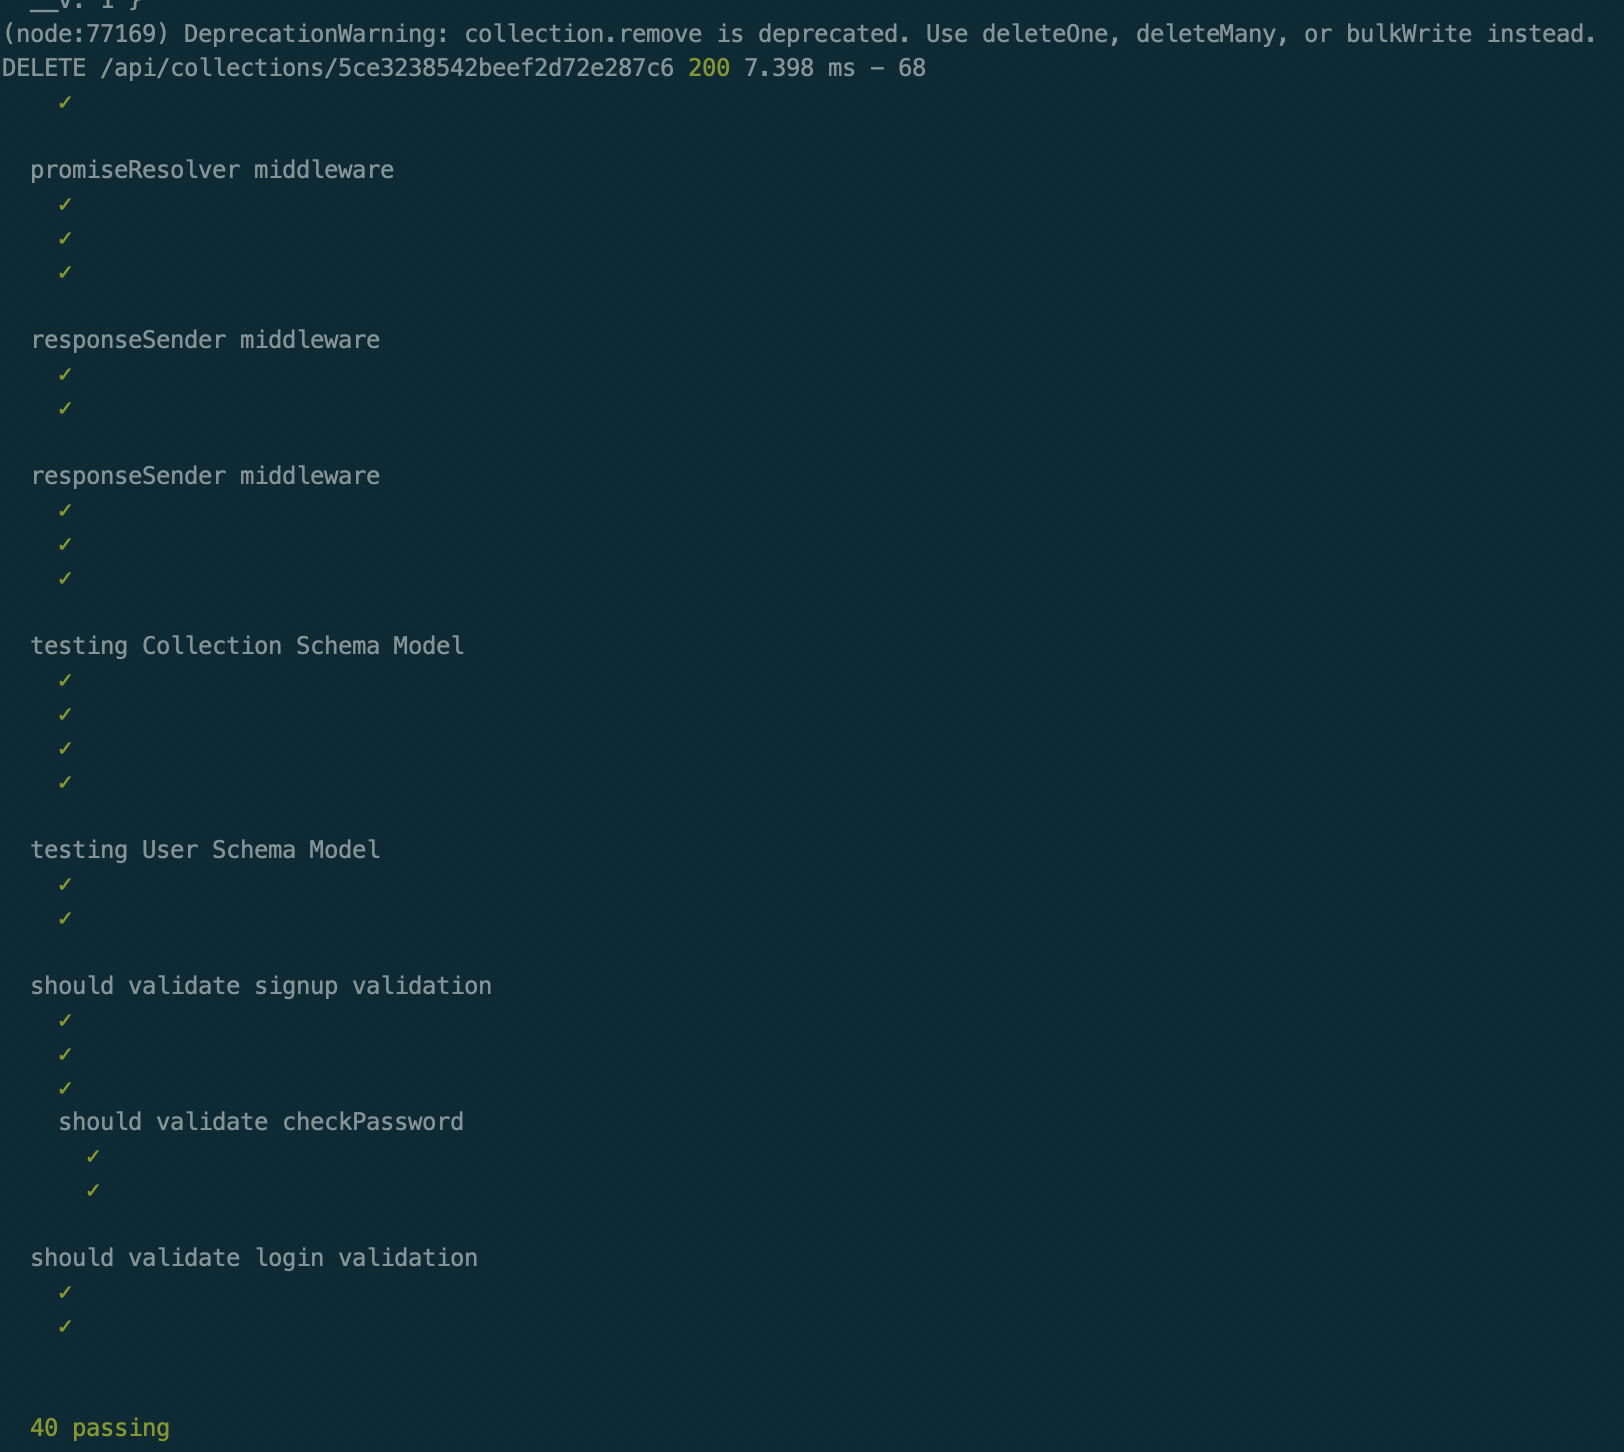
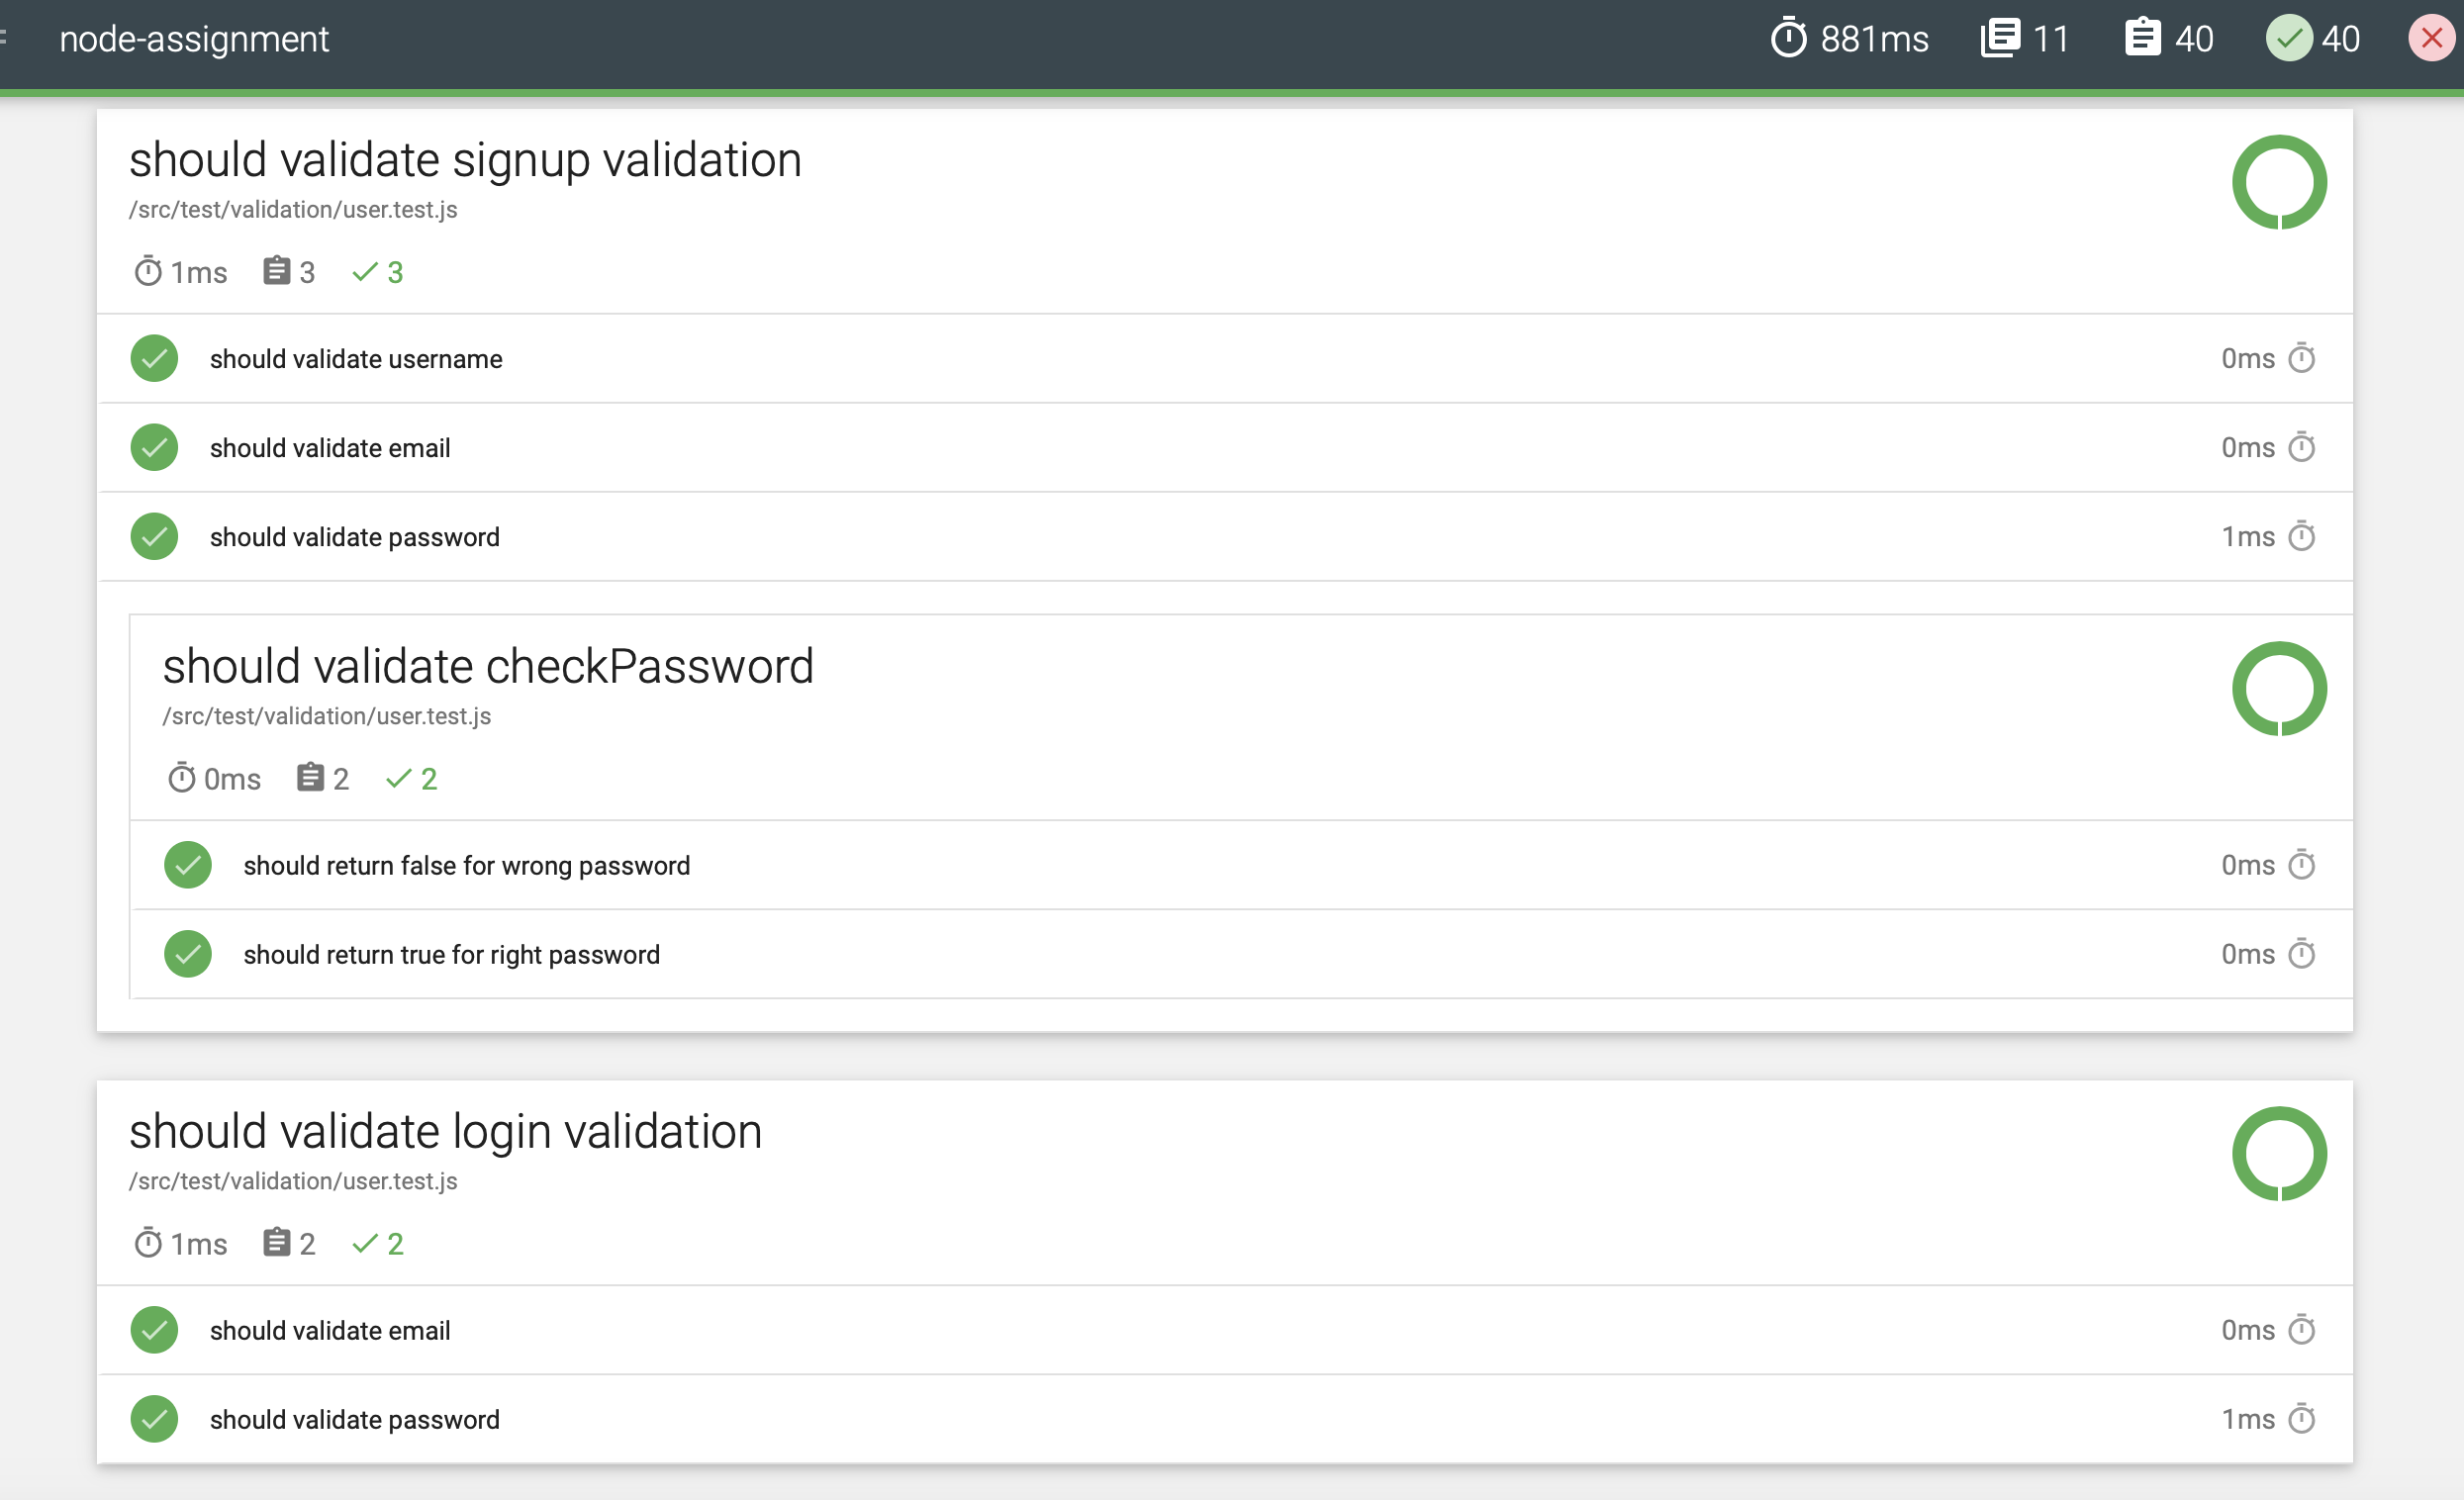
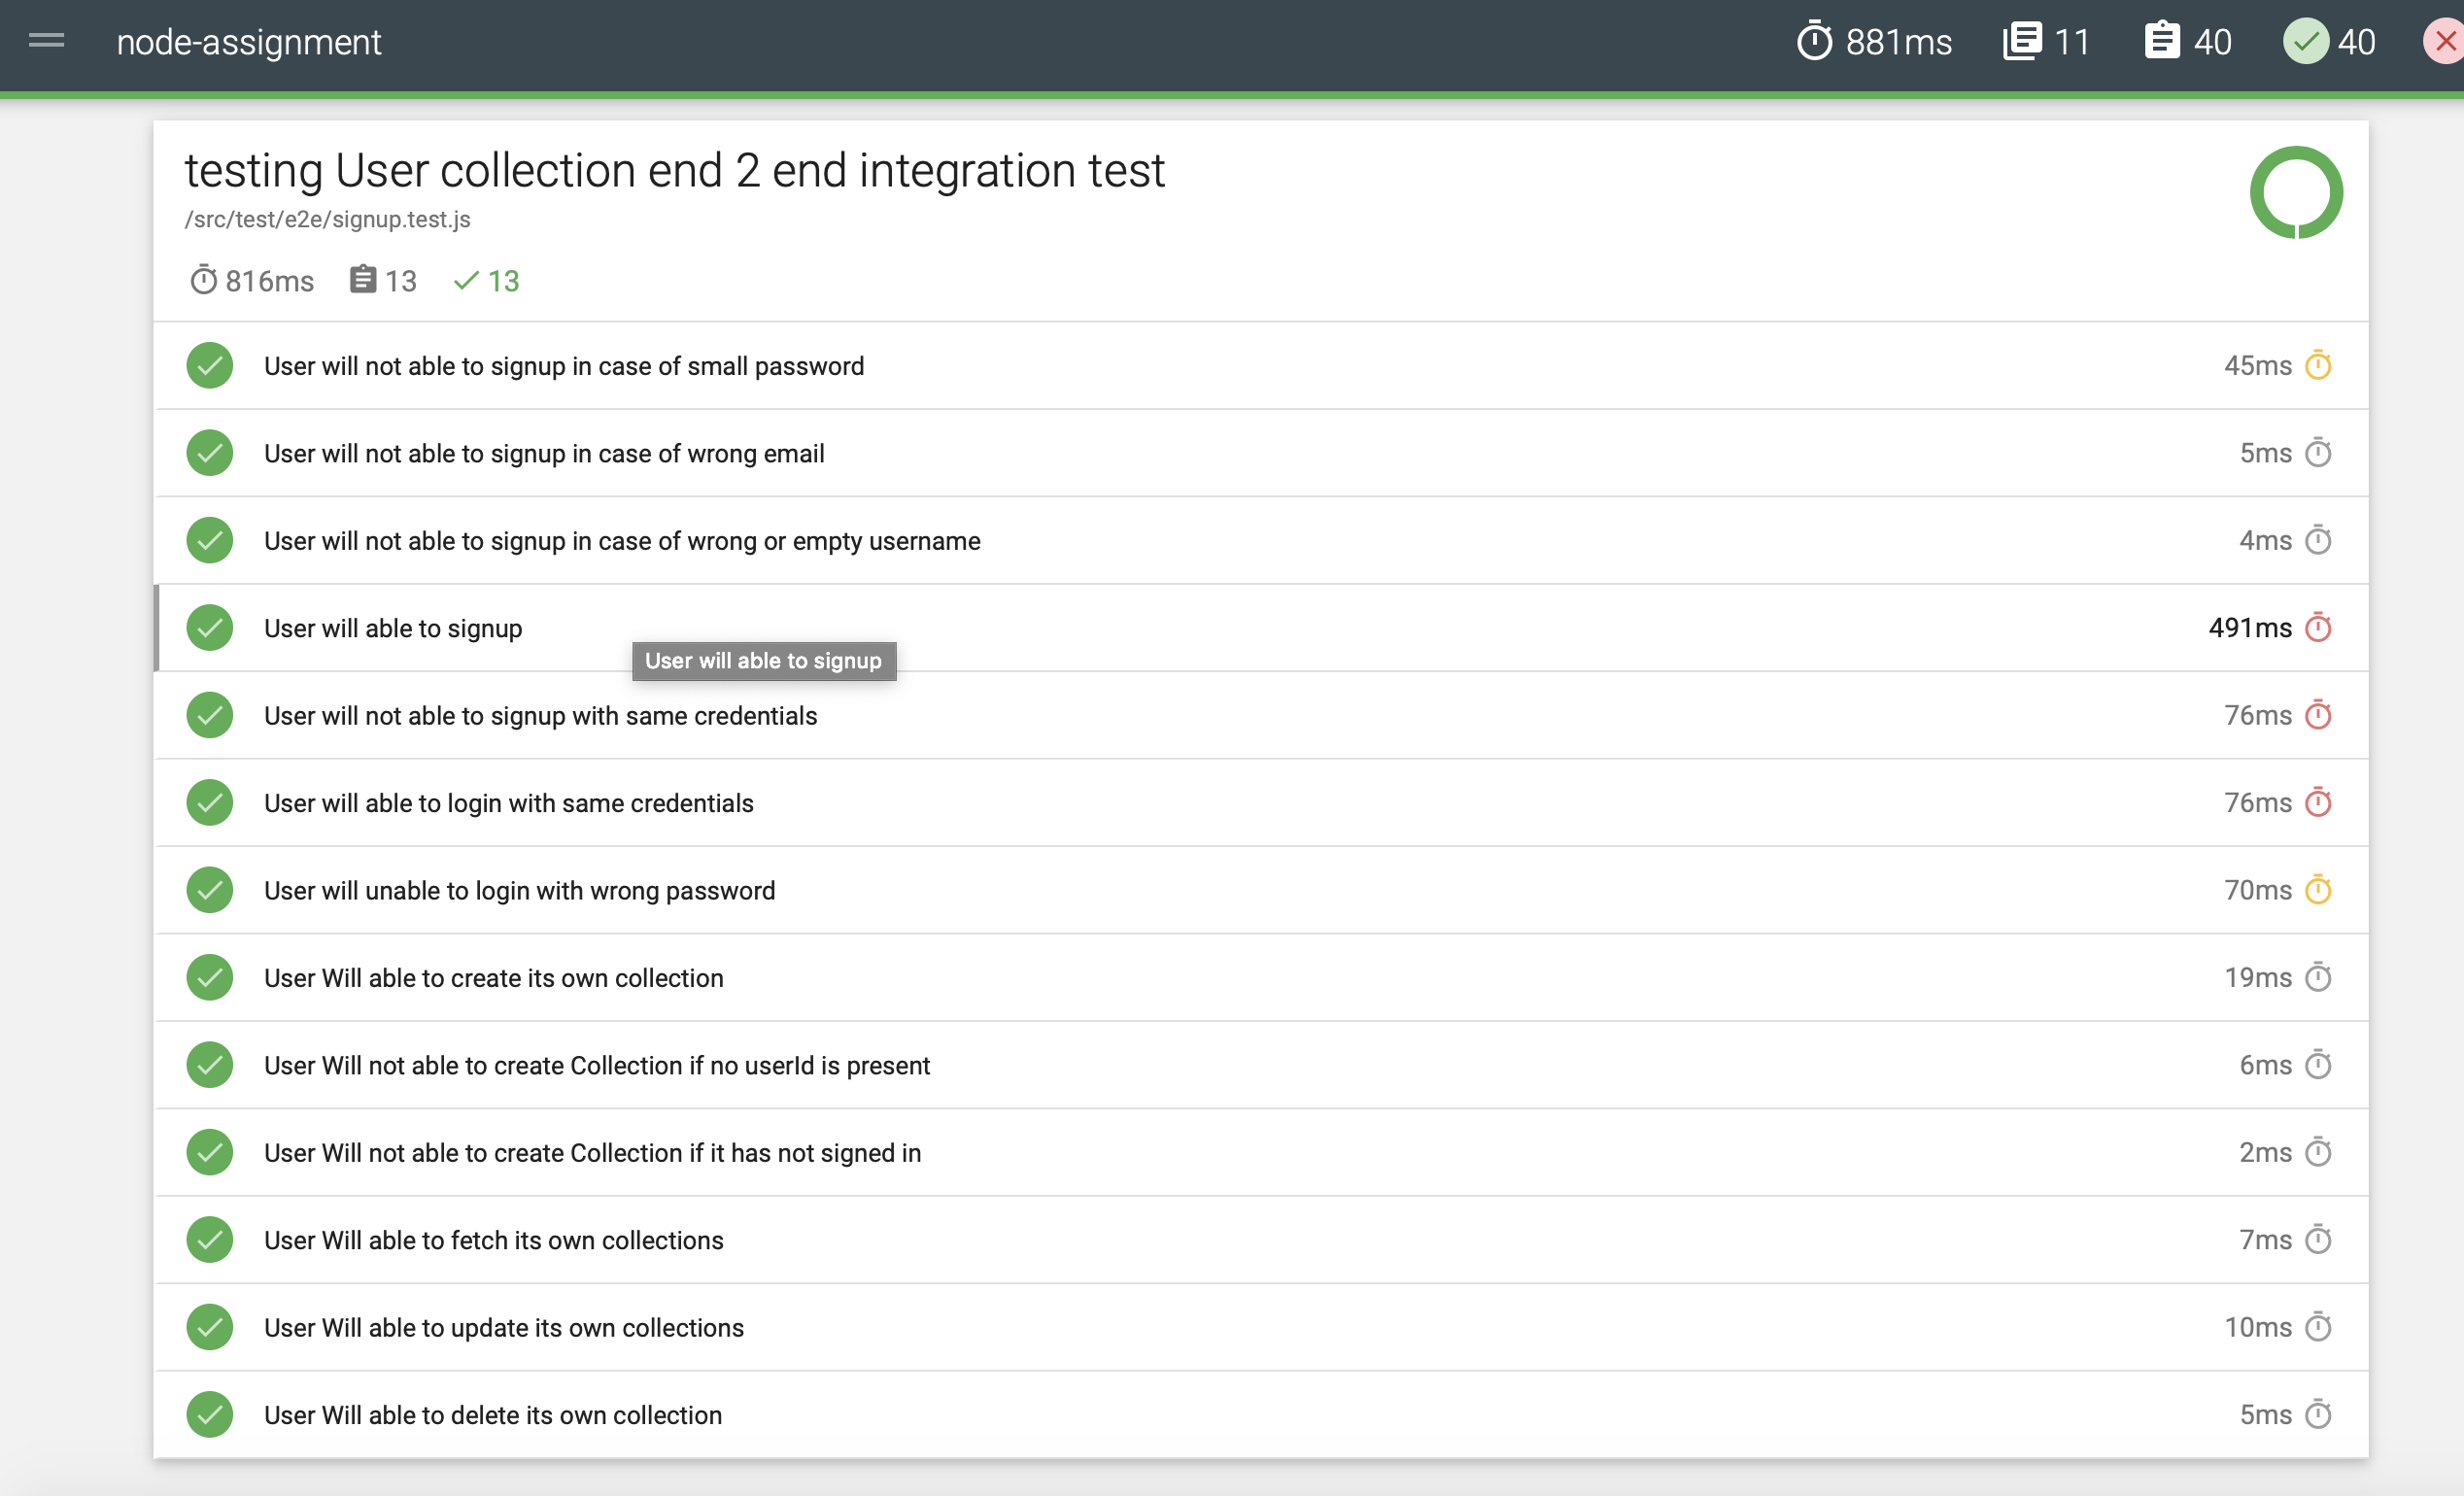
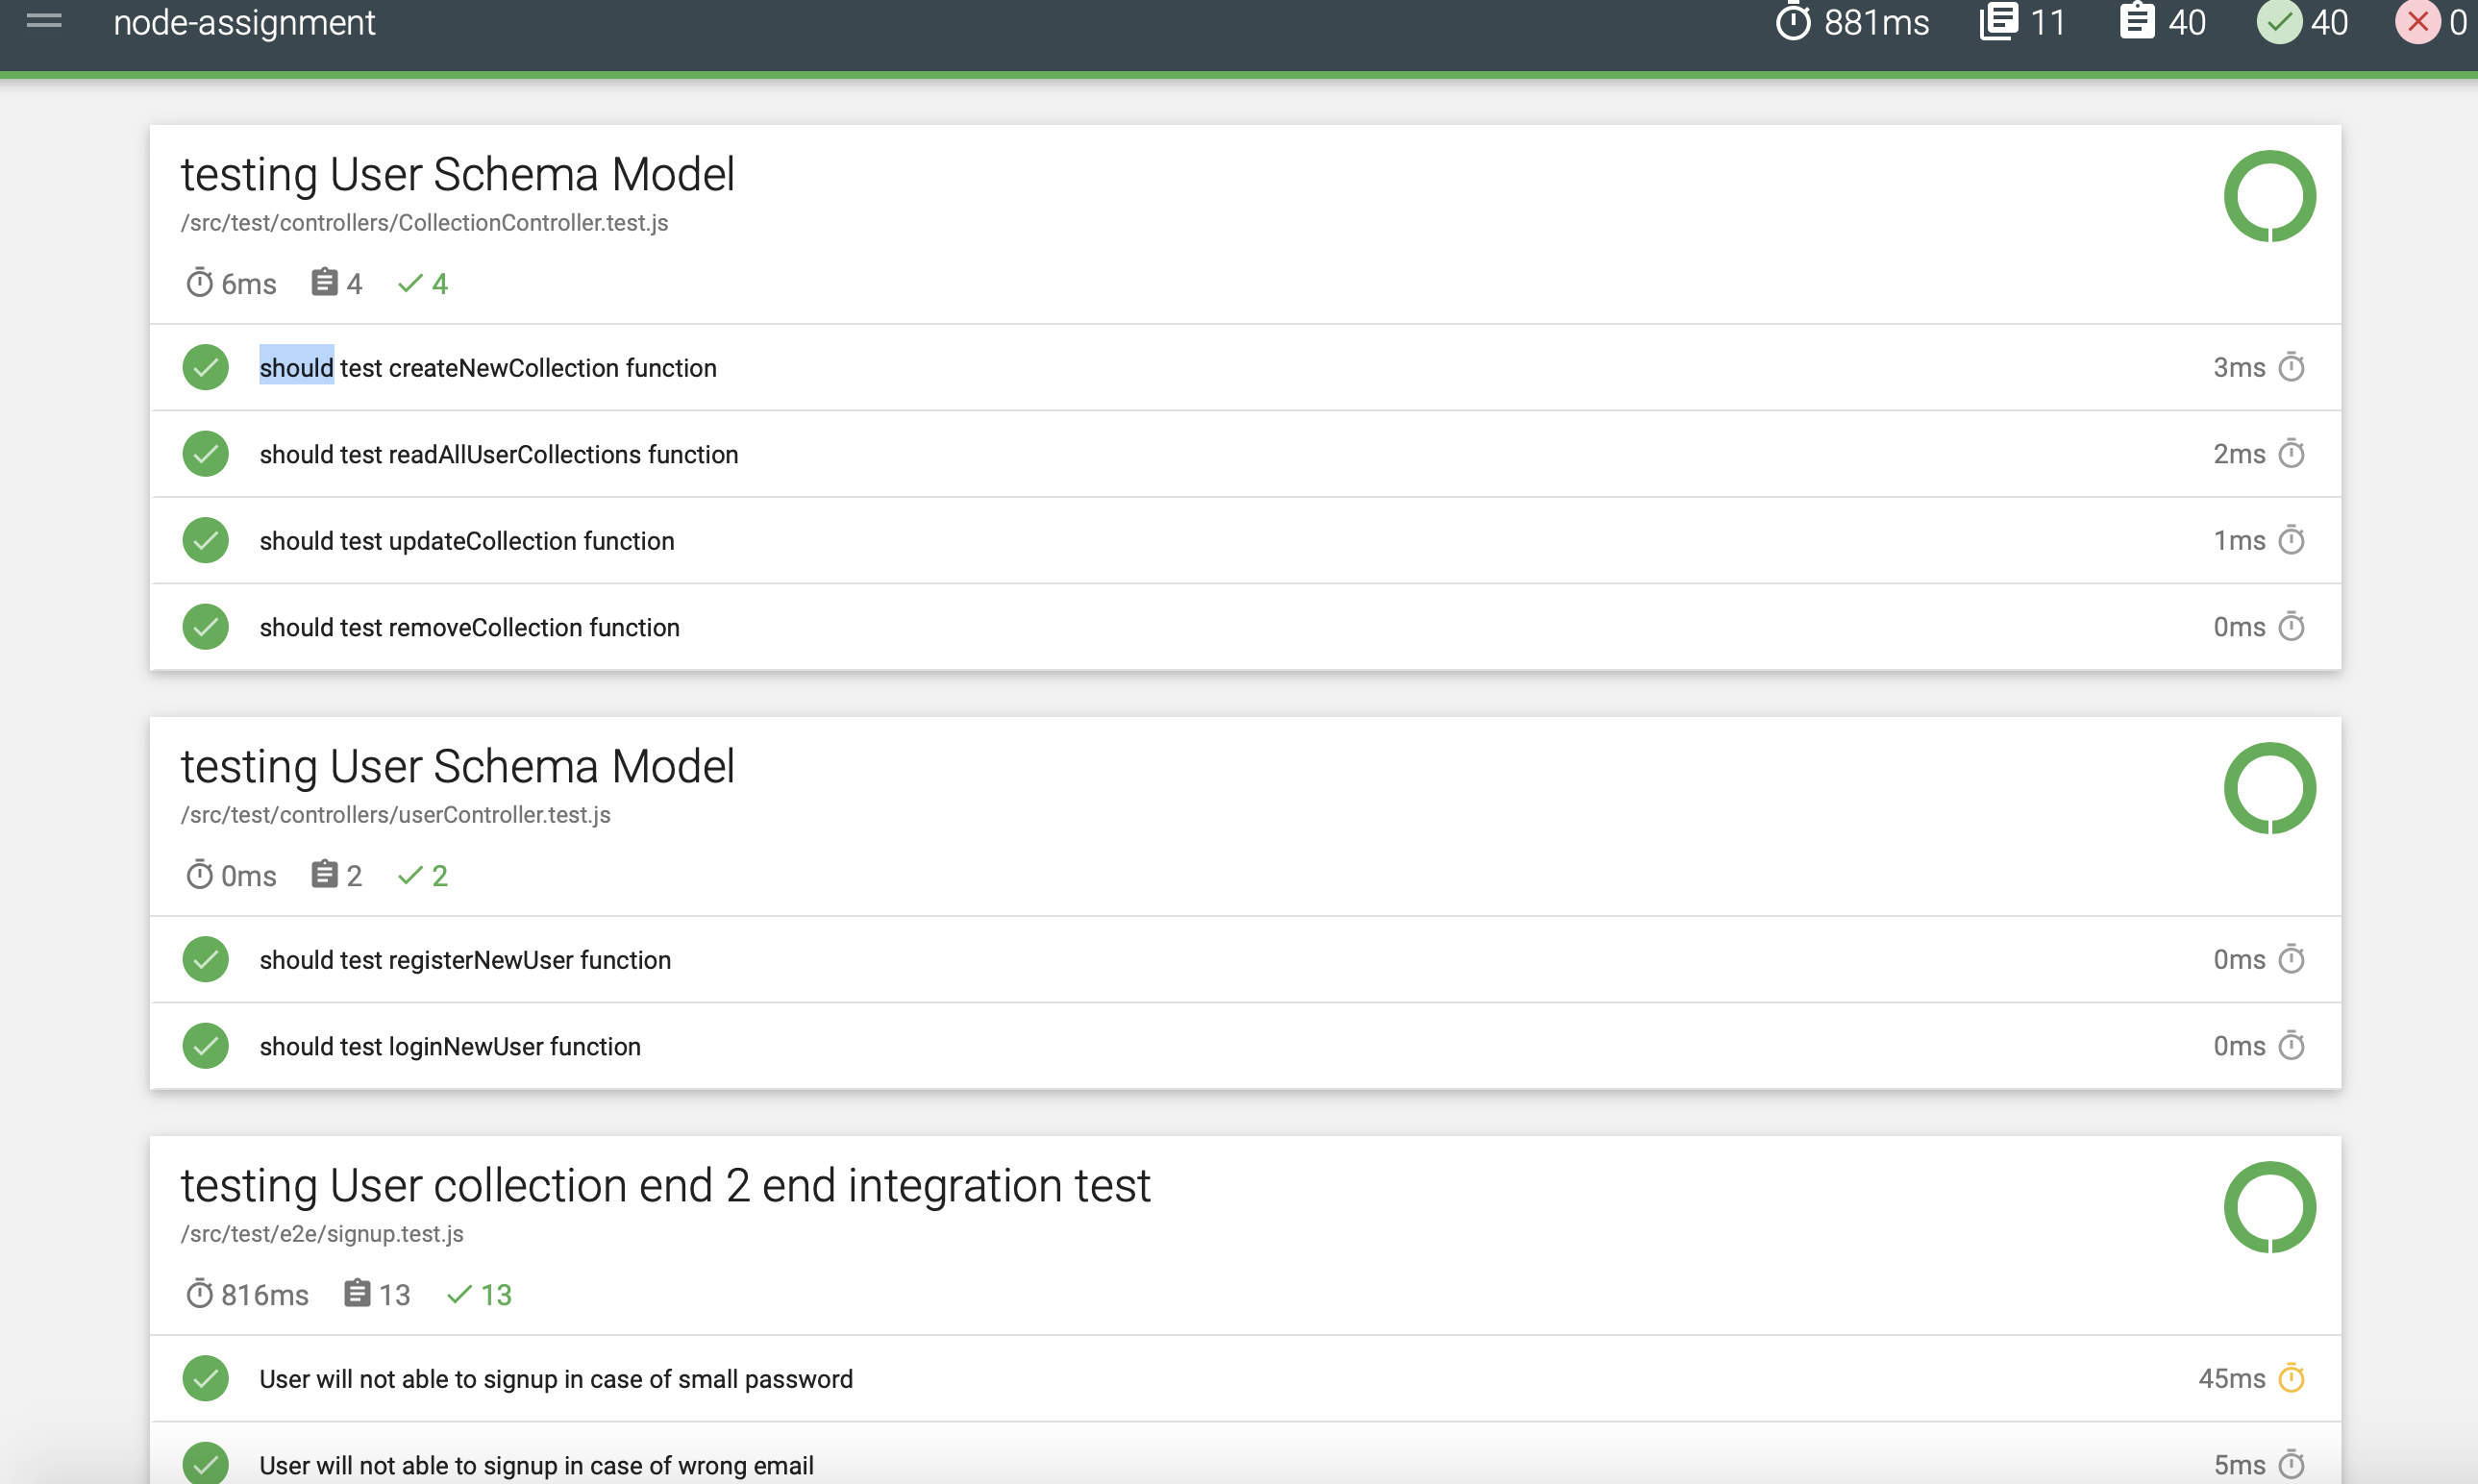
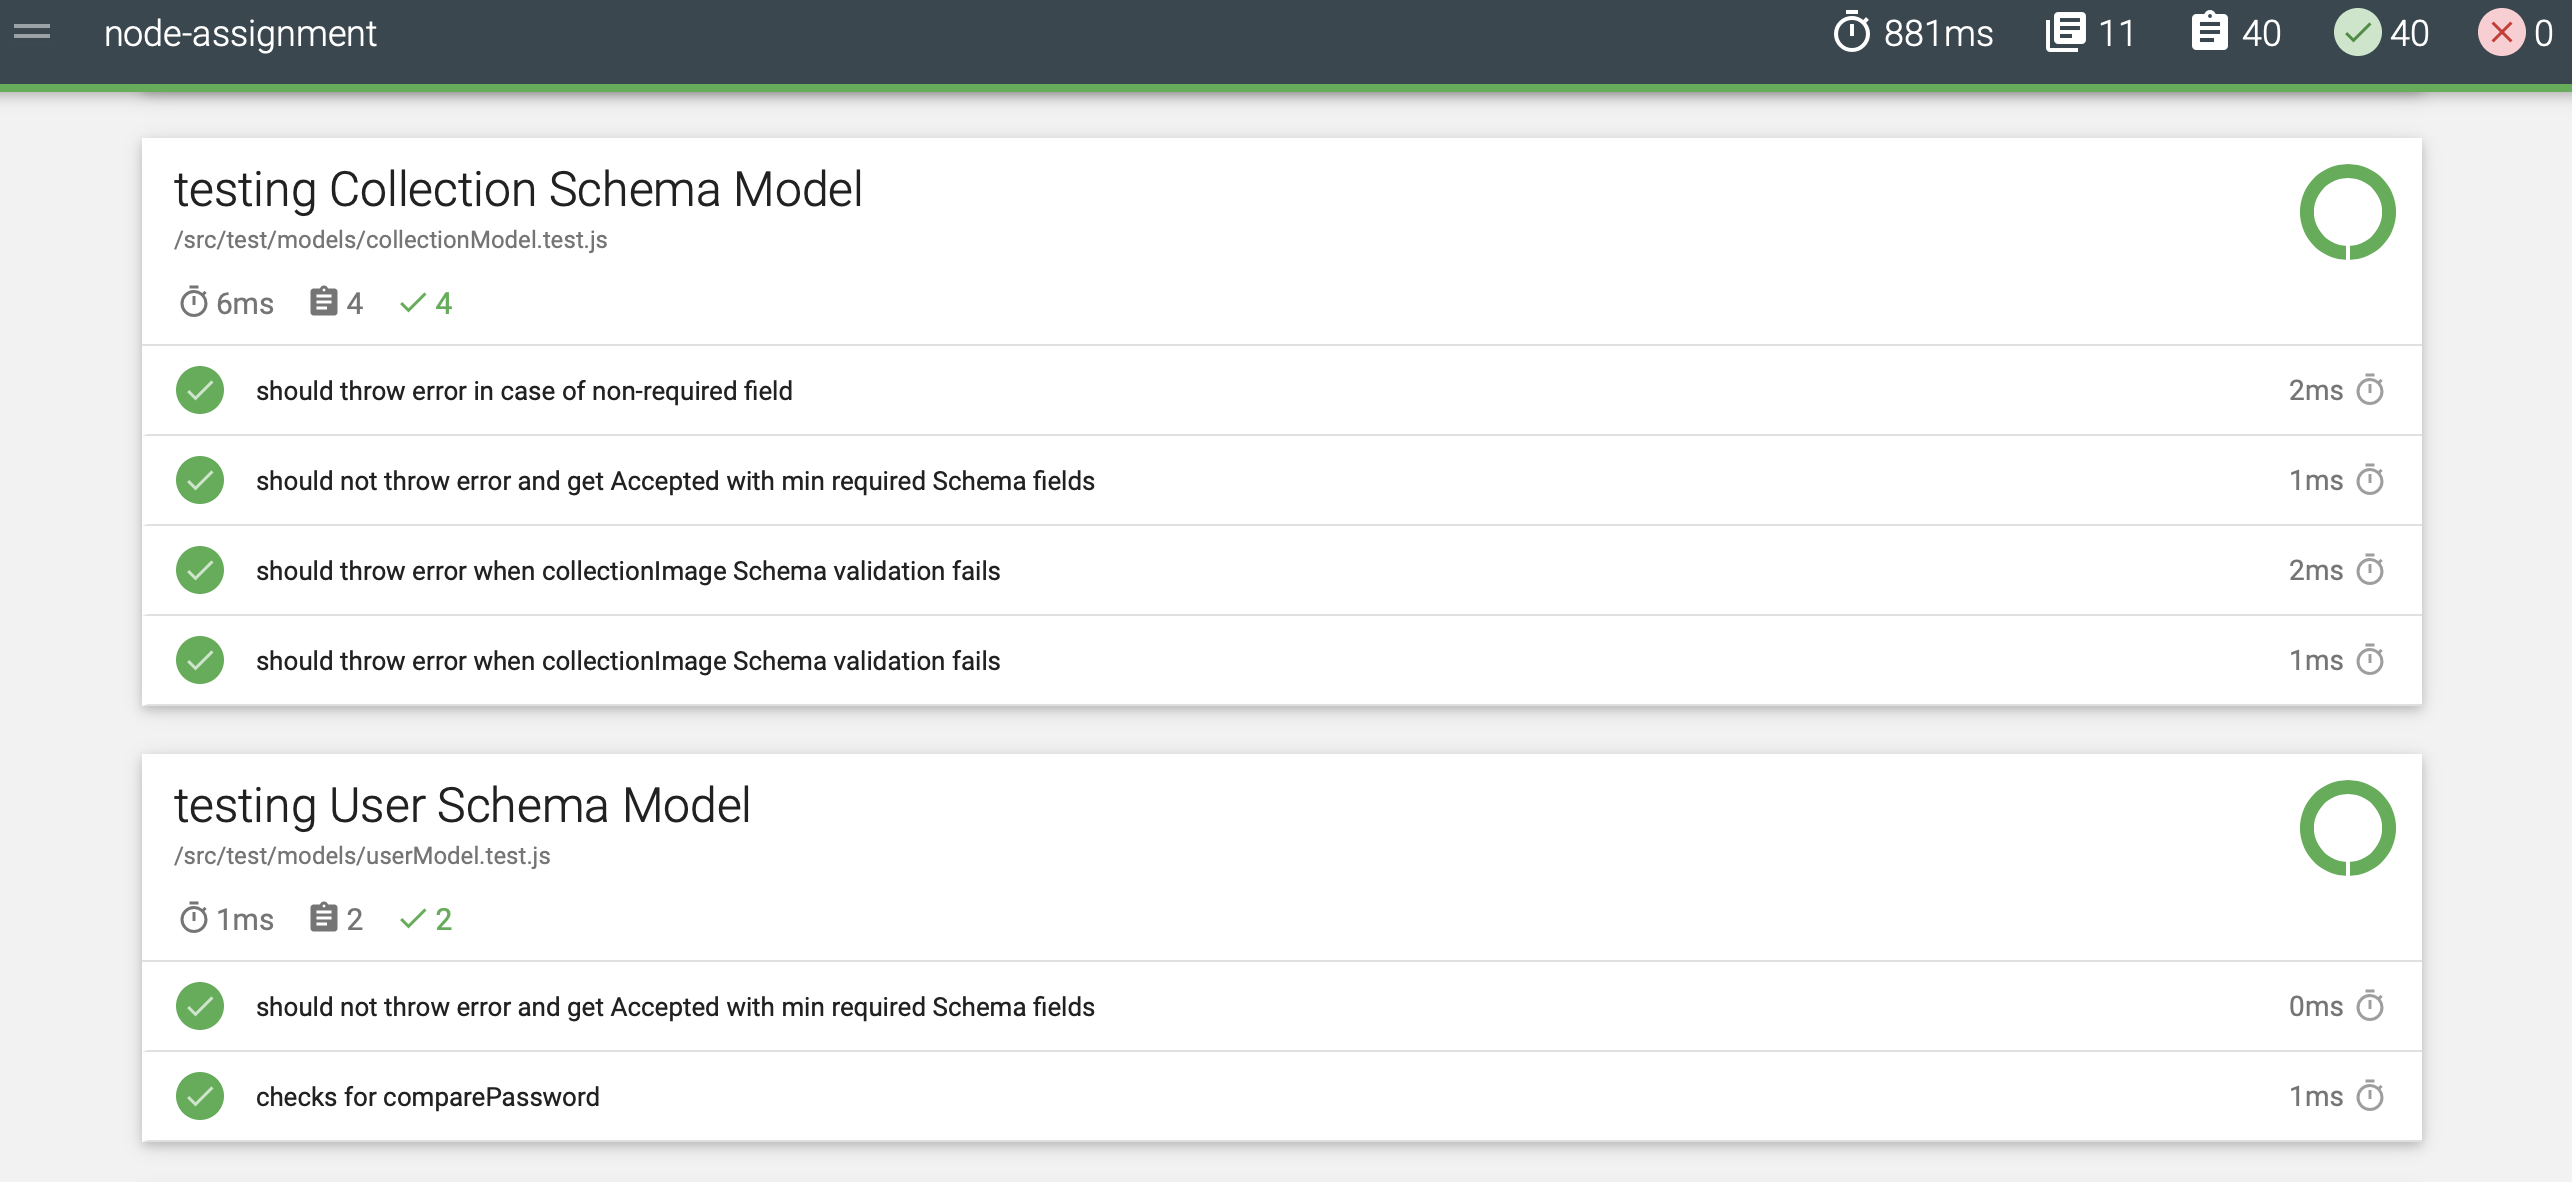
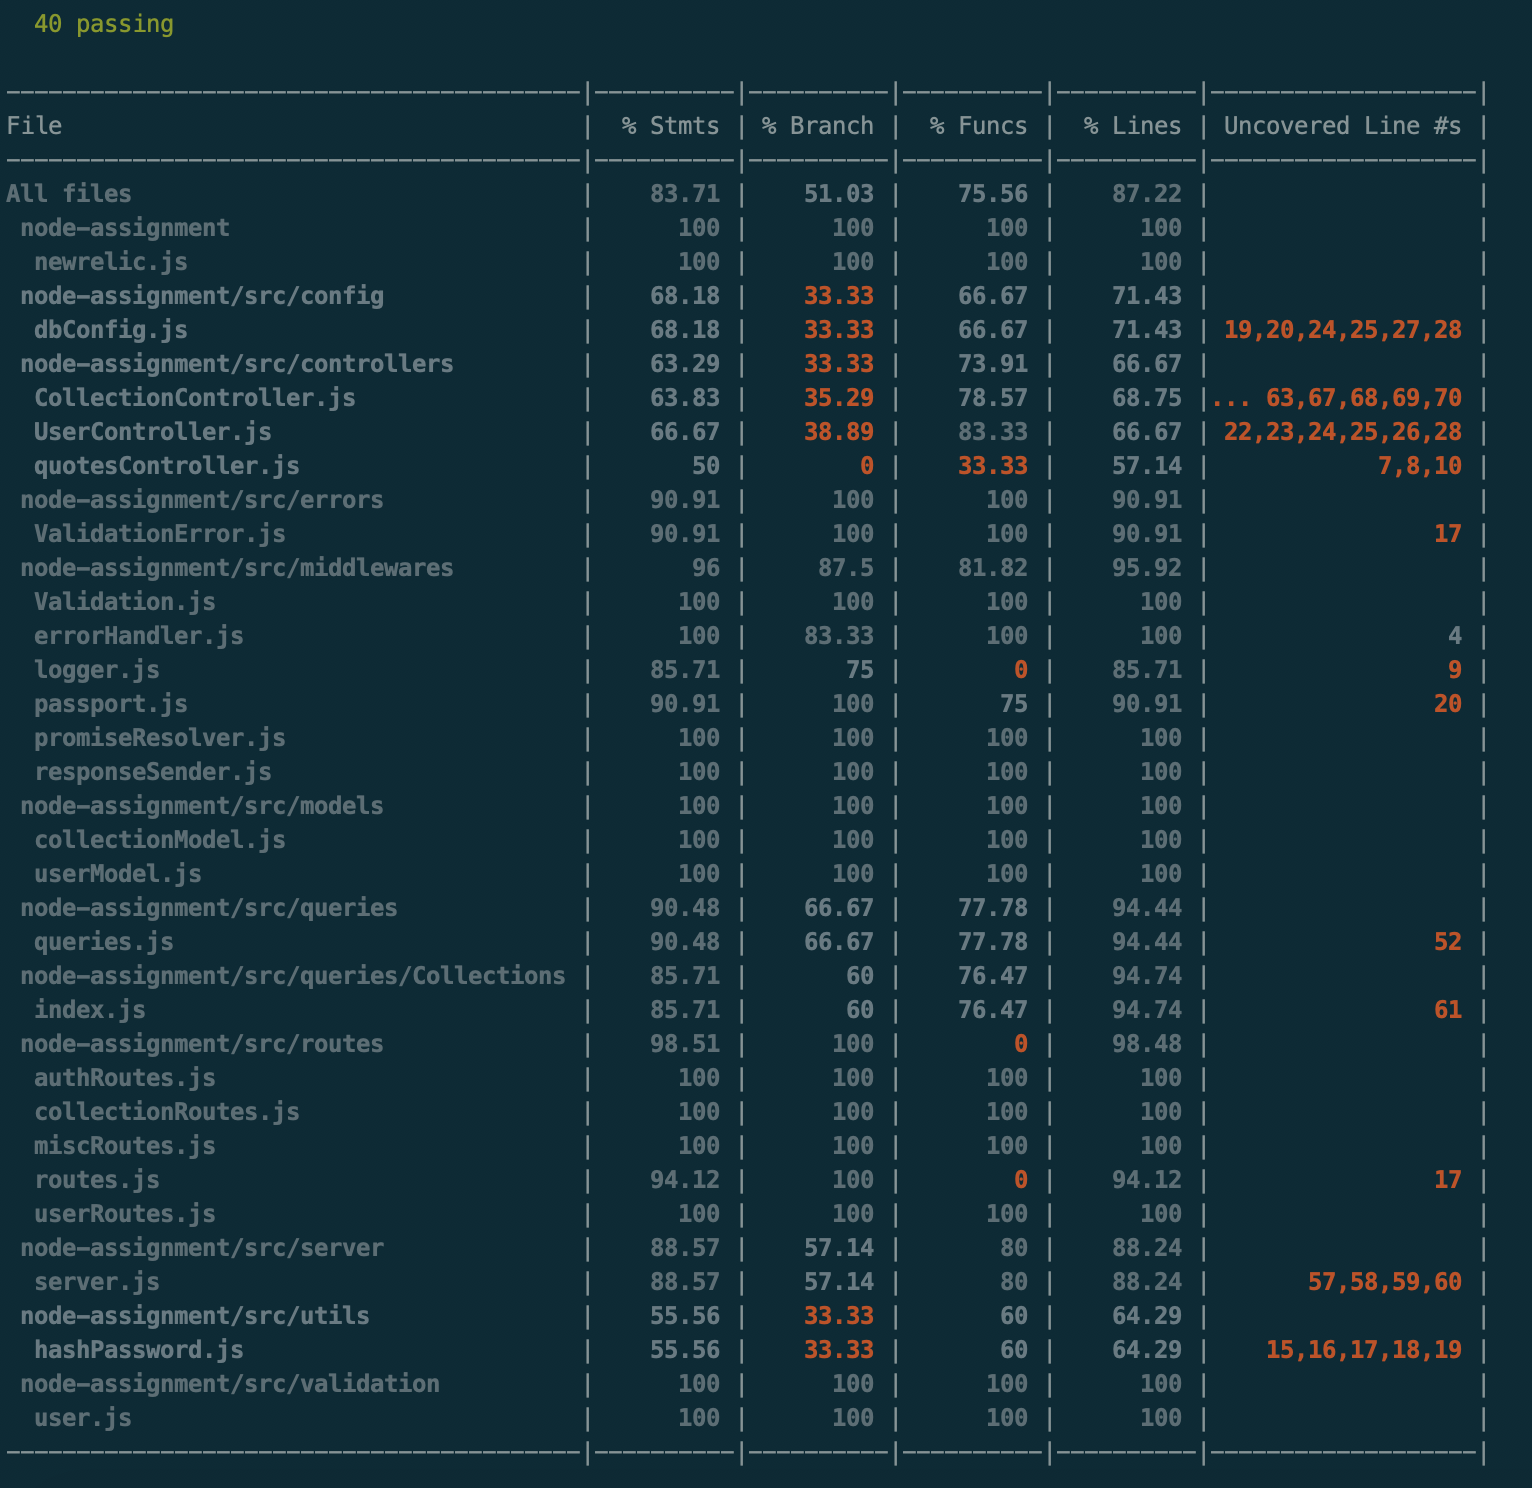
- 🔘 : Below are screenshots of the tests ran [40 tests in total along with test coverage, and report ]
-
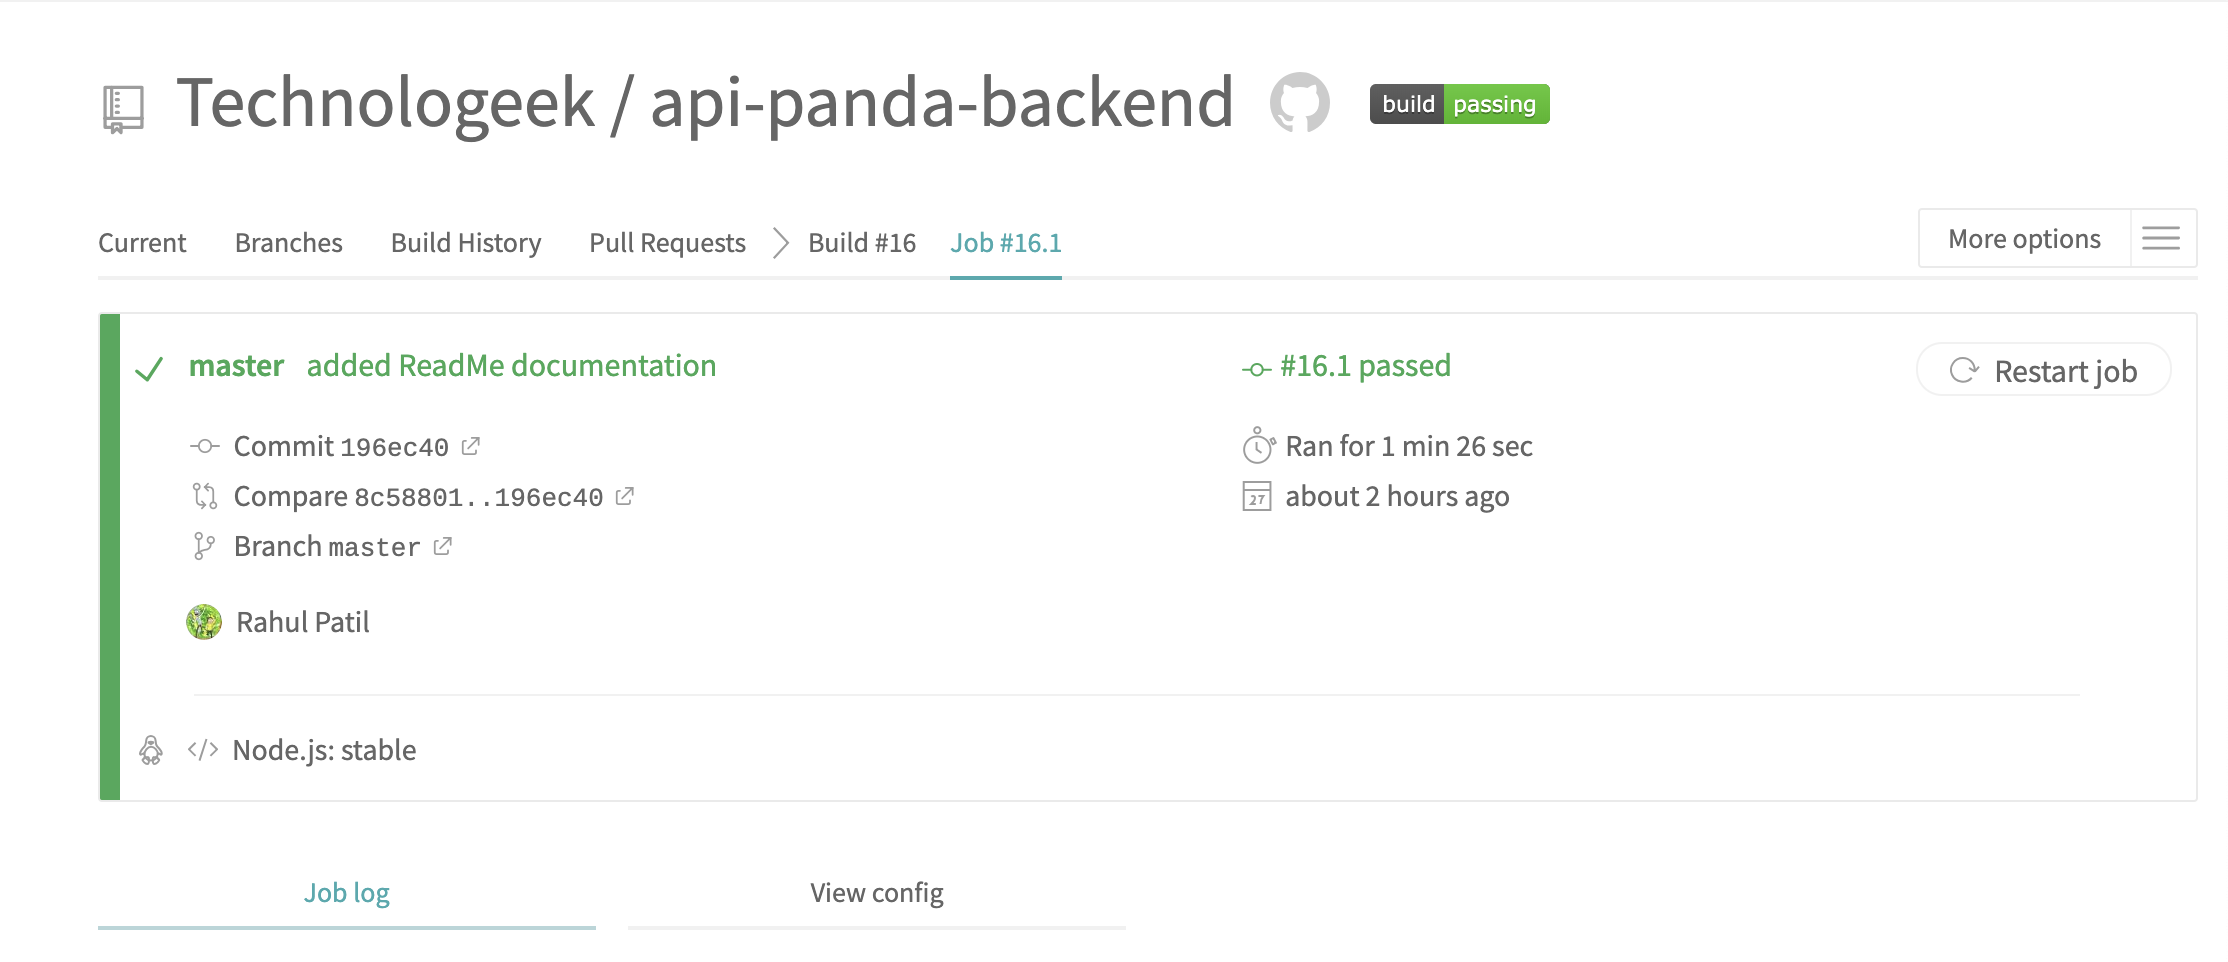
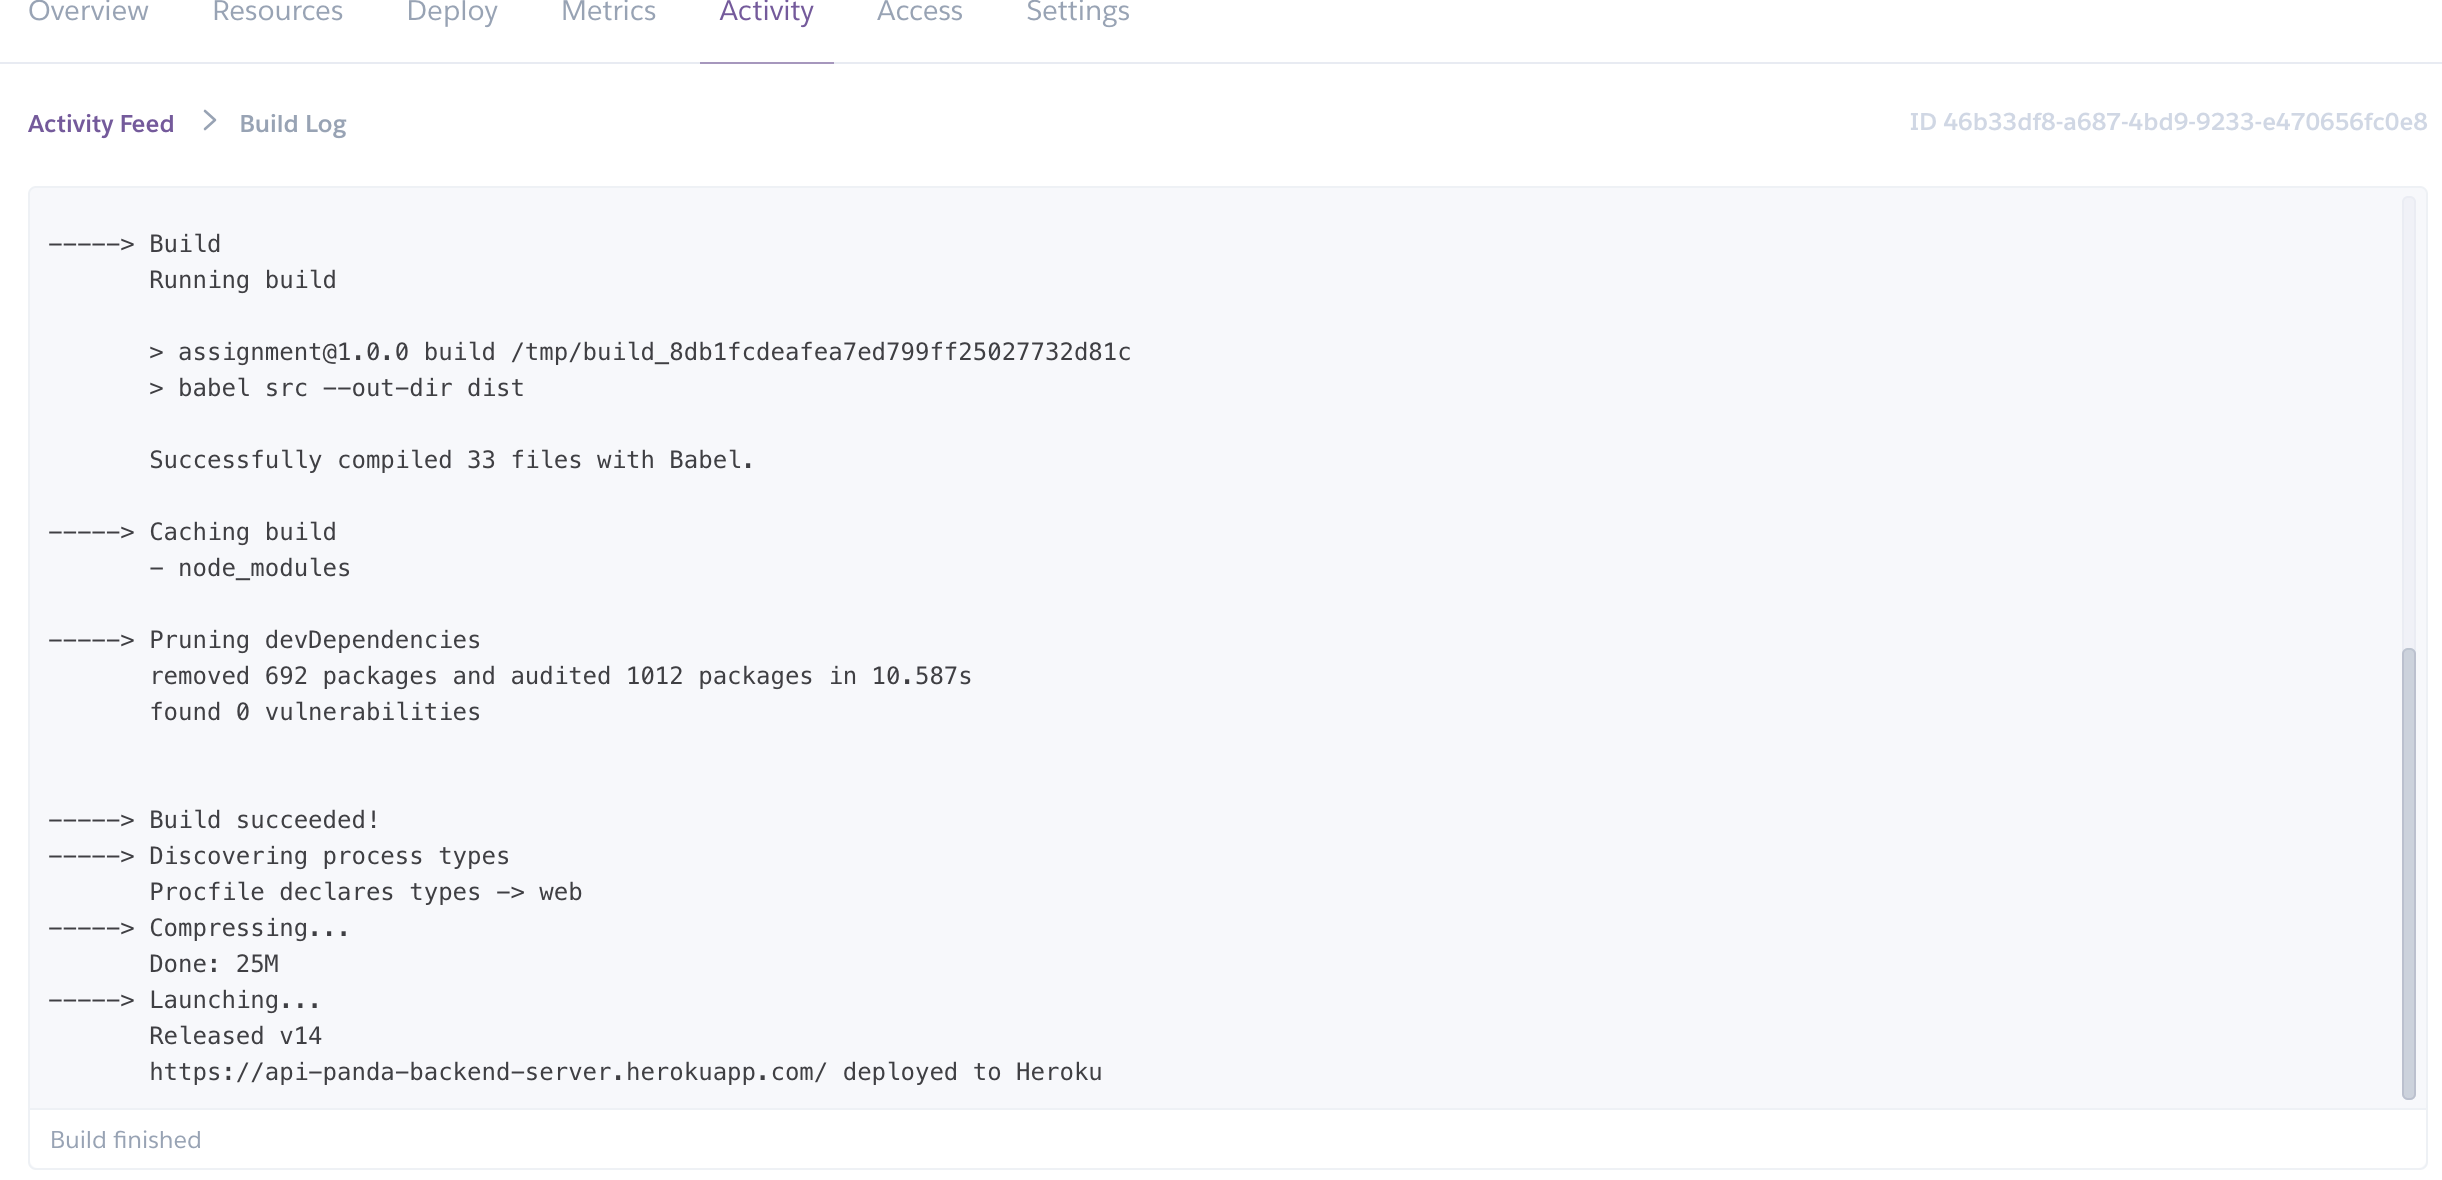
🔘 : API-Panda backend uses a Travis CI build process to run the build, verify all tests are passing and then deploy the error free application to Heroku. The free Heroku plan is limited to just couple of builds so instead I've used Heroku's Automatic deploy feature where every successful build from Travis will trigger a auto-deployment in Heroku from the specified branch.
-
🔘 : The current build status of the Application from Travis is highlighted in the GitHub's ReadMe File.
-
🔘 : ProcFile is used to tell Heroku to run a command after building the dist folder. In our case, it is
npm run serve. -
🔘 : Below are the screenshots for the Travis and Heroku builds.
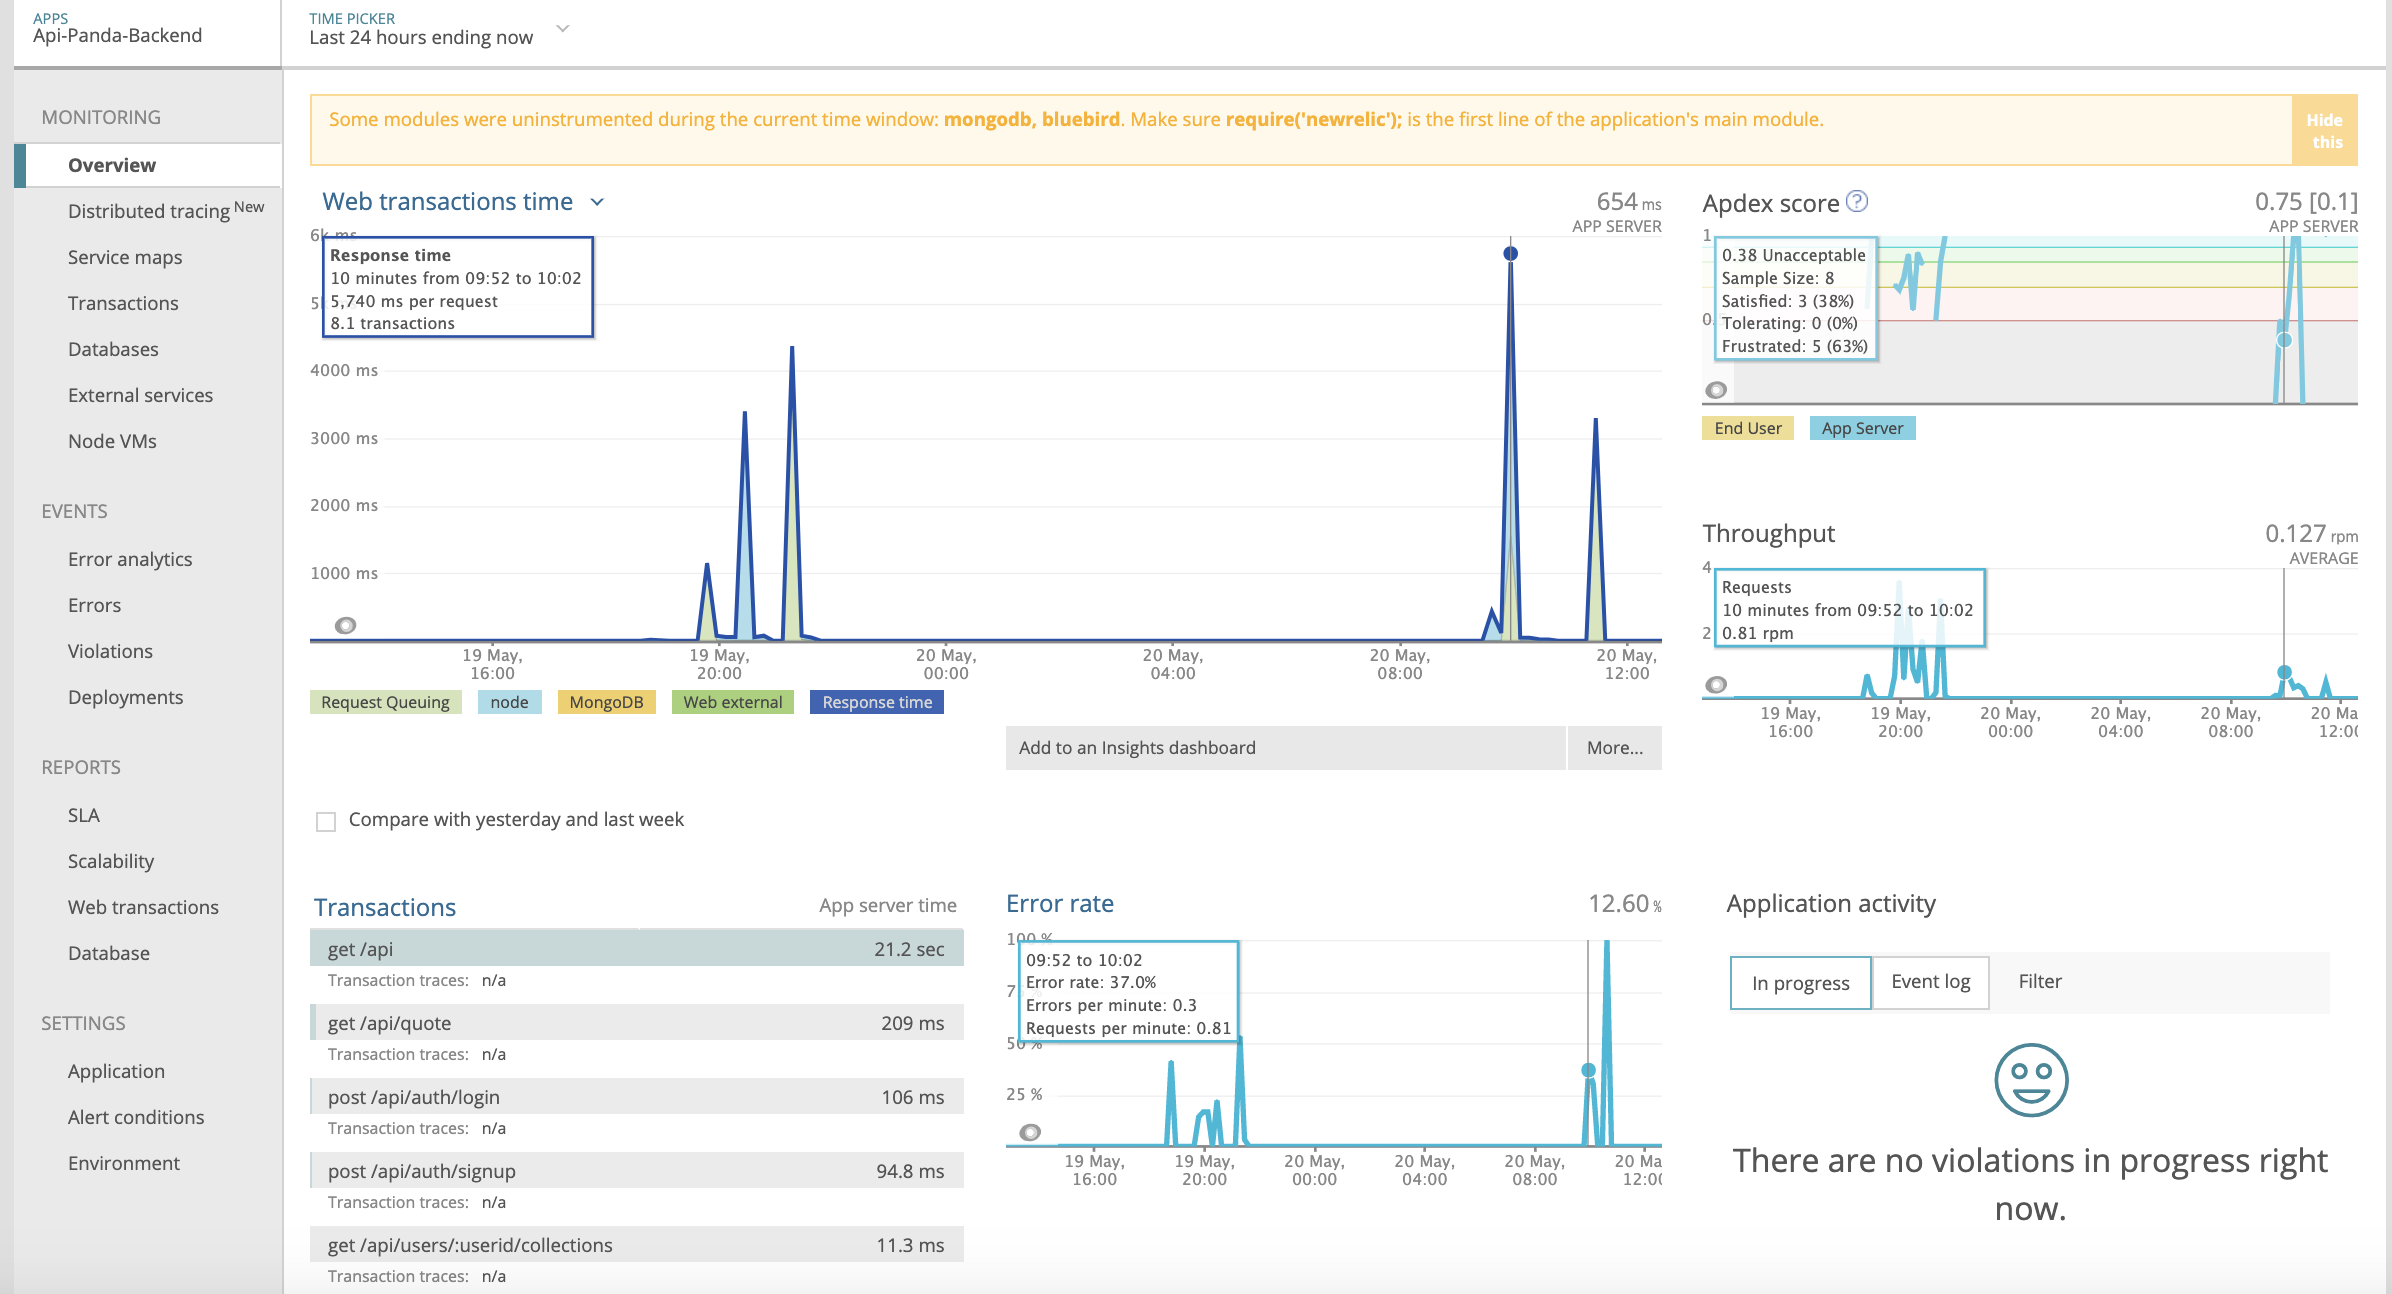
- 🔘 Analytics : API-Panda uses NewRelic APM to check the applications performence measures. New-Relic APM records all the activities on the application including the network errors, response times, 404's, database, service maps, transactions etc to give useful insights in form of visualizations on the dashboard. These visualizations can help in determining which API is taking long time to respond or what are the common causes of error and other similar use-cases. New Relic is currently one of the most widely used analytics system for the Node.js applications.
- 🔘
- 🔹express
- 🔹express-validation
- 🔹express-boom : Pretty Format Errors with custom Error messages.
- 🔹body-parser
- 🔹cors : To allow cross orgin scripts.
- 🔹jsonwebtoken
- 🔹mockgoose : Mocking models for testing.
- 🔹mongoose
- 🔹mongoose-unique-validator
- 🔹Husky : Pre-Commit Utility.
- 🔹ES-Lint : Code Linting.
- 🔹eslint-config-airbnb-base
- 🔹morgan : Logging.
- 🔹newrelic : New Relic Analytics
- 🔹winston : Beautified Console Logs.
- 🔹request : Making external http/https calls.
- 🔹supertest
- 🔹chai
- 🔹chai-http
- 🔹mocha
- 🔹mochawesome
- 🔹sinon
- 🔹nyc : Test Coverage Generator
- 🔹sinon
- 🔹bluebird : Full Featured Promise based library and other standard liblaries.
- 🔹Random Programming Quotes : Api to generate random quotes
-
🔘 Validating on the front-end, and back-end express level before data hits the databse to avoid unnesessay delay.
-
🔘 Using CORS to allow secure access from the browser.
-
🔘 Pretty formatted logging on the console every request along with the request's status code and the response time.
-
🔘 Using NYC to generate detail test coverage reports in the console.
-
🔘 The application uses full-fledged promise based asynchronous architecture that non-blocking.
-
🔘 Application uses Comprehensive testing strategies from unit, integration to end-to-end tests including mocking.
-
🔘 The written architecture is production ready and can be scaled as needed. I've ran load tests from an external service comprising of 1000 requests from different origins per second and application performs normally in these conditions.
-
💡 I've designed the entire architecture myself by taking a few references into consideration. I came across a few good boilerplates but they lacked model and query seperation. I wanted to focus on Seperation of Concerns and reusability as much as possible so I structured it according to my requirements.
-
💡 I'm not very keen on using third party libraries for basic operations like async-await. I wrote my own utility functions instead to hanlde the promises.
-
💡 To enhance the developer experience, I've tried to decompose components as much as possible to avoid strong binding. ES6 features are utilized as much as possible.
-
💡 To demonstrate an external API call from the server, I've used request package that calls the quote end-point and forwards data as a response to the server.
-
💡 Standard error codes for responses have been used. Not only limiting to 200 and 400, I send appropriate response like 422 for validation, and other accepted response codes.