1 - Creating the SageMaker Jupyter Notebook
4 - Training, testing, and deploying the Mammography Classification model
Today we will learn how to classify mammography images into 5 different categories using Amazon SageMaker, Amazon GroundTruth, AWS StepFunctions, AWS Lambda, and much more!
You will need to use your own AWS account for this workshop, and all information will be provided through this documentation.
Let's begin!
To get started you will need an IAM user with the following access:
- CloudFormation
- S3
- IAM
- Cognito
- Lambda
- SageMaker
- StepFunctions
- Lambda
Pre-requirements:
- Service limit of 1 GPU instance type (p2, p3, etc.)
- Service limit to create 2 more buckets
This lab has been tested in the following regions:
- N. Virginia (us-east-1)
- Ohio (us-east-2)
- Oregon (us-west-2)
- Ireland (eu-west-1)
Before we can start the workshop, we need to have a SageMaker Jupyter Notebook deployed in your account. It will also create a bucket for output files.
CloudFormation
- Login in the AWS Console. Make sure you are in the correct region assigned for this workshop.
- Deploy the following CloudFormation template: https://console.aws.amazon.com/cloudformation/home?#/stacks/create/template?stackName=sagemaker-mammography-workshop&templateURL=https://mammography-workshop.s3.amazonaws.com/cloudformationtemplate/sagemaker_template.yml
- On the "Step 3 - Configure stack options": Just click on Next button
- On the "Step 4 - Review": Enable the checkbox I acknowledge that AWS CloudFormation might create IAM resources with custom names., and click on Create Stack button
While you wait for the template to be deployed, let's learn from our instructors the motivation behind this workshop and what we plan to deliver today.
Let's navigate to the Ground Truth lab.
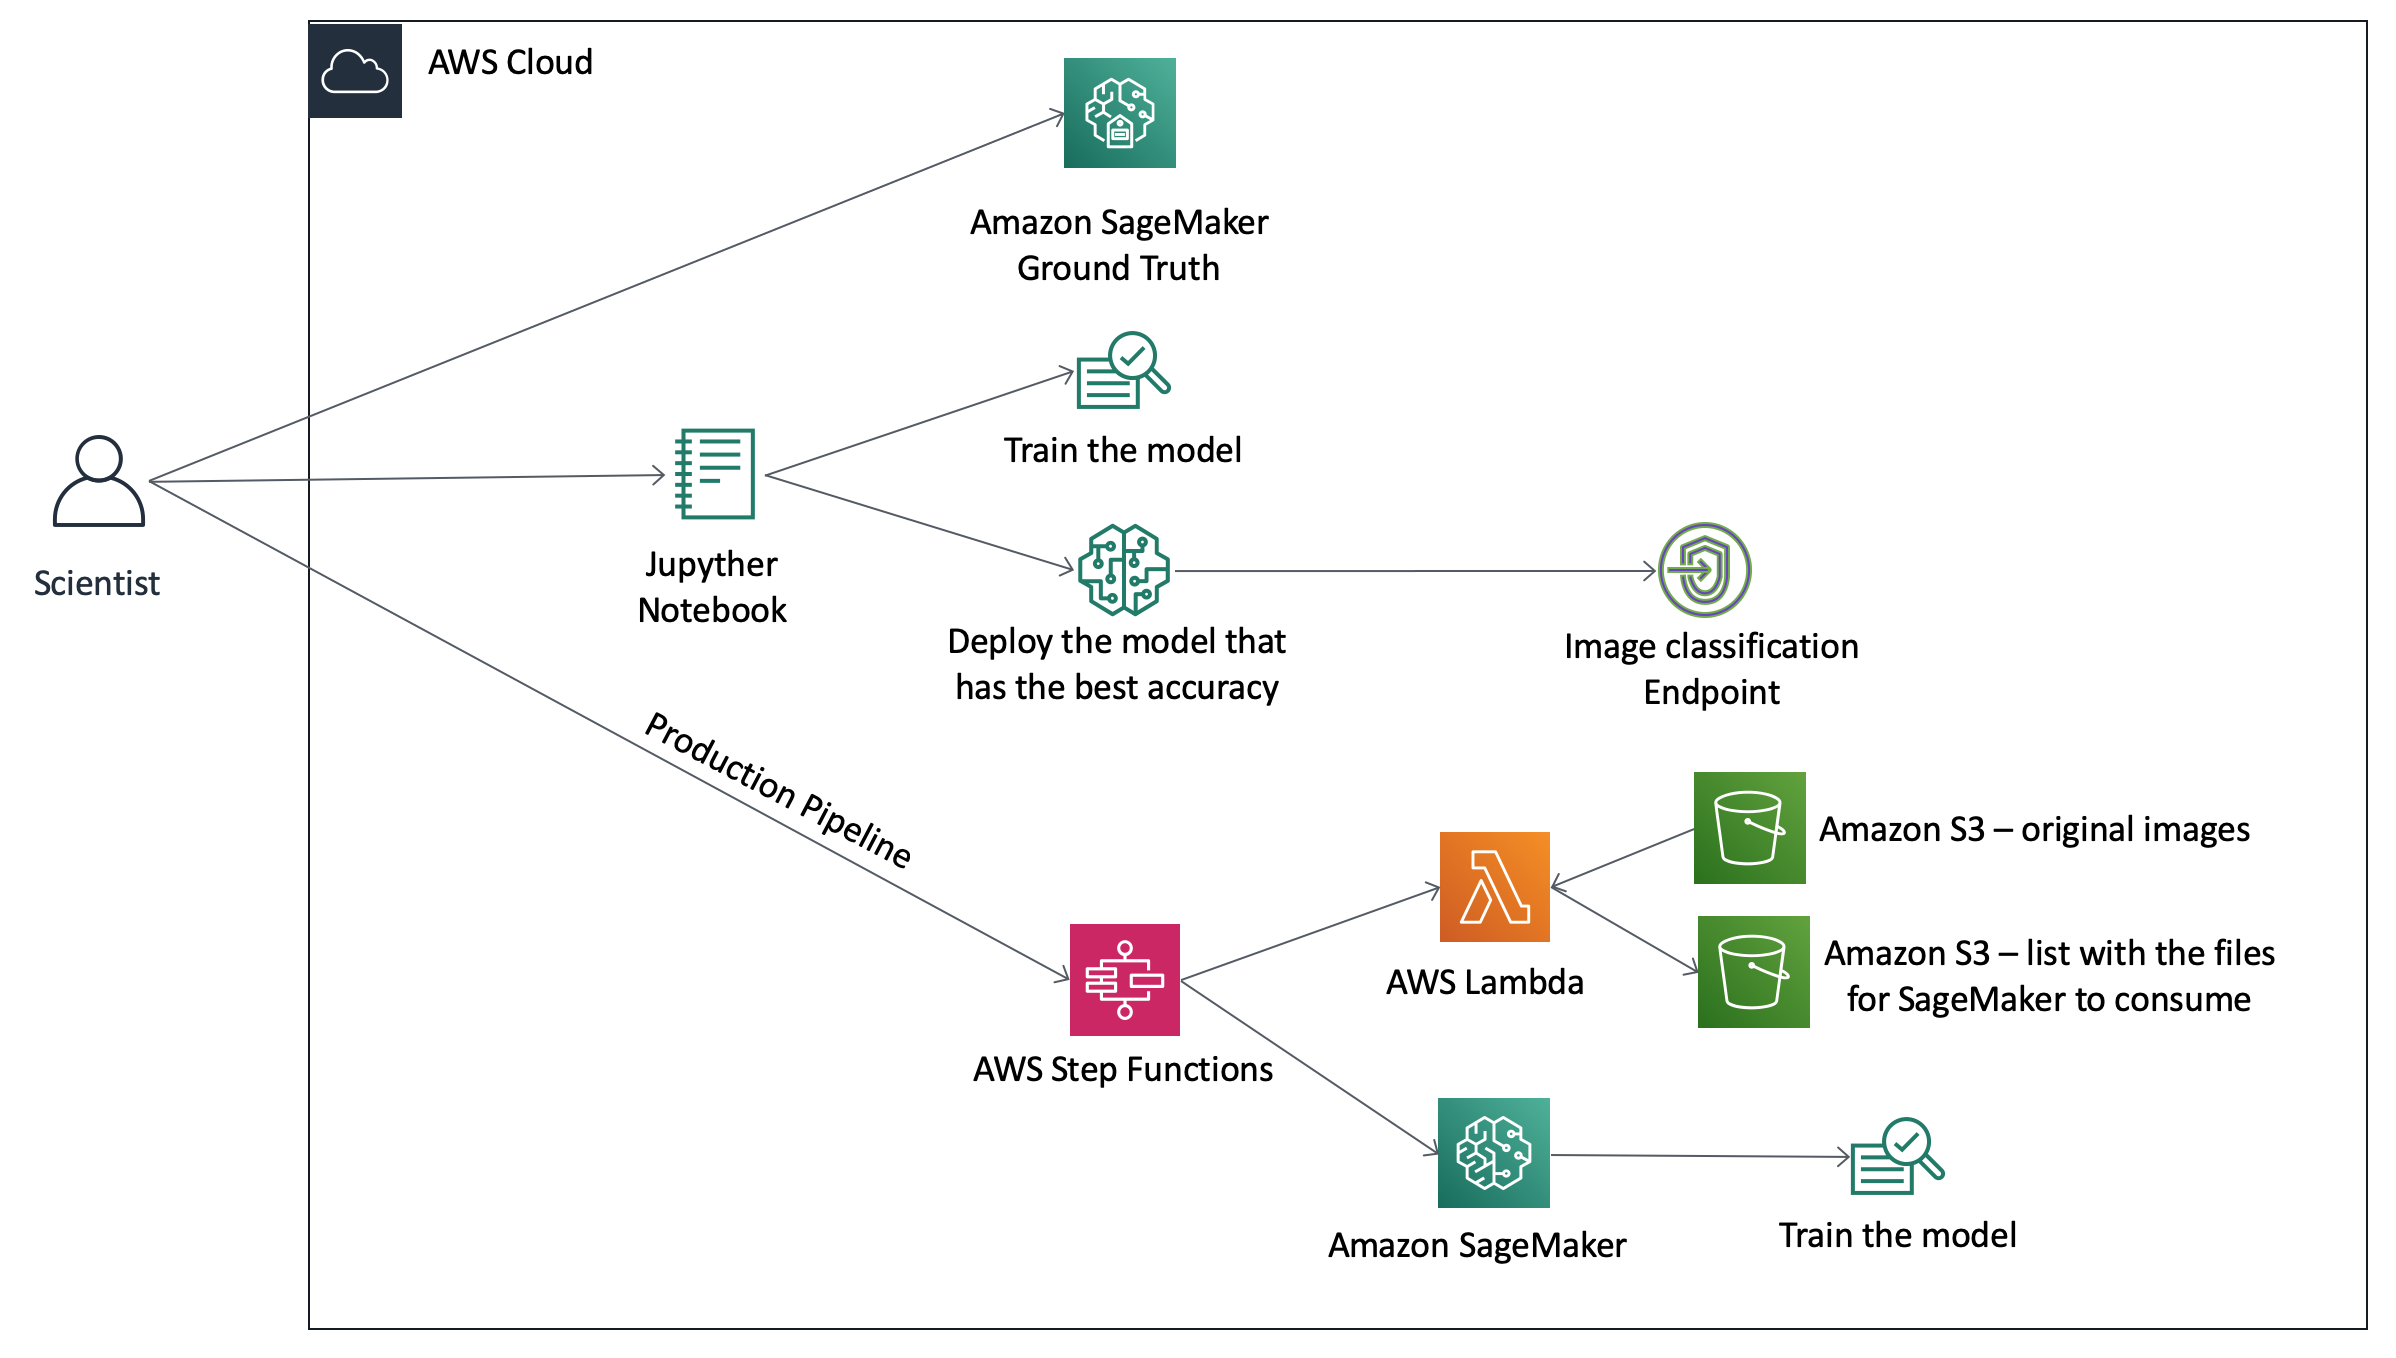
The architecture below represents what we will deploy today:
In order for us to do that, we will need to open the Jupyter Notebook created in step 1.
- Open the SageMaker Notebook console at https://console.aws.amazon.com/sagemaker/home#/notebook-instances
- Click on Open JupyterLab
- In the Jupyter Lab console, click on Git and then Open Terminal. Execute the code below in the terminal:
cd SageMaker
git clone https://github.com/mravanini/mammography-workshop.git
If successful, you should see a message like this:
Receiving objects: 100% (359/359), 61.28 MiB | 26.27 MiB/s, done.
Resolving deltas: 100% (109/109), done.
- In the File Browse on the left, navigate to the folder mammography-workshop/sagemaker. You should see something like the image below. Open the notebook with the name mammography-classification.ipynb:
- Now follow the instructions described in the notebook.
We will now deploy a front-end static application in order for us to test our model.
The client application architecture is depicted below:
-
Go back to the Git terminal you opened previously.
-
Now navigate to the deploy folder:
cd mammography-workshop/deploy -
Open a new tab in your browser and navigate to: https://console.aws.amazon.com/sagemaker/home#/endpoints
-
Copy the last successful endpoint-name. It will look like this: 'image-classification-2020-01-13-09-58-43-599'
-
Run the deploy script. Replace the <<endpoint_name>> below by the endpoint copied in step 4.
./deploy.sh create <<endpoint_name>> -
Copy the Client URL from the script output. It will look something like this:
http://sg-tko-workshop-public-123456789011.s3-website.region.amazonaws.com/
- Open the URL in a browser, upload a mammography image and see the results! Download a sample mammography image here:
Let's navigate to the Step Functions lab.
- Deleting client app
- In the notebook Terminal, run deploy script with delete function
cd deploy
./deploy.sh delete
!!! If you are an Amazon employee, make sure you delete the front-end. It has a Public Bucket that will escalate a ticket to your manager.
-
Deleting SageMaker notebook
- First delete the contents of the output bucket
- Then go to CloudFormation and delete sagemaker-mammography-workshop stack
-
Deleting the SageMaker endpoint
- Go to the SageMaker Endpoints console. Delete the endpoint created during the lab.
- AWS CLI: https://docs.aws.amazon.com/cli/latest/userguide/cli-chap-install.html
- Python boto3: https://boto3.amazonaws.com/v1/documentation/api/latest/index.html?id=docs_gateway
- SageMaker: https://docs.aws.amazon.com/sagemaker/latest/dg/gs.html
This sample code is made available under the MIT-0 license. See the LICENSE file.


