A follow-along repository of StephenGrider's Course Electron for Desktop Apps The Complete Developer's Guide
- About
- Installing Electron
- Setting Up
- Event Listeners
- Power of Electron
- IPC
- Custom Menu
- Add New Window
- Function based on Environment
- Garbage Collection
- Roles
- Browser Window Configuration
- Tray
- Bounds
- Open-source JavaScript Framework.
- Developed by GitHub in 2014.
- Used to build desktop apps with the technologies used to make websites (HTML, CSS, JavaScript).
- Let's you build cross-platform Desktop apps.
- Is just a Chromium based window that can render webpages.
- Allows you to integrate any frontend framework eg. React, Angular, Vue, etc. in your apps.
- Can't access your hard drive (unless you feed a specific file)


$ mkdir project-name
$ cd project-name
$ npm init -y
$ npm install electron- Add
electron .as the start script in yourpackage.json
...
"scripts: [
    "start": "electron ."
]
...- Create
index.jsfile. - Import electron module (with require).
- Extract
app&BrowserWindowobject from electron. - Add
readyevent listener onapp. - Create new
BrowserWindowobject in the callback function.
// Import electron
const electron = require("electron");

// Extract app & BrowserWindow object
const { app, BrowserWindow } = electron;

// Add `ready` event listener on app
app.on("ready", () => {
    // Creating new BrowserWindow object
    const mainWindow = new BrowserWindow({});

    // Serve `index.html` file on the main window
    mainWindow.loadURL(`file://${__dirname}/index.html`);
});- Allows you to listen for an event on a particular window or app.

readyis used when window is ready (completely rendered).
mainWindow.on("ready", () => {
    console.log("You are ready!");
});clickis used when user clicks on the window.
mainWindow.on("click", () => {
    console.log("You Just Clicked!");
});right-clickis used when user right clicks on the window.
mainWindow.on("right-click", () => {
    console.log("You Just Right Clicked!");
});bluris used when user looses it's focus from the window.
mainWindow.on("blur", () => {
    console.log("You Lost Focus!");
});- Main Window = Node + Web Browser
- Allows you to use Node Modules in the Main Window


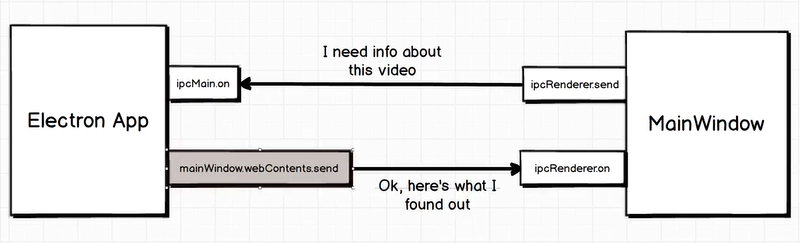
- Inter Process Communication.
- Allows you to communicate between different processes of the Electron app.


- There are some differences between the methods to send and receive the data through IPC on Electron App and Web App side.

let mainWindow;
app.on("ready", () => {
    mainWindow = new BrowserWindow({
        webPreferences: {
            nodeIntegration: true,
            contextIsolation: false,
        },
    });

    mainWindow.loadFile("index.html");
});Renderer
const electron = require("electron");
const { ipcRenderer } = electron;

const formElement = document.querySelector("form");
formElement.addEventListener("submit", (event) => {
    event.preventDefault();

    const { path } = document.querySelector("input").files[0];

    // Send file path with custom event name to Electron
    ipcRenderer.send("video:submit", path);
});
Main
// Get event data from the Web
ipcMain.on("video:submit", (event, path) => {
    console.log(path);
});Main
mainWindow.webContents.send("video:metadata", metadata.format.duration);Renderer
// Receive Data from Main
ipcRenderer.on("video:metadata", (event, duration) => {
    const resultElement = document.getElementById("result");

    resultElement.innerHTML = `Video is ${duration} seconds`;
});- Adding a Custom menu removes all the predefined functionality of the default Electron menu.
- Every Menu Item has a label, optionally an accelerator, a sub-menu and a click function.
const { app, BrowserWindow, Menu } = require("electron");

let mainWindow;
app.on("ready", () => {
    ...
    // Use Menu from the Menu Template
    const mainMenu = Menu.buildFromTemplate(menuTemplate);
    // Add Menu to the Application
    Menu.setApplicationMenu(mainMenu);
});

// Create a Menu Template
const menuTemplate = [
    {
        label: "File",
        submenu: [
            {
                label: "Add ToDo",
            },
            {
                label: "Quit",
                // Platform based hotkeys
                accelerator:
                    process.platform === "darwin" ? "Command+Q" : "Ctrl+Q",
                click() {
                    app.quit();
                },
            },
        ],
    },
];- Add a new window on click of a menu item.
let addWindow;
...
function createAddWindow() {
    addWindow = new BrowserWindow({
        width: 300, // set window width in pixel
        height: 200, // set window height in pixel
        title: "Add New Todo", // set window title
    });

    addWindow.loadFile("add.html");
}

// Create a Menu Template
const menuTemplate = [
    {
        label: "File",
        submenu: [
            {
                label: "Add ToDo",
                click() {
                    createAddWindow();
                },
            },
        ],
    },
];- Show Development Tools on if its Development environment.
if (process.env.NODE_ENV === "development") {
    menuTemplate.push({
        label: "View",
        submenu: [
            {
                label: "Toggle Developer Tools",
                accelerator:
                    process.platform === "darwin"
                        ? "Command+Alt+I"
                        : "Ctrl+Shift+I",
                click(item, focusedWindow) {
                    focusedWindow.toggleDevTools();
                },
            },
        ],
    });
}- Closing a window doesn't frees up the memory in Electron.
- We have to manually specify it to work the way JavaScript's Garbage collection works.
function createAddWindow() {
    ...
    // Delete the Add Window
    addWindow.on("closed", () => {
        addWindow = null;
    });
}

// Get todo from Add Window and send it to Main Window
ipcMain.on("todo:add", (event, todo) => {
    mainWindow.webContents.send("todo:add", todo);

    // Close the add Window
    addWindow.close();
});- There are several predefined roles that are made available by Electron.
- These roles allow to patch things up easily in your app.
- eg. adding back the reload menu item to your custom menu without need to create one again.
menuTemplate.push({
    label: "View",
    submenu: [{ role: "reload" }],
});webPreferences: {
nodeIntegration: true, // Allows to integrate node modules
backgroundThrottling: false, // Prevents from app getting freezed in the background
},- We can set the default width and height of the window with the keys
widthandheightand set it to the pixel value.
mainWindow = new BrowserWindow({
    width: 300,
    height: 500,
});- The frame contains the menu bar and the title bar to minimize, full-screen or close the application.
framecan be set to false if we don't want to display the frame.
mainWindow = new BrowserWindow({
    frame: false,
});- We can set whether we want the user to resize our app screen or not.
resizableis the flag used to enable or disable the resizing of the window.- Default value is true.
mainWindow = new BrowserWindow({
    resizable: false,
});showallows you to either show or hide the window when the application is launched.- By default
showis set totrue.
mainWindow = new BrowserWindow({
    show: false,
});skipTaskbarallows you to hide the window's (application's) Taskbar Icon.- By default
skipTaskbaris set tofalse.
mainWindow = new BrowserWindow({
    skipTaskbar: false,
});- Electron has a Tray object which allows you to create a tray icon for your application.
- Every Tray has an icon.
- Icon doesn't needs to have the specific resolution indicator (eg. icon@2x.png), Electron adjusts the icon to be used automatically.
// Import Tray from electron
const { Tray } = require("electron");

app.on("ready", () => {
    ...
    const iconName = "windows-icon.png";
    const iconPath = path.join(__dirname, `./src/assets/${iconName}`);
    // Adding Tray Icon of Application
    new Tray(iconPath);
});let tray;
app.on("ready", () => {
...
tray = new Tray();
// Click Event Listener on Tray
tray.on("click", () => {
if (mainWindow.isVisible()) {
mainWindow.hide();
} else {
mainWindow.show();
}
});
})- ToolTips are used to display the short information whenever we hover on some object.
setToolTipmethod can be used on the tray object to set the tool tip.
const tray = new Tray();

// Setting tooltip
tray.setToolTip("Timer App");- Context Menu can be added to the Tray with the help of
popUpContextMenumethod on tray object. popUpContextMenutakes Menu Template as a parameter to display the menu items in the context menu.
tray.on("right-click", () => {
    // Create context menu items
    const menuConfig = Menu.buildFromTemplate([
        {
            label: "Quit",
            click: () => {
                app.quit();
            },
        },
    ]);

    // Adding Context Menu
    tray.popUpContextMenu(menuConfig);
});- Allows you to see the position of where the event happened on the screen.
- Bounds are automatically passed to the callback function with event by electron.
const { height, width } = mainWindow.getBounds();tray.on("click", (event, bounds) => {
console.log(bounds.x, bounds.y);
// Windows: Somewhere around (1283, 824) -> (1315, 784) ie. lower right (position of tray on taskbar)
// MacOS: top-right
});- We can set the position of the window with
setBounds(). - It takes x position, y position to be displayed at and the width & height of the window to be displayed.
mainWindow.setBounds({
    x: xPosition,
    y: yPosition,
    width: widthValue,
    height: heightValue,
});