The following document describes the SAFE-Stack sample project. SAFE is a technology stack that brings together several technologies into a single, coherent stack for typesafe, flexible end-to-end web-enabled applications that are written entirely in F#.
![]()
You can see it running on Microsoft Azure at http://fable-suave.azurewebsites.net.

- Mono on MacOS/Linux
- .NET Framework 4.6.2 on Windows
- node.js - JavaScript runtime
- yarn - Package manager for npm modules
- dotnet SDK 2.0.3 The .NET Core SDK
- Other tools like Paket or FAKE will also be installed by the build script.
- For deployment you need to have docker installed.
This development stack is designed to be used with minimal tooling. An instance of Visual Studio Code together with the excellent Ionide plugin should be enough.
Start the development mode with:
> build.cmd run // on windows
$ ./build.sh run // on unix
This command will call the target "Run" in build.fsx. This will start in parallel:
- dotnet fable webpack-dev-server in src/Client (note: the Webpack development server will serve files on http://localhost:8080)
- dotnet watch msbuild /t:TestAndRun in test/serverTests to run unit tests and then server (note: Suave is launched on port 8085)
You can now edit files in src/Server or src/Client and recompile + browser refresh will be triggered automatically.
For the case of the client "Hot Module Replacement" is supported, which means your app state is kept over recompile.

Usually you can just keep this mode running and running. Just edit files, see the browser refreshing and commit + push with git.
This topic will guide you through creating a new page. After every section you should check whether you can see the changes in your browser.
Let's say we want to call our new page Tomato
-
Adjust the
src/Client/Pages.fsand register our Tomato page as a page and define the corresponding hash value.type Page = | Home | Login | WishList | Tomato // <- our page let toHash = function | Home -> "#home" | Login -> "#login" | WishList -> "#wishlist" | Tomato -> "#tomato" // <- our page let pageParser : Parser<Page->_,_> = oneOf [ map Home (s "home") map Page.Login (s "login") map WishList (s "wishlist") map Page.Tomato (s "tomato") ] // <- our page
-
Adjust the
PageModeltype and the following functions inside thesrc/Client/App.fs:PageModeltype PageModel = //... | TomatoModel
- urlUpdate function
let urlUpdate (result:Page option) model =
    match result with
    //...
    | Some Page.Tomato ->
        { model with PageModel = TomatoModel }, []
- viewPage function
let viewPage model dispatch =
    match model.Page with
    //...
    | TomatoModel ->
        [ words 60 "Tomatoes taste good!"]
-
Try it out by navigating to
http://localhost:8080/#tomato
You should see Tomatoes taste good!
Inside src/Client/views/Menu.fs:
let view (model:Model) dispatch =
    div [ centerStyle "row" ] [
        //...
        yield viewLink Page.Tomato "Tomato"
//...-
Add a new .fs file to the pages folder:
src/Client/pages/Tomato.fs. Add thesrc/Client/pages/Tomato.fsto your .fsproj file and move it aboveApp.fs.<Compile Include="pages/Tomato.fs" /> <Compile Include="App.fs" /> -
Place following code in the
src/Client/pages/Tomato.fs:module Client.Tomato open Style let view() = [ words 60 "Tomatoes taste VERY good!"]
-
Remove old 'view' code from the
viewPagefunction insrc/Client/App.fsand replace it with:| TomatoModel -> Tomato.view()
-
Replace the code in
src/Client/pages/Tomato.fswithmodule Client.Tomato open Style type Model = { Color:string } let init() = { Color = "red" } let view model = [ words 60 "Tomatoes taste VERY good!" words 20 (sprintf "The color of a tomato is %s" model.Color) ]
-
Adjust the
PageModelDUtype PageModel = | HomePageModel | LoginModel of Login.Model | WishListModel of WishList.Model | TomatoModel of Tomato.Model
-
urlUpdateshould now call theinitfunction and setTomato.Modelas the newPageModel| Some Page.Tomato -> let m = Tomato.init() { model with PageModel = TomatoModel m }, Cmd.none
-
The
viewPagefunction should call theviewfunction of the the Tomato module and pass in the page model if it is aTomatoModel| TomatoModel m -> Tomato.view m
-
Add a new message DU in
src/Client/pages/Tomato.fstype Msg = | ChangeColor of string
-
Add a message to the
MsgDU insrc/Client/App.fstype Msg = //... | TomatoMsg of Tomato.Msg
-
Adjust the match pattern in the
updatefunction ofsrc/Client/App.fs| TomatoMsg msg, TomatoModel tm -> let color = match msg with ChangeColor c -> c let tm = { tm with Color = color } { model with PageModel = TomatoModel tm }, Cmd.none | TomatoMsg msg, _ -> model, Cmd.none // in case we receive a delayed message originating from the previous page
-
Change the
Tomato.viewfunction to:let view model dispatch = [ words 60 "Tomatoes taste VERY good!" words 20 (sprintf "The color of a tomato is %s" model.Color) br [] button [ ClassName ("btn btn-primary") OnClick (fun _ -> dispatch (ChangeColor "green"))] [ str "No, my tomatoes are green!" ] ]
-
Edit
App.viewPageand pass thedispatchfunction toTomato.view, remappingTomato.MsgontoApp.Msg| TomatoModel m -> Tomato.view m (TomatoMsg >> dispatch)
The server side of the application can be debugged using Ionide.
- Run
build.cmd\build.shto restore everything properly - Open repo in VSCode
- Open debug panel, choose
Debugfrom combobox, and press green arrow (orF5). This will build server and start it with debugger attached. It will also start Fable watch mode for the Client side and open the browser.
Client side debugging is supported by any modern browser with any developer tools. Fable even provides source maps which will let you put breakpoints in F# source code (in browser dev tools). Also, we additionally suggest installing React-devtools (for better UI debugging) and Redux-devtools (time travel debugger).
The webserver backend is running as a Suave.io service on .NET Core.
In development mode the server is automatically restarted whenever a file in src/Server is saved.
The client is React single page application that uses fable-elmish.
The communication to the server is done via HTTPS calls to /api/*. If a user is logged in then a JSON Web Token is sent to the server with every request.
The Fable compiler is used to compile the F# client code to JavaScript so that it can run in the browser.
"Isomorphic F#" started a bit as a joke about Isomorphic JavaScript. The naming is really bad, but the idea to have the same code running on client and server is really interesting.
If you look at src/Server/Shared/Domain.fs then you will see code that is shared between client and server. On the server it is compiled to .NET core and for the client the Fable compiler is translating it into JavaScript.
This is a really convenient technique for a shared domain model.
Start the full build (incl. UI tests) with:
> build.cmd // on windows
$ ./build.sh // on unix
Expecto is a test framework like NUnit or xUnit, but much more developer friendly. With Expecto you write tests as values in normal code. Tests can be composed, reduced, filtered, repeated and passed as values, because they are values. This gives the programmer a lot of leverage when writing tests.
If you are in development mode then you can use Expecto's focused test feature to run a selected test against the running server.
canopy is a F# web automation and testing library, built on top of Selenium. In our expecto suite it looks like the following:
testCase "login with test user" <| fun () ->
    url serverUrl
    waitForElement ".elmish-app"

    click "Login"

    "#username" << "test"
    "#password" << "test"

    click "Log In"

    waitForElement "Isaac Abraham"
FAKE is a build automation system with capabilities which are similar to make and rake. It's used to automate the build, test and deployment process. Look into build.fsx for details.
Paket is a dependency manager and allows easier management of the NuGet packages.
The deployment for this repo works via docker and therefore you need docker installed on your machine.
The following part shows how to set up automatic deployment to Microsoft Azure.

Create a new Docker Hub account and a new public repository on Docker Hub.
Create a file called release.cmd with the following content and configure your DockerHub credentials:
@echo off
cls

.paket\paket.exe restore
if errorlevel 1 (
  exit /b %errorlevel%
)

packages\build\FAKE\tools\FAKE.exe build.fsx Deploy "DockerLoginServer=docker.io" "DockerImageName=****" "DockerUser=****" "DockerPassword=***" %*
Don't worry the file is already in .gitignore so your password will not be commited.
In order to release a container you need to create a new entry in [RELEASE_NOTES.md] and run release.cmd.
This will build the server and client, run all test, put the app into a docker container and push it to your docker hub repro.
Go to the Azure Portal and create a new "Web App for Containers".
Configure the Web App to point to the docker repo and select latest channel of the container.
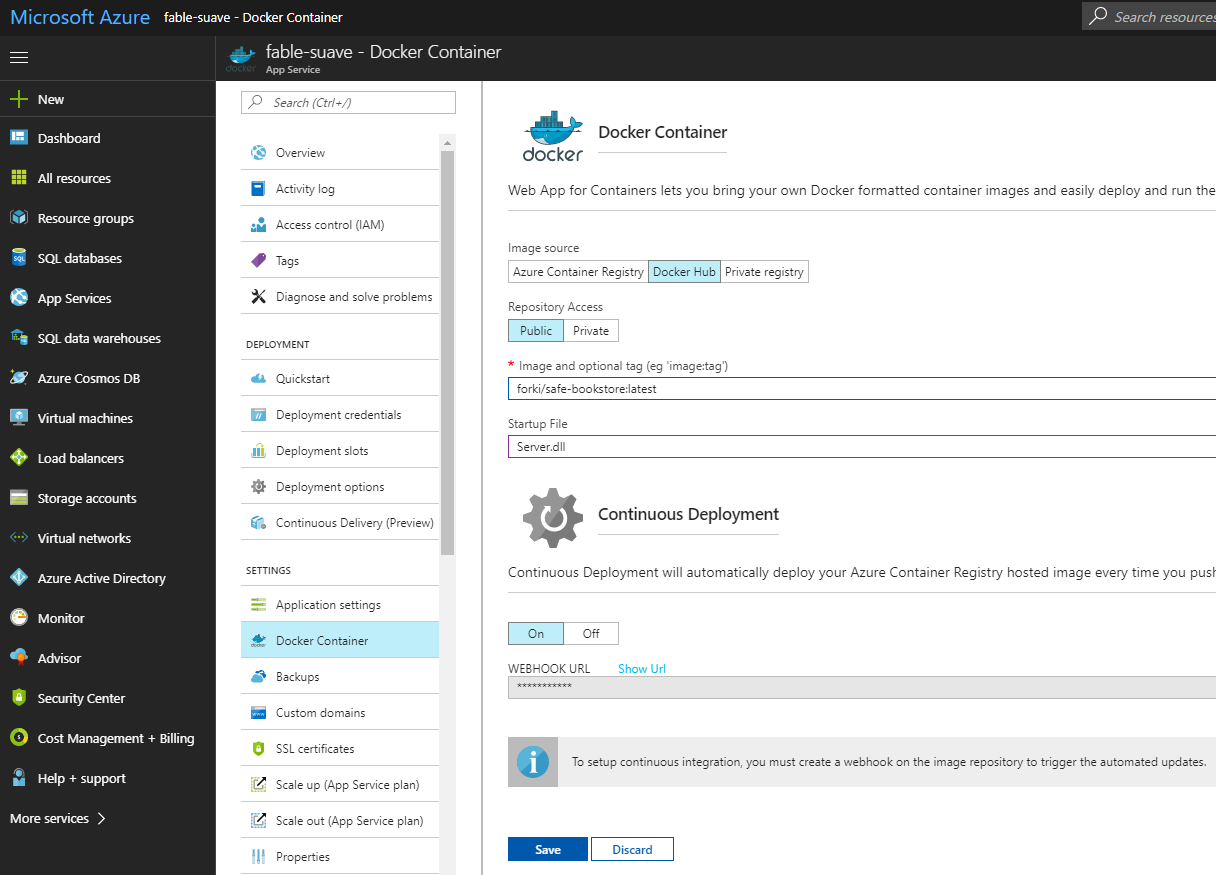
Also look for the "WebHook Url" on the portal, copy that url and set it as new trigger in your Docker Hub repo.
Note that entering a Startup File is not necessary.
The Dockerfile used to create the docker image exposes port 8085 for the Suave server application. This port needs to be mapped to port 80 within the Azure App Service for the application to receive http traffic.
Presently this can only be done using the Azure CLI. You can do this easily in Azure Cloud Shell (accessible from the Azure Portal in the top menu bar) using the following command:
az webapp config appsettings set --resource-group <resource group name> --name <web app name> --settings WEBSITES_PORT=8085
The above command is effectively the same as running docker run -p 80:8085 <image name>.
Now you should be able to reach the website on your .azurewebsites.net url.
Now everything is set up. By creating new entries in [RELEASE_NOTES.md] and a new run of release.cmd the website should update automatically.
With the steps above the website is only using local file storage. If you want to use it together with Azure Storage, then go back to the Azure Portal and create a new "Storage account". Copy the Connection String from "Access keys" tab and move over to your Azure app service.

The repository comes with a sample app.yaml file which is used to deploy to Google Cloud AppEngine using the custom flex environment. At the moment it seems like the application must run on port 8080 and that is set as a environment variable in the app.yaml file. When you run the deploy command it will first look for the app.yaml file and then look for the Dockerfile for what should deploy. The container that is deploy is exactly that same as the one that should have been deployed to Azure, but it is only set up to deploy from local to Google Cloud at the moment, and not from CI server to Google Cloud.
Before you can execute the deploy command you also need to build the solution with the Publish target, that is so the container image will get the compiled binaries when the container build is executed via the deploy command.
To execute the deploy you need a Google Cloud account and project configured as well as the tooling installed, https://cloud.google.com/sdk/downloads. The command you need to run is:
gcloud app deploy -q <--version=main> <--verbosity=debug>
The version and verbosity flag isn't need, but it is recommended to use the version flag so you don't end up with too many versions of your application without removing previous ones. Use verbosity=debug if you are having some problems.
Deploy to the flex environment with a custom runtime like this is might take some time, but the instructions here should work.
- Either comment out the lines in
App.fs:
#if DEBUG
|> Program.withDebugger
#endif- Or install the Redux DevTools as a Chrome Extensions (recommended) Only one error remains, when visiting the WebApp the first time.
Sadly, .NET Core 2.0 currently does not support Type Providers, so you can not just add the NuGet packages like FSharp.Data to your backend project.
- You can not call the functions of Fable inside the F# interactive.