Note
This repository now has received 2 stars from developers who work directly for Espressif. Thanks guys.
This template is the result of years of study and development. I refer to it as a boiler-plate project for large scale development. This would be a starting point for a commerical project -- but it is by no means a beginner's project. You must have a solid undertanding of most everything like: C/C++ programming, the multi-task (threading) model, freeRTOS concepts, CMake, and Esp component architecture.
This is a project that Espressif should be publishing so advanced users will know how to construct large applications. Espressif is fairly good about showing how to create basic resources and using them, but they tend to ignore the procedures on how to correctly dispose of resources. We give attention to the full lifecycle here in what could be considered a genuine commerical grade project.
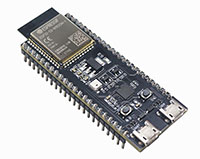
This project supports SMP with a dual core Esp32 microcontroller running FreeRTOS. The hardware is equivalent to a DevKitC running an Esp32S3 N16R8, but this project should be portable to other dual and single core Esp32 processors with minor changes. For example, you may need to size down the partition table as this project is a foundation for IOT based projects (which includes OTA).
Alpha refers to the hardware for which this project will run on.
5.2 refers to the version of ESP-IDF for which this project is built with.
Hardware Supported:
- Esp32s3 DevKitC

Current Features:
- Full SMP support
- C++ Construction/Destruction
- Wifi STA (basic connection/disconnection support)
- SNTP support (ability to fetch epoch time)
- NVS support
- RGB Indicator for ws2812 LED
- Universal Wifi Provisioning (Wifi method only)
Testable Features: (not applied to the main build yet)
- Power Management (implemented in the test area)
- Light Sleep (implemented in the test area)
- Deep Sleep (wakeable by GPIO0 -- also implemented in the test area)
This project will evolve to include other features which are not included here at this time. When this Alpha project can not expanded upon further, we will create a Beta, and Gamma projects that will allow for more expansion on larger hardware.
- Downloading, compiling, and running the application are all standard common processes and need no special instruction. This project calls for the ESP-IDF version 5.2.
- This project has been built in VS Code with the following plugins:
- C/C++ Microsoft
- C/C++ Extension Pack
- CMake
- CMake Tools
- Espressif IDF Plugin (running Configure ESP-IDF Extension will do most of the heavy lifting for you.)
- Git Graph (optional extras)
- C/C++ Themes
NVS Readme Document
Wifi/SNTP Readme Document
Indication Readme Document
-
Clone the project and open the root directory in VS Code.
-
As an option, you may make an adjustment to freeRTOS Maximum priority README_RTOS Document
-
Run the ESP-IDF SDK Configuration Editor (menuconfig)
A. Select the correct GPIO output pin under WS2812 RGB LED
B. Apply the correct SSID and Password for your Wifi connection under Wifi STA Manual Settings
C. Set your time zone under Simple Network Time Protocol Settings
(there is a link in the source code to help find your correct time zone on the web.) -
Set your COM port and flash method (UART) and you should be ready to go.
-
Compile, Flash, and Monitor. Apply input through GPIO0 push button switch as needed.
-
NOTE: Test software snippets can be swapped into system_gpio.cpp source file so that the switch (GPIO0) can make various test calls.
Software documentation doesn't exactly lend itself well to telling a chronological story. Instead, we will use software engineering concepts to present multiple viewpoints which should deliver not only how the software functions, but also why the software is developed the way that it is. The topics will be presented through Abstractions, Block Diagrams, Flowcharts, Sequence Diagrams, and State Transition Diagrams. With all these different perspectives, you should be able to key in the ideas in the way that registers with you best.
On a project level, the primary abstraction is the operation of the entire system. At present, the project doesn't interact much with the surrounding world, so its abstractions are of limited value. project abstraction document
You are looking at an overview of the classes, translation units and the FreeRTOS tasks (threads) for the entire project.

Features which are included, explained, or demonstrated are:
- C++ Construction (excluding inheritance and polymorphism).
- Component Construction with CMake build directives.
- State Transition Program Flow.
- Semaphores, Task Notification, and Queues (freeRTOS).
- Basic Wifi Connectivity.
- Simple Network Time Protocol integration.
- WS2812 Addressable Indication RGB LED (employs the remote control transceiver (RMT) driver).
For more detailed information about the system, follow this link: project block document.
At a project level, there is not much to show in a flowchart except for app_main(). Our flowchart page will also provide links to allow you to drill down to other areas. project flowchart document
There are a few key sequences which are worth examining on a global level. The one that is most interesting is how a supporting object is constructed and how its task is spun up. project sequence document
One of the basic premises of development in a predominately cooperative multitasking system is that the threads (tasks) must yield back to the operating system's scheduler on a regular basis frequently enough to supply enough processor time to service all tasks of lesser or equal priority. If any task doesn't yield, the system will starve of CPU time and a task watchdog timer will expire causing a core panic followed by a reboot. If you have worked for any length of time with Esp32 and FreeRTOS, you have seen a watchdog timer expire (as well as stack overflows).
However, as you may know, freeRTOS by default configures a new project as preemptive mulitasking. So, why do we see watchdogs timers expiring when we don't cooperativly release back to the scheduler? This may be confusing to some developers but the explaination is not very complex.
When the operating system has a higher priority task ready, it pre-emptively stops a lower priorty task and starts the higher priorty task. You see nothing and do nothing for that action to work as expected.
BUT, when the operating system has a lower (or equal) priorty task that needs to run as some point, you can't tie up the system. Any upper priority task must yield as soon as it can so a lower (or equal) priority tasks will run. In this case, you must do somthing to yield. If you don't yield, the Task Watchdog Timers will complain and abort the program (assuming those WDTs are active). So, the key idea here is that all software designers, whether its is freeRTOS developers, or IDF developers, all must be thoughtfull enough to release the CPU expeditiously.
So, a strong development approach must include a smart, efficient, and easily understood way to complete discrete work and systematically yield to freeRTOS. There may be several approaches to solving this problem, but one well known approach is to use state transition modeling.
State transition modeling provides a well understood mechanism that upon input and time, a system moves from one state to another. Incrementally, the system completes a task, creates output, and reaches a possible stopping point. It is at these natural stopping points, that we can yield back to the operating system. When that task resumes work, it considers new input and has a next task to complete and does what is required before yielding again. This cycle repeats continuously to achieve the system's objectives. Most of our programming will follow the state transition programming model.
On the down side, state modeling can't be easily followed in a single page of source code. State modeling isn't a linear list of things to do (as is seen in most of Espressif's small code examples). State modeling resembles a series of interrelated repeating loops. With time and experience, state modeling becomes easier to see and understand, and one way to quickly get up to speed in understanding it - is to view state modeling diagrams and consider how it is a road map to the source code. As a rule, if you can easily diagram your intended state transition process, then it is likely to be expressible in code. Additionally, explaining why you are doing something is typically very important, so always include good documentation about your design intent.
The state model at a project level is fairly simple: project state model document.
Want me on the team? Reach out with my contact information in Github. Thanks.
