https://www.udacity.com/course/cloud-developer-nanodegree--nd9990

- Intro
- Cloud Fundamentals
- Full Stack Apps on AWS
- Monolith to Microservices at Scale
- Lesson 1: Introduction to Microservices
- Lesson 2: Microservices Design Principles and Best Practices
- Lesson 3: Containers Using Docker
- Lesson 4: Authomating the Application Development Lifecycle
- Lesson 5: Orchestration with Kubernates
- Lesson 6: Best Practices/Design Patterns for Kubernetes in Production
- Project: Refactor Monolith to Microservices and Deploy
- Develop & Deploy Serverless App
- Capstone
https://udacity.github.io/git-styleguide/
Project Portfolio
- Real-world projects are integral to every Udacity Nanodegree program. They become the foundation for a job-ready portfolio to help learners advance their careers in their chosen field. The projects in the Cloud Developer Nanodegree program were designed in collaboration with a group of highly talented industry professionals to ensure you develop the most in-demand skills. Every project in a Nanodegree program is human-graded by a member of Udacity’s mentor and reviewer network. These project reviews include detailed, personalized feedback on how you can improve their work. Udacity graduates consistently rate projects and project reviews as one of the best parts of their experience with Udacity.
Project 1
- Deploy Static Website on AWS The cloud is perfect for hosting static websites that only include HTML, CSS, and JavaScript files that require no server-side processing. In this project, you will deploy a static website to AWS. First, you will create a S3 bucket, configure the bucket for website hosting, and secure it using IAM policies. Next, you will upload the website files to your bucket and speed up content delivery using AWS’s content distribution network service, CloudFront. Lastly, you will access your website in a browser using the unique S3 endpoint.
Project 2
- Udagram: your own Instagram on AWS In this project, you will develop a cloud-based application for uploading, listing, and filtering images. You will use Node.js/Express, a popular javascript framework for networked application development to develop this application. You will implement a REST API to issue commands using HTTP, store data in Amazon Web Services Relational Data Service (RDS) and S3, extend the codebase with secure authentication signon features, and deploy to Amazon Web Services Elastic Beanstalk. These are the hard skills you’ll need in any Cloud developer role.
Project 3
- Refactor Udagram app into Microservices and deploy using Kubernetes In this project, you will reuse their existing Udagram application and convert and extend into a microservice architecture. After the application is divided into smaller service, you will containerize it and deploy it to a Kubernetes cluster. This includes the deployment pipeline, scalability, observability, services, networking, and deployment strategies to service the system. You will then implement and interpret performance, usage, and logs to solve real problems similar to those they would encounter in the field.
Project 4
- Serverless Application In this project you will develop an Instagram-like serverless service for uploading, listing, and filtering images. You will begin with building serverless REST APIs using API Gateway and AWS Lambda, a stack of serverless technologies on AWS. You will then implement an API to interact with this application, store data in AWS DynamoDB, S3, and Elasticsearch, secure your application with authentication, and deploy to Amazon Web Services using a Serverless framework.
Project 5
- Capstone Project
The purpose of the cloud development capstone project is to give you a chance to combine what you've learned throughout the program. This project will be an important part of your portfolio that will help you achieve your cloud development-related career goals.
In the capstone project, each project is unique to the student. You’ll build an application on AWS based on predefined criteria. Students will define the scope of the project, come up feature list and decide which AWS services to use to meet availability and performance criteria.
-
Elastic Cloud Compute or EC2 is a foundational piece of AWS' cloud computing platform and is a service that provides servers for rent in the cloud.

-
Pricing Options: there are several pricing options for EC2.
On Demand- Pay as you go, no contract.Dedicated Hosts- You have your own dedicated hardware and don't share it with others.Spot- You place a bid on an instance price. If there is extra capacity that falls below your bid, an EC2 instance is provisioned. If the price goes above your bid while the instance is running, the instance is terminated.Reserved Instances- You earn huge discounts if you pay up front and sign a 1-year or 3-year contract.

Elastic Block Store(EBS) is a storage solution for EC2 instances and is a physical hard drive that is attached to the EC2 instance to increase storage.
- Virtual Private Cloud or VPC allows you to create your own private network in the cloud.
- You can launch services, like EC2, inside of that private network.
- A VPC spans all the Availability Zones in the region.
- VPC allows you to control your virtual networking environment, which includes:
- IP address ranges
- subnets
- route tables
- network gateways
In this hands-on exercise, you will launch a virtual server in the cloud within a secure network. You will also manage additional storage options for your server.
- By the end of this lab, you will be able to:
- Launch a secure EC2 (Elastic Cloud Compute) instance within a VPC (Virtual Private Cloud)
- Manage an EBS volume
- Steps
- Access VPC service from AWS Management Console
- On the AWS Management Console page, type vpc in the Find Services box and then select VPC.
- Click the Launch VPC Wizard button and select VPC with a Single Public Subnet. Important: In the VPC Name text box, enter a name for the VPC, and then select the first AZ from the Availability Zone dropdown. Leave everything else as the defaults.
- Select Create VPC button.
- You should see the VPC Successfully Created page, click the OK button in the far right. Important: You should see a table that lists all of the VPCs, make a note of the one just created.
- Launch an EC2 instance
- Navigate to the EC2 console page, by clicking on Services in the upper left-hand menu. Type EC2 in the text box and click on EC2 found in the search results.
- On the EC2 Dashboard page, click on Instances in the left-hand navigation.
- Click Launch Instance.
- Select the Amazon Linux 2 AMI (HVM), SSD Volume Type_ Amazon Machine Image (AMI). Important: You are free to choose a different AMI, but to avoid excessive charges, pick one that says, Free Tier Eligible.
- For the Instance Type, select the free-tier instance type of t2.micro.
- Click on Next: Configure Instance Details.
- Enter the 1 for the Number of Instances.
- For Purchasing option, leave unchecked.
- For Network, select the VPC that was created in the previous step, and then select the subnet in to which to launch the instance.
- Keep the other default settings on this page as is.
- Attach an EBS volume
- Click on Next: Add Storage to attach an EBS volume. Important: Here we already see there is a root volume (or device) attached to your instance, this is an EBS volume. We are going to add additional storage.
- To attach additional storage, click on Add New Volume.
- Select Delete on Termination and keep the other default settings.
- Click Review and Launch.
- Click Launch
- Generate and download a new key pair and then click Launch Instances. Important: This will allow you to SSH into your instance from your local machine. This is a one-time process, so generate and download the new key pair now.
- The launch will take a couple of minutes, select View Instances during the wait.
- Check the instance state, it should say running.
- Cleanup & Disable EC2 Instance To avoid recurring charges for leaving an instance running, let’s disable the EC2 instance and terminate the VPC
- From the EC2 Dashboard, select the instance just created, click Actions, then Instance State, and then select Terminate.
- From the VPC Dashboard, select the VPC just created, click Actions, then Delete VPC.
- Access VPC service from AWS Management Console
-
AWS Lambda provides you with computing power in the cloud by allowing you to execute code without standing up or managing servers.
-
Tips
- Lambda is found under the Compute section on the AWS Management Console.
- Lambdas have a time limit of 15 minutes.
- The code you run on AWS Lambda is called a “Lambda function”
- Lambda code can be triggered by other AWS services.
- AWS Lambda supports Java, Go, PowerShell, Node.js, C#/.NET, Python, and Ruby. There is a Runtime API that allows you to use other programming languages to author your functions.
- Lambda code can be authored via the console.

- Create a Lambda Function
- On the AWS Management Console page, type lambda in the Find Services box and then select Lambda.
- Click the “Create function” button and select Author from scratch.
- Enter a Function name and select Node.js 8.10 as the runtime.
- For Permission, click Choose or create an execution role, and select Create a new role with basic Lambda permissions.
- Click Create function.
- Modify a Lambda Function
- Scroll down to the code for the Lambda function.
- Replace the code on Line 5 with the statement below:
body: JSON.stringify('Hello ' + event.key1 + ' from Lambda!'),
- Click the Save button in the upper right-hand corner.
- Scroll down to the Basic Settings section.
- For the Description, enter Udacity Function.
- Change the Timeout from 3 seconds to 10 minutes.
- Click the Save button in the upper right-hand corner.
- Test a Lambda Function
- Click on the Test button in the upper right-hand corner.
- Ensure the Event template is Hello World.
- For the Event name enter TestEvent Important: The name cannot contain spaces.
- Update the JSON to the statement below, replacing the statement with your name.
{ "key1": "Place your name here" }
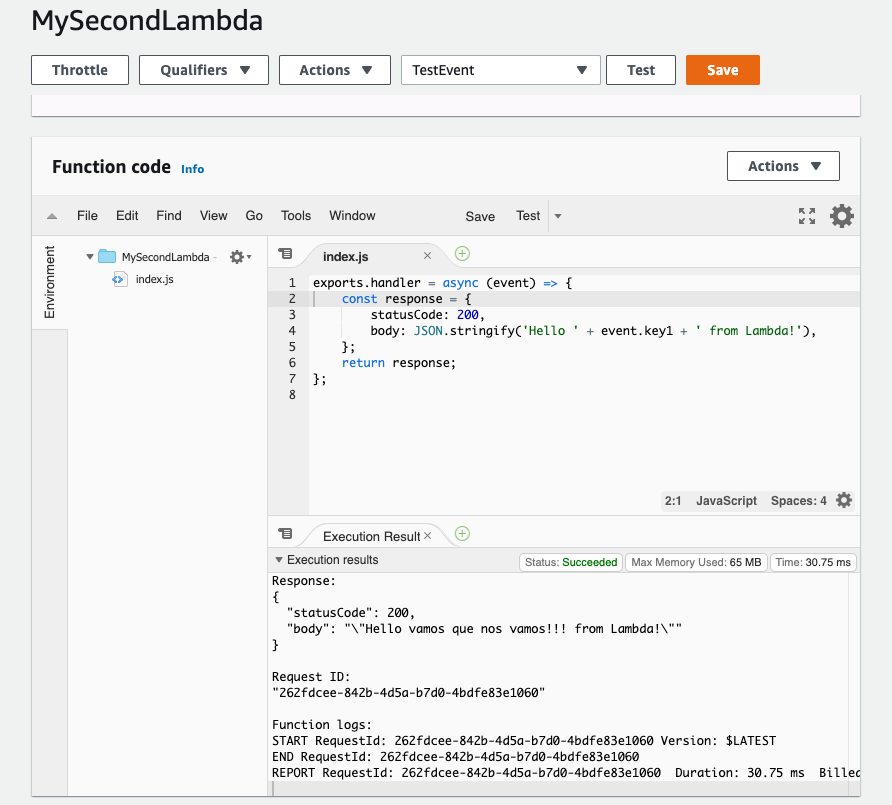

- Click Create.
- Click the Test button in the upper right-hand corner again.
- Scroll up to see the output in the Execution Results pane.
- Review your results in the window.
Elastic Beanstalks is an orchestration service that allows you to deploy a web application at the touch of a button by spinning up (or provisioning) all of the services that you need to run your application. Tips
- Elastic Beanstalk is found under the Compute section of the AWS Management Console.
- Elastic Beanstalk can be used to deployed web applications developed with Java, .NET, PHP, Node.js, Python, Ruby, Go, and Docker.
- You can run your applications in a VPC.
- Storage in the Cloud
- Storage and database services in the cloud provide a place for companies to collect, store, and analyze the data they've collected over the years at a massive scale.
- Storage & Database Services
- Amazon Simple Storage Service (Amazon S3)
- Amazon Simple Storage Service (Amazon S3) Glacier
- DynamoDB
- Relational Database Service (RDS)
- Redshift
- ElastiCache
- Neptune
- Amazon DocumentDB
-
Amazon Simple Storage Service (or S3) is an object storage system in the cloud.
-
S3 offers several storage classes, which are different data access levels for your data at certain price points.
- S3 Standard
- S3 Glacier: data archiving purposes
- S3 Glacier Deep Archive
- S3 Intelligent-Tiering
- S3 Standard Infrequent Access
- S3 One Zone-Infrequent Access
-
S3 properties:
- Objects are stored in a bucket
- Hold millions of objects
- S3 bucket live in a region
- S3 bucket name must be globaly unique
-
Uses case:
- Static websties
- content delivery
- backup and recovery
- archiving and big data
- application data
- hybrid cloud storage
-
S3 Glacier: cheaper than S3, for data that you don't intend to access frequently, data retrieval can be few minutes up to hours. For data infrequently access.
-
Resources
DynamoDB is a NoSQL document database service that is fully managed. Unlike traditional databases, NoSQL databases, are schema-less. Schema-less simply means that the database doesn't contain a fixed (or rigid) data structure.
Tips:
-
DynamoDB is found under the Database section on the AWS Management Console.
-
DynamoDB can handle more than 10 trillion requests per day.
-
DynamoDB is serverless as there are no servers to provision, patch, or manage.
-
DynamoDB supports key-value and document data models.
-
DynamoDB synchronously replicates data across three AZs in an AWS Region.
-
DynamoDB supports GET/PUT operations using a primary key.
-
Resources
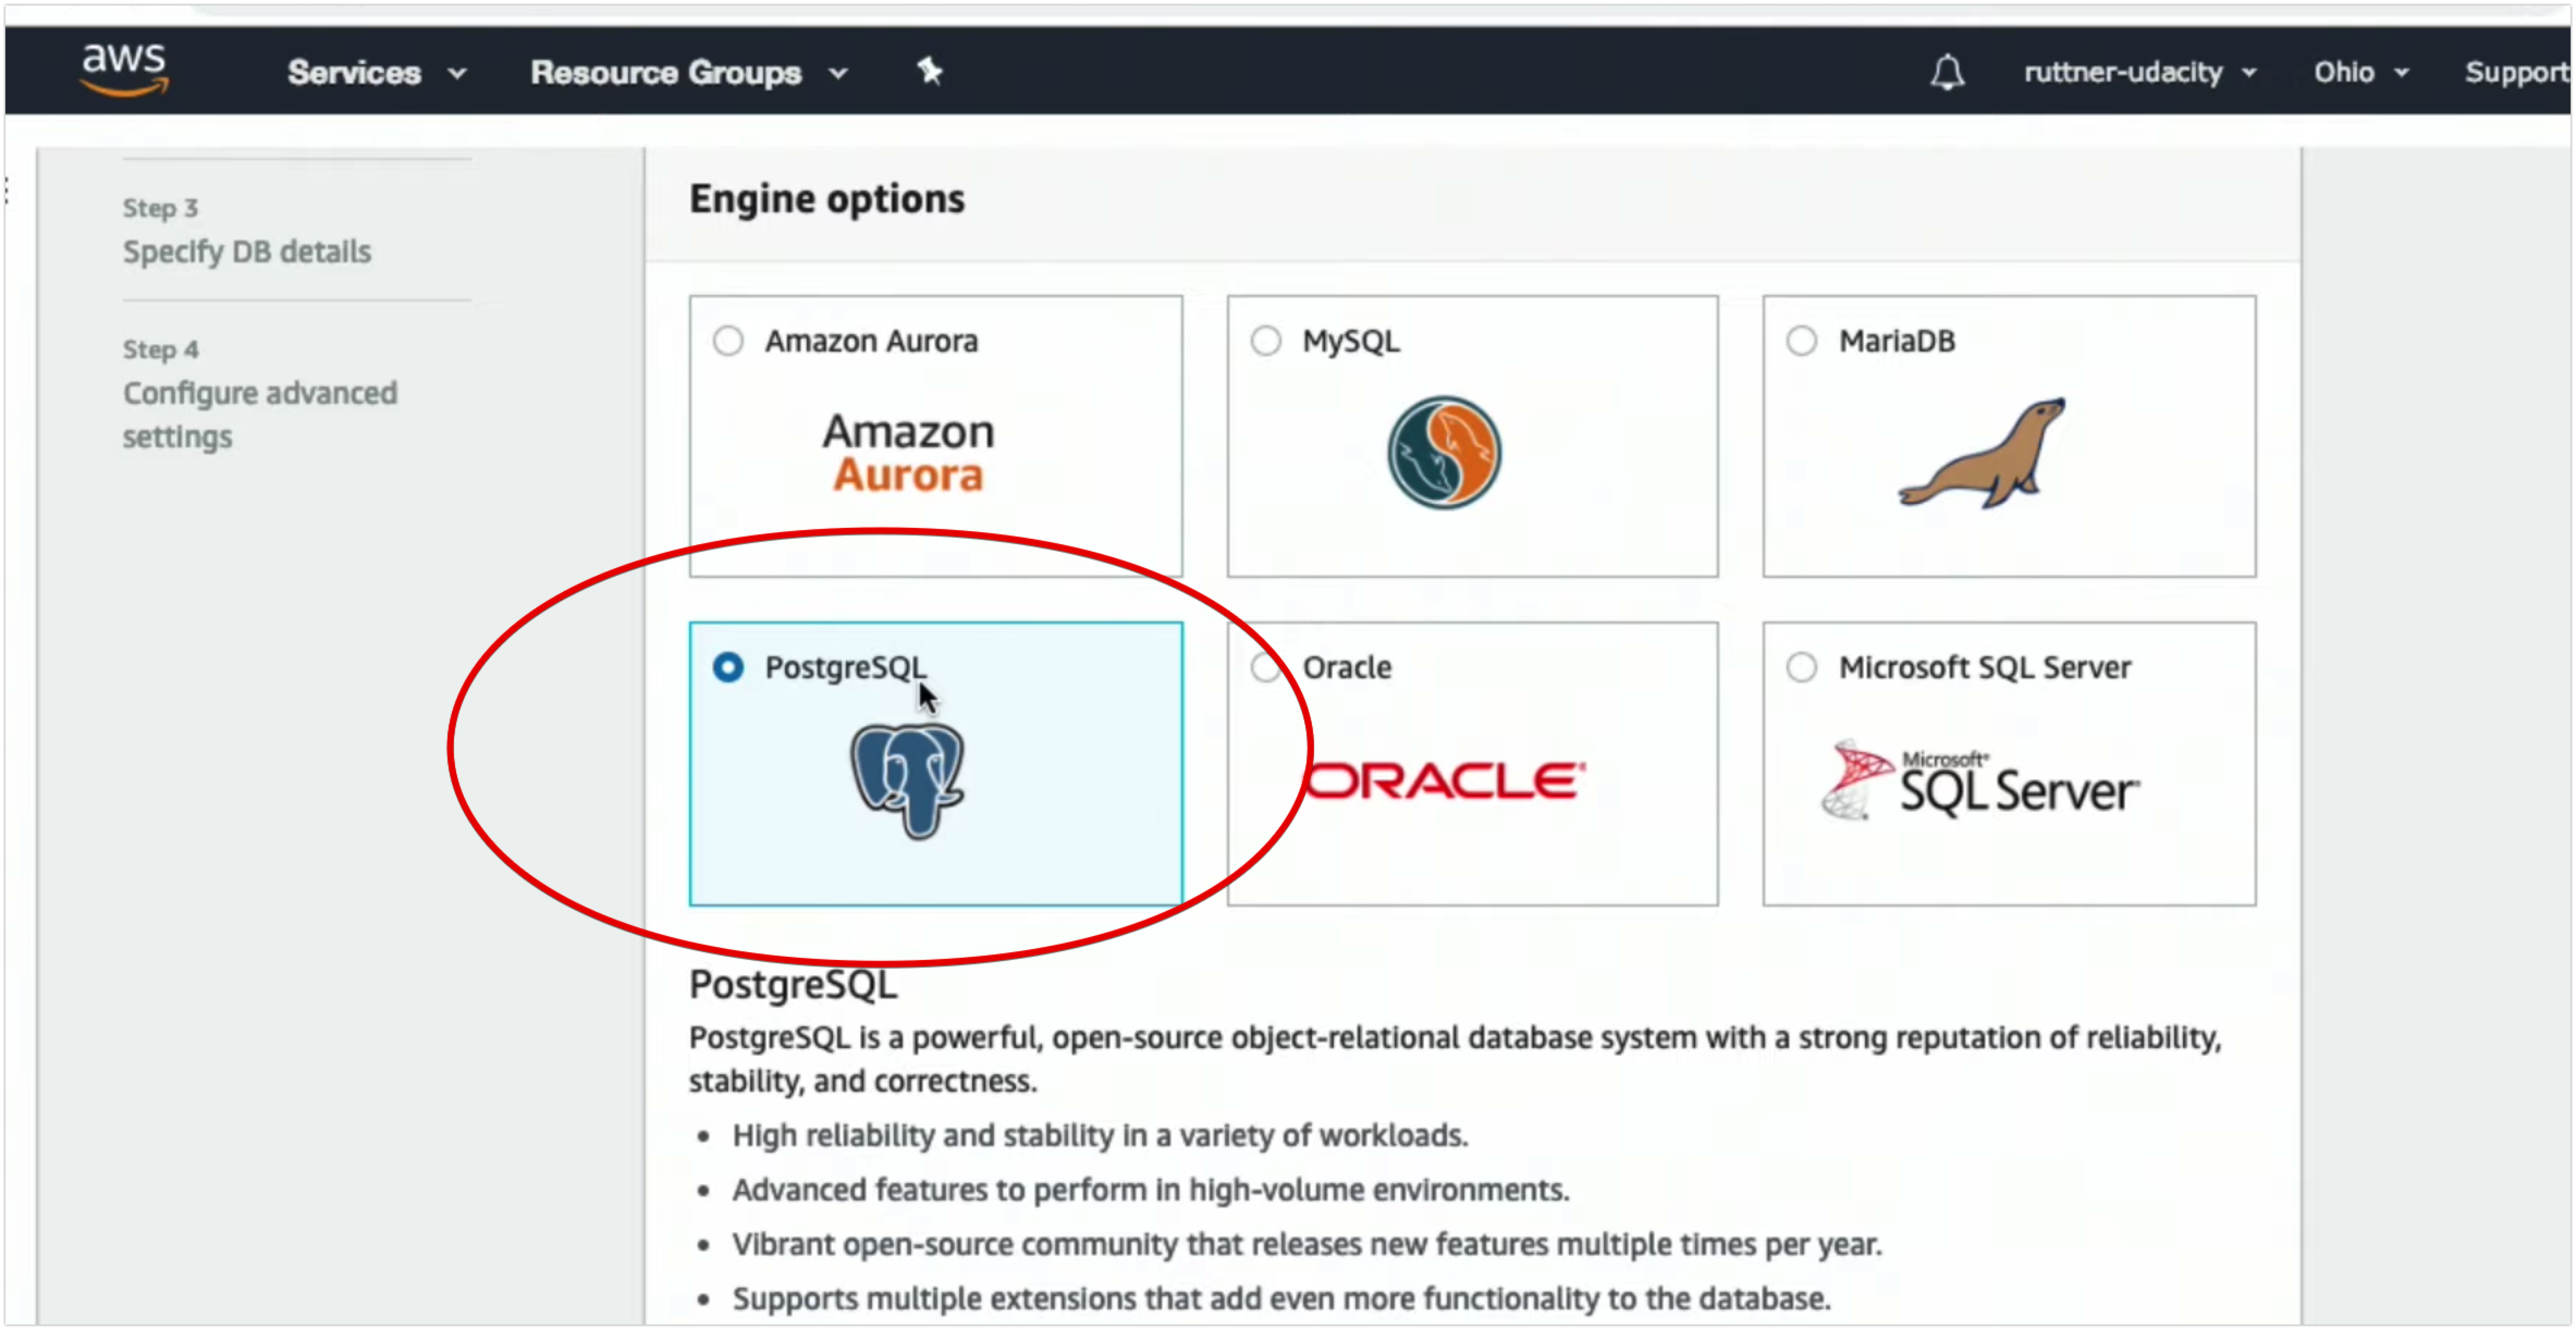
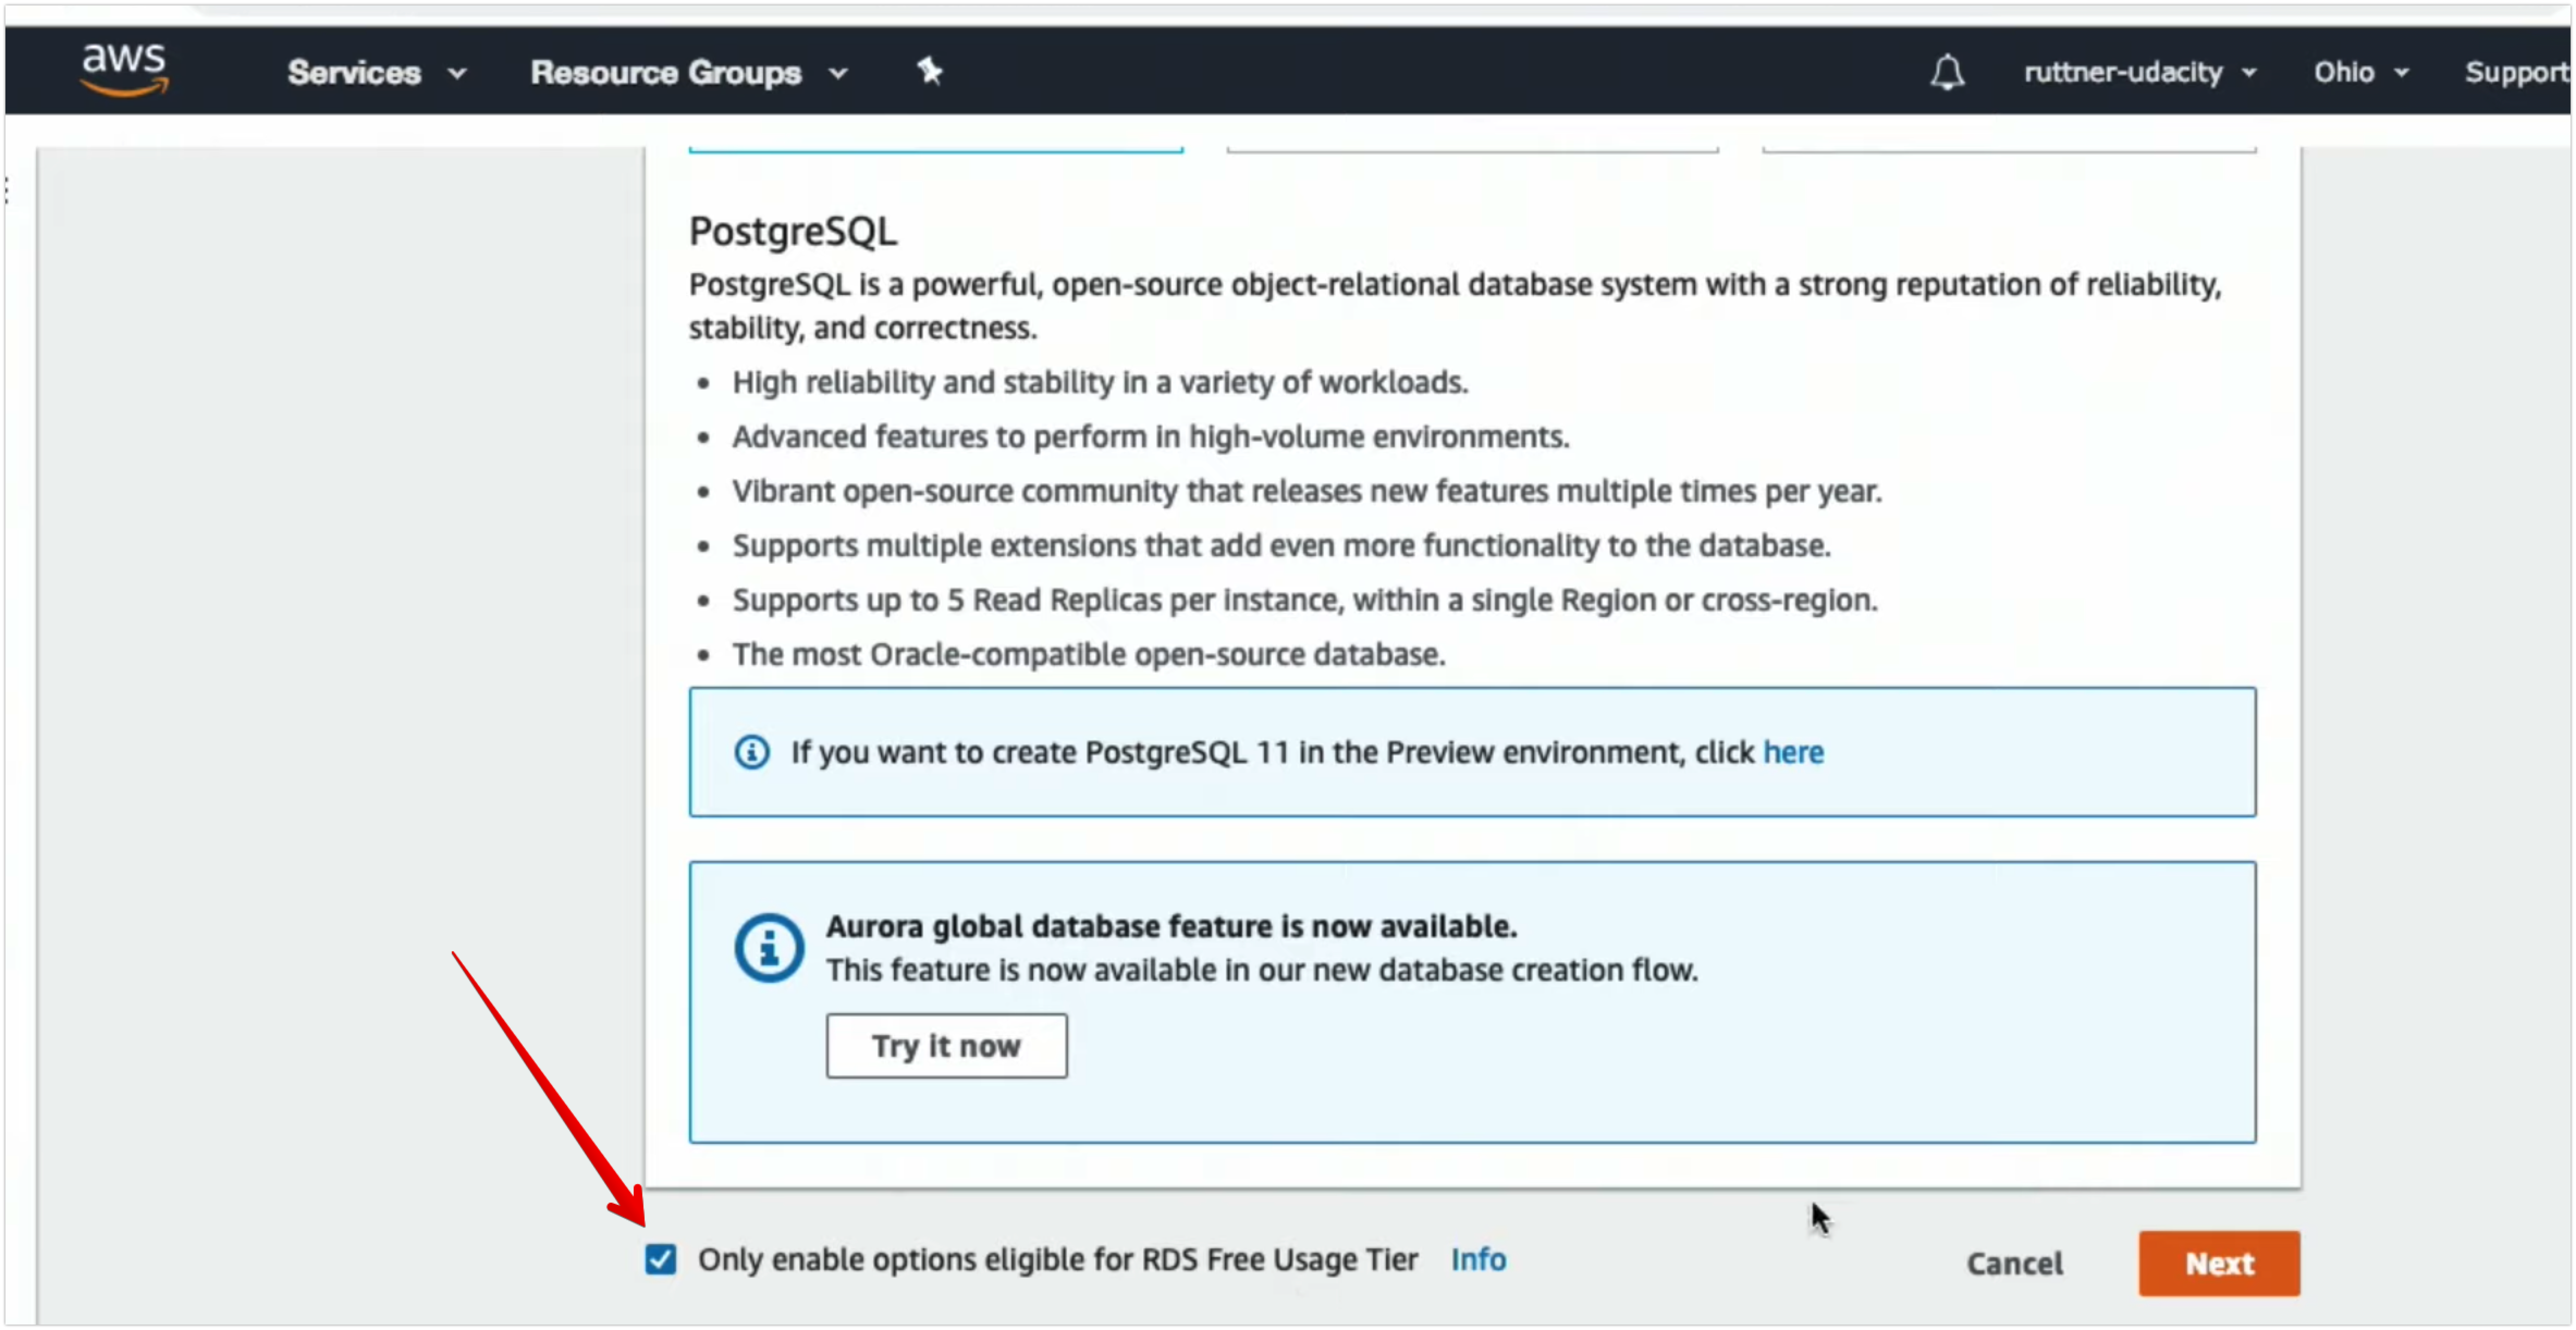
- RDS (or Relational Database Service) is a service that aids in the administration and management of databases. RDS assists with database administrative tasks that include upgrades, patching, installs, backups, monitoring, performance checks, security, etc.
- Database Engine Support
- Oracle
- PostgreSQL
- MySQL
- MariaDB
- SQL Server
- Redshift is a cloud data warehousing service to help companies manage big data. Redshift allows you to run fast queries against your data using SQL, ETL, and BI tools. Redshift stores data in a column format to aid in fast querying.
- Tips
- Redshift can be found under the Database section on the AWS Management Console.
- Redshift delivers great performance by using machine learning.
- Redshift Spectrum is a feature that enables you to run queries against data in Amazon S3.
- Redshift encrypts and keeps your data secure in transit and at rest.
- Redshift clusters can be isolated using Amazon Virtual Private Cloud (VPC).
Steps
- Launch MySQL Database
- View Instance Details
- Delete Database Instance
-
A Content Delivery Network (or CDN) speeds up delivery of your static and dynamic web content by caching content in an Edge Location close to your user base.
-
The benefits of a CDN includes:
- low latency
- decreased server load
- better user experience
-
CloudFront is used as a global content delivery network (CDN). Cloud Front speeds up the delivery of your content through Amazon's worldwide network of mini-data centers called Edge Locations.
-
CloudFront works with other AWS services, as shown below, as an origin source for your application:
- Amazon S3
- Elastic Load Balancing
- Amazon EC2
- Lambda@Edge
- AWS Shield
-
Tips
- CloudFront is found under the Networking & Content Delivery section on the AWS Management Console.
- Amazon countinously adds new Edge Locations.
- CloudFront ensures that end-user requests are served from the closest edge location.
- CloudFront works with non-AWS origin sources.
- You can use GeoIP blocking to serve content (or not serve content) to specific countries.
- Cache control headers determine how frequently CloudFront needs to check the origin for an updated version your file.
- The maximum size of a single file that can be delivered through Amazon CloudFront is 20 GB.
-
Resources
-
In this hands-on exercise, you will create a S3 bucket with a Cloud Front distribution to speed up our the delivery of content to our website.
-
Steps
- Create S3 Bucket
- Upload Object to Bucket
- Create CloudFront Distribution
- Delete Bucket and Distribution
-
As adoption of cloud services has increased, so has the need for increased security in the cloud. The great thing about cloud security is that it not only protects data, it also protects applications that access the data. Cloud security even protects the infrastructure (like servers) that applications run on.
-
The way security is delivered depends on the cloud provider you're using and the cloud security options they offer.

-
AWS Shield is a managed DDoS (or Distributed Denial of Service) protection service that safeguards web applications running on AWS.
-
AWS Shield is a service that you get "out of the box", it is always running (automatically) and is a part of the free standard tier. If you want to use some of the more advanced features, you'll have to utilize the paid tier.
-
Tips
- AWS Shield can be found under the Security, Identity, & Compliance section on the AWS Management Console.
- AWS Shield Standard is always-on, using techniques to detect malicious traffic.
- AWS Shield Advanced provides enhanced detection.
- AWS WAF (or AWS
Web Application Firewall) provides a firewall that protects your web applications.

-
WAF can stop common web attacks by reviewing the data being sent to your application and stopping well-known attacks.
-
Tips
- WAF is found under the Security, Identity, & Compliance section on the AWS Management Console.
- WAF can protect web sites not hosted in AWS through Cloud Front.
- You can configure CloudFront to present a custom error page when requests are blocked.
-
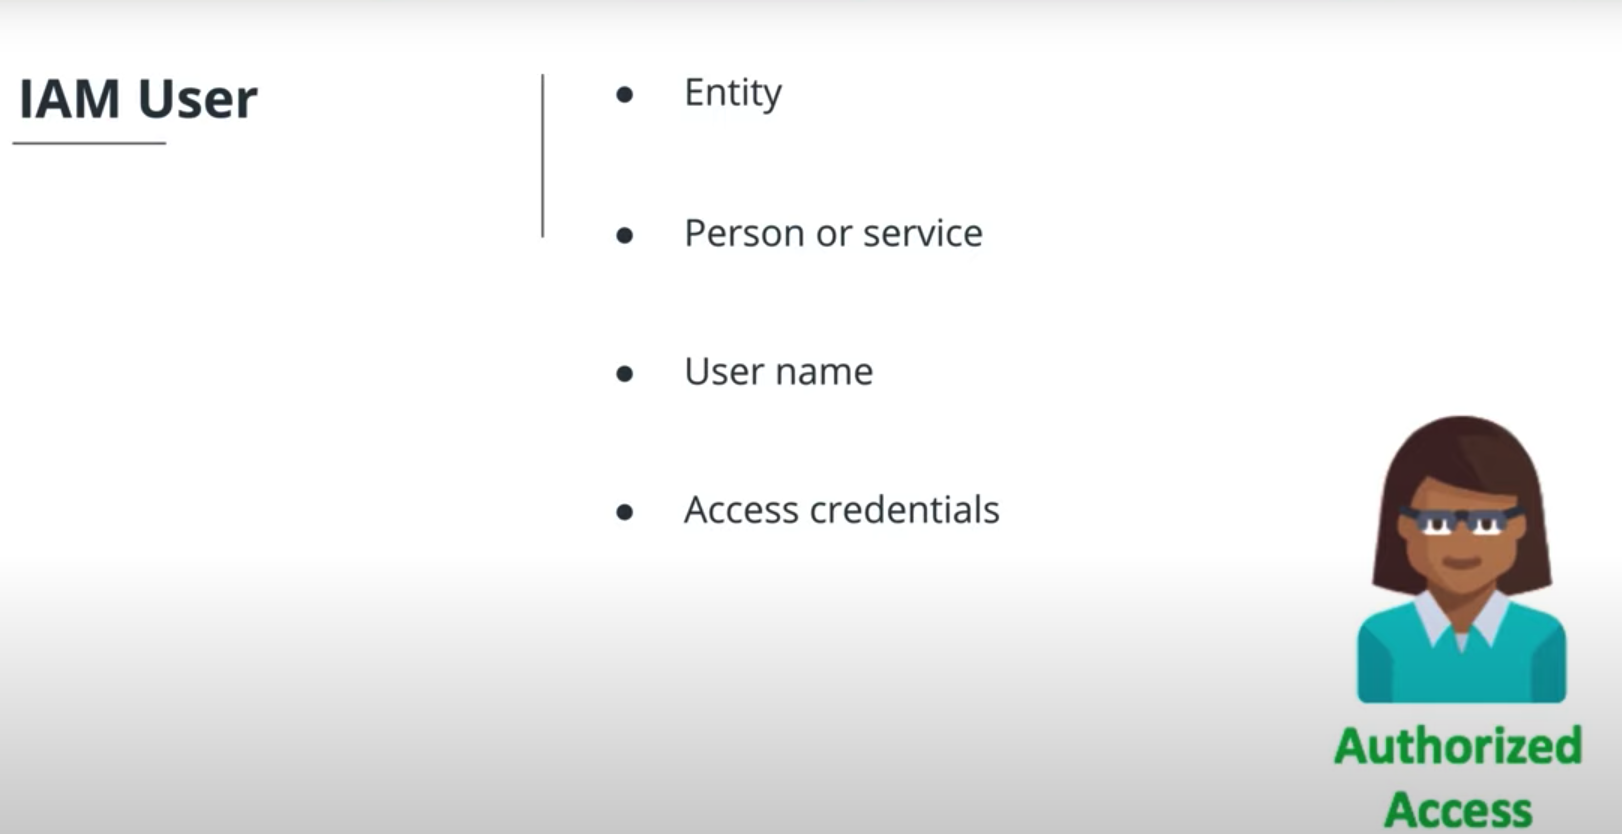
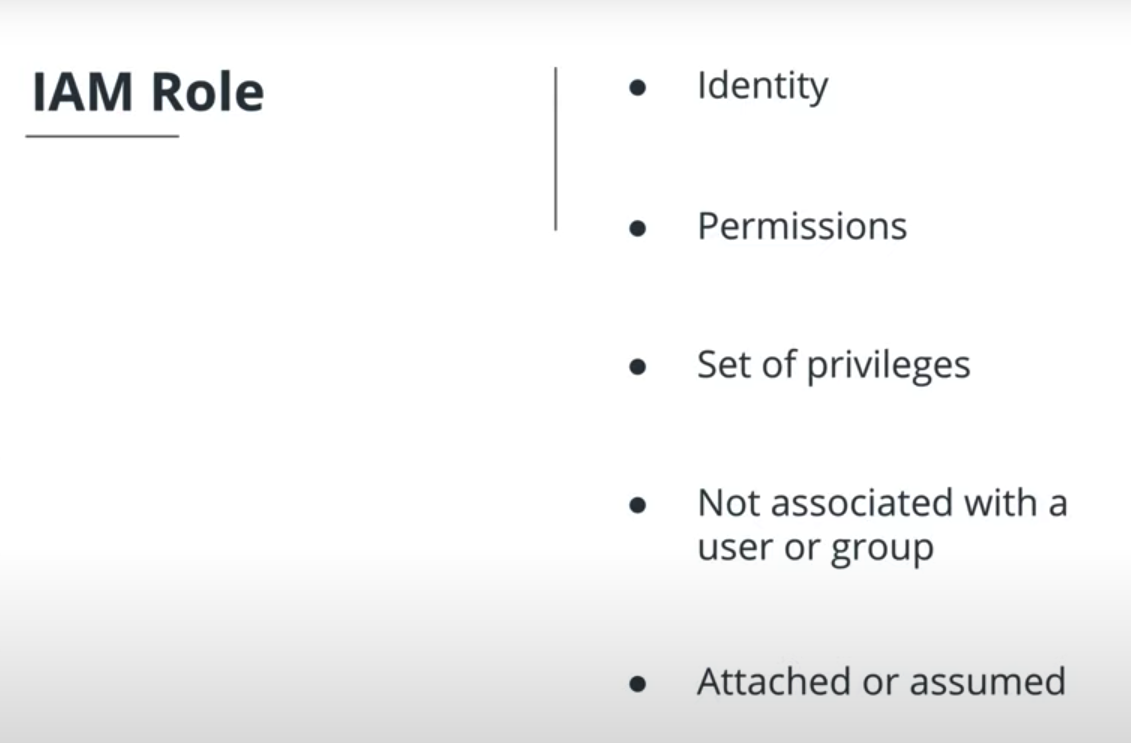
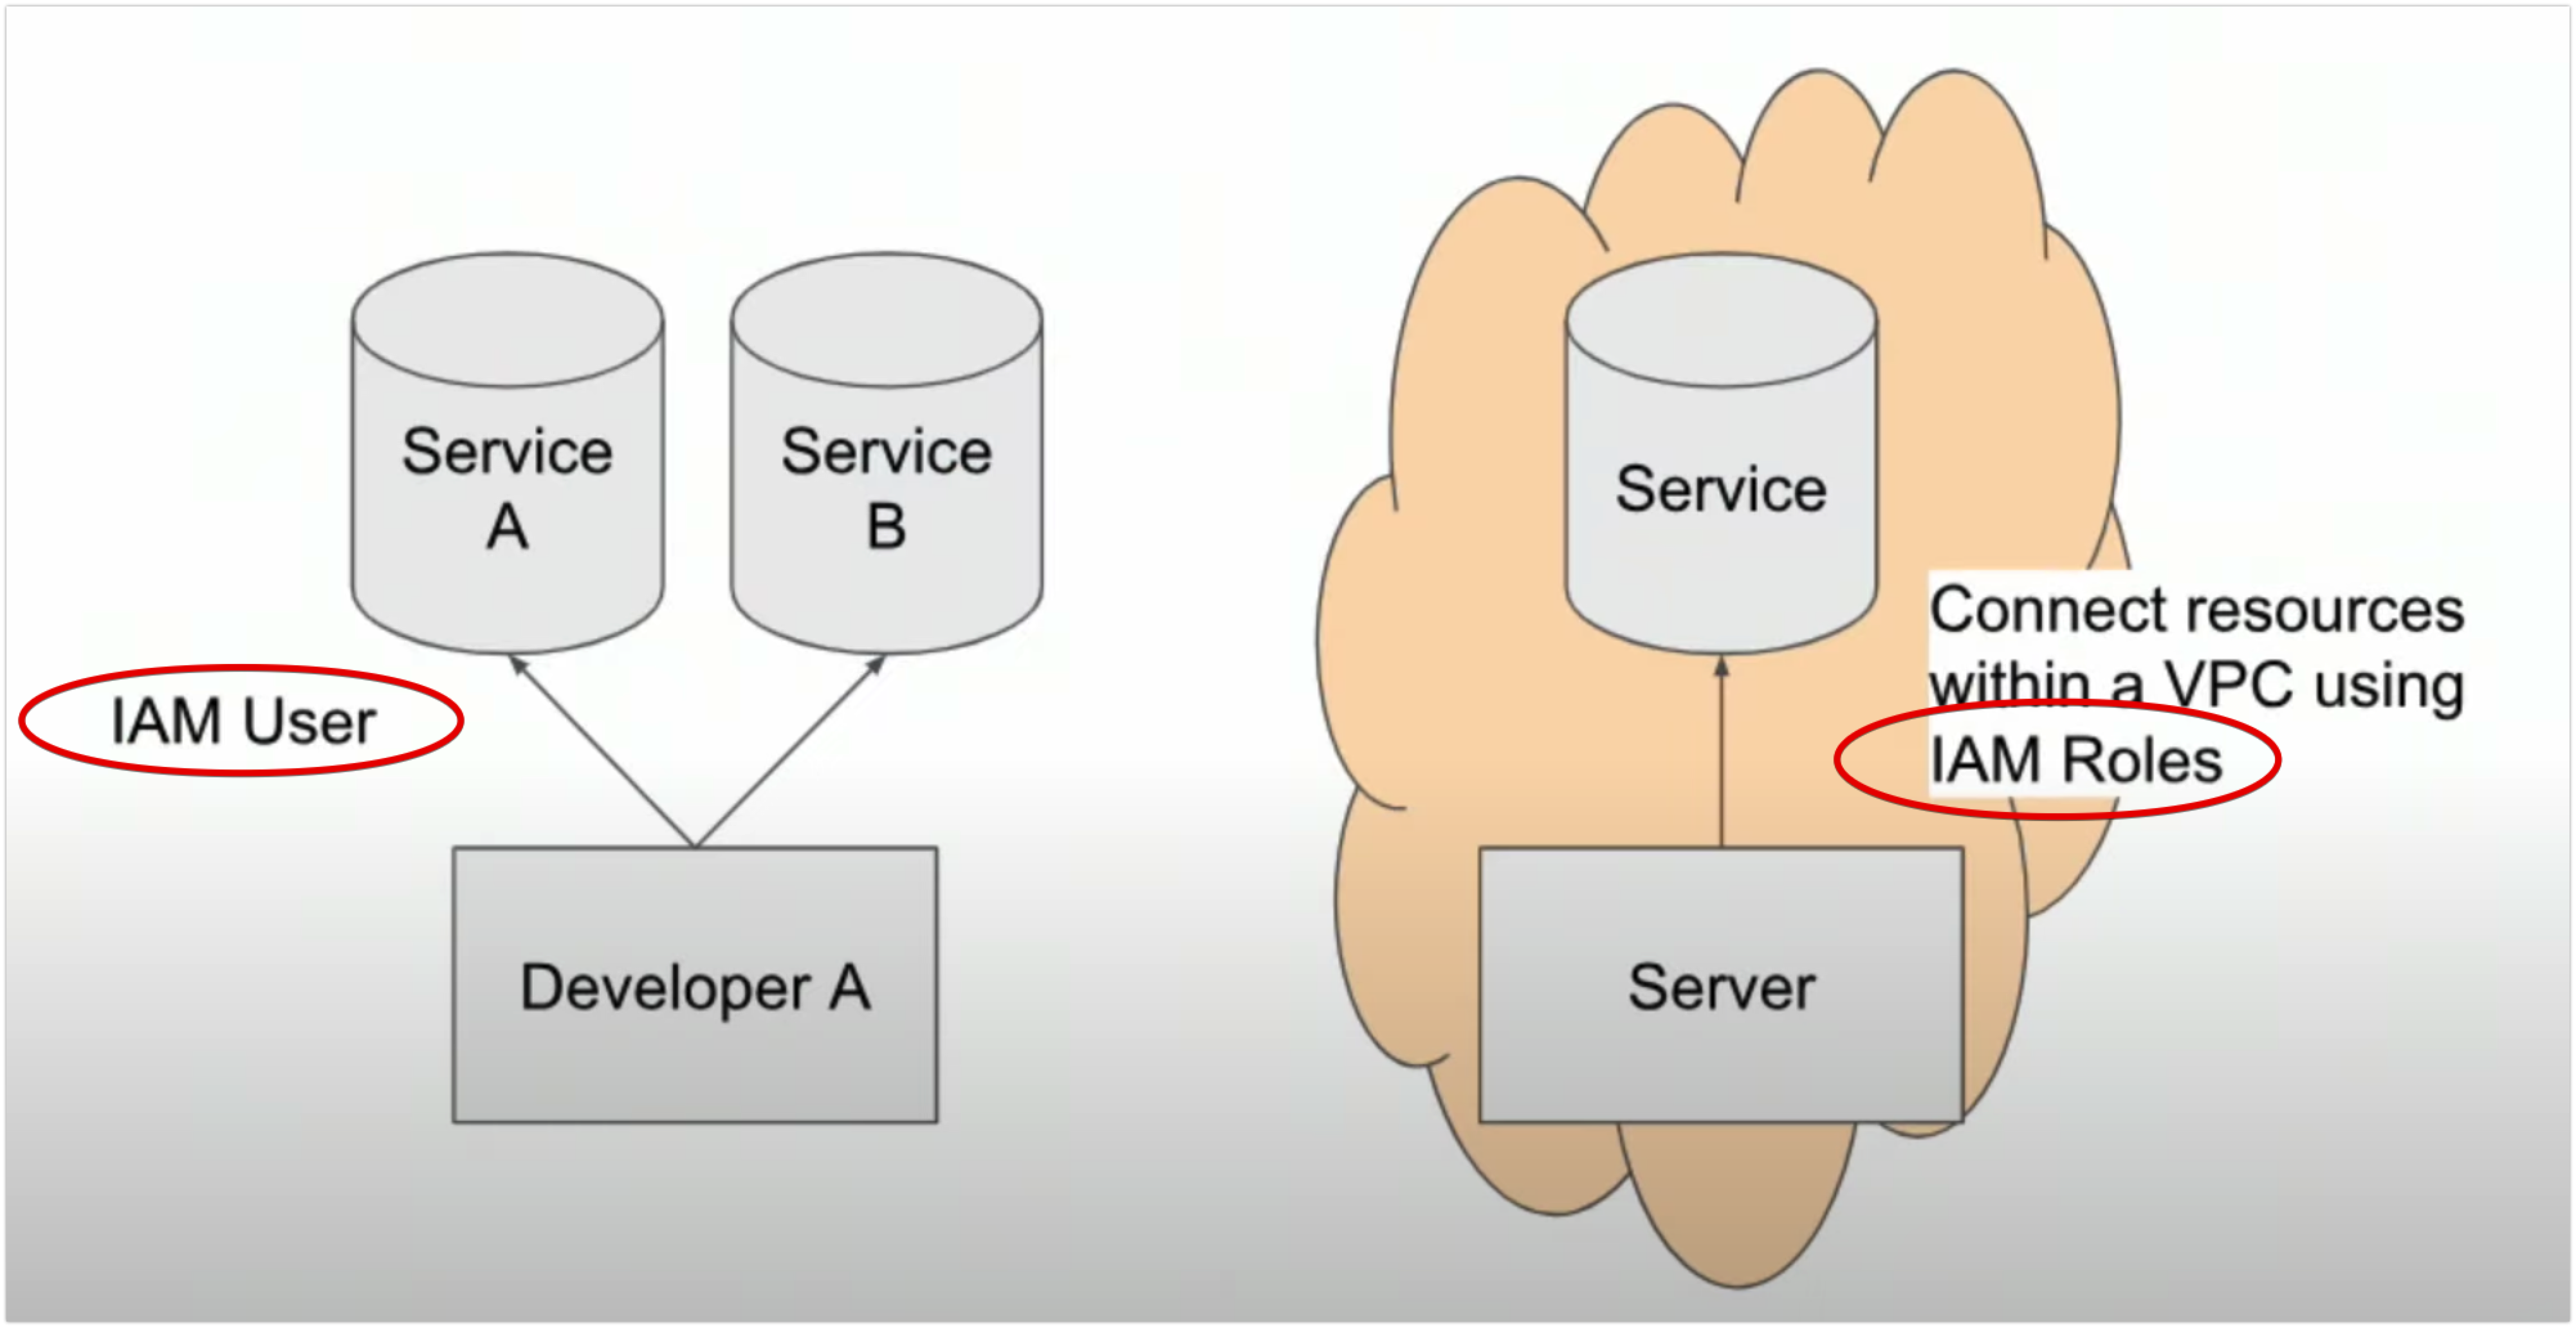
Identity & Access Management (IAM) is an AWS service that allows us to configure who can access our AWS account, services, or even applications running in our account. IAM is a global service and is automatically available across ALL regions.
-
Security Concepts
- User
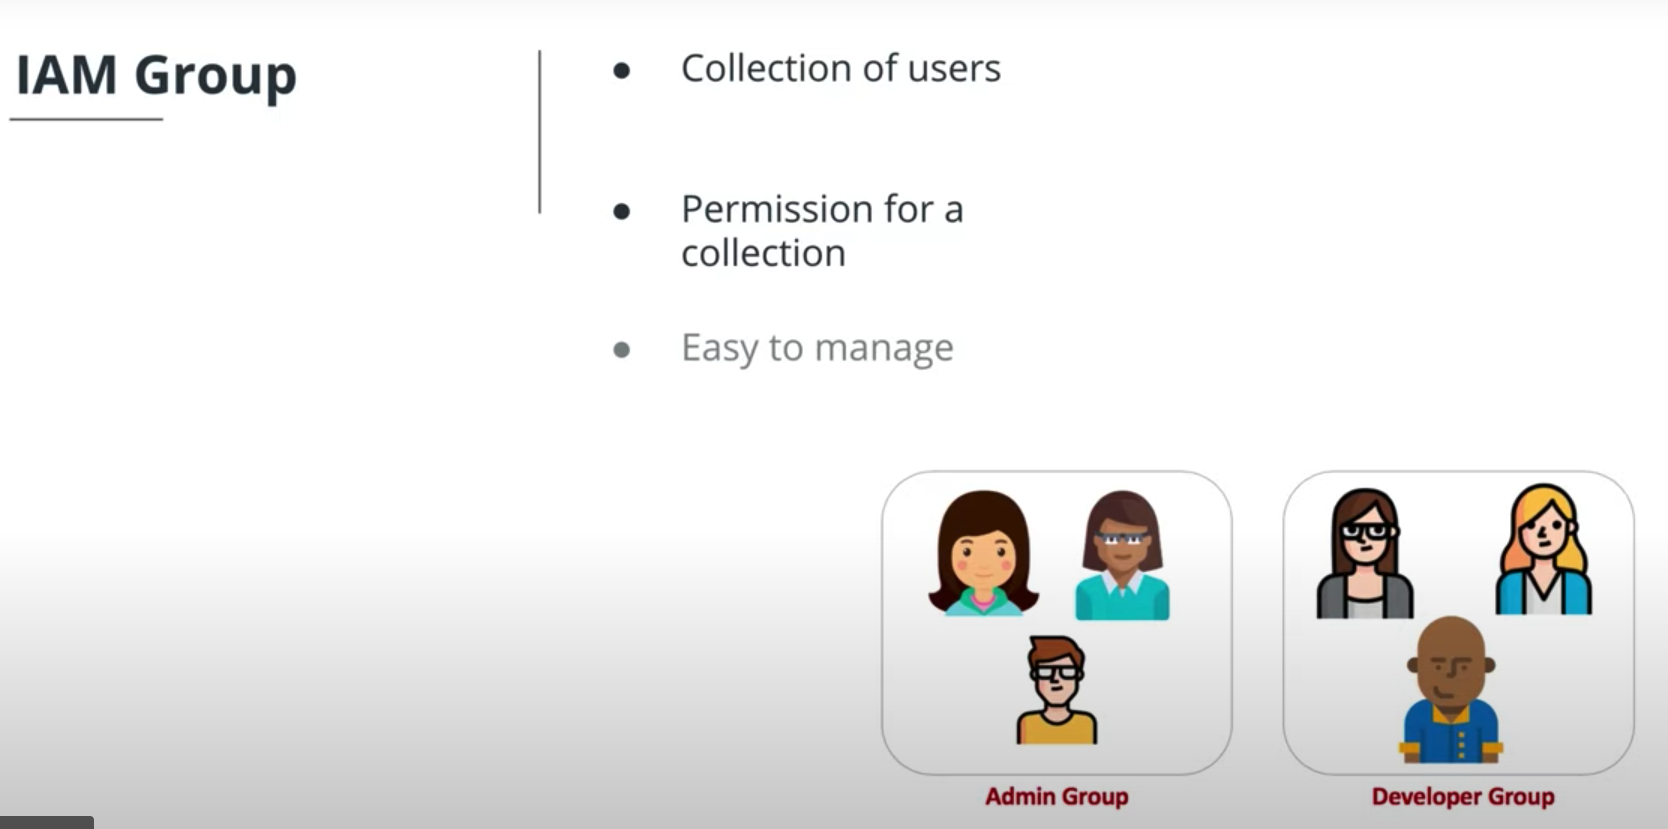
- IAM Group
- IAM Role
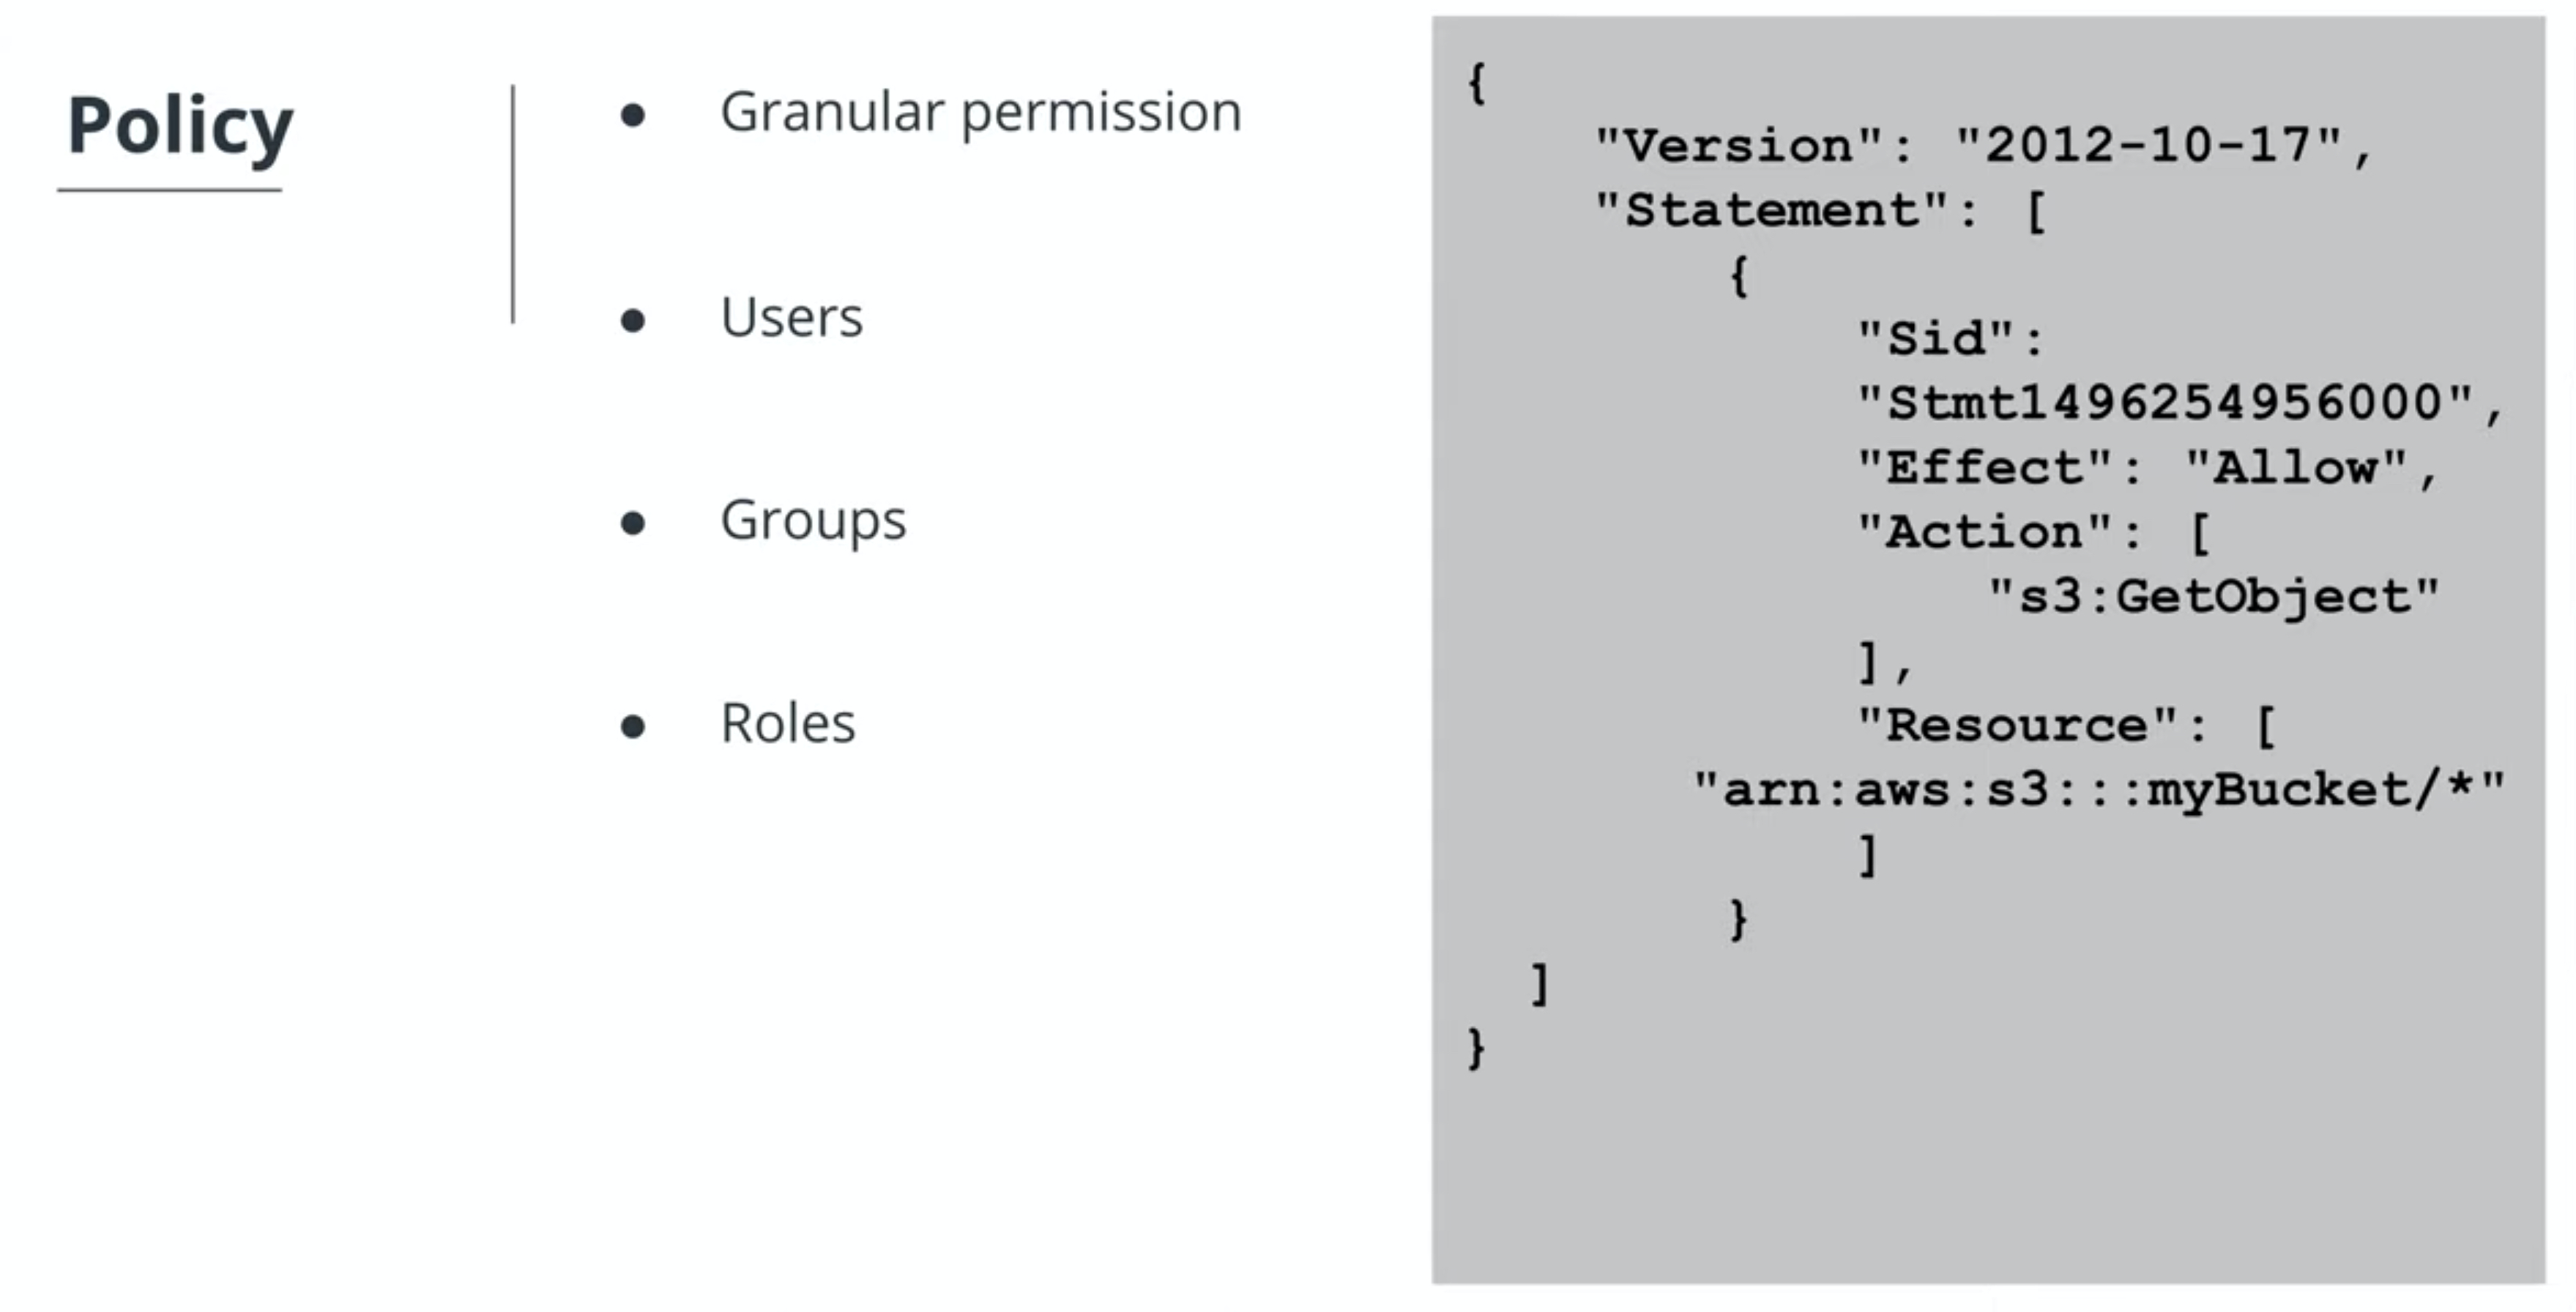
- Policy
- User
-
Resources


-
Networks reliably carry loads of data around the globe allowing for the delivery of content and applications with high availability. The network is the foundation of your infrastructure.
-
Cloud networking includes:
- network architecture
- network connectivity
- application delivery
- global performance
- delivery
- Amazon Route 53 Overview
- Route 53 is a cloud domain name system (DNS) service that has servers distributed around the globe used to translates human-readable names like www.google.com into the numeric IP addresses like 74.125.21.147.
- Features
- scales automatically to manage spikes in DNS queries
- allows you to register a domain name (or manage an existing)
- routes internet traffic to the resources for your domain
- checks the health of your resources
- Tips
- Route 53 is found under the Networking & Content Delivery section on the AWS Management Console.
- Route 53 allows you to route users based on the user’s geographic location.
-
One of the main benefits of the cloud is that it allows you to stop guessing about capacity when you need to run your applications. Sometimes you buy too much or you don't buy enough to support the running of your applications.
-
With elasticity, your servers, databases, and application resources can automatically scale up or scale down based on load.
-
EC2 Auto Scaling is a service that monitors your EC2 instances and automatically adjusts by adding or removing EC2 instances based on conditions you define in order to maintain application availability and provide peak performance to your users.
-
Features
- Automatically scale in and out based on needs.
- Included automatically with Amazon EC2.
- Automate how your Amazon EC2 instances are managed.
-
Tips
- EC2 Auto Scaling is found on the EC2 Dashboard.
- EC2 Auto Scaling adds instances only when needed, optimizing cost savings.
- EC2 predictive scaling removes the need for manual adjustment of auto scaling parameters over time.
-
Resources

- Elastic Load Balancing automatically distributes incoming application traffic across multiple servers.
- Elastic Load Balancer is a service that:
- Balances load between two or more servers
- Stands in front of a web server
- Provides redundancy and performance
- Tips
- Elastic Load Balancing can be found on the EC2 Dashbaoard.
- Elastic Load Balancing works with EC2 Instances, containers, IP addresses, and Lambda functions.
- You can configure Amazon EC2 instances to only accept traffic from a load balancer.
- There are often times that users of your applications need to be notified when certain events happen. Notifications, such as text messages or emails can be sent through services in the cloud. The use of the cloud offers benefits like lowered costs, increased storage, and flexibility.
- Amazon Simple Notification Service (or SNS) is a cloud service that allows you to send notifications to the users of your applications. SNS allows you to decouple the notification logic from being embedded in your applications and allows notifications to be published to a large number of subscribers.
- Features
- SNS uses a publish/subscribe model.
- SNS can publish messages to Amazon SQS queues, AWS Lambda functions, and HTTP/S webhooks.
- Tips
- SNS uses a publish/subscribe model.
- SNS can publish messages to Amazon SQS queues, AWS Lambda functions, and HTTP/S webhooks.
- Resources
- A queue is a data structure that holds requests called messages. Messages in a queue are commonly processed in order, first in, first out (or FIFO).
- Messaging queues improve:
- performance
- scalability
- user experience
- Amazon Simple Queue Service (SQS) is a fully managed message queuing service that allows you to integrate queuing functionality in your application. SQS offers two types of message queues: standard and FIFO.
- Features
- send messages
- store messages
- receive messages
- Tips
- The Simple Queue Service (SQS) is found under the Application Integration on the AWS Management Console.
- FIFO queues support up to 300 messages per second.
- FIFO queues guarantee the ordering of messages.
- Standard queues offer best-effort ordering but no guarantees.
- Standard queues deliver a message at least once, but occasionally more than one copy of a message is delivered.
- Resources
- Topics Covered:
- Create a topic
- Subscribe to a topic
- Publish a message to a topic PDF
- Enterprises are adopting container technology at an explosive rate. A container consists of everything an application needs to run: the application itself and its dependencies (e.g. libraries, utilities, configuration files), all bundled into one package.
- Each container is an independent component that can run on its own and be moved from environment to environment.
- We will be going more in-depth on the topic of Microservices in Course 4: Microservices at Scale using AWS & Kubernetes
- ECS is an orchestration service used for automating deployment, scaling, and managing of your containerized applications. ECS works well with Docker containers by:
- launching and stopping Docker containers
- scaling your applications
- querying the state of your applications
- Tips
- ECS is under the Compute section on the AWS Management Console.
- You can schedule long-running applications, services, and batch processeses using ECS.
- Docker is the only container platform supported by Amazon ECS.
- Resources
- Logging provides visibility into your cloud resources and applications. For applications that run in the cloud, you will need access to logging and auditing services to help you proactively monitor your resources and applications.
- Logging allows you to answer important questions like:
- How is this server performing?
- What is the current load on the server?
- What is the root cause of an application error that a user is seeing?
- What is the path that leads to this error?
- Cloud Trail allows you to audit (or review) everything that occurs in your AWS account. Cloud Trail does this by recording all the AWS API calls occurring in your account and delivering a log file to you.
- Features
- CloudTrail provides event history of your AWS account activity, including:
- who has logged in
- services that were accessed
- actions performed
- parameters for the actions
- responses returned
- This includes actions taken through the AWS Management Console, AWS SDKs, command line tools, and other AWS services.
- CloudTrail provides event history of your AWS account activity, including:
- Tips
- Cloud Trail is found under the Management & Governance section on the AWS Management Console.
- CloudTrail shows results for the last 90 days.
- You can create up to five trails in an AWS region.
- Resources
- Cloud Watch is a service that monitors resources and applications that run on AWS by collecting data in the form of logs, metrics, and events.
- There are several useful features:
- Collect and track metrics
- Collect and monitor log files
- Set alarms and create triggers to run your AWS resources
- React to changes in your AWS resources
- Tips
- CloudWatch is found under the Management & Governance section on the AWS Management Console.
- Metrics are provided automatically for a number of AWS products and services.
- Resources
- Topics covered:
- Create Cloud Watch event to react to the creation of an Amazon EC2 instance
- Send SNS notification via Cloud Watch when an event occurs.
- Infrastructure as Code allows you to describe and provision all the infrastructure resources in your cloud environment. You can stand up servers, databases, runtime parameters, resources, etc. based on scripts that you write. Infrastructure as Code is a time-saving feature because it allows you to provision (or stand up) resources in a reproducible way.
- wikipedia
- AWS Cloud Formation allows you to model your entire infrastructure in a text file template allowing you to provision AWS resources based on the scripts you write.
- Tips
- Cloud Formation is found under the Management & Governance section on the AWS Management Console.
- Cloud Formation templates are written using JSON or YAML.
- You can still individually manage AWS resources that are part of a CloudFormation stack.
- Resources
- Topics Covered
- Create a CloudFormation stack using the CloudFormation Designer
- Launch S3 bucket using Infrastructure as Code
- Save and deploy a CloudFormation stack
- View resources created through CloudFormation
- The AWS CLI (or Command Line Interface) allows you to access and control services running in your AWS account from the command line. To use the CLI, simply download, install, and configure it.
- Tips
- The AWS CLI allows you to work with AWS services in a programmatic manner
- Resources
-
The cloud is perfect for hosting static websites that only include HTML, CSS, and JavaScript files that require no server-side processing. In this project, you will deploy a static website to AWS.
-
Steps
- You will create a S3 bucket and upload the website files to your bucket.
- You will configure the bucket for website hosting and secure it using IAM policies.
- You will speed up content delivery using AWS’ content distribution network service, CloudFront.
- You will access your website in a browser using the unique CloudFront endpoint.
-
Topics Covered
- S3 bucket creation
- S3 bucket configuration
- Website distribution via CloudFront
- Access website via web browser
-
Dependencies
- Cloud Services
- Amazon Web Services S3 - Resource hosting and deployments
- AWS CloudFront - CDN for SPA
- AWS EKS - Backend API
- AWS DynamoDB - Persistent Datastore
- AWS Cognito - User Authentication
- Performance Tracking and DevOps Tools
- AWS CloudWatch - Performance and Health checks
- Sentry - Bug Reporting
- Alternates:
- TBD
- Google Analytics - Usage Reporting
- Alternates:
- Mixpanel
- Travis (CI/CD)
- Frameworks:
- Ionic (Javascript) (Frontend)
- Node.js (Javascript) (Backend)
- Cloud Services
- Create S3
- Upload content
- Secure Bucket via IAM
- Configure S3 Bucket
- Distribute Website via CloudFront
- Access Website in Web Browser
- Key Terminology
Data: we store digital data as bytes on physical media like hard drives, but in the cloud, we use systems to simplify this for us.Filestore or Filesystem: A system to save, archive, and recall specific documents and media. Usually, a file store offers low cost per unit space optimized for larger files.Database: A system to save and organize complex data models. They often use more advanced data structures to index and organize data for faster lookup time. Databases are compelling solutions for data models that have complicated relationships.Compute: any computer operation requires some computation on a CPU (central processing unit).Server: A specialized computer for cloud and web services.Instance: A computational unit which may be a physical server or a virtual server that is abstracted by a cloud service.Cluster: A collection of instances which perform the same function. It may be used to distribute workloads.Autoscaling Group: A type of cluster that can increase or decrease the number of instances based on demand.
-
Loosely coupled systems are recommended over monolithic systems, as they reduce technical debt.
-
Technical Debt
The cost (in time and resources) of additional code rework caused by choosing an easy solution now instead of using a better approach that would take longer to implement. -
Microservices
Microservices are individual specialized systems (software deployed on specialized infrastructure) designed to accomplish a specific task. Specific tasks may include things like authentication, image processing, or data management.


- URL format.
- HTTP request format.
- HTTP status codes
-
Installing Node and NPM
This project depends on Nodejs and Node Package Manager (NPM). Before continuing, you must download and install Node (NPM is included) from https://nodejs.com/en/download. -
Installing Ionic Cli
The Ionic Command Line Interface is required to serve and build the frontend. Instructions for installing the CLI can be found in the Ionic Framework Docs. -
Installing Python3
Python is a powerful programming language used for anything from quick scripts through data science. We'll use Python for the final project and it is required for some development tools like the AWS CLI. Instructions to download and install Python for your OS can be found here: https://www.python.org/downloads/ -
Amazon Web Services (AWS)
-
Account Setup
We'll be provisioning cloud resources throughout the next few lessons. You'll need an AWS account to set up these resources. We'll be taking advantage of the free tier offerings so there should be no costs to set up the resources we'll be using. Create a new account here: https://portal.aws.amazon.com/billing/signup#/ -
AWS CLI
We'll interface with AWS using the Command Line Interface (CLI). Instructions to download and install the AWS CLI for your OS can be found here: https://docs.aws.amazon.com/cli/latest/userguide/cli-chap-install.html
-
-
Installing useful tools
-
Postbird -> https://github.com/paxa/postbird
Postbird is a useful client GUI (graphical user interface) to interact with our provisioned Postgres database. We can establish a remote connection and complete actions like viewing data and changing the schema (tables, columns, ect). -
Postman -> https://www.getpostman.com/downloads/ Postman is a useful tool to issue and save requests. Postman can create GET, PUT, POST, etc. requests complete with bodies. It can also be used to test endpoints automatically. We've included a collection in the starter code repository (./udacity-c2-restapi.postman_collection.json) which contains example requests.
-

- Only user noums and no verbs.
They should be plural and consistent. - APIs should be versioned
{{host}}/api/v0/cars/5 - List should be paginated to limit the amount of date sent
{{host}}/api/v0/cars/?ofset=50&limit=10 - All responses should be attempt to use status codes
- All responses should include data format
- i.e. application/json
- Error payloads should include
-
Introduction to Node
Node (aka NodeJs) is a powerful framework to build network applications using JavaScript (in our case using TypeScript) outside of browsers. It has an asynchronous concurrent model which releases the developer from many concerns involving threading and dead-locking.
Node is used as our server framework along with Express to handle web http requests and responses.
Node -> https://nodejs.org/en/
Express -> https://expressjs.com/insert%20link -
Introduction to TypeScript
Typescript is a flavor of JavaScript that forces hard typing on variables and methods. This prevents implementation errors like passing a string instead of a number. It compiles to pure JavaScript.
https://github.com/Microsoft/TypeScript -
Github link to basic server
- In this lesson, we'll be referencing a prewritten, simple server which uses Node/Express.
- The github link to clone and follow along is: https://github.com/grutt/udacity-c2-basic-server.
- Alternatively, you can clone the repo for the entire nanodegree cloud-developer and find the files for this course in the path https://github.com/udacity/cloud-developer/tree/master/course-02/exercises
-
Clone Repository
-
Installing project dependencies
- This project uses NPM to manage software dependencies. NPM Relies on the
package.jsonfile located in the root of this repository. - After cloning, open your terminal in the repo directory and run:
npm install
- This project uses NPM to manage software dependencies. NPM Relies on the
-
Understanding the Code
-
Running our server and making requests:
npm run dev
-
Unit Tests
Ensure our atomic functions and methods perform their tasks correctly or fail appropriately. We'll be playing with Mocha and Chai as our unit testing framework. We'll be covering the basics so checkout the docs!
https://mochajs.org/ -
Integration Tests
Integration Tests ensure every endpoint in our software package perform their tasks correctly, fails appropriately, and communicates with other systems in a predictable manner (so they integrate properly). We'll be playing with Postman as our integration testing framework. We'll be covering the basics so checkout the docs!

- RAM (Random Access Memory): Data can be accessed quickly, but is erased once the server restarts. It may be okay to use RAM when prototyping, and later replace it with a database.
- Hard Drive Disk: Data remains after server restarts, but is specific to that server (not shared across servers).
- Race Condition: When an application’s behavior is dependent on other uncontrollable events. This is an issue with storing data on disks or RAM of multiple servers.
- Relational Database: can store at scale, improve search runtime, and maintain relationships between data fields. We recommend using a database for storing data.
- Indexing Our Data for Better Recall
- NoSQL - Simple Key:Value Stores
- Relational Databases - Structured and Queryable Datastores
B-Tree: a generalization of a binary search tree, which stores sorted data, but can have more than 2 child nodes.
Bloom Filters: a data structure that is useful for determining if an item is probably in a data set, or definitely not in the data set. Bloom filters don’t actually store the data themselves.
primary key and foreign key: The primary consists of one or more column in a table that are unique to each record (each row). A foreign key in a table contains the primary key of another table.
Scaling out -> noSQL easier -> more instances
Scale up -> SQL database easier -> make computer bigger (more CPU, RAM,...)
-
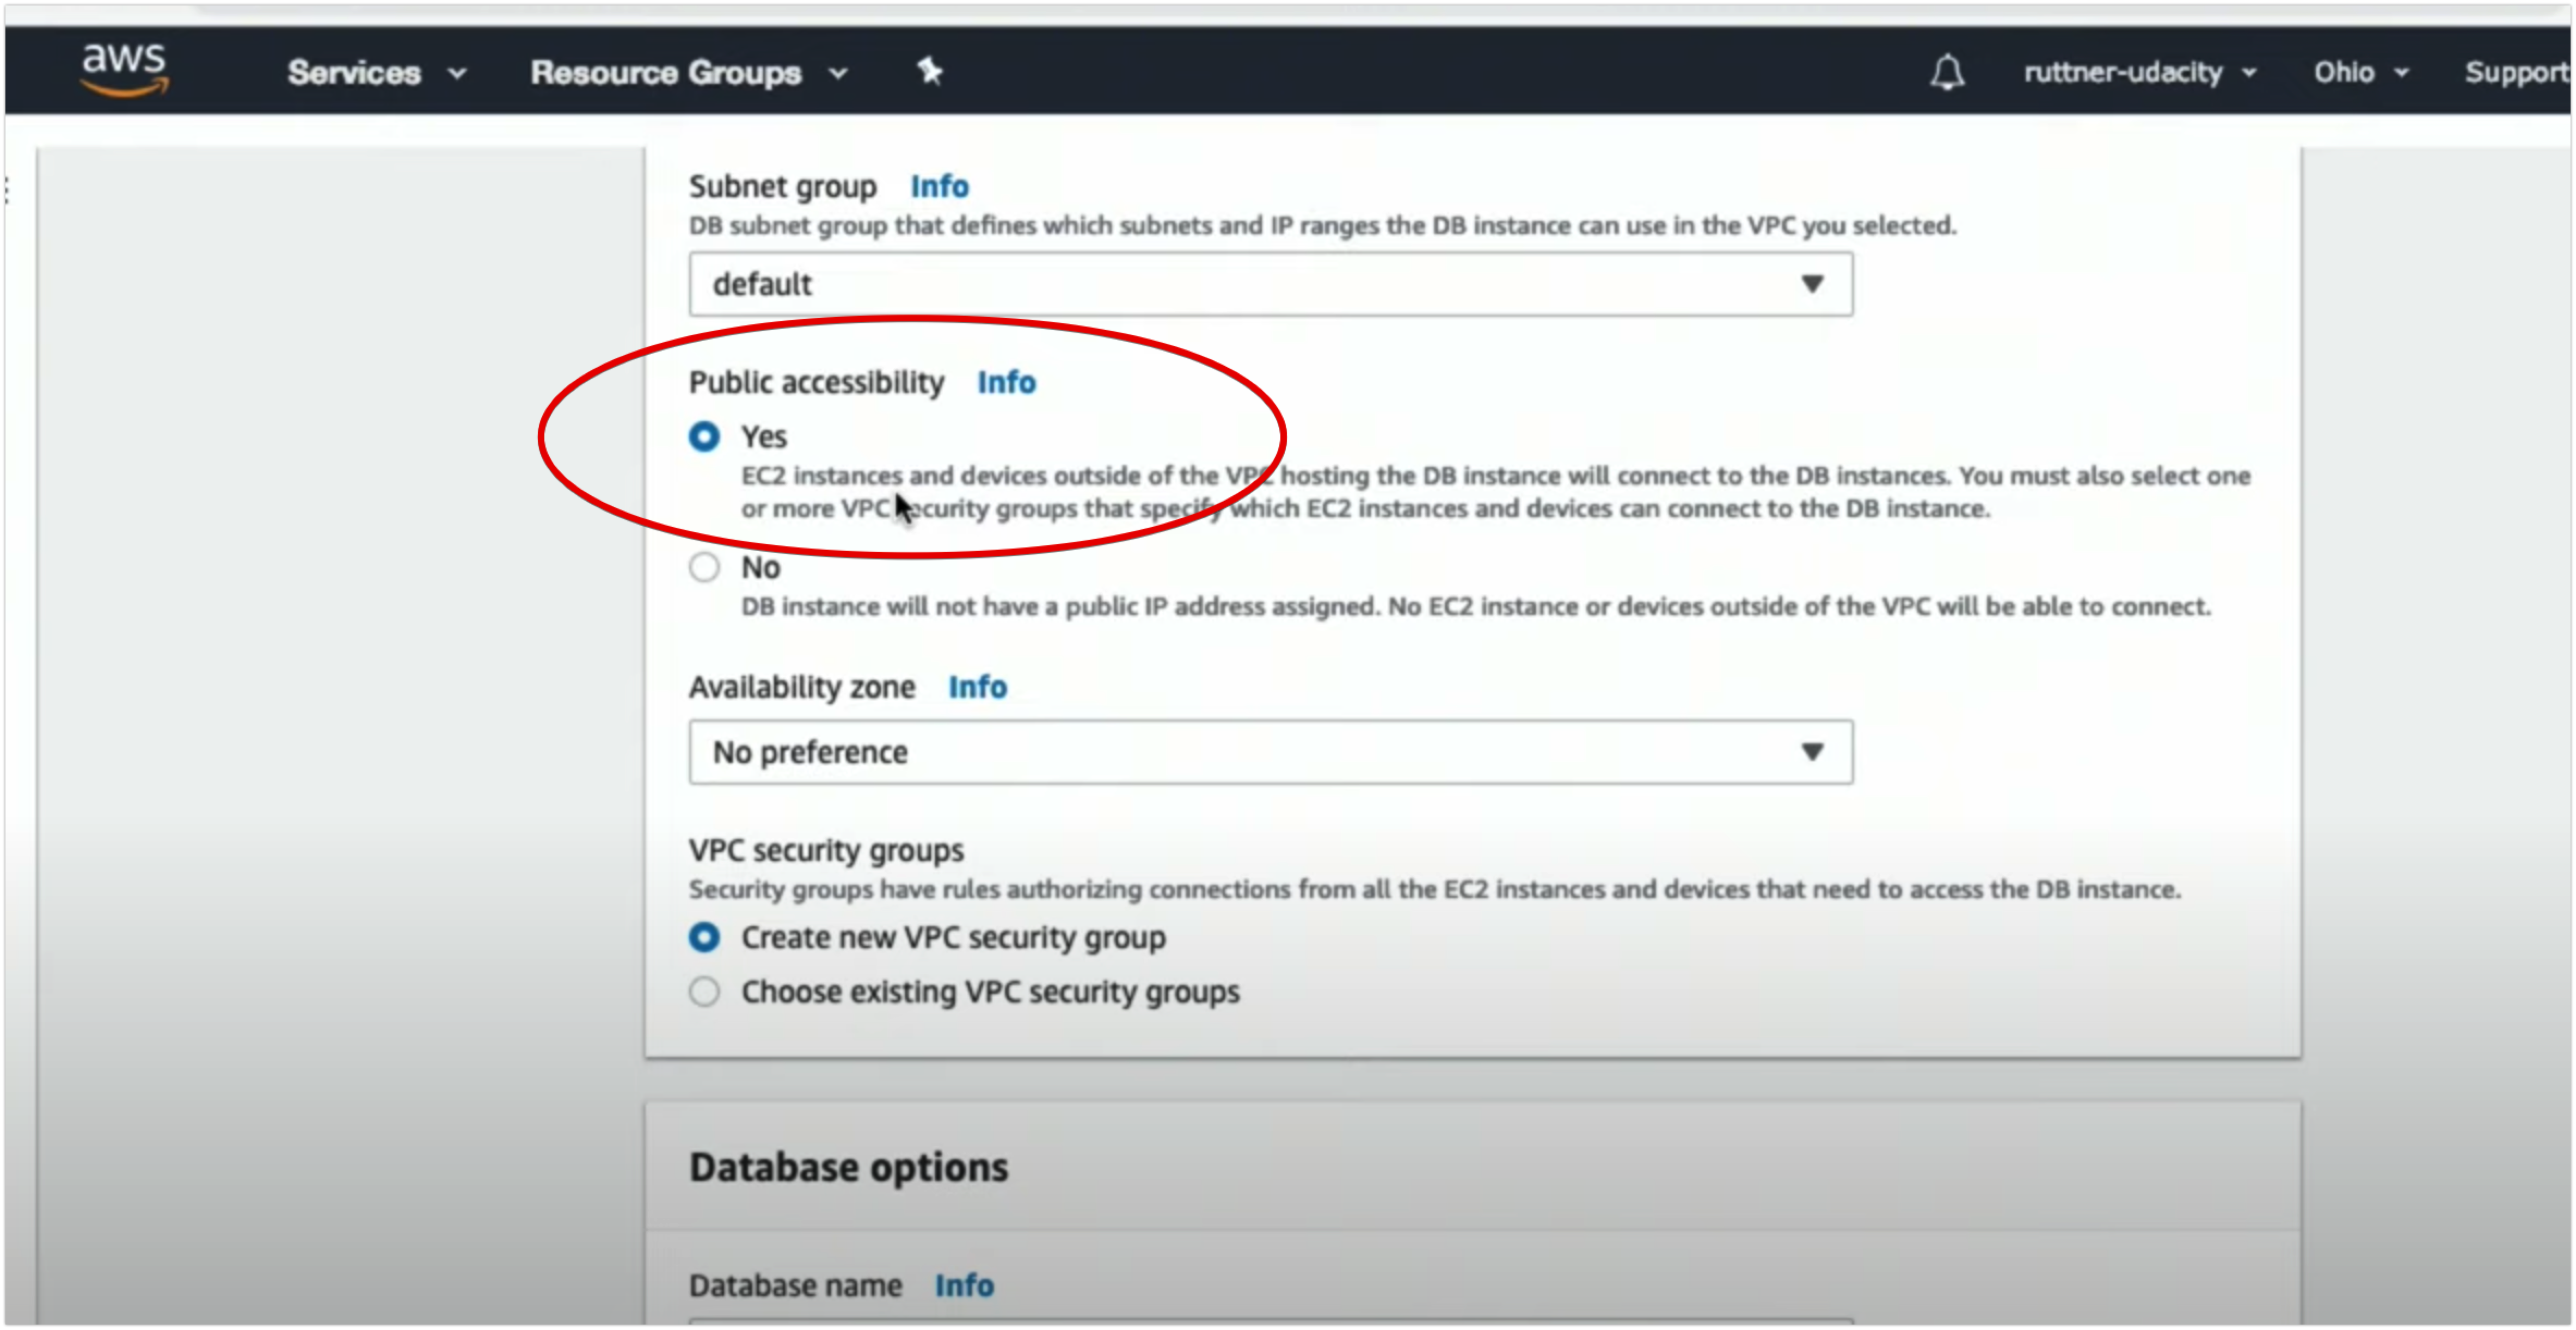
Configuring Amazon Web Services Relational Database Service
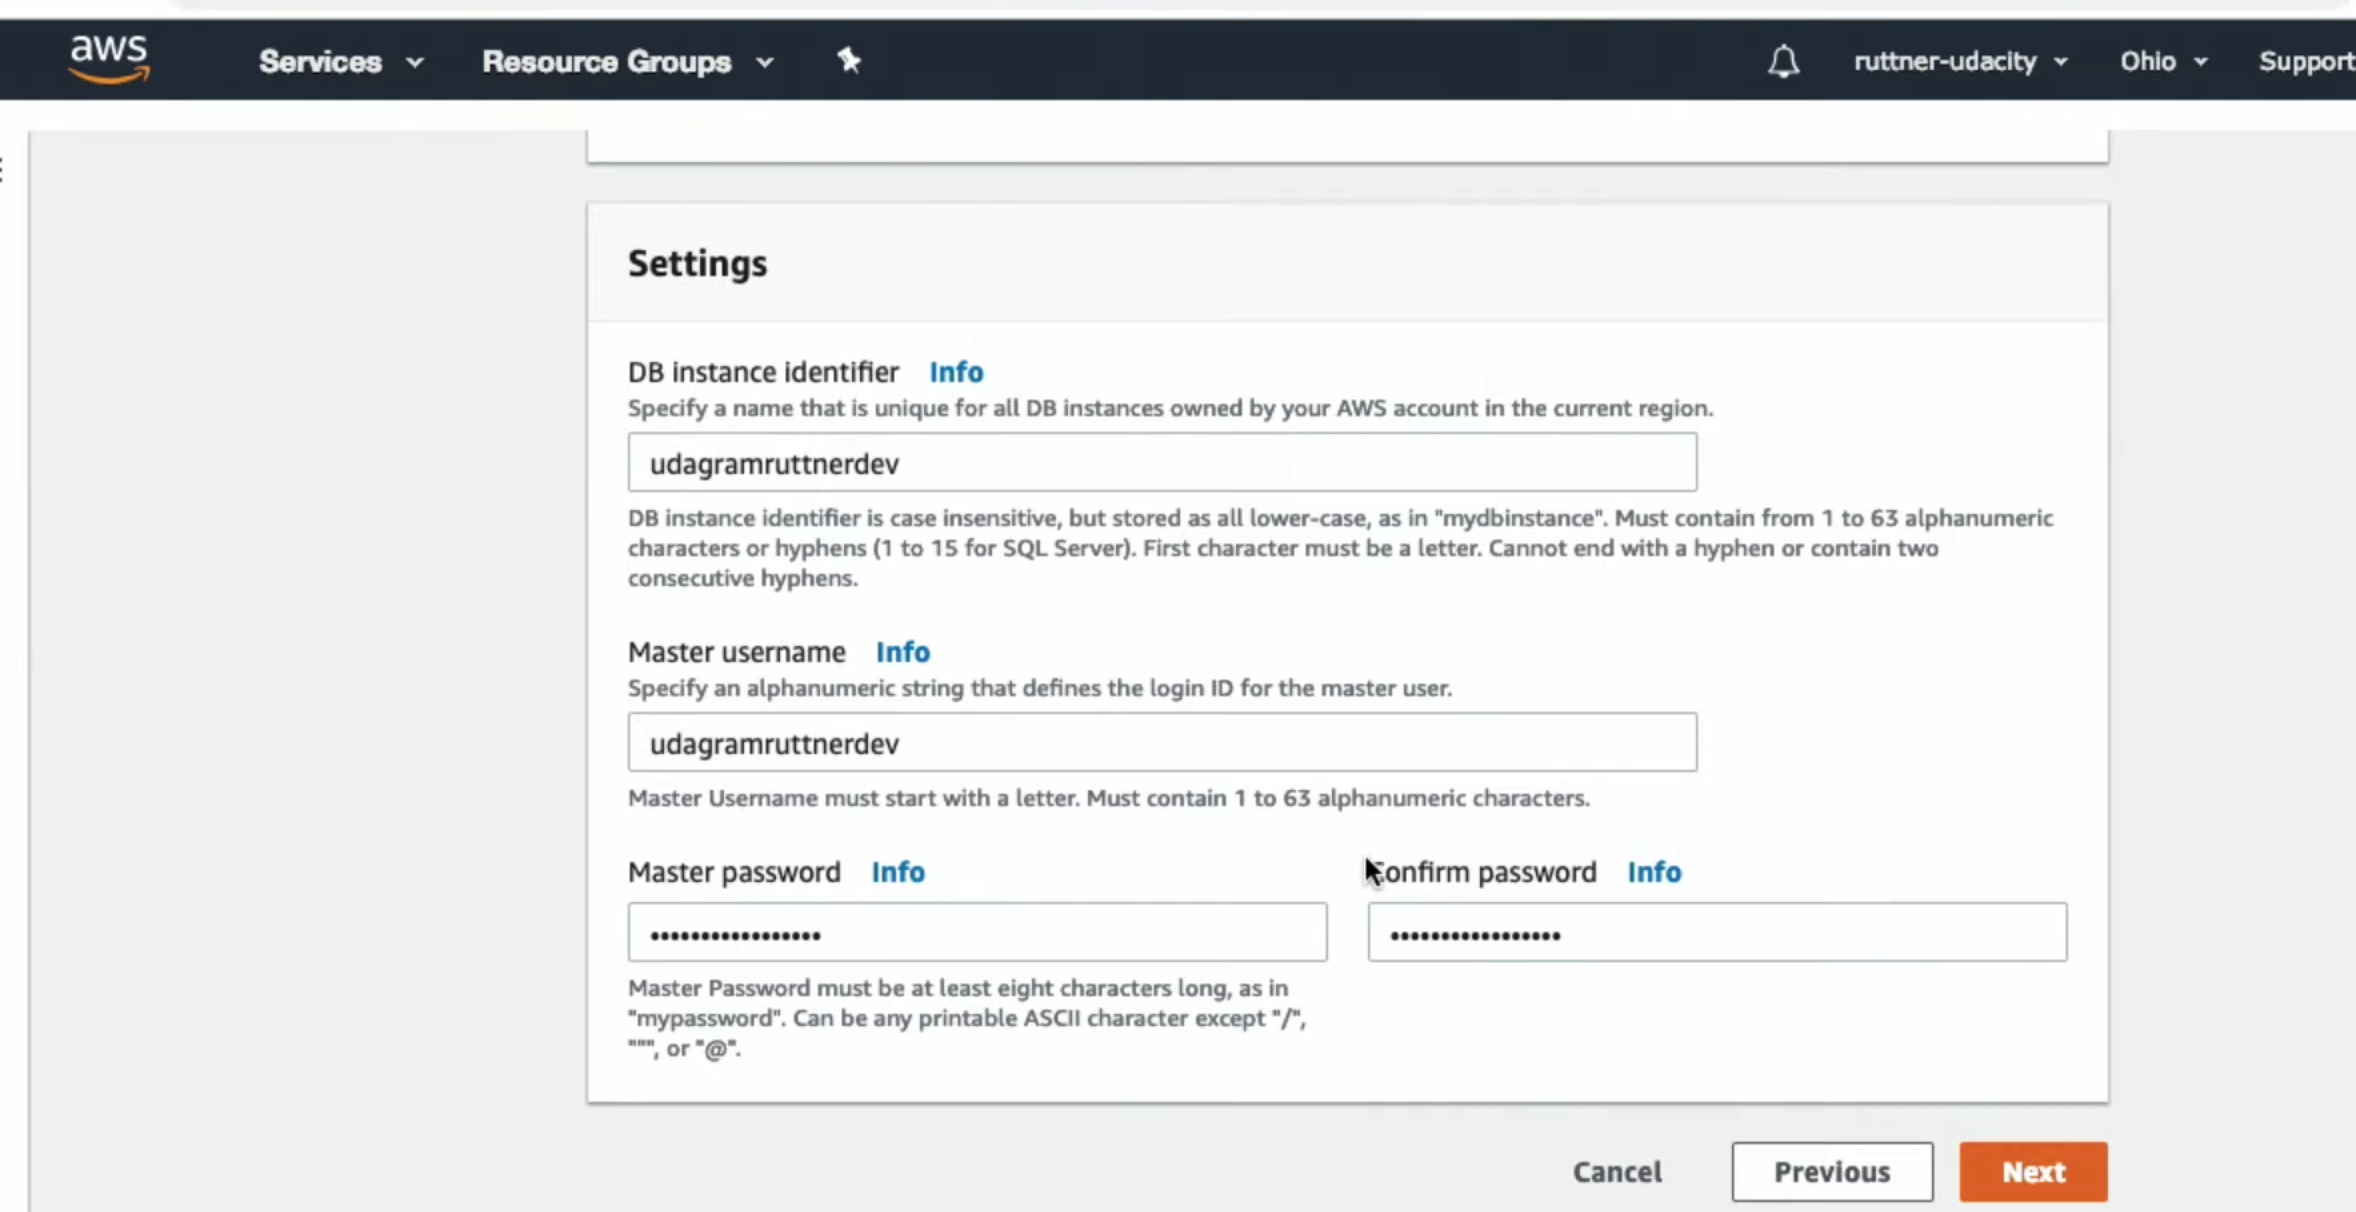
-
Allowing Public Traffic to RDS
-
Connecting to RDS with Postbird
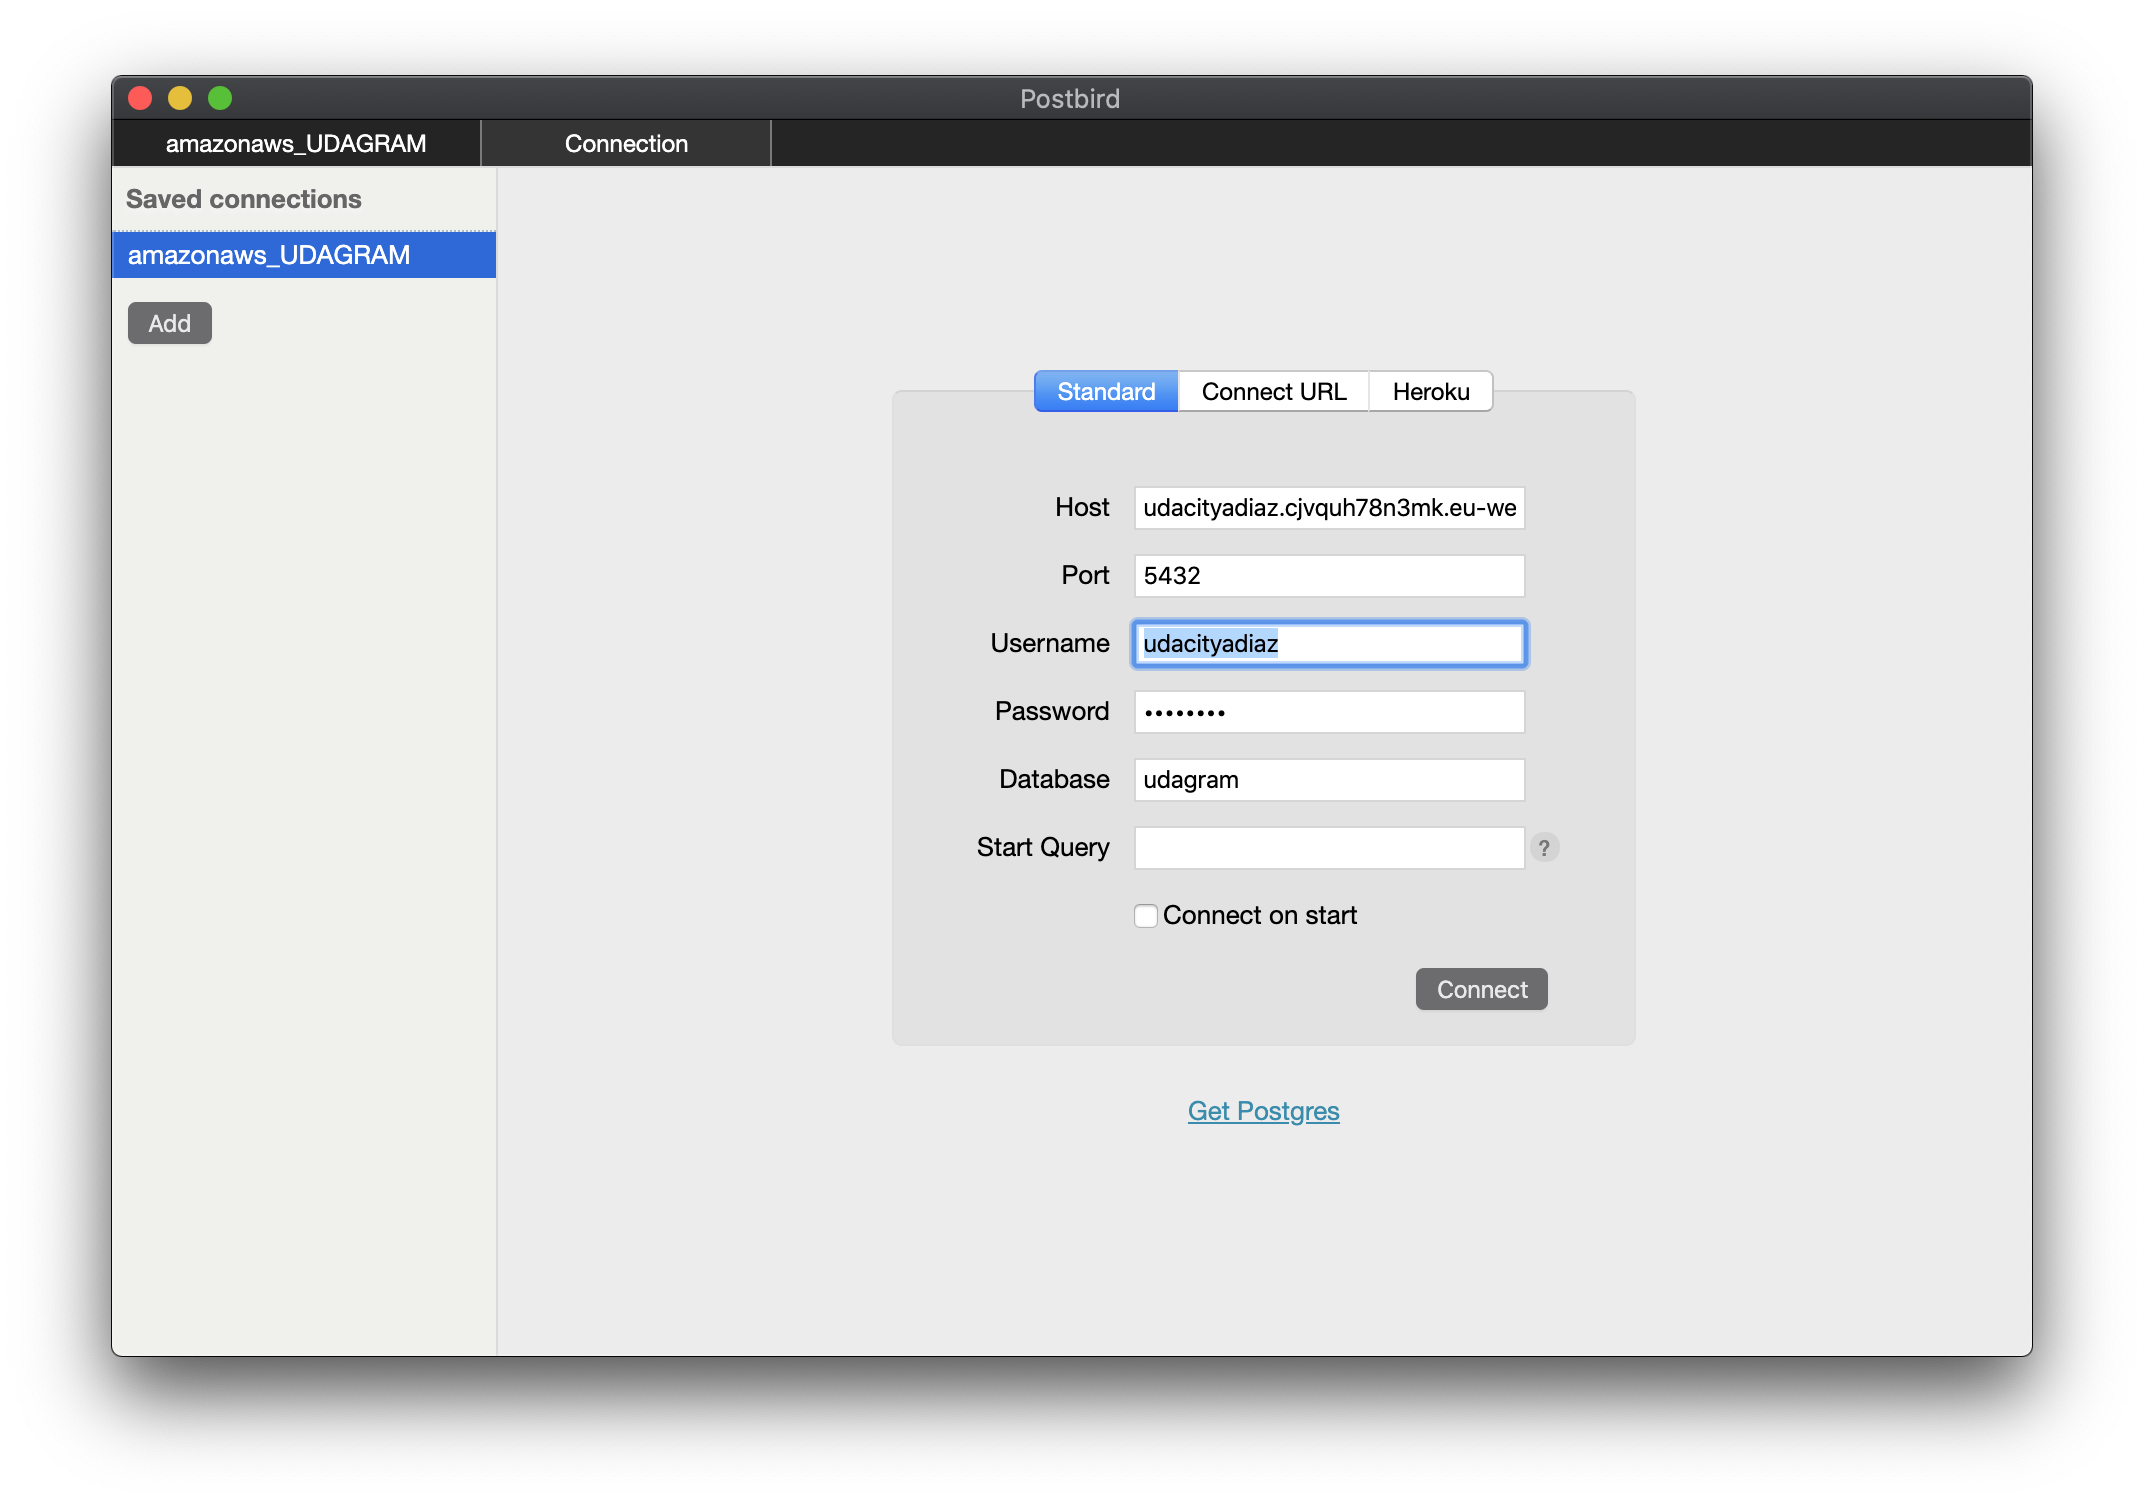
-
Creating Tables in RDS with Postbird
-
Making SQL Commands with Postbird


-
File stores allow for archiving data. In AWS, the file store is called
S3, and the archive resource is called “glacier”. -
Content Delivery Network (CDN): are a network of proxy servers that are placed closer to end users to deliver data and compute. CDNs reduce latency for end users. -
SignedURLsallow clients to send and receive data by directly communicating with the file store.
This saves the server from using its bandwidth to serve as the intermediary that transmits data to and from the client.
This is faster for clients as well. -
Buckets: a simple directory-like system in which to store data. -
Signed URL pattern


- Create “dev” resources: Use the “dev” set of infrastructure (set of servers, filestores, databases) for development, and a separate set of infrastructure for production.
- AES 256: Advanced Encryption Standard with a 256-bit key. This is a popular encryption standard.
- CORS: Cross Origin Resource Sharing: defines how a client can interact with a resource, and what the client can and cannot do with that resource. Setting the CORS policy of our S3 bucket allows our client to communicate with the S3 bucket using the SignedURL pattern.
Bucket CORS Policy
You'll need this policy to create a bucket where we can use the SignedURL pattern.
<?xml version="1.0" encoding="UTF-8"?>
<CORSConfiguration xmlns="http://s3.amazonaws.com/doc/2006-03-01/">
<CORSRule>
    <AllowedOrigin>*</AllowedOrigin>
    <AllowedMethod>POST</AllowedMethod>
    <AllowedMethod>GET</AllowedMethod>
    <AllowedMethod>PUT</AllowedMethod>
    <AllowedMethod>DELETE</AllowedMethod>
    <AllowedMethod>HEAD</AllowedMethod>
    <AllowedHeader>*</AllowedHeader>
</CORSRule>
</CORSConfiguration>-
All access should be revocable
-
What are permissions?
HIPAA(Health Insurance Portability and Accountability Act) is a law in the U.S that requires data privacy and security for medical information.- Use
environment variablesto store your username and password, to avoid hard-coding username and password information in your code. - Avoid committing your passwords to git. Use
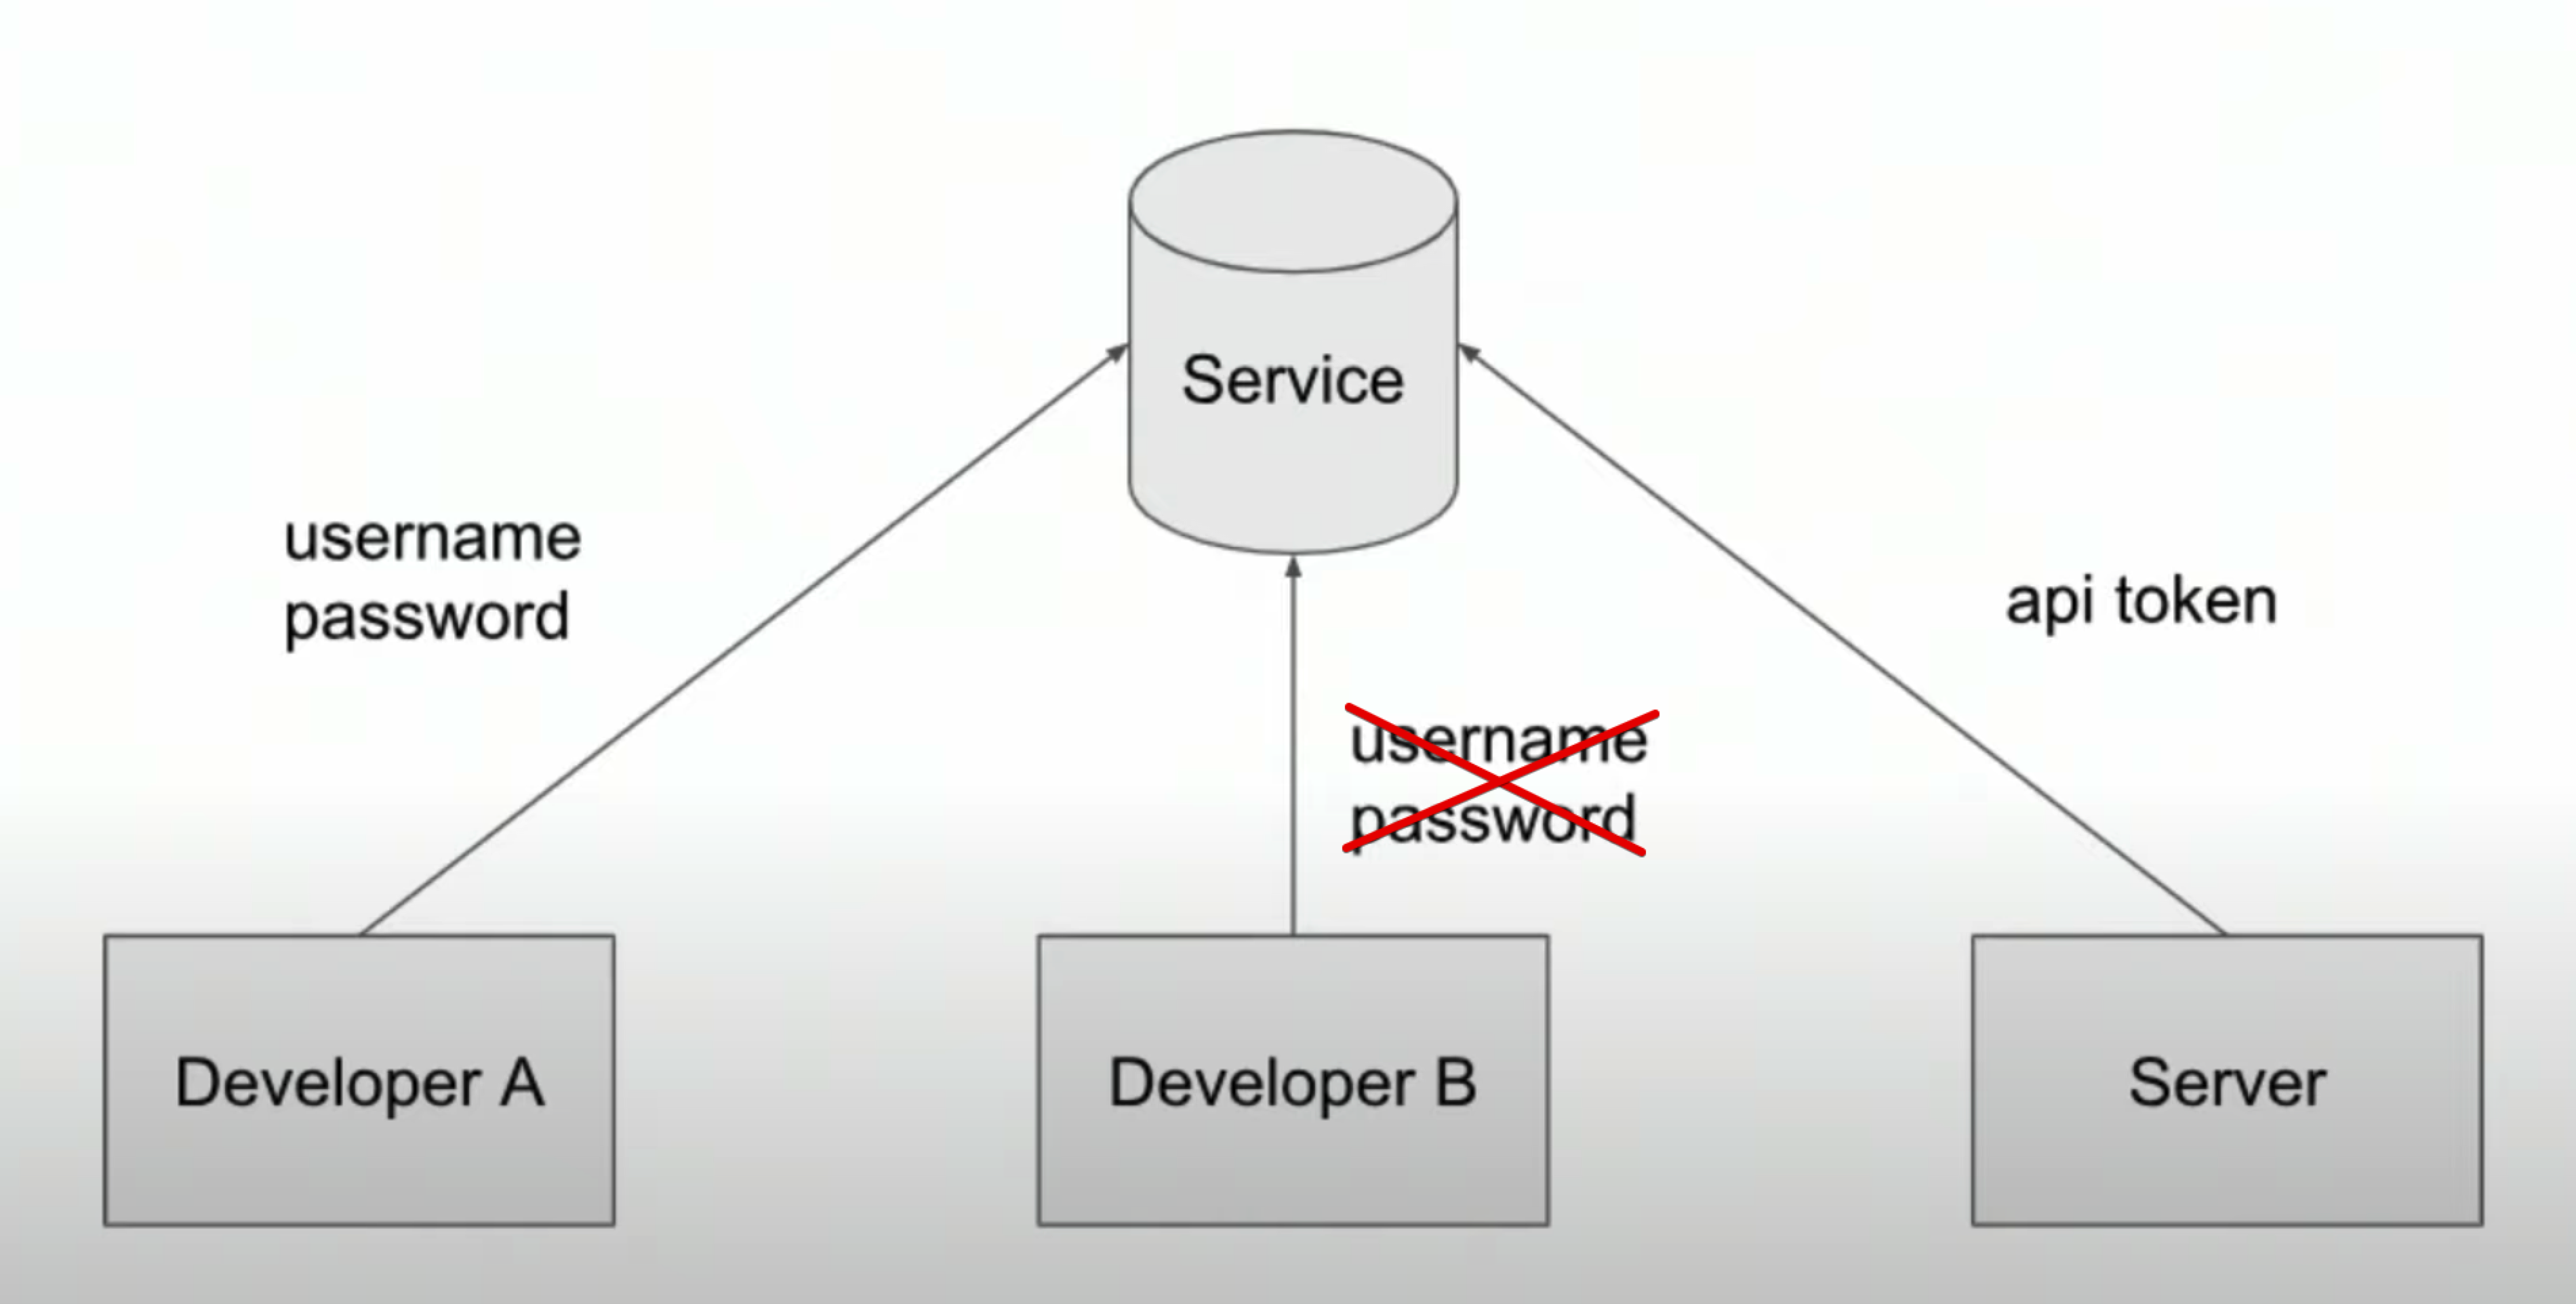
.gitignoreto define files that you do not want to commit to git. IAM user role: an IAM role can give a user a set of permissions to access one or more services.IAM service role: an IAM role gives a service a set of permissions to access one or more services.
-
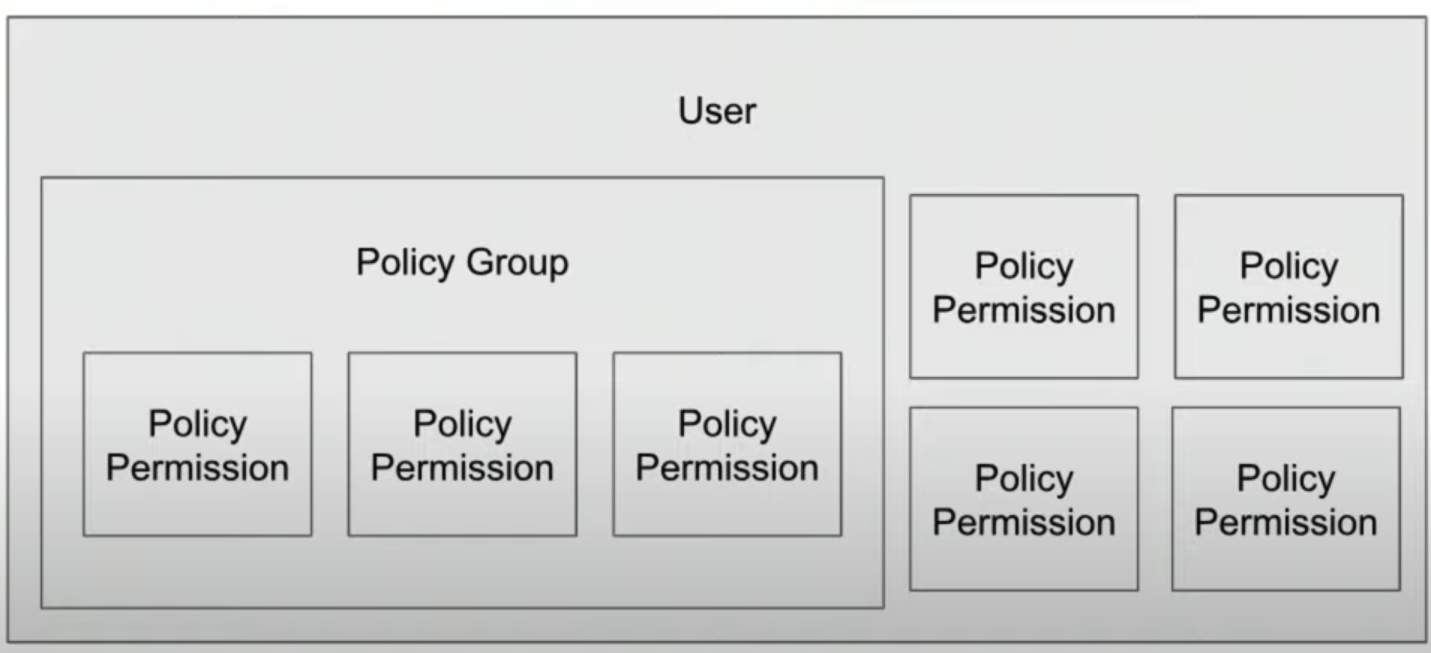
User IAM profiles on AWS- It’s beneficial to create a role that contains a policy group (a set of permissions), rather than to assign individual permissions to a specific user.
- Imagine if a user leaves the company and a new hire takes their place. Instead of re-assigning all the permissions needed for their job, we can assign the existing IAM role to that new employee.
-
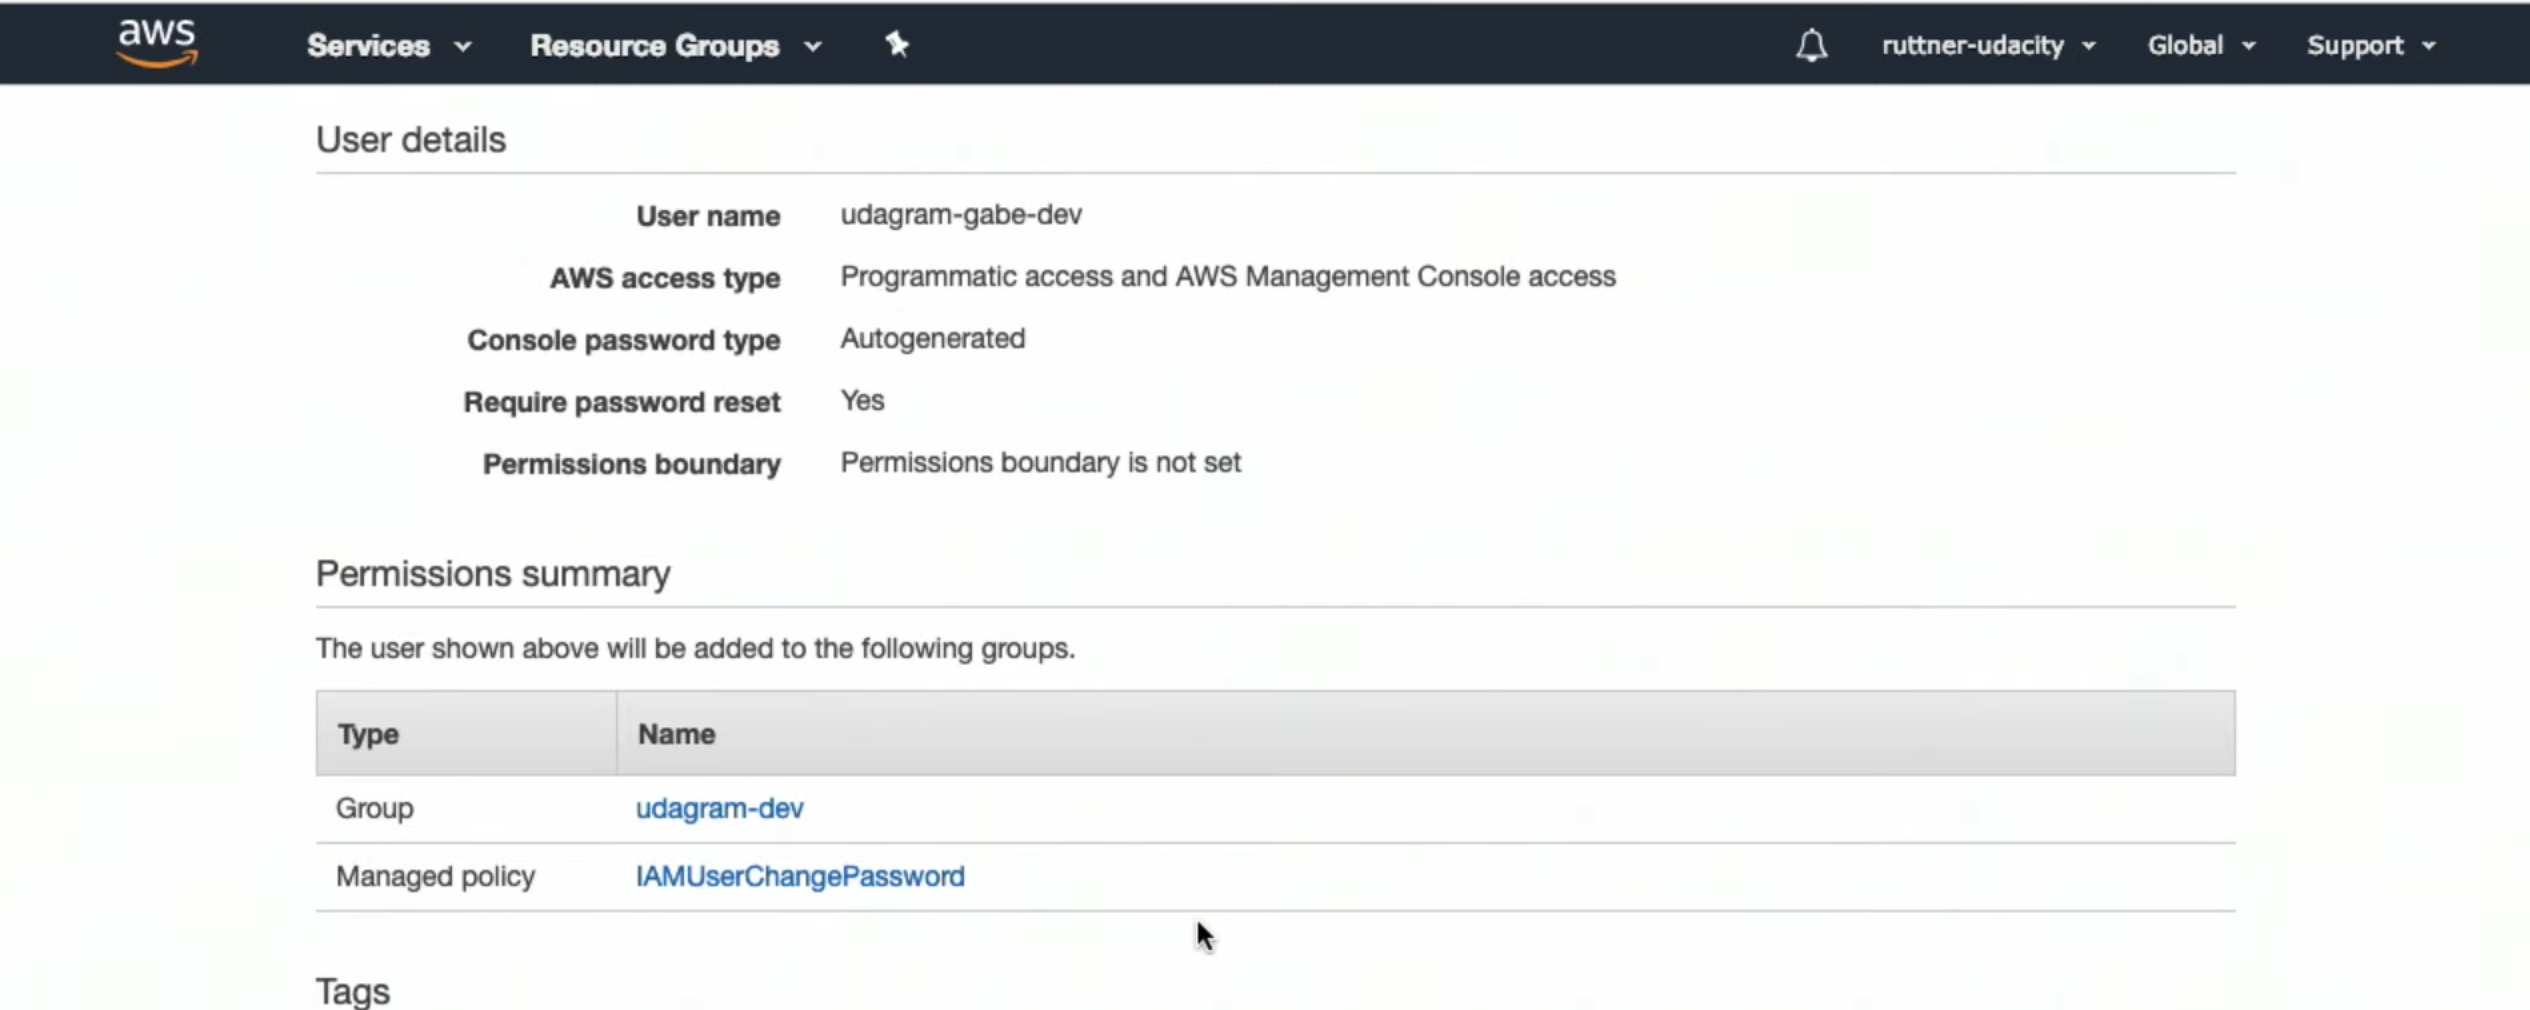
Creating User Profiles Using the AWS Console- Video
- Create user
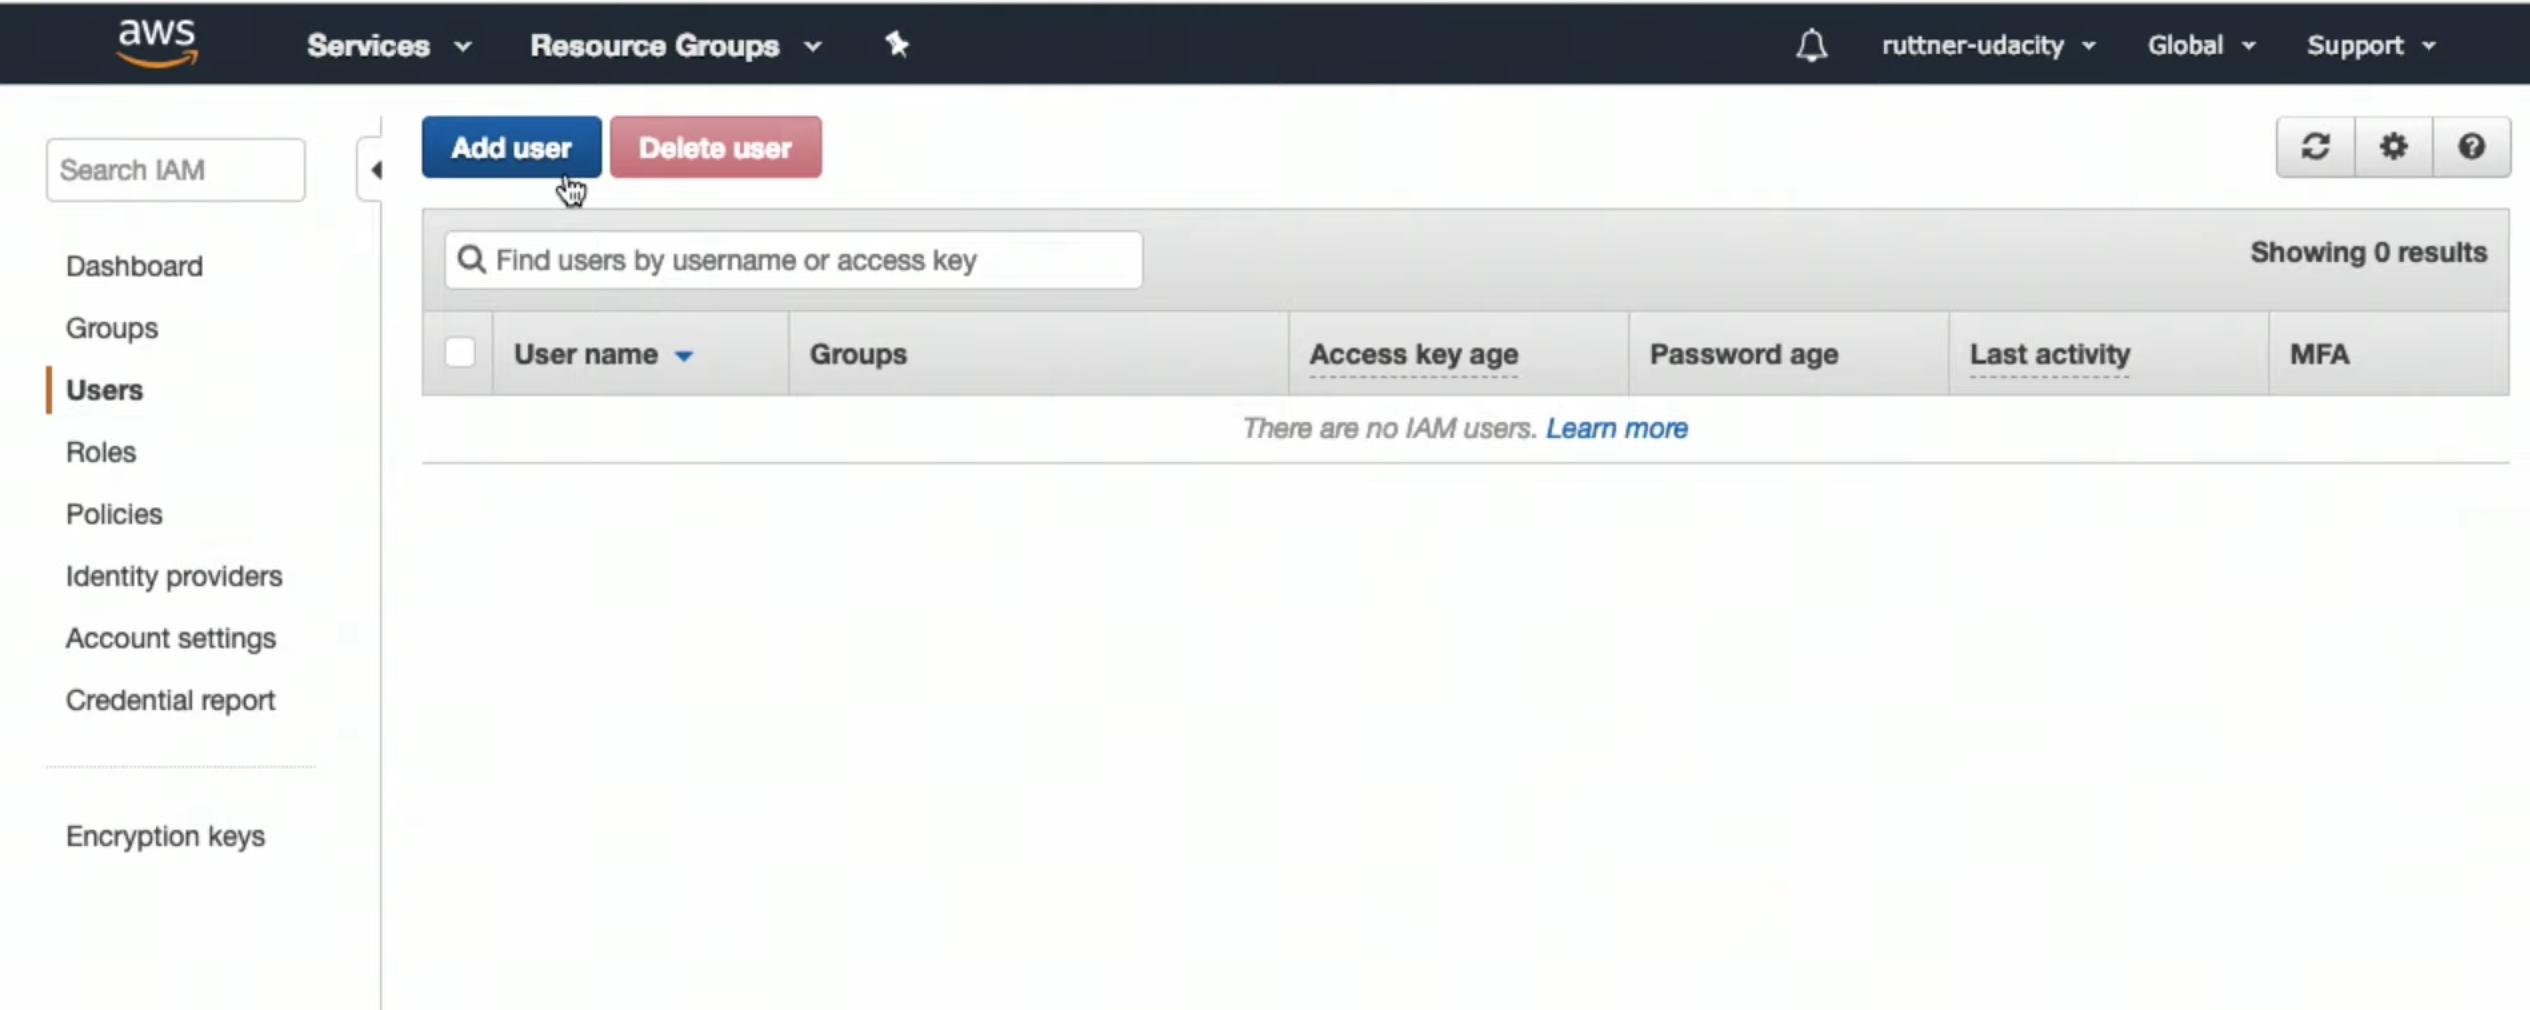
- Create group
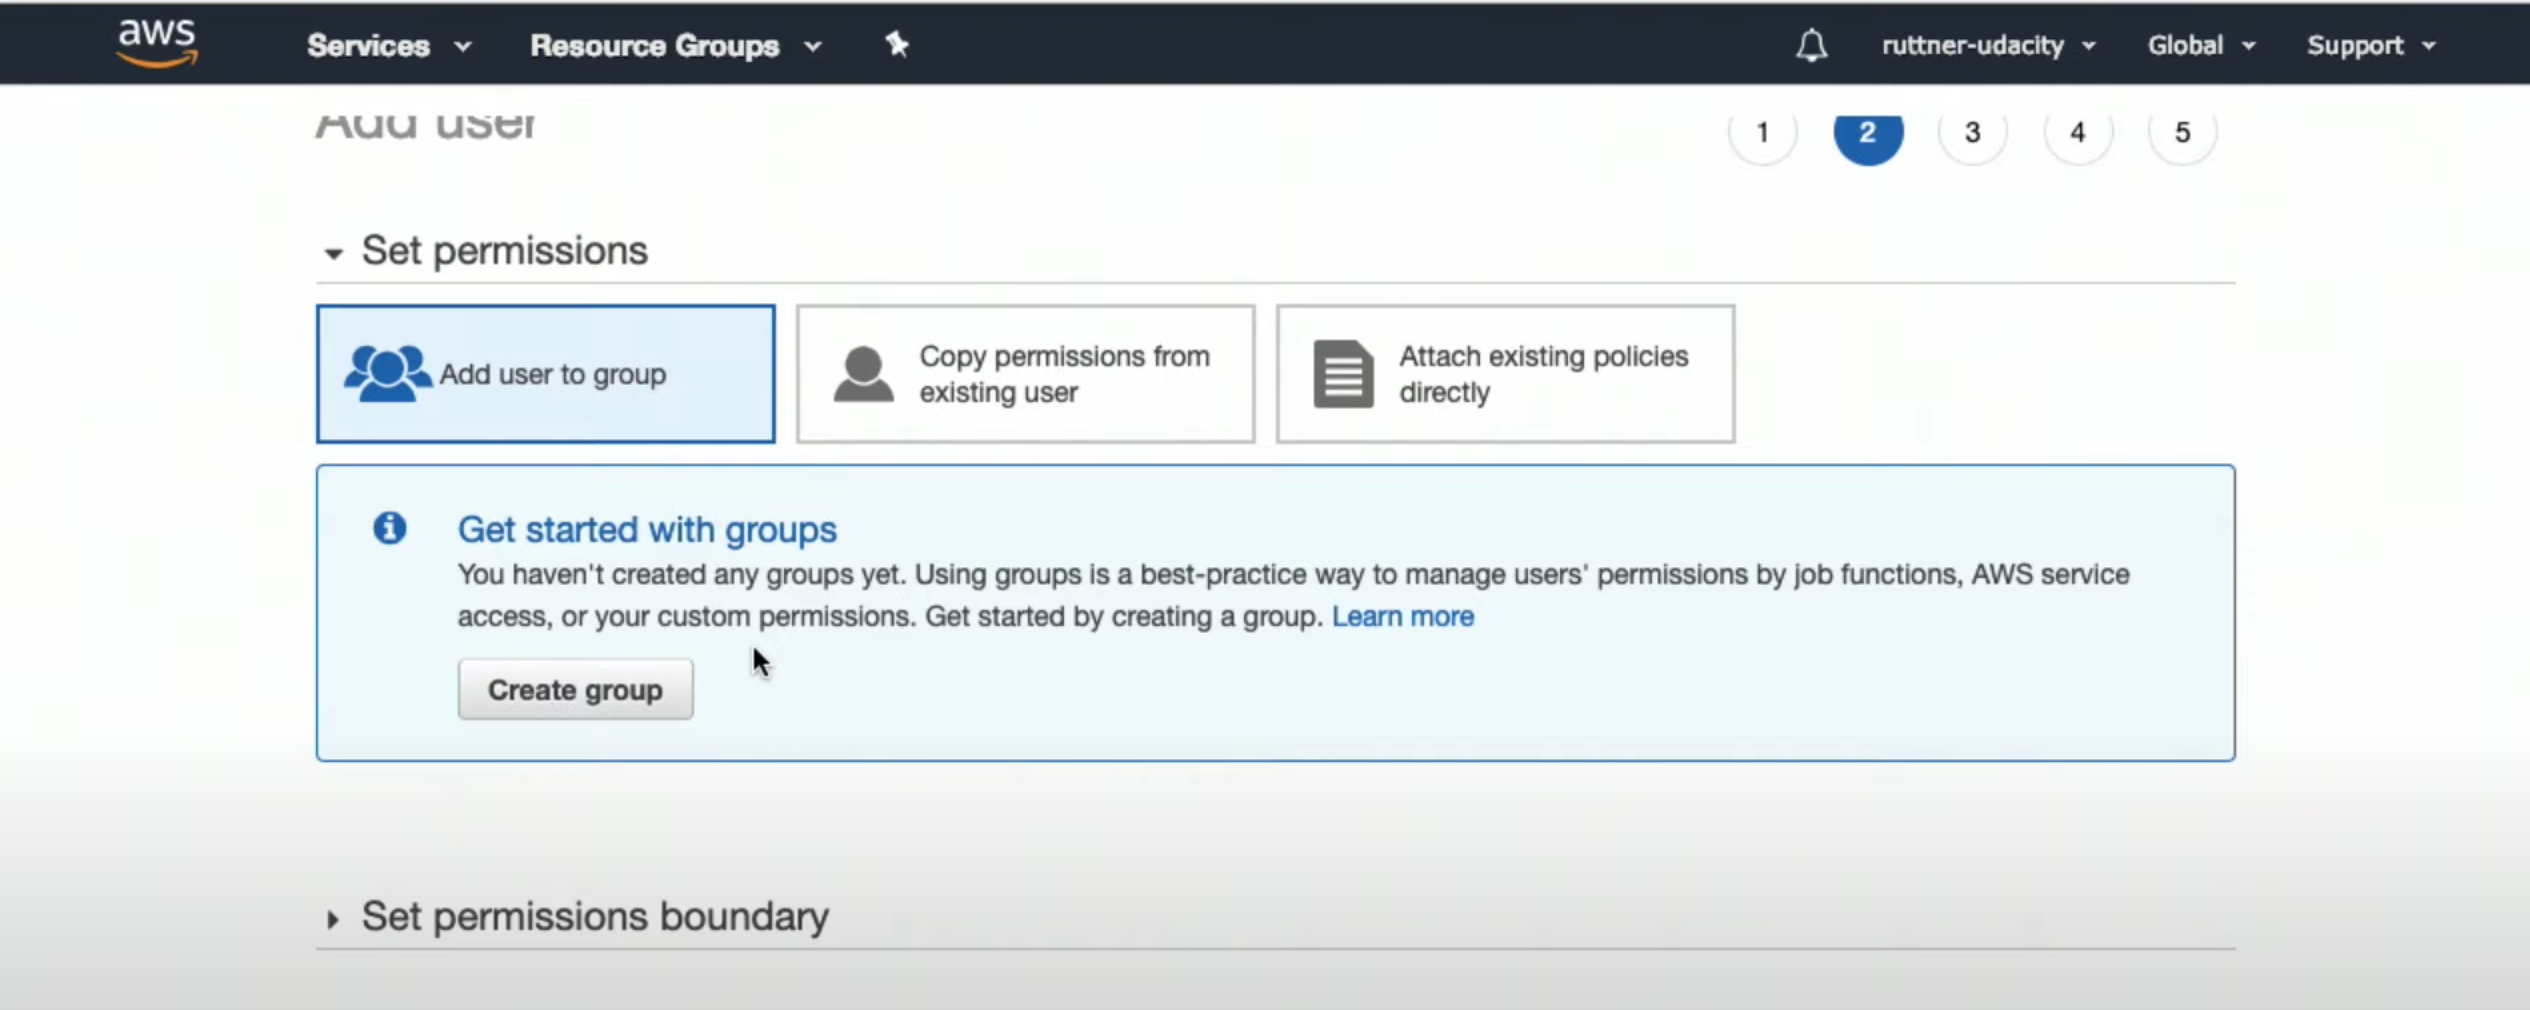
- Create policy
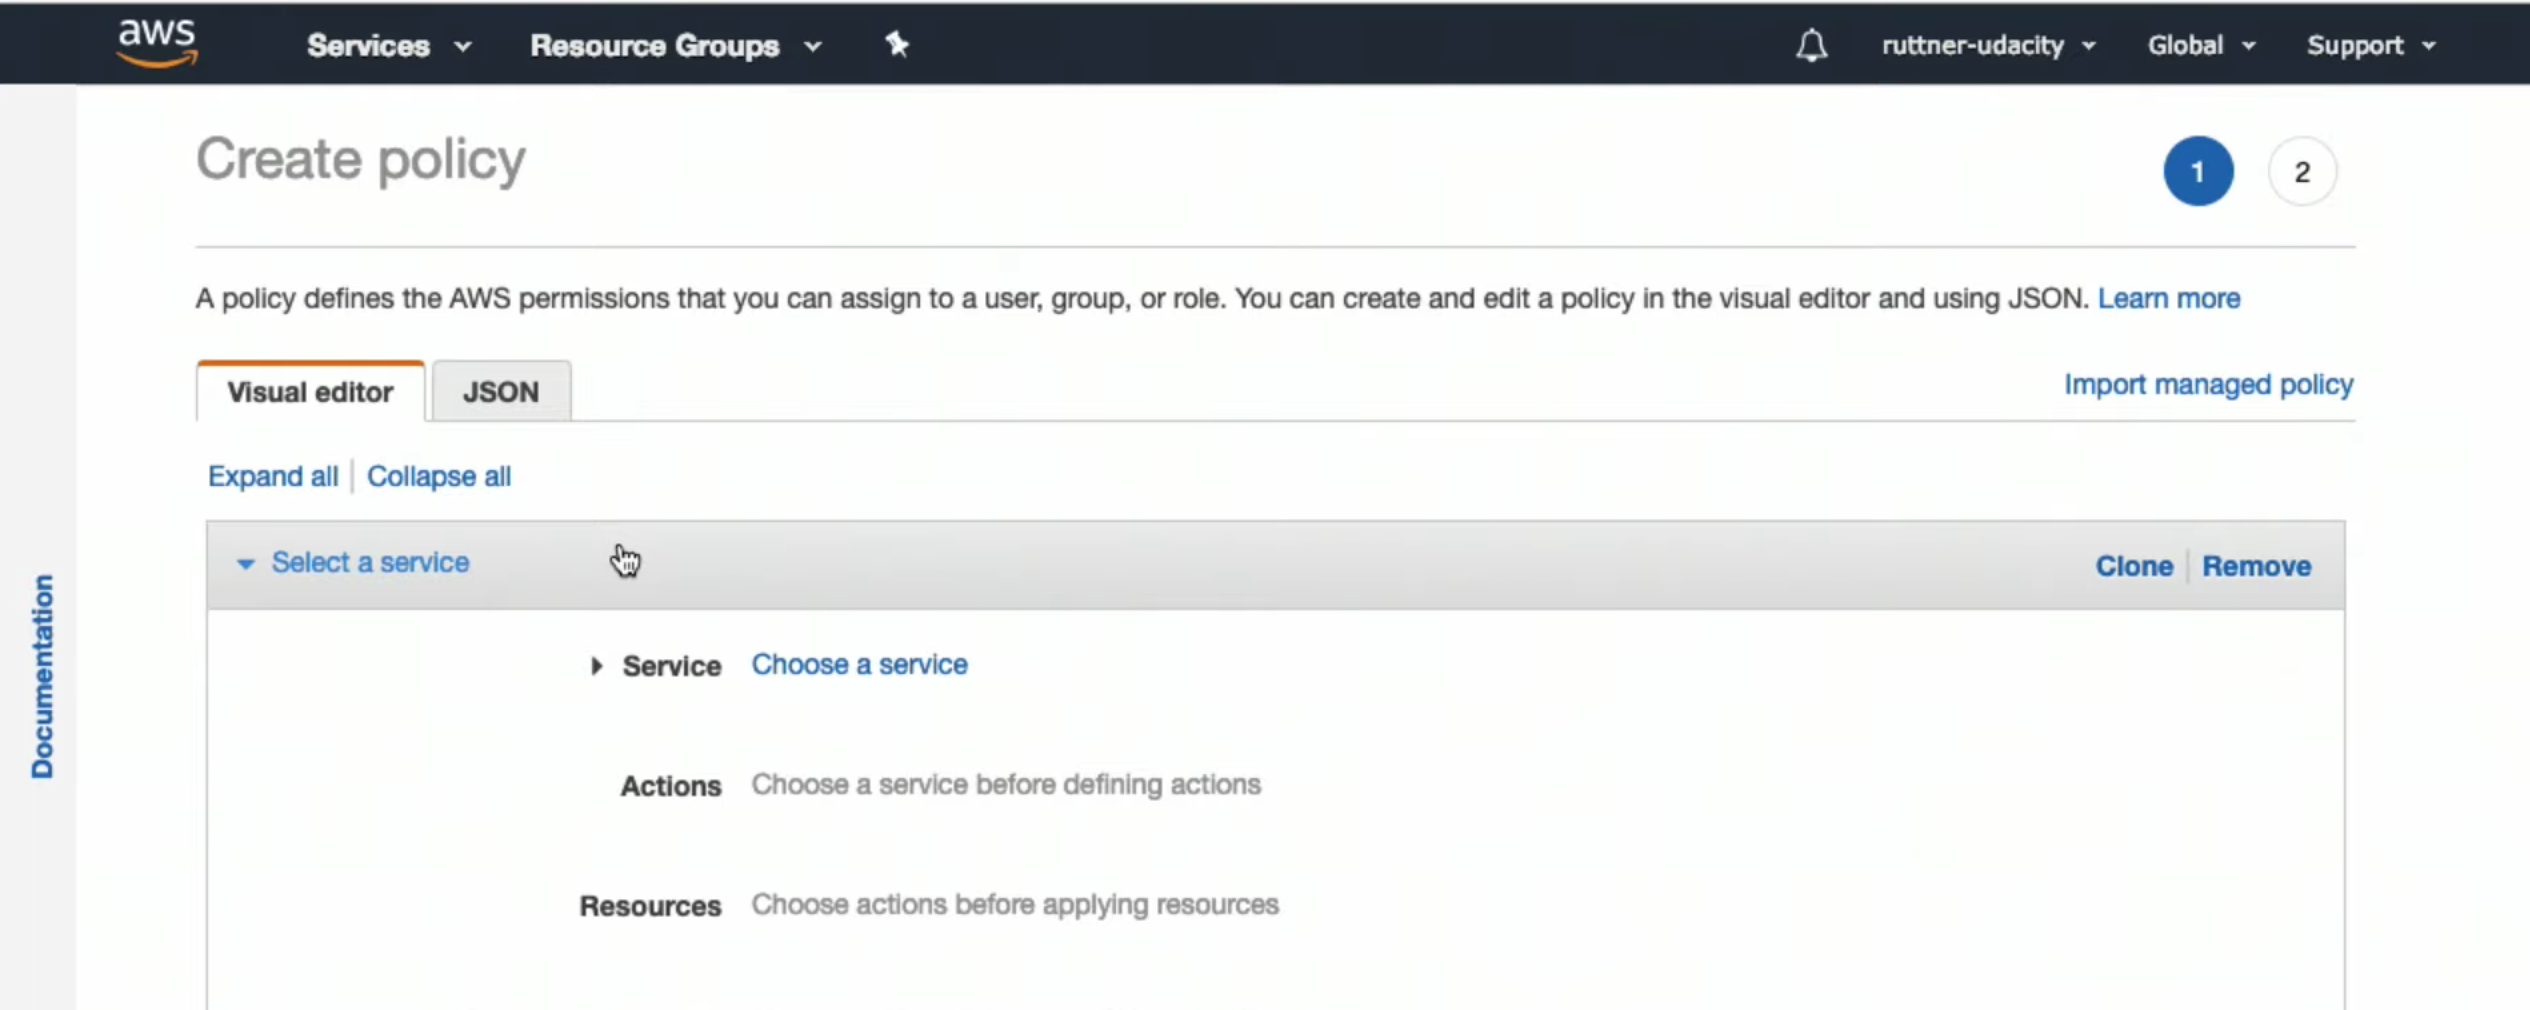
- Add access to S3 service
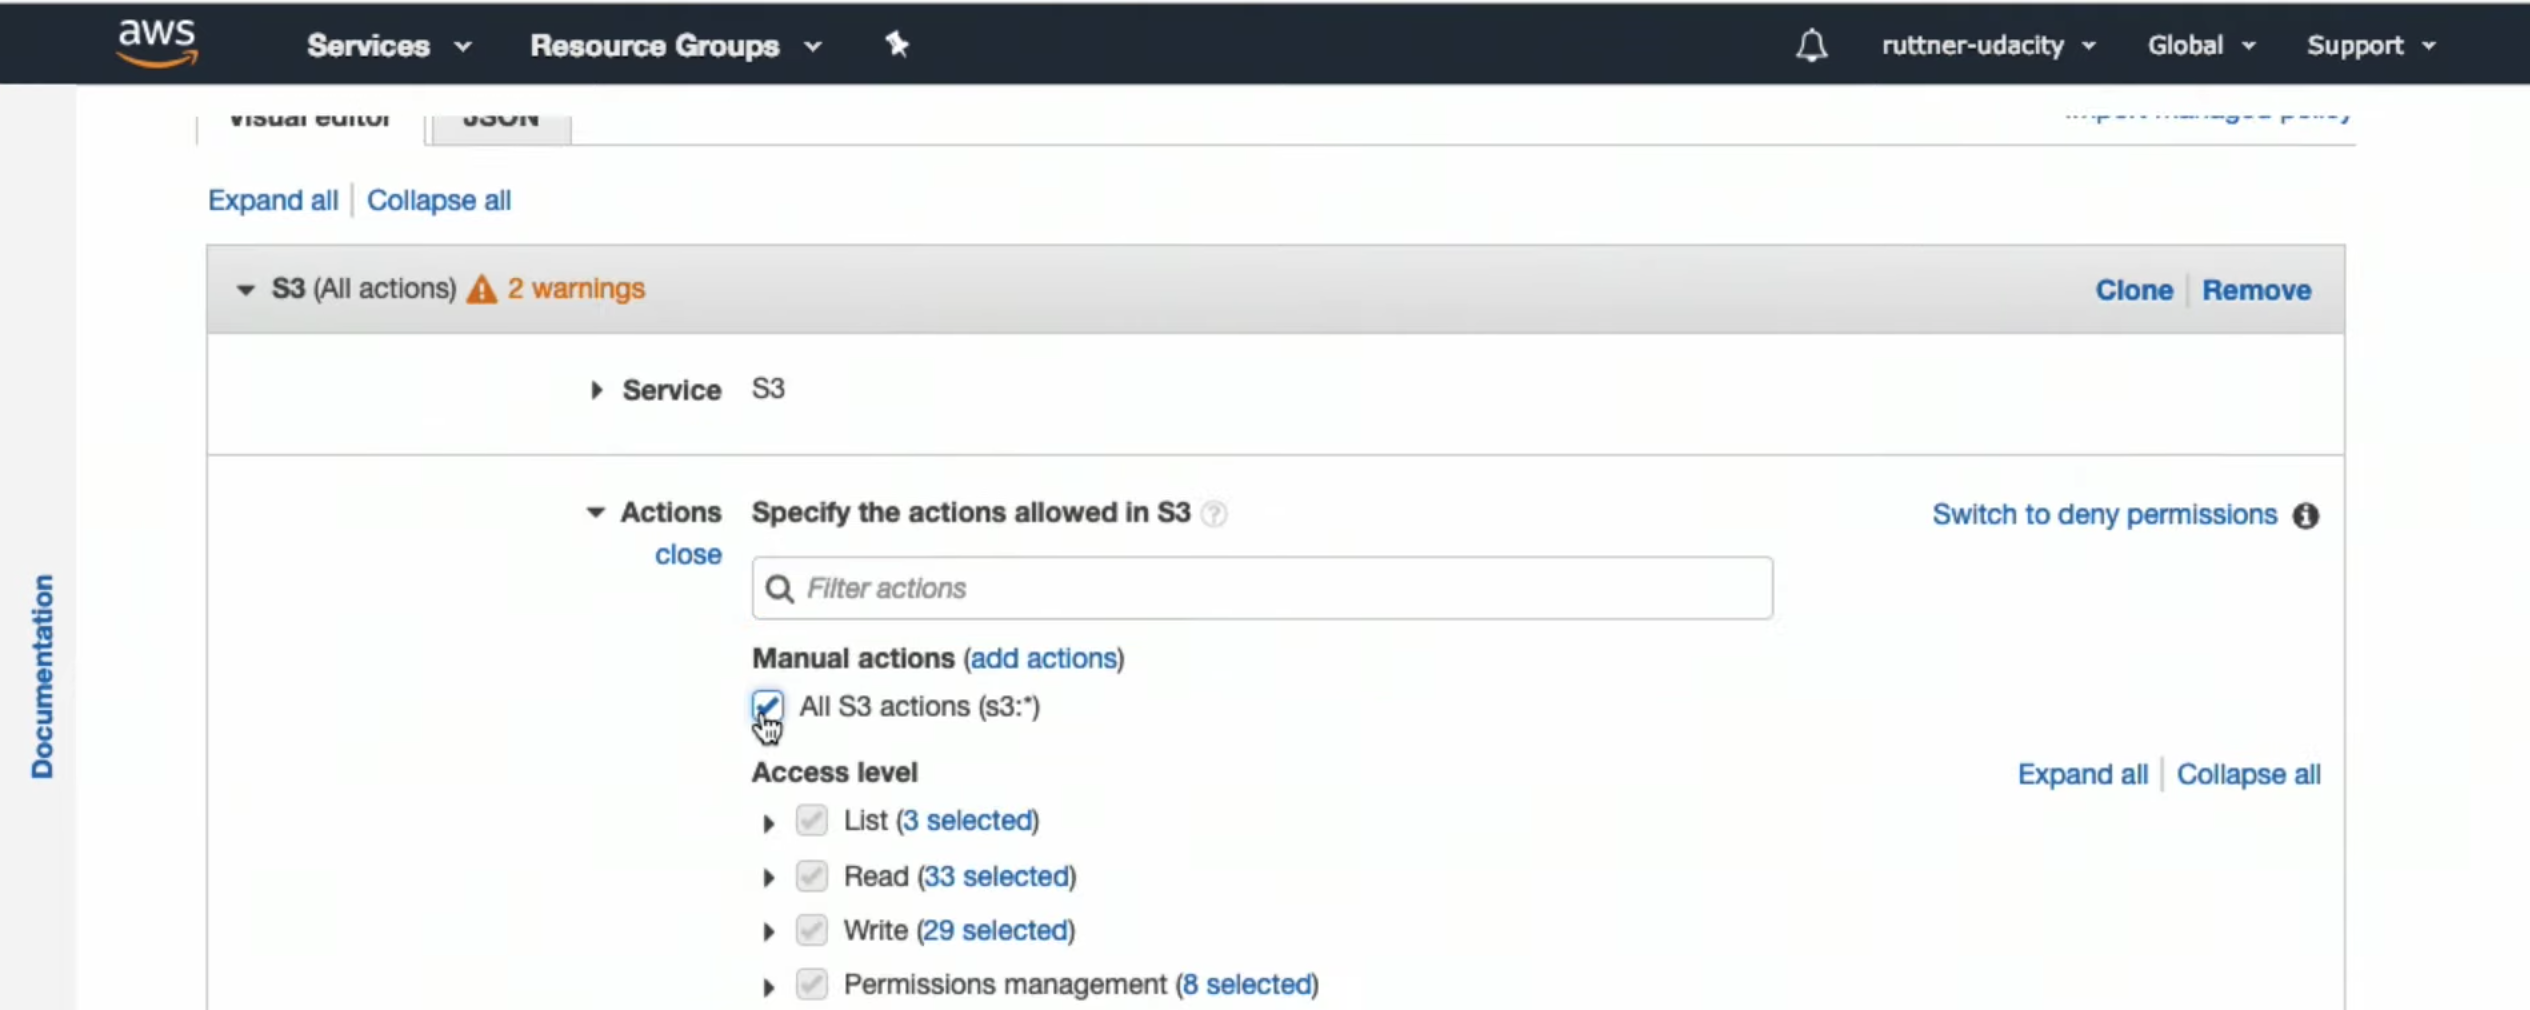
- Add access to the bucket

-
Assing that policy to the new group
-
See details and download
credential.csv
-
Installing AWS User IAM Profiles Locally-
From the
credentials.csvyou will need:
- Access key ID
- Secret access key
-
Run command:
aws configure -
This will add the profile to
- ~/.aws/credentials
[default] aws_access_key_id=######################## aws_secret_access_key=######################## [profile1] aws_access_key_id=######################## aws_secret_access_key=######################## [profile2] aws_access_key_id=######################## aws_secret_access_key=########################- ~/.aws/config
[default]
region=us-east-1

[profile1]
region=us-west-2

[profile2]
region=us-east-2
-
-
Creating IAM Service Roles
- Role is
consumed by a service - Role has
policiesasociated
- Role is


- Designing the Application to be Extensible
- Features and Modularity
-
In this concept, we dive into splitting our code into logical "features". This is a way of describing modular programming where the code which relates to one task is grouped together.
In this example, the /feed and /auth endpoints are our features.
All routing, models, business logic, and helper functions for these modules should be separated as much as possible.
This way, we have an understanding of where code responsibilities just by looking at the general structure. -
Often one feature may depend on another feature - for example, user authentication will be needed within the feed. But these dependencies should be kept loose and consistent with only a few methods being consumed.
The goal as the system continues to grow, is to minimize refactoring outside of specific features. As you continue to learn cloud and explore microservices, often entire features might be ported to their own servers infrastructure making this loose coupling even more critical.
-
- Features and Modularity


- Github link to the project RestAPI Server
In this lesson, we'll be referencing a stubbed, more complex server which uses Node/Express.
The GitHub link to clone and follow along is in the exercises folder of the course repo: https://github.com/udacity/cloud-developer/tree/master/course-02/exercises/udacity-c2-restapi.
Installing project dependencies
- This project uses NPM to manage software dependencies.
- NPM Relies on the package.json file located in the root of this repository.
- After cloning, open your terminal in the repo directory and run:
npm install - RestAPI Source Walkthrough
- Code Structure and Organization
- In the file
controllers/v0/feed/routes/feed.router.ts, the root directory router.get('/',... is not the server root directory.
The root in this case is based on where the server is entering from, which in this case, isapi/v0/feed/routes. - We’ll keep S3 related code in its own file
aws.ts, and database connection code in its own filesequelize.ts.
- In the file
- Code Structure and Organization
We'll be using an ORM called Sequelize to manage the connection to our database.
We'll cover the basics in this concept, but Sequelize is a powerful tool and is extremely well documented at http://docs.sequelizejs.com/
-
Models
A model is the data representation of some group of data. In object-oriented programing terms, a model is an object and is represented by a new class. It should usually represent a noun such as a user, a feed item, an order, etc.
We use the @Table_ decorator and extend the base sequelize Model class to link our model to our database table. -
Parameters
The model contains instance parameters.
These can be other models or primitive fields.
We use the @Column decorator to link our parameters to the table columns.
The bang symbol ! specifies if the field in the table can be null.
Sequelize handles the datatype mappings from TypeScript types to Postgres column datatypes.
import {Table, Column, Model, HasMany, PrimaryKey, CreatedAt, UpdatedAt, ForeignKey} from 'sequelize-typescript';
import { User } from '../../users/models/User';

@Table
export class FeedItem extends Model<FeedItem> {
  @Column
  public caption!: string;

  @Column
  public url!: string;

  @Column
  @CreatedAt
  public createdAt: Date = new Date();

  @Column
  @UpdatedAt
  public updatedAt: Date = new Date();
}
Read more at the Sequelize docs entry on models -> http://docs.sequelizejs.com/class/lib/model.js~Model.html
-
ORMS allow us to easily switch to a different dialect of SQL (e.g. PostgreSQL, MySQL), without having to modify the code that interacts with the database. If we were to write SQL queries directly, instead of using an ORM, we would have to modify our SQL statements to be compatible with the dialect of the database that we are using.
-
Migrations
- Migration refers to modifying the database (by adding or removing tables or columns, for instance, or switching to a different dialect of SQL) to a newer version (usually based on new business requirements).
- Up migration is the process of modifying the database to a newer state.
- Down migration is the process of reversing an up migration, to a prior state.
Read more at the Sequelize docs on migrations
Note Migrations is a loaded term. We most commonly refer to migrations when changing database table states (new columns, adding tables, etc). However, it can also refer to migrating infrastructure - for examples Postgres to MySQL.
- Seeding
Seeds are default rows of data that will be inserted upon database formation.
This may be helpful when provisioning databases frequently for specific applications and having welcome data populated, or when running tests on staging systems to simulate real-world conditions.
Read more at the Sequelize docs on seeding -> http://docs.sequelizejs.com/manual/migrations.html#creating-first-seed
- Using Sequelize in our Node RestAPI Source Code
-
The following video uses PostBird to run SQL queries -> https://github.com/Paxa/postbird
-
In the video, we also go the AWS console to get the RDS endpoint.
To steps are: Go to AWS console, click RDS. In the new page, in the left-hand menu, click “Databases”. In the “connectivity & security” section, under “Endpoint”, copy the endpoint URL.
-

-
Decorators
The Decorators (also known as Annotations) mentioned in this video are a feature of the sequelize-typescript package which allows us to link database features with our models.
We exemplify this using the @CreatedAt and @UpdatedAt. This will set the option in the Postgres database to automatically set the date when any row is created, or updated and is useful when sorting and filtering our data.
Read more and view complete details on the model definition in the sequelize-typescript docs -
Enter npm run dev in terminal to start the server
-
Associations In Sequelize
Check out the Sequelize documentation on associations to understand how to implement this pattern: http://docs.sequelizejs.com/manual/associations.html
- Signed URL Pattern
- We'll be using the Amazon Web Services (AWS) Javascript Software Development Kit (SDK) to implement the SignedURL pattern within our Node server.

//Configure AWS
var credentials = new AWS.SharedIniFileCredentials({profile: c.aws_profile});
AWS.config.credentials = credentials;

export const s3 = new AWS.S3({
  signatureVersion: 'v4',
  region: c.aws_region,
  params: {Bucket: c.aws_media_bucket}
});


/* getGetSignedUrl generates an aws signed url to retreive an item
 * @Params
 *    key: string - the filename to be put into the s3 bucket
 * @Returns:
 *    a url as a string
 */
export function getGetSignedUrl( key: string ): string{
  const signedUrlExpireSeconds = 60 * 5
    const url = s3.getSignedUrl('getObject', {
        Bucket: c.aws_media_bucket,
        Key: key,
        Expires: signedUrlExpireSeconds
      });
    return url;
}

/* getPutSignedUrl generates an aws signed url to put an item
 * @Params
 *    key: string - the filename to be retreived from s3 bucket
 * @Returns:
 *    a url as a string
 */
export function getPutSignedUrl( key: string ){
    const signedUrlExpireSeconds = 60 * 5
    const url = s3.getSignedUrl('putObject', {
      Bucket: c.aws_media_bucket,
      Key: key,
      Expires: signedUrlExpireSeconds
    });
    return url;
}- Shell - Linux/Mac Users
- For Unix/Linux/Mac operating systems, a shell is a command-line program that accepts users' commands and executes those commands on the underlying kernel. Each command has a specific job to perform.
- There are multiple shells available. The default shell for (most) Linux systems is the bash shell. Other examples are ksh, tcsh, and zsh. The default shell for macOS 10+ is zsh.
- Your default shell boots when you open a terminal, which allows you to execute commands.
- Environment Variables - Linux/Mac Users
-
Assume you store the user-specific secrets, such as username, password, or private key, into a simple file. It might not be a safe approach because all the sensitive information may become public if you put that information on Github/any other Version Control System. User-specific secrets, visible publicly, are never a good thing.
-
Here comes the role of Environment variables in this scenario. Environment variables are pretty much like standard variables, in that they have a name and hold value. The environment variables only belong to your local system and won't be visible when you push your code to a different environment like Github.
-
-
The .env file
- The .env file is one of the hidden files in which you can store your choice of environment variables.
- The variables stored in this file are your individual working environment variables.
- Note that the environment variables that are stored in the .env file override the variables set in the /etc/environment file, that is shared by all users of that computer.
- You will need to follow the steps below to configure environment variables in a .env file:
- Install environment variables package:
npm install dotenv --save
This will allow you to use the environment variables that you'll set in a new file. - Create a new .env file in the root of your project.
Fill the .env file with your new variables, and their corresponding values.
For example:POSTGRES_USERNAME = yourUsername POSTGRES_PASSWORD = yourpassword AWS_REGION = yourAWSRegion AWS_PROFILE=awsProfileName
- Require the package in your server - Add the following code on top of the server.ts file
require('dotenv').config(); - Use your environment variables - If you want to refer the environment variables that you just saved in the .env file, anywhere in the code, try putting a prefix process.env. in front of the variable name. For example, process.env.POSTGRES_USERNAME will fetch you the value stored in it.
- Add .env to your .gitignore - You wouldn't want your .env file to be available publicly in the project Github repository. For this reason, go to the .gitignore file in the project root, and add and entry .env to it. It will make sure that you don't push our environment variables to Github!
- Install environment variables package:
-
The process.env file
- The process.env file is a default file that stores the variables for the current terminal environment. When you run the following command, it will store the POSTGRES_USERNAME to the current terminal environment:
export POSTGRES_USERNAME = yourUsername - By default, the Node is accessing the same set of variables that are defined in your process.env file.
- The process.env file is a default file that stores the variables for the current terminal environment. When you run the following command, it will store the POSTGRES_USERNAME to the current terminal environment:
-
Bash Profile - .profile file
- You won't want to export the user-specific variables every time you'll log in to your system, and do not want to override the variables set in the root level /etc/environment file.
- The solution is to store the new variables either in .profile,.bashrc or .zshrc file, depending on your shell.
- These are the files that the shell executes even before you type your first command to it.
- Note that every user of the computer has its own .profile file.
- When you put
export AWS_PROFILE=awsProfileName - inside the .profile file, it will run this command before you start firing commands in your shell.
- Usually, the bash profile is found at ~/.profile, where ~ represents your current logged in user's home directory. Keep in mind the . preceding profile means this file will be hidden.
- If you wish to instruct your Node to execute the .profile file anytime, you can run the following command:
source ~/.profile
-
Adding to .zshrc file:
export POSTGRESS_USERNAME=xxxxx
export POSTGRESS_PASSWORD=xxxxxx
export POSTGRESS_DATABASE=udagram
export POSTGRESS_HOST=xxxxx.cjvquh78n3mk.eu-west-3.rds.amazonaws.com
export AWS_REGION=eu-west-3
export AWS_PROFILE=default
export AWS_MEDIA_BUCKET=udagram-xxxxx-dev
export JWT_SECRET=helloworld- Add permissions AWSElasticBeanstalkFullAccess and AdministratorAccess

- Basic AWS Architecture


-
Build process
- Transpile TypeScript
- Include some source files
- Zip a file
- Upload to Elastic Beanstalk
-
Using AWS Elastic Beanstalk
Elastic Beanstalk is a powerful Development Operations tool (Dev Ops) to deploy your code to AWS services and infrastructure with minimal effort.- EB CLI
-
We'll be using the Command Line Interface to work with Elastic Beanstalk.
This will provide us with a set of commands to create new applications and deploy code to these systems.
Before continuing, you must install the EB CLI by reading the AWS Doc Instructions for Install for your platform. -
After running the
eb initcommand and following the guided setup will create a new directory in our project named.elasticbeanstalk.
Within this configuration file, there is a configuration file namedconfig.yml.
This is the set of instructions Elastic Beanstalk will follow when provisioning your AWS infrastructure and deploying your code.
-
- EB CLI
-
Generating SSH Keypairs
Public-Key Cryptography is a method to encrypt and decrypt authentication information for connecting to your resources in the cloud. The keys you generate replace your password, but they should be treated as sensitive data that would grant anyone who holds them access to your running instance. AWS offers a great guide on how to create Key Pairs for your EC2 Instances. -
Creating Deployable Build Archives and Deploying
- Now that you have a running Beanstalk instance, we must package our code into a format that is usable by Elastic Beanstalk.
- We do this by transpiring our typescript into javascript and then zipping the contents into a single file which we can upload. NPM allows us to define simple script commands in the package.json file. As described in the video, we've included the build command to perform these steps for us.
- After running
npm run buildto transpile and package our code into a zip, we need to configure Elastic Beanstalk to use this build archive.
This is accomplished with the following addition to the .easticbeanstalk/config.yml configuration file:- Inside the .elasticbeanstalk folder there is a file
config.yml, this must be added:deploy: artifact: ./www/Archive.zip
- Inside the .elasticbeanstalk folder there is a file
-
Setting Environment Variables in Elastic Beanstalk
Just like our local code, we'll need to access certain variables from our system within our Node server. We can set these variables through the AWS Console.
On aws console > Elastic Beanstalk > Configuration > Software

- Change at package.json required to deploy at Elastic Beanstalk.
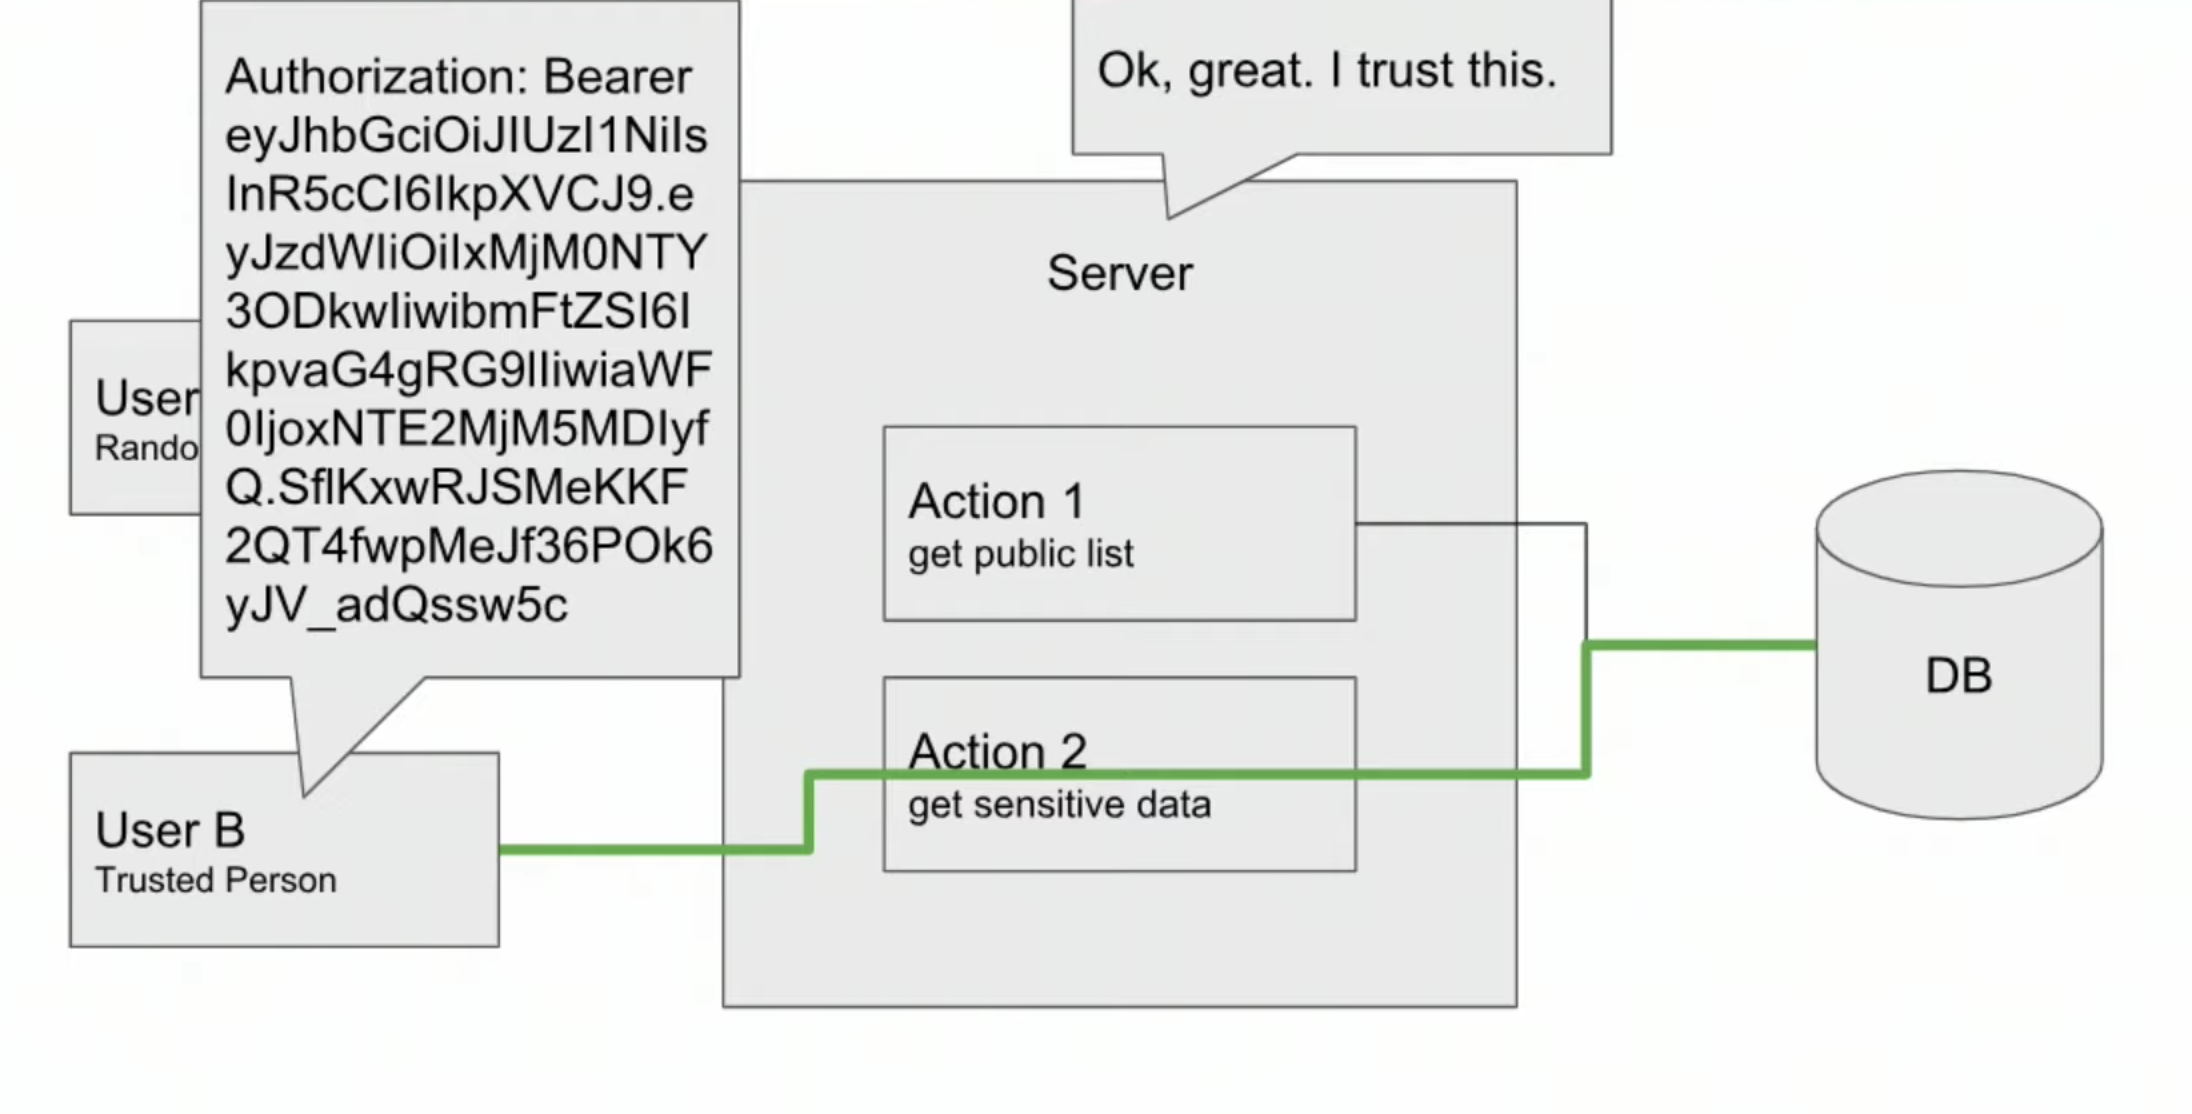
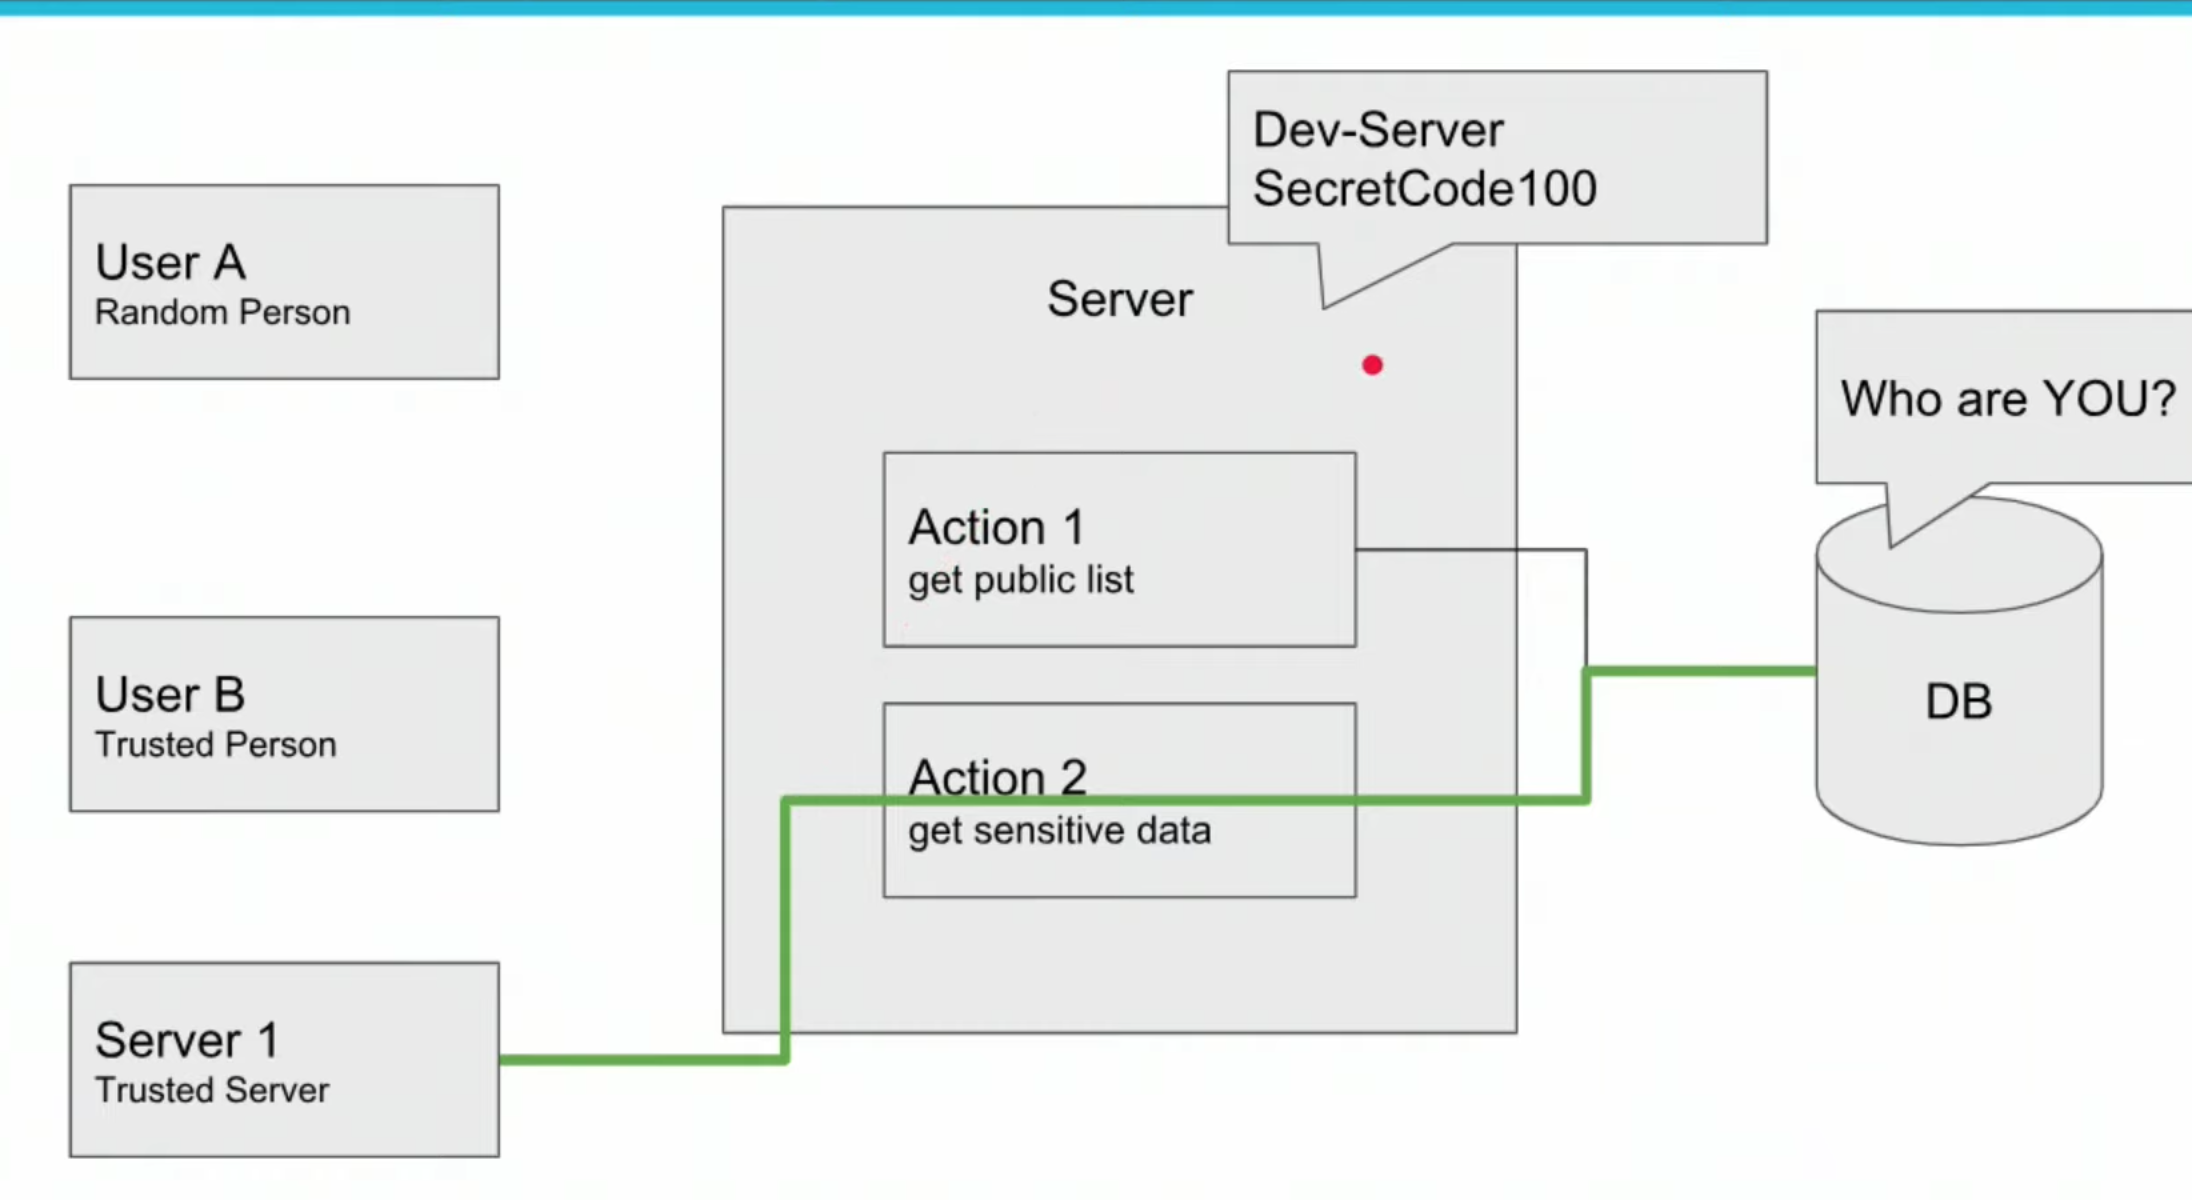
"main": "server.js",- Authentication: Who is asking?
- Authorization: Can they ask?
- Schema

-
Storing and Using Passwords: do not store passwords as plain text.
-
Improving our Password Storage
- Symmetric key
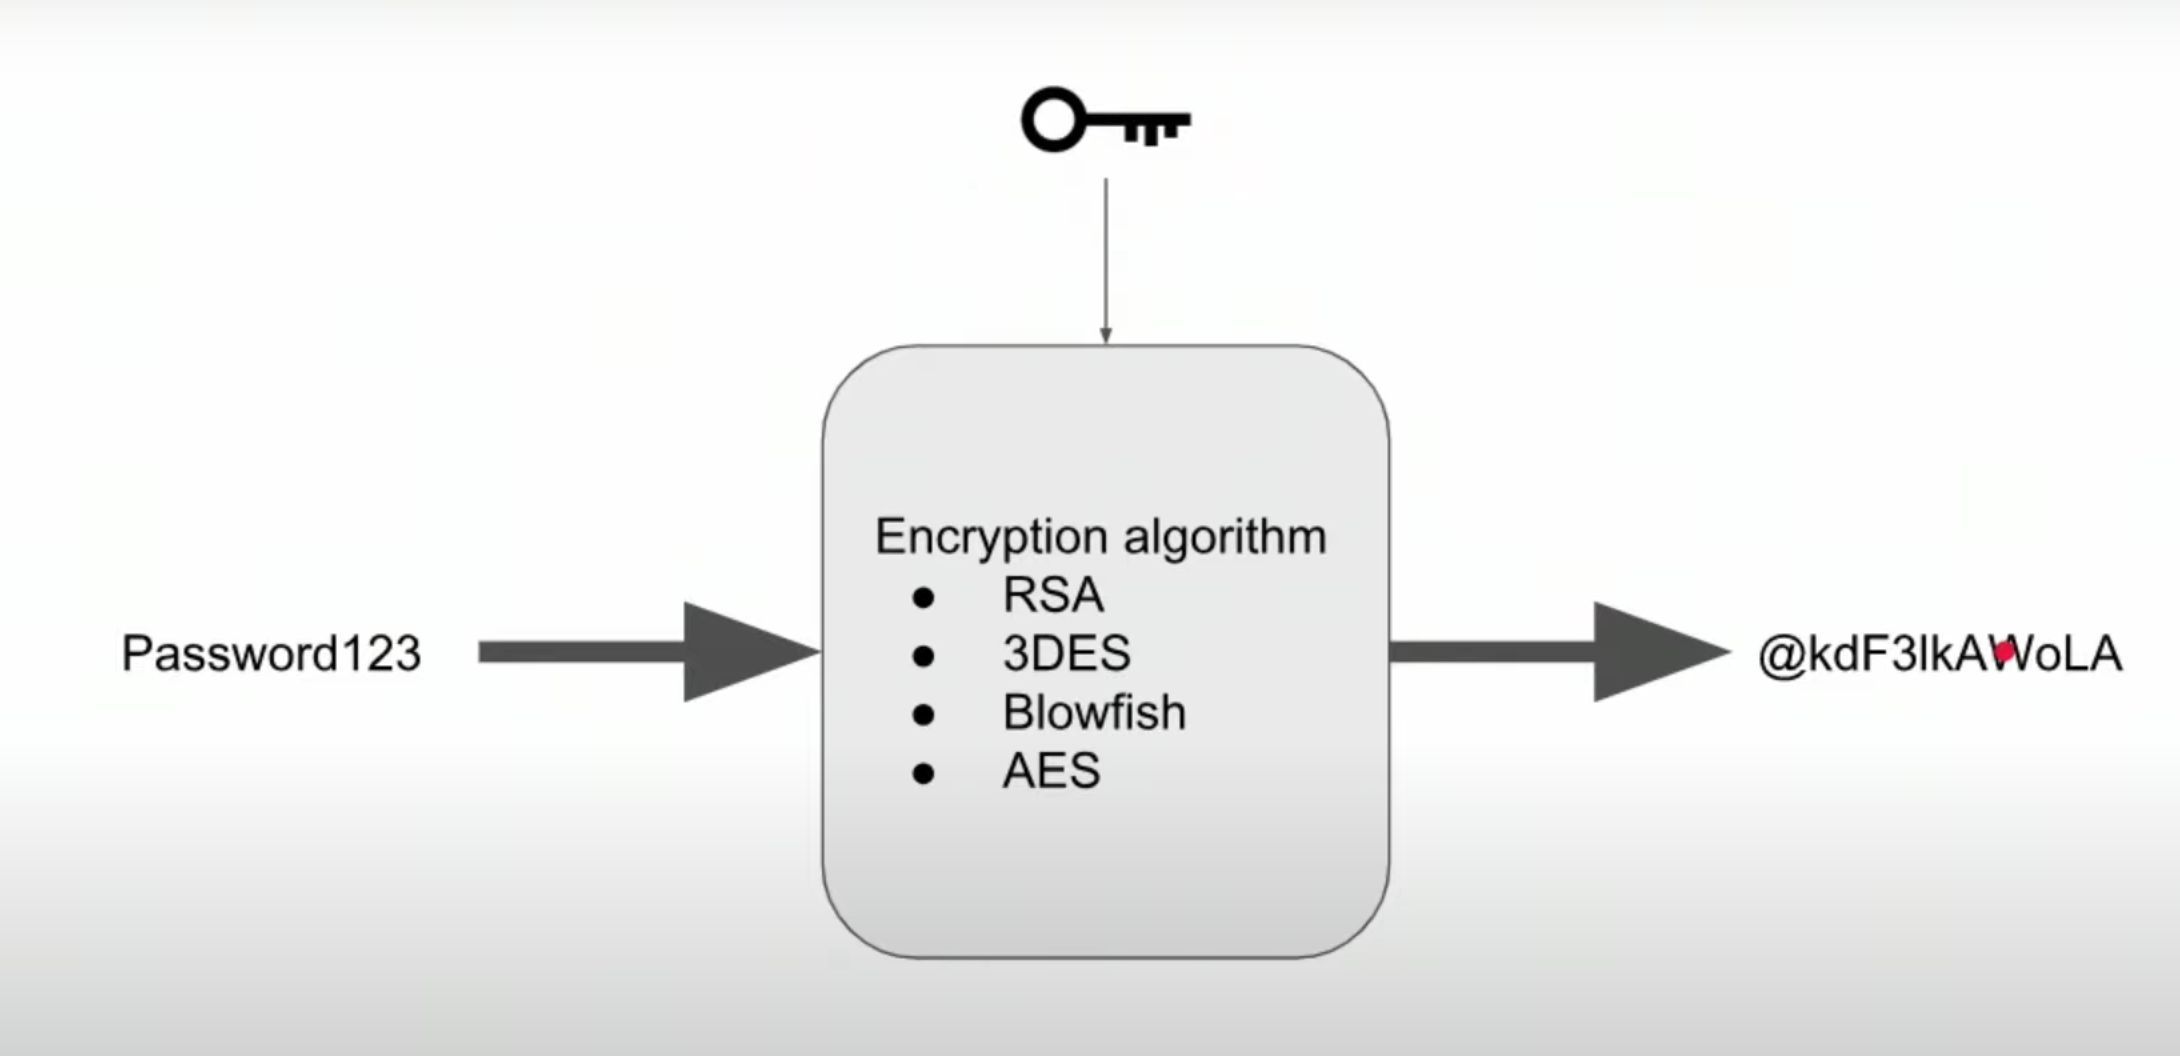
- One way hash
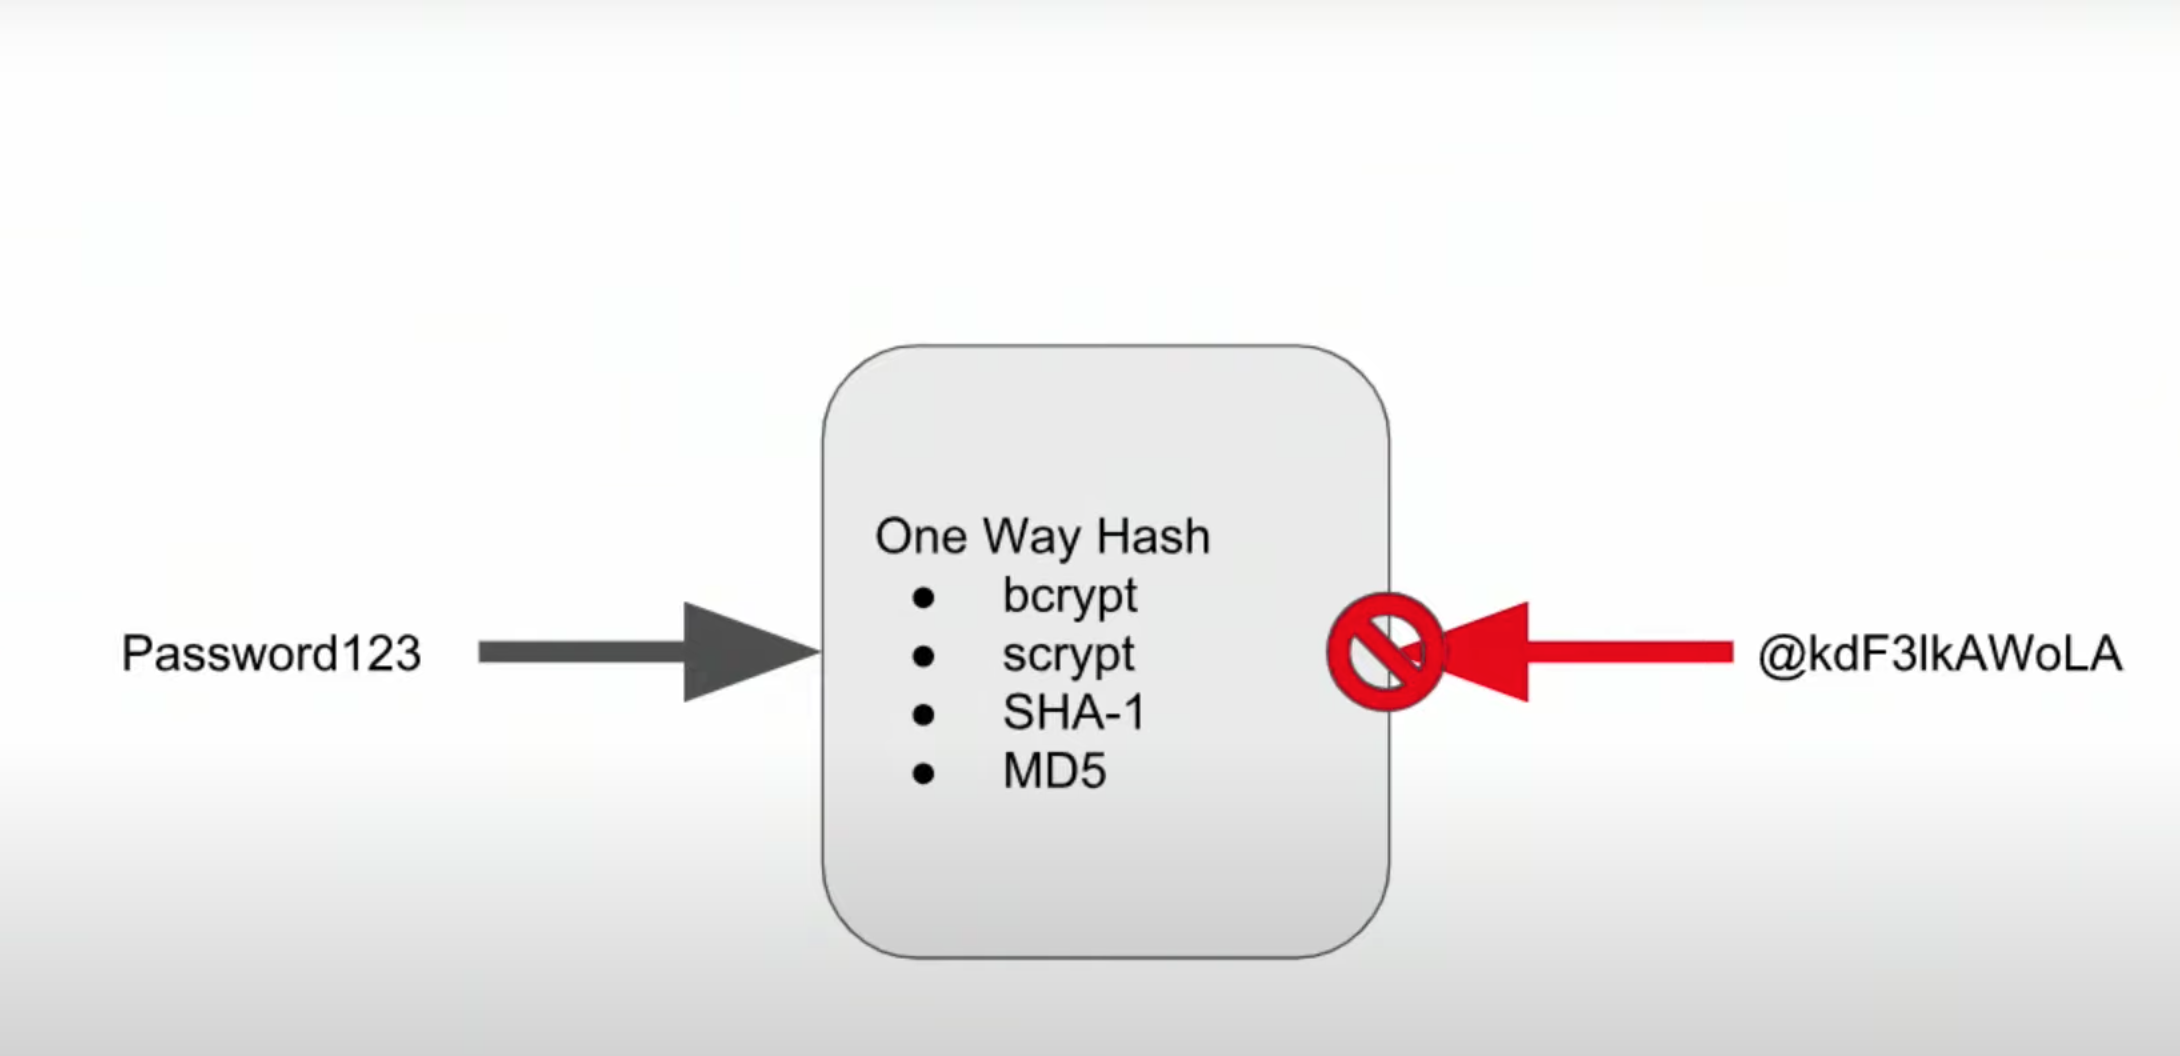
- Salt
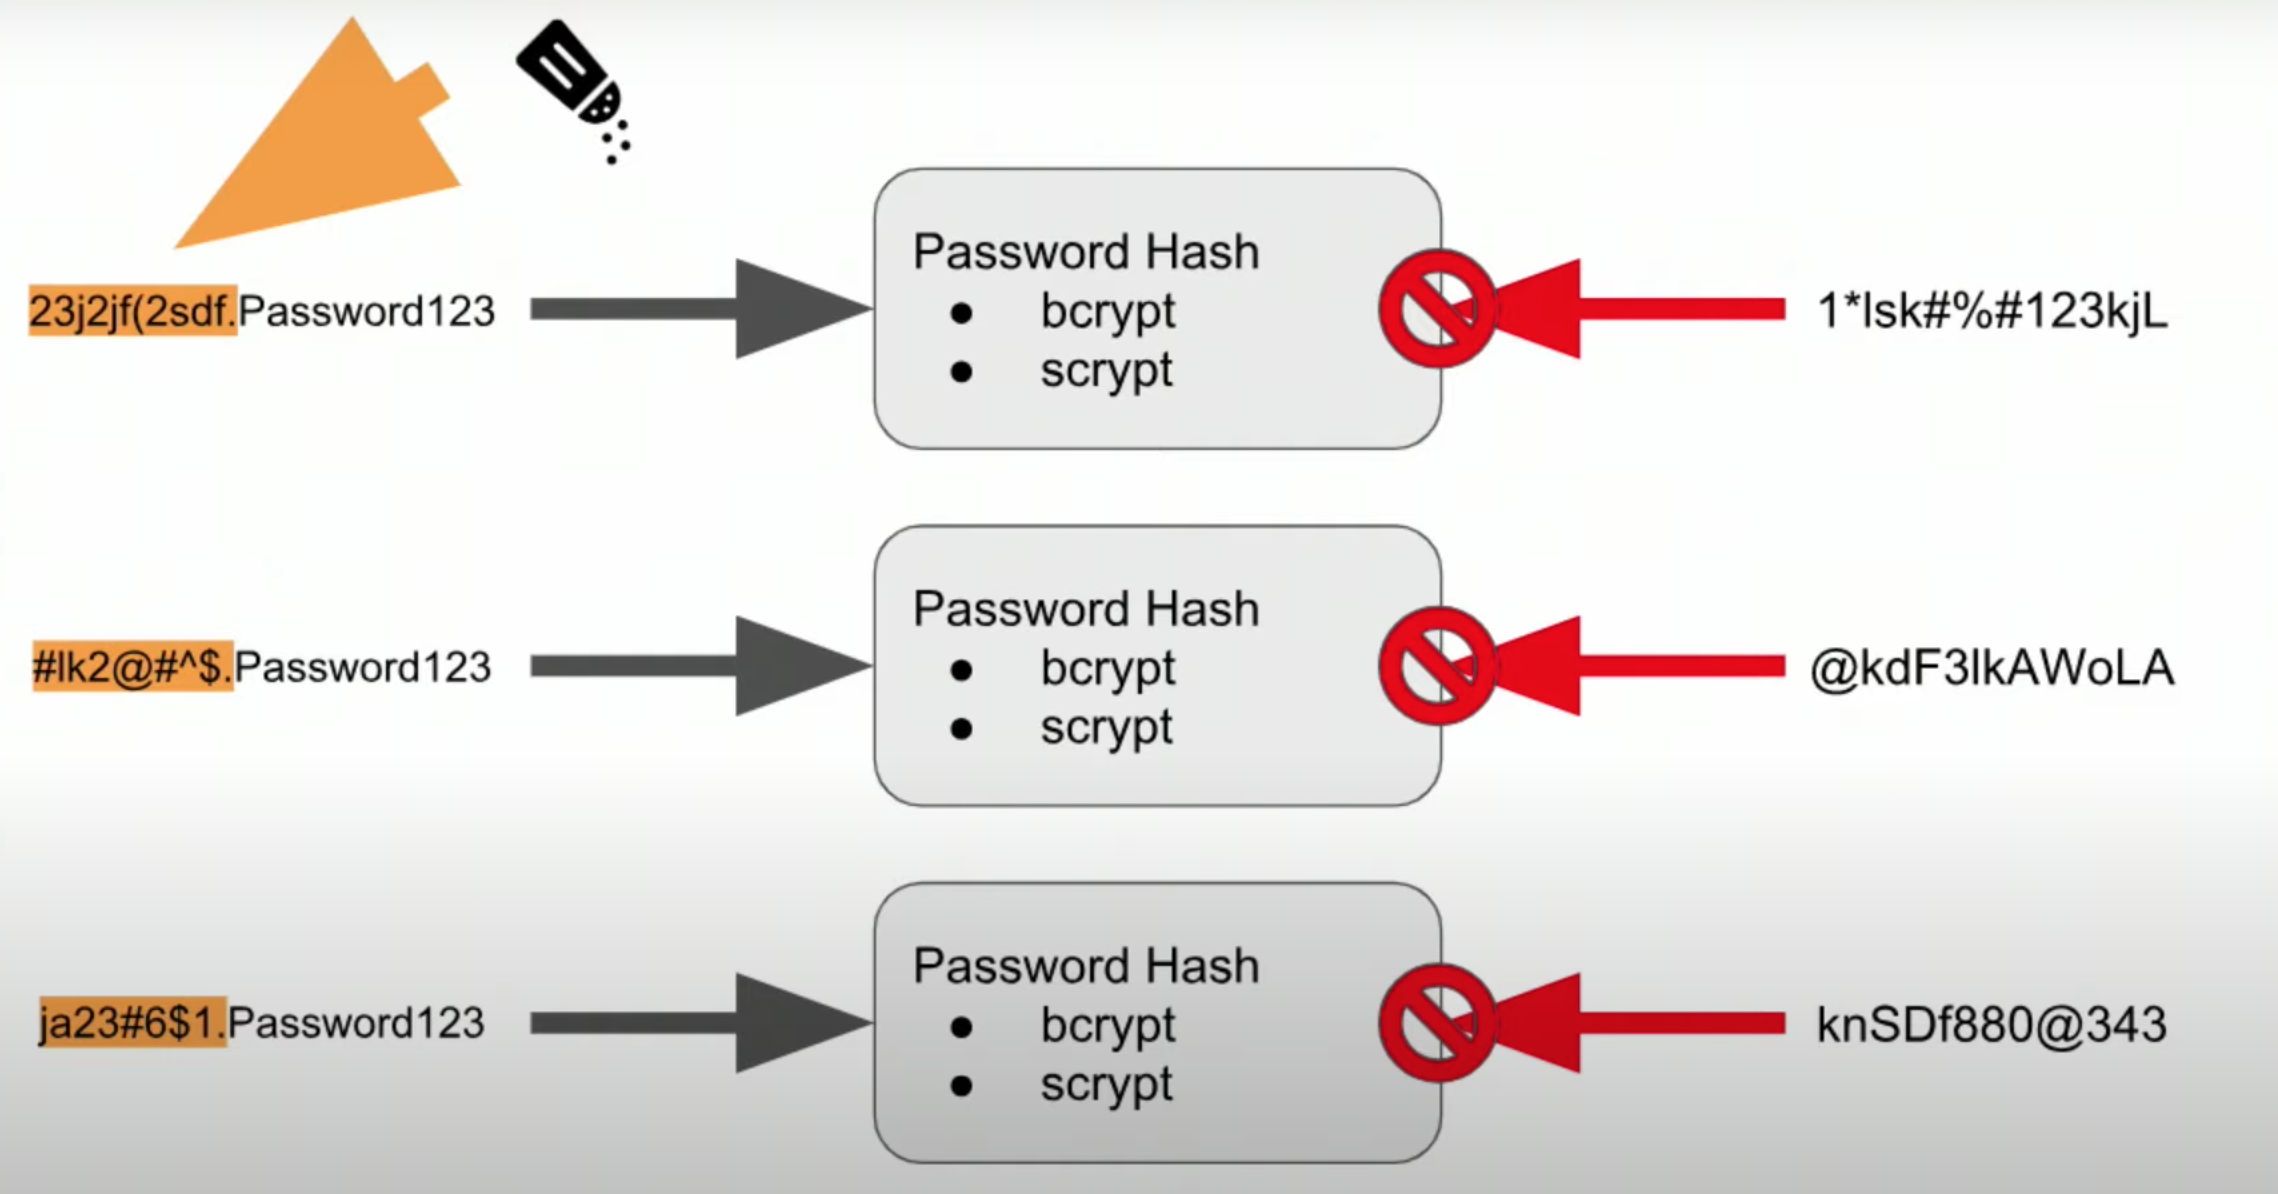
- Other things to keep in mind:
- Don't reuse your salt
- Keep your salt long
- Dont't trunst anyone
- Including yourself. Don't invent your own crypto!
- Review policies of 3rd pariteis and ask hard questions
- Secrets are high risk, keep them limited and secure
- MFA, email verifications, etc.
- Cognito, service of aws to manage users: https://aws.amazon.com/es/cognito/


-
Adding Authentication
In this lesson, we'll be adding a new feature to our server. Each concept will build on prior steps so make sure you're comfortable before moving forward. -
Git Process
It may be good practice to branch off your dev branch with a feature branch for f-auth. This way you have an easy way to go back in time to see what you've changed. -
Running the Server
Don't forget, you can run the server in developer mode by runningnpm run devin the terminal.
- Using bcrypt to salt, hash, and compare
We'll be using the bcrypt library to perform these functions. Check out the bcrypt docs for some more information: https://www.npmjs.com/package/bcrypt - Install bcrypt
npm i bcrypt --save
npm i --save-dev @types/bcrypt
- BCrypt Clarification
-
Salt Rounds: the password is passed through the salted hashing function, and the output is again passed through the hashing function in a loop. The more times we iterate on the hashing function, the more we can guard against brute force attacks that try to guess the password. The salt rounds decide how many times to go through this loop. Settings salt rounds to 10 means we iterate on this hashing function 2^10 times.
-
Comparing Passwords: When you're using the
bcrypt.comparemethod, it may appear that the salt is ignored. However, if you look closely at the example outputs in the video above, it is clear that the salt is actually prepended to the hash which we are using in the compare method. In other words, when we save the hash in our database - it is storing both the salt and the resulting hash as one value. Then, when comparing the plain text password, the stored salt and hash are split and the salt is used to produce the new hash, which is ultimately what is being compared.
-
async function generatePassword(plainTextPassword: string): Promise<string> {
    const saltRounds = 10;
    const salt = await bcrypt.genSalt(saltRounds);
    return await bcrypt.hash(plainTextPassword, salt);
}

async function comparePasswords(plainTextPassword: string, hash: string): Promise<boolean> {
    return await bcrypt.compare(plainTextPassword, hash);
}- Sessions, JWTs, and Environment Variables
-
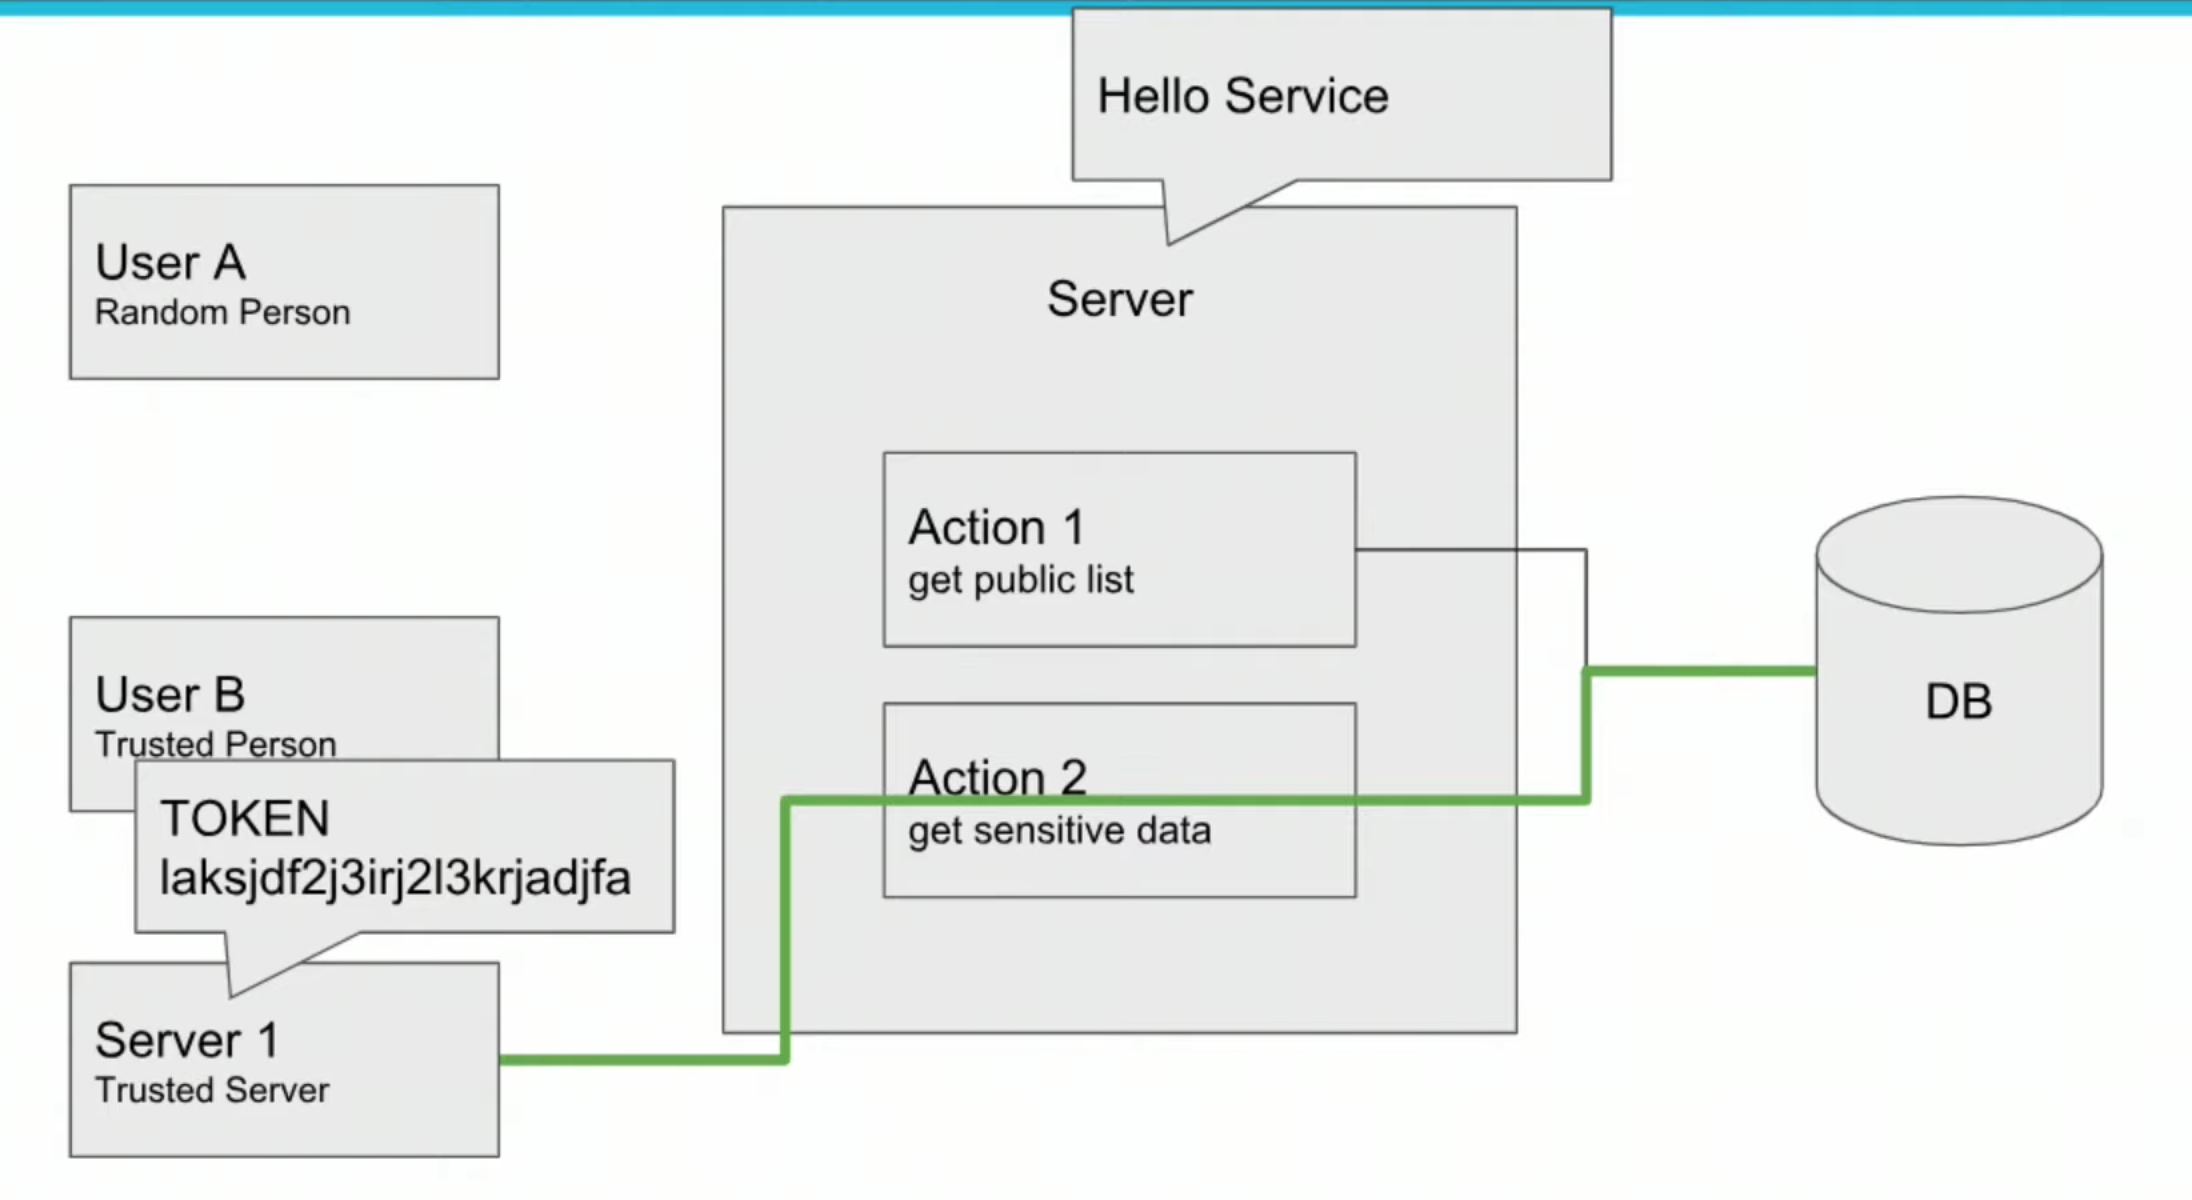
Our client can be a web browser or another server. In either of these cases, we need to send some authentication information along with each request.
-
On our web browser, this is most commonly performed by storing some kind of credentials in something like the localstorage which allows us to store information for a specific site in a key-value store. JSON Web Tokens are one type of credential that can be stored locally in this fashion.
-
On our servers, we'll usually want to use something like an environment variable. This is a variable which is accessible within that instance and only that instance.
-
The idea is to avoid sending password every request, methods
- Cockies
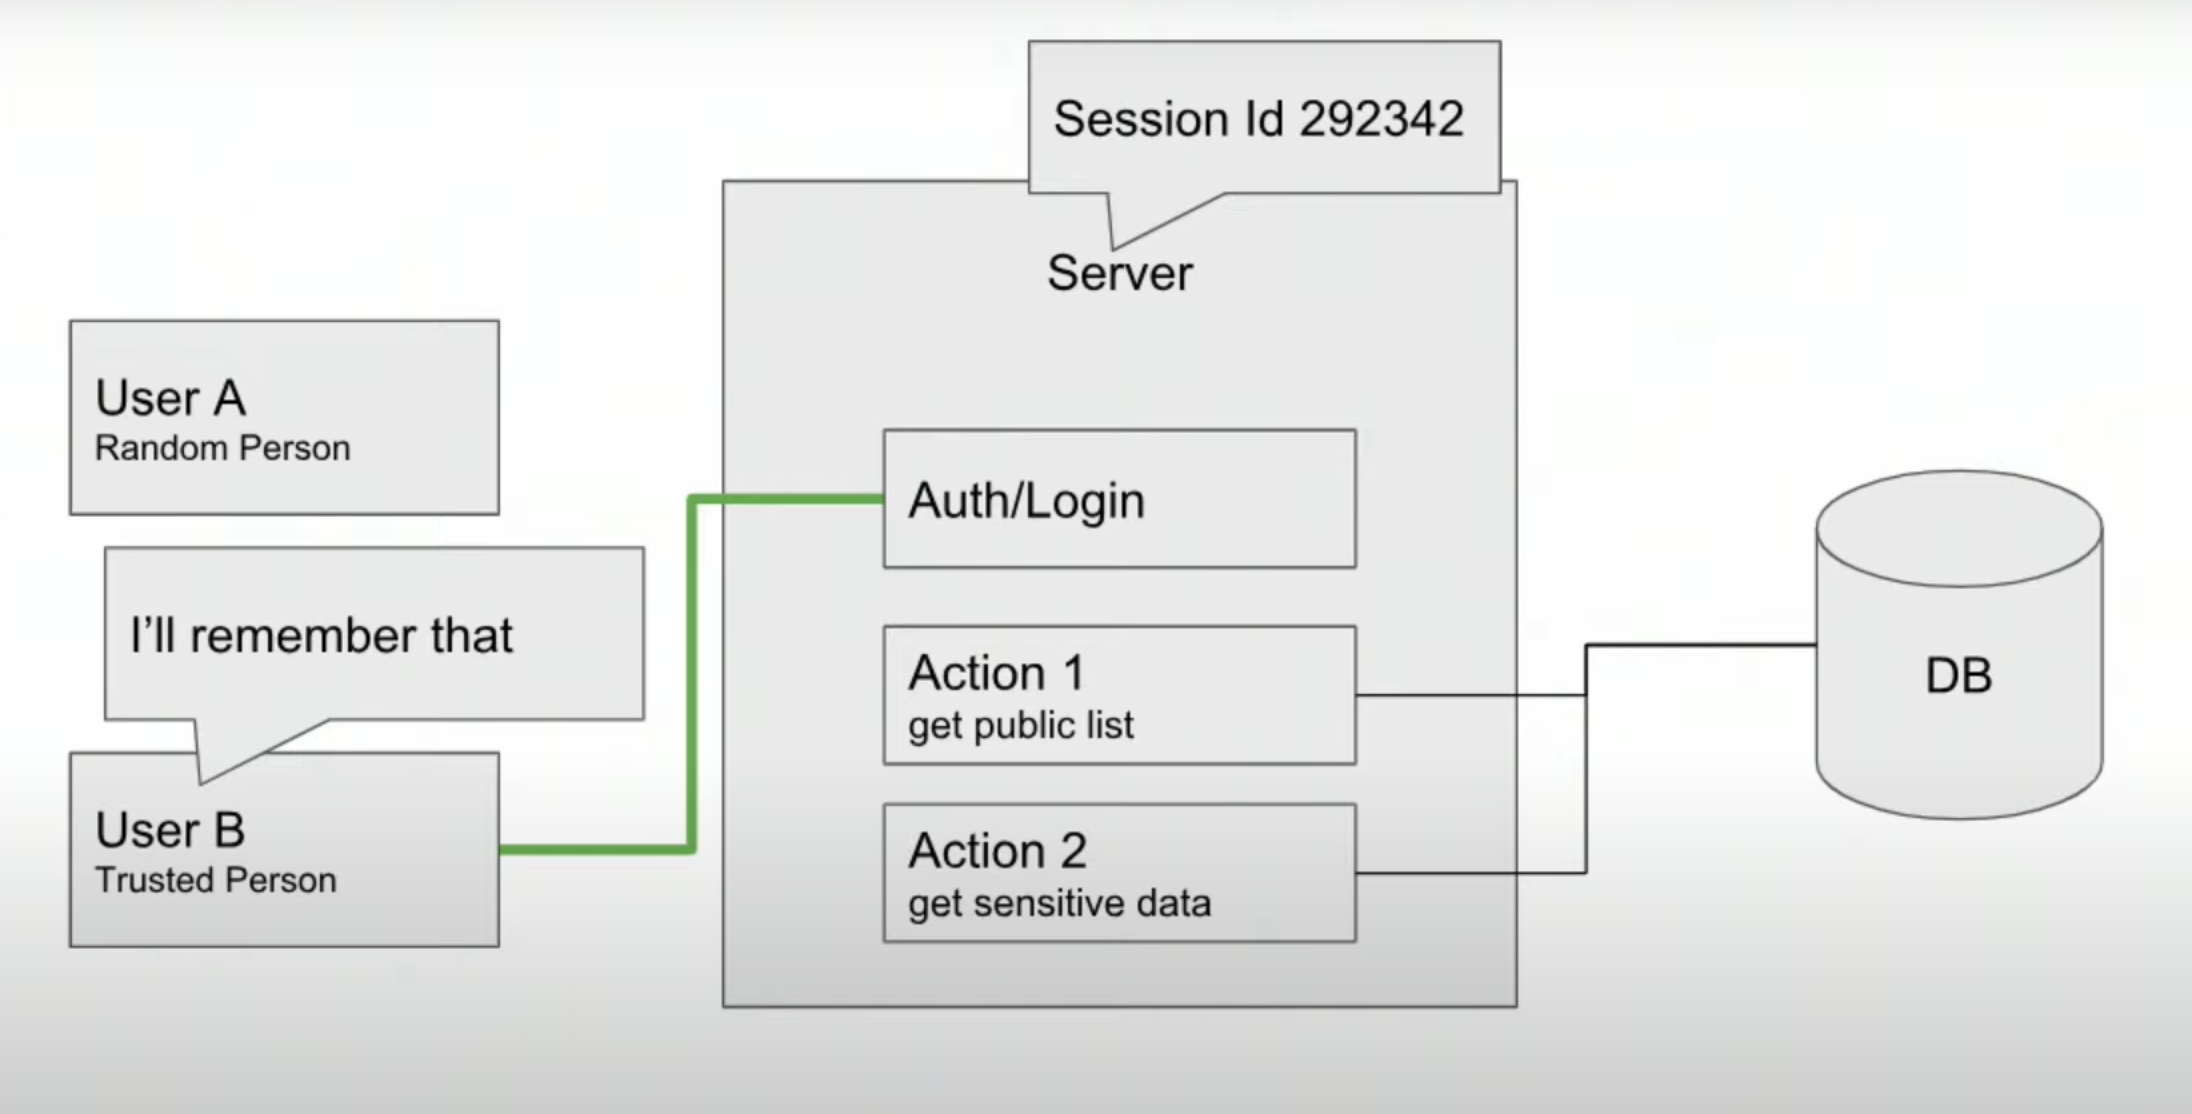
- JSON Web Tokens (JWT), authorization header
Visit the site and play with JSON Web Tokens at jwt.io
- Server
-


-
Steps
- Import library
import * as jwt from 'jsonwebtoken';
- Generate de JWT
function generateJWT(user: User): string {
    return jwt.sign(user, config.jwt.secret);
}
- Return the JWT on the register user request
router.post('/', async (req: Request, res: Response) => {
  ....
  res.status(201).send({token: jwt, user: savedUser.short()});
}
-
Requiring Auth to Restrict Endpoint Usage
-
In the next video, we'll be calling our requireAuth method to validate the JWT is in the request authorization header. Before continuing, it's recommended you read this express resource on writing middleware to clarify this concept.
-
Each protected endpoint adds a middleware function
requireAuthwhich is defined in theauth.router.tsfile.
This method will check if the authorization header exists and is a valid JWT.- If yes, it allows the endpoint to continue processing.
- If no, it rejects the request and sends appropriate HTTP status codes.
-
-
Integrate Changes in Git
If you've been following the Git process, create an merge a pull request to integrate your stable feature branch with dev. Keep in mind, if this was a real project, this is when you'd want to make sure your system is passing unit and integration tests, and conduct a peer code review. -
Build from Source
To create fresh build artifacts to deploy run:npm run build
If you recall, this will create a new artifact to run on the cloud server at www/Archive.zip.
- Deploy to the Cloud
Once built, you can deploy changes to the elastic beanstalk instance by running:eb deploy
This will upload the new code and restart the running instances!
- Some Resources to Stay On Point:
- AWS Route 53 Developer Guide
- Amazon Web Services' flavor of DNS is called Route53. This service allows you to set up routing profiles for your domain names and direct traffic to services inside of and external to AWS.
- Amazon provides great documentation on using Route53 in their developer guide.


-
Intro to Frontend JavaScript Frameworks
- Frontend frameworks allow us to quickly standup compelling, highly interactive user experiences to interface with our cloud services.
- Many frameworks use JavaScript or TypeScript which is another great reason to use Node for our servers - we'll have the same technology requirements throughout our stack!
-
Github link to frontend
- In this lesson, we'll be referencing a prewritten, simple server which uses Node/Express. The github link to clone and follow along is: https://github.com/grutt/udacity-c2-frontend
-
Installing project dependencies
-
This project uses NPM to manage software dependencies. NPM Relies on the package.json file located in the root of this repository.
-
After cloning, open your terminal in the repo directory and run:
npm install -
Running the frontend development server
- Before running the frontend development server, you either need to run your backend RestAPI server or have a running RestAPI server running in the cloud. In either case, make sure you set an accessible endpoint as the apiHost variable in
./src/environments/environments.ts. - To run the developer server and live reload the frontend, open terminal and run:
ionic serve
- Before running the frontend development server, you either need to run your backend RestAPI server or have a running RestAPI server running in the cloud. In either case, make sure you set an accessible endpoint as the apiHost variable in
-
-
tip: the ionic-cli must be installed to run
ionic serve. Read the docs to make sure this is installed globally.
npm i -g ionic

-
Using CDNs to Serve Our Frontend
Our frontend is loosely coupled and can be served from a separate server than our backend. This allows us to create static build artifacts (pure html/css/javascript files that can be directly used by a browser) that can be served efficiently using content delivery networks. -
Deploying the frontend using AWS S3 and CloudFront
The static build artifacts in the www/ directory can be uploaded to an S3 bucket which can be linked to a CloudFront distribution.
This is beyond the scope of required work for this course, but it is a good skill to practice. -
Amazon provides a great resource to configure S3 and CloudFront to accomplish this goal: https://aws.amazon.com/premiumsupport/knowledge-center/cloudfront-serve-static-website/
-
Command:
ionic build
ionic build --prod
-
Scaling Up
Making your instance more powerful - more ram, better CPU, blazing fast GPU! -
Scaling Out
Adding more server instances and splitting the responsibility.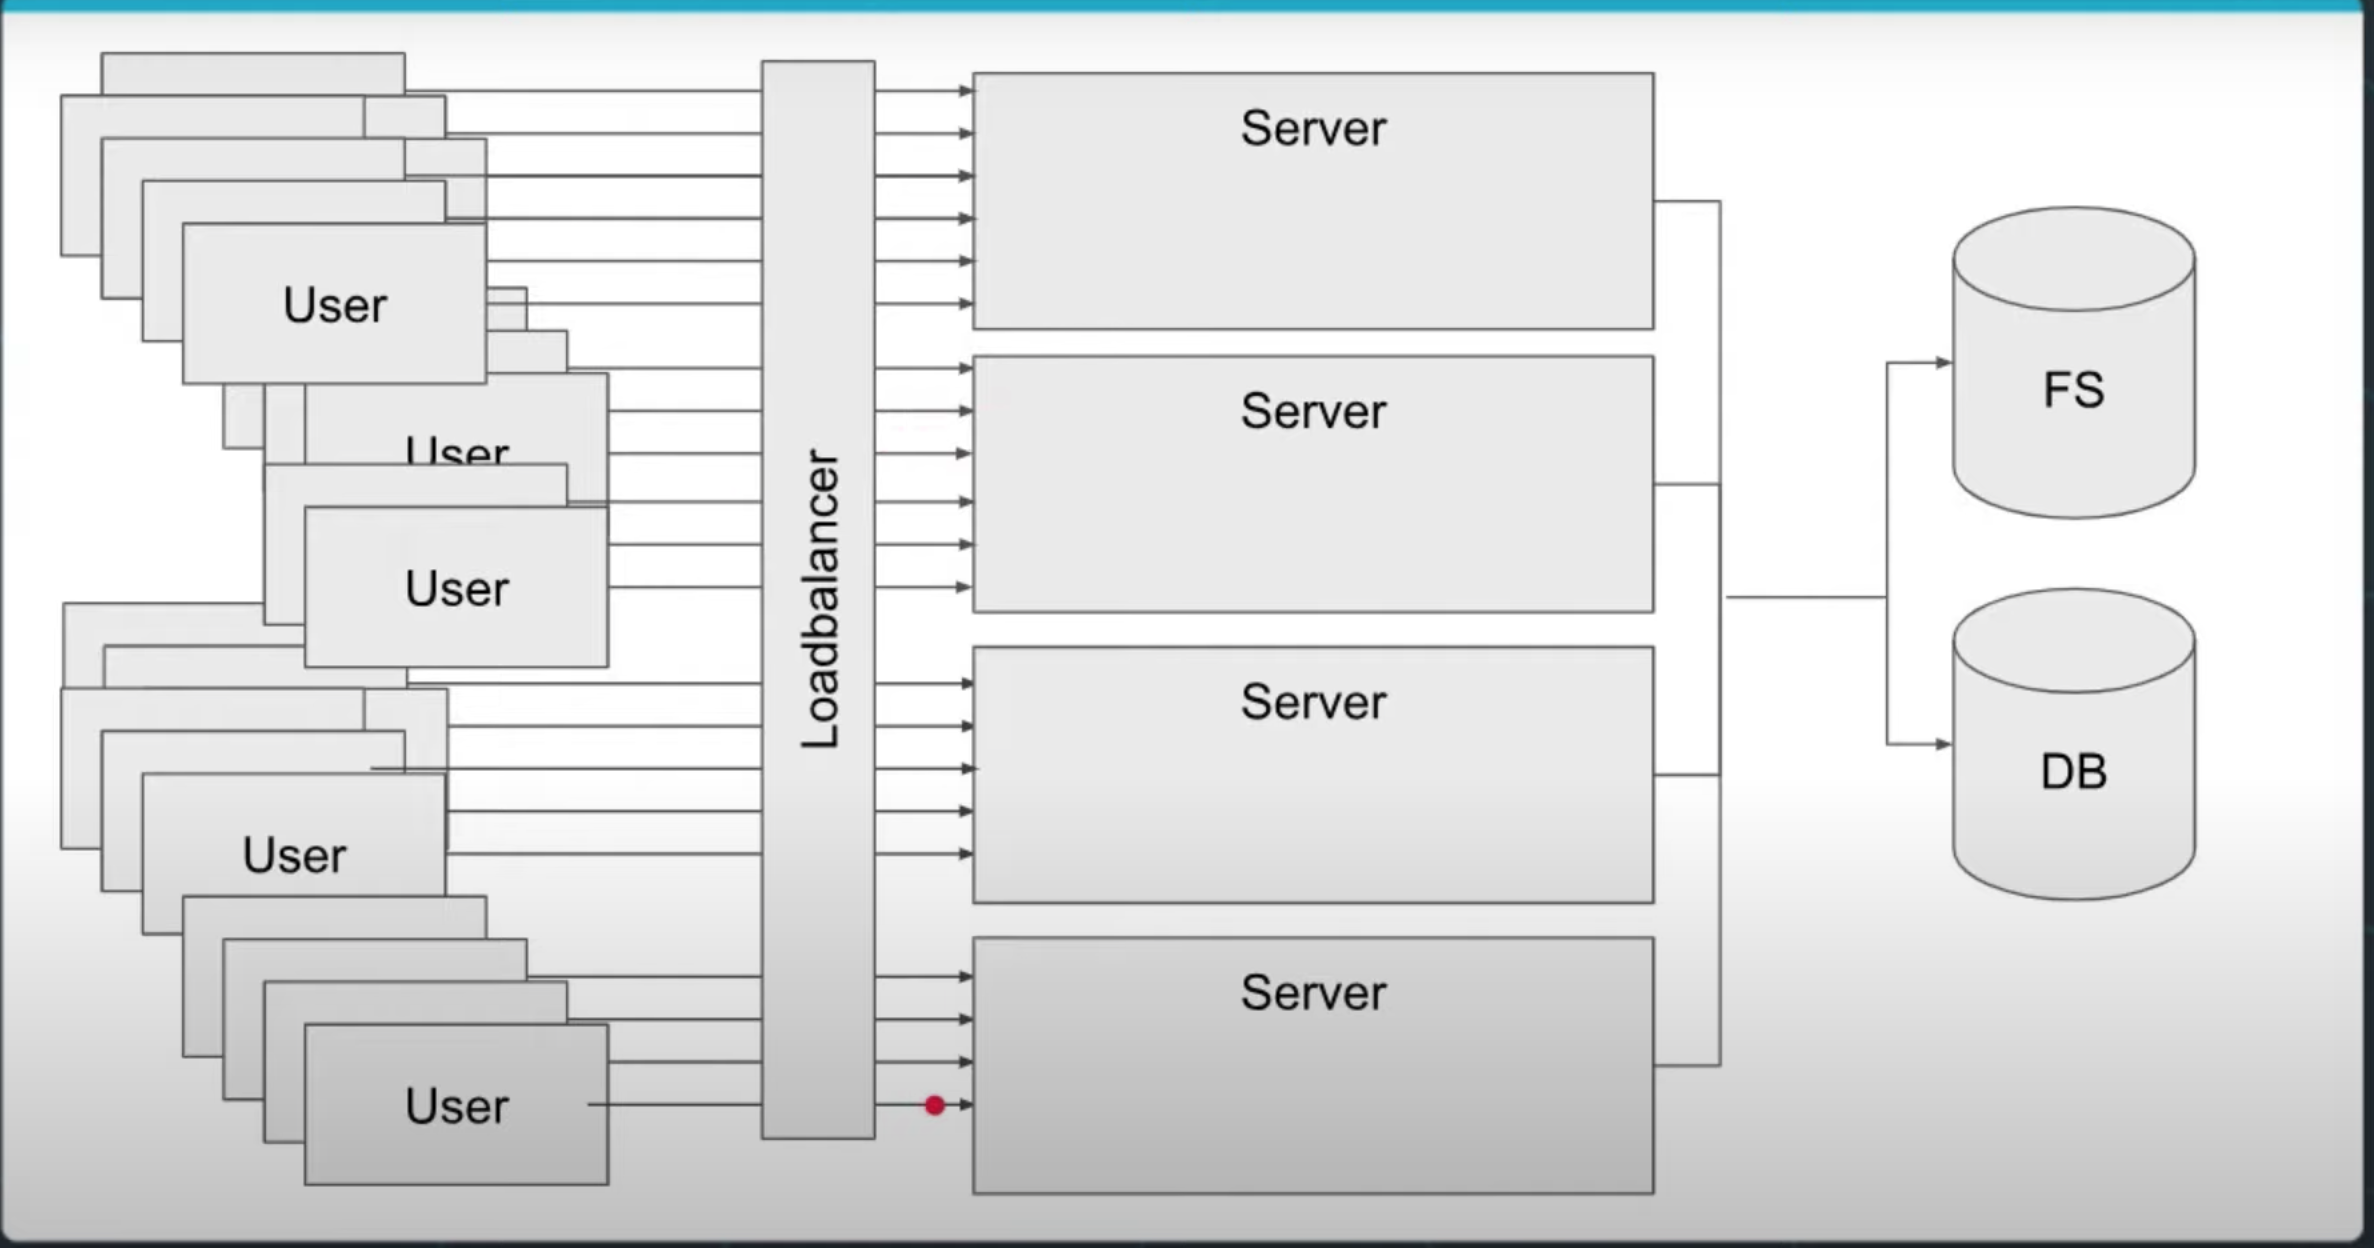
-
AWS Autoscaling Group Autoscaling Triggers
AWS offers a detailed article on all of the options to scale your elastic beanstalk deployments: https://docs.aws.amazon.com/elasticbeanstalk/latest/dg/environments-cfg-autoscaling-triggers.html -
Bottlenecks - Scaling the Whole System
-
AWS RDS Autoscaling Configuration
AWS offers a great resource describing scaling of RDS: https://aws.amazon.com/blogs/database/scaling-your-amazon-rds-instance-vertically-and-horizontally/ -
Note: AWS uses Vertical Scaling to refer to Scaling Up and Horizontal Scaling to refer to scaling out.

-
Automatic Bug Reporting
We discuss Sentry to automatically catch errors and provide a stack trace to developers so we can quickly find and fix bugs!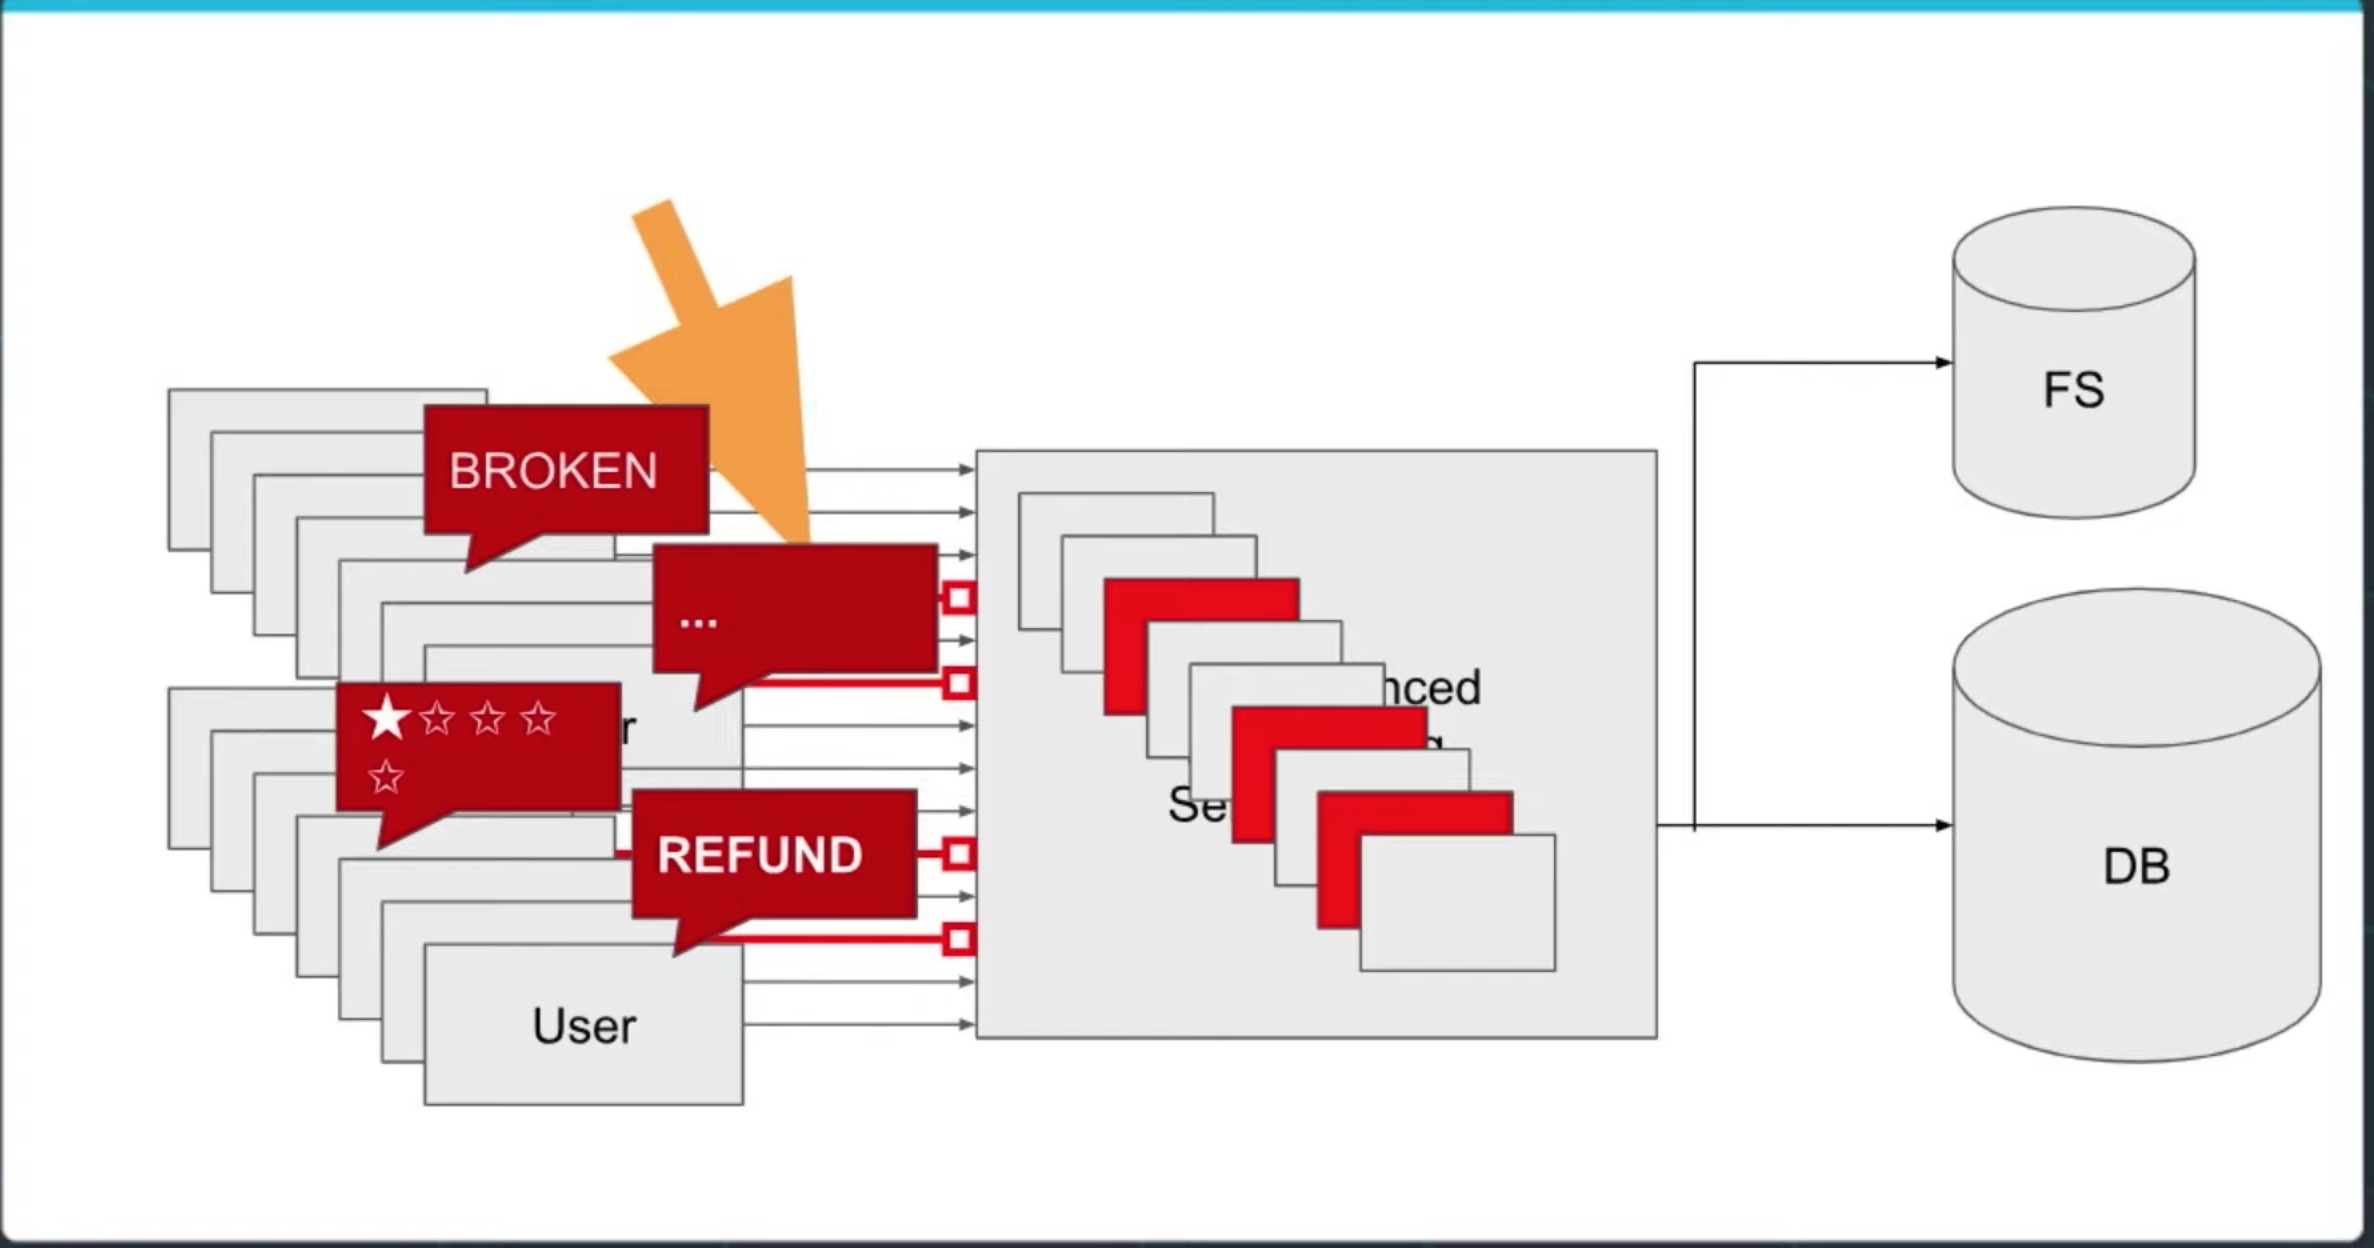
-
Testing Concurrency
As a cloud developer, you'll often want to test how your cloud will react and perform under high load.
Siege is a lightweight CLI tool to create a large number of concurrent requests to simulate this kind of situation.
It's strongly encouraged to read the manual and, if you're up for it, try issuing some siege tests on your local development RestAPI server. -
WARNING! Amazon Web Services isn't really "cool" with load testing or other forms of aggressive testing like penetration testing on their platform.
Be cautious before running these kinds of tests on AWS infrastructure to prevent your local IP from being blocked or your services being suspended. -
Monitoring the State of the System
- We'll introduce:
- CloudFlare for improved DNS with monitoring and failover capabilities.
- DataDog for stack performance and health status.
- AWS also has native tools to help monitor performance called CloudWatch.
- We'll introduce:

-
Starter Code
The project starter code can be found here: Image Filter Starter Code -
Getting Started
-
Setup Node Environment
You'll need to create a new node server.
Open a new terminal within the project directory and run:- Initialize a new project:
npm i - run the development server with
npm run dev
- Initialize a new project:
-
Create a new endpoint in the
server.tsfile- The starter code has a task for you to complete an endpoint in
./src/server.tswhich uses query parameter to download an image from a public URL, filter the image, and return the result. - We've included a few helper functions to handle some of these concepts and we're importing it for you at the top of the
./src/server.tsfile.
import {filterImageFromURL, deleteLocalFiles} from './util/util';
- The starter code has a task for you to complete an endpoint in
-
Deploying your system
Follow the process described in the course toeb inita new application andeb createa new environment to deploy your image-filter service!
Don't forget you can useeb deployto push changes. -
Submit your project, the project submission should include:
- a Git repository
- a screenshot of the elastic beanstalk application dashboard after deployement
- a link to the endpoint URL for a running elastic beanstalk deployment either in the Project README or in the project submission notes.
-
Before submitting, check if you have completed all criteria in the project rubric.
Independently-deployed services that communicate with one another through networks.
Self-contained applications that are deployed as one unit.
- Utilize a powerful, costlier machine
- Codebase is centralized and easy to manage
- Code is easily shared across the project
- Scoped for worst-case usage across all parts of the application
- Utilize smaller, cost-effective machines for what we need
- Flexibility to implement logic in a way that makes sense for the team and business
- Lean to target a specific business purpose
- Interfaces set up for building out other applications
- Try not to overcommit and pay for resources that aren't needed
- Writing code is not enough -- it must also be deployed
- Deploying Code is the act of releasing code changes to an environment.
In a professional environment, deploying code is not always simply a copy-and-paste operation. There’s often an automated process that streamlines the deployment of code. When we deploy code, we need to consider the impact of factors including:
-
Bugs and troubleshooting
-
Downtime
-
Ease of deployment
-
Downstream effects including changes in expected behavior
-
Deploying Code is Not Easy
Deploying changes in code is non-trivial. We have to consider the impact of potential bugs, downtime, ease of deployment, and downstream effects to consumers of the application.

-
Business Requirements Drive Teams
Teams can be organized around business needs and have a clearer focus on customer requirements. There is clear ownership on who owns what. -
Teams Can Work in Parallel
Since projects are deployed independently, teams can develop and deploy code without stepping on each others' toes. -
Flexibility in Technology
We are not limited to a certain technology and can choose what may work best for the business need or team.
- Monoliths Are Not Bad!
- Microservices designs are another architectural pattern and are not intended to replace monolith applications. We should not blindly build applications as microservices without understanding the tradeoffs. Doing so could actually decrease productivity!
- One way to think about this is to revisit our analogy with the Sports Superstore. Does it make sense for every aspiring small business owner to open and manage multiple stores at once?
- Considerations for Not Using Microservices
- System Complexity
Rather than deploying a single application, we would be deploying multiple modules separately. There is more overhead in setting up projects. - Network Latency
By introducing a network between modules, we have increased latency in application performance and will find it harder to debug our application. - Difficulty with Debugging
We can no longer rely on a stack trace or tools that can help us pinpoint where a bug is. We may end up relying on logging to find causes of issues.
- System Complexity
- Release Cycles
Software was often released a few times a year with large deployments. Now, containers and deployment strategies have made it possible to deploy multiple times a day with no downtime.

-
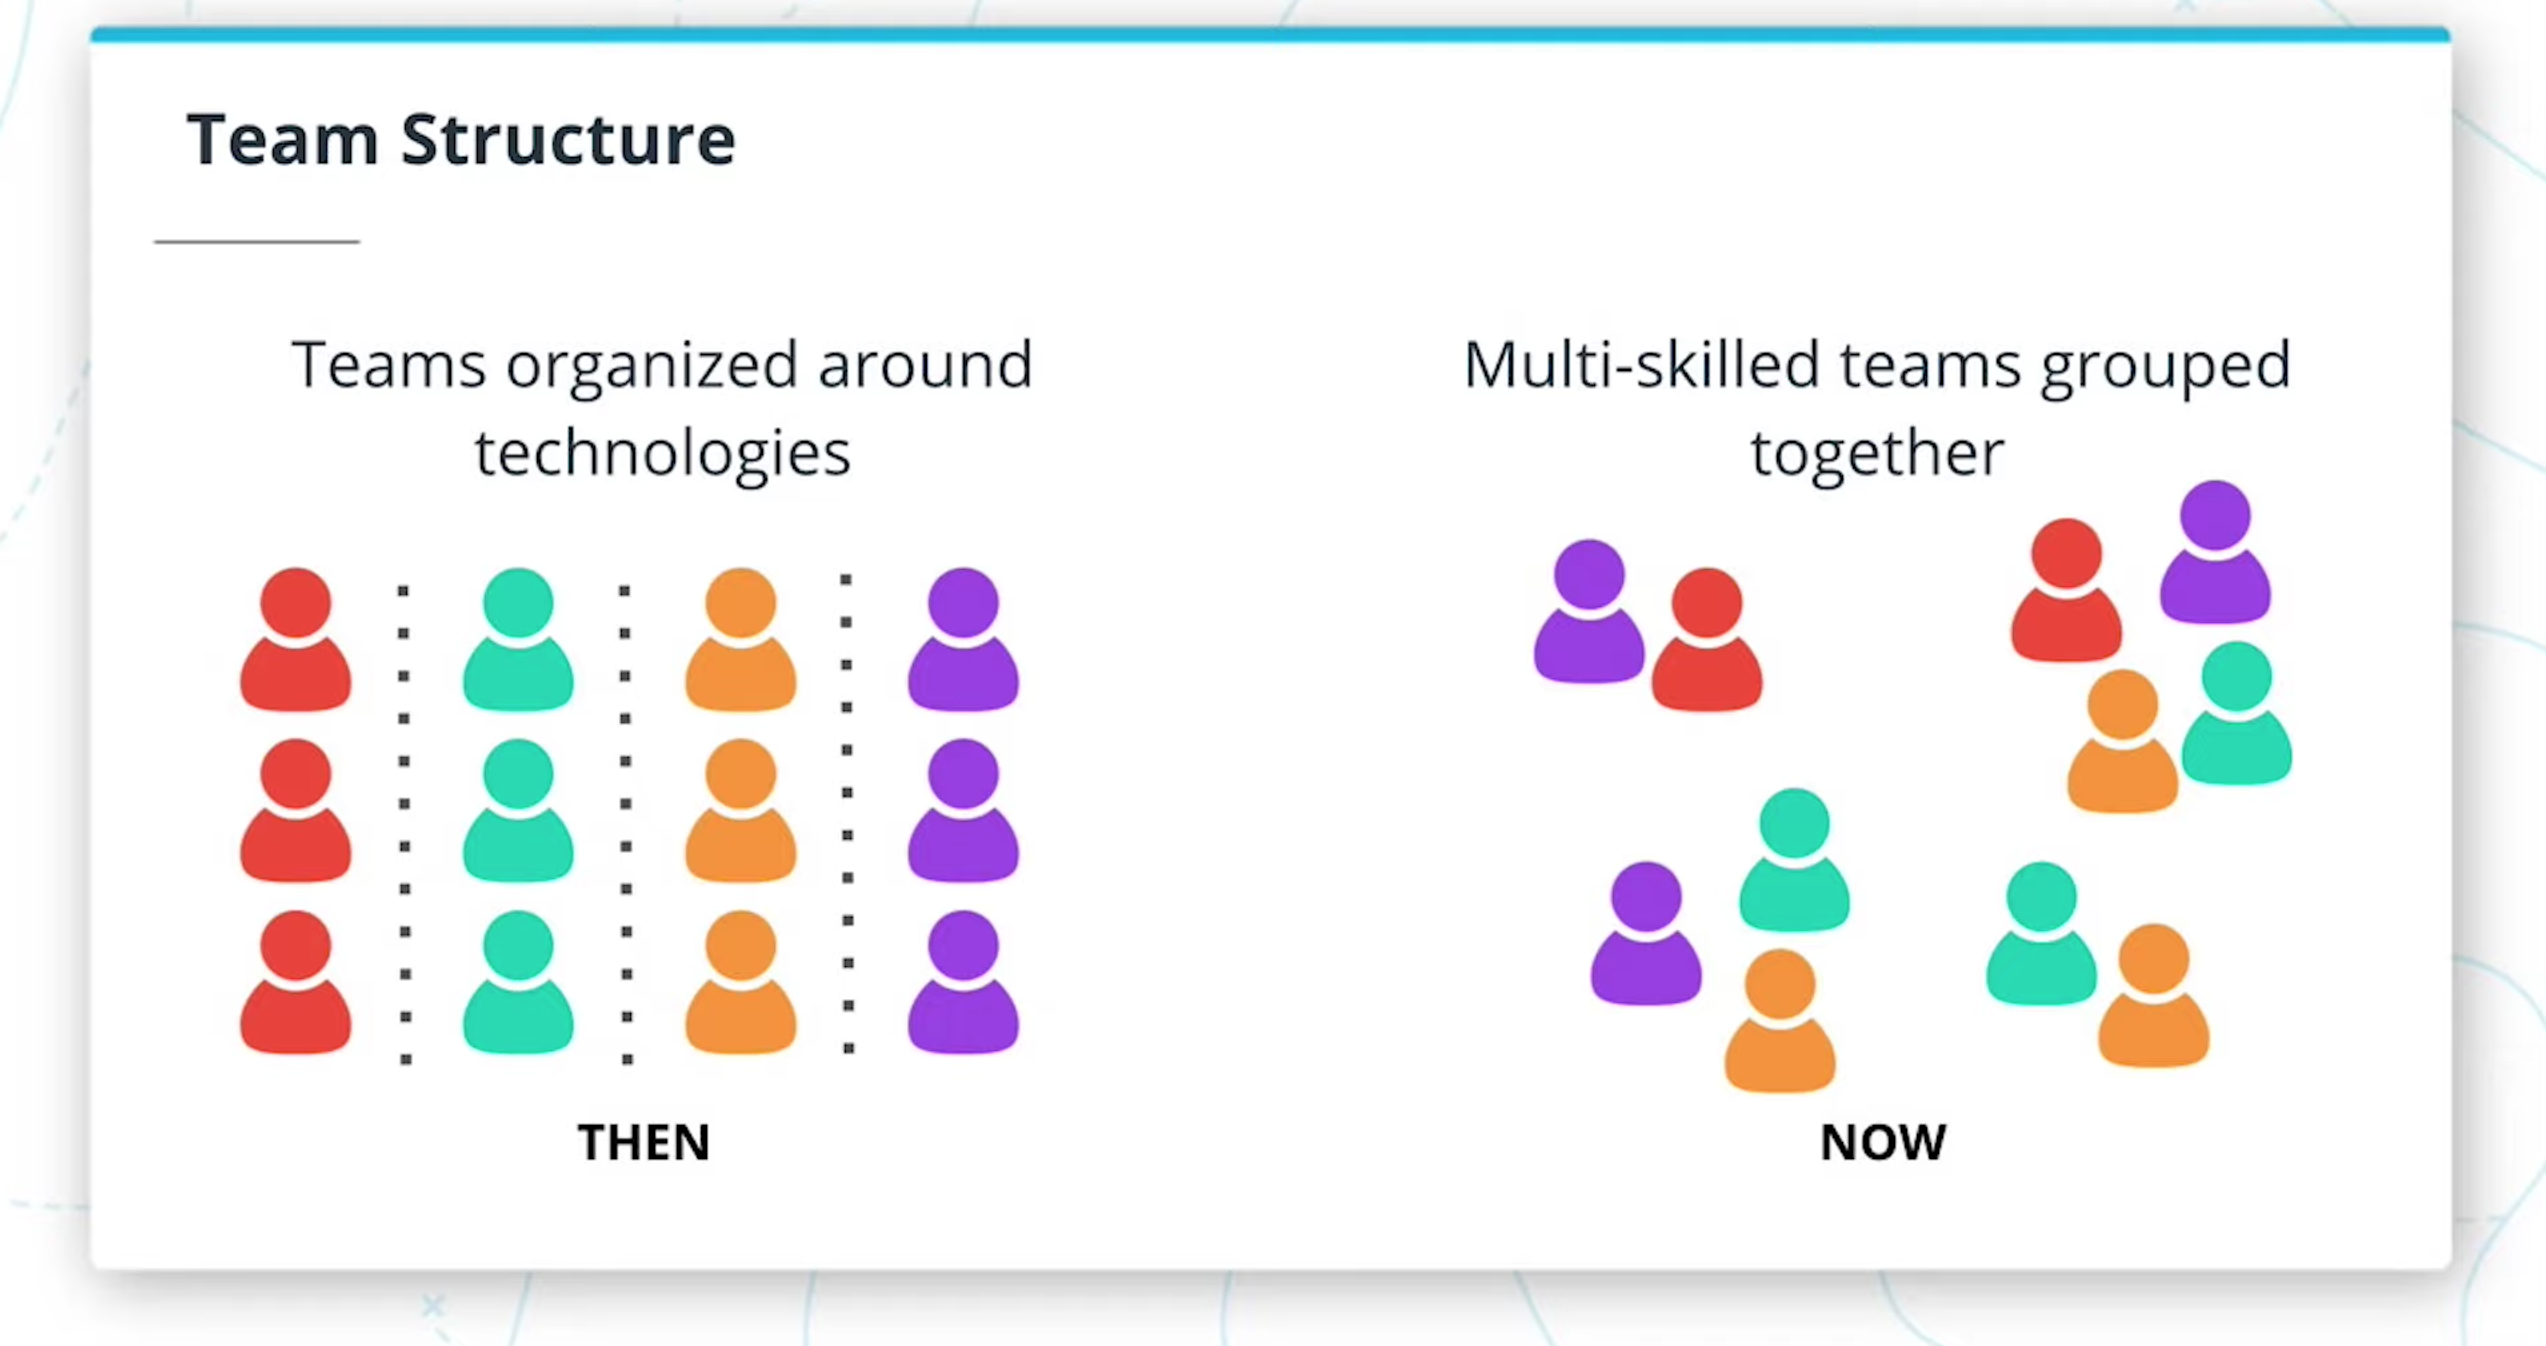
Team Structure
Teams were organized around technologies rather than business requirements.
Teams may have previously consisted of separate teams for Quality Assurance, Database Administrators, and Designers. Now, we may have multi-skilled teams grouped together where all of these roles can be found in a single team.
-
Hardware
Software was deployed to expensive mainframe computers located in data centers. Now, commodity hardware is powerful enough to run our applications. Distributed computing can help us perform large-scale data processing without the need to purchase dedicated, expensive hardware.


- Microservices Design Principles and Best Practices
- Explain different microservices architecture designs
- Divide an application into microservices
- Containers using Docker
- Build and run a container image using Docker
- Debug a container
- Store these images using a container registry
- Independent Releases and Deployments
- Understand CI/CD benefits
- Use Travis to build a CI/CD pipeline
- Integrate GitHub and CI/CD and automate testing with CI
- Understand alternatives to Travis CI including Jenkins
- Service Orchestration with Kubernetes
- Understand the fundamentals of Kubernetes
- Configure and launch an auto-scaling, self-healing Kubernetes cluster
- Deploy microservices using a Kubernetes cluster
- Understand alternative deployment strategies including ECS and Fargate
- Securing and Tuning Kubernetes Services for Production
- Use a reverse proxy to direct requests to the appropriate backend
- Securing the microservices
- Configure scaling and self-healing for each service
- Understand the differences between internal and external traffic
- Debugging, Monitoring, and Logging
- Use best practices for logging with microservices
- Use logs to capture metrics for debugging
- Implement monitoring and logging for microservices deployment
- Improve resilience and availability into cloud applications
Please create an account for each of these services:
Software Requirements Please install these so you can run them on the command line:


- Microservices are an architectural style where an application is composed of modules that can be independently developed and deployed.
- In monoliths, all the components of the application are built into a single application.
Microservice Benefits
- Scale
Lean applications that are able to tailor their logic and infrastructure to their specific business needs. More-easily architected for horizontally-scaling. - Development in Parallel
Teams can develop and deploy their own codebases. - Cost Effectiveness
Utilize resources only for what is necessary for the specific microservice. - Flexibility
Choose technologies that make the most sense for the team and business.
- Any application that can be built as a monolith can be built as a microservice.
- It’s up to you to weigh out the benefits of choosing one over the other.
- Oftentimes, microservices are harder to manage and take more investment to initially set up


Technical Properties
-
Communication --> REST
- Services communicate through a network
- REST is currently the most-commonly used network interface
-
Independently Deployed
- Deployment to one service should not affect another
-
Fault Tolerant
- Diligence in writing code that can anticipate when another microservice isn’t working
-
Alternatives to REST
While REST is the most popular form of network communication used for microservices, there are many other protocols that can be used.
The following are some other ways microservices can communicate with one another:- Publish-Subscribe
- Queues
- gRPC
- SOAP
- GraphQL
-
Other The following has some more context on microservices in greater detail. More on Microservices: https://martinfowler.com/articles/microservices.html


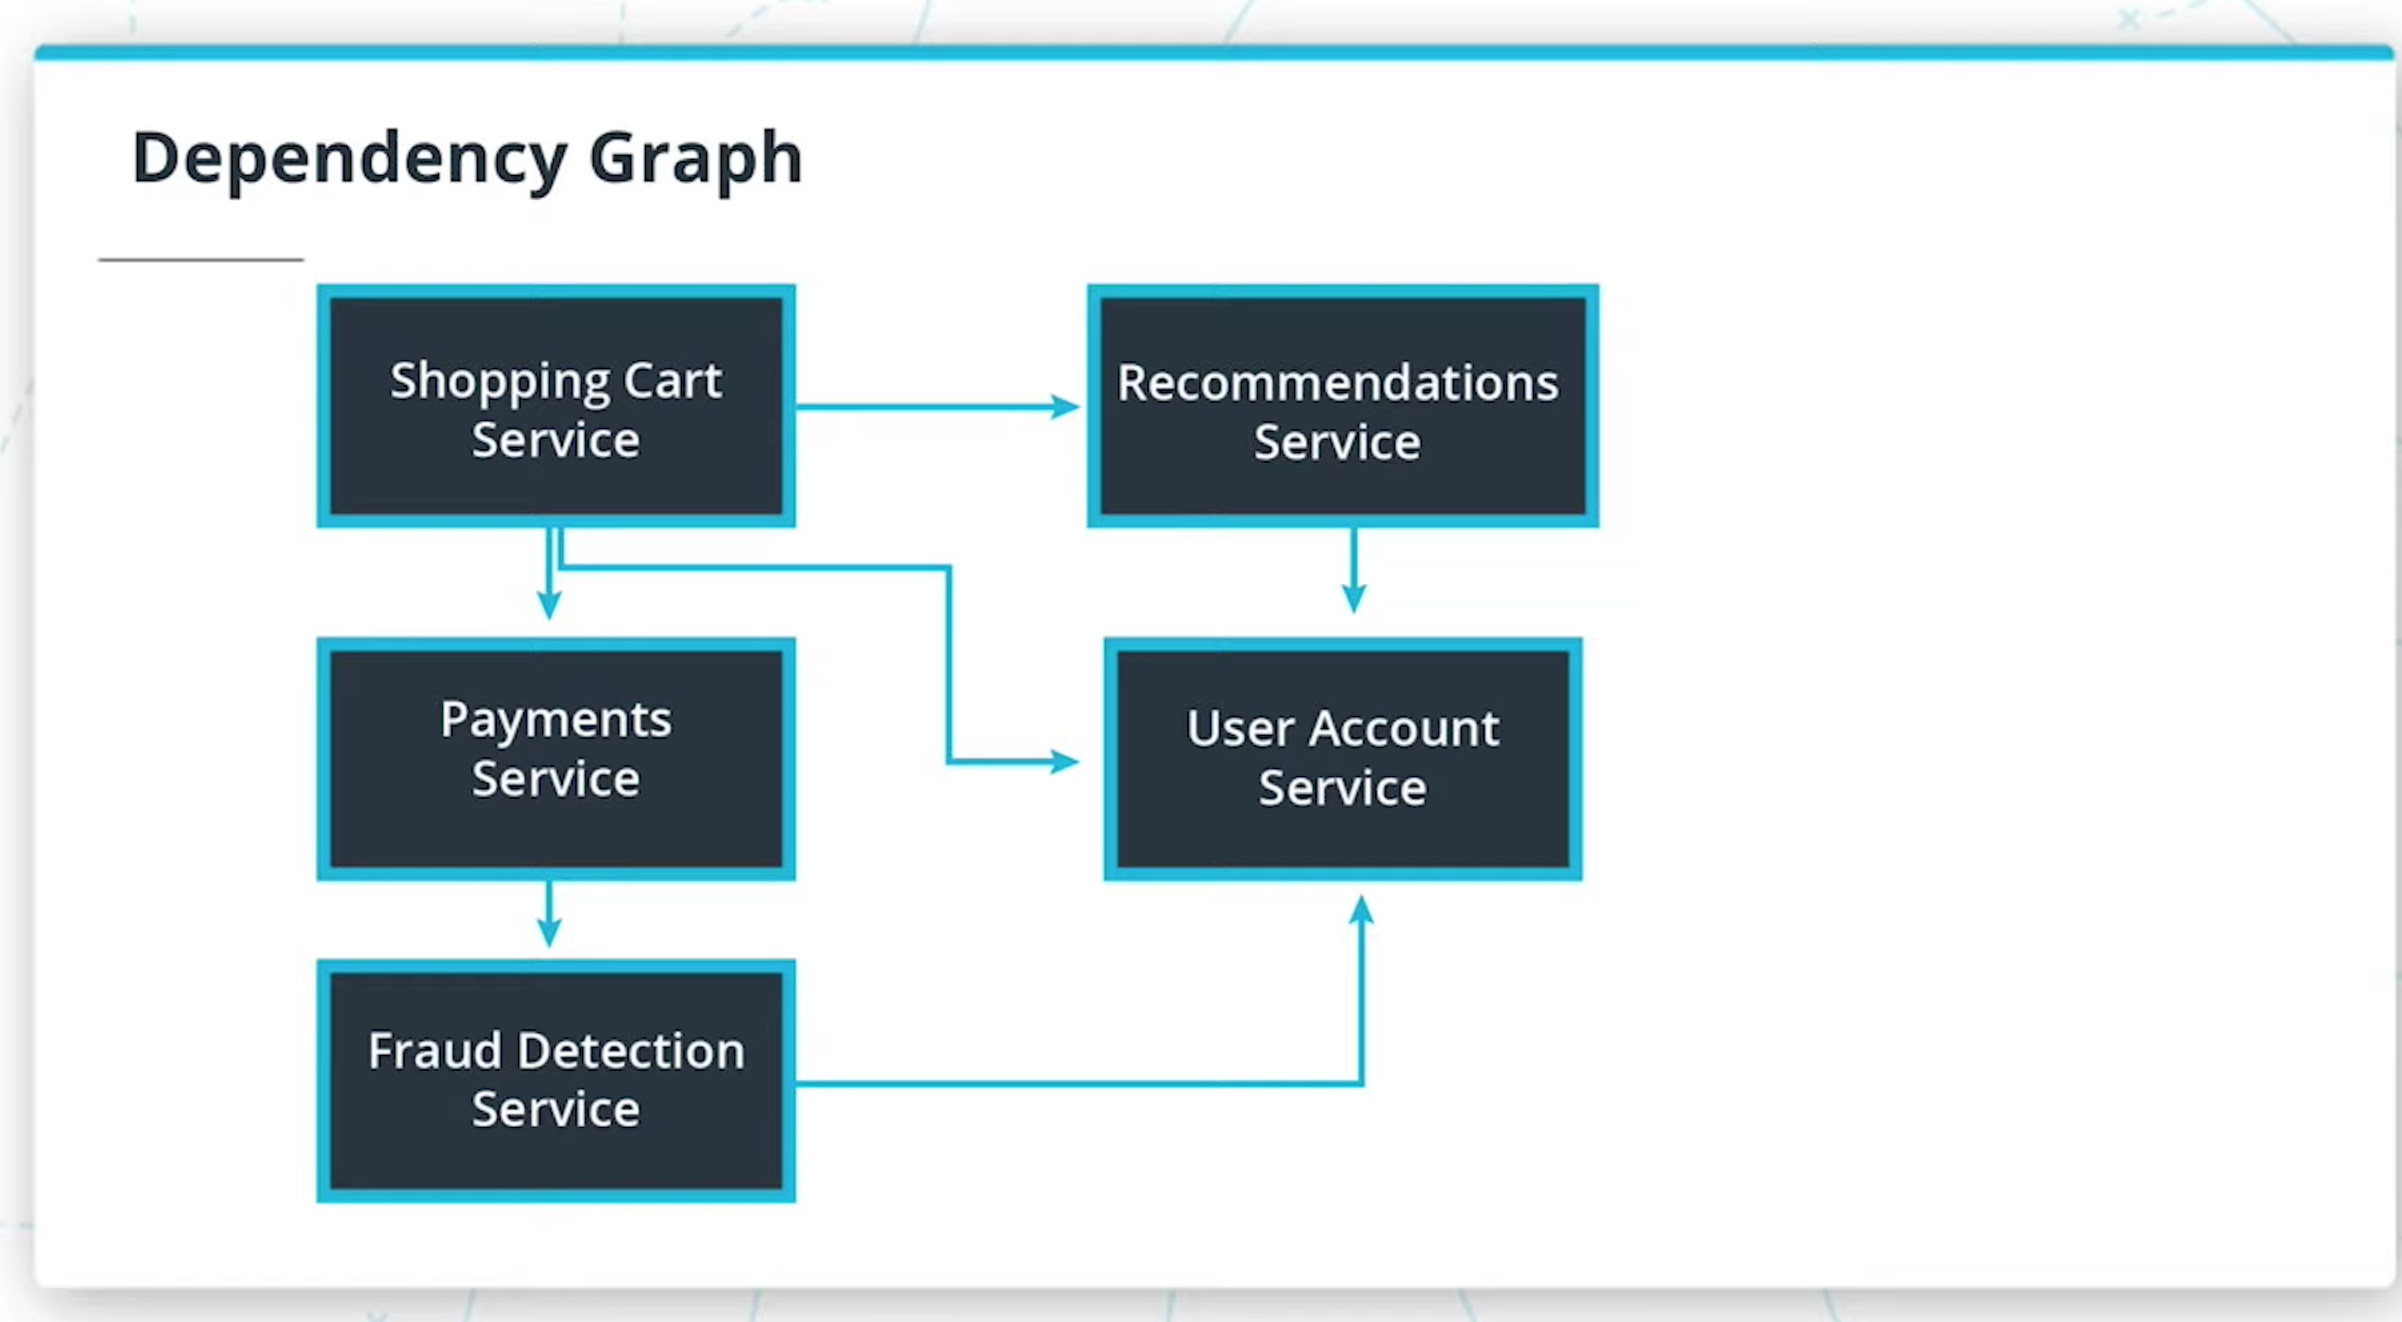
- Map Your Dependencies
- It's important to understand the application you're working with before breaking it apart.
- One strategy is to map out the modules and their dependencies as a directed graph to understand the downstream impact of your changes.
- Where to Start?
- There’s no hard rule: choose the part of the application that makes the most sense to you.
- Dependency graph serves merely as a guideline on risk based on the number of dependencies.
- A module with the least dependencies will potentially have the downstream effects meaning less risk.
- How to Start?
- The Strangler pattern is a common and effective way to migrate legacy applications.
- Rather than replacing your code with a new version, you can gradually replace components of your application.

-
Shared Code
- Code duplication can be abstracted into common libraries used across projects.
-
Further Reading
We went over some strategies and techniques on a high level. Here are some additional resources if you would like to learn more about these topics.
-
Let's plan for how we can refactor a hypothetical e-commerce monolith application.
-
Build a dependency graph of the system below. Then, using the graph and business context, decide what parts of the application would make the most sense to begin refactoring using the
strangler pattern. -
(Hint: there’s no “correct” answer for the dependency graph -- use your intuition to draw the relationships. In practice, we may have to also read through code to build these out!)
-
Architecture of hypothetical e-commerce website

-
Dependency Graph
- Dependency graphs are one way to help us visualize and make an informed decision
- We often have to use additional context with regards to business functionality to weigh decisions
- Database complexity should also be considered for refactors. Services that seem simple may have complicated refactor strategies with their databases.

- Trade-Offs
Designing software is not a binary process. There's rarely a right or wrong answer and it's often a decision of balancing both technical and business tradeoffs. - Some trade-offs include
- Cost of InfrastructureBut
- Time of Development
- Managing Technical Debt
- Scope of Refactor
Microservices may not just be refactoring code. We also need to also consider other parts of the system including databases and infrastructure.
- Microservice Benefits
- Scale
- Development in Parallel
- Cost Effectiveness
- Flexibility
- Microservice Properties
- Communication
- Independently Deployed
- Fault tolerant
- Refactor Strategies
- Dependency Graph as a starting point to understand downstream effects of modules
- Strangler Pattern as an approach to how we gradually refactor our code in pieces
Next Lesson
In this lesson, we often mentioned how microservices are deployed independently. In the next lesson, we’ll dive into this in greater detail and learn about the industry standard of deploying our code with a technology named Docker.
- Your Code is Not a Black Box...Yet
- Applications often require many packages and dependencies to run properly
- It’s common for an application to work on one computer but not another
- Deployment Headaches
- Organizations often have different development environments. These often include development and production.
- Deploying and testing the same code across different environments can be cumbersome
- In practice, it’s difficult to keep a development and production environment perfectly synchronized with regards to their versions, operating systems, dependencies, etc.
- It is common for code to work in a development environment and not behave as expected in production
- Let’s Learn About Containers!
- What containers are
- When it is helpful to use them
- How to build a container with Docker
- How to debug containers
- How to use container registries
- How to modify containers
- Your Code is Now Kind of a Black Box
- Containers are self-contained applications with all the dependencies needed to run
- Containers can be treated as one unit of deployment
- Rolling back code with containers is simply re-deploying an older snapshot
- Why Kind of?
- Containers make things easier but don’t magically make deployment problems disappear
- Code may still work in one environment and fail in another, though now we have an understanding of what might have failed
- Containers are Ephemeral
- Containers should be stateless and are expected to be destroyed.
- Containers Help Manage Dependencies
- Each container can be running its own versioned software. We resolve the issue where different applications may have different dependencies.
- Simplify Deployment
- Containers are self-contained so deployment is simply swapping out an existing container with a new one.

-
Overview
Docker is a platform that helps us manage the process of creating and managing our containers. -
Docker Image- When we have an application that we want to deploy, we can package it into a Docker Image.
- The image contains all of your code and dependencies.
-
Docker Container
A Docker Container is an ephemeral running instance of a Docker Image. -
Sample Dockerfile
# Use NodeJS base image
FROM node:13

# Create app directory in Docker
WORKDIR /usr/src/app

# Install app dependencies by copying
# package.json and package-lock.json
COPY package*.json ./

# Install dependencies in Docker
RUN npm install

# Copy app from local environment into the Docker image
COPY . .

# Set the API’s port number
EXPOSE 8080

# Define Docker’s behavior when the image is run
CMD ["node", "server.js"]- Docker basic commands:
docker build -t simple-node . |
will run the Dockerfile to create an image |
docker images |
will print all the available images |
docker run <IMAGE_ID> |
will run a container with the image |
docker ps |
will print all the running containers |
docker kill <CONTAINER_ID> |
will terminate the container |
- Key Terms - Docker
Base Image |
A set of common dependencies built into a Docker image that acts as a starting point to build an application’s Docker images to reduce build times |
Container |
Grouped software dependencies and packages that make it easier and more reliable to deploy software |
Container Registry |
A centralized place to store container images |
Docker-compose |
A tool used to run multiple Docker containers at once; often used to specify dependent relationships between containers |
Dockerfile |
A file containing instructions on how to translate an application into an image that can be run in containers |
Ephemeral |
Software property where an application is expected to be short-lived |
Image |
A snapshot of dependencies and code used by Docker containers to run an application |
- Further Optional Research on Docker
Dockerfiles are very open-ended and can become very messy very quickly.
The following is an article on some best practices for writing Dockerfiles:
-
Development
Troubleshooting Docker Containers is different as we lose access to some of our development tools. -
Viewing Logs
docker logs -
Attaching to a Container
docker exec -it <CONTAINER_ID> sh -
View Docker Processes
docker ps -
View Details of Docker Objects
docker inspect -
New Term
System Process: a computer program run by the operating system -
Further Research
We’ve gone over some Docker commands and how to use them to build images and run containers.
The following are some documentation on the commands for further understanding of other ways they can be useful.- More help: https://docs.docker.com/engine/reference/commandline/
- docker logs
- docker exec
- docker ps
- docker inspect
-
Let’s debug an application in a container.
A Docker image has been prepared that has an error during runtime. Using some of the commands we learned earlier, diagnose the cause of the issue. -
Key Commands
docker pull isjustintime/debug-me:latest
Downloads a container onto your development environment.docker run -d isjustintime/debug-me
Runs the image in a container as a background task so the container doesn’t prevent us from being able to run other commands in our terminal
-
Solution
docker images
docker run -d xxxxx
docker ps
docker inspect xxxxx
docker exec -it xxxxx sh -> go inside the container
# pwd
# ps aux
# exit
docker logs xxxxx


- Register image on https://docs.docker.com/registry/
- Asociate the image with the container registered:
docker tag simple-node adiazarroyo/testingnode - Login at docker:
docker login --username=adiazarroyo - Push image to registry:
docker push adiazarroyo/testingnode - Pull image to registry:
docker pull adiazarroyo/testingnode:latest - Additional Reading
Here are some more reading materials that you can reference for improving how Docker is used in a production system.
- Docker images should be considered a single unit of deployment.
- You shouldn't be editing code or making changes to the system at all in a container.
- If something is broken, you build a new image and deploy that to a new container.
| Base Image | A set of common dependencies built into a Docker image that acts as a starting point to build an application’s Docker images to reduce build times |
| Container | Grouped software dependencies and packages that make it easier and more reliable to deploy software |
| Container Registry | A centralized place to store container images |
| Docker-compose | A tool used to run multiple Docker containers at once; often used to specify dependent relationships between containers |
| Dockerfile | A file containing instructions on how to translate an application into an image that can be run in containers |
| Ephemeral | Software property where an application is expected to be short-lived |
| Image | A snapshot of dependencies and code used by Docker containers to run an application |
- We'll be going over how to streamline the process in how our code gets built and deployed.
We’ll review:
Why we use deployment pipelines
-
Best practices for deploying code
-
Understanding CI/CD
-
Using Travis as a CI tool integrated with GitHub and DockerHub
-
Deployment Pipelines
- A deployment pipeline may contain stages for committing, building, testing, and deploying code
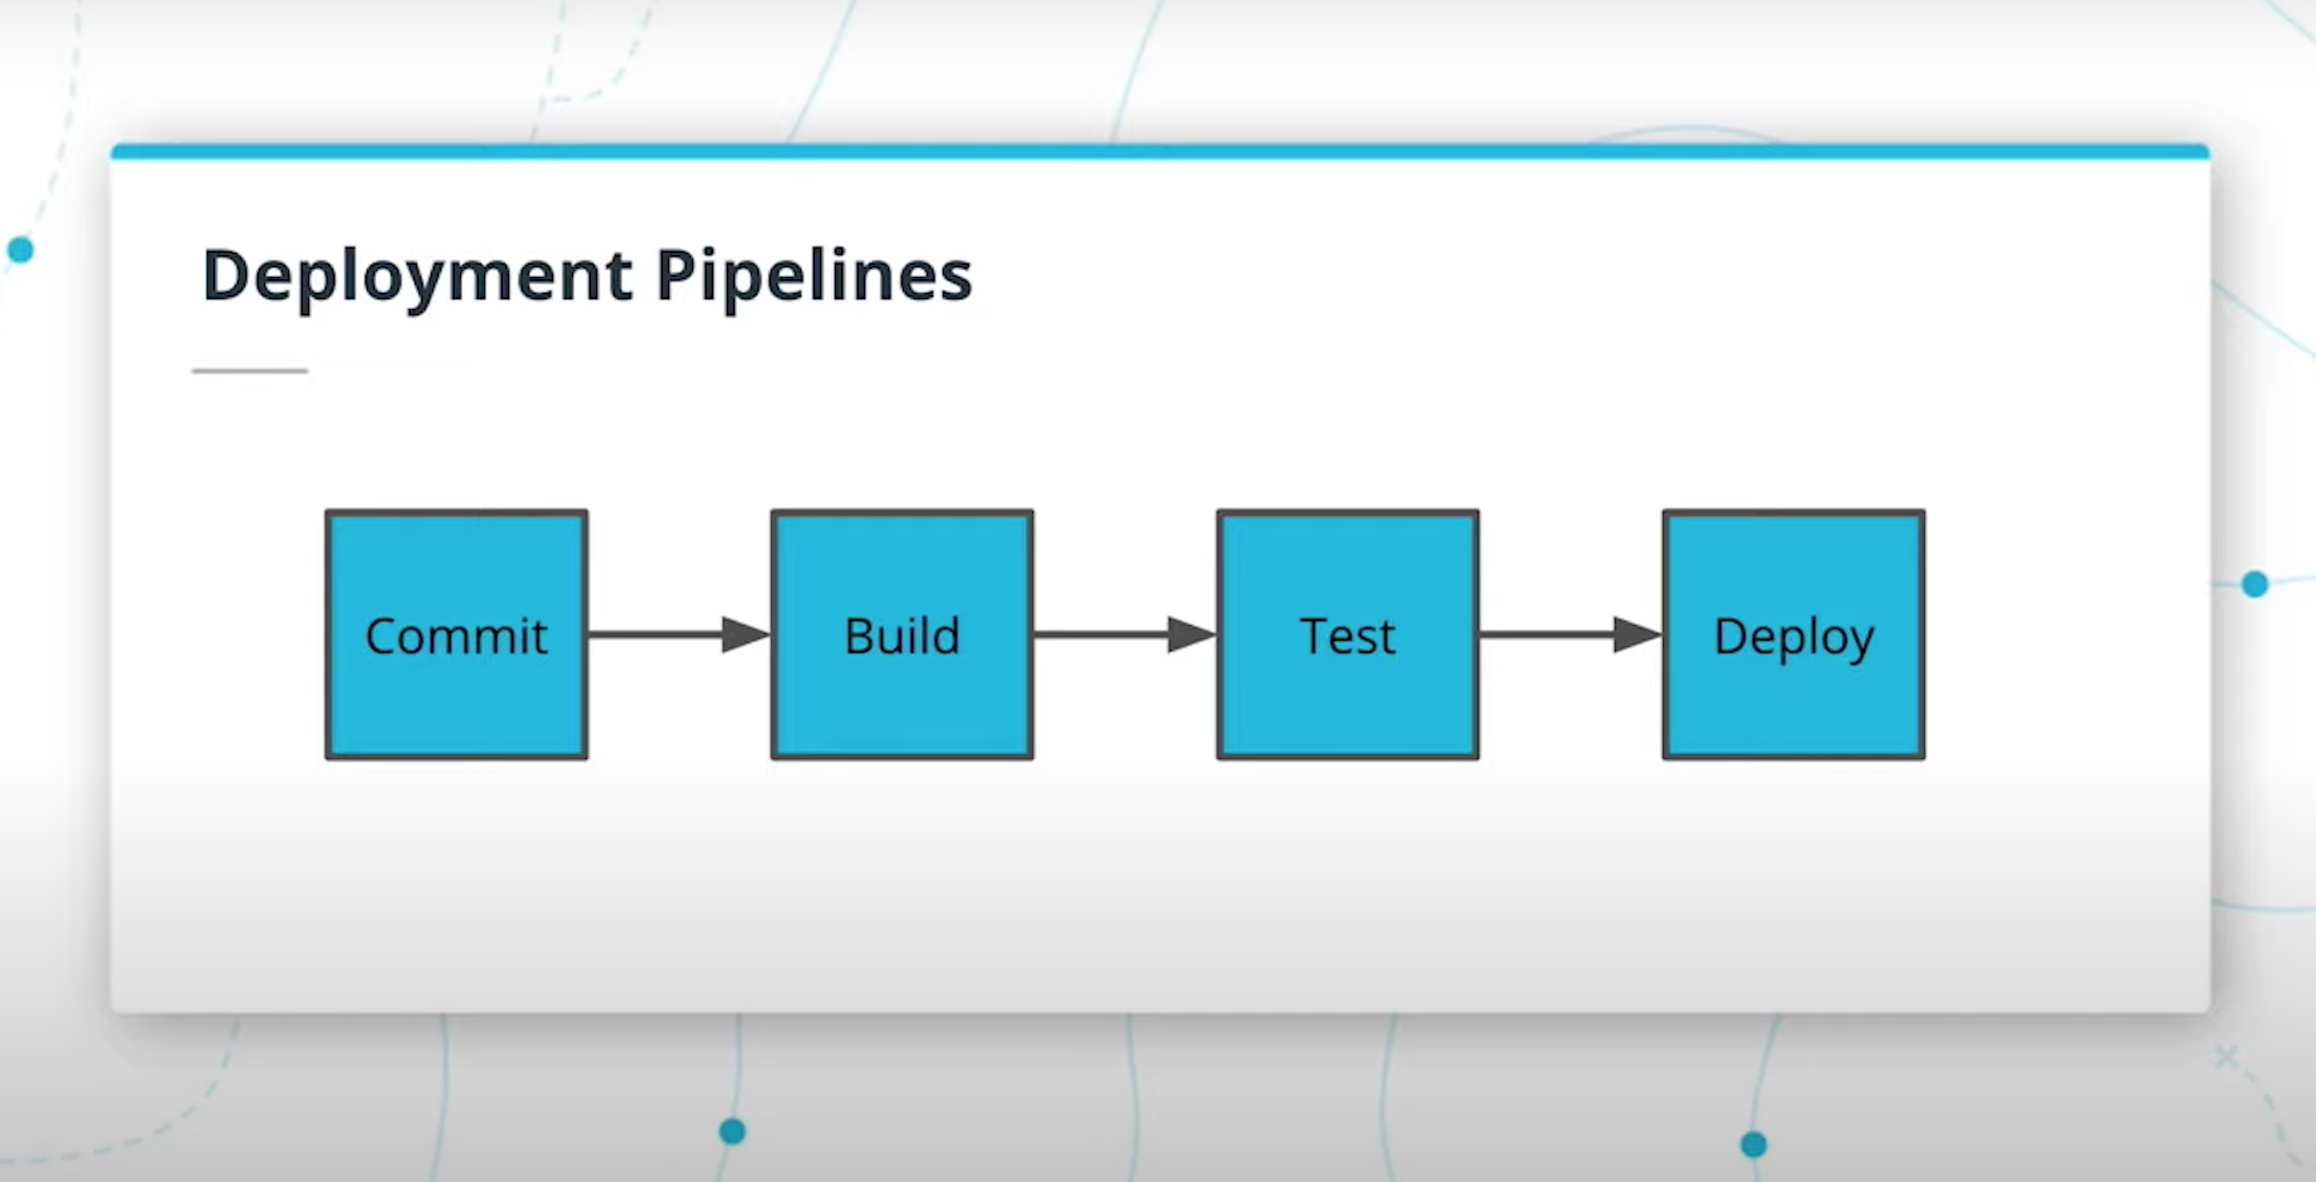
- A deployment pipeline may contain stages for committing, building, testing, and deploying code
-
We now have industry standards and tools for how we can deploy our code. Docker containers simplify what we deploy.
-
Deployment pipelines simplify how we deploy Docker containers.
-
Code is often deployed multiple times to different environments to validate functionality and minimize bugs.
-
Deployment pipelines enable us to have an automated process that is reliable and reproducible.

-
Code After Coding
Once your code is done, how do you ship it? Typically, the software development cycle will proceed with building the code, installing all of the dependencies, running automated tests, manually testing, and then repeating for each development environment the application needs to be deployed to. -
It’s a common fallacy to underestimate the time it takes to deploy code
-
Teams deploying enterprise software often involves many internal and external dependencies that may include: infrastructure changes, security changes, permissions provisioning, load testing
-
CI/CD enables us to have a streamlined process for how our code transforms from being written to being deployed to production.
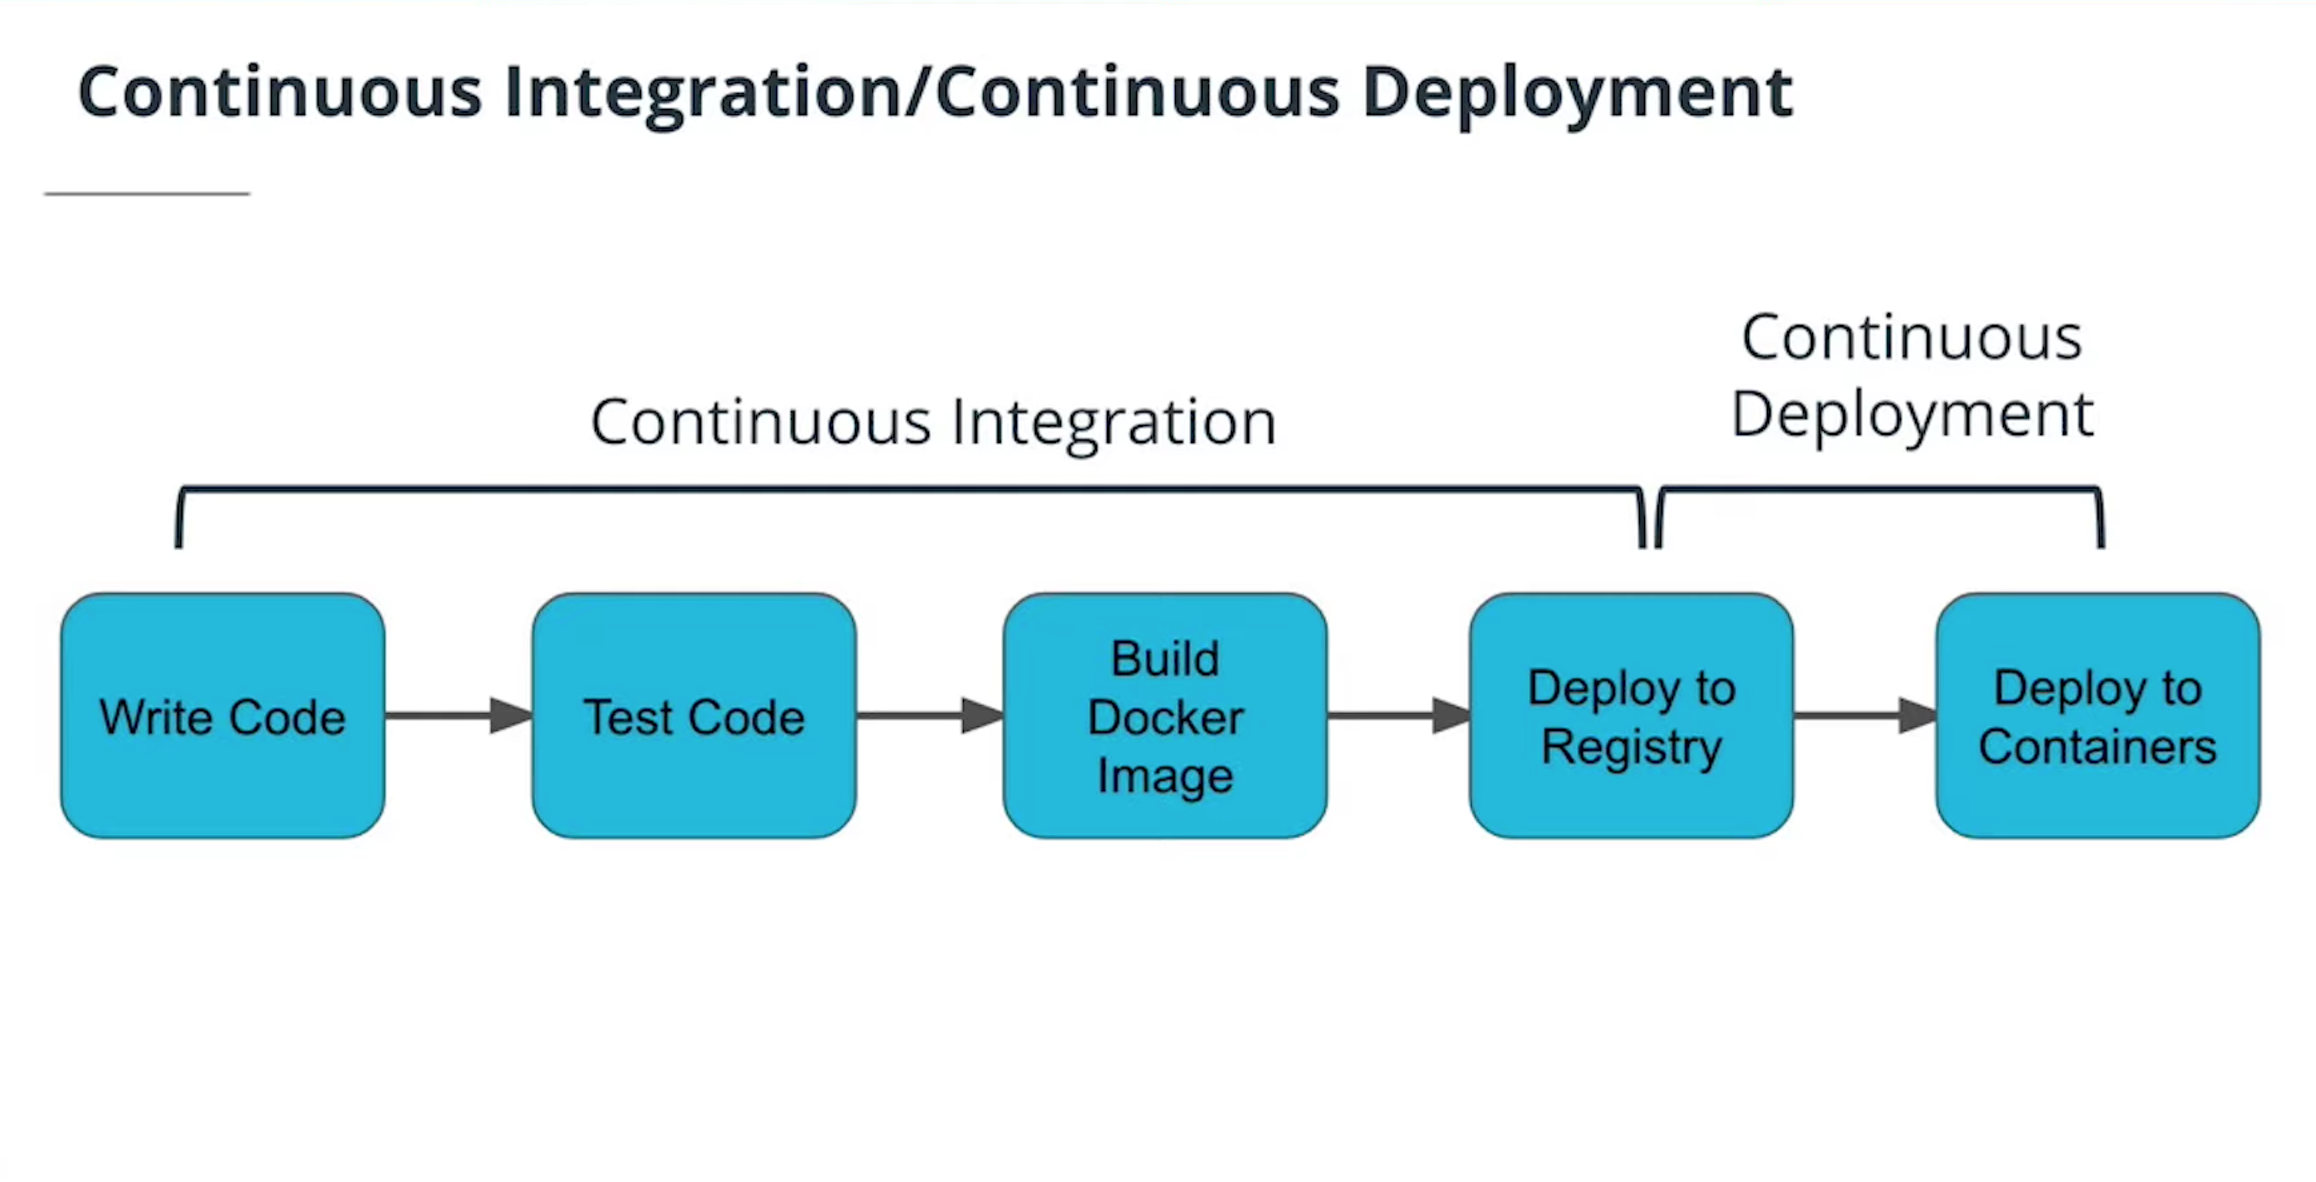
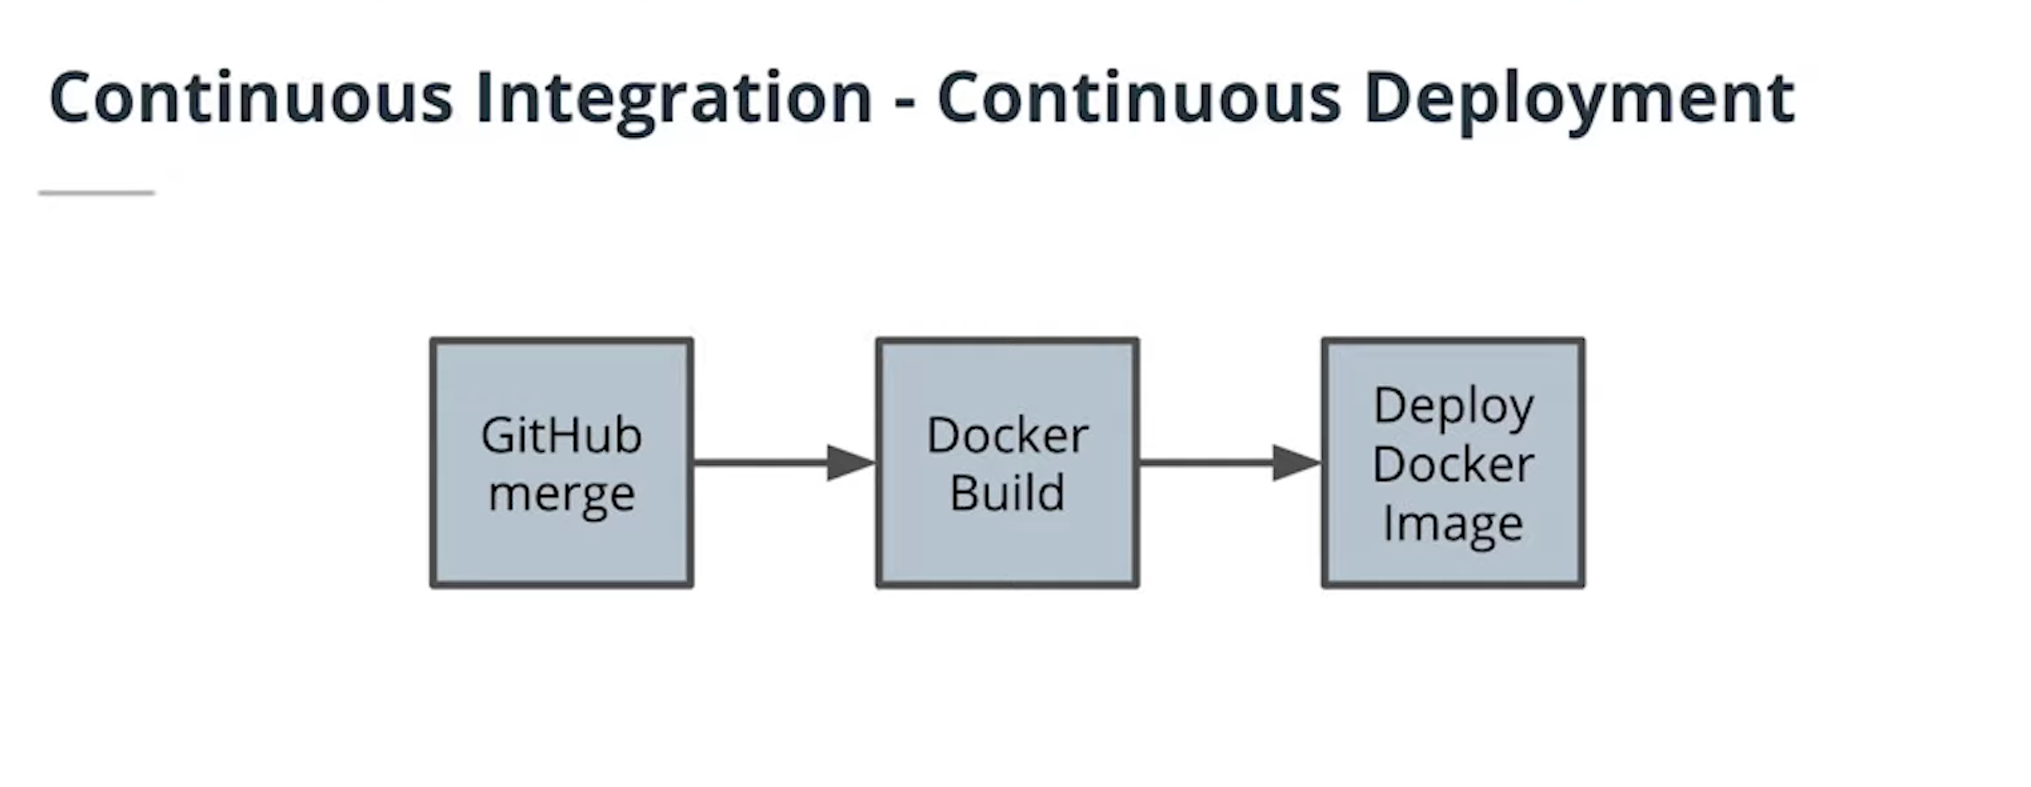
-
Continuous Integration
Process in which code is tested, built into a Docker image, and deployed to a container registry. -
Continuous Deployment
Process in which our Docker image is deployed to containers. -
Additional Benefits
By streamlining our build and deploy to an automated process, developers are provided the least privilege that they need to write their code. -
Additional Reading The following information is available for further reading on key ideas for deploying code.
Ship Early and Often -
By using a CI/CD pipeline, we reduce the risk of failed deployments from user error.
-
All of these steps can become automated.
-
If there is an issue with the deployed code, a user can revert the changes with an older container rather than backtracking by using older code and downgrading packages and dependencies.
-
Benefits of CI/CD
- Reduce risk of failed deployments
- Connecting to a production environment is a security risk
- Backing up the code is not always a comprehensive backup of the existing state since we may have other dependencies such as databases
- Packages and dependencies may have to be downgraded and would introduce downtime


- Travis is a tool that helps us with the CI process
- Travis integrates with your application using a YAML file
- YAML files are often used to specify configurations.
- Travis can be used to build and push images to DockerHub
Travis File
- The Travis file is always named
.travis.yamland stored in the top-level of your git directory. - This is detected by Travis CI and turned into a
build pipeline - Example:
language: node_js
node_js:
  - 13

services:
  - docker

# Pre-testing installs
install:
  - echo "nothing needs to be installed"

# Scripts to be run such as tests
before_script:
  - echo "no tests"

script:
  - docker --version # print the version for logging
  - docker build -t simple-node .
  - docker tag simple-node YOUR_DOCKER_HUB/simple-node:latest

# Tasks to perform after the process is successful. Formatting the Docker username and password as below enables you to programmatically log in without having the password exposed in logs.
after_success:
  - echo "$DOCKER_PASSWORD" | docker login -u "$DOCKER_USERNAME" --password-stdin
- docker push YOUR_DOCKER_HUB/simple-node- Additional Reading
https://docs.travis-ci.com/user/for-beginners/
-
Environment variables are a useful way to handle variables that shouldn’t be hard-coded into our application.
-
These values are often credentials that shouldn’t be stored in the code.
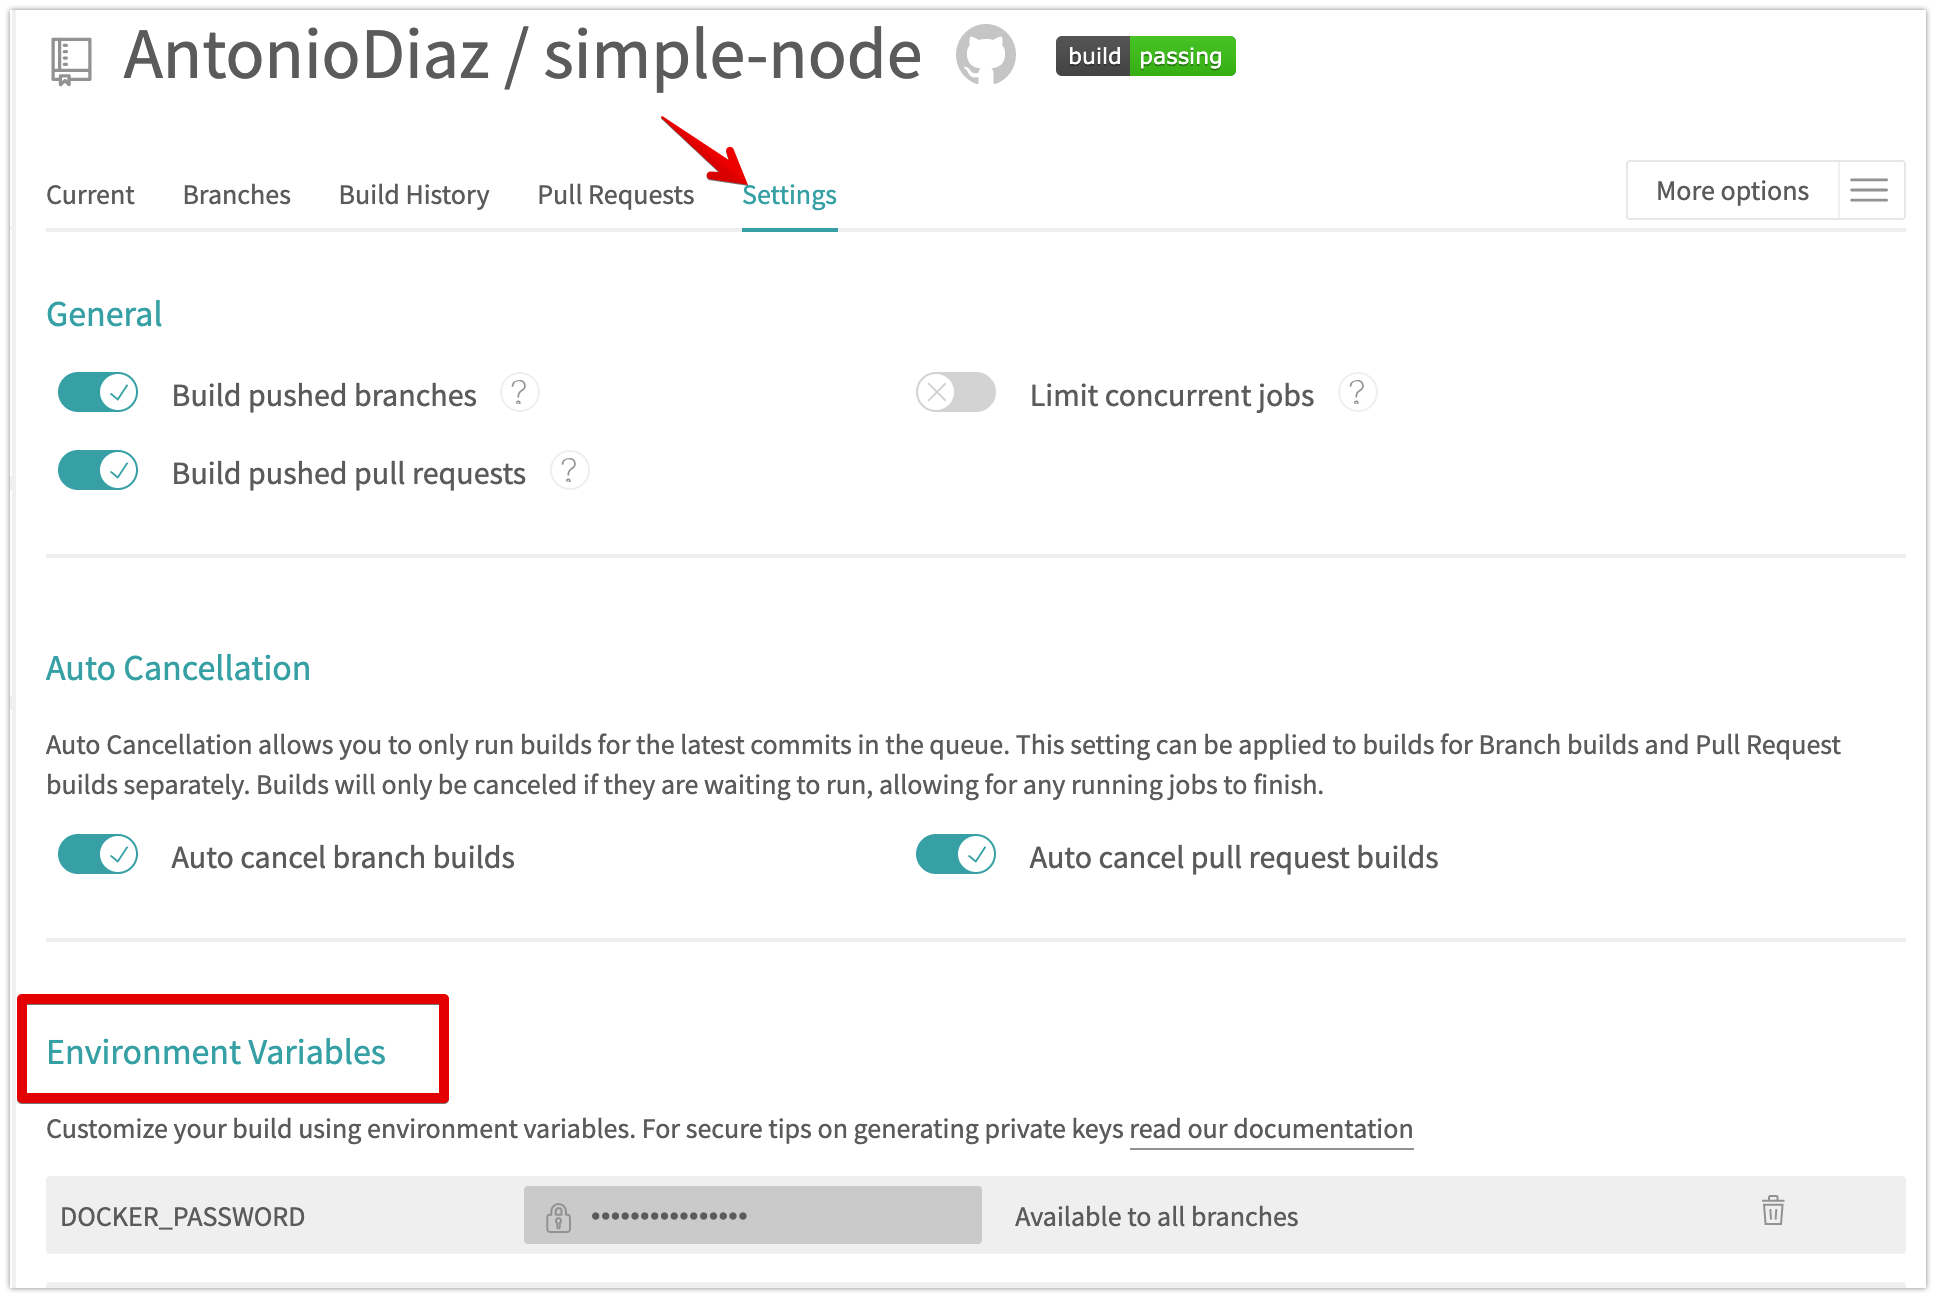
-
Aditional reading:
Best Practices in Securing Your Data

- Environment Variables in NodeJS Review
- We can set environment variables locally using the command:
export VARIABLE_NAME=VALUE - For NodeJS to pick up the environment variable to be used, we use
process.env. - To illustrate, if we set an environment variable with
export FAVORITE_FOOD=pizza, we can programmatically reference the value in NodeJS as follows:
- We can set environment variables locally using the command:
const favoriteFood = process.env.FAVORITE_FOOD;
console.log(`My favorite food is ${favoriteFood}`);
- Jenkins - most flexible but more overhead of setup
- CircleCI - alternative to Travis CI with many competing features
- AWS CodeBuild - integrates easily with other AWS tools
- Orchestration is the automated management of the lifecycle of our application
- With CI/CD, if Travis is our CI tool, then Kubernetes is our CD tool
- Orchestration helps us handle complicated workflows in deploying our application
- Helps us automate our deployment process for continuous deployment
-
Kubernetes
- A container orchestration system packed with features for automating our application’s deployment.
- Enables us to easily scale our application and ship new code.
-
Pods
- Containers often need to communicate with one another. It's not uncommon to see a deployment involving a few containers to be deployed.
- Kubernetes pods are abstractions of multiple containers and are also ephemeral.
-
Services
- Applications are often deployed with multiple
replicas. This helps withload balancingandhorizontal scaling. - Services are an abstraction of a set of pods to expose them through a network.
- Applications are often deployed with multiple
-
A service is an abstraction of pods and pods are abstractions of containers
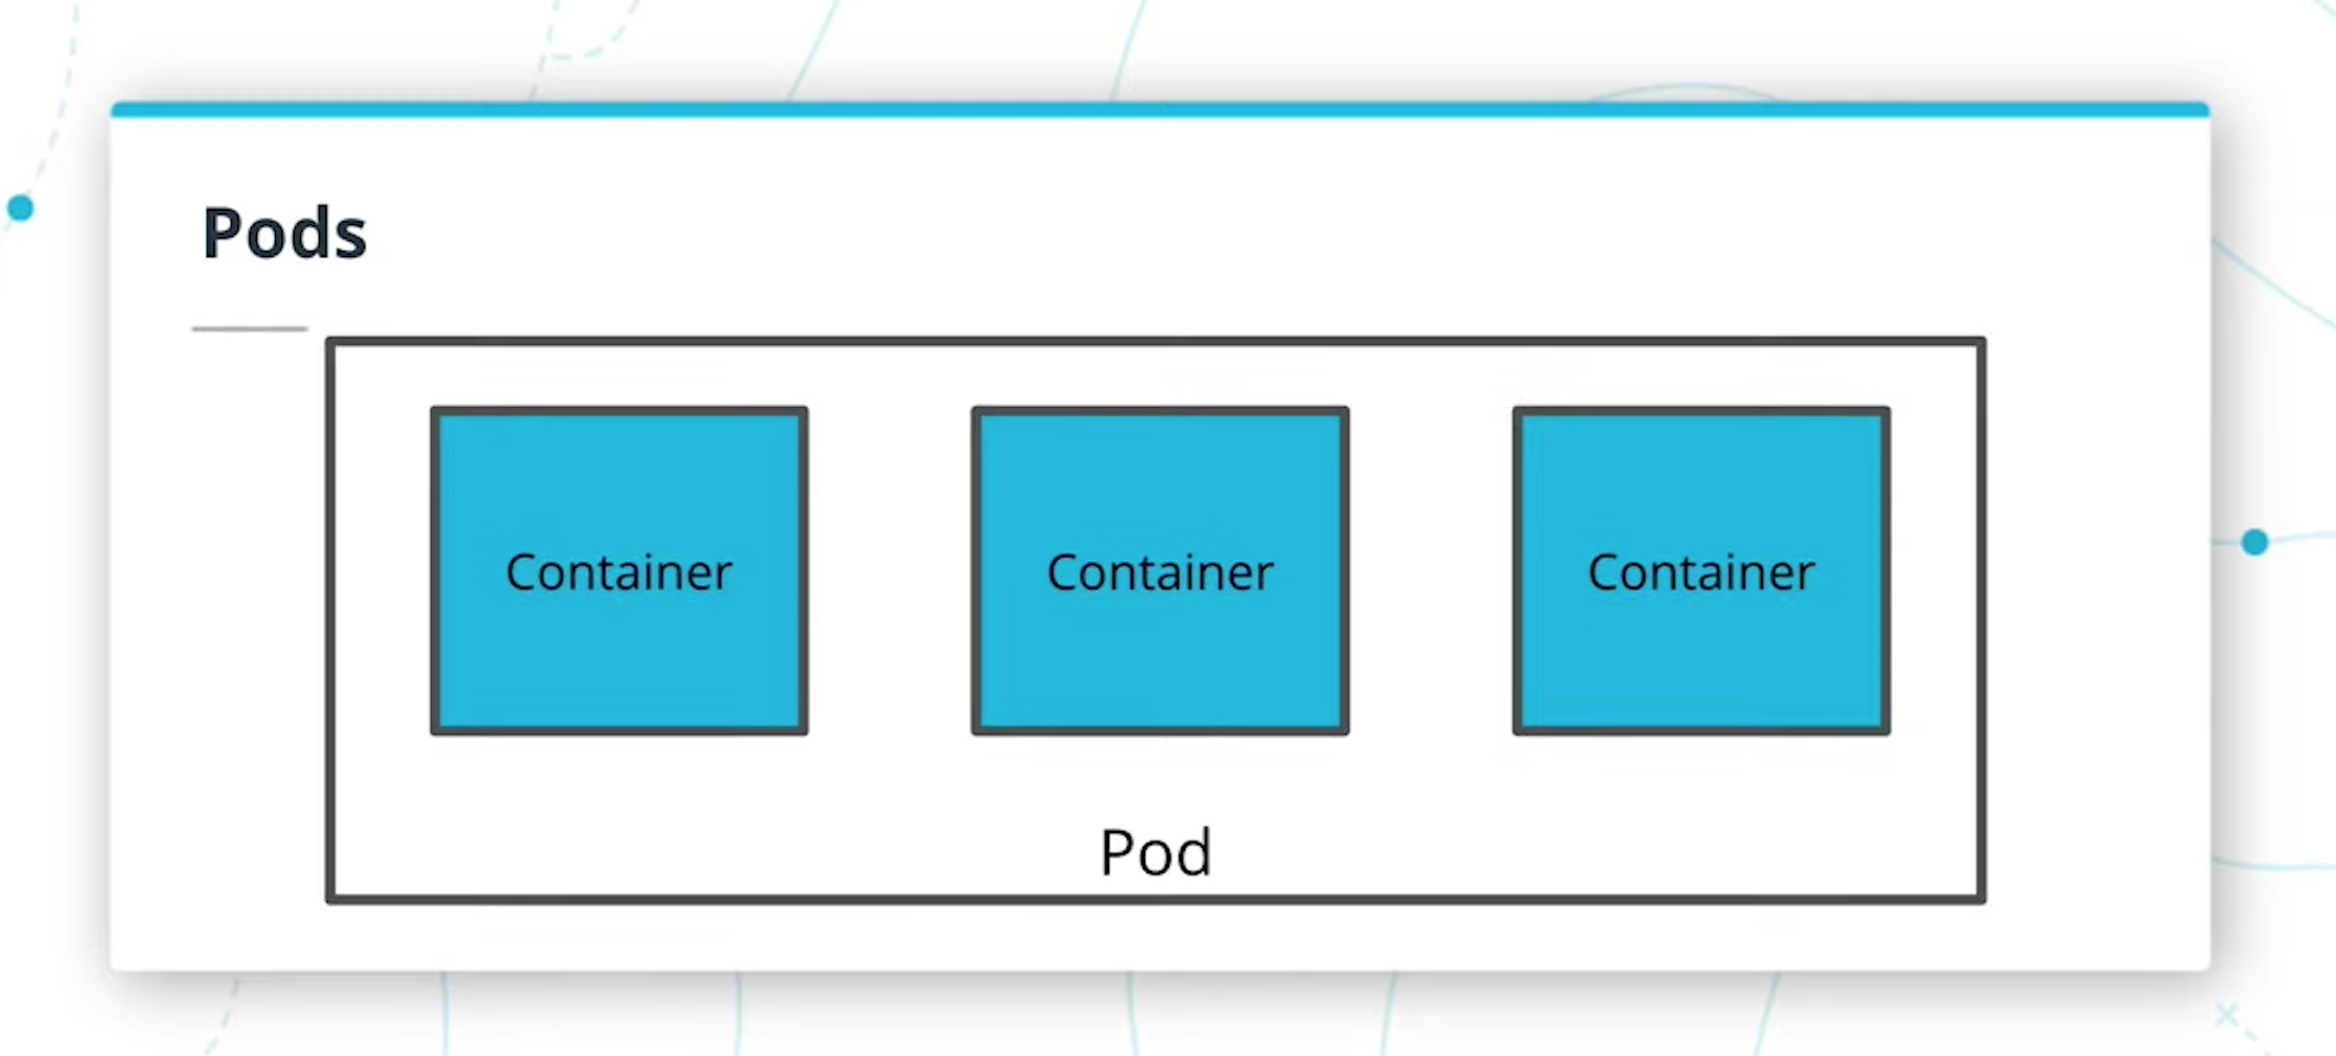
-
New terms:
Horizontal Scaling
Handling increased traffic by creating additional replicas so that traffic can be divided across the replicasKubernetes Service
An abstraction of a set of pods and interface for how to interact with the podsPods
A set of containers that are deployed togetherLoad Balancing
Handling traffic by distributing it across different endpointsReplica
A redundant copy of a resource often used for backups or load balancingConsumer
An external entity such as a user or program that interfaces with an application

AWS EKSElastic Kubernetes Service is a service that we can use to set up Kubernetes.- The
deployment.yamlfile is used to specify how our pods should be created.- Example
apiVersion: apps/v1
kind: Deployment
metadata:
  name: my-app
  labels:
    app: my-app
spec:
  replicas: 2
  selector:
    matchLabels:
      app: my-app
  template:
    metadata:
      labels:
        app: my-app
    spec:
      containers:
      - name: simple-node
        image: YOUR_DOCKER_HUB/simple-node
        ports:
        - containerPort: 80
    livenessProbe:
      httpGet:
        path: /health
        port: 8080
      initialDelaySeconds: 3
      periodSeconds: 3
- Example
- The
service.yamlfile is used to specify how our pods are exposed.- Example
apiVersion: v1
kind: Service
metadata:
  name: my-app
  labels:
    run: my-app
spec:
  ports:
  - port: 80
    protocol: TCP
  selector:
    run: my-app
- Example
Creating a Kubernetes Cluster on AWS
-
Creating an EKS Cluster
-
Create cluster in EKS
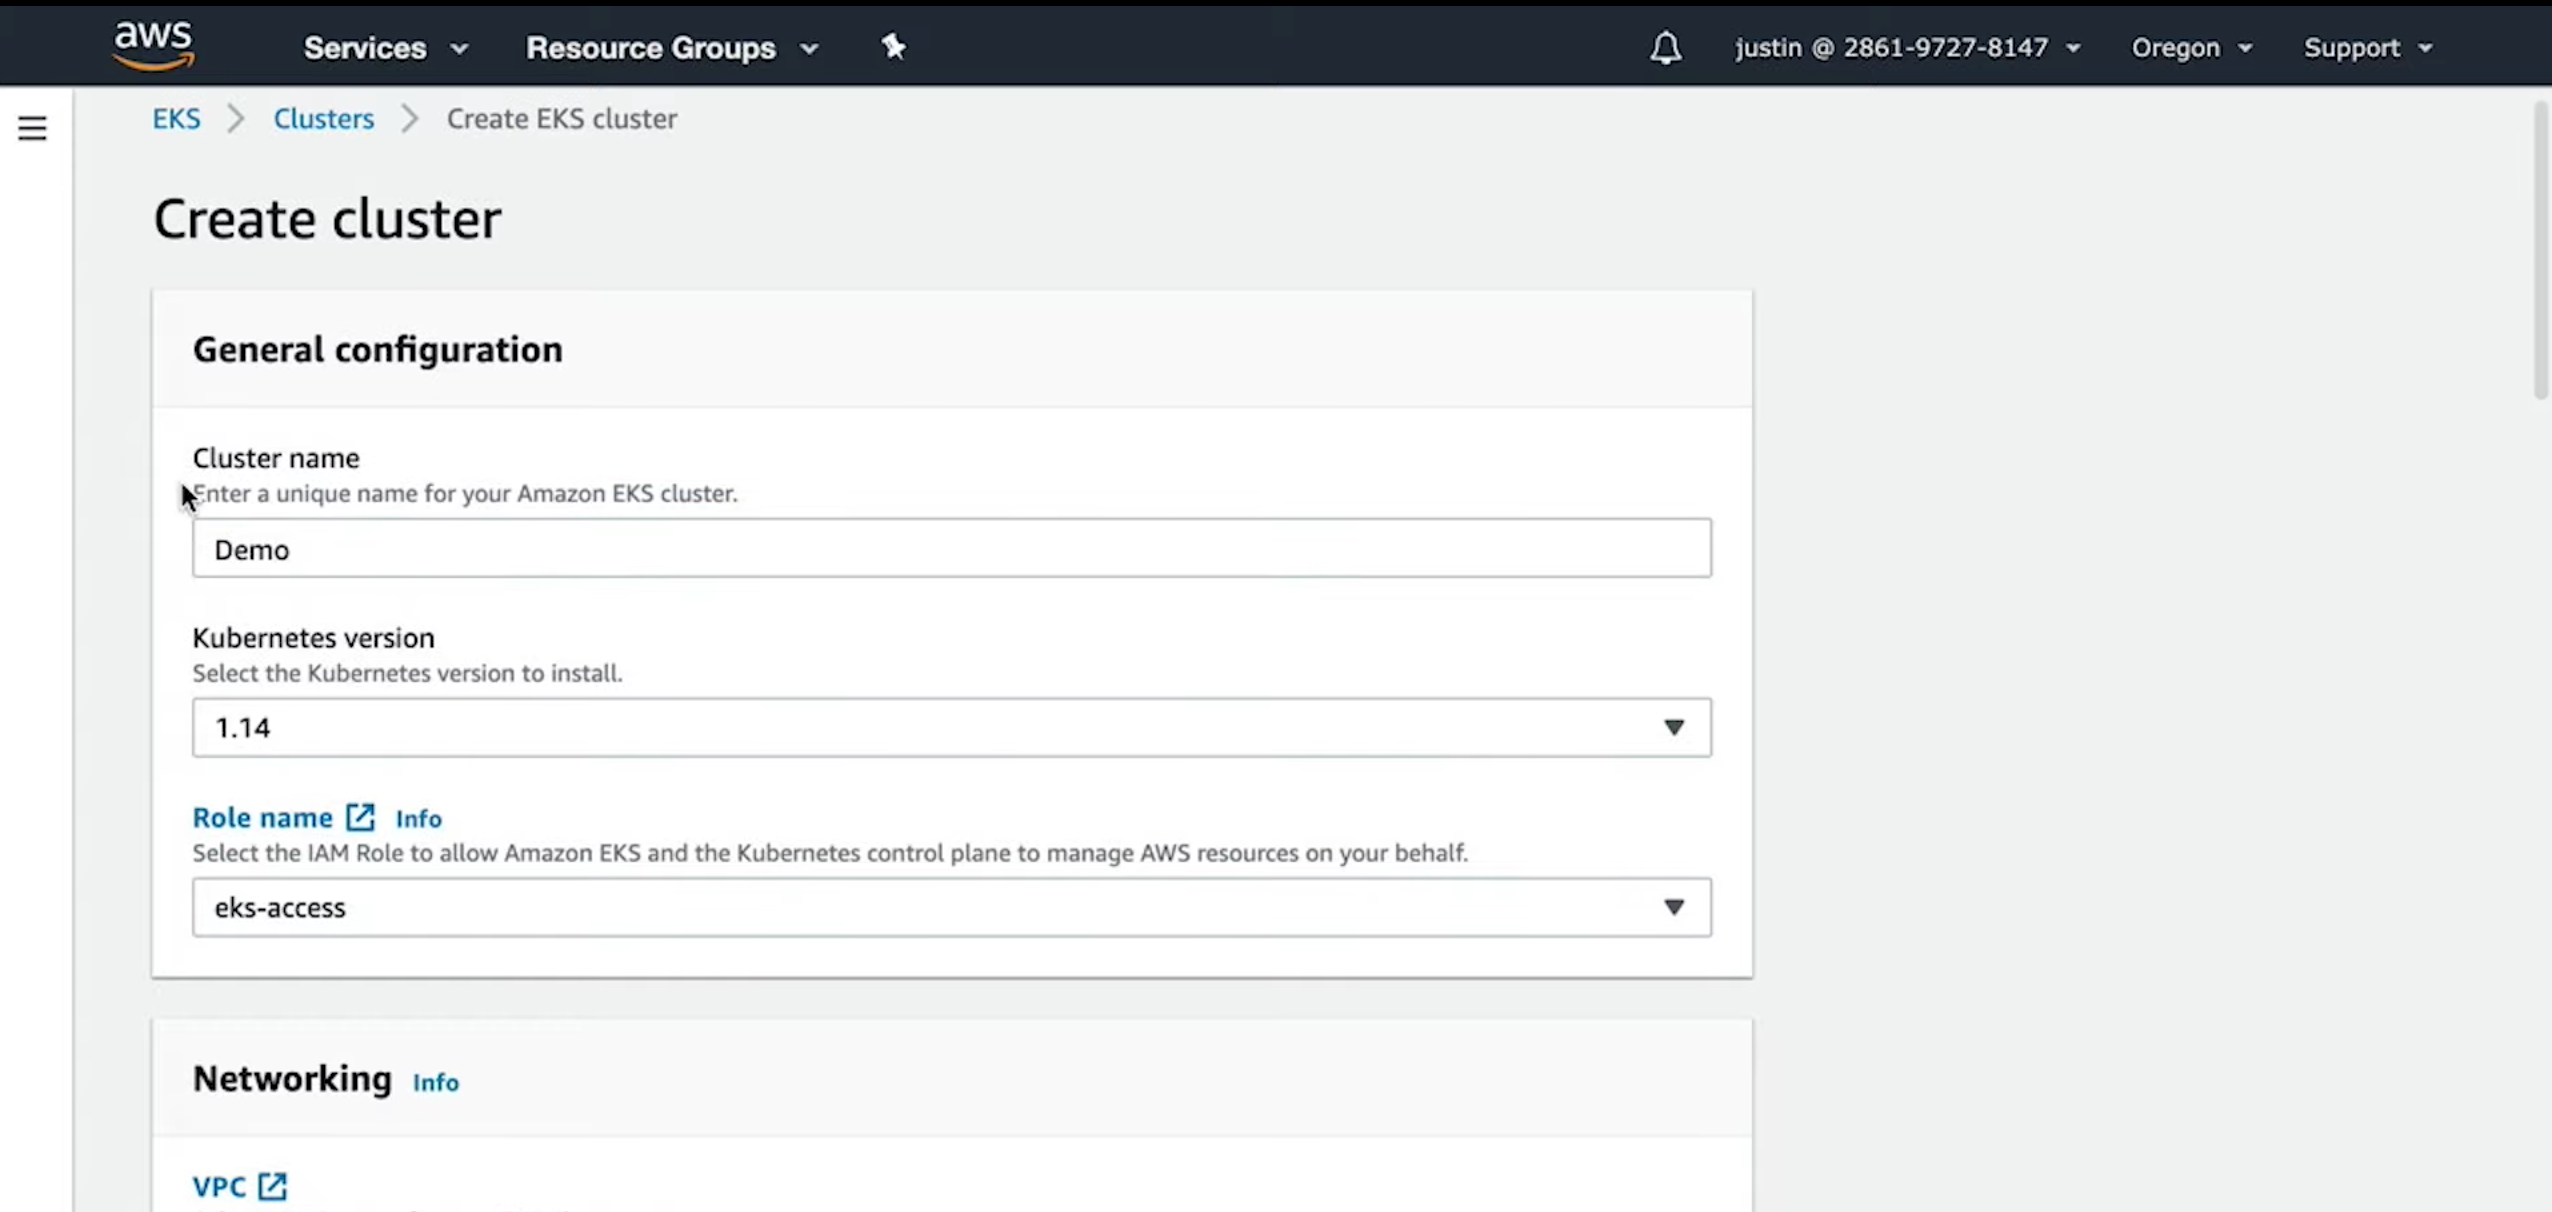
-
Create and specify role for Kubernetes cluster

-
Enable public access
-
-
Creating a Node Group
-
Add Node Group in the newly-created cluster
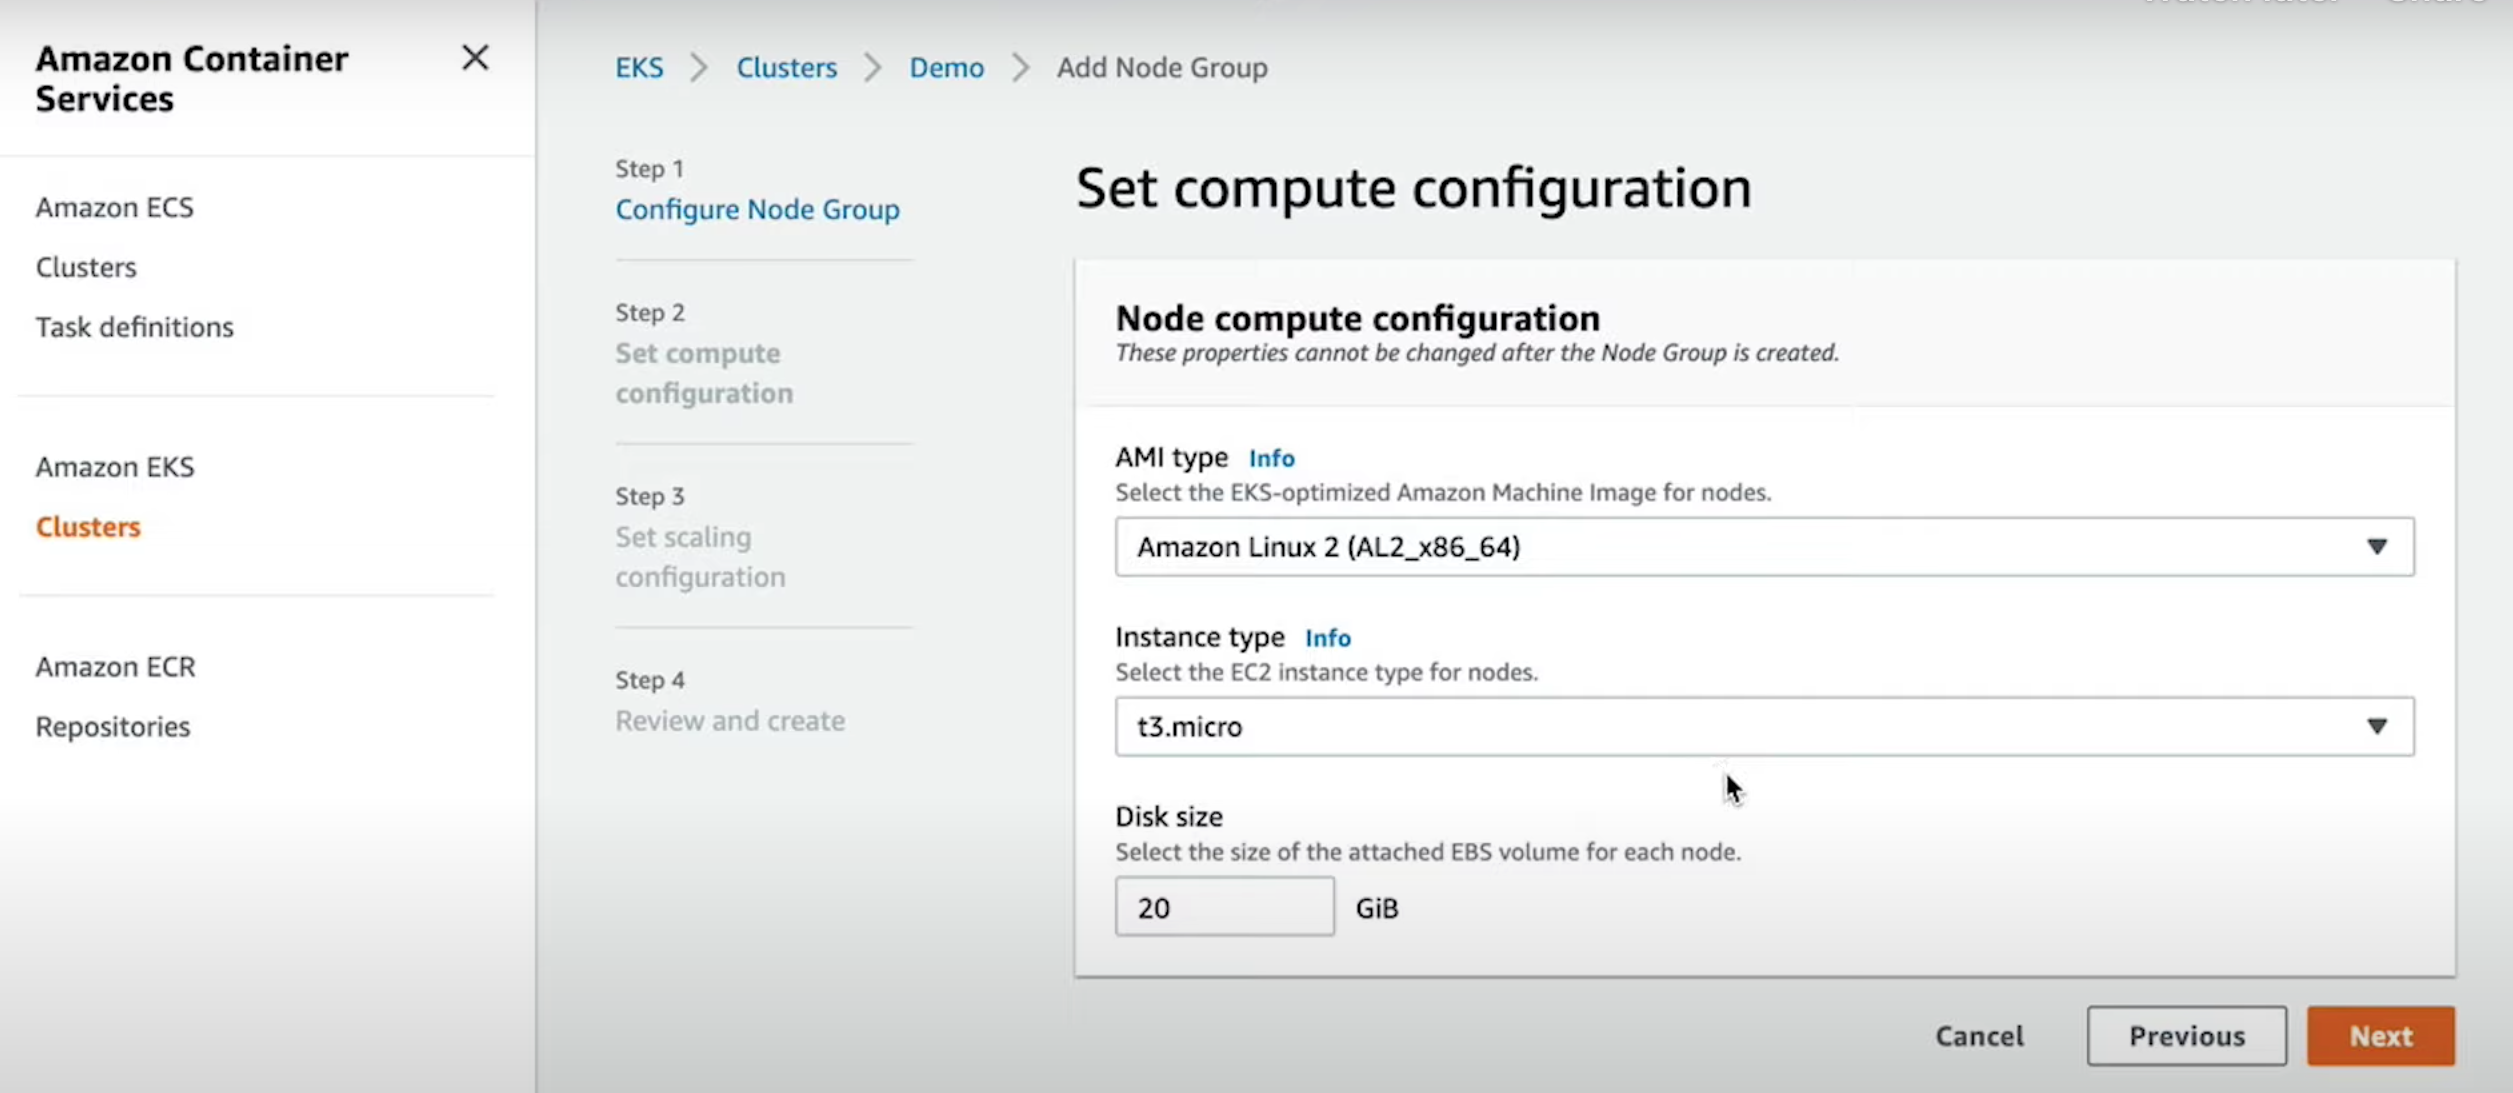
-
Create and specify role for IAM role for node group
-
Create and specify SSH key for node group
-
Set instance type to
t3.microfor cost-savings as we learn how to use Kubernetes -
Specify desired number of nodes
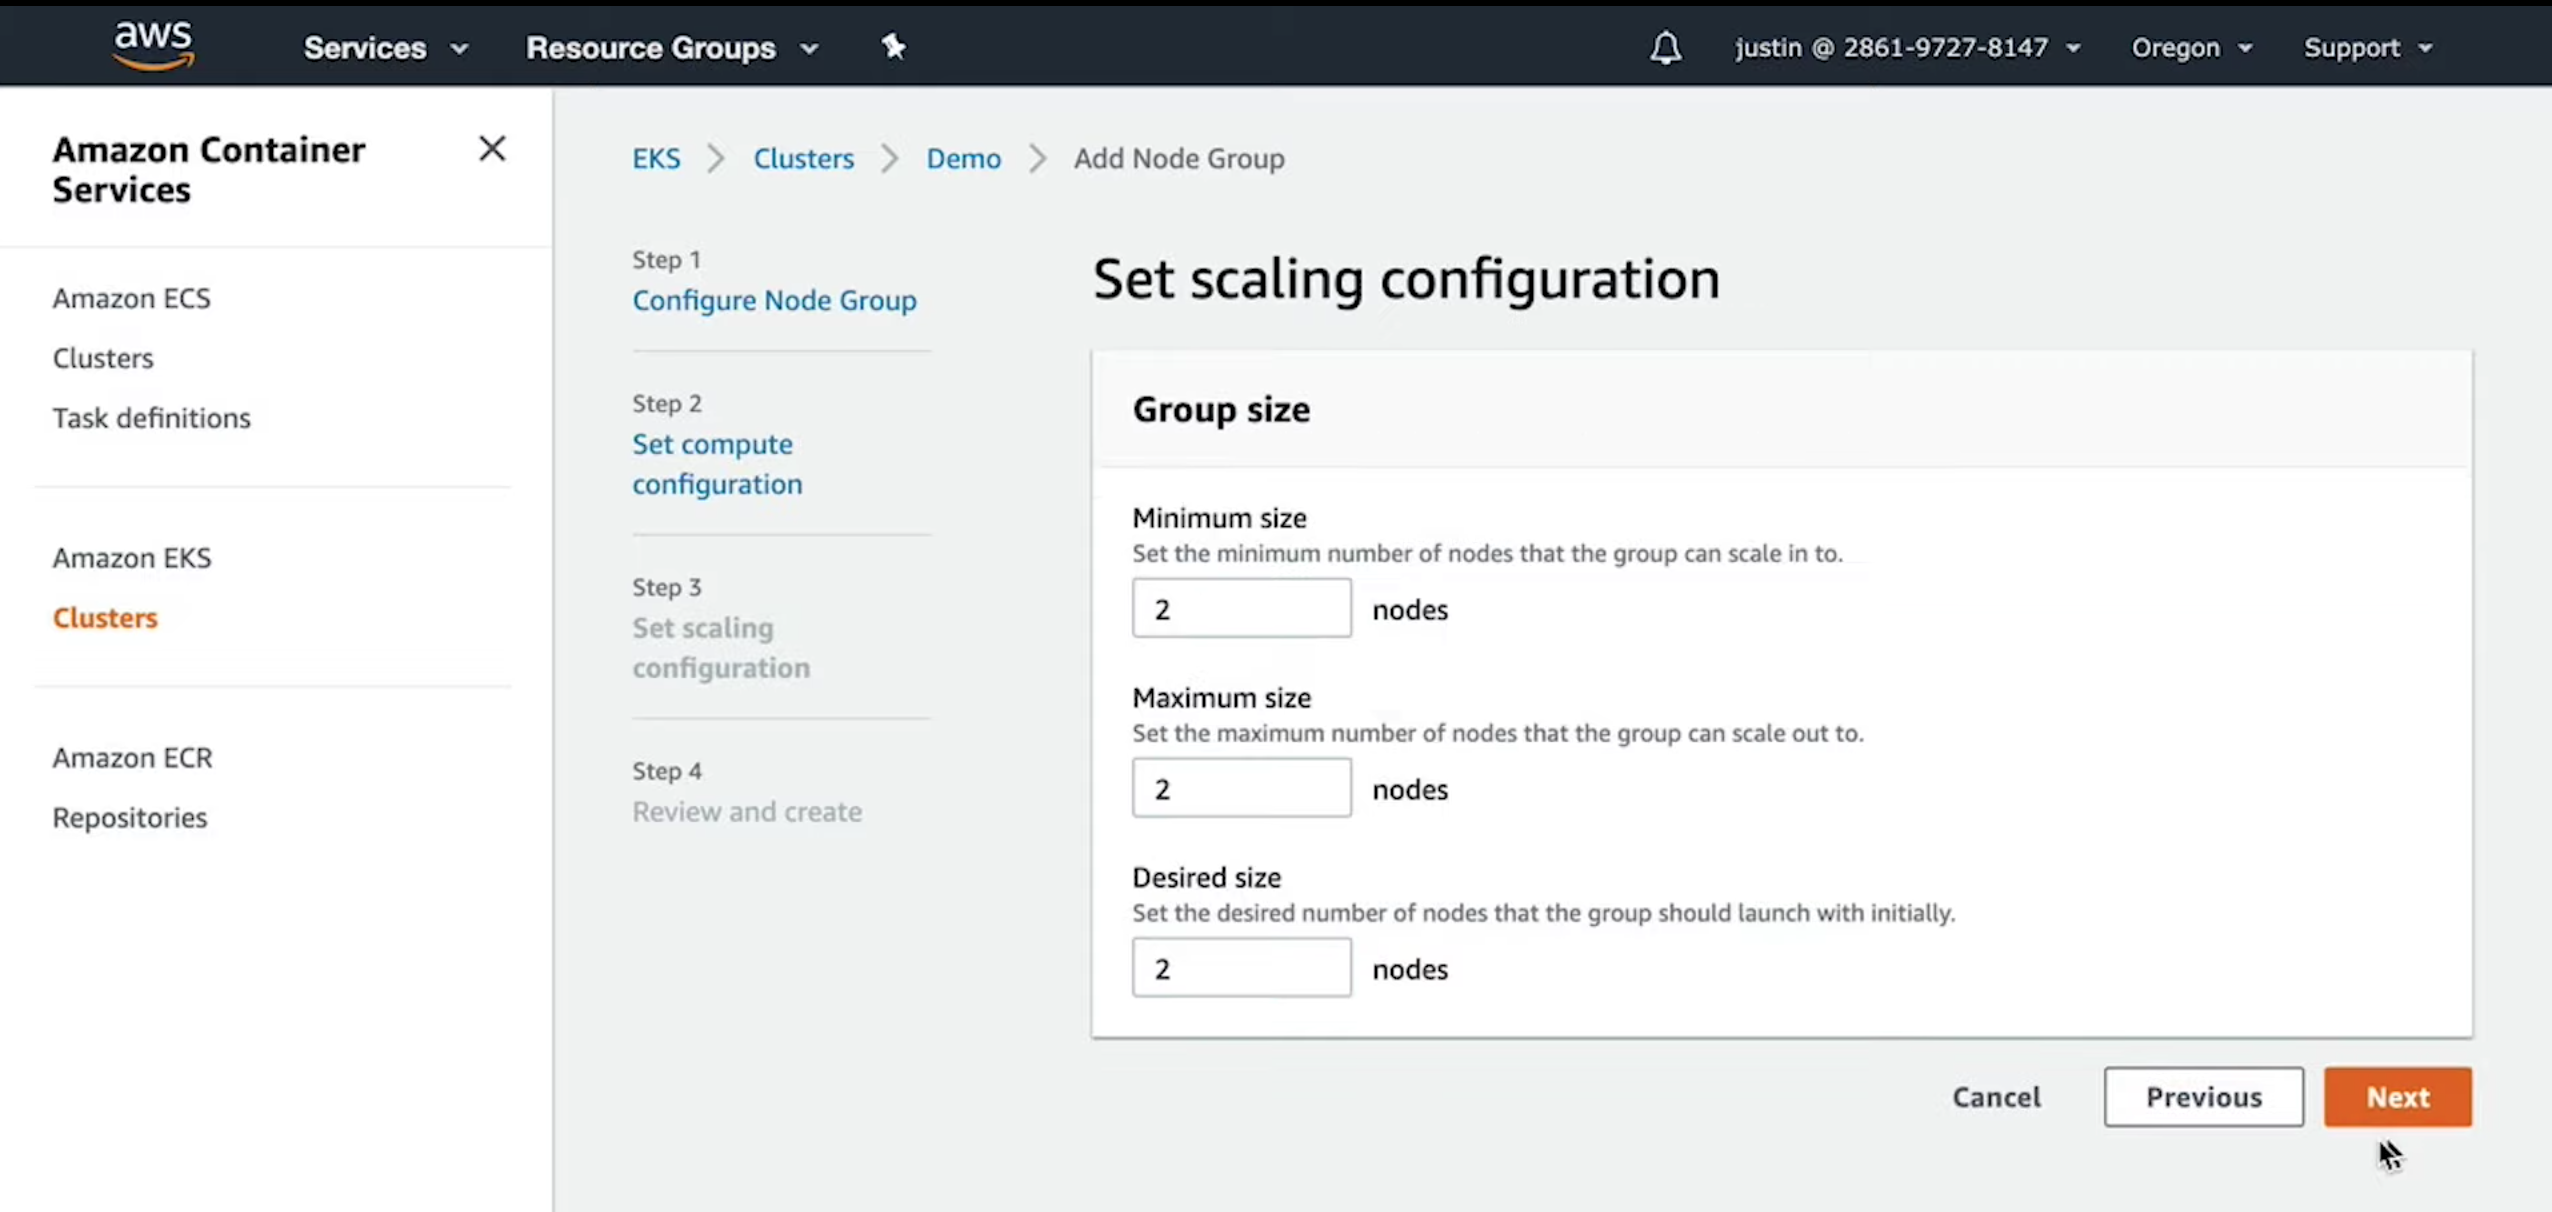
-
-
Docker images are loaded from the container registry into Kubernetes pods. Access to the pods are exposed to consumers through a service.
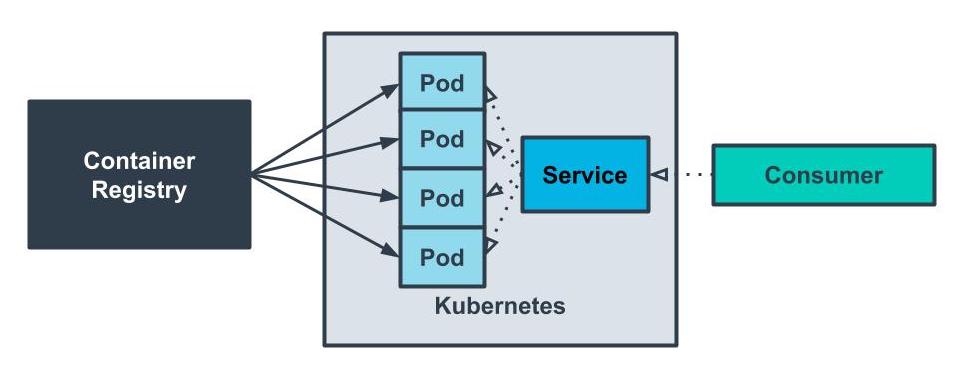
-
Additional Reading
The following are some additional resources for more information about EKS.


- Overview
Kubernetes YAML files have many possible configurations and are very open-ended. The solution I have is one example of how we can set up our files.
Some key areas to note are that:
kind: Deploymentandkind: Servicedenotes how Kubernetes will process the file.replicasspecifies the number of replicas that we want. This corresponds to the number of pods that will be created for one deployment.containersin deployment.yaml specifies the source for our Docker image
- At this point, we have a Kubernetes cluster set up and understand how YAML files can be created to handle the deployment of pods and expose them to consumers.
- Moving forward, we’ll be using the Kubernetes command-line tool, kubectl, to interact with our cluster.
- Interacting With Your Cluster
- Install kubectl
- Set up aws-iam-authenticator
- Set up kubeconfig
aws eks update-kubeconfig --region eu-west-3 --name TestingEKS
aws eks update-kubeconfig --name TestingEKS --region eu-west-3 --role-arn arn:aws:iam::732945014111:role/eks_cluster_access
https://docs.aws.amazon.com/cli/latest/userguide/cli-configure-role.html#cli-role-prepare
-
Loading YAML files
kubectl apply- create deployment and service
kubectl apply -f deployment.yaml
kubectl apply -f service.yaml -
Introductory Commands
kubectlprovides a wide range of commands to interact with Kubernetes. The following are some basic commands that we can use to interact with our current cluster.kubectl get pods- show the pods in the clusterkubectl describe services- show the services in the clusterkubectl cluster-info- display information about the clusterkubectl rollout restart deployment myapp
-
We will be interfacing with our Kubernetes cluster with the Kubernetes command-line tool kubectl. The YAML files that we created will be loaded through this tool.
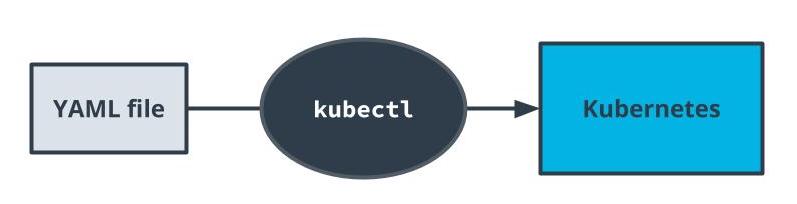
-
Cluster: a group of resources that are connected to act as a single system -
Additional Reading
The following are some additional information on interacting with Kubernetes

-
Kubernetes is one solution for deploying your containers. It's packed with features but can sometimes be overwhelming. As we've mentioned before, choosing a tool comes with its own set of tradeoffs. Here are a few other popular technologies that are used in the industry today.
-
AWS ECS
AWS' proprietary solution that predates AWS EKS. It integrates very well with other AWS tools and is a bit more straightforward as it is not as feature-packed as Kubernetes. -
AWS Fargate
AWS tool that helps streamline deploying containers to ECS and EKS. -
Docker
It's an option to simply run the container manually with Docker. Sometimes, it's tempting to pick a shiny hot tool that may lead to overengineered architectures.
- With Docker, we were able to connect to the container as one approach for debugging.
- Look through the documentation here and see how we can do something similar by connecting to a pod in kubernetes.
kubectl get pod my-app-b7f58d8b8-5dsql
kubectl exec --stdin --tty my-app-b7f58d8b8-5dsql  -- /bin/bash
Cluster
A group of resources that are connected to act as a single systemHorizontal Scaling
Handling increased traffic by creating additional replicas so that traffic can be divided across the replicasKubernetes Service
An abstraction of a set of pods and interface for how to interact with the podsPods
A set of containers that are deployed togetherLoad Balancing
Handling traffic by distributing it across different endpointsReplica
A redundant copy of a resource often used for backups or load balancingConsumer
An external entity such as a user or program that interfaces with an application

-
A single interface that forwards requests on behalf of the client and appears to the client as the origin of the responses.
-
Useful for abstracting multiple microservices to appear as a single resource.
-
A reverse proxy proxy is used to route traffic from one endpoint to multiple endpoints
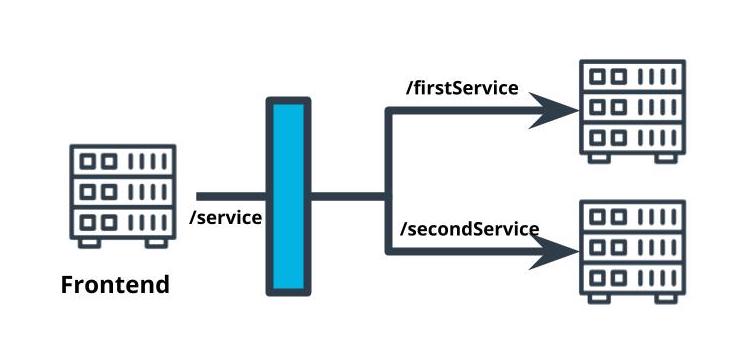
-
API Gateway
A form of a reverse proxy that serves as an abstraction of the interface to other services. -
Sample reverse proxy
Nginxis a web server that can be used as a reverse proxy.- Configurations can be specified with an
nginx.conffile.events { } http { server { listen <PORT_NUMBER>; location /<PROXY_PATH>/ { proxy_pass http://<REDIRECT_PATH>/; } } }
-
Test Reverse Proxy
kubeclt get pods

kubeclt describe services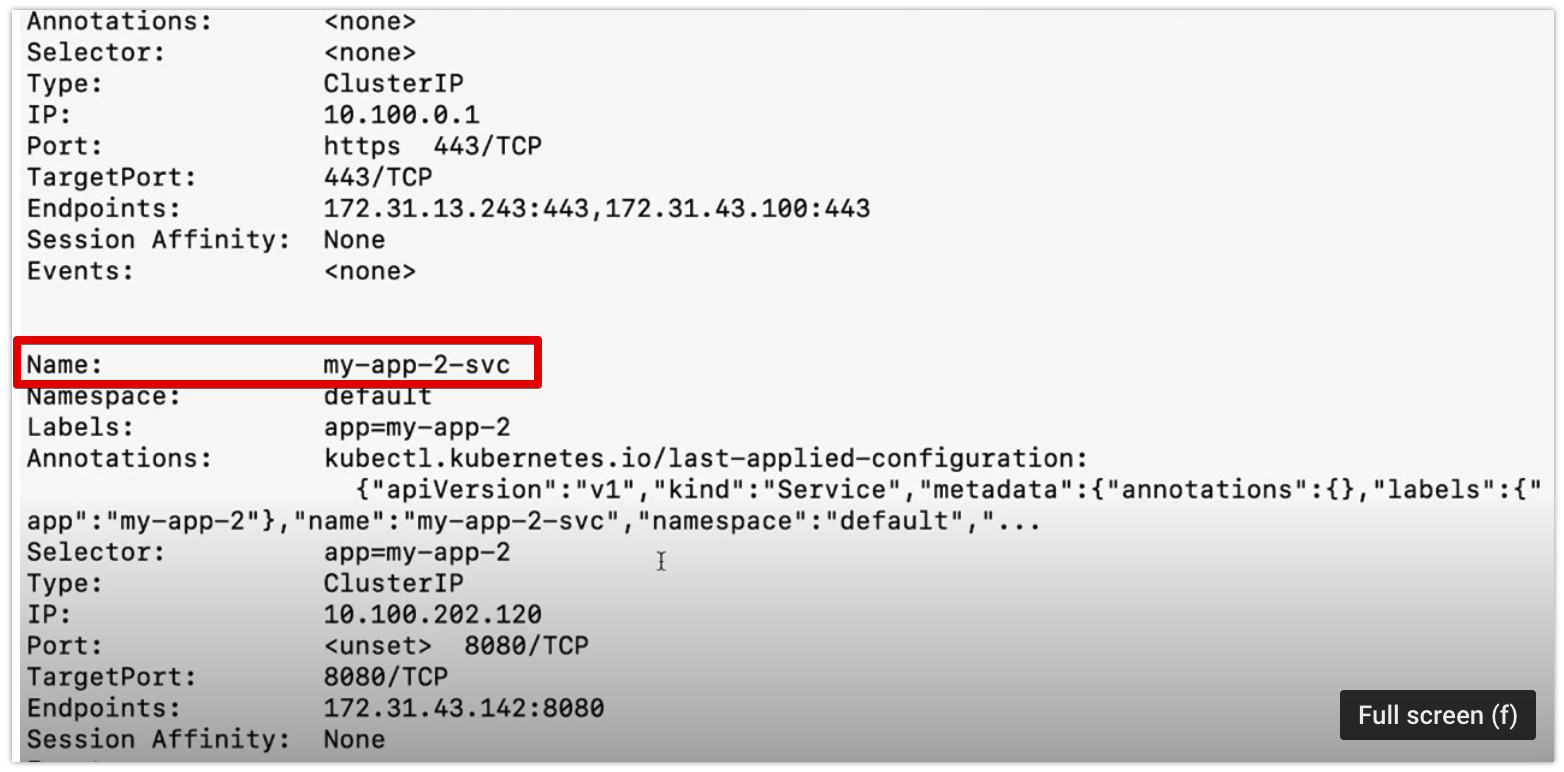
kubectl exec -it my-app-2-766b988c8c-9x256 bash
-
Create Reverse Proxy
-
nginx.confevents { } http { server { listen 8080; location /api/ { proxy_pass http://my-app-2-svc:8080/; } } }
-
Dockerfile: The Nginx service listens for requests at port 8080. Any requests with endpoints prefixed with/api/will be redirected to the Kubernetes servicemy-app-2-svc. my-app-2-svc is a name that our Kubernetes cluster recognizes internally.FORM nginx:alpine COPY nginx.conf /etc/nginx/nginx.conf
-
Push to Docker Hub:
docker build -t udacity-reverse-proxy .docker tag udacity-reverse-proxy adiazarroyo/udacity-reverse-proxy:latestdocker push adiazarroyo/udacity-reverse-proxy
-
deployment.yamlapiVersion: extensions/v1beta1 kind: Deployment metadata: labels: service: reverseproxy name: reverseproxy spec: replicas: 1 template: metadata: labels: service: reverseproxy spec: containers: - image: YOUR_DOCKER_HUB/simple-reverse-proxy name: reverseproxy imagePullPolicy: Always resources: requests: memory: "64Mi" cpu: "250m" limits: memory: "1024Mi" cpu: "500m" ports: - containerPort: 8080 restartPolicy: Always
-
service.yamlapiVersion: v1 kind: Service metadata: labels: service: reverseproxy name: reverseproxy-svc spec: ports: - name: "8080" port: 8080 targetPort: 8080 selector: service: reverseproxy
-
Deploy reverse proxy:
kubectl apply <REVERSE_PROXY_DEPLOYMENT>.yaml
kubectl apply <REVERSE_PROXY_SERVICE>.yaml
-
-
Additional Reading
The following are some additional resources for learning more about API Gateways.


-
This is not an all-inclusive list of things to do for securing your application. It means that while some of these are best-practice, there's no guarantee that these steps will ensure your application is perfectly secure.
- AWS security groups Enables you to restrict the inbound and outbound traffic for AWS resources.
- Kubernetes Ingress and Egress Enables you to restrict the inbound and outbound traffic for Kubernetes resources.
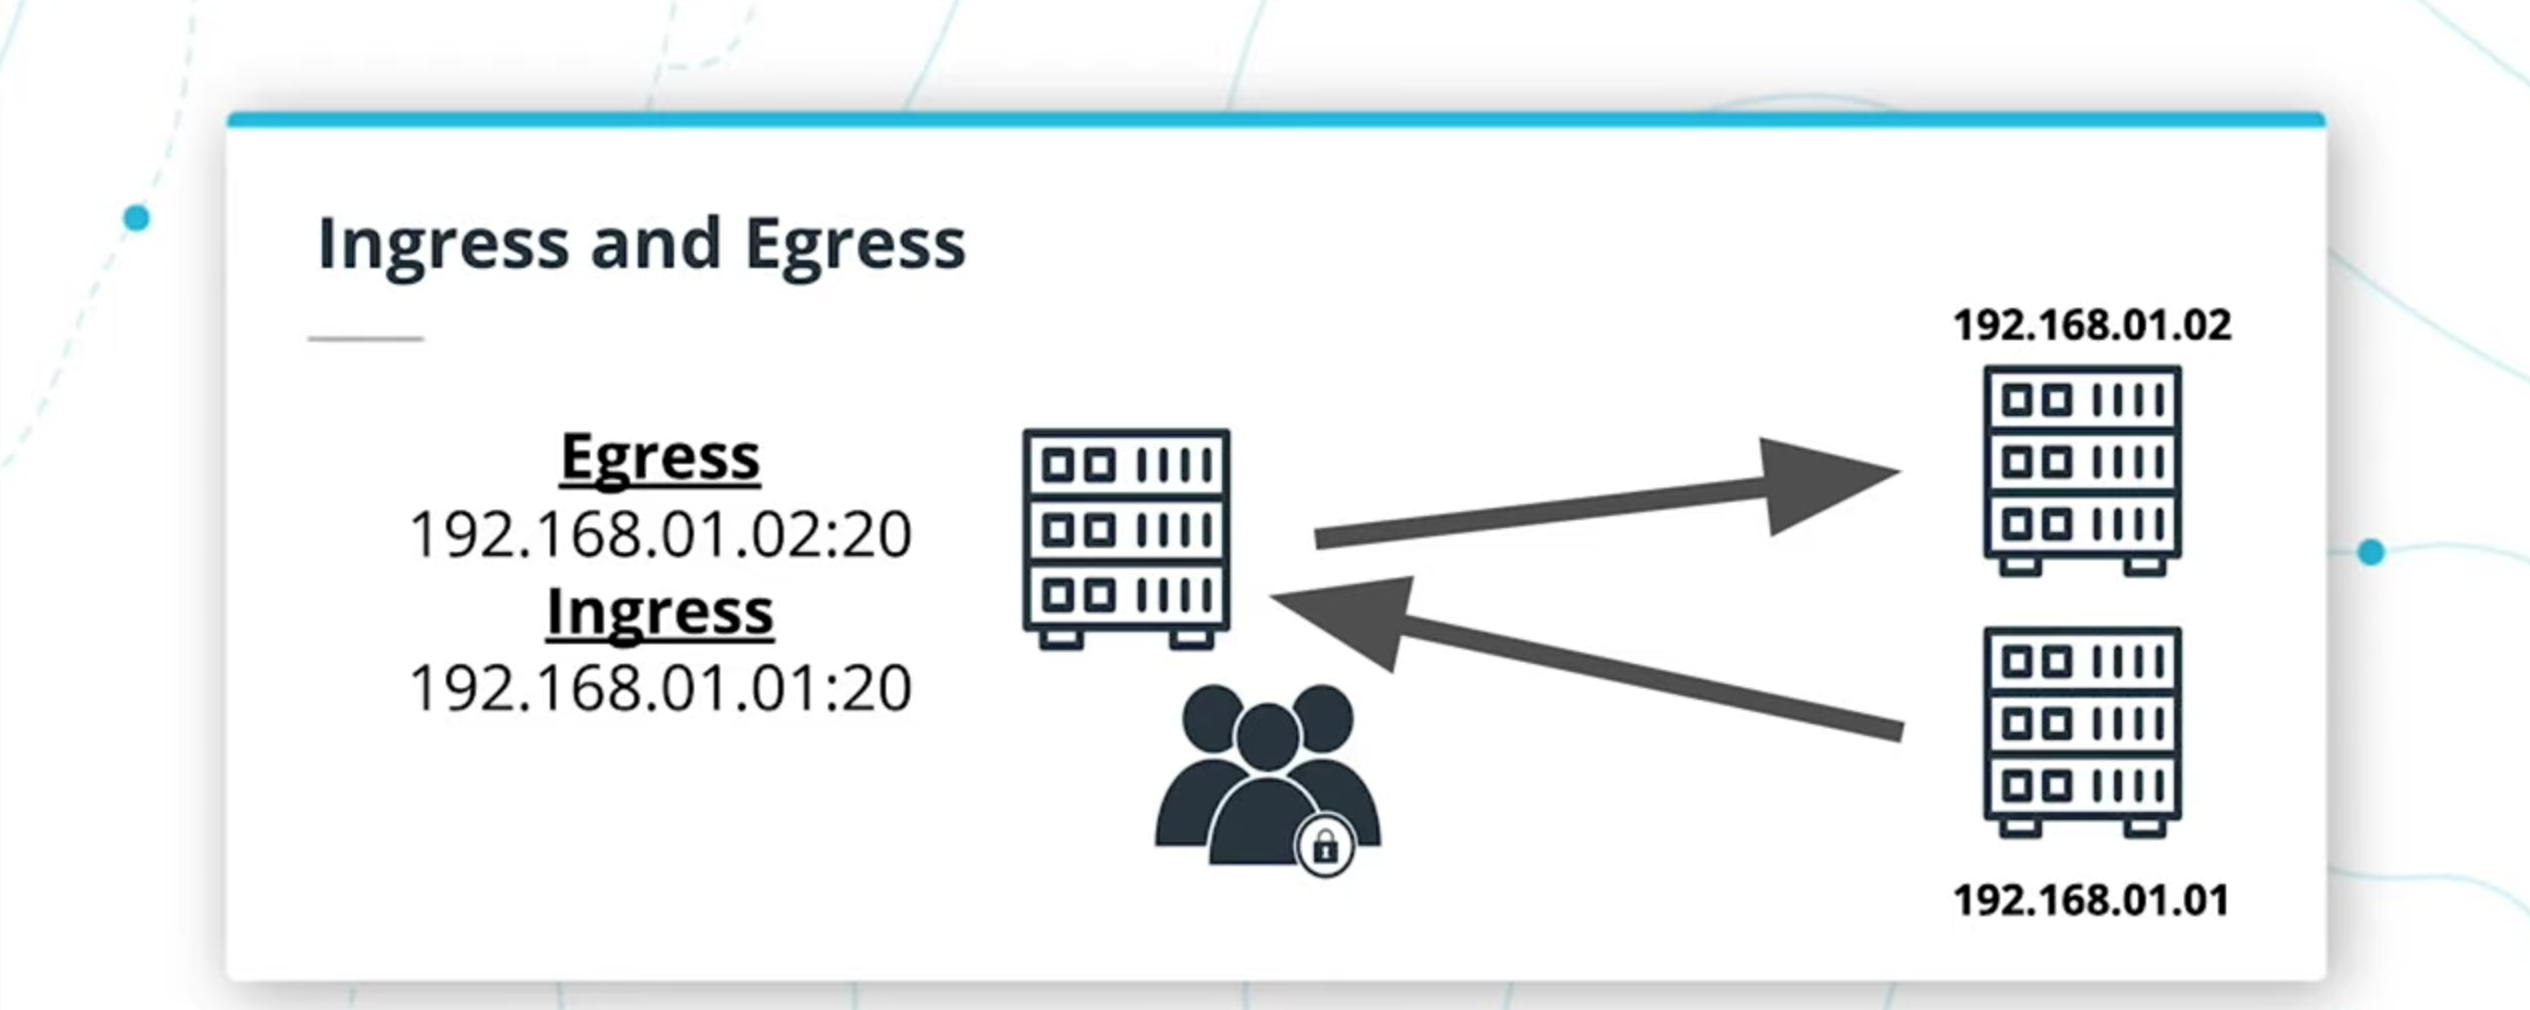

- Create HPA
kubectl autoscale deployment <NAME> --cpu-percent=<CPU_PERCENTAGE>                --min=<MIN_REPLICAS>
--max=<MAX_REPLICAS>- View HPA
kubectl get hpa- Introduction
- Now that we have learned about monolith applications and microservices, let's do it ourselves! For our project, we will be taking an existing monolith application and deploy it as microservices in Kubernetes on AWS.
- Steps
- Refactor the monolith application to microservices
- Set up each microservice to be run in its own Docker container
- Set up a CI/CD pipeline to deploy the containers to Kubernetes
- Keep in mind that we don’t want to make any feature changes to the frontend or backend code. If a user visits the frontend web application, it should look the same regardless of whether the application is structured as a monolith or microservice.
- Starter Code
- The project starter code can be found here
- The starter code is divided into two parts: a frontend web application and RESTful API.
- For your convenience, a Postman collection is also provided so that we can verify our API requests.
- Project Rubric
- To understand how you project will be assessed, see the Project Rubric
- Setup Instructions
- The following steps are a high-level review. Please refer to the
README.mdfile for detailed instructions- Set up the
set_env.shfile to handle your environment variables. Do not store your credentials in git. - Launch the
udagram-apiwithnpm installandnpm run dev - Launch the
udagram-frontendwithnpm install,ionic build, andionic serve
- Set up the
- The following steps are a high-level review. Please refer to the
- Tasks
- Refactor the API
The API code currently contains logic for both/usersand/feedendpoints.
Let's decompose the API code so that we can have two separate projects that can be run independent of one another.
Tips- Using Git is recommended so you can revert any unwanted changes in your code!
- You may find yourself copying a lot of duplicate code into the separate projects -- this is expected! For now, focus on breaking apart the monolith and we can focus on cleaning up the application code afterwards.
- Containerize the Code
Start with creating Dockerfiles for the frontend and backend applications. Each project should have its own Dockerfile. - Build CI/CD Pipeline
After setting up your GitHub account to integrate with Travis CI, set up a GitHub repository with a.travis.ymlfile for a build pipeline to be generated. - Deploy to Kubernetes
Deploy the Docker containers for the API applications and web application as their own pods inAWS EKS.
We should be able to see the pods deployed successfully via the command against your EKS cluster:kubectl get pods- Screenshots
- To verify Kubernetes pods are deployed properly ->
kubectl get pods - To verify kubernetes services as propertly set up ->
kubectl get pods - To verify than you have horizontal scaling set against CPU usage ->
kubectl describe hpa
- To verify Kubernetes pods are deployed properly ->
- Screenshots
- Logging
Use logs to capture metrics. This can help us with debugging.- Screenshots:
kubectl logs <your pod name>
- Screenshots:
- Refactor the API
- Suggestions to Make Your Project Stand Out (Optional)
- Submission Requirements
- The project will be submitted as a link to a GitHub repo or a zip file and should include screenshots to document the application's infrastructure.
- Required Screenshots
- Docker images in your repository in DockerHub
- TravisCI build pipeline showing successful build jobs
- Kubernetes
kubectl get podsoutput - Kubernetes
kubectl describe servicesoutput - Kubernetes
kubectl describe hpaoutput - Kubernetes
kubectl logs <your pod name>output
Commands:
docker run --env-file ~/Desktop/env_var.sh adiazarroyo/restapi-feedsdocker pull adiazarroyo/restapi-feeds:latestdocker run adiazarroyo/restapi-feeds
- What is "Serverless"?
- A buzzword (not a pattern/technology/architecture)
- A spectrum of solutions
- servers are managed by someone else
- allow to scale up and down easily
- pay for what you use (except for storage)
- no administration
- Benefits of Serveless
- Low entry barrier
- Cost efficient
- High-availability and scalability
- What we will cover in this lesson
- What is serverless?
- Function as a Service (FaaS)
- Simple functions and how to connect them to events
- How functions are executed
- Pros and Cons of using FaaS
- What are we going to build?
- Image sharing application
- Images and groups
- A number of features
- REST API
- React frontend
- WebSockets
- Authentication
- Scalable
- Mostly serverless components
Serverless Components
FaaS: Function as a service: write code in individual functions and deploy them to a platform to be executedDatastores: Storage of dataMessaging: Send messages from one application to anotherServices: Services that provide functionalities where we don't need to manage servers; i.e. authentication, ML, video processing

Function as a Service or Event Driven


- Lambda function vs AWS Lambda
Keep in mind that AWS Lambda is a computing service that runs code in response to events from Amazon Web Services, while a Lambda function is a single function connected to an event source running in AWS Lambda. - Lambda function example:
exports.handler (event) => {
  const number = event.number
  const updateNum = number++
  return {
    result: updateNum
  }
}