
Penkēsu (Japanese: ペンケース) is a retro-style handheld device powered by a Raspberry Pi Zero 2 W, a 7.9 inch widescreen display (1280 x 400 resolution), and a 48-key ortholinear mechanical keyboard.
The enclosure of Penkesu Computer is designed around the display and keyboard to achieve a (relatively) compact physical dimensions.

Repurposed Gameboy Advance SP hinges and ribbon cable for HDMI are used to keep the hinge design thin, yet they hold the weight of the display so it won't tip over.
Electronics are kept to be minimal (3 internal components) and most of the parts are either 3D printable or off-the-shelf product.
 |
 |
|---|---|
 |
 |
 |
 |
See also: the keyboard sound test video.
Ever since the CutiePi tablet has been successfully funded and started shipping, I feel the need to work on a new project, something I don't need to worry too much about commercial viability, and to remind myself why I started tinkering. A "rebound" project, so to speak.
And since there are no immediate plans on selling kits or making Penkesu Computer mass producible, I'd like to publish all the designs and plans so there's enough information for anyone interested in making one.

- Display
- Waveshare 7.9inch Capacitive Touch Screen
- Adafruit DIY HDMI Cable Parts - Right Angle adapter, Mini HDMI adapter, and 20cm Ribbon Cable
- Case
- Gameboy Advance SP Replacement Hinges
- 3D printed parts (STL files and STEP file)
- Electronics
- Raspberry Pi Zero 2 W
- 3.7V 606090 (or similar size) Li-Po battery
- Adafruit PowerBoost 1000C
- Keyboard
- Kailh Low Profile Choc v1 Switches x 48
- MBK Choc Low Profile Keycaps x 48
- 1N4148 Diode x 48
- Arduino Pro Micro x 1
- PCB x 1 (gerber file and QMK firmware)
Links are not affiliate links, and only provided as references.
About the keyboard:
- The keyboard is called
Koda, which is originally designed by larrbo and released under Creative Commons BY-NC-SA 4.0 License. I've tweaked the layouts so it fits my need and looks closer to thePlanck - If one wishes to use other 40% keyboard for the build, it can be done by editing the STEP file and adjusting the compartment size in the chassis
- A thin metal sheet was glued to the base as the counterweight, your mileage may vary depending on how you like the weight distribution
For the keycaps:
- The legends on keycaps were printed with a laser engraver, which I used black dip powder for nails as pigment
- More information about this method can be found with keywords laser dye-sub keycaps
- There are custom printing services for keycaps e.g. yushakobo.jp if one does not have access to a laser engraver
- Glue two hinges to the chassis (my 3D printer is not accurate enough to print a functional hinge lock, so I simply glued them with 5 minute epoxy)

-
Add heat-set threaded inserts (M2x6) to the 4 corners of screen bezel, and 2 to the hinge cover
-
Wrap the ribbon cable twice and pull it out through the hinge cover

-
Wiring:
Component Pin battery positive PowerBoost Batpinbattery negative PowerBoost GNDpinswitch 1 pin PowerBoost GNDpinswitch 2 pin PowerBoost ENpinPowerBoost 5V OUTdisplay and Pi Zero's VCCPowerBoost GNDdisplay and Pi Zero's GND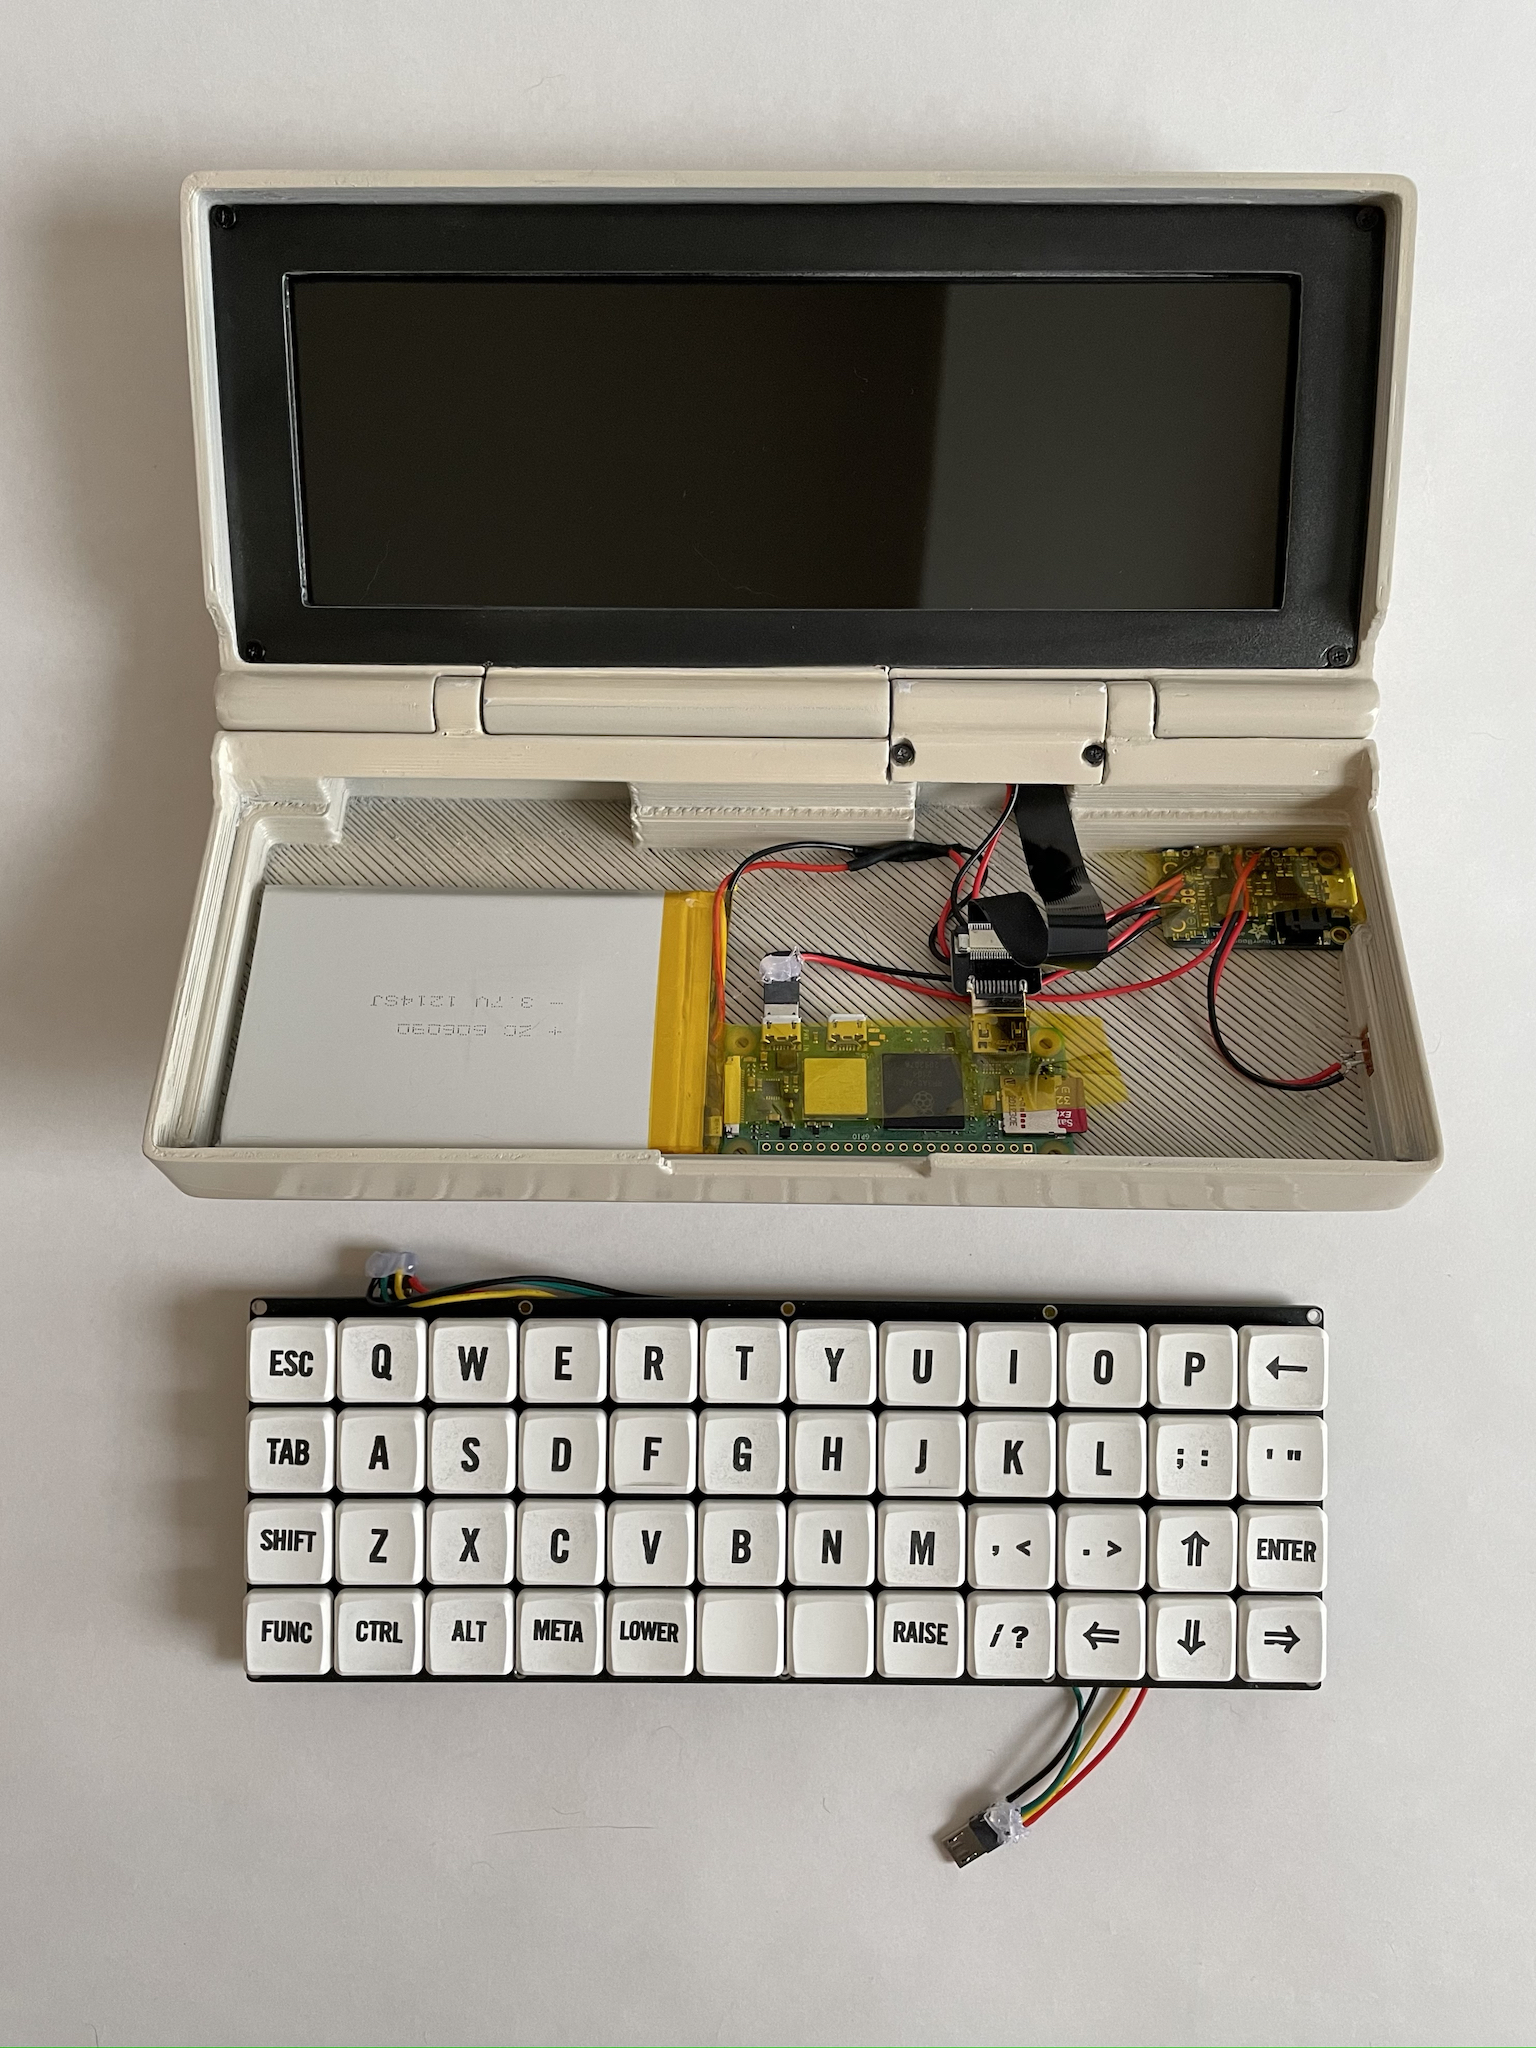
-
Connect keyboard's micro USB and display's mini HDMI port to Pi Zero 2 W; inset micro SD card into Pi Zero 2 W
-
Fasten all components with M2x6 screws

If you made it this far, welcome to check out my other project, the CutiePi tablet, which is also a 100% open source hardware! :-)
Copyright (c) 2022 Penk Chen. All rights reserved.
All files are licensed under MIT license, see the LICENSE for more information.