Visual taste approximator is a very simple tool that helps anyone create an automatic replica of themselves, one that can approximate their own personal visual taste.
This is done by first labeling a few images and then training a machine learning model to mimic ourselves.
This tool was developed and used extensively to create the Synthetic Faces High Quality (SFHQ) dataset. In this repo we also demonstate how it can be used to detect "proper portrait image composition" amoung a large corpus of generated images by the text-to-image stable diffusion v1.4 model (sample images in this repo were generated using only 30 steps, BTW)
- A simple GUI that helps anyone to manually label images into positive or negative classes. These classes can be anything. either something boring like cats vs dogs, or something more abstract and interesting like images with good composition vs images with poor composition. Or simply nice looking images vs not nice looking images according to your own personal taste
- A simple classifier that extract various features (e.g. pretrained CLIP/DINO/ConvNext models) from each image and attempts to approximate the human perception decision boundery regarding the two classes by training a small ensemble classifier on top of those features.
- After training, the classifier can be applied on a large folder with many thousands of images and help sift though it in a few minutes of automatic inspection instead of hours of manual inspection, helping us separate wheat from chaff. Usually one can get very decent results even after manually labeling as little as 100 positive and 100 negative samples. but of course more is always better.
- The GUI allows one to re-train a classifier while doing the labeling, and thus focus the labeling effort on images with high degree of uncertainty of the classifier and avoid labeling many times over things the classifier already understood
After cloning the repo one should have a folder named folder_to_classify/ that contains 300 portrait images pre generated by stable diffusion.
We wish to find the subset of images in that folder that have "proper" portrait composition.
In this case "proper" as defined by me and the definition was invented on a whim specifically for this demonstation. The approximate meaning is that a "proper portrait" is not too zoomed in, i.e. that the face/hair is not partially cut, nor they are too zoomed out so that the face and shoulders can hardly be seen.
This definition is vague on purpose to demonstate that the classfieir can easily "catch your drift" just by looking at a few labeled images.
I've pre-labeled 100 "proper" portraits and placed them in the folder positively_labeled/ and under negatively_labeled/ one can find 100 "not good" portrait compositions.
To train a classifier on positive vs negative folders, please run the command:
python train_binary_classfier.py --positive_folder positively_labeled --negative_folder negatively_labeled --model_name proper_portrait_classifier
In the first run, this will run for a few minutes as it will need to download various pretrained models (CLIP/ConvNext/DINO/BEiT)
It will create a file named proper_portrait_classifier_num_samples_200_num_features_6784_<curr_date>.pickle under the folder models_folder/
To use the classifier on the test folder and extract some "proper" portraits, use the command:
python use_classifier_on_test_folder.py --test_folder folder_to_classify --model_path models_folder/proper_portrait_classifier_num_samples_200_num_features_6784_2022-09-05.pickle --positive_threshold 0.65
This will create a new folder named likely_positive/ and under it we'll have a few "proper" portrait images
For any new task of your choosing, one can run the labeling GUI to define it
python image_labeling_GUI.py --test_folder TEST_FOLDER --positive_folder POSITIVE_FOLDER --negative_folder NEGATIVE_FOLDER --model_name MODEL_NAME
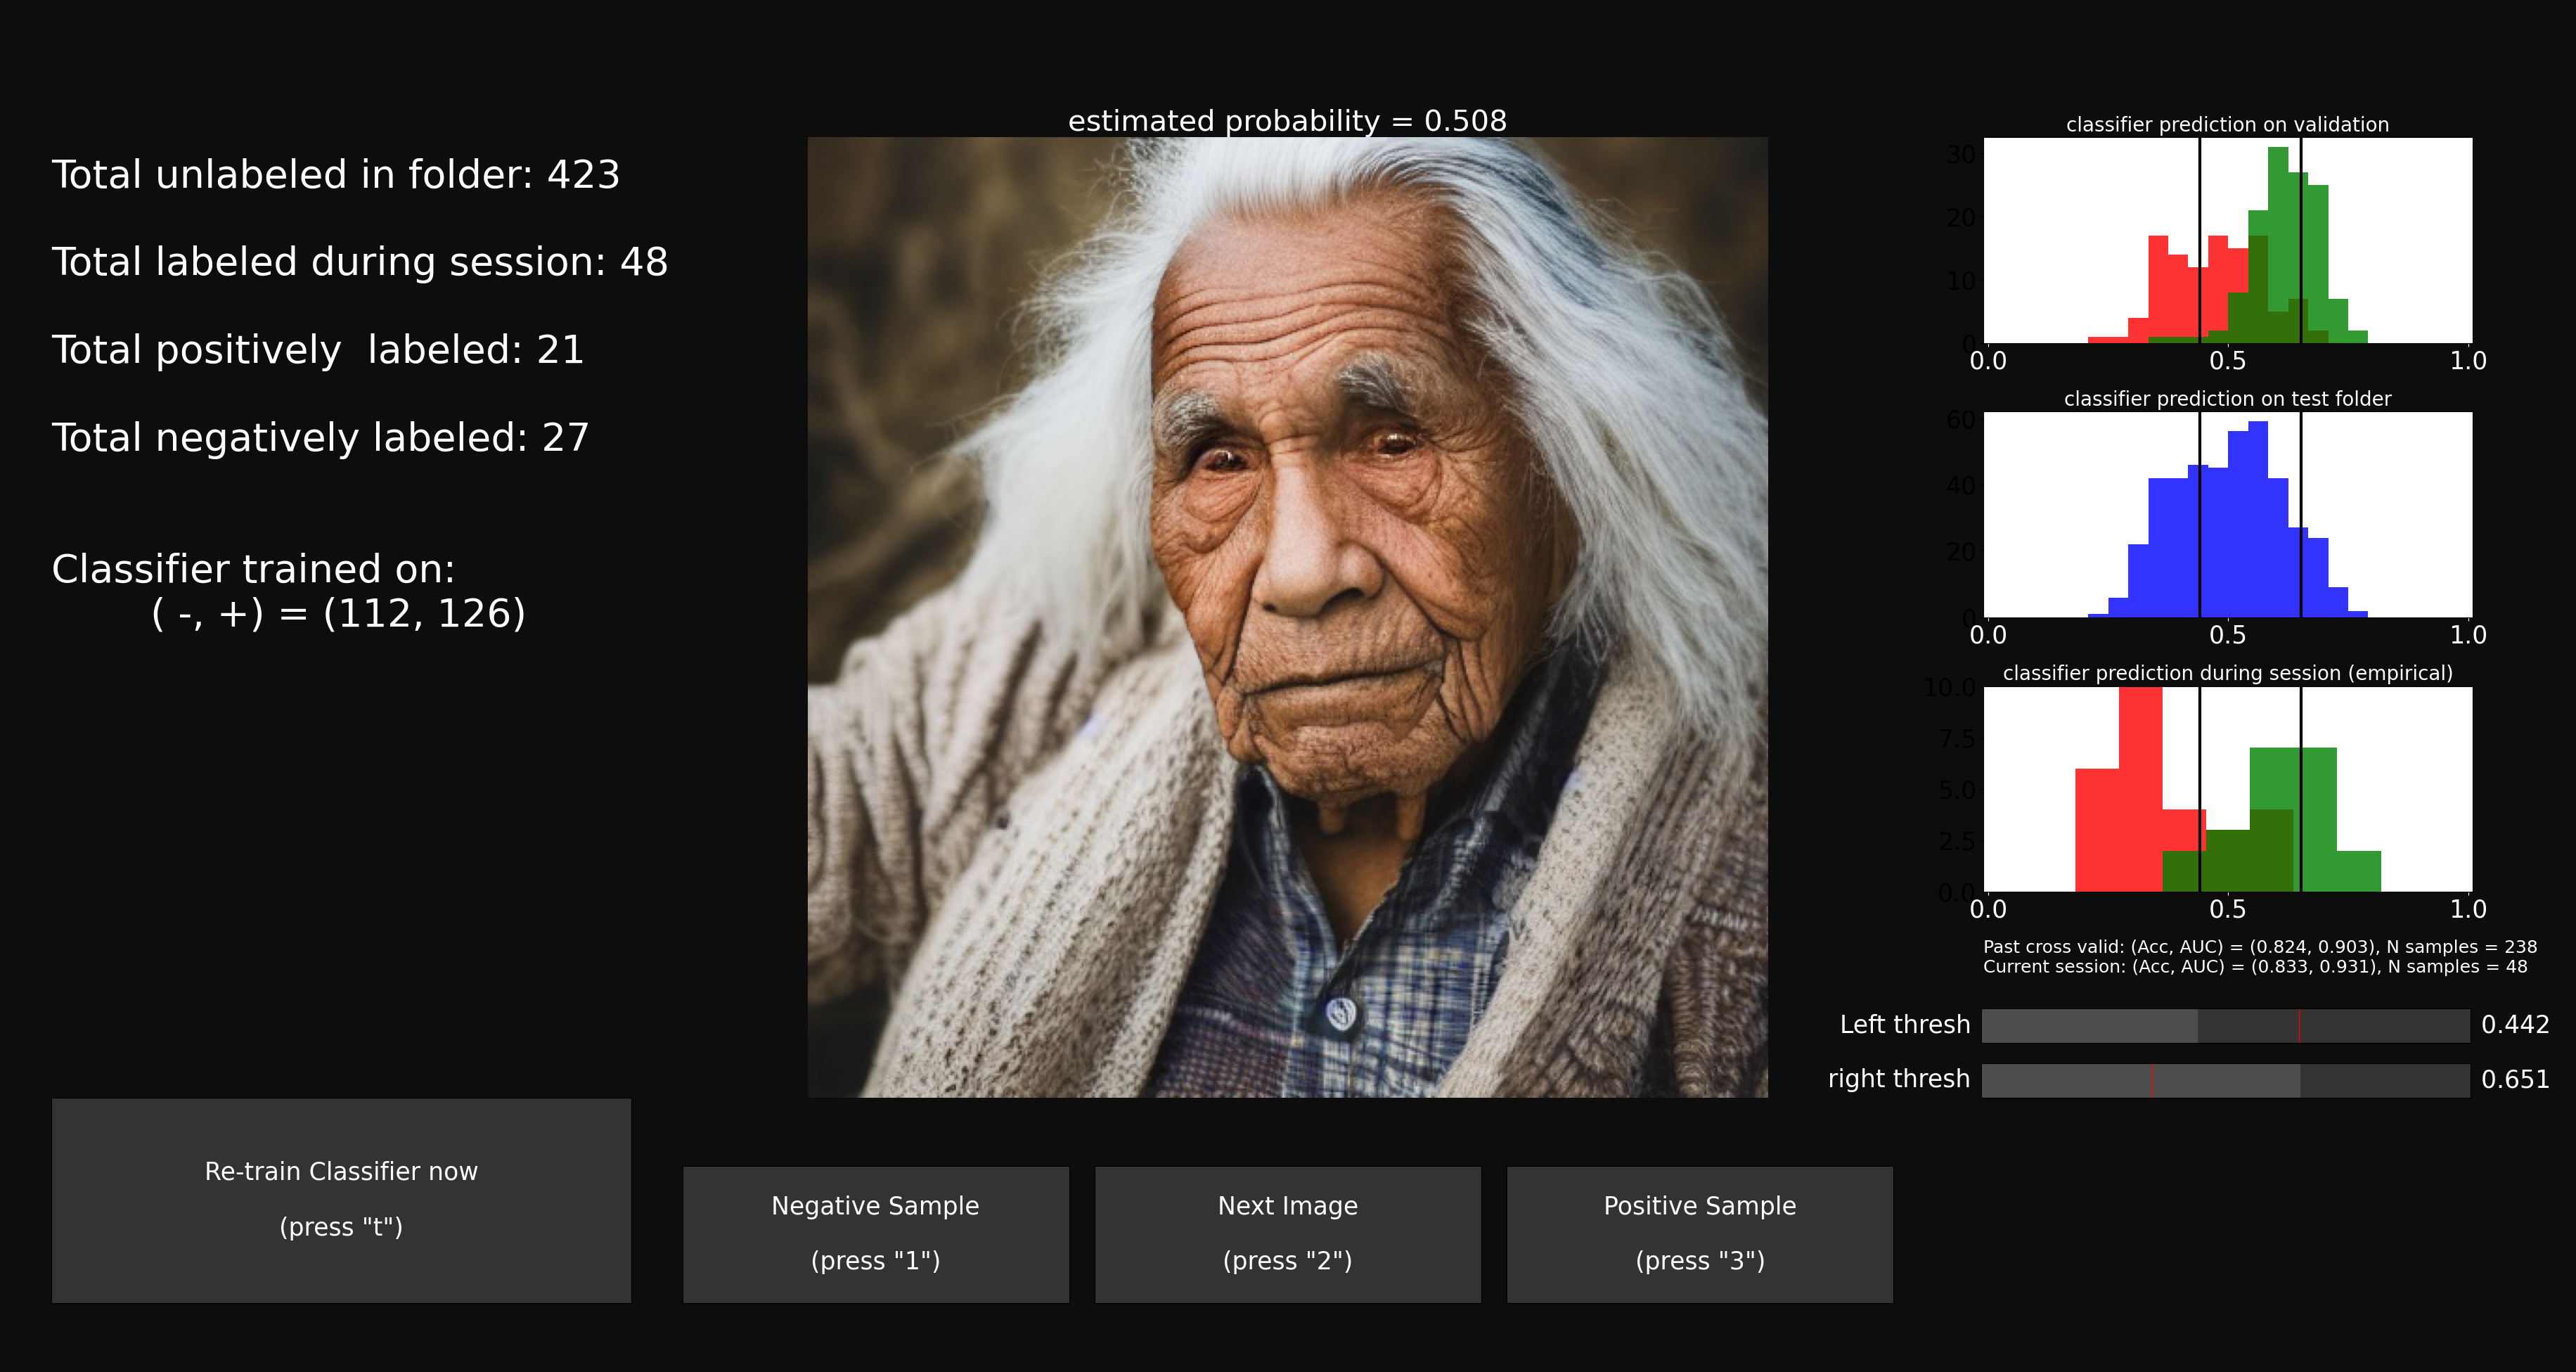
- An image will be presented at the center of the screen
- by pressing the "positive sample" button (or "3" on your keyboard) you can label it as positive. this sample will be transfered to the positive folder,
- by pressing the "nagative sample" button (or "1" on your keyboard) it will be labeled as negative and tranfered to negative folder.
- pressing "next image" (or "2") will skip to next image without making a decision
- After labeling some number of images (I suggest at least 50 positive and 50 negatives to start, this should not take more than a few minutes)
- one can press the "train/re-train classifier" button (or "t" button on keyboard)
- this will train a classifier on all images in the positive vs negative folders and the graphs on the right will be updated. this classifier will be saved in the models_folder with the requested prefix model_name
- the top most graph on the right will display the histogram of classifier prediction on internal cross vlaidation of positives (green) and negatives (red)
- One can use these histograms to zoom in on areas where the classifier is not certain (where histogram overlap). this is done by the left and right sliders at the buttom right of the screen.
- during labeling, images from the folder to classify will be presented mostly from inside the selected ranges using the sliders
- If the positive and negative folder are not empty in the begining, then a classifier will first be trained on them and one can continue to labeling images
If you wish to tradeoff speed vs accuracy of the approximation, you can use more or less pretrained feature sets by using the --num_features_sets option (supported options are {1,2,4,7})
the option with a single feature set will use only CLIP ViT-L/14 @336 model and will run approximatly 8 times faster than using the full 7 feature sets (multiple CLIP models, ConvNext_XL, multiple DINO models, and BEiT), but it will be less accurate.
The specific accuracy details will depend on the specific task, but the differece can be quite substantial, in particular when having a small amoung of labeled images
The three files image_labeling_GUI.py,train_binary_classfier.py,use_classifier_on_test_folder.py have several other input argument options.
You can inspect the using the -h or --help options
For example, this is the help for image_labeling_GUI.py:
usage: python image_labeling_GUI.py [-h] [--test_folder TEST_FOLDER] [--positive_folder POSITIVE_FOLDER] [--negative_folder NEGATIVE_FOLDER] [--models_folder MODELS_FOLDER] [--model_name MODEL_NAME]
                             [--num_features_sets {1,2,4,7}]

optional arguments:
  -h, --help            show this help message and exit
  --test_folder TEST_FOLDER
                        path to folder to classify
  --positive_folder POSITIVE_FOLDER
                        path to folder with positively labeled images
  --negative_folder NEGATIVE_FOLDER
                        path to folder with negatively labeled images
  --models_folder MODELS_FOLDER
                        path to where to store the resulting trained models
  --model_name MODEL_NAME
                        the prefix name of the model that will be saved
  --num_features_sets {1,2,4,7}
                        number of pretrained features sets to use (more features takes longer but more accurate)
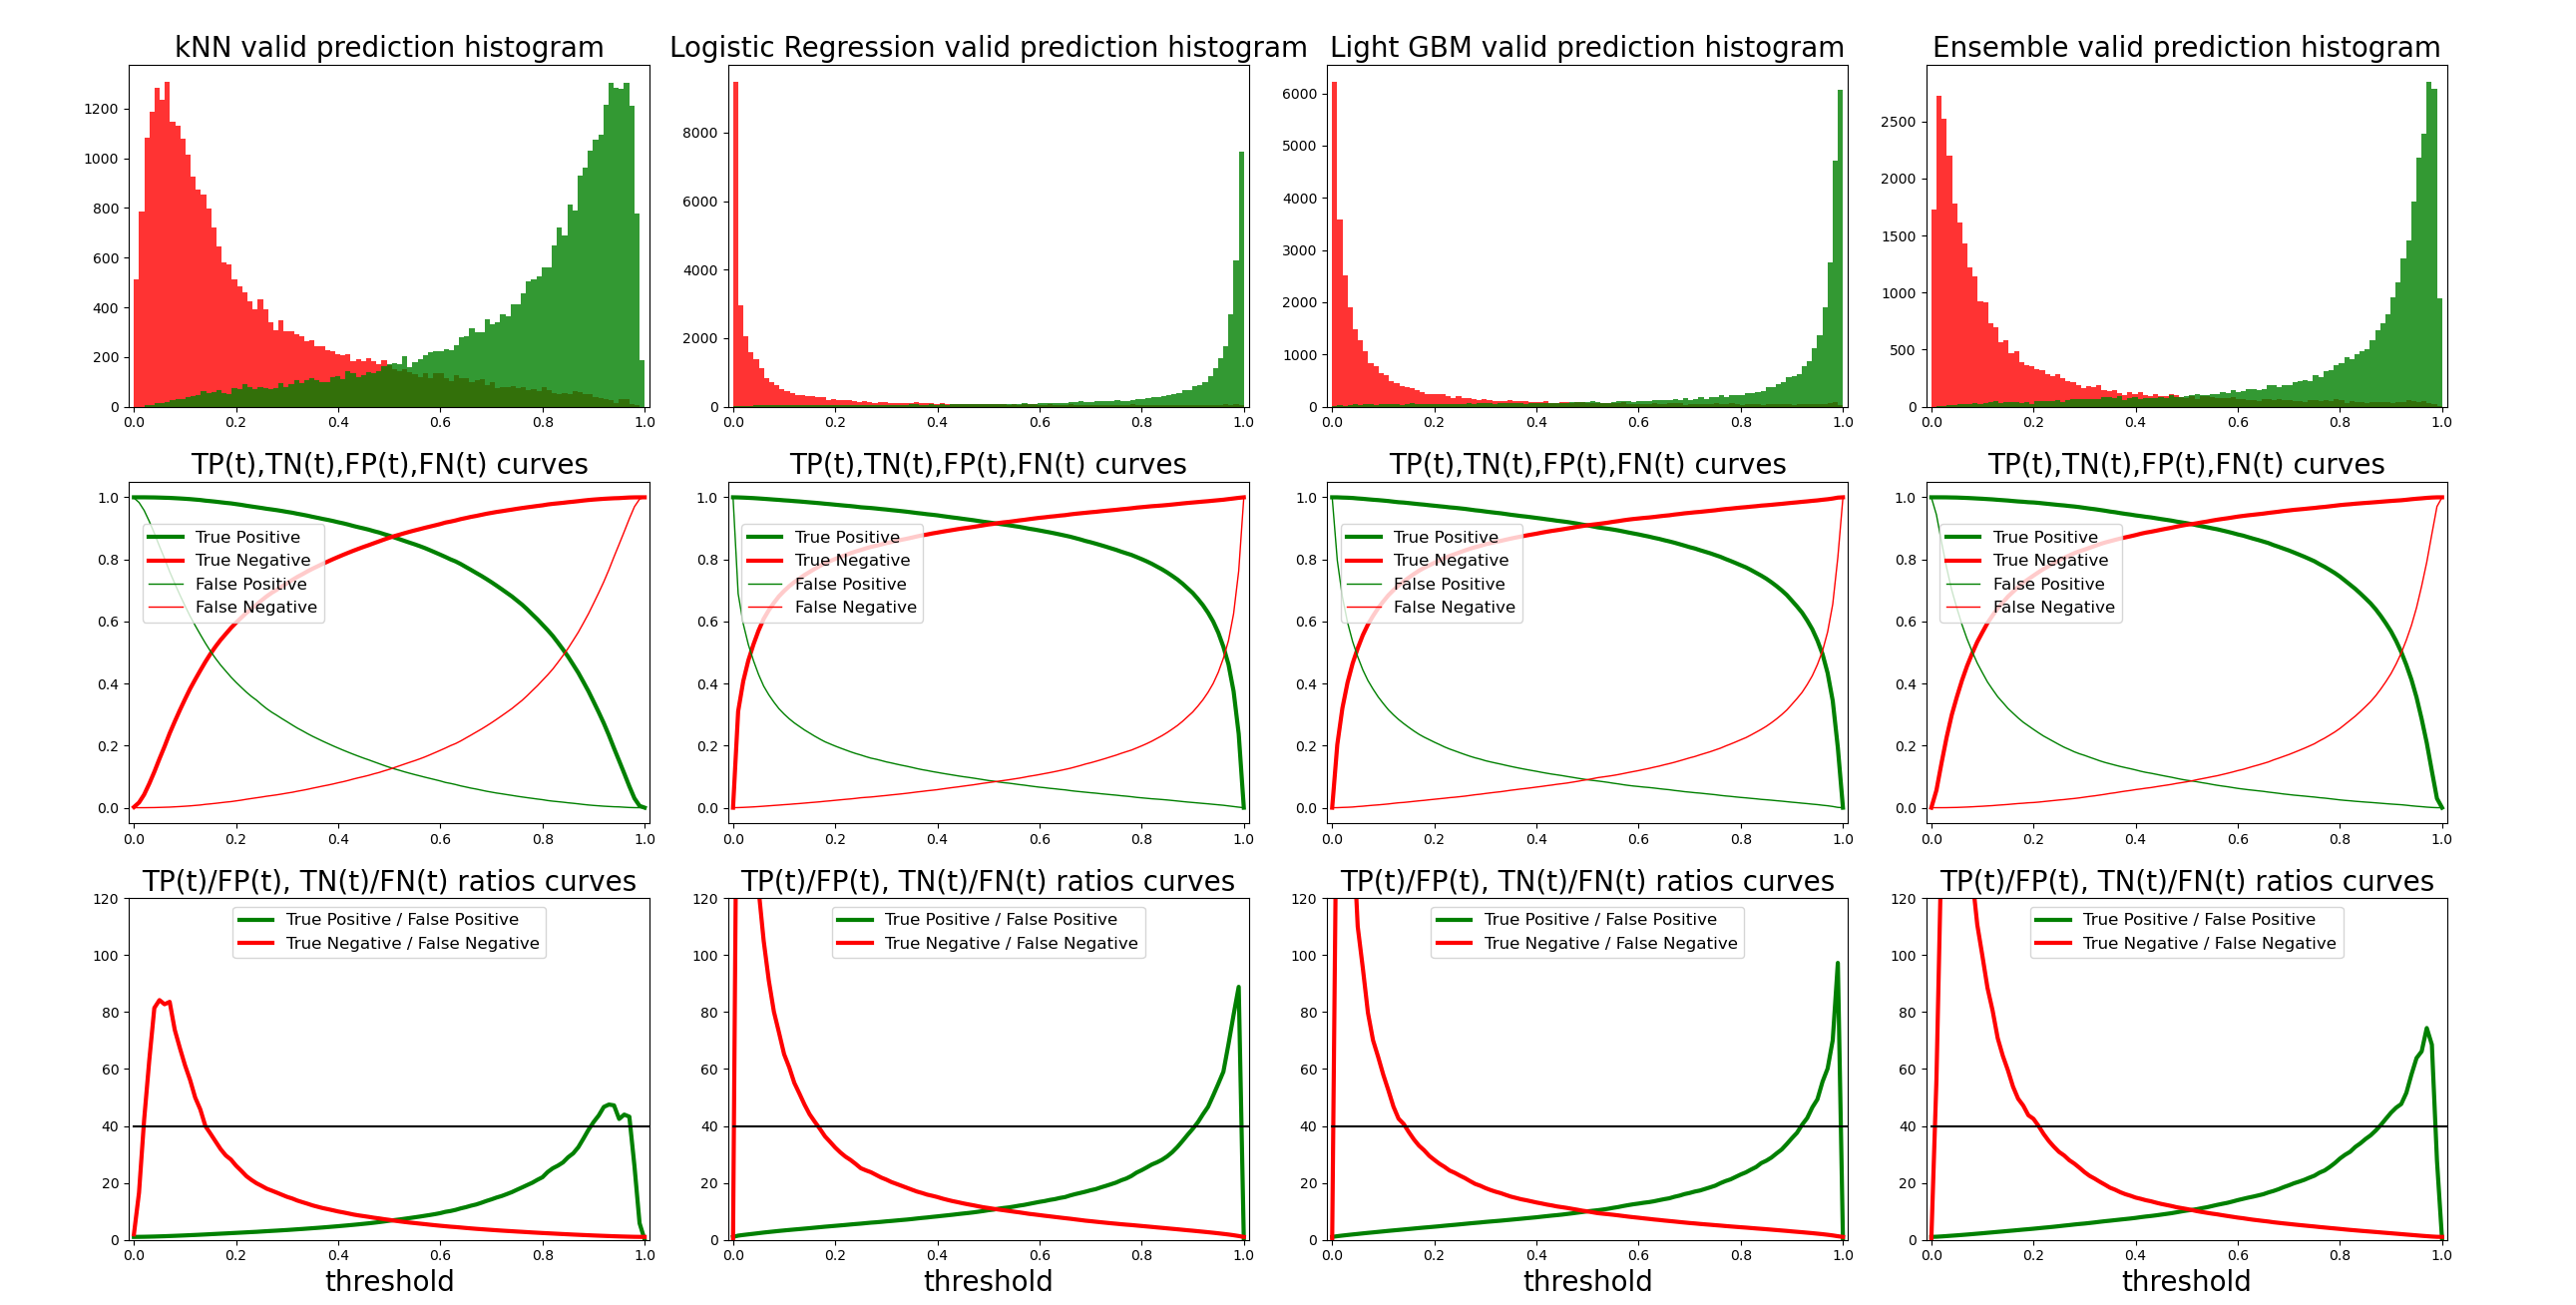
here you can find the performance of the approximation of the classifier for each of the 3 models that are involved in the ensemble
The 3 model types are quite different in nature and therefore very suitable for ensembling. In particual, using an ensemble widens the region of "almost certainly positive" which is the value of interest in the case of SFHQ dataset
The accuracy of the full strength classifier in this particualr case is around 92% (while self consistency of me relabeling the same images is around 97% accuracy)
The computer can work all night and label millions of images, I get tired after 30 minutes. So a slightly worse replica of oneself can be quite uesful.
The 'visual_taste_approximator' tool is shared here because I believe it could be useful to many, in particular with the new age of generative image models like stable diffusion, midjourny, Imagen, Dalle2 and others out there
But, it's important to keep in mind that this tool was build for my own personal usage and it might not work if not used as intended.
This is not (!!) a product, just a hacky piece of code that happens to be working well for me and maybe useful to some of you.
Cheers, David