Managing passwords is often a challenging task. The main objective behind Shield Pass is to provide a comprehensive solution for managing both website and card passwords across any device with a single login.
Shield Pass addresses the critical need for secure password management by incorporating dual authentication and encryption. Users can save their website passwords securely and access them with ease. The app uses a login PIN to grant access to the application, while an additional app PIN is required to view sensitive details, such as card or password information. This layered security approach ensures that all stored information remains protected and accessible only to the user.
By offering a robust and secure platform for managing passwords and card details, Shield Pass stands out as a reliable tool for anyone looking to enhance their digital security and streamline password management across various devices.
https://play.google.com/store/apps/details?id=com.sandeep03edu.passwordmanager.android
https://shield-pass.onrender.com/

Shield Pass uses various modern technologies to work seamlessly across multiple platforms. The core development framework is Kotlin Compose Multiplatform (KMP), which allows the app to run on Android, iOS, and desktop with a unified codebase. This means we can write most of the code in Kotlin and only add some Swift code for iOS-specific functionalities when necessary.
To create the Kotlin Multiplatform (KMP) app, we followed a straightforward process using the resources provided by JetBrains. Here’s a detailed explanation of the steps we took:
-
Visit the KMP Website: We started by visiting the Kotlin Multiplatform (KMP) website, which offers a simple template for KMP apps. This template helps set up the basic structure for a multiplatform project.
-
Project Setup: On the KMP website, we filled in the required details:
- Project Name: We entered a suitable name for our project, like “Shield Pass.”
- Project ID: This is a unique identifier for the project, similar to a package name (e.g., com.example.shieldpass).
- Selecting Platforms: The KMP template allows you to select the platforms you want your app to support. We checked the boxes for:
- Android: For creating the Android version of Shield Pass.
- iOS: For creating the iOS version of Shield Pass.
- Desktop: For creating a desktop version of Shield Pass.
-
Download the Template: We downloaded the generated project template after filling in the project details and selecting the platforms. This template included the basic project structure and configuration for all selected platforms.
-
Sync the Project: Once we had the template, we opened it in our preferred integrated development environment (IDE), IntelliJ IDEA or Android Studio. We then synced the project to ensure all dependencies and configurations were correctly set up.
-
Start Developing: With the template ready and the project synced, we started developing Shield Pass. The KMP framework allowed us to write shared code in Kotlin for all platforms while providing the flexibility to write platform-specific code when needed.
For the web version of Shield Pass, we used the MERN stack:
- Frontend: React.js to develop the user interface.
- Backend: Next.js and Express for server-side functionality.
- Database: MongoDB for storing user data securely.
To create a promotional video for the Android app on the Play Store, we utilized Adobe After Effects, which provided the tools necessary to produce a high-quality video.
Shield Pass offers robust features to store and manage website credentials and card details securely.

- Registration: Users register with their email ID and name, then set up a login PIN and an app PIN. The login PIN is used to access the app, while the app PIN is required to view sensitive information.

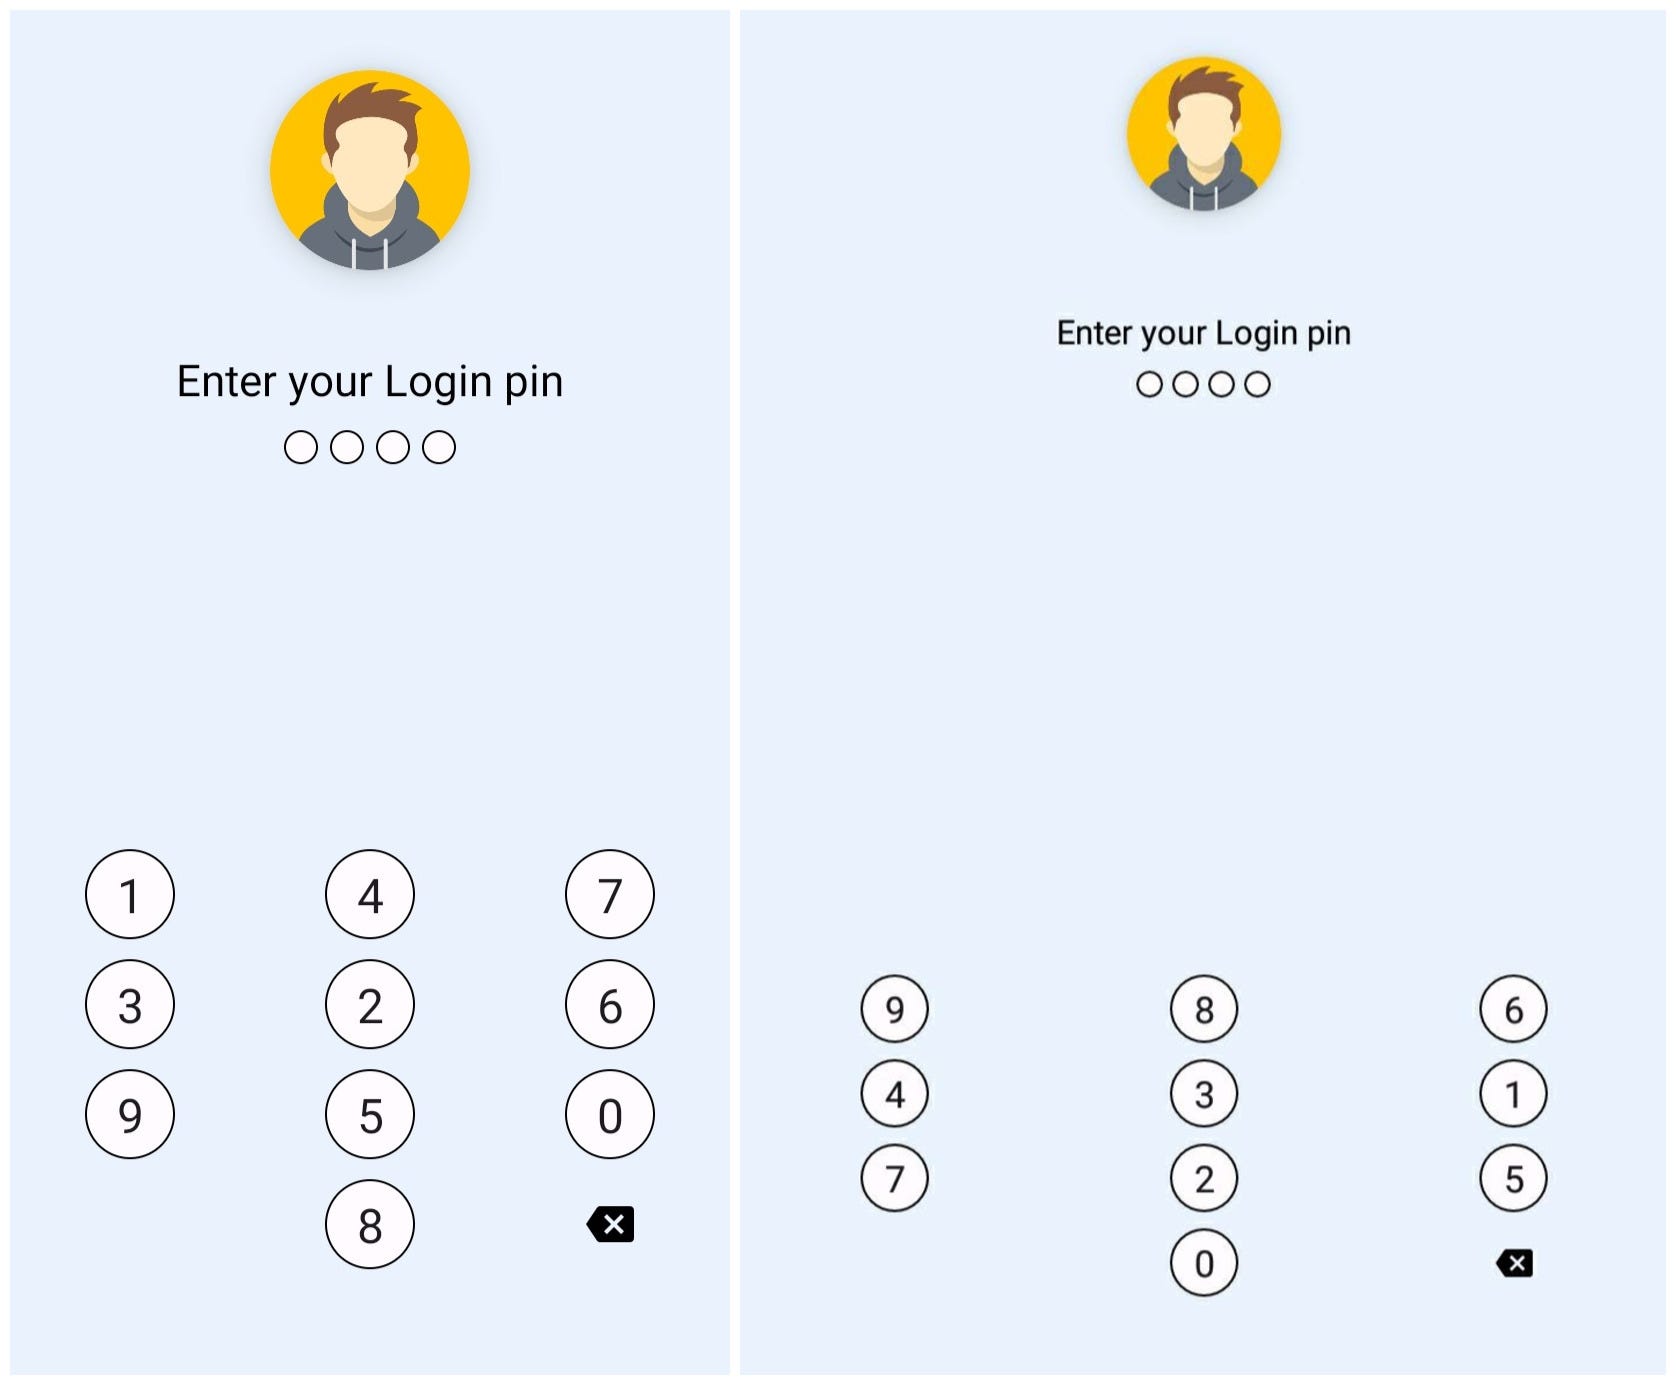
- Login Page: The login page requires the user to enter their email ID for registration and a login PIN from a shuffled number list grid.
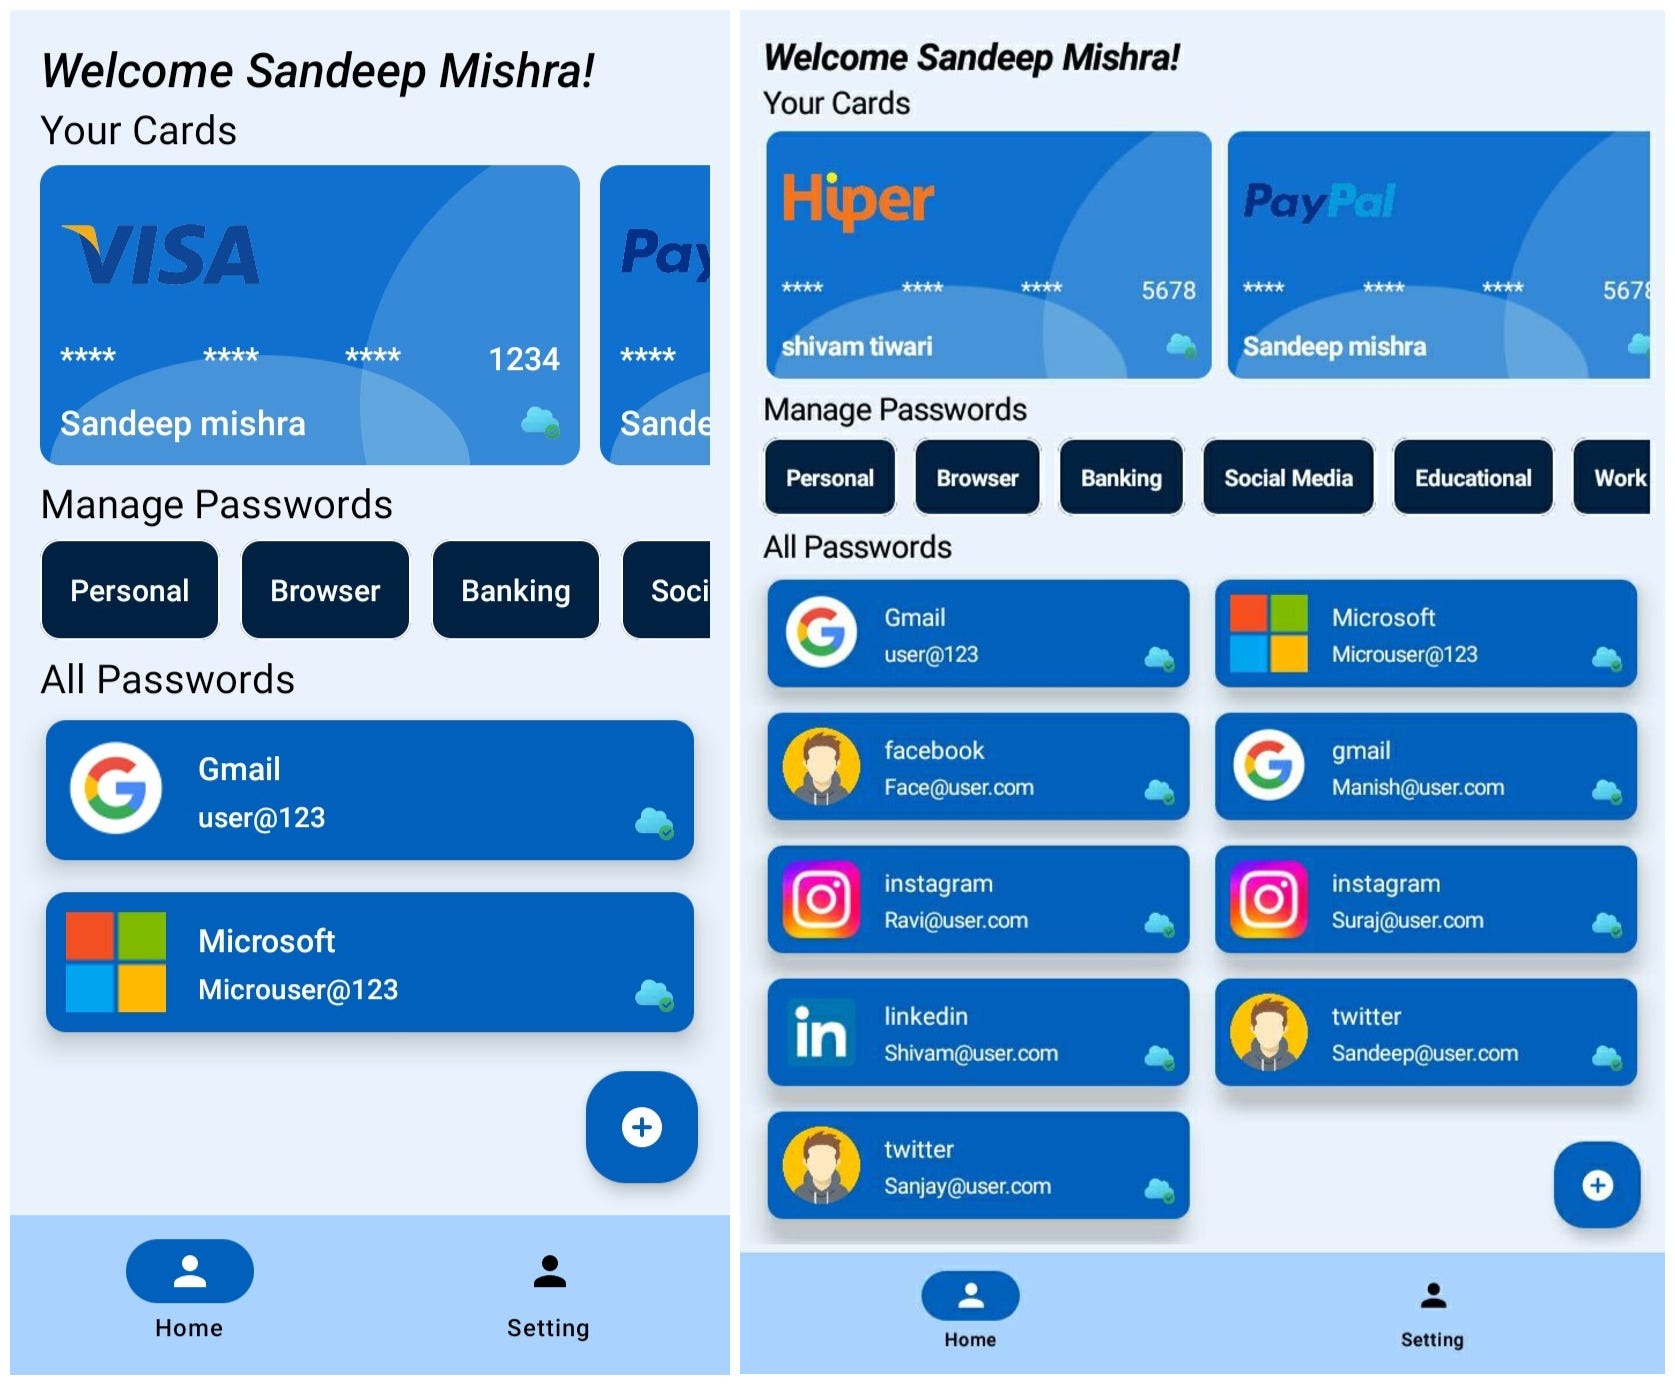
- Home Screen: Upon logging in with the login PIN, users can view basic information about their credentials. For card details, users see the cardholder’s name and half of the card number. Users see the username/email ID and website title for password details.
-
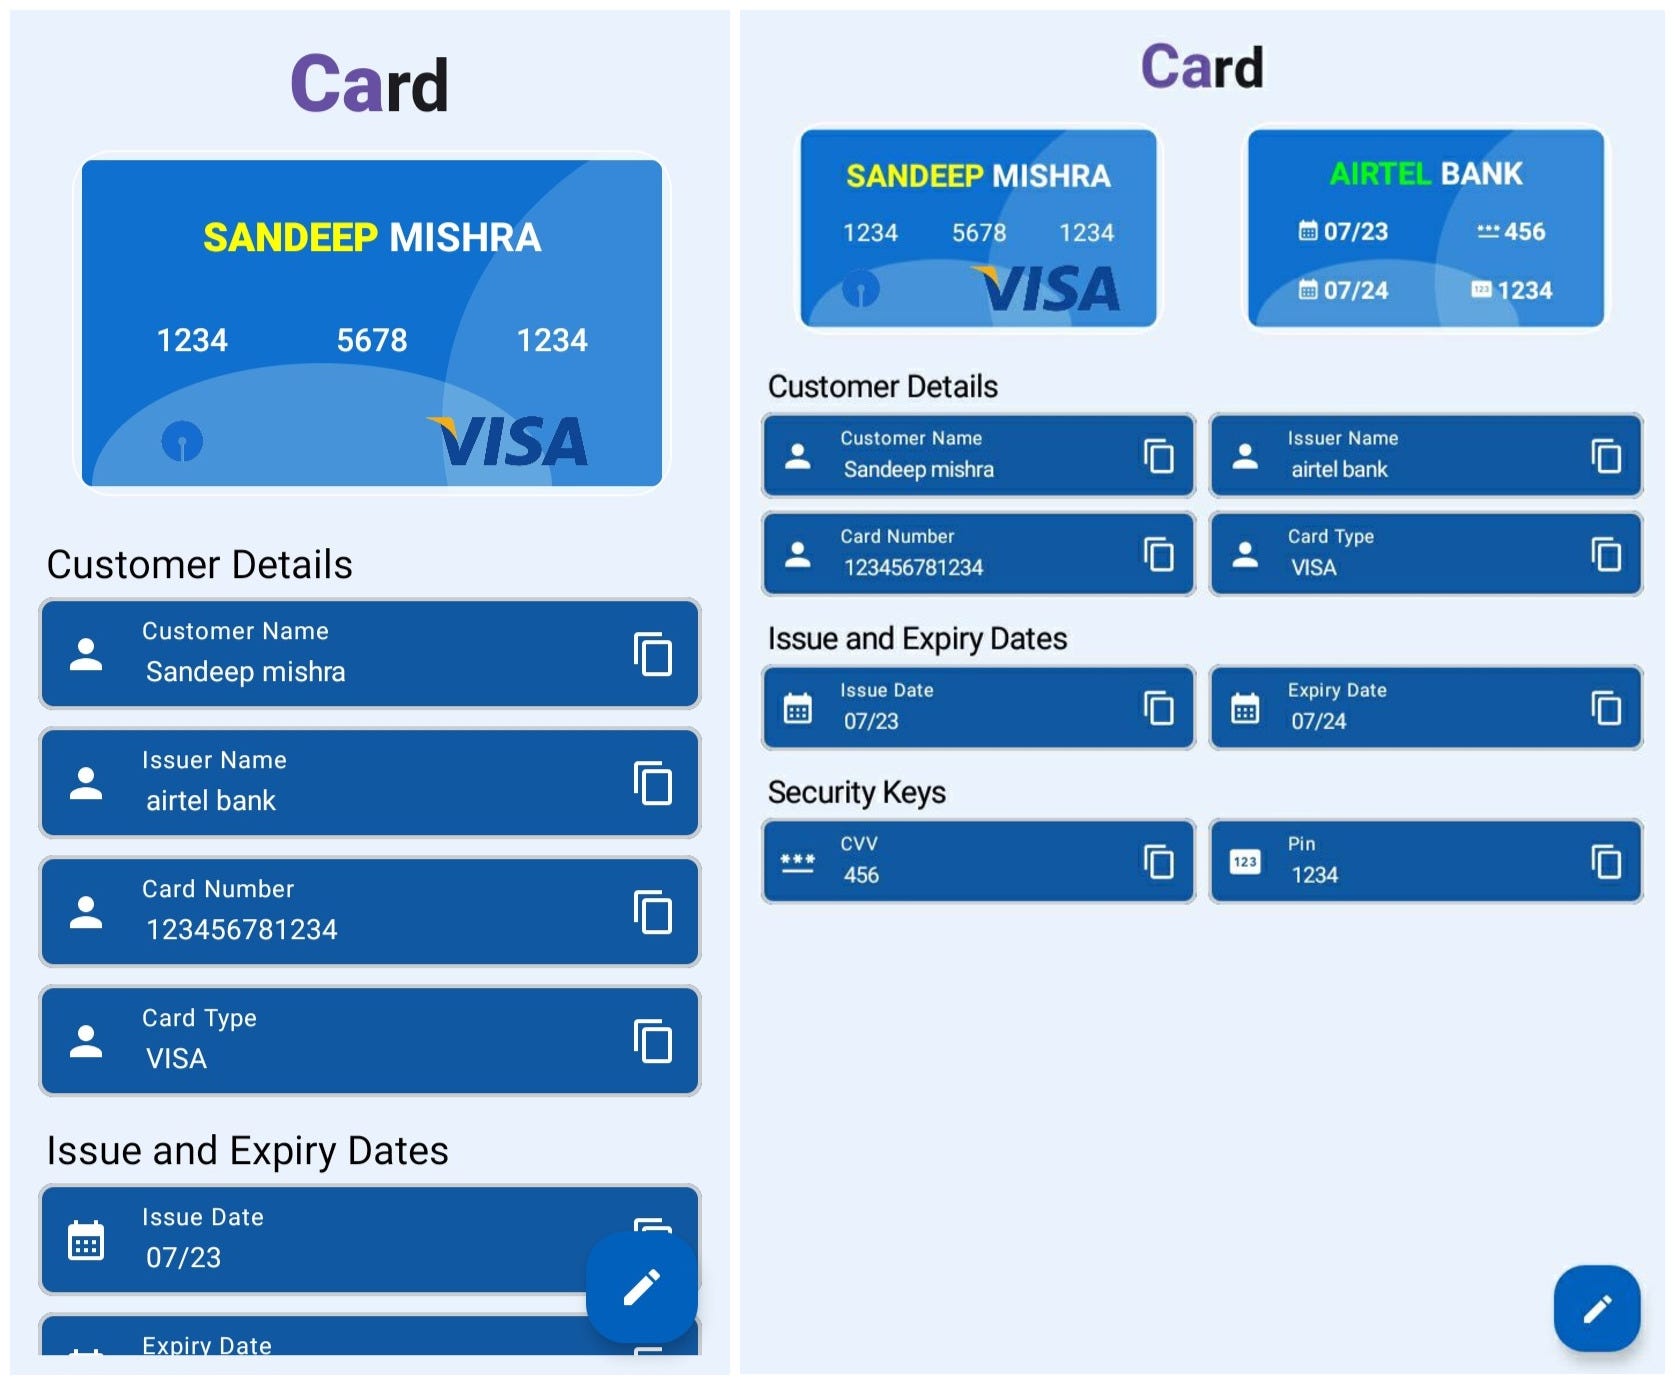
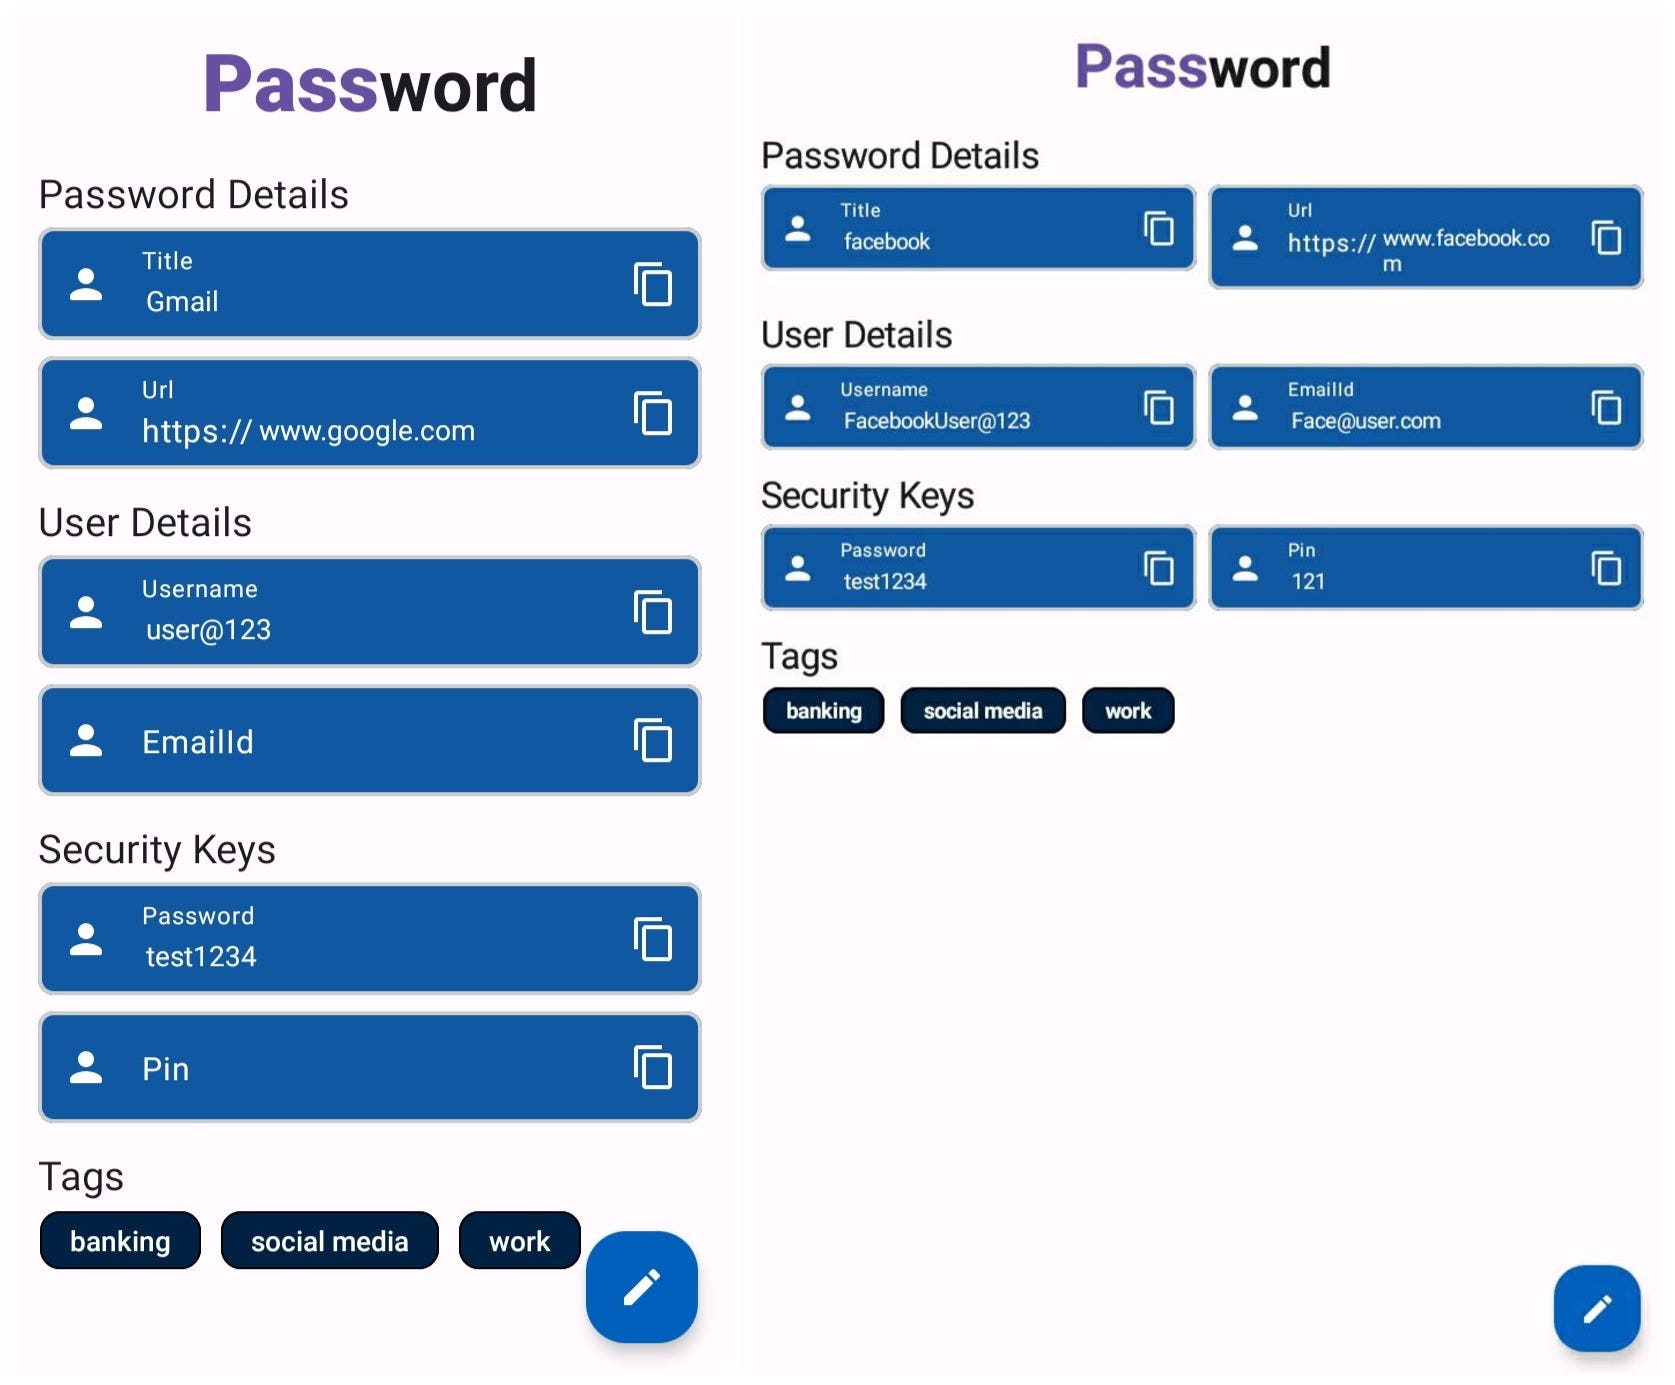
App PIN Screen: Users must enter the app PIN to access sensitive information such as the full card number, CVV, PIN, or password. This additional security layer ensures sensitive details are protected.
-
Detailed Card and Password Screens: After entering the app PIN, users can see all sensitive details of their credentials. Card details include the full card number, CVV, PIN, issue date, expiry date, bank name, and card type. This includes the username, email ID, pin, and password for password details.
By leveraging these features, Shield Pass ensures that all stored information remains protected and easily accessible, offering a comprehensive solution for managing passwords and card details across various devices.
A standout feature of Shield Pass is its double authentication system. This involves using two different passwords: a 4-digit login PIN and a 6-digit app PIN. This dual-layer authentication significantly enhances the security of stored information, ensuring that sensitive data remains protected even if one layer of security is compromised.
By leveraging modern technologies and innovative design principles, Shield Pass successfully addresses the need for secure and efficient password management across multiple platforms.
Shield Pass offers robust security features, giving users control over how and where their credentials are stored. Users can save their passwords locally on a single device or synchronize them online for access across multiple devices.
When users save their credentials in the app, the data is encrypted and stored securely on their devices. The encryption logic ensures that even if someone gains access to the device, they cannot read the sensitive information without the correct decryption key. The home screen displays only non-sensitive information, such as cardholder names and partial card numbers. Users must enter the app PIN to view complete details, which decrypts and fetches the full credentials.
Shield Pass ensures that data is transmitted securely for users who opt to synchronize their credentials online. Credentials are encrypted before being sent to the web server and are stored in an encrypted format. When the user logs in and authenticates successfully, the data is decrypted and presented to the user. This process ensures that even if someone gains access to the user’s database on the server, they cannot retrieve the sensitive information without the proper decryption key.
Shield Pass uses advanced encryption and hashing algorithms to secure user data:
-
Blake2b Keyed Algorithm: This is used to hash data before storing it in the database. Blake2b is a cryptographic hash function known for its speed and security. It converts user credentials into a fixed-size string of characters, making it difficult for attackers to reverse-engineer the original data. A keyed version adds an extra layer of security by incorporating a secret key into the hashing process, ensuring that only users with the correct key can verify the hash.
-
AES (Advanced Encryption Standard): This algorithm is used to encrypt and decrypt user credentials. AES is widely regarded as one of the most secure encryption standards. It converts plaintext data into an unreadable format using a secret key, which is required to decrypt the data back into its original form. This ensures that even if encrypted data is intercepted, it cannot be read without the decryption key.
By implementing this robust encryption and hashing techniques, Shield Pass ensures that user credentials remain secure, whether locally or synchronized online. This comprehensive security approach protects sensitive information and gives users peace of mind when managing their passwords and card details.
Deploying Shield Pass involved several key steps to ensure the app was available to users on multiple platforms, including the Google Play Store for Android and GitHub for both the Android APK and desktop versions.
-
Creating a Developer Account: The first step was to create a Google Play Developer account to publish Shield Pass on the Google Play Store. This process involves providing basic information and paying a one-time registration fee of $25. This fee grants access to publish and manage apps on the Play Store.
-
Close Testing Release: Due to new Google Play policies, we had to release Shield Pass initially as a close testing release. This required finding at least 20 testers to install and use the app for at least 14 days. Close testing is crucial as it helps identify potential issues or bugs in a controlled environment before the app is available to the general public.
-
Generating a Release Bundle: After successful close testing, the next step was to create a release bundle for the app. This involves generating an app bundle file (.aab) using Android Studio. The app bundle is signed with a Keystore key, ensuring the authenticity and integrity of the app. Once the release bundle is ready, it is uploaded to the Play Store, where it undergoes a review process before becoming available for download.
-
Publishing and Updating: After the 14-day close testing period and upon receiving positive feedback from testers, Shield Pass was published to the Play Store. For subsequent updates, the process involves creating a new release bundle, signing it with the Keystore key, and submitting it for review. This ensures that users can access the latest and most secure app version.
Hosting the web service on Render.com was crucial in making Shield Pass available to users. Here’s a detailed guide on how we achieved this:
-
Create a Render Account: Start by signing up for an account on Render.com. If you already have an account, you can log in.
-
Create a New Web Service: After logging in, navigate to the Render dashboard, click the “New” button, and select “Web Service” from the dropdown menu.
-
Connect to a Repository: Render allows you to connect your web service to a Git repository. We connected it to our GitHub repository, where the code for the web service was hosted. This is done by authorizing Render to access your GitHub account and selecting the repository you want to deploy.
-
Configure the Web Service: Fill in the necessary details for the web service configuration:
- Name: A descriptive name for the service, such as “Shield Pass Web Service.”
- Region: The region closest to your users for better performance.
- Root directory: The web service folder name in the GitHub repository, such as
Backendin our app. - Branch: The branch from your repository to deploy (typically
mainormaster). - Build Command: The command to build your application, such as
npm installfor our app. - Start Command: The command to start your application, such as
npm start.
-
Set Environment Variables: Configure any required environment variables, such as API keys or database URLs, in the “Environment” section.
-
Deploy the Service: Once everything is configured, click the “Create Web Service” button. Render then started the deployment process, which included building the application and making it live.
Hosting static sites, such as a marketing website or documentation for Shield Pass, was also done through Render.com. Here’s the process:
-
Create a New Static Site: — From the Render dashboard, click the “New” button and select “Static Site” from the dropdown menu.
-
Connect to a Repository: — Render allows you to connect your web service to a Git repository. We connected it to our GitHub repository, where the code for the web service was hosted. This is done by authorizing Render to access your GitHub account and selecting the repository you want to deploy.
-
Configure the Static site: Fill in the necessary details for the static site configuration:
- Name: A descriptive name for the site, such as “Shield Pass Static Site”
- Region: The region closest to your users for better performance.
- Root directory: The static site folder name in the GitHub repository, such as
frontendin our app. - Branch: The branch from your repository to deploy (typically
mainormaster). - Build Command: The command to build your application, such as
npm installfor our app. - Start Command: The command to start your application, such as
npm start.
-
Set Environment Variables: Configure any required environment variables, such as API keys or database URLs, in the “Environment” section.
-
Deploy the Service: Once everything is configured, click the “Create Static Site” button. Render then started the deployment process, which included building the application and making it live.
-
Android APK Release: For users who prefer to download the APK directly, we managed releases on GitHub. The release APK is generated for the latest version of Shield Pass and uploaded to the GitHub repository. This provides an alternative download option and allows users to access previous versions if needed.
-
Desktop App Distribution: The desktop version of Shield Pass is built using Jetpack Compose Multiplatform. To create a distributable version of the desktop app, we use the
gradlew createDistributablecommand. This command packages the app for distribution on desktop platforms. Detailed instructions and resources for creating native distributions with Kotlin Multiplatform can be found in the JetBrains Compose Multiplatform tutorial.
By following these deployment steps, we ensured that Shield Pass was accessible to users across different platforms, providing a secure and reliable password management solution.
One of the major challenges was developing an app that could operate smoothly across different platforms, each with its own internal architecture, user experience requirements, and screen sizes. To overcome this, we had to design Shield Pass in a way that it could adapt to various devices, ensuring a consistent user experience.
In Jetpack Compose, the WindowSize class allowed us to develop different layouts tailored to various screen sizes. This approach divides the screen’s height and width into compact, medium, and expanded regions. This division results in nine possible layout configurations, enabling us to optimize the app’s interface for any screen size.
Additionally, finding libraries that performed well across all platforms was a significant challenge due to the different architectures. We relied heavily on resources such as Kotlin Multiplatform Libraries to identify suitable libraries that could function seamlessly on Android, iOS, and desktop.
One of the challenges we encountered while deploying our web service on Render.com was the service’s tendency to spin down after 15 minutes of inactivity. According to Render’s policy for free instances, a web service that remains inactive for 15 minutes is spun down to save resources. This means that the next request to the service would trigger a spin-up process, which could take up to a minute, causing a noticeable delay for the user. This was not ideal for Shield Pass, as we wanted to ensure a seamless and responsive user experience at all times.
To overcome this, we needed a way to keep the web service active continuously, preventing it from spinning down. The solution was to create a cron job that would send periodic requests to the web service, ensuring it remained active.
We implemented the cron job using a simple API call that would run at regular intervals. Here’s a step-by-step explanation of how we set it up:
-
Creating a Restart API: We developed a small API endpoint, named restart, which returns a response with success: true. This endpoint was designed to be lightweight and efficient, ensuring minimal load on the server.
-
Scheduling the Cron Job: We used a free cron job scheduling service, cron-job.org, to automate the periodic API calls. This service allowed us to schedule HTTP requests at specified intervals.
-
Setting Up the Cron Job: On cron-job.org, we created a new cron job with the following configuration: URL: The URL of our restart API endpoint. Execution Schedule: Every 10 minutes (to ensure the service is pinged well before the 15-minute inactivity window).
Implementing the cron job provided several benefits:
-
Continuous Availability: The web service remained active, providing users a seamless and responsive experience.
-
Resource Efficiency: The lightweight restart API ensured minimal server load, maintaining efficiency.
-
Cost-Effective: A free cron job scheduling service allowed us to achieve our goal without additional costs.
Shield Pass is a secure and user-friendly password manager app that simplifies and enhances how users manage their passwords. Through its intuitive interface and robust security features, Shield Pass offers a convenient solution for storing, generating, and accessing passwords across various devices.
One of the key highlights of Shield Pass is its strong emphasis on security. The app uses advanced encryption techniques to ensure user data remains safe and protected from unauthorized access.
Another standout feature of Shield Pass is its versatility. The app allows users to store passwords and other sensitive information, such as credit card details. Shield Pass is a comprehensive tool for managing digital identities and securing valuable information.
Overall, Shield Pass is a reliable and efficient password manager app that offers a secure and convenient solution for managing passwords and sensitive information. With its robust security features, user-friendly interface, and versatility, Shield Pass stands out as a valuable tool for enhancing digital security and simplifying password management.