How to set up ssh with public-key authentication using different images that run on a Raspberry Pi.
ssh-keygen -b 4096You should then see the following lines:
-
Generating public/private rsa key pair. -
Enter file in which to save the key (/home/<username>/.ssh/id_rsa):
Specify the path and name of the key by entering:
/home/<username>/.ssh/<the pis username>
If you want to you can enter a passphrase and then confirm it.
You should receive something like this:
Your identification has been saved in /home/<username>/.ssh/<the pis username>
Your public key has been saved in /home/<username>/.ssh/<the pis username>.pub
The key fingerprint is:
SHA256:XXXXXXXXXXXXXXXXXXXXXXXXXXXXXXXXXXXXXXXXXXX <username>@<device name>
The key's randomart image is:
+---[RSA 4096]----+
|                 |
|                 |
|                 |
|                 |
|                 |
|                 |
|                 |
|                 |
|                 |
+----[SHA256]-----+
- Select the OS and the storage device
-
Click the settings button in the bottom right
-
Set username and password
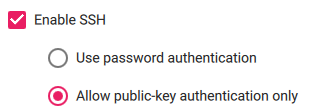
- Enable ssh
-
Enter the public key saved under
/home/<username>/.ssh/<the pis username>.pubinto the field below. -
You can now save the changes and write them to the SD card.


