Please use v1.0.2 tag and later from now as an important fix done to avoid bricking your device.
STM32PRGFW-UTIL package provides embedded SW applications to manage the One-Time Programmable (OTP) memories on STM32MP13xx, STM3MP15xx devices as described in the following wiki page
It is alternative to the use of U-Boot embedded SW package described in article How to fuse OTP↑ but of course U-Boot services are still available.
This Utility could be usefull during bring-up phase to modify OTP when ecosystem Software (U-Boot in particular) is not ready yet. Indeed, this STM32PRGFW-UTIL firmware is DDR independant ; thus it is ready to use in most of cases for your own design.
This package includes only source code required to support UART and USB DFU protocol and OTP programming without more complex software, i.e. easy to adapt and improve for your own needs.
This package contains several "Modes" (CP_Serial_Boot, Console_SH..) that you can use with Windows® or Linux®host PC.
Please find below the more appropriated mode depending on your setup.
""How to"" for each mode is described below into this document.
| Major Use cases / Setup | CP_Serial_boot (Preferred) |
Console_SH | Console_UART | CP_Dev_Boot |
|---|---|---|---|---|
| * Board with USB DFU or UART serial if * STM32CubeProgrammer PC tool installed (v2.15.0 minimum) |
X | |||
| * Board with Debug port * STM32CubeIDE PC tool installed (v1.13.0 minimum) |
X | |||
| * Board with Debug port and 1 UART interface * Semihosting (Terminal I/O through debug port) NOT available on PC |
X Note: need to modify UART instance in source code if different from ST boards |
|||
| * Need to debug your own tool based on this package | X |
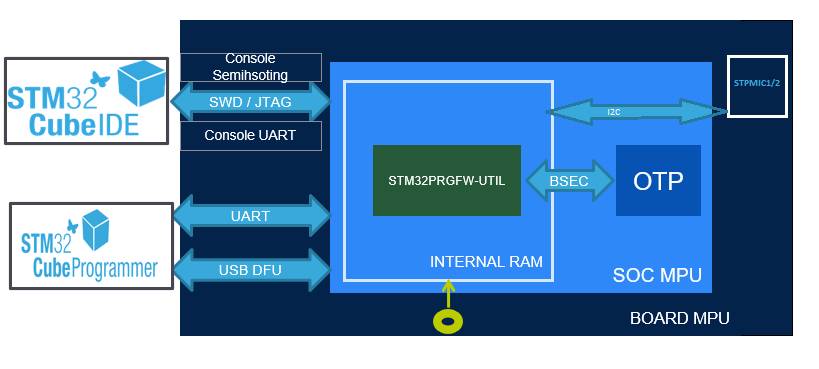
The functional chart of the project describing all applications mentioned above:
The STM32PRGFW-UTIL repository consists of the following repositories:
- Drivers: It contains HAL/LL component per serie and CMSIS Device source code. You can notice there is no BSP as this package is board independent.
- Middlewares: It contains OpenBL and USB device library core source code modified for MPU protocols.
- Projects: Project directory. It contains 1 STM32CubeIDE project per serie and 1 common project containing source code common to the different projects.
The project structure is described as below:
In this section, you will use "Binary" directory containing a STM32PRGFW-UTIL binary and a tsv file used by STM32CubeProgrammer.
-
Set boot boot pins to b000 (BOOT0/1/2 to OFF) position to select serial boot
-
If you want to use USB DFU interface
- connect USB cable between PC and the board. PC shoud test USB DFU interface
-
else if you want to use UART interface
- connect UART cable between PC and the board
- Note: could be STLink connector if Virtal COM port is connected on the board like ST DK boards
- !!! NOTE: USB cable should not be connected if you want to use UART !!! - ROM CODE will USB DFU if both interface are available!
- connect UART cable between PC and the board
Please Read STM32CubeProgrammer user manual for further details if needed
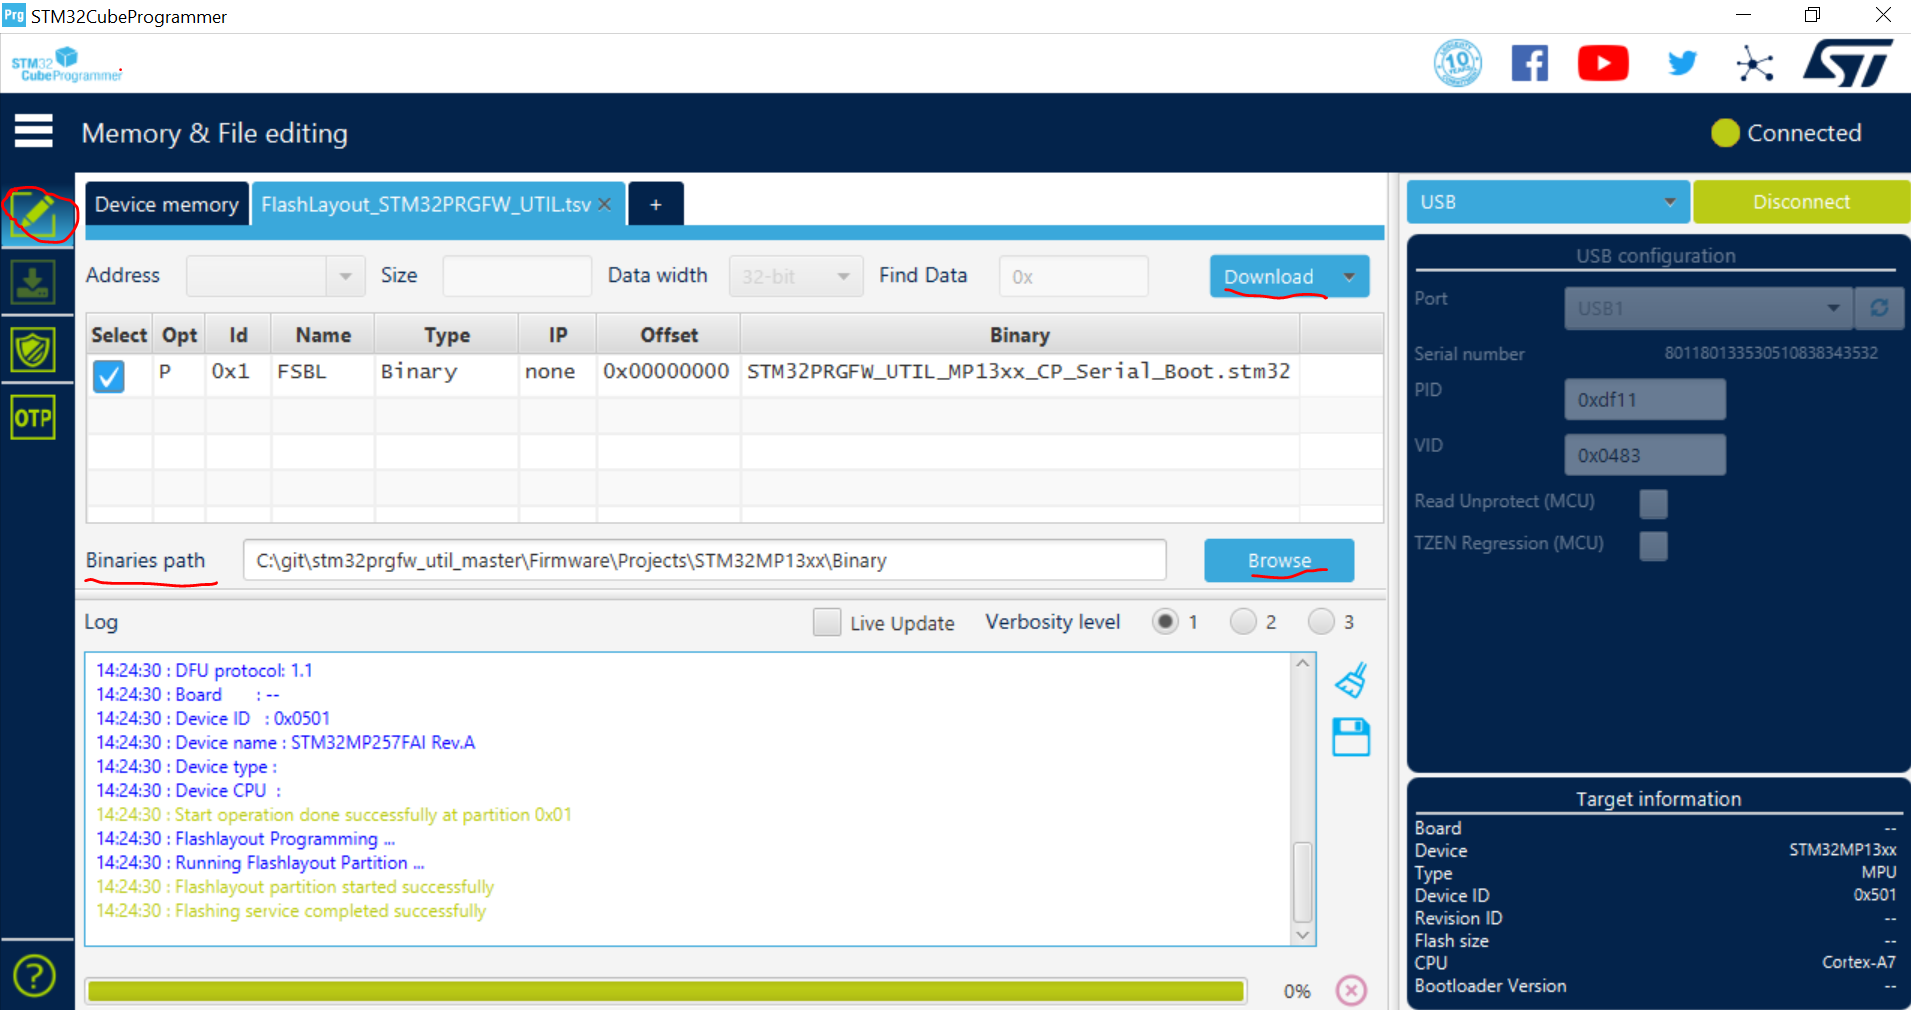
- Select Port (USB or UART) depending on the choice you made
- Click on Connect button - STM32CubeProgrammer is now connected to ROM Code
- Select TSV
<Your Directory Path>\Projects\<STM32 device>\Binary\FlashLayout_STM32PRGFW_UTIL.tsv - Select Binary Path with Browse Button
<Your Directory Path>\Projects\<STM32 device>\Binary\ - Click on Download - STM32CubeProgrammer is now connected to STM32PRGFW-UTIL firmware
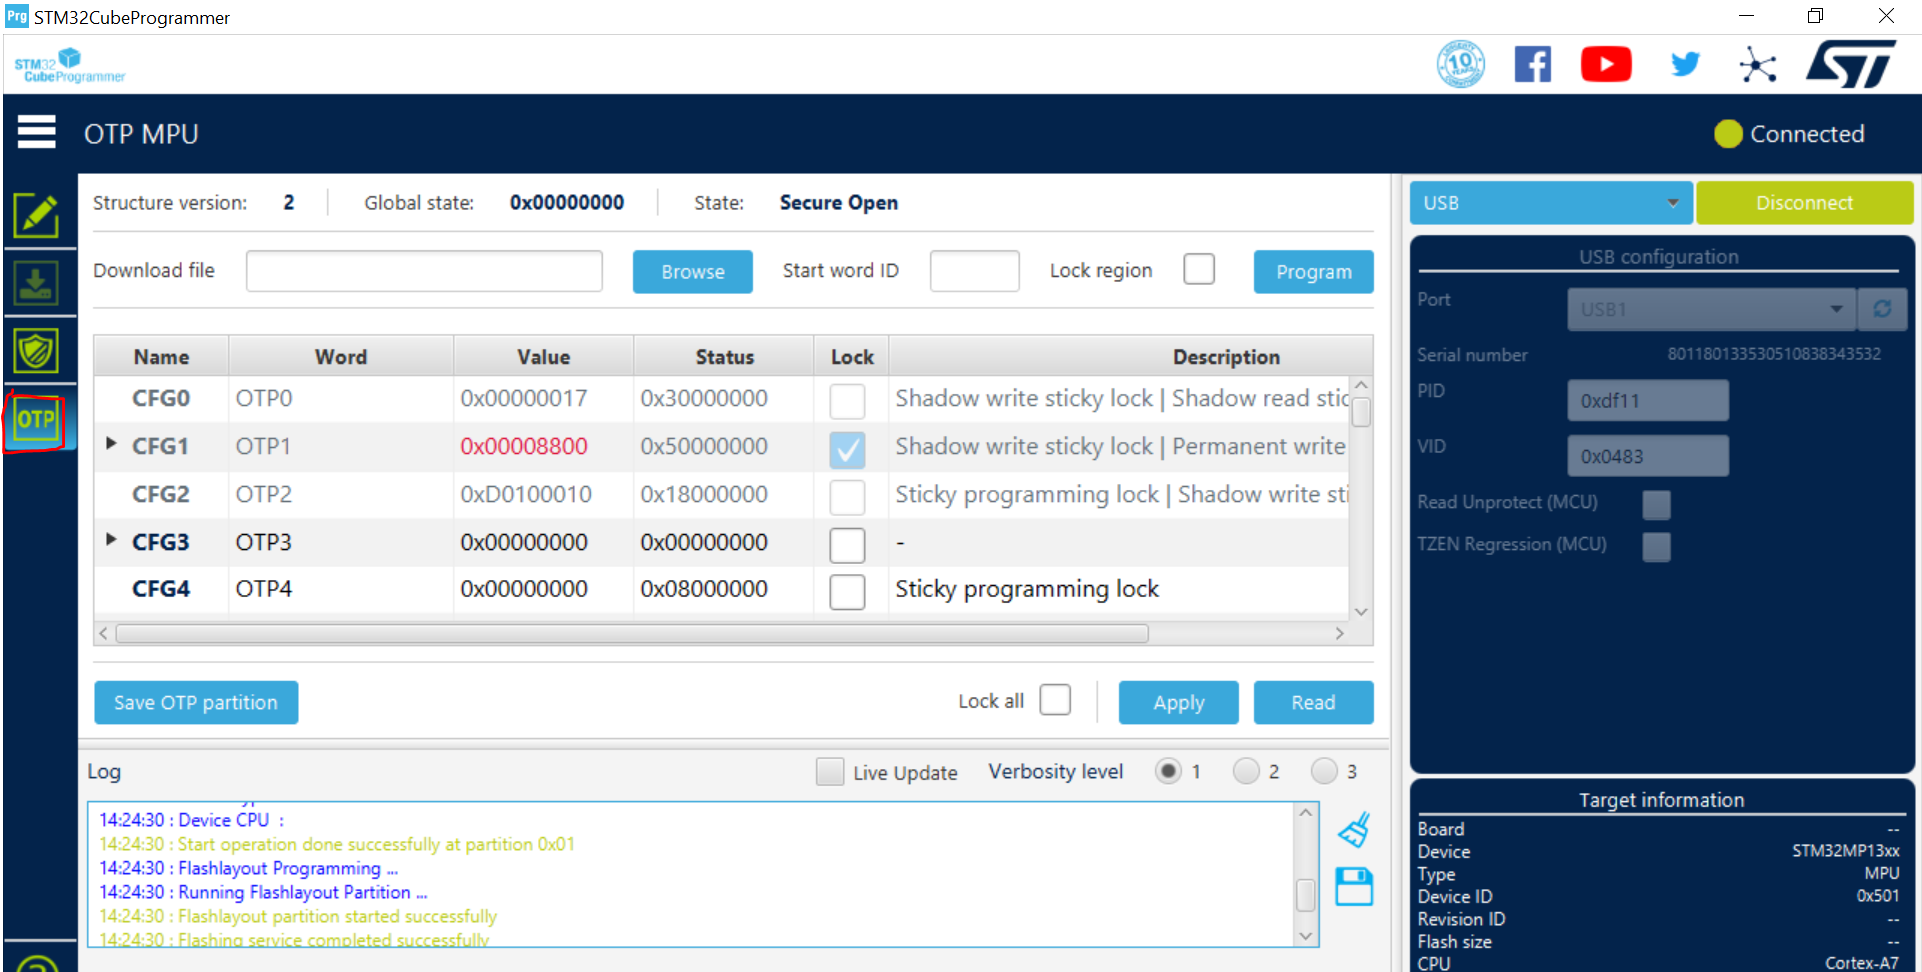
- Click on OTP button to get OTP Panel
Please Read STM32CubeProgrammer user manual for further details if needed
- Go to the STM32CubeProgrammer binary directory (i.e. STM32CubeProgrammer-212\bin)
- Open command prompt inside this bin directory
- Run this command to load the STM32PRGFW-UTIL binary in the embedded ram:
$STM32_Programmer_CLI.exe -c port=COM<num>-w<Your Directory Path>\Projects\<STM32 device>\Binary\FlashLayout_STM32PRGFW_UTIL.tsv - Do not reset the board and execute command - Some command examples where UART interface (COM8) is used:
$STM32_Programmer_CLI.exe -c port=COM8 -otp displ
$STM32_Programmer_CLI.exe -c port=COM8 -otp write word=10 value=0x1
Note: In MP15 if connection is lost while programming, Do port refresh, connect and download or Power Reset.
- PMIC NVM can be programmed in serial boot mode using USB DFU or UART.
- Read the entire NVM partition by following command
$STM32_Programmer_CLI -c port=usb1 -rp 0xf4 0x0
<size of partition><Your Directory Path>\PMIC_NVM_read.bin here NVM data is written to PMIC_NVM_read.bin. - To read NVM using UART in serial boot mode replace usb1 with COM port appearing on the HOST.
$STM32_Programmer_CLI -c port=COM
<num>-rp 0xf4 0x0<size of partition><Your Directory Path>\PMIC_NVM_read.bin - Backup it by creating a copy PMIC_NVM_write.bin
- using hex editor modify PMIC_NVM_write.bin.
- Write the NVM partion using below command for USB DFU.
$STM32_Programmer_CLI -c port=usb1 -pmic "
<Your Directory Path>\PMIC_NVM_write.bin" - To write NVM using UART in serial boot mode replace usb1 with COM port appearing on the HOST.
$STM32_Programmer_CLI -c port=COM
<num>-pmic "<Your Directory Path>\PMIC_NVM_write.bin"
- Read the entire NVM partition by following command
$STM32_Programmer_CLI -c port=usb1 -rp 0xf4 0x0
In this mode, you will use STM32CubeIDE and build config Console_SH
- Set boot boot pins to b100 (BOOT2 = ON, BOOT0/1=OFF) position to select development boot (or also called Engineering boot)
- Connect cable from Board/STLINK connector to the PC
- Build Project by selecting Console_SH build confiuration
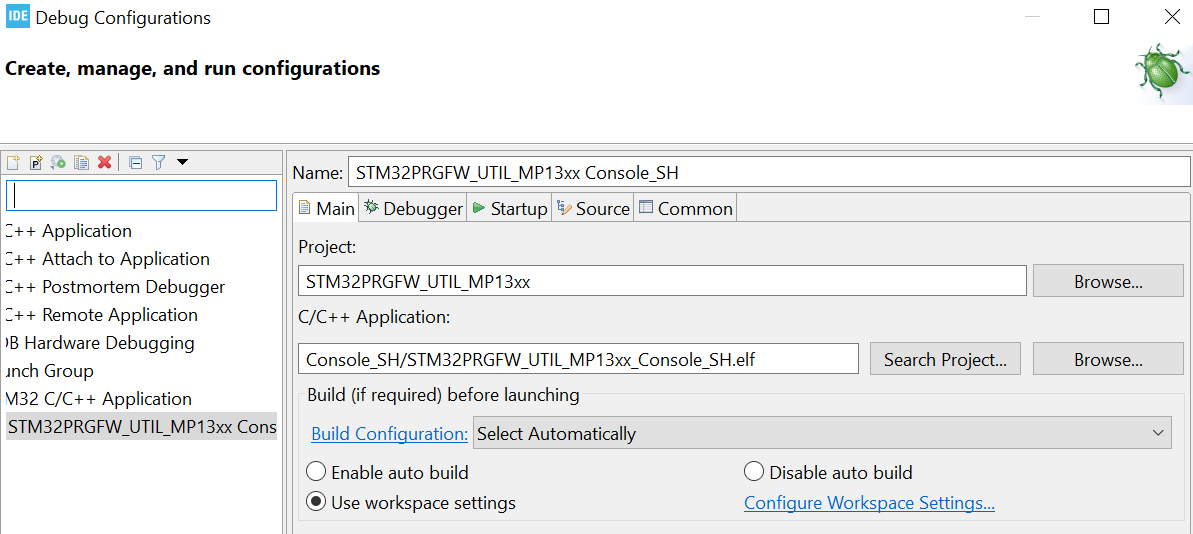
- Setup Debug Configuration as below and in particular (in Startup tab):
monitor reset
monitor halt
mon arm semihosting enable
mon arm semihosting_redirect tcp 2323
- Run Debug configuration and Open TCP window with localhost and port number as described below (Window ->Show View-> Other-> TCP Console)
- Some command examples:
  $help
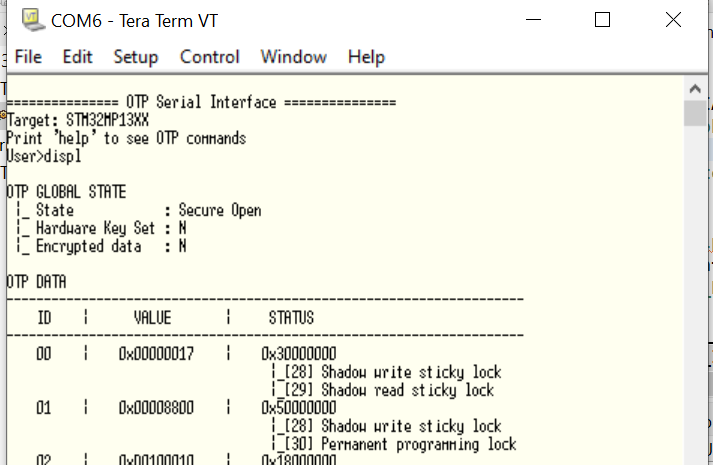
  $displ
  $displ word=10
  $write word=10 value=1
In this mode, you will use STM32CubeIDE and build config Console_UART
- Set boot boot pins to b100 (BOOT2 = ON, BOOT0/1=OFF) position to select **development boot (or also called Engineering boot)
- Connect cable from Board/STLINK connector to the PC
- Depending your own board, you should change UART instance and GPIO into otp_interface_cli_util.h file
- By default it is the instance used on ST board (UART4 PD6&PD8 for STM32MP13xx / UART4 PG11/PB2 for STM32MP15xx)
- Build Project by selecting Console_UART build confiuration
- Setup Debug Configuration and in particular (in Startup tab):
monitor reset
monitor halt
- Run Debug confiiguration
- Connect an hyperterminal and connect to COM port
Details about the content of this release are available in the release note Release_Notes.html.
Caution : The issues are strictly limited to submit problems or suggestions related to the software delivered in this repository.
For any other question related to the product, the hardware performance or characteristics, the tools, the environment, you can submit it to the ST Community on the STM32 MPUs related page.
